BOMANN WA 5721 User manual

H
HH
H
OUSEHOLD
OUSEHOLDOUSEHOLD
OUSEHOLD
-
--
-
W
WW
W
ASHING
ASHING ASHING
ASHING
M
MM
M
ACHINE
ACHINEACHINE
ACHINE
WA
WAWA
WA
5721
57215721
5721
Instruction Manual
Instruction ManualInstruction Manual
Instruction Manual

2
Contents
ContentsContents
Contents
Introduction.............................................................................................................Page 3
General Notes…………………………………………………………..………….…….Page 3
Special safety Information for this Unit…………………………….…………………..Page 4
Unpacking the Appliance………………...……………………….…….………..…..…Page 6
Appliance Equipment……..……………….………………...…………….……..……..Page 6
Installation…………….……...…………….………...………………………...………...Page 7
Startup / Operation………...................……...………………………..…..…….……Page 10
Starting a Wash Program.………………..………………...…………….……………Page 14
Cleaning and Maintenance.....…………………………...……..………………...…..Page 18
Troubleshooting……………………….………..………………………………......….Page 21
Technical Data……………...…………………………..……………..……..…………Page 22
Disposal….………………………..………………..….……………………..……..…..Page 23
EU Product Data Sheet………….………………..….……………………..……..…..Page 24

3
Introduction
IntroductionIntroduction
Introduction
Thank you for choosing our product. We hope you will enjoy using the appliance.
Symbols in these Instructions for Use
Symbols in these Instructions for UseSymbols in these Instructions for Use
Symbols in these Instructions for Use
Important information for your safety is specially marked. It is essential to comply with
these instructions in order to avoid accidents and prevent damage to the machine:
WARNING:
WARNING:WARNING:
WARNING:
This warns you of dangers to your health and indicates possible injury
risks.
CAUTION:
CAUTION:CAUTION:
CAUTION:
This refers to possible hazards to the machine or other objects.
NOTE
NOTENOTE
NOTE:
::
: This highlights tips and information.
General Notes
General NotesGeneral Notes
General Notes
Read the operating instructions carefully before putting the appliance into operation and
keep the
instructions including the warranty and the receipt. If you give this device to
other people, please also pass on the operating instructions.
NOTE
NOTENOTE
NOTE:
::
:
The illustrations in this instruction manual can deviate from the original appliance.
•The appliance is
designed exclusively for private use and for the envisaged pu
pose. This appliance is not fit for commercial use.
•
The appliance is only to be used as described in the user manual. Do not use the
appliance for any other purpose. Any other use is not intend
ed and can result in
damages or personal injuries.
•Do not use it outdoors. Keep it
away from sources of heat, direct sunlight
•Do not operate the appliance without
withoutwithout
without supervision.
•When not in use, for cleaning, user maintenance works or with
disruption, switch off
the appliance and disconnect the plug (pull the plug itself, not the lead) or turn off
the fuse.
Thank you for choosing our product. We hope you will enjoy using the appliance.
Important information for your safety is specially marked. It is essential to comply with
these instructions in order to avoid accidents and prevent damage to the machine:
risks.
Read the operating instructions carefully before putting the appliance into operation and
instructions including the warranty and the receipt. If you give this device to
The illustrations in this instruction manual can deviate from the original appliance.
designed exclusively for private use and for the envisaged pu
r-
The appliance is only to be used as described in the user manual. Do not use the
ed and can result in
away from sources of heat, direct sunlight
, humidity.
disruption, switch off
the appliance and disconnect the plug (pull the plug itself, not the lead) or turn off

4
•
The appliance and if possible the mains lead have to be checked regularly for signs
of damage. If damage is found the appliance must not be used.
•
For safety reasons, alterations or modifications of the appliance are prohibited.
•
In order to ensure your children’s safety, please keep all packaging (plastic bags,
boxes, polystyrene etc.) out of their reach.
WARNING:
WARNING:WARNING:
WARNING:
Do not allow small children to play with the foil. There is a
danger of suffocation!
danger of suffocation!danger of suffocation!
danger of suffocation!
Special safety Information for this Unit
Special safety Information for this UnitSpecial safety Information for this Unit
Special safety Information for this Unit
WARNING: Hot surface! Danger of burns!
WARNING: Hot surface! Danger of burns!WARNING: Hot surface! Danger of burns!
WARNING: Hot surface! Danger of burns!
During operation the temperature of the bull’s-
eye may be
very hot.
•Before using the
transportation locking screws must be
removed, otherwise it may cause serious damages.
•The dry weight of laundry must not exceed
the max.
loading capacity.
•
The unit must be connected with a new set of hoses to
the water supply; old hose sets should not be
•The maximum / lowest permitted water inlet
pressure is
1.0 MPa / 0.03 MPa.
•Do not use any flammable/explosive
cleaning agents
such as benzene in the appliance.
The appliance and if possible the mains lead have to be checked regularly for signs
For safety reasons, alterations or modifications of the appliance are prohibited.
In order to ensure your children’s safety, please keep all packaging (plastic bags,
danger of suffocation!
danger of suffocation!danger of suffocation!
danger of suffocation!
Special safety Information for this Unit
Special safety Information for this UnitSpecial safety Information for this Unit
Special safety Information for this Unit
WARNING: Hot surface! Danger of burns!
WARNING: Hot surface! Danger of burns!WARNING: Hot surface! Danger of burns!
WARNING: Hot surface! Danger of burns!
eye may be
transportation locking screws must be
removed, otherwise it may cause serious damages.
the max.
The unit must be connected with a new set of hoses to
the water supply; old hose sets should not be
reused.
pressure is
cleaning agents

5
•In the appliance bottom are located ventilation openings
(depending on model). These may not be blocked e.g.
by carpet. Pay attention to free circulation of air.
•If the unit is used in the bathroom, unplug the power
cord after using as the proximity of water presents a
danger. This even applies when the unit is switched off.
•This appliance can be used by children
children children
children aged from
8 years and above and persons with reduced physical,
sensory or mental capabilities or lack of experience and
knowledge if they have been given supervision or in-
struction concerning use of the
use of theuse of the
use of the appliance
applianceappliance
appliance in a safe way
and understand the hazards involved.
•Children
ChildrenChildren
Children shall not play with the appliance.
•Children
ChildrenChildren
Children younger than 3 years should be kept away,
unless they are constantly supervised.
•Cleaning and user maintenance
user maintenanceuser maintenance
user maintenance shall not be made by
children
childrenchildren
children unless they are older 8 years and supervised.
•The appliance must be cleaned regularly. Follow the
instructions in the chapter "Cleaning and Maintenance".
•Do not try to repair the appliance on your own. Always
contact an authorized technician. To avoid the expo-

6
sure to danger, always have faulty cable be replaced
only by the manufacturer, by our customer service or by
qualified person and with a cable of the same type. Do
not use the device if the device or plug is damaged.
Unpacking the Appliance
Unpacking the ApplianceUnpacking the Appliance
Unpacking the Appliance
•Remove the appliance from its packaging.
•
Remove all packaging material, such as foils, filler and cardboard packaging.
•
To prevent hazards, check the appliance for any transport damage.
•
In case of damage, do not put the appliance into operation. Contact your distr
NOTE
NOTENOTE
NOTE:
::
:
Production residue or dust may have collected on the appliance. We recommend clea
ing the appliance according to chapter “Cleaning and Maintenance”.
Appliance
Appliance Appliance
Appliance Equipment
EquipmentEquipment
Equipment
Appliance overview
Appliance overviewAppliance overview
Appliance overview
1
11
1
Detergent drawer
2
22
2
Control panel
3
33
3
Appliance door
4
44
4
Feet
5
55
5
Drain pump cover
6
66
6
Inlet valve (cold water)
7
77
7
Power plug
Delivery scope
Delivery scopeDelivery scope
Delivery scope
1x Inlet hose, 1x wrench
sure to danger, always have faulty cable be replaced
only by the manufacturer, by our customer service or by
qualified person and with a cable of the same type. Do
not use the device if the device or plug is damaged.
Remove all packaging material, such as foils, filler and cardboard packaging.
To prevent hazards, check the appliance for any transport damage.
In case of damage, do not put the appliance into operation. Contact your distr
ibutor.
Production residue or dust may have collected on the appliance. We recommend clea
n-

7
Installation
InstallationInstallation
Installation
WARNING:
WARNING:WARNING:
WARNING:
The unit must not be connected to the mains during installing. Otherwise there is
ger to life
ger to lifeger to life
ger to life or electric shock hazard
electric shock hazardelectric shock hazard
electric shock hazard!
CAUTION:
CAUTION:CAUTION:
CAUTION:
For a correct operation
the appliance must be connected properly. The specifications
for water supply and drain as well as the electrical connection must fulfill the required
criteria.
Remove the transport locking
Remove the transport locking Remove the transport locking
Remove the transport locking screws
screwsscrews
screws
CAUTION:
CAUTION:CAUTION:
CAUTION:
•Before using, all transport locking screws
must be removed from the
back.
Otherwise it may cause serious damages.
•Keep the transport
locking screws for later use / transport. Never transport the
appliance without properly attached transportation safety!
•Loosen and remove the four transport locking screws with
the supplied
•Insert the pre-installed transport locking covers at the unit back.
Installation location
Installation locationInstallation location
Installation location
•
The site should be located near the water inlet and outlet, as well as near a properly
grounded power socket.
•
Good ventilation around the appliance is required, in order to dissipate the heat
properly. Sufficient clearance must be created for this purpose.
•The clearance to the front must be created so,
that the appliance door can open
without being impeded.
•Make sure that the floor on which the appliance is installed, is
even,
and clean.
The unit must not be connected to the mains during installing. Otherwise there is
da
dada
dan-
n-n-
n-
the appliance must be connected properly. The specifications
for water supply and drain as well as the electrical connection must fulfill the required
must be removed from the
appliance
locking screws for later use / transport. Never transport the
the supplied
wrench.
The site should be located near the water inlet and outlet, as well as near a properly
Good ventilation around the appliance is required, in order to dissipate the heat
that the appliance door can open
even,
heat-resistant

8
•T
ake care of a solid and horizontal position of the appliance. If the appliance is not
horizontally leveled, adjust the feet accordingly (see “Adjust the feet”).
•Power cord and water hoses may not kinked or squashed.
•The wall socket must be freely accessible.
•Avoid the installation:
Avoid the installation:Avoid the installation:
Avoid the installation:
-
near heaters, next to a stove, direct sunlight or any other heat sources;
-
at locations with high humidity (e.g. outdoors), as metal parts would be su
ceptible to corrosion under such circumstances;
-in rooms wh
ere the temperature could drop below freezing. Do not expose
the appliance any weather.
-
near volatile or flammable materials (e.g. gas, fuel, alcohol, paint, etc.).
Adjust the feet
Adjust the feetAdjust the feet
Adjust the feet
CAUTION:
CAUTION:CAUTION:
CAUTION:
The feet must never be removed. Do not restrict the floor clearance through carpets,
strips of wood or similar. Danger of heat accumulation!
Danger of heat accumulation!Danger of heat accumulation!
Danger of heat accumulation!
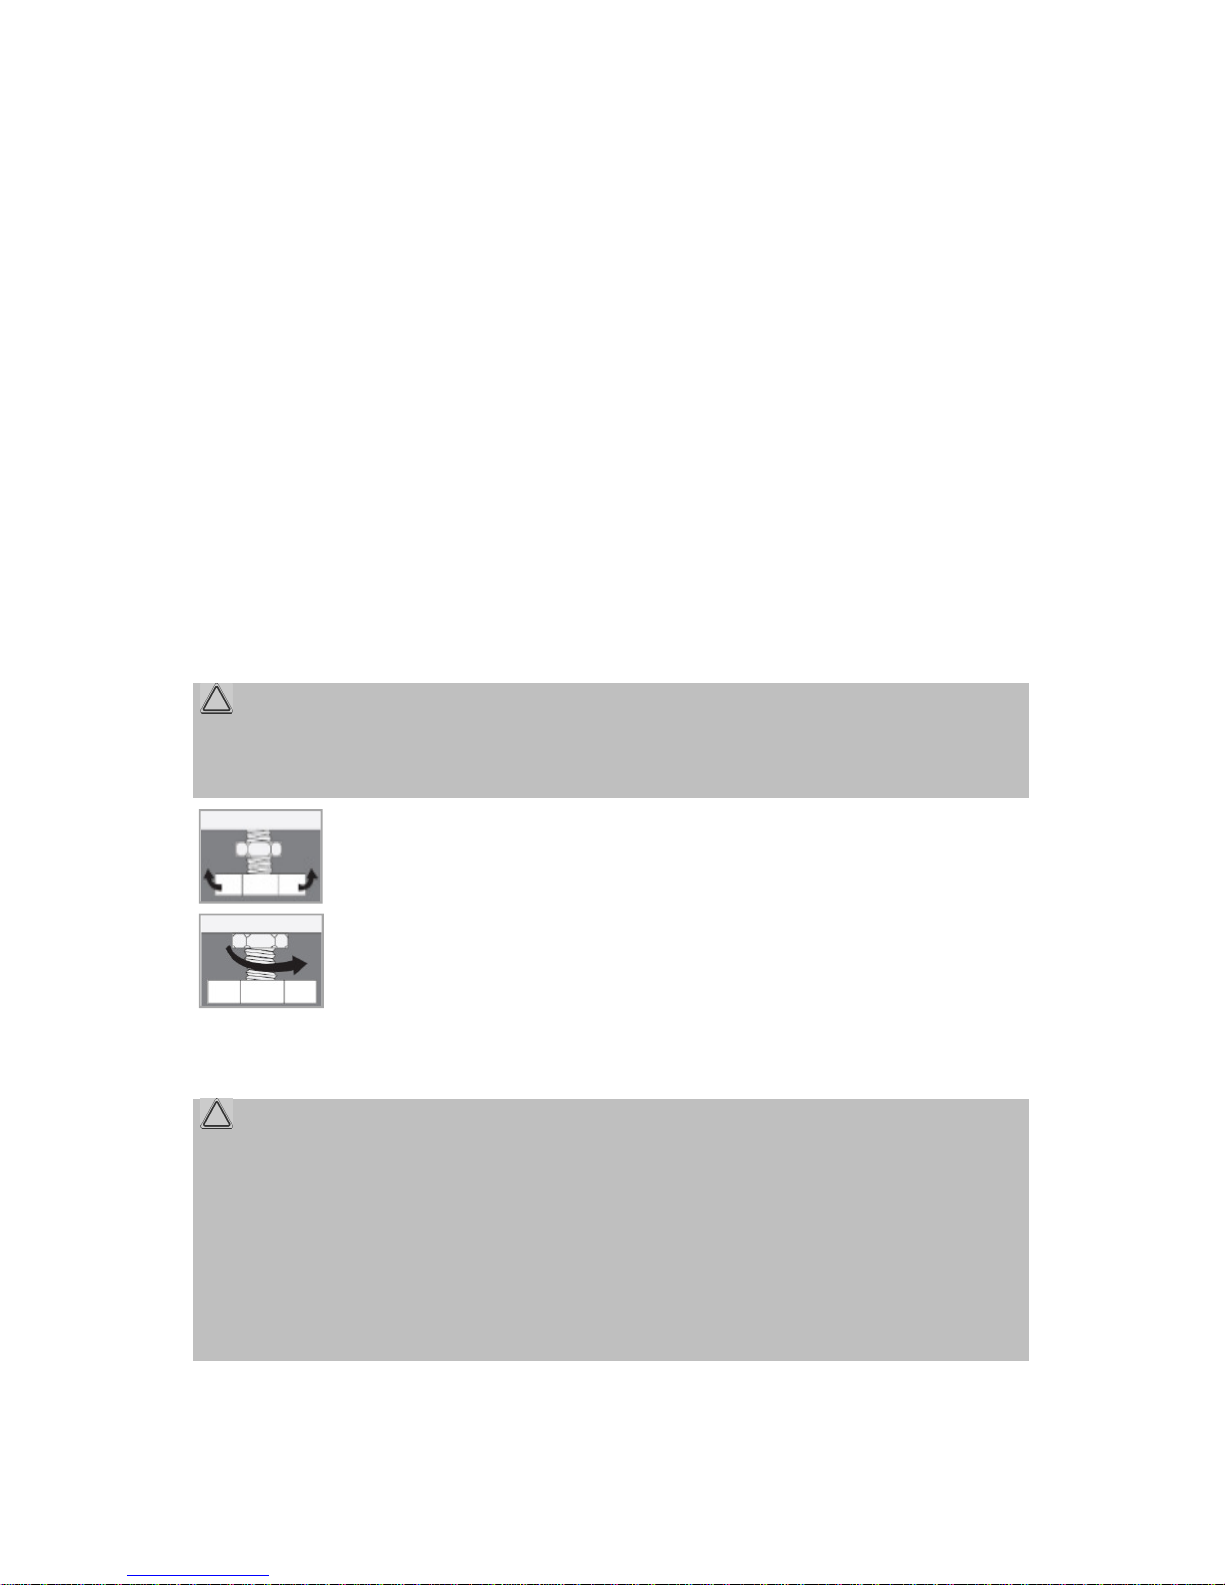
Use the wrench to loosen the lock nuts.
Rotate the feet to change the height. Tighten the lock nuts with the
wrench, if the unit is aligned. The feet must have solid ground contact.
Check with a spirit level whether the appliance is leveled horizontally. If
the unit is not in balance, the feet must be adjusted again.
Water connection
Water connectionWater connection
Water connection
CAUTION:
CAUTION:CAUTION:
CAUTION:
•The
Installation of the water supply must conform to the local laws and regulations.
•The appliance is not
notnot
not suitable for hot water supply.
•
Use the new supplied hose set to connect the appliance to the water supply. Do not
reuse old or used connection sets.
•If
the water pipe is new or long time not used, ensure before connecting to the
water system, that the water is clear and free from contamination.
ake care of a solid and horizontal position of the appliance. If the appliance is not
horizontally leveled, adjust the feet accordingly (see “Adjust the feet”).
near heaters, next to a stove, direct sunlight or any other heat sources;
at locations with high humidity (e.g. outdoors), as metal parts would be su
s-
ere the temperature could drop below freezing. Do not expose
near volatile or flammable materials (e.g. gas, fuel, alcohol, paint, etc.).
The feet must never be removed. Do not restrict the floor clearance through carpets,
Rotate the feet to change the height. Tighten the lock nuts with the
wrench, if the unit is aligned. The feet must have solid ground contact.
Check with a spirit level whether the appliance is leveled horizontally. If
the unit is not in balance, the feet must be adjusted again.
Installation of the water supply must conform to the local laws and regulations.
Use the new supplied hose set to connect the appliance to the water supply. Do not
the water pipe is new or long time not used, ensure before connecting to the

9
Notes on inlet hose safety system (
Notes on inlet hose safety system (Notes on inlet hose safety system (
Notes on inlet hose safety system (
delivery scope depending on model
delivery scope depending on modeldelivery scope depending on model
delivery scope depending on model
The safety system consists of a double-walled inlet hose. It
guarantees to cut off the
water supply when leakage of the inner hose. Switching off the water supply leads over
an electronic contact.
If necessary, you can order an inlet hose safety system from your
dealer or in our online
accessories shop, www.bomann-germarny.de
. To order, use the reference number
found under “Technical Data”.
Connect the water inlet hose (cold water connection)
Connect the water inlet hose (cold water connection)Connect the water inlet hose (cold water connection)
Connect the water inlet hose (cold water connection)
NOTE
NOTENOTE
NOTE:
::
:
The water pressure must be between 0.03 MPa and 1.0
MPa. With higher
use a pressure regulator.
•
Check the tightness of the rubber seals (d) at both ends of the inlet
hose to prevent leakage.
•
Connect the water inlet hose to a water thread with ¾“.
hose firmly in the direction of the screw thread; pay attention for a
tight fit.
•
Connect the other end of the inlet hose to the inlet valve on the
appliance back; pay attention for a tight fit too.
Connect the water drain hose
Connect the water drain hoseConnect the water drain hose
Connect the water drain hose
NOTE
NOTENOTE
NOTE:
::
:
The drain hose has a length of approx. 1.5 m and can extend with a suitable hose and
connecting piece to a length of max. 4 m.
CAUTION:
CAUTION:CAUTION:
CAUTION:
In order to prevent backflow of contaminated water, the free end of
the hose must not
come under the water level of the drain.
•
Connect the drain hose to a drain pipe with a minimum diameter of 40 mm; altern
tively the drain hose can be fixed to a sink or directly to the drainage.
delivery scope depending on model
delivery scope depending on modeldelivery scope depending on model
delivery scope depending on model
)
))
)
guarantees to cut off the
water supply when leakage of the inner hose. Switching off the water supply leads over
dealer or in our online
. To order, use the reference number
MPa. With higher
pressure:
Check the tightness of the rubber seals (d) at both ends of the inlet
Connect the water inlet hose to a water thread with ¾“.
Screw the
hose firmly in the direction of the screw thread; pay attention for a
Connect the other end of the inlet hose to the inlet valve on the
The drain hose has a length of approx. 1.5 m and can extend with a suitable hose and
the hose must not
Connect the drain hose to a drain pipe with a minimum diameter of 40 mm; altern
a-
tively the drain hose can be fixed to a sink or directly to the drainage.

10
•Always make sure that the ho
se is not bent or
squeezed.
Use for example a hose retaining sheet
(a) (not included).
•
The hose must be installed at a height of min.
850 mm and max. 1250
mm above the floor.
•Secure the hose securely
in order
change in position and with it a
water leakage.
Electrical connection
Electrical connectionElectrical connection
Electrical connection
WARNING:
WARNING:WARNING:
WARNING:
•
The installation to the mains supply must conform to the local standards and regul
tions.
•Improper connection may cause to an electric shock
electric shockelectric shock
electric shock!
•Do not use multiple sockets or extension cords.
•It is not allowed to modify the plug provided with the appliance!
If the plug does not
fit properly to the outlet, let install a proper outlet by an authorized specialist.
•
The accessibility of the power plug must always be ensured in order to disconnect
the device from the power supply in case of an emergency.
•
Make sure that the voltage supply matches the specifications on the rating label
before connecting.
•
Connect the mains cable to a properly installed and earthed wall outlet.
•If the plug after installation is
not accessible, a corresponding disconnect device
must be available to meet the relevant safety regulations.
Startup / Operation
Startup / OperationStartup / Operation
Startup / Operation
Prior using for the first t
Prior using for the first tPrior using for the first t
Prior using for the first time
imeime
ime
•Make sure that all transport securing devices has been removed.
•Remove the accessories and any material from the drum.
•Allow the appliance to wash the
first time without any laundry, with the addition of
some washing agent in the program [Drum Clean] (see "
Starting the appliance
se is not bent or
Use for example a hose retaining sheet
The hose must be installed at a height of min.
mm above the floor.
in order
to avoid a
water leakage.
The installation to the mains supply must conform to the local standards and regul
a-
If the plug does not
fit properly to the outlet, let install a proper outlet by an authorized specialist.
The accessibility of the power plug must always be ensured in order to disconnect
Make sure that the voltage supply matches the specifications on the rating label
Connect the mains cable to a properly installed and earthed wall outlet.
not accessible, a corresponding disconnect device
first time without any laundry, with the addition of
Starting the appliance
").

11
Preparation of c
Preparation of cPreparation of c
Preparation of clothes
lotheslothes
lothes
CAUTION
CAUTIONCAUTION
CAUTION
•Do not wash any items that are declared as non-
washable. Follow always the i
structions on the care label of your laundry.
•
Do not wash clothes soaked in petrol, thinners, alcohol or solvents.
•
Foreign objects (e.g. nails, coins) can cause damage to garments and components.
•Check the pockets of all garments on content and empty them
completely.
•
Sort your fabrics by color and the symbols contained on the care label. Separate
white and colored laundry. All new colored clothes should be washed separately.
•Turn buttons and embroidery inside.
•
Close zippers, buttons and hooks before washing. Tie any loose straps and loops.
•Wash bras e.g.
in a pillowcase to prevent leakage of the steel bracket.
•
Particularly delicate fabrics such as curtains, crochet or small items (socks, han
kerchiefs, neckties, etc.) should be washed in a closed bag.
•Remove always all the hooks from curtains.
•
Washing large and heavy parts such as bath towels, jeans, lined jackets and the
like can cause the drum to run unbalanced. We recommend adding one or two
smaller parts; this especially helps with the spinning cycle.
•
The clothes which easily get fuzzed shall be washed separately; otherwise the other
articles can be stained with dust and thrum etc. Preferably, black
clothes and cotton
clothes shall be washed separately because
they can easily get stained with the
thrums of other colors when being washed together.
•Clean away dusts, stains and pet hairs from the clothes.
•
For spot removing heavy soiling the laundry can be treated with a special prewash
spray. Follow the operating instructions of the product packaging.
washable. Follow always the i
n-
Do not wash clothes soaked in petrol, thinners, alcohol or solvents.
Foreign objects (e.g. nails, coins) can cause damage to garments and components.
completely.
Sort your fabrics by color and the symbols contained on the care label. Separate
white and colored laundry. All new colored clothes should be washed separately.
Close zippers, buttons and hooks before washing. Tie any loose straps and loops.
in a pillowcase to prevent leakage of the steel bracket.
Particularly delicate fabrics such as curtains, crochet or small items (socks, han
d-
Washing large and heavy parts such as bath towels, jeans, lined jackets and the
like can cause the drum to run unbalanced. We recommend adding one or two
The clothes which easily get fuzzed shall be washed separately; otherwise the other
clothes and cotton
they can easily get stained with the
For spot removing heavy soiling the laundry can be treated with a special prewash

12
Select proper detergent
Select proper detergentSelect proper detergent
Select proper detergent
CAUTION
CAUTIONCAUTION
CAUTION:
::
:
Always consider the dosage and storage recommendations on the sales packaging.
WAR
WARWAR
WARNING
NINGNING
NING:
::
:
Keep detergent and additives out of reach for children!
•Use only “slightly foaming”
detergent for washing machines according to type of
fabric (cotton, synthetics, lined or woolen products), color, washing temperature and
degree of soiling. Otherwise foaming can cause overflowing.
•Bleach is alkaline and can damage your clothing, preferab
ly does not use bleach.
•
Detergents often leave residue in the clothes, which can cause bad odor if not
rinsed properly.
•
Detergent cannot easily get dissolved completely if there is too much detergent or
water temperature is rather low. It can remain in clo
thes, pipes and washing m
chines to pollute the clothes.
•
Washing shall follow the weight of clothes, dirty degrees, local water hardness as
well as the recommendations from the detergent manufacturers. C
onsult the water
company if you are not clear of water hardness.
Detergent drawer
Detergent drawerDetergent drawer
Detergent drawer
CAUTION
CAUTIONCAUTION
CAUTION:
::
:
The dispenser is designed exclusively for the use of detergents for washing machines!
NOTE
NOTENOTE
NOTE:
::
:
•Always add the detergent powder just before starting the wash
cycle, otherwise it
could get damp and will not dissolve properly.
•At the end of the wash cycle the container for the manual dosing
must be empty.
•Pull out the drawer and pour in the detergent.
IChamber of detergent for pre-wash.
II Chamber of detergent
for the main wash.
Chamber for detergent additive (softener) Do not exceed
the MAX mark.
Always consider the dosage and storage recommendations on the sales packaging.
detergent for washing machines according to type of
fabric (cotton, synthetics, lined or woolen products), color, washing temperature and
ly does not use bleach.
Detergents often leave residue in the clothes, which can cause bad odor if not
Detergent cannot easily get dissolved completely if there is too much detergent or
thes, pipes and washing m
a-
Washing shall follow the weight of clothes, dirty degrees, local water hardness as
onsult the water
The dispenser is designed exclusively for the use of detergents for washing machines!
cycle, otherwise it
must be empty.
for the main wash.
Chamber for detergent additive (softener) Do not exceed

13
•Close the drawer.
Foam
Foam Foam
Foam detection
detectiondetection
detection
Excessive foam forms when too much detergent is used. This affects the wash and
rinse cycle. The function automatically checks foaming; excessive foam is removed by
an extra rinse and spin cycle.
Fill in the laundry
Fill in the laundryFill in the laundry
Fill in the laundry
•Unravel the clothes before putting them into the machine.
•Each load should correspond to the nominal capacity of the appliance. Do not
overload the appliance. Different strengths, sizes and types of laundry can affect
the actual loading capacity. It is advisable to load the appliance just that a normal
circulation during washing is possible.
•Close the door. Make sure that no laundries are caught between the door and seal.
Control panel
Control panelControl panel
Control panel
1
1 1
1 EIN/AUS (
EIN/AUS (EIN/AUS (
EIN/AUS (Power
PowerPower
Power)
))
)
Press the button to switch the unit on and/or off.
2
2 2
2 Program selector switch
Program selector switchProgram selector switch
Program selector switch
To select a wash program, turn the program selector switch to the appropriate position.
3
3 3
3 STARTVORWAHL (Start delay)
STARTVORWAHL (Start delay)STARTVORWAHL (Start delay)
STARTVORWAHL (Start delay)
By repeatedly pressing the button, the program start can be changed about 3 / 6 / 9 / 12
(3+9) / 15 (6+9) / 18 (3+6+9) hours. Press the START/PAUSE button and the unit will
start automatically after the selected time has elapsed.

14
*3
*3*3
*3
Child safety lock
Child safety lockChild safety lock
Child safety lock
To activate / deactivate, press the button
STARTVORWAHL (Start delay)
3 seconds after program start.
4 VORWÄSCHE (Pre
4 VORWÄSCHE (Pre4 VORWÄSCHE (Pre
4 VORWÄSCHE (Prewash)
wash)wash)
wash)
Use this button to select an additional washing
cycle to the previously set main wash
program. Consider that the option is depending on the program.
5
55
5
START/PAUSE
START/PAUSESTART/PAUSE
START/PAUSE
Press the button to start / stop the selected or running wash program.
6 Control lamps
6 Control lamps6 Control lamps
6 Control lamps
Wash / Rinse / Spin
Depending on the program selector switch position, the start cycle of
th
program is lit. After starting the program, the control lamps
indicate the further
program sequence.
3 / 6 / 9 / 12 (3+9) / 15 (6+9) / 18 (3+6+9)
The control lamps indicate the start delay selection.
The control lamp indicates the activation of the child safety
lock.
The control lamp indicates the activation of the door lock.
The control lamp indicates the activation of the
option prewash
Starting a Wash Program
Starting a Wash ProgramStarting a Wash Program
Starting a Wash Program
Wash program table
Wash program tableWash program table
Wash program table
NOTE
NOTENOTE
NOTE:
::
:
The shown values
are approximate and recommendations under standard conditions
and therefore not binding. The consumption data can vary
depending on water pre
sure, water hardness, water inlet temperature, ambient temperature, type and quantity,
as
well as power supply and selected additional options from the specified values.
STARTVORWAHL (Start delay)
for about
cycle to the previously set main wash
th
e respective
indicate the further
lock.
option prewash
.
are approximate and recommendations under standard conditions
depending on water pre
s-
sure, water hardness, water inlet temperature, ambient temperature, type and quantity,
well as power supply and selected additional options from the specified values.

15
Program
ProgramProgram
Program
max.
max. max.
max.
L
LL
Loading
oadingoading
oading
Temperature
TemperatureTemperature
Temperature
°C
°C°C
°C
Spin speed
Spin speedSpin speed
Spin speed
rpm
rpmrpm
rpm
Baumwolle*
(Cotton) 6 kg cold/30/40/60/90 800/800/1000/
1000/800
88/93/254/272/149
Mix ≤4 kg cold/40/60 800/800/800
Pflegeleicht
(Easy Care) ≤3 kg cold/40 800/800
Feinwäsche
(Delicate) ≤3 kg cold/30 800/800
Trommelreinigung
(Drum Clean) - 60 800
Schleudern
(Spin) 6 kg - 800
Express 15‘‘ ≤2 kg cold 800
Spülen &
Schleudern
(Rinse & Spin)
6 kg cold 800
Option: Vorwäsche
(Prewash)
Prewash cycle available for the programs:
Cotton, Mix, Easy Care and Delicate.
*
* *
*
Standard program
Standard programStandard program
Standard program:
: :
: Cotton
CottonCotton
Cotton
60
6060
60°C
°C °C
°C /
//
/
Cotton
Cotton Cotton
Cotton 40°
40°40°
40°C
CC
C
With full and partial load, these are the standard wash programs to identify the infor
mation on the energy label. These programs are suitable to clean normally soiled lau
dry and of combined energy and water consumption most efficiently.
W
WW
Wash program
ash programash program
ash program
selection
selectionselection
selection
CAUTION
CAUTIONCAUTION
CAUTION:
::
:
Choose the right wash cycle according to the type, quantity and pollution. Always
sider the instructions on the care label of your laundry.
Program
ProgramProgram
Program
Explanation
ExplanationExplanation
Explanation
Cotton
Suitable for your daily laundry. Recommended for hard wearing,
cotton textiles.
Mix
Suitable for textiles of mixed fabrics, means cotton mixed with synthetic fibers.
Easy Care
Suitable for fine textiles, such as silk, satin, synthetic or blended fabrics.
Time
TimeTime
Time
Min.
Min.Min.
Min.
88/93/254/272/149
66/78/95
61/73
56/59
78
14
15
34
With full and partial load, these are the standard wash programs to identify the infor
-
mation on the energy label. These programs are suitable to clean normally soiled lau
n-
Choose the right wash cycle according to the type, quantity and pollution. Always
con-
Suitable for your daily laundry. Recommended for hard wearing,
heat resistant
Suitable for textiles of mixed fabrics, means cotton mixed with synthetic fibers.
Suitable for fine textiles, such as silk, satin, synthetic or blended fabrics.

16
Program
ProgramProgram
Program
Explanation
ExplanationExplanation
Explanation
Delicate The wash cycle is gentler and also suitable for machine washable silk. Use
appropriate detergent.
Drum Clean Suitable for self-cleaning the washing machine drum. You cannot wash laundry
in this program. Drum cleaning is perfect when you fill in the appropriate amount
of chlorine bleach.
Spin Separate spinning cycle. Water is pumped off before spinning.
Express 15‘‘ Suitable for a small amount of textiles with light soiling without noticeable stains.
Rinse & Spin Separate rinse cycle with spinning function. Suitable for rinsing detergent resi-
dues.
Option:
Prewash
For heavily soiled laundry, set this option to the previously set main wash pro-
gram.
Select the temperature corresponding to the textiles and pollution. Basically: the higher
the temperature, the higher the power consumption.
Temperatur
TemperaturTemperatur
Temperature
ee
e
Explanation
ExplanationExplanation
Explanation
90°C Heavily soiled pure white cotton or linen (e.g. tablecloths, sheets and towels).
60°C Moderately soiled colored cotton, linen and synthetic (e.g. shirts or underwear).
Slightly soiled whites (e.g. underwear).
40-30°C-cold Normally soiled laundry (including synthetic and wool).
Capacity
CapacityCapacity
Capacity
Do not overload the appliance otherwise the laundry is not getting clean. Refer to the
information in the "Wash program table".
Starting
Starting Starting
Starting the
the the
the appliance
applianceappliance
appliance
•Connect the appliance to the power supply and switch it on.
•The water supply must be opened up to the maximum pressure.
•Load your laundry and fill in the detergent, if necessary.
•Close the appliance door.
•Set the required washing conditions.
•Start the operation.

17
Door lock
Door lockDoor lock
Door lock
Once a wash program has been started, the door cannot be opened.
A control lamp indicates the door lock.
When the wash cycle is finished, the door lock will automatically be unlocked after a few
minutes and the control lamp goes out.
Reloading laundry
Reloading laundryReloading laundry
Reloading laundry
WARNING:
WARNING:WARNING:
WARNING:
Never try to open the appliance door by force during the operation.
After program start you can add or remove laundry if necessary.
Stop the
process with the START/PAUSE button
. The appliance checks whether
refit and releases the door lock after a short time.
As soon as the water temperature or the water level exceeds a certain value, the door
remains locked for safety reasons and a reloading is not possible.
Changing the program
Changing the programChanging the program
Changing the program
•To change the program,
stop the washing process with the START/PAUSE button
•Select the desired program and start the new operation.
End of program
End of programEnd of program
End of program
At the end of the wash cycle, several beeps are sounded; a
few minutes later, the unit
goes into standby mode. The door lock will be unlocked.
Switch
SwitchSwitch
Switching
inging
ing
off
offoff
off
•Switch off the appliance.
•Close the water supply!
•
Leave the appliance door slightly open until the next wash cycle to avoid odors.
•If the appliance is not in use for an extended period, d
isconnect the mains plug or
switch off or turn out the fuse.
When the wash cycle is finished, the door lock will automatically be unlocked after a few
Stop the
washing
. The appliance checks whether
it is possible to
As soon as the water temperature or the water level exceeds a certain value, the door
stop the washing process with the START/PAUSE button
.
few minutes later, the unit
Leave the appliance door slightly open until the next wash cycle to avoid odors.
isconnect the mains plug or

18
Energy saving tips
Energy saving tipsEnergy saving tips
Energy saving tips
•If possible avoid the selection of high wash temperatures.
Modern detergents
achieve good washing results even at low temperatures.
•Select the
wash program depending on the type of laundry and the required degree
of washing.
•Take advantage of the maximum capacity of each wash program.
•Clean the filter regularly to avoid excessive washing and high
energy
•Ventilate the room well. The room temp
erature should not rise above +35°
Cleaning and Maintenance
Cleaning and MaintenanceCleaning and Maintenance
Cleaning and Maintenance
WARNING:
WARNING:WARNING:
WARNING:
•
Always switch off the appliance and disconnect the plug or turn off / unscrew the
fuse before cleaning and user maintenance.
•Allow the appliance to cool down sufficient before cleaning.
Scalding!
Scalding!Scalding!
Scalding!
•
Do not use steam cleaners for cleaning the appliance; moisture could enter electr
cal components. Risk of electric shock!
Risk of electric shock!Risk of electric shock!
Risk of electric shock!
Hot steam could damage the plastic parts.
The appliance must be dry before restarting operation.
CAUTION:
CAUTION:CAUTION:
CAUTION:
•Do not use a wire brush or other sharp, abrasive items.
•Do not use any acidic or abrasive detergents.
NOTE
NOTENOTE
NOTE:
::
:
Dirty or clogged filter degrades the washing result
. Regularly check the filter
them if necessary.
Maintenance of the
Maintenance of the Maintenance of the
Maintenance of the washing machine
washing machinewashing machine
washing machine
CAUTION:
CAUTION:CAUTION:
CAUTION:
•
Never use spray cleaners to clean the door panel, this may damage the door lock
and electrical components.
Modern detergents
wash program depending on the type of laundry and the required degree
energy
consumption.
erature should not rise above +35°
C.
Always switch off the appliance and disconnect the plug or turn off / unscrew the
Scalding!
Scalding!Scalding!
Scalding!
Do not use steam cleaners for cleaning the appliance; moisture could enter electr
i-
Hot steam could damage the plastic parts.
. Regularly check the filter
and clean
Never use spray cleaners to clean the door panel, this may damage the door lock

19
CAUTION:
CAUTION:CAUTION:
CAUTION:
•
Check after each wash the door seal and remove fiber residues, other materials
and foreign objects, otherwise it can lead to water leakage.
•
Clean the appliance outer surfaces and the door sealing thoroughly with a soft,
damp cloth. Use only mild cleaning agent.
•
Use a dampened cloth with a little white vinegar or a special detergent
machines to clean the appliance drum.
•Recommendation: allow the appliance to run regularly
without loadin
gram [Drum Clean].
•Dry the outer surfaces thoroughly before taking in operation again.
Cleaning the detergent drawer
Cleaning the detergent drawerCleaning the detergent drawer
Cleaning the detergent drawer
•Pull out the drawer until it stops.
•
Carefully push the lever (a) into the container for the fabric softener and pull out the
tray completely.
•Wash the guide grooves and the containers with water.
•Use a soft brush to clean the housing.
•Replace the detergent drawer.
Cleaning the inlet filter
Cleaning the inlet filterCleaning the inlet filter
Cleaning the inlet filter
CAUTION
CAUTIONCAUTION
CAUTION:
::
:
•Close the water supply before cleaning!
•
Always check if the water hoses are properly reinstalled and no water leaks.
Inlet filter at the tap
Inlet filter at the tapInlet filter at the tap
Inlet filter at the tap
Clean the filter when not sufficient water is supplied with opened
water valve.
•Unscrew the inlet hose from the water valve.
•Wash the inlet filter under running water.
Check after each wash the door seal and remove fiber residues, other materials
Clean the appliance outer surfaces and the door sealing thoroughly with a soft,
Use a dampened cloth with a little white vinegar or a special detergent
for washing
without loadin
g in the pro-
Carefully push the lever (a) into the container for the fabric softener and pull out the
Always check if the water hoses are properly reinstalled and no water leaks.
water valve.

20
•Reconnect the inlet hose firmly.
Inlet filter at the a
Inlet filter at the aInlet filter at the a
Inlet filter at the appliance
pplianceppliance
ppliance
Clean the filter regularly, about every one to three months.
•Unscrew the inlet hose f
rom the appliance back.
•Clean the filter with a small brush.
•Reconnect the inlet hose firmly.
Cleaning the filter of drain pump
Cleaning the filter of drain pumpCleaning the filter of drain pump
Cleaning the filter of drain pump
CAUTION
CAUTIONCAUTION
CAUTION:
::
:
The appliance must never be used without the filter.
The foreign body trap in the drain pump prevents the flushed parts from closing off the
pumping system. Clean the pump regularly, approx. once a month; Depending on use.
•Open the drain pump cover.
•Place a drip tray under to catch possible leaking water.
•Turn the cap counterclockwise. Look for leaking water!
Turn
TurnTurn
Turn
the filter not completely out!
the filter not completely out!the filter not completely out!
the filter not completely out!
•Interrupt the water flow by turning the filter clockwise again.
•If the draining process is completed, turn out the filter completely.
•Take off the filter and remove any dirt and foreign objects.
•
Insert the cap again and make sure it is tightened well and no water can escape.
•Close the drain pump cover.
Antifreeze protection
Antifreeze protectionAntifreeze protection
Antifreeze protection
If the appliance is out of operation
and exposed to temperatures below zero, observe
the following precautions:
•Disconnect the mains plug.
•
Close the water supply and remove the inlet hose from the water valve.
rom the appliance back.
The foreign body trap in the drain pump prevents the flushed parts from closing off the
pumping system. Clean the pump regularly, approx. once a month; Depending on use.
Insert the cap again and make sure it is tightened well and no water can escape.
and exposed to temperatures below zero, observe
Close the water supply and remove the inlet hose from the water valve.
This manual suits for next models
1
Table of contents
Other BOMANN Washer manuals

BOMANN
BOMANN WA 5729 User manual

BOMANN
BOMANN MWA 9481 CB User manual

BOMANN
BOMANN WA 5719 User manual

BOMANN
BOMANN WA 9310.1 User manual

BOMANN
BOMANN WA 5716 User manual

BOMANN
BOMANN WTK 5020 Guide

BOMANN
BOMANN WA 5727 TL User manual

BOMANN
BOMANN WA 5712 User manual

BOMANN
BOMANN HAUSHALTS User manual

BOMANN
BOMANN WA 5724 User manual

BOMANN
BOMANN WA 5722 User manual

BOMANN
BOMANN WAA 936 E manual

BOMANN
BOMANN WA 9312.1 User manual

BOMANN
BOMANN WA 7192 User manual

BOMANN
BOMANN WA 7191 User manual

BOMANN
BOMANN WA 7182 User manual

BOMANN
BOMANN WA-921 manual

BOMANN
BOMANN MWA 948 CB User manual

BOMANN
BOMANN WA 7174 User manual

BOMANN
BOMANN WA 5711 User manual