BOMTECH A-ONE Lite User manual

A-ONE Lite
One-click Automatic Diagnosis System
User Manual

∙ ∙ ∙ ∙ ∙∙ ∙ ∙ ∙ ∙ ∙ ∙ ∙ ∙ ∙ ∙ ∙ ∙ ∙ ∙ ∙ ∙ ∙ ∙ ∙ ∙ ∙ 3
∙ ∙ ∙ ∙ ∙ ∙ ∙ ∙ ∙ ∙ ∙ ∙ ∙ ∙ ∙ ∙ ∙ ∙ ∙ ∙ ∙ ∙ ∙ ∙ ∙ ∙ ∙ ∙ ∙ ∙ ∙ ∙ ∙ ∙ ∙ ∙ ∙ ∙ ∙ ∙ ∙ ∙ 4
∙ ∙ ∙ ∙ ∙ ∙ ∙ ∙ ∙ ∙ ∙ ∙ ∙ ∙ ∙ ∙ ∙ ∙ ∙ ∙ ∙ ∙ ∙ ∙ ∙ ∙ ∙ ∙ ∙ ∙ ∙ ∙ ∙ ∙ ∙ ∙ ∙ ∙ 5
∙ ∙ ∙ ∙ ∙ ∙ ∙ ∙ ∙ ∙ ∙ ∙ ∙ ∙ ∙ ∙ ∙∙ ∙ ∙ ∙ ∙ ∙ ∙ ∙ ∙ ∙ ∙ ∙ ∙ ∙ 6
∙ ∙ ∙ ∙ ∙ ∙ ∙ ∙ ∙ ∙ ∙ ∙ ∙ ∙ ∙ ∙ ∙ ∙ ∙ ∙ ∙ ∙ ∙ ∙ ∙ ∙ ∙ ∙ ∙ ∙ ∙ ∙ ∙ ∙ ∙ ∙ ∙ ∙ ∙ ∙ 8
∙ ∙ ∙ ∙ ∙ ∙ ∙ ∙ ∙ ∙ ∙ ∙ ∙ ∙ ∙ ∙ ∙ ∙ ∙ ∙ ∙ ∙ ∙ ∙ ∙ ∙ ∙ ∙ ∙ ∙ ∙ ∙ ∙ ∙ ∙ ∙ ∙ ∙ ∙ ∙ ∙ ∙ 9
∙ ∙ ∙ ∙ ∙ ∙ ∙ ∙ ∙ ∙ ∙ ∙ ∙ ∙ ∙ ∙ ∙ ∙ ∙∙ ∙ ∙ ∙ ∙ ∙ ∙ ∙ ∙ ∙∙ ∙ ∙ ∙ 10
∙ ∙ ∙ ∙ ∙ ∙ ∙ ∙ ∙ ∙ ∙ ∙ ∙ ∙ ∙ ∙ ∙ ∙ ∙ ∙ ∙ ∙ ∙ ∙ ∙ ∙ ∙ ∙ ∙ ∙ ∙ ∙ ∙ ∙ ∙ ∙ ∙ ∙ ∙ ∙ ∙ ∙12
∙ ∙ ∙ ∙ ∙ ∙∙∙∙∙∙ ∙ ∙ ∙ ∙ ∙ ∙ ∙ ∙ ∙ ∙ ∙ ∙ ∙ ∙ ∙ ∙ ∙ ∙ ∙ ∙ ∙ ∙ 14
∙ ∙ ∙ ∙ ∙ ∙ ∙ ∙ ∙ ∙ ∙ ∙ ∙ ∙ ∙ ∙ ∙ ∙ ∙ ∙ ∙ ∙ ∙ ∙ ∙ ∙ ∙ ∙ ∙ ∙ ∙ ∙ ∙ 17
∙ ∙ ∙ ∙ ∙ ∙ ∙ ∙ ∙ ∙ ∙ ∙ ∙ ∙ ∙ ∙ ∙ ∙ ∙ ∙ ∙ ∙ ∙ ∙ ∙ ∙ ∙ ∙ ∙ ∙ ∙ ∙ ∙ 21
∙ ∙ ∙ ∙ ∙ ∙ ∙ ∙ ∙ ∙ ∙ ∙ ∙ ∙ ∙ ∙ ∙ ∙ ∙ ∙ ∙ ∙ ∙ ∙ ∙ 25
∙ ∙ ∙ ∙ ∙ ∙ ∙ ∙ ∙ ∙ ∙ ∙ ∙ ∙ ∙ ∙ ∙ ∙ ∙ ∙ ∙ ∙ ∙ ∙ ∙ ∙ ∙ ∙ ∙ ∙ ∙ ∙ ∙ 26
∙ ∙ ∙ ∙ ∙ ∙ ∙ ∙ ∙ ∙ ∙ ∙ ∙ ∙ ∙ ∙ ∙ ∙ ∙ ∙ ∙ ∙ ∙ ∙ ∙ ∙ ∙ ∙ ∙ ∙ ∙ 28
∙ ∙ ∙ ∙ ∙ ∙ ∙ ∙ ∙ ∙ ∙ ∙ ∙ ∙ ∙ ∙ ∙ ∙ ∙ ∙ ∙ ∙ ∙ ∙ ∙ ∙ ∙ ∙ ∙ ∙ ∙ ∙ ∙ 29
Contents
1. Product overview & Composition
2. Requirement
3. Product connection
4. Program installation
5. Instructions (How to use)
1) Precautions
2) Start Page
3) Customer Information
4) Diagnosis
6. Results
7. Extra functions
8. Configuration
9. Product Update
10. FAQ
11. Maintenance & warranty
12. BOMTECH
2

1. Product overview & composition
3
Advantages
- High-resolution BOMTECH camera (10 mega PIXEL)
- One-click full facial skin diagnosis system
- Provides high-quality images
- Provides vivid and realistic image
- Easy to operate
- Accurate and scientific diagnosis results by photos and graphs
Scanner
CD USB Lock key
** Side wings, USB Cable, and Power Cable are included.
Overview
- Size : width - 302mm, length - 369mm, height - 480mm
- Weight : 7800g (Scanner only)
- Rated power : AC 100-120V, 200-240V
- Internal output : DC 12V (4.2A), DC 5V (10A)
- Consumption of electrical power : Maximum 50W
* Please attach side wings to prevent
light from affecting diagnosis

2. Requirement
4
1. PC OS
- Window XP/ Vista/ 7/ 8/ 9/ 10
2. Hardware Requirements
- CPU : Over Pentium 4
- RAM : Over 1G (Over 2G is recommended)
- VGA : Over 32MB video card memory
- HDD : Over 10GB
- Monitor : Over 17 inch, Resolution 1024×768
3. Graphic Card
- 3Dfx Voodoo classes
- ATI RageⅡ, Rage Pro, Radeon classes
- Matrox classes
- Nvidia Riva 128, Riva TNT, Geforce classes
- Intel i740, S3 Virge GX/GX2, Trio 3D, Savage 3D classes
3. Product connection
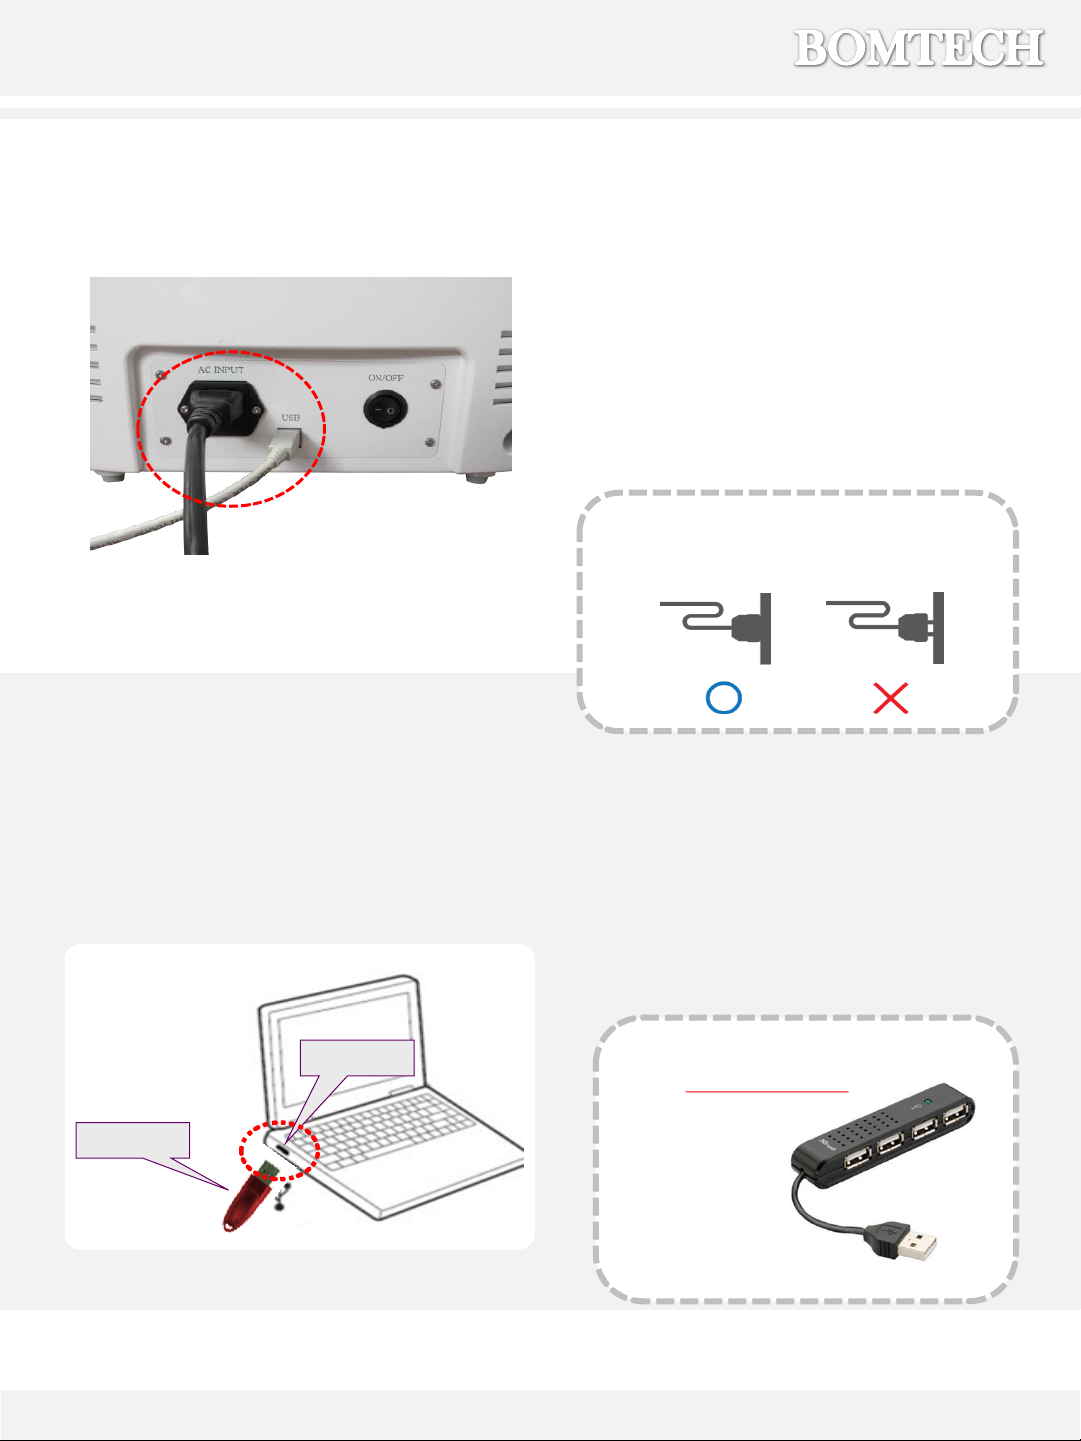
5
** Check if the power cable is
connected well.
1) Connect the power cable to
the scanner and plug in.
2) Connect the USB cable to both
the scanner and PC.
3) Connect the lock key to the PC
USB hub.
** It is recommended to use
the self-power hub.
USB port
Lock key

6
4. Program installation
Caution when installing the program in Windows 7/8
If you want to install the program on Windows 7 (64bit) or 8, you
should run the Auto-run file as Administrator.
1. Open CD-ROM Drive
2. Right click on the “Autorun.exe” file
3. Choose “Run as administrator(A)”
If pop-up appears, select “Yes”(Y).
To start installation, insert program CD into CD-ROM drive.
Auto-run file will automatically begin.
Please install the software driver as shown in page 6 and 7.
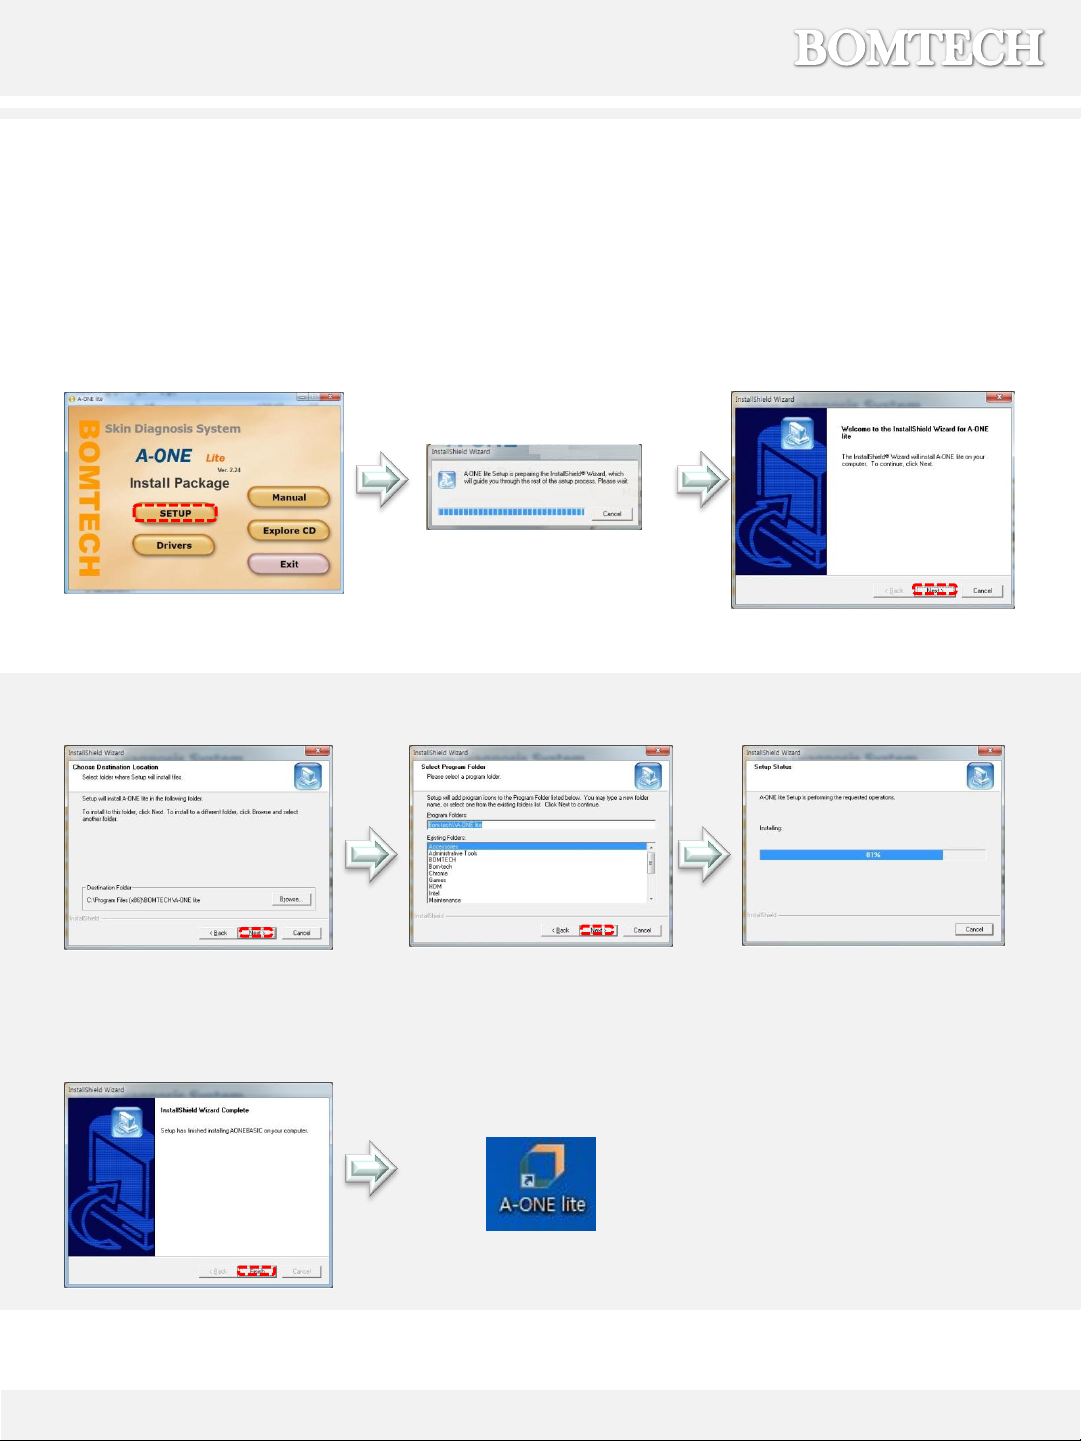
4. Program installation
7
Click ‘Setup’ Setup Preparing Click ‘Next’
Click ‘Next’ Click ‘Next’ (Processing)
Click ‘Finish’ A-ONE Lite icon is
generated in desktop.
▶Software
5. Instructions (How to use)
8
▶Precautions
Please be sure to read the instructions before use and follow as described.
1. Do not use it with other electronic devices.
It may cause malfunction.
2. Do not keep it in the humid place.
It may cause malfunction.
3. Do not use it on the power more than AC 100~120 or 200~240V.
It may cause fires, electric shocks or malfunction.
4. Do not put the device nearby water.
It may cause fires, electric shocks or malfunction as water flows into it.
If water flows, stop using it immediately and make sure to inspect it.
5. Do not use it near the place with high temperature, dust or humidity.
It may cause electric shock (sparks) and malfunction.
6. Do not repair, disassemble or alter the device.
It may cause malfunction, fires or burns.
7. Do not touch the device or detach the power cords with wet hands.
It may cause electric shock.
8. Do not strip or bend the cord by force.
It may cause fires or electric shocks.
(Be sure to replace a defective one with a new one.)
9. Do not run the scanner or sensor into a hard object, or drop it.
It may cause injuries and malfunction.
10. When not in use for a long time, unplug it from the outlet.

5. Instructions (How to use)
▶Start Page(Main Page)
①②
④
③
⑤
①Diagnosis : Diagnosis or bring the saved data from PC
②Configuration : Go to configuration page for setting
③Product Update : Update new products or manage saved products
④Minimize or close the software.
⑤To check out the software Version
5. Instructions (How to use)
10
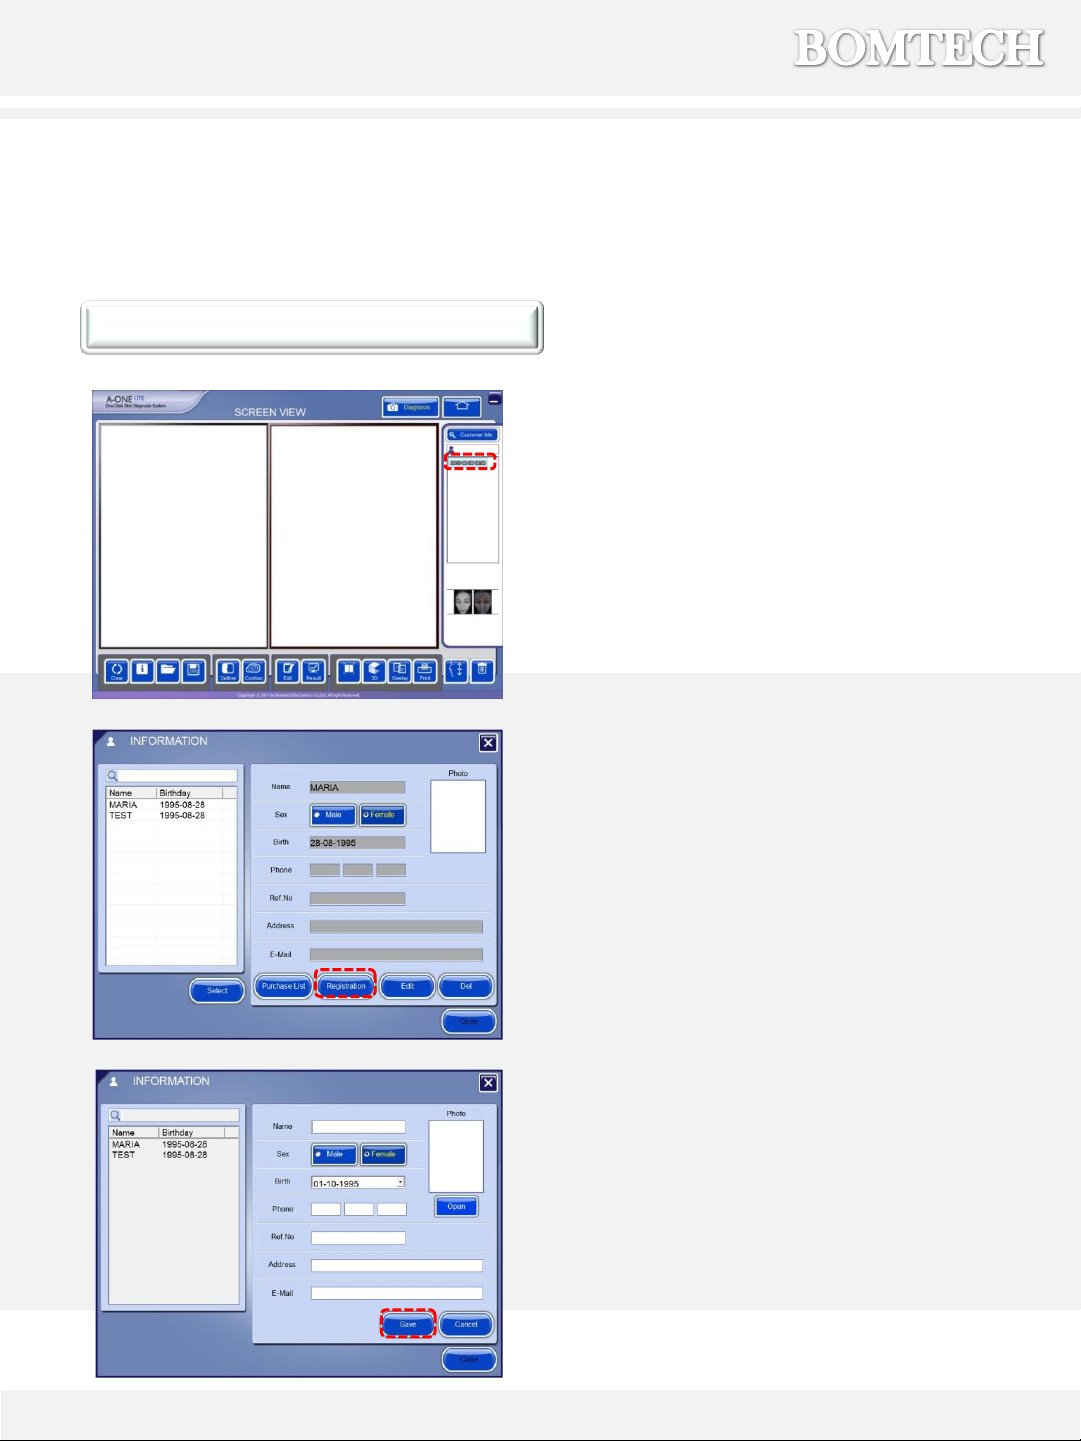
▶Customer Information
Customer Registration
* If you register a new customer, page
will move to camera screen right after
you click the ‘save’ button.
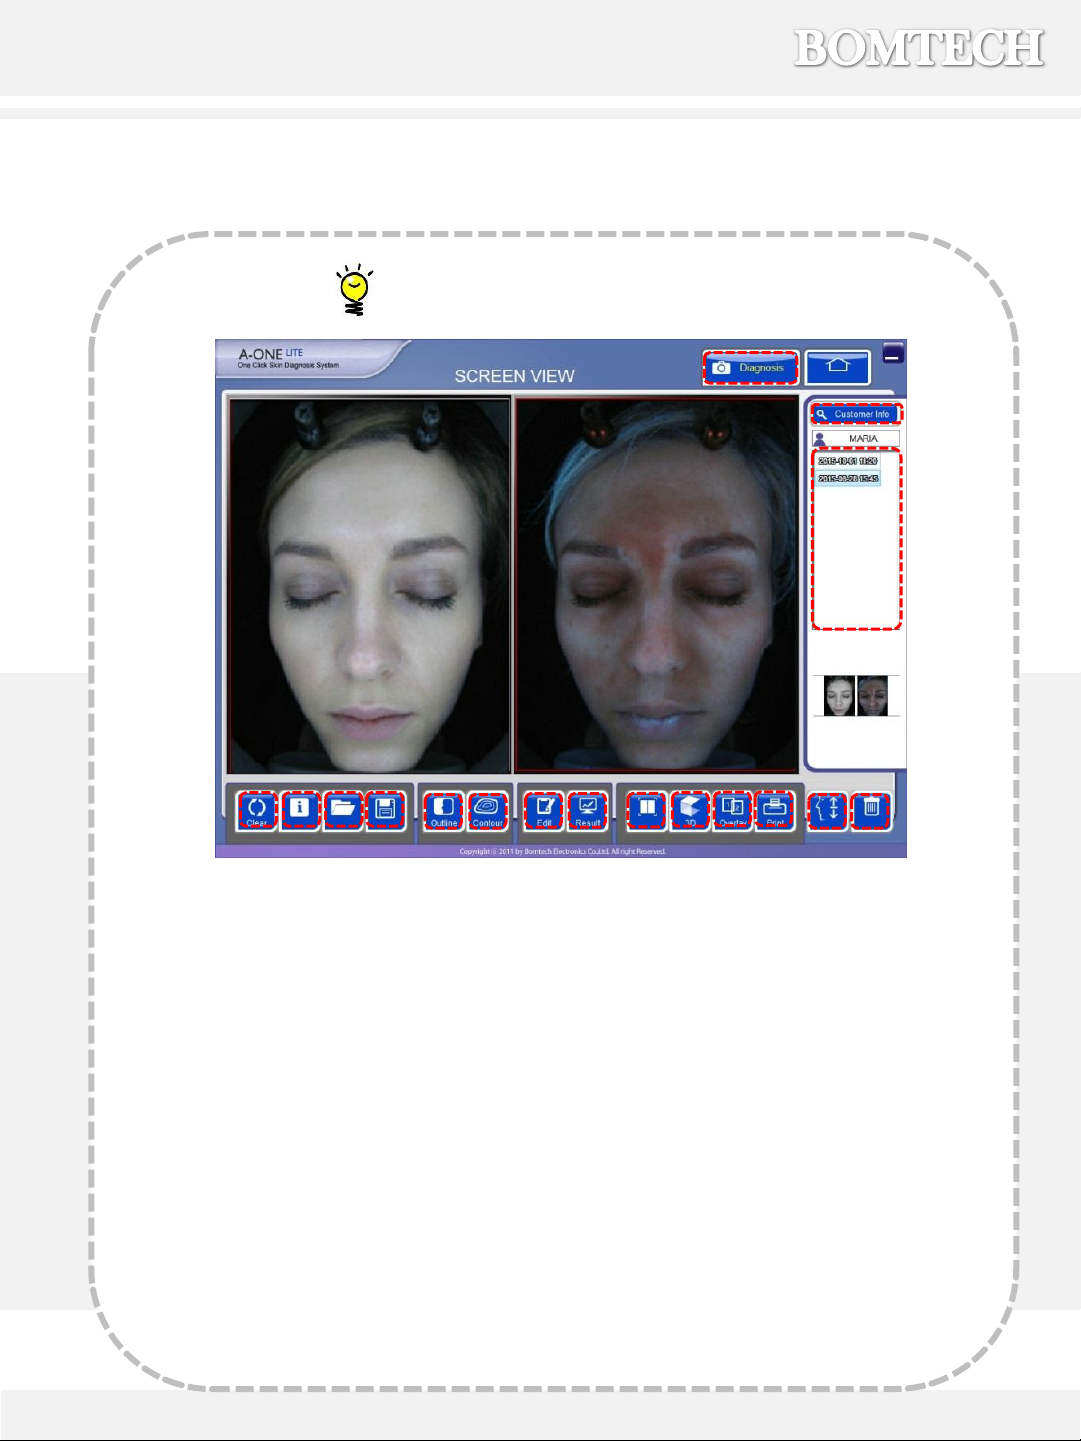
1) Click ‘Diagnosis’ from the start page.
2) Click ‘Customer Info’ button.
3) Click ‘Registration’ to register a new
customer.
4) Enter the customer’s name, gender,
birth date, and other information. And
then click the ‘save’ button.
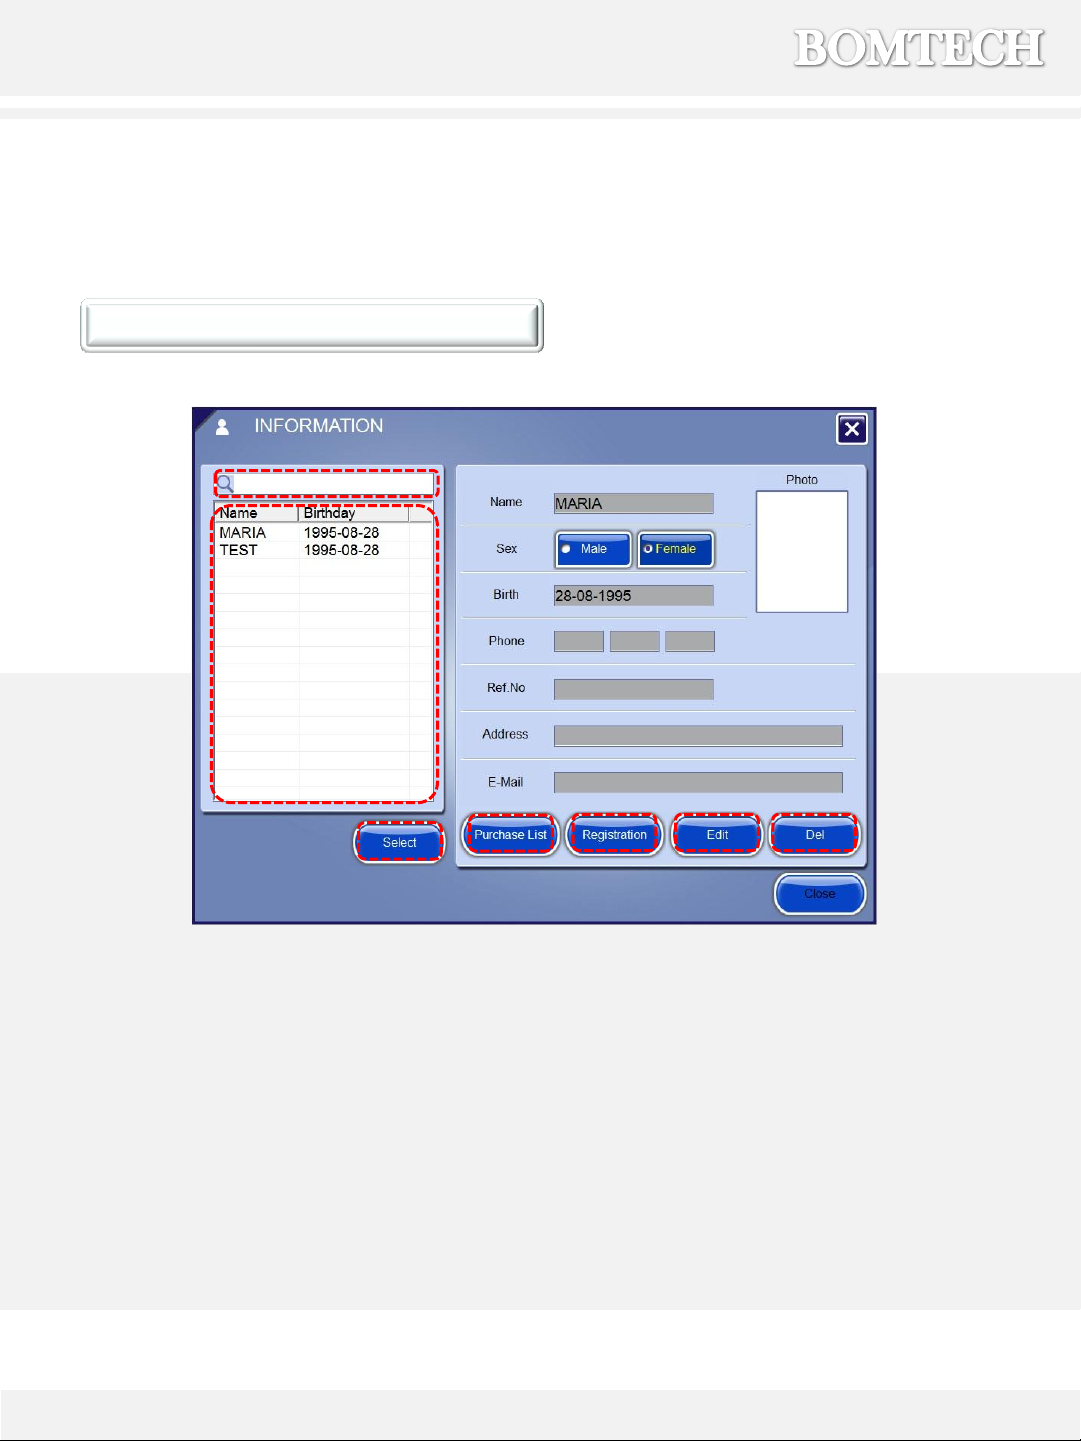
①Search : To search a registered customer, enter a customer’s name or phone number.
②Select : Choose a customer on the list(⑦) and click it to move on to screen view page.
③Purchase List : Click a customer and click it to check the customer’s purchase list.
④Registration : Click to register the customer’s information.
⑤Edit : Click to edit the customer’s information.
⑥Del : Click to delete the customer’s information. (*Deleted data cannot be restored. )
⑦Customer List : If you double-click a customer, the page will move on to the screen view page.
11
▶Customer Information
How to use buttons
5. Instructions (How to use)
①
②④③⑤⑥
⑦
** Check the flash count .
1) Take photos.
•First diagnosis : If you register a new
customer, click ‘save’ button. The page will
automatically move on to the camera
screen.
•Re-diagnosis : Click a customer
and click ‘Diagnosis’ button.
2) Place the customer’s face inside the
scanner as shown on the left photo.
3) Place the customer’s face properly and
click ‘Shot’. Stay still until two photos are
taken in normal light and UV light.
4) Click ‘Diagnosis’ button to move on to the
diagnosis page.
12
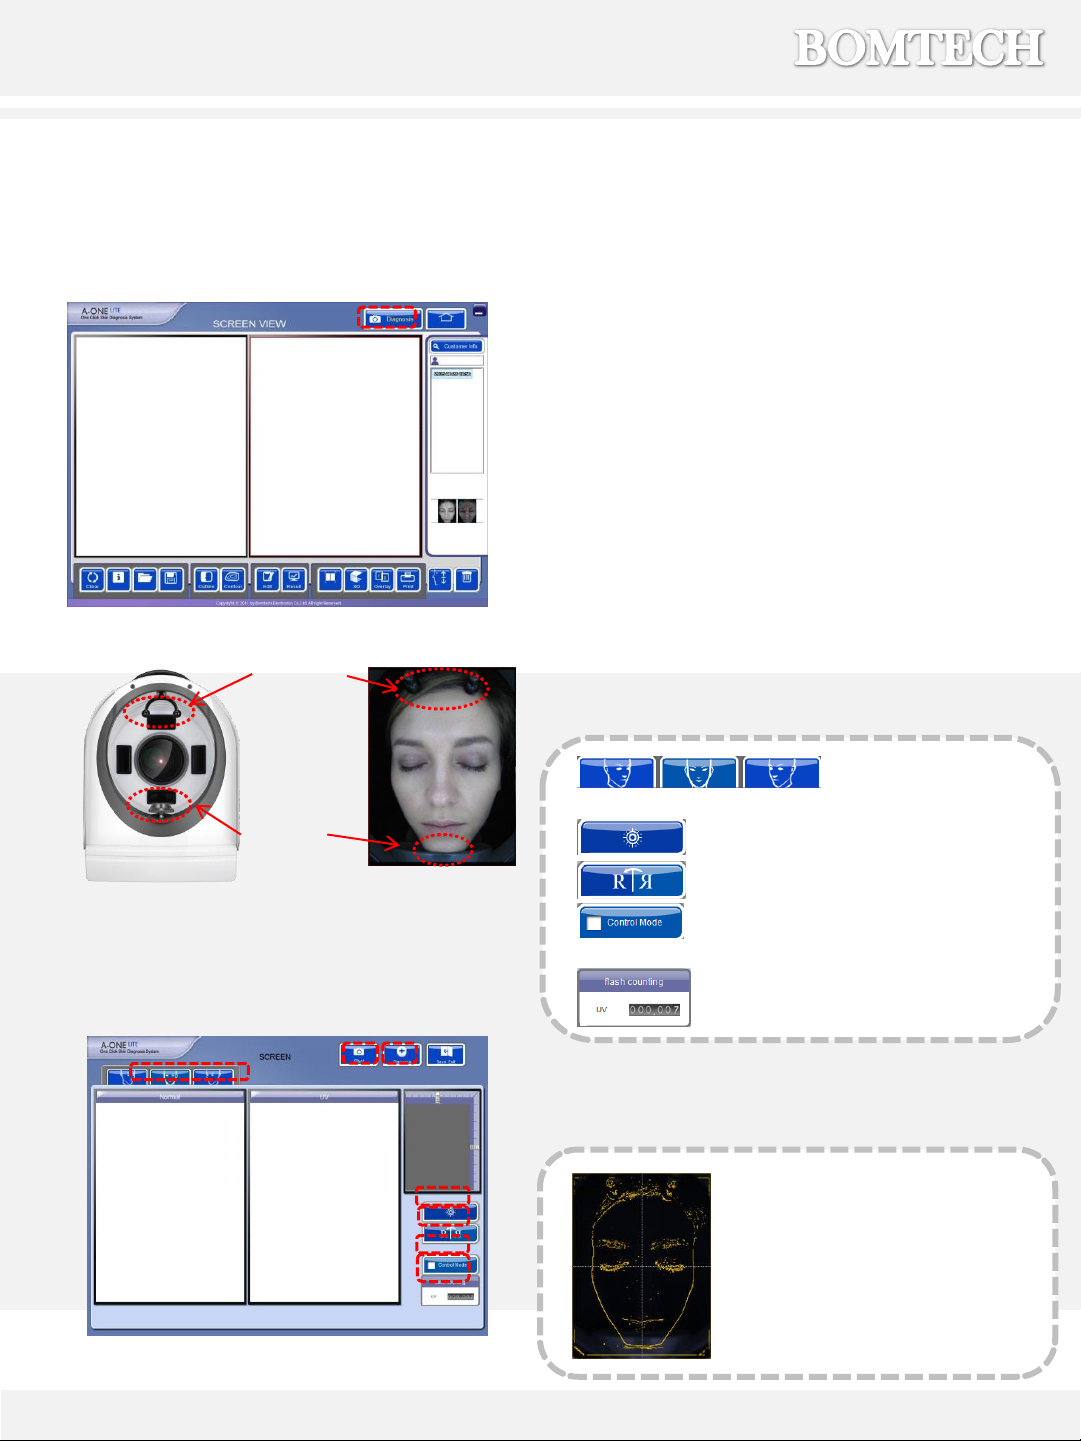
5. Instructions (How to use)
▶Diagnosis
Headrest
Chinrest
** Adjust the position
by turning the chinrest.
**For re-diagnosis, a yellow
guide-line appears. Please make
sure to adjust the face to the
line for accurate diagnosis and
comparison.
** Turn on / off LED light.
** See a photo in reverse.
* To take picture of front/left/right side face.
** Control mode is to prevent the
result from being worse than the previous results.
①
②
④③
**
**
**
**
**

④If you click ‘Pigment’, pigment condition appears as
brown dots.
②If you click ‘Wrinkles’, you can measure wrinkles.
1) Drag red box on the face to select an area to
measure.
2) Click the wrinkle. Its value appears on the right
side.
3) Click ‘OK’ button to keep the value you
measured .
4) Click ‘CANCEL’ button to keep automatically
measured value.
If you click ‘Diagnosis’ button on camera screen, this page will appear.
In this page, you can check in-depth diagnosis on pore, wrinkle, pigment, and sebum.
13
5. Instructions (How to use)
▶Diagnosis
①If you click ‘Pore’, pores appear as black dots.
①
②
④
③
③If you click ‘Sebum’, UV picture pops-up.
Check sebum conditions as color.
- Red : Suppurative sebum
- White : Daily sebum
- Blue : Dust
①
②
③
④

Result 1
①Age of skin.
②Intensive skin care graph.
: In graph, the further the dots are located from
the center, the better the result is.
③Descriptions of diagnosis.
④Move to another result pages.
⑤Comment : User can input any description
or recommended treatment for the client.
14
6. Results
▶Result 1-3
①②
④
③
⑤
Result 2
Compare customer’s skin diagnosis results with
customer’s age group.
Result 3
①Compare customer’s skin condition with
standard (ideal) skin.
②Real 3D image of the client’s skin.
③Show recent 10 results of diagnosis items in
graph.
④According to the sensor test, one of the
balls in the box turns into blue. (Check skin
tone and flushed red)
①
②④
③
- A Group: look in bright with redness on the skin
- B Group: look pale. Skin tone is bright but no redness on the face.
- C Group: A little dark tone from regular skin tone but has redness.
- D Group: A little dark tone and no redness.

1) Click ‘Products’ on the result page.
2) If you click each ‘skin type’, updated products
are shown in recommendation products.
(** If you want to edit product, see p. 25)
3) Click the product in recommendation
products and click arrow button.
4) If you want to change quantity of product,
click the product in the cart.
5) Edit the quantity of product and click ‘APPLY’
button.
6) Mark the product on cart and click ‘Purchase’
button. (If you want to buy all products on
cart, mark on top.)
7) Confirm the product, quantity, unit price and
total amount and then click ‘PURCHASE’
button.
8) Click ‘Yes’ to complete purchase. 15
6. Results
▶Product Recommendation
: In Product Recommendation page, you can recommend the suitable product to your
customer’s skin type which is marked in orange.
Product Recommendation
②③④
⑤
③
⑥
⑥
⑦
⑧

①Click ‘Edit’ to edit purchase date, unit cost
and quantity.
②Click ‘Delete’ to delete purchase list.
16
6. Results
▶Purchase List
Purchase List
Purchase List in Recommendation Products Purchase List in Customer Information page
Click customer and click ‘Purchase List’.
Purchase list will pop up.
Purchase from Customer Information page
Click ‘Purchase’ button.
Then you can purchase products from the
product list.
②
①
17
7. Extra Functions
Extra Function Icon
①
⑦⑧
②
③
④⑨⑩⑪
⑥⑫⑬⑭
⑤⑮⑯⑰
①Go to diagnosis.
②Go to customer information page.
③List of all the records.
④Initialize screen view page.
⑤Show / hide diagnosis information
on the picture.
⑥Open Image : Open an image file.
⑦Save Image : Save the selected
picture.
⑧Outline : Show the outline of the
face.
⑨Contour : Show high and low areas
of the face in contour.
⑩Edit : Go to camera screen to edit
picture and sensor test result .
⑪Result : Go to result page.
⑫Full Screen : Show the pictures in full
screen.
⑬3D Viewer : Show 3D image of the skin
surface.
⑭Overlay : Overlap two selected
pictures and compare them.
⑮Print : Print the selected picture.
⑯Simulation : Show the virtual change
of the skin condition.
⑰Delete selected date’s pictures.

7. Extra Functions
18
Full Screen
Show the pictures in full screen.
①Color pencil : Mark on the pictures by
drawing lines with color pencil.
②Eraser : Erase the marks by color
pencil on the picture.
③Enlarge/Reduce : Enlarge or reduce
the size of the picture
④100% : Show the picture in full size.
⑤CLOSE : Go back to screen view page.
Show 3D image of part of skin surface
with picture(select Normal picture or
UV picture in screen view page).
You can select the part you want to see
in 3D by dragging orange box on the
face.
①Enlarge or reduce the selected part.
(The size of orange box.)
②Click to move and turn around the
3D image. And also you can enlarge or
reduce the size of 3D image.
③Change 3D image into contoured 3D .
3D Viewer
①
②③
①
②③④
⑤
Full Screen 3D Viewer
7. Extra Functions
19
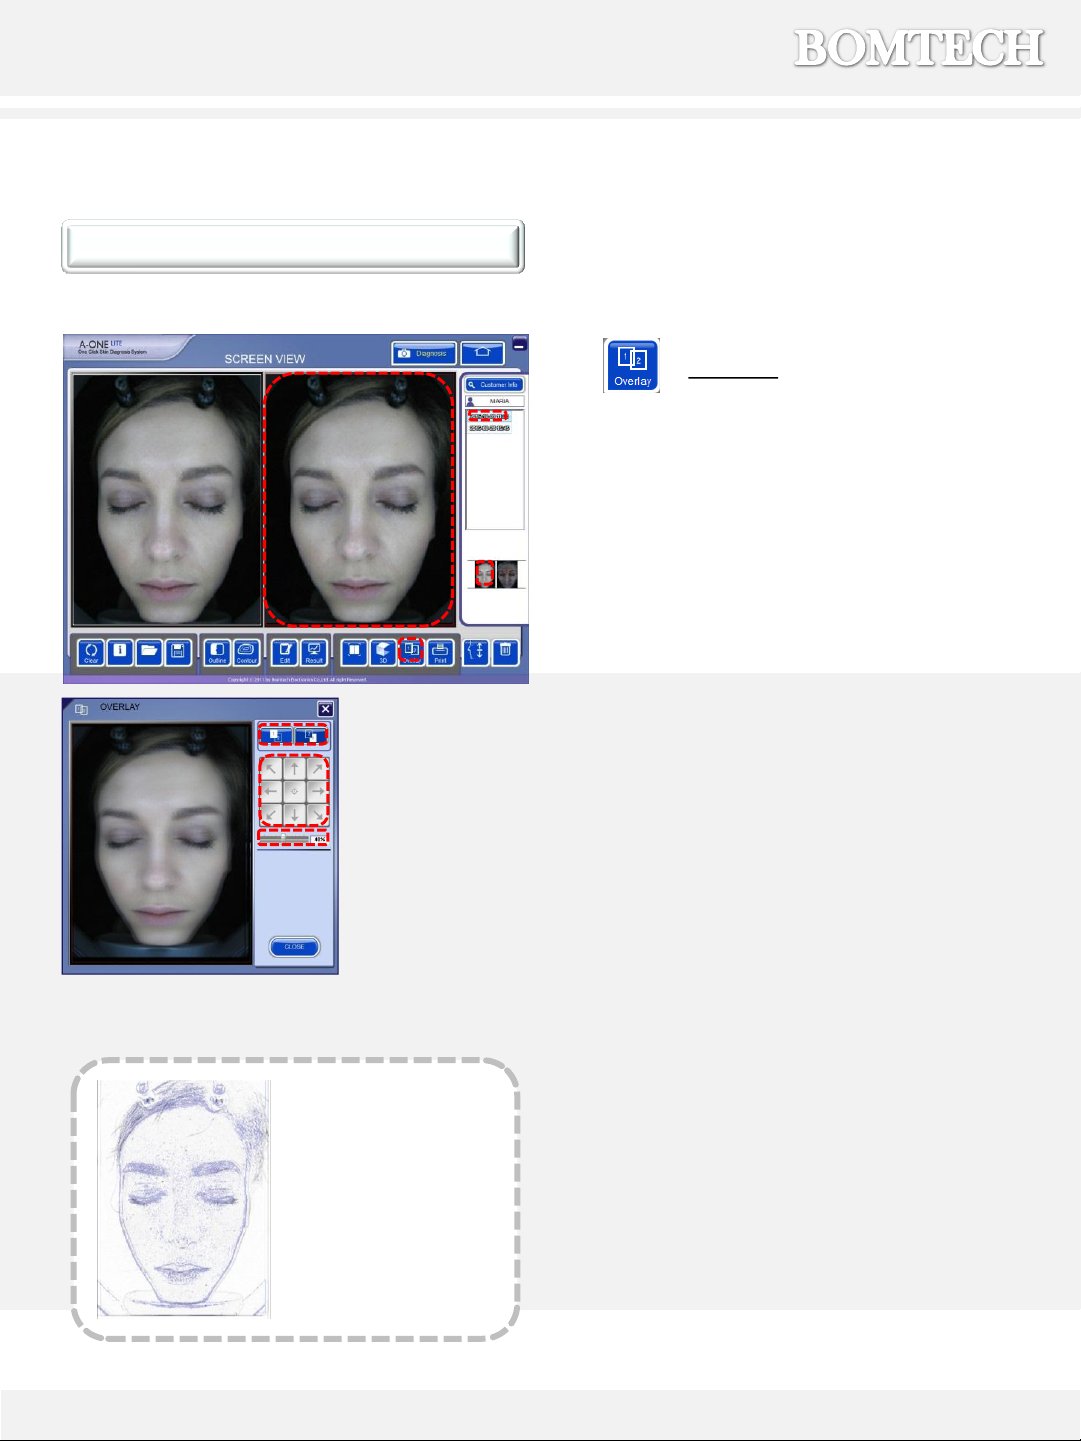
Overlay
Overlay function is for comparing the
two pictures from screen view page.
(Usually before and after procedure.)
Any type of picture can be compared.
(Normal, UV, Contour, or Outline)
It is good for comparing before and
after figure of surgery etc.
①Click frame to bring a picture in.
②Click the date to compare.
③Click the picture to compare.
④Click the overlay button.
⑤Choose which picture will be located
at the front and moved.
⑥Move the front picture.
⑦Adjust the degree of transparency of
the front picture.
①
⑦
②
③
④
⑥
⑤
* Outline function is
good for showing the
change in contours of
the faces.
Overlay
⑥Show the pigmentation on the face.
⑦Two pictures on the right side are not
linked. Only activated picture (red box)
on right side is shown on left side.
⑧Two pictures on the right side are linked,
so both pictures are shown on the left
side by adjusting the degree of
transparency.
⑨It shows an activated picture in full
screen.
⑩When not linked, the same picture is
shown as two in full screen. When linked,
two pictures are shown in full screen.
7. Extra Functions
20
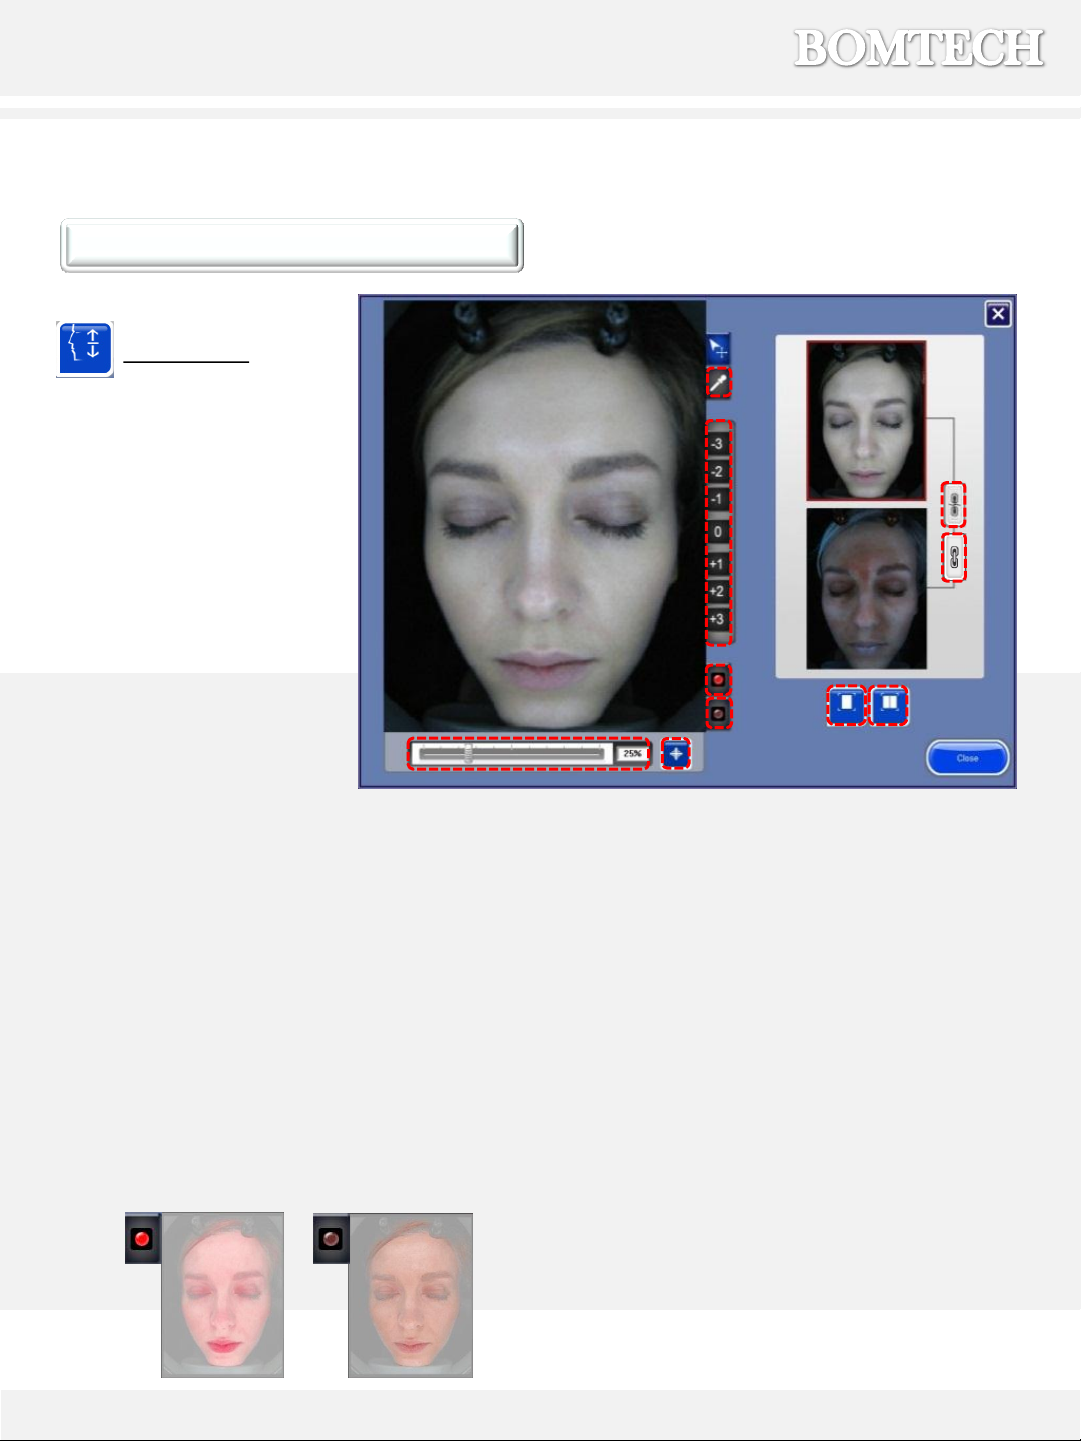
Simulation
Virtual simulation of the
selected picture from screen
view page.
Virtual simulation shows
results after surgery or
procedure.
①
⑦
②
④
⑥
⑤
①Adjust the degree of transparency of the
picture on the left side.
②Move the picture back to the original location.
③Virtually remove blemishes on face by blurring.
④Simulation View
▪-3, -2, -1 : show the skin condition without
treatment.
▪0 : show the current skin condition.
▪1, 2, 3 : show the skin condition with
treatment.
⑤Show the redness on the face.
Simulation
⑧
⑨
③
⑩
Table of contents
Other BOMTECH Diagnostic Equipment manuals


