Bort BSS-22DC-Multicyclone User manual

BSS-22DC-
Multicyclone
93411515
RU
FR
DE
GB
Akku-Staubsauger ......................8
Cordless handheld vacuum cleaner.....10
Aspirateur sans l ......................12
Пылесос ручной аккумуляторный. . . . . 15


3
220
W0,6 L HEPA 1,4
kg
22 V /
2,2 Ah
21
kPa
Dust Cup Set
Dust Cup
Release Button
Plastic Centering
Filter System
Dust Cup
Dust Cup Bottom
Dust Cup Cover
Dust Cup Cover
for Air Exhaust
13
12
11
10
1
2
3
45
6
7
8
9
1
2

4
1 Push here
2 Move
3
4
7 8
5 6

5
2 Move
1 Push here
Move
9 10
11
12 13
A

6
14 15


8
DEUTSCHDE
Akku-Staubsauger
Bestimmungsgemäßer Gebrauch
Dieser Staubsauger ist nur für den Gebrauch im Haushalt
und nicht für gewerbliche Zwecke bestimmt. Den Staub-
sauger ausschließlich gemäß den Angaben in dieser Ge-
brauchsanweisung verwenden.
Dieses Werkzeug ist für Sammeln von trockenem Staub
ausgelegt.
Der Hersteller haftet nicht für eventuelle Schäden, die
durch nicht bestimmungsgemäßen Gebrauch oder fal-
sche Bedienung verursacht werden.
Deshalb beachten Sie bitte unbedingt die nachfolgenden
Hinweise!
Lieferumfang:
• Düse;
• Turbobürste;
• Aluminium Verlängerungsrohr.
Anwendungsdauer:
Die Anwendungsdauer beträgt 5 Jahre.
Herstellungsdatum:
Angegeben auf der Produktverpackung.
Aufbewahrungsdauer:
Bei Einhaltung der Lagerbedingungen ist die Gebrauchs-
dauer unbefristet.
Lagerbedingungen:
Das Gerät wird in trockenen, belüfteten Lagerräumen bei
Temperaturen von 0 °C bis +40 °C und einer relativen Luft-
feuchtigkeit von nicht mehr als 80 % gelagert.
Transportierung:
Abstürze und beliebige mechanische Einwirkungen auf
die Verpackung sind grundsätzlich nicht erlaubt.
Beim Laden / Entladen dürfen keine Geräte, die nach
dem Prinzip der Packungsspannung arbeiten, verwendet
werden.
BESCHREIBUNG DES PRODUKTS Abb.2)
VORSICHT: Um die Gefahr von Feuer, Stromschlag
oder Verletzungen zu verringern.
1. Verwenden Sie das Gerät im Freien oder auf nassen
Oberflächen nicht;
2. Das Gerät muss als Spielzeug nicht verwendet wer-
den. Wenn der Staubsauger von oder in der Nähe von
Kindern verwendet wird, ist besondere Aufmerksam-
keit erforderlich;
3. Benutzen Sie den Staubsauger nur so wie in diesem
Handbuch beschrieben. Verwenden Sie nur die vom
Hersteller empfohlenen Zubehörprodukte;
4. Verwenden Sie das Gerät nicht, wenn es beschädigt,
ins Wasser oder Feuer gefallen ist. Schicken Sie es an ein
autorisiertes Servicezentrum zurück;
5. Behandeln Sie Stecker oder Gerät nicht mit nassen
Händen;
6. Stellen Sie keine Gegenstände in Öffnungen. Ver-
wenden Sie den Staubsauger mit blockierter Öffnung
nicht. Halten Sie ihn frei von Staub, Flusen, Haaren und
allem, was den Luftstrom beeinträchtigen kann;
7. Halten Sie Haare, lose Kleidung, Finger und alle Kör-
perteile von Öffnungen und beweglichen Teilen fern.
8. Räumen Sie keine brennenden oder rauchenden Ge-
genstände wie Zigaretten, Streichhölzer oder Asche ab.
9. Seien Sie bei der Reinigung der Treppen besonders
8. Öffnung des Oberteils
des Staubbehälters;
9. Taste der Freigabe des
Staubbehälters;
10. Verbindungsstück;
11. Multibürste;
12. Ladegerät;
13. HEPA-Filter
1. Bürste;
2. Aluminiumrohr;
3. Knopf der
Rohrabtrennung;
4. Anzeigelampe;
5. Knopf der
Gehäusetrennung;
6. Einschalter;
7. Staubbehälter;
TECHNISCHE DATEN (bild. 1)
Leistungsaufnahme 220 W
Saugleistung 80 W
Unterdruck 21 kPa
Fassungsraum des
Staubbehälters 0,6 L
Filtertyp HEPA-Filter
Akkuspannung 22 V
Geschwindigkeitseinstellung +
Akkutyp Lithium-Ionen-
Batterie
Gewicht des Produktes 1,4 kilo
Stromkapazität des Akkus 2,2 Ah
Arbeitsdauer mit einer einzigen
Ladung 0,5 St.

9
vorsichtig.
10. Nicht zum Aufnehmen brennbarer Flüssigkeiten
wie Benzin. Nicht zur Verwendung in Bereichen, in de-
nen die Brennflüssigkeiten vorhanden sein können.
11. Schauen Sie auf Ihren Staubsauger und befolgen
Sie alle Anweisungen auf der Etiketten.
12. Halten Sie das Ende des Schlauchs, Ansatzrohre
und anderer Öffnungen vom Gesicht und Körper fern.
13. Verwenden Sie den Staubsauger nicht ohne Staub-
becherfilter.
14. Ziehen Sie immer den Netzstecker aus der Steck-
dose, bevor Sie den Luftschlauch anschließen oder ab-
ziehen.
15. Lagern Sie das Vakuum in Innenräumen. Stellen Sie
das Vakuum nach Gebrauch weg, um Stolperunfälle zu
vermeiden.
16. Wenn Sie die falsche Batterie verwenden, werden
Motor und Benutzer beschädigt. Bitte verwenden Sie
die empfohlenen Batterien.
17. Nur auf trockenen Innenflächen verwenden.
18. Verwenden Sie das Gerät nicht für einen anderen
Zweck, als den in diesem Benutzerhandbuch beschrie-
benen.
19. Wenn das Speisekabel beschädigt ist, muss es vom
Hersteller, seinem Servicemitarbeiter oder ähnlich qua-
lifizierten Personen ausgetauscht werden, um die Ge-
fahr zu vermeiden.
VORSICHTSMASSNAHMEN
Wenn die Luftöffnung, die Bürste oder die Verlänge-
rungsrohre verstopft sind, soll der Staubsauger sofort
ausgeschaltet werden. Entfernen Sie zuerst die ver-
stopfte Substanz, bevor Sie versuchen, den Staubsau-
ger wieder zu starten.
1. Betreiben Sie den Staubsauger nicht zu nahe an den
Heizkörper und Flammenquelle wie Zigarettenkippen
usw;
2. Bevor Sie den Staubsauger verwenden, entfernen Sie
bitte alle große oder scharfe Gegenstände vom Boden,
um zu verhindern, dass der Filter beschädigt wird. Ver-
wenden Sie den Staubsauger nicht zum Reinigen von
leicht brennbaren Gegenständen wie Gas und Zigaret-
ten.
MONTAGE DES ZUBEHÖRS AN DEN STAUB-
SAUGER
1. Installierung des Bodenbürstenkopfs (Abb. 5).
Wenn Sie auf das Zubehör zugreifen müssen, verwen-
den Sie bitte das Verbindungsstück.
2. Installierung des Verlängerungsrohrs (Abb. 6).
Das Aluminiumrohr kann als eine Verlängerung ver-
wendet werden. Nach dem hörbaren Klickgeräusch bei
der Installation ist das Aluminiumrohr an seiner Stelle.
Stecken sie die andere Seite des Rohres in die Bürste
und der Staubsauger ist zur Arbeit bereit.
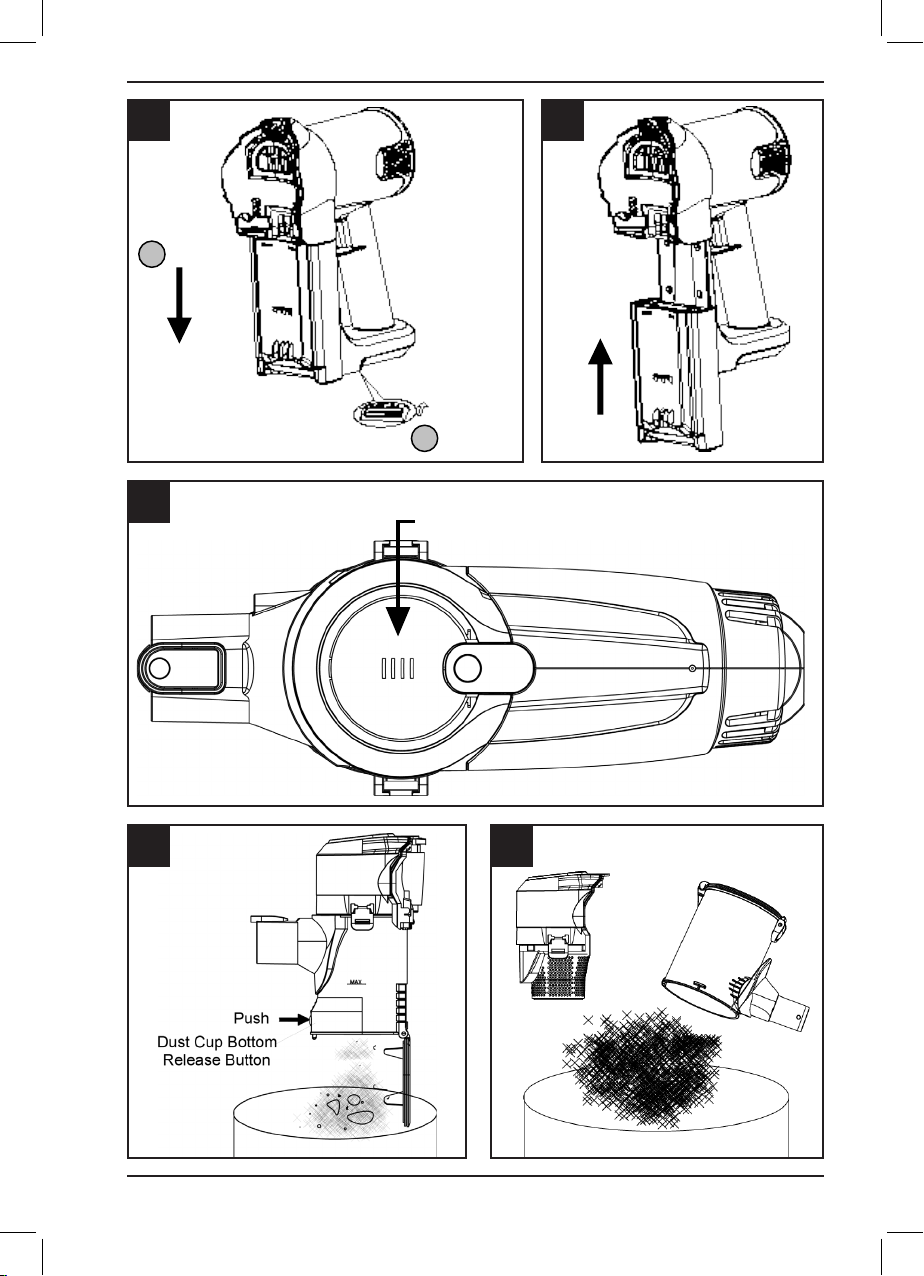
3. Staubbehälter ein- und ausbauen.
Entfernen Sie den Staubbehälter vom Gehäuse: drü-
cken Sie den Entriegelungsknopf und nehmen Sie dann
den Staubbecher aus dem Gehäuse (Abb. 7)
Um den Staubbehälter zu installieren, stellen Sie zuerst
die Unterseite des Staubbechers her, um ihn mit dem
Gehäuse zu verbinden. (Bitte achten Sie auf die Ein-
baulage und -richtung). Drücken Sie dann den Staub-
behälter, um ihn mit dem Gehäuse zu schließen. Der
Staubbecher wird nach dem Klickgeräusch verschlos-
sen (Abb. 8).
4. Installierung des Batterieblocks
• Um den Batterieblock zu entfernen, bewegen Sie den
Knopf im unteren Teil des Gehäuses und verschieben
Sie den Akkus vom Gehäuse nach unten (Abb. 9).
• Um den Batterieblock zu installieren, schieben Sie
ihn gemäß der Richtung entlang der Führung ein. Das
Klickgeräusch hinweist, dass der Batterieblock festge-
setzt ist (Abb. 10).
5. Anzeigelampe (Abb. 10).
• Bei der Arbeit werden die Lichtstriche im Bereich A
gelöscht, wenn die Elektrizitätsmenge abnimmt.
• Bei der voller Elektrizität sind alle Lichter in Zone A
hell.
REINIGUNG DES STAUBSAUGERS
1. Den Staubbehälter abnehmen und reinigen
• Kuppeln Sie den Staubbecher vom Körper ab.
• Drücken Sie den unteren Entriegelungsknopf des
Staubbechers. Der Staub fällt dann automatisch her-
unter. Normalerweise können Sie nur es tun, um den
Staub herunterfallen zu lassen (Abb. 12).
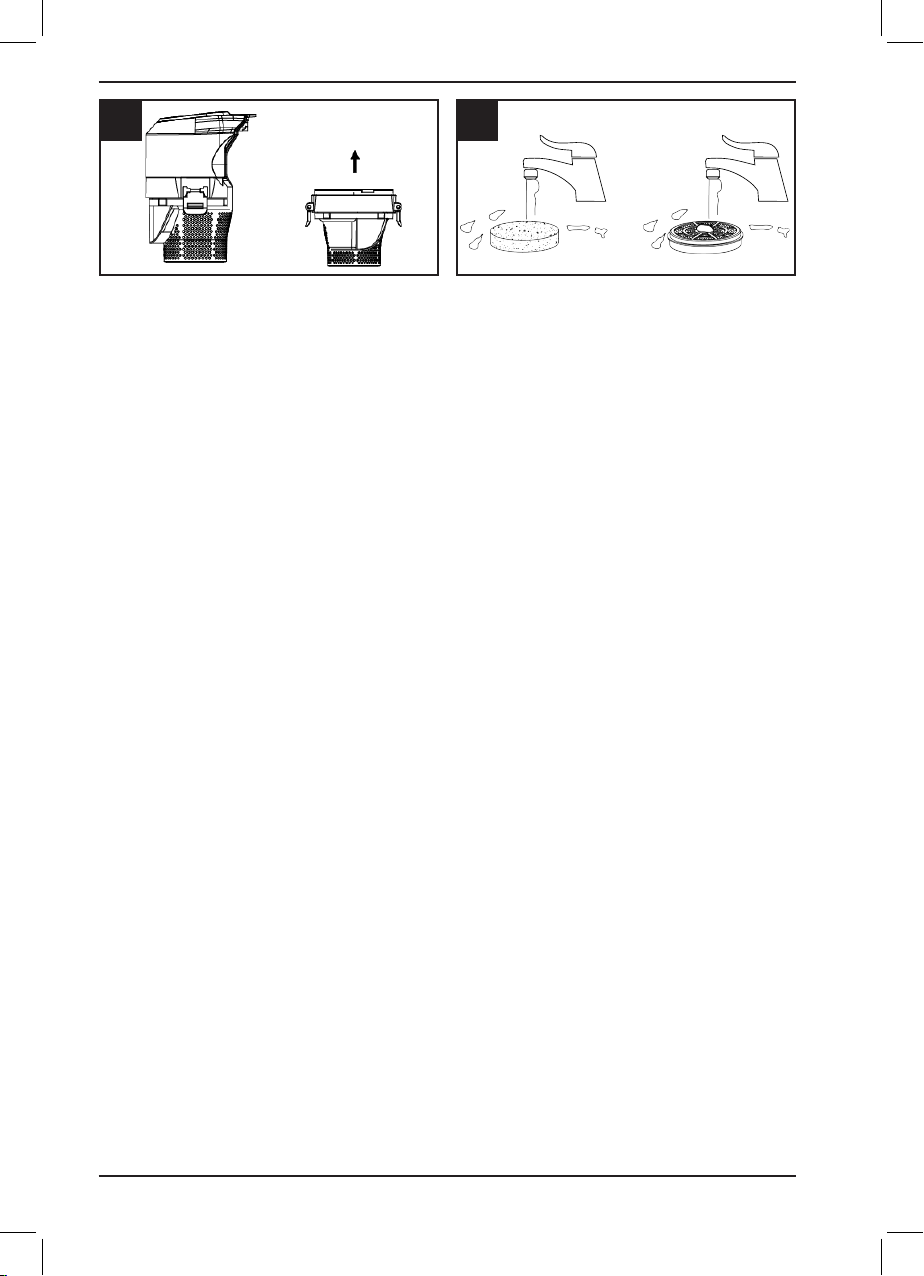
• Wenn das Kunststofffiltersystem zu verschmutzt ist,
drücken Sie den Entriegelungsknopf des Staubbehäl-
ters (für Luftauslass), nehmen Sie die Filterbaugruppe
aus dem Staubbehälter heraus und reinigen Sie sie mit
einer weichen Bürste oder waschen Sie sie mit Wasser.
Sie soll vollständig getrocknet werden, bevor erneut
verwendet werden (Abb. 13).
2. Wie Schwamm und HEPA-Filter wechseln oder reini-
gen
• Entfernen Sie den Staubbehälter vom Gehäuse.
• Drehen Sie den Deckel des Staubbehälters gegen den
Uhrzeigersinn von„Schließen“ zu„Öffnen“ und nehmen
Sie den Staubbecherdeckel heraus. Ziehen Sie den
Schwamm und den HEPA-Filtersatz heraus.
• Ziehen Sie den Knopf des Filterrahmens nach oben
und ziehen Sie den Schwammfilter und den HEPA-Filter
aus der Gehäusekiste. Reinigen Sie den Schwamm- und
HEPA-Filter mit einer weichen Bürste oder spülen Sie sie
in lauwarmem Wasser ab und trocknen Sie sie vollstän-
dig ab, bevor Sie ihn erneut verwenden. Alle Filter sind
waschbar. Wir empfehlen Ihnen, die Filter zu reinigen,
wenn die Saugkraft niedrig wird. (Abb. B.)
WICHTIG: Die oben genannten Filter sollten bei der
Arbeit an dem Staubsauger an den richtigen Stellen

10
ENGLISHGB
Cordless handheld
vacuum cleaner
Intended Use
This vacuum cleaner is intended for domestic use only,
not for commercial use.
Only use this vacuum cleaner in accordance with the in-
structions in this instruction manual.
The tool is intended for collecting dry dust.
The manufacturer will not accept any responsibility for
damage caused by improper use or incorrect operation.
Therefore, you must note the following points.
The complete set includes:
Nozzle;
Japanese air turbo rotating brush;
Aluminium tubes.
Product Life:
The service life of the product is 5 years.
Production date:
Is indicated on the packaging of the goods.
Shelf life:
Shelf life is not limited (subject to storage conditions).
angebracht werden.
WARTUNG UND REINIGUNG
Trennen Sie die Maschine vom Netz, wenn Sie am
Mechanismus Wartungsarbeiten ausführen müs-
sen.
• Die Maschinen von BORT GLOBAL LIMITED sind entwor-
fen, um während einer langen Zeit problemlos und mit
minimaler Wartung zu funktionieren. Sie Verlängern die
Lebensdauer, indem Sie die Maschine regelmäßig reini-
gen und fachgerecht behandeln.
• Reinigen Sie das Maschinengehäuse regelmäßig mit
einem weichen Tuch, vorzugsweise nach jedem Einsatz.
Halten Sie die Lüfterschlitze frei von Staub und Schmutz.
Entfernen Sie hartnäckigen Schmutz mit einem weichen
Tuch, angefeuchtet mit Seifen wasser. Verwenden Sie
keine Lösungsmittel wie Benzin, Alkohol, Ammonia,
usw. Derartige Stoe beschädigen die Kunststoteile.
• Die Maschine braucht keine zusätzliche Schmierung.
• Wenden Sie sich in Störungsfällen, z.B. durch Verschleiß
eines Teils, an Ihren örtlichen BORT GLOBAL LIMI-
TED-Vertragshändler.
ENTSORGUNG
Alt-Elektrogeräte sind Wertstoe, sie gehören da-
her nicht in den Hausmüll!
Wir möchten Sie daher bitten, uns mit Ihrem ak-
tiven Beitrag bei der Ressourcenschonung und
beim Umweltschutz zu unterstützen und dieses Gerät bei
den-falls vorhandeneingerichteten Rücknahmestellen ab-
zugeben.
Um Transportschäden zu verhinderen, wird die Maschine
in einer soliden Verpackung geliefert. Die Verpackung be-
steht weitgehend aus verwertbarem Material. Benutzen
Sie also die Möglichkeit zum Recyclen der Verpackung.
Bringen Sie bei Ersatz die alten Maschinen zu Ihren örtli-
chen BORT GLOBAL LIMITED-Vertagshändler. Er wird sich
um eine umweltfreundliche Verarbeitung ïhrer alten Ma-
schine bemühen.
TECHNICAL SPECIFICATIONS (g. 1)
Power consumption 220 W
Suction power 80 W
Vacuum 21 kPa
Container capacity 0,6 L
Flitration type HEPA filter
Battery tension 22 V
Speed adjustment +
Battery type Li-Ion
Product weight 1,4 kg
Capacity of the
charged battery 2,2 A.h
Battery
life 0,5 h

11
Storage conditions:
Products are stored in dry, ventilated warehouses at tem-
peratures from 0 ° C to +40 ° C with a relative humidity of
not more than 80%.
Transportation:
It is strongly perhebited dropping and any mechanical im-
pact on the pfckaging during transportation.
When unloading / loading, it is not allowed to use any
type of equipment that works on the principle of packing
clamping.
DESCRIPTION OF THE PRODUCT Fig.2
WARNING: To reduce the risk of re, electrical
shock, or injury.
1. Do not use outdoors or on wet surfaces;
2. Do not allow to be used as a toy. Close attention is nec-
essary when used by or near children;
3. Use only as described in this manual. Use only manu-
facturer’s recommended attachments;
4. Do not use vacuum if it has been dropped, damaged,
left outdoors, or dropped in water. Return it to an author-
ized service center;
5. Do not handle plug or appliance with wet hands;
6. Do not put any object into openings. Do not use with
any opening blocked; keep free of dust, lint, hair and any-
thing that may reduce air ow;
7. Keep hair, loose clothing, ngers, and all parts of body
away from openings and moving parts;
8. Do not pick up anything that is burning or smoking,
such as cigarettes, matches, or got ashes;
9. Use extra care when cleaning on stairs;
10. Do not use to pick up ammable or combustible liq-
uids such as gasoline or use in areas where they may be
present;
11. Look on your vacuum and follow all label and marking
instructions;
12. Keep end of hose, wands and other openings away
from your face and body;
13. Do not use the vacuum cleaner without dust cup lter
in place;
14. Always unplug this appliance before connecting or
disconnecting vacuum hose;
15. Store the vacuum indoors. Put the vacuum away after
us to prevent tripping accidents;
9. Dust tank bottom re-
lease button;
10. Transformation joint;
11. Multi crevice nozzle;
12. Charger;
13. Sponge, HEPA.
1. Brush;
2. Aluminum tube;
3. Tube release button;
4. Indicator light;
5. Body release button;
6. Power switch;
7. Dust cup;
8. Dust tank upper part
release button;
16. Use the incorrect battery will damage motor and us-
ers. Please use the recommended batteries;
17. Use only on dry, indoor surfaces;
18. Do not use for any purpose other than described in
this user’s guide;
19. If the supply cord is damaged, it must be replaced by
the manufacturer, its service agent or similarly qualied
persons in order to avoid a hazard.
PRECAUTIONARY MEASURES
If the opening that sucks in the air, the brush or exten-
sion tubes are blocked, you should switch o the vacuum
cleaner at once. First clear the blocked substance before
you attempt to start the vacuum cleaner again.
1. Do not operate the vacuum cleaner too close to heaters
and like radiators, cigarette butts etc. (Fig. 3);
2. Before you start using the vacuum cleaner,please
remove large or sharp objects from the oor in order to
prevent that the lter is damaged. Do not use the vacuum
to clean anything that is easy to burning, such as gas and
cigarettes (Fig. 4).
ASSEMBLING VACUUM CLEANER
1. Install the conversion connector (Fig. 5).
When you need to be used directly to access the body
accessories, please use the conversion joint connection.
2. Install extended aluminum tube (Fig. 6).
We can use aluminum tube longer a head of connection
machine (after heard cut when installation, the installa-
tion is successful), and then the other side of the connect
accessories in the pipe (right), so that it can be used as
vertical vacuum cleaner:
* Connection after shangdi brush can be directly used to
clean the oor or carpet.
* Connected to brush or at after absorption, can be used
to clean the ceiling, curtain is dicult to clean at ordinary
times, such as higher place, very convenient and practical.
3. Remove and install the dust cup.
Remove dust cup from body: push the release button of
dust cup. Then take out the dust cup from body (Fig. 7).
Install dust cup on body: rst make the underside of dust
cup to connect with the body. (pls pay attention to the
tting position and direction). Then push the dust cup to
close with the body. The dust cup will be locked after a
voice of“kata”(Fig. 8).
4. Installation and remove the battery pack.
• Remove the battery pack: to promote the body BaoSuo
button at the bottom of the battery, and then along the
direction of mobile battery pack, so that you can remove
the battery pack from the body (Fig. 9).
• Install the battery pack: according to the direction
along the guide into the battery pack, heard a loud
“crack” the sound of the dust cup lock (Fig. 10).
5. Indicator light (Fig.11).
• In the work, the light of area A will be extinguished as
the quantity of electricity decreases, and the green light
of zone B will be always bright.

12
• Full of electricity, the lights in zone A are all bright, and
the red light in area B is always bright.
CLEAN UP THE CHARGING CLEANER AND
CLEANER
1. How to drop dust and clean the dust cup:
• Remove the dust cup from body.
• Press the dust cup bottom release button, then the dust
will fall down automatically. Usually you may only do like
this to drop the dust (Fig. 12).
• If nd the plastic lter system too dirty, please press the
dust cup cover (for air exhaust) release button, take out
the lter assembly out of the dust cup, then you can clean
them with soft brush or wash them with water. You should
dry them completely before you use again (Fig. 13).
2. Change or cleaning the sponge and HEPA lter:
• Remove the dust cup from body.
• Rotate the dust cup cover anticlockwise from “close” to
“open”, take out the dust cup cover. Draw out the sponge
and HEPA lter set (Fig. 14).
• Pull up the knob of the lter frame, and pull out the
sponge lter and HEPA lter from the case box. Cleaning
the Sponge and HEPA lter by soft brush or rinse it in luke-
warm water and dry them completely before use again.
All the lters are washable (we recommend you to clean the
lters when feeling the suction power becoming weak.) (Fig.
15).
NOTE: The above lters should be equipped in correct
places when work the vacuum machine.
MAINTENANCE AND CLEANING
Make sure that the machine is not live when carry-
ing out maintenance work on the motor.
• Regularly clean the machine housing with a soft cloth,
preferably after each use. Keep the ventilation slots free
from dust and dirt.If the dirt does not come o use a soft
cloth moistened with soapy water. Never use solvents
such as petrol, alcohol, ammonia water, etc. These sol-
vents may damage the plastic parts.
• The machine requires no additional lubrication.
• Should a fault occur, e.g. after wear of a part, please con-
tact your local BORT GLOBAL LIMITED dealer.
DISPOSAL
Discarded electric appliances are recyclable and
should not be discarded in the domestic waste!
Please actively support us in conserving resources
and protecting the environment by returning this
appliance to the collection centres (if available).
In order to prevent the machine from damage during
transport, it is delivered in a sturdy packaging. Most of the
packaging materials can be recycled. Take these materials
to the appropriate recycling locations. Take your unwant-
ed machines to your local BORT GLOBAL LIMITED dealer.
Here they will be disposed of in an environmentally safe
way.
FRANÇAISFR
Aspirateur manuel sans l
Introduction
Cet aspirateur est destiné exclusivement à l’emploi do-
mestique et non pas à l’usage industriel.
Utilisez l’aspirateur exclusivement selon les indications
gurant dans cette notice d’utilisation.
Cet outil est destiné au collectage de la poussière sèche.
Le fabricant n’est pas responsable d’éventuels dommages
résultant d’un emploi non conforme ou d’un
maniement incorrect. Veuillez donc respecter impérative-
ment les consignes suivantes!
Composition:
• Suceur;
• Turbobrosse;
• Aluminium tubes.
Durée de fonctionnement:
La durée de vie du produit est de 5 ans.
Date de production:
Indiquée sur l’emballage du produit.
Temps de stockage:
Sous réserve de l’accomplissement des conditions de
stockage, la durée de conservation est illimitée.
SPECIFICATIONS TECHNIQUES (g. 1)
Demande de la puissance 220 W
Puissance d’aspiration 80 W
Pression négative 21 kPa
Capacité du bac à poussière 0,6 L
Type de filtration Filtre HEPA
Tension de la batterie
d’accumulateur 22 V
Réglage de la vitesse +
Type de la batterie
d’accumulateur Lithium-ion
Poids du produit 1,4 kg
Capacité de l’accumulateur 2,2 Ah
Autonomie en une seule charge 0,5 heure

13
Conditions de stockage:
L’appareil doit être stockés dans des entrepôts secs et
ventilés à la température de 0 ° C à +40 °C avec une
humidité relative ne dépassant pas 80 %.
Manutention:
Les chutes et les opérations mécaniques sur l’em-
ballage pendant le transport sont catégoriquement
inacceptables. Lors du déchargement / chargement, il
est interdit d’utiliser tout type de mécanisme fonction-
nant selon le principe du serrage des emballages.
DESCRIPTION DU PRODUIT Fig.2
1. Brosse à plancher;
2. Allonge en aluminium;
3. Bouton du déclenchement de l’allonge;
4. Indicateur de charge;
5. Bouton du déclenchement du boîtier;
6. Interrupteur;
7. Bac à poussière;
8. Bouton de déverrouillage de la partie supérieure du
réservoir à poussière;
9. Bouton du déclenchement du bac à poussière;
10. Pièce-raccord;
11. Multi brosse;
12. Chargeur;
13. Éponge, ltre HEPA
AVERTISSEMENT: pour réduire le risque
d’incendie, de décharge électrique ou de blessure.
1. N’utilisez pas à l’extérieur ou sur des surfaces
humides.
2. Ne laissez pas utiliser l’appareil comme jouet. Une
attention particulière est nécessaire lorsqu’il est utilisé
par ou à proximité d’enfants.
3. Utilisez uniquement comme décrit dans ce manuel.
Utilisez uniquement les accessoires recommandés par
le fabricant.
4. N’utilisez pas l’aspirateur s’il est tombé, abîmé,
endommagé par le feu ou trempé. Retournez-le à un
centre de service agréé.
5. Ne manipulez pas la fiche ou l’appareil avec les mains
mouillées.
6. Ne placez aucun objet dans les ouvreaux. N’utilisez
pas si l’ouvreau est bloqué; garder à l’abri de la
poussière, des peluches, des cheveux et rien, qui peut
réduire le flux d’air.
7. Gardez les cheveux, les vêtements amples, les doigts
et toutes les parties du corps à distance des ouvreaux et
des pièces mobiles.
8. Ne ramassez avec l’aspirateur rien qui brûle ou qui
fume, comme des cigarettes, des allumettes ou des
cendres.
9. Prenez des précautions supplémentaires lors du
nettoyage des escaliers.
10. L’aspirateur n’est pas à être utilisé pour ramasser
des liquides inflammables ou combustibles tels que
l’essence, ou être utilisé dans des zones où ils peuvent
être présents.
11. Examinez votre aspirateur et suivez toutes les
instructions sur l’étiquette et le marquage.
12. Tenez le bout du tuyau et les autres ouvreaux à
distance de votre visage et de votre corps.
14. Débranchez toujours l’appareil avant de connecter
ou de déconnecter le tuyau d’aspirateur.
15. Gardez l’aspirateur à l’intérieur. Rangez l’aspirateur
après utilisation pour éviter les accidents de l’appareil.
16. Veuillez utiliser les piles recommandées. Utilisation
de batterie non appropriée peut endommager le
moteur et l’utilisateur.
17. Utilisez l’aspirateur uniquement sur des surfaces
intérieures sèches.
18. N’utilisez pas à d’autres fins que celles décrites
dans ce guide de l’utilisateur.
19. Si le cordon d’alimentation est endommagé, il doit
être remplacé par le fabricant, son agent de service ou
des personnes de qualification similaire afin d’éviter
tout accident.
MESURES DE PRÉCAUTION
Si l’ouverture qui aspire l’air, la brosse ou les tubes
d’extension sont bloqués, il faut éteindre l’aspirateur
immédiatement. Retranchez d’abord la substance
bloquante le courant d’air avant d’essayer de
redémarrer l’aspirateur.
1. N’utilisez pas l’aspirateur à proximité des appareils
de chauffage, comme des radiateurs; des cheminées,
etc.
2. Avant de commencer à utiliser l’aspirateur, veuillez
retirer les objets gros ou pointus du sol afin d’éviter
l’endommagement du filtre. N’utilisez pas l’aspirateur
pour nettoyer les matières hautement inflammables,
comme le gaz, les liquides inflammables, le carbure et
bien d’autres.
ASSEMBLAGE DE L’ASPIRATEUR AVEC
ACCESSOIRES
1. Installation de la pièce-raccord (Fig. 5):
Si vous devez utiliser un accessoire, veuillez utiliser la
pièce-raccord.
2. Installation d’allonge en aluminium (Fig. 6):
On peut utiliser l’allonge en aluminium peut être utilisé
pour atteindre un endroit inaccessible. Après le clic
audible lors de l’installation, le tube en aluminium est
à sa place, insérez l’autre côté du tube dans la brosse et
l’aspirateur est prêt à fonctionner:
• La multi brosse peut être utilisée pour nettoyer les
sols ou les tapis.
• Avec l’allonge, il est pratique de nettoyer les zones et
les meubles difficiles d’accès.

14
3. Installer et retirer le bac à poussière.
Retirez le bac à poussière du boîtier: appuyez sur le
bouton de déverrouillage du bac à poussière. Ensuite
retirez-le ensuite du boîtier (Fig. 7).
Installez le bac à poussière sur le boîtier: connectez-
le au boîtier. (Veuillez faire attention à la position et
à la direction de montage). Poussez ensuite le bac
à poussière pour le fermer avec le corps. Le bac à
poussière sera verrouillé après un déclic (Fig. 8).
4. Installation et retrait de la batterie.
• Retrait de la batterie: décalez le bouton au bas de la
batterie, puis retirez-la batterie du boîtier (Fig. 9).
• Installation de la batterie: selon la direction le long du
guide dans la batterie, poussez-la jusque vous entendez
un son distinctif du verrou du bac à poussière (Fig. 10).
5. Indicateur de charge (Fig. 11).
• Pendant le travail, la lumière de la zone A se réduira
à mesure que le niveau de charge de la batterie
diminuera.
• Si la batterie est chargée d’électricité, les lumières de
la zone A sont toutes lumineuses.
NETTOYAGE DU BAC À POUSSIÈRE ET DU
FILTRE
1. Comment faire tomber la poussière et nettoyer le
bac à poussière:
• Retirez le bac à poussière du boîtier.
• Appuyez sur le bouton de déverrouillage
inférieur du bac à poussière, la poussière tombera
automatiquement. Habituellement, ça suffit pour faire
tomber la poussière (Fig. 12).
• Si le système de filtre en plastique est bouché,
appuyez sur le bouton de déverrouillage du couvercle
du bac à poussière (pour l’évacuation de l’air) et retirez
le filtre du bac à poussière. Maintenant vous pouvez
les nettoyer avec une brosse douce ou les laver à l’eau.
Il faut les sécher complètement avant de les réutiliser
(Fig. 13).
2. Changer ou nettoyer l’éponge et le filtre HEPA.
• Retirez le sac à poussière du corps.
• Faites pivoter le couvercle du bac à poussière dans
le sens antihoraire de «fermer» à «ouvert», retirez
le couvercle du bac à poussière. Retirez l’ensemble
d’éponge et filtre HEPA (Fig. 14).
• Tirez le bouton du cadre du filtre vers le haut et retirez
le filtre en éponge et le filtre HEPA du boîtier. Nettoyez
l’éponge et le filtre HEPA à l’aide d’une brosse douce
ou rincez-les à l’eau tiède et séchez-les complètement
avant de les réutiliser. Tous les filtres sont lavables. (il
est recommandé de nettoyer les filtres lorsqu’on sent
que l’aspiration devient faible)(Fig. 15).
REMARQUE: Les filtres doivent être installés aux
bons endroits.
NETTOYAGE ET ENTRETIEN
Assurez-vous que la machine n’est pas sous tension
si vous allez procéder à des travaux d’entretien dans
son système mécanique.
• Nettoyez régulièrement le carter au moyen d’un chion
doux, de préférence a Tissue de chaque utilisation. Veil-
lez à ce que les fentes d’aération soient indemnes de
poussière et de saletés.
• En présence de saleté tenace, employez un chion doux
humecté d’eau savonneuse. Proscrivez l’emploi de sol-
vants comme l’essence, l’alcool, l’ammoniaque etc. car
ces substances attaquent les pièces en plastique.
• Cette machine ne nécessite pas de graissage supplé-
mentaire.
• En cas de panne survenue par exemple à la suite de
l’usure d’une pièce, contactez votre distributeur BORT
GLOBAL LIMITED local.
ÉLIMINATION DES DÉCHETS
Tout appareil électrique usé est une matière recy-
clable et ne fait pas pas partie des ordures ména-
gères! Nous vous demandons de bien vouloir
nous soutenir en contribuant activement au mé-
nagement des ressources et à la protection de
l’environnement en déposant cet appareil dans sites de
collecte(si existants).
Pour éviter les dommages liés au transport, la machine est
livré dans un emballage robuste. L’emballage est autant
que possible constitué de matériau recyclable. Veuillez
par conséquent destiner cet emballage au recyclage.

15
RU
Данный пылесос предназначен для уборки бытовых
помещений, он не предназначен для промышленного
использования.
Используйте пылесос только согласно инструкции по
эксплуатации.
Данный инструмент предназначен для сбора сухой
пыли.
Изготовитель не несёт ответственности за
повреждения, полученные в результате использования
пылесоса не по назначению или неправильного
обращения с ним. Поэтому обязательно соблюдайте
указания, приведённые ниже!
:
• Насадка;
• Турбощётка;
• Трубка удлинительная алюминиевая.
:
Срок службы изделия составляет 5 лет.
:
Указана на упаковке товара.
:
Cрок хранения не ограничен (при соблюдении усло-
вий хранения).
:
Продукция хранится в сухих, проветриваемых
складских помещениях при температуре от 0°С до
+40 °С при относительной влажности не более 80%.
:
Категорически не допускается падение и любые ме-
ханические воздействия на упаковку при транспор-
тировке.
При разгрузке/погрузке не допускается использова-
ние любого вида техники, работающей по принципу
зажима упаковки.
ОПИСАНИЕ ИЗДЕЛИЯ (Рис. 2)
1. Турбощетка;
2. Трубка;
3. Защёлка трубки;
4. LED индикатор заряда;
5. Защелка корпуса;
6. Выключатель;
7. Контейнер для сбора пыли;
8. Защелка контейнера;
9. Крышка контейнера;
10. Адаптер;
11. Щелевая насадка 2в1;
12. Зараядное устройство;
13. HEPA фильтр
:
, :
1. Не используйте пылесос на открытом воздухе или на
мокрой поверхности;
2. Не позволяйте детям использовать пылесос в
качестве игрушки. Использование детьми возможно
под контролем родителей;
3. Используйте только рекомендованные
производителем аксессуары;
4. Не используйте пылесос, если он упал, поврежден,
оставлен на улице или упал в воду. Верните его в
авторизованный сервисный центр;
5. Не беритесь за вилку или прибор мокрыми руками;
6. Не используйте пылесос с заблокированным
отверстием трубки, не допускайте попадания пыли,
пуха, волос и всего, что может уменьшить поток
воздуха;
7. Следите, чтобы волосы, края одежды, пальцы
и другие части тела не попадали в отверстия или
подвижные детали пылесоса. Не направляйте шланг,
трубку и насадки пылесоса в глаза или уши и не берите
их в рот;
8. Не используйте пылесос для сбора, горящего или
тлеющего мусора, такого как сигареты, спички или
Изготовитель: BORT GLOBAL LIMITED, Room 1501, 15/F., SPA Centre,
53-55 Lockhart Road, WANCHAI HONG KONG
Тел/Факс +85 258 194 891
Уполномоченное изготовителем лицо: ООО «Дизайн-строй»
125222, г. Москва, Пенягинская ул., д. 18, т +7 (499) 700-10-34
ТЕХНИЧЕСКИЕ ХАРАКТЕРИСТИКИ (рис. 1)
Потребляемая мощность 220 Вт
Мощность всасывания 80 Вт
Разрежение 21 кПа
Вместимость пылесборника 0,6 л
Тип фильтрации HEPA-фильтр
Напряжение аккумуляторной
батареи 22 В
Регулировка скорости +
Тип аккумуляторной батареи Li-Ion
Вес изделия 1,4 кг
Емкость заряжаемого
аккумулятора 2,2 А.ч
Время работы
от аккумулятора 0,5 ч

16
горячий пепел;
9. Будьте крайне аккуратны при уборке лестниц;
10.Неиспользуйтедлясбора легковоспламеняющихся
или горючих жидкостей, таких как бензин, или
используйте в местах, где они могут присутствовать;
11. Следуйте всем инструкциям на этикетке и
маркировке;
12. Не используйте пылесос вблизи лица и тела;
13. Не используйте пылесос без установленного
пылезащитного фильтра;
14. Всегда отключайте прибор от сети перед
подключением или отключением шланга;
15. Храните пылесос в помещении, в специальном
месте;
16. Использование неправильной батареи приведет к
повреждению двигателя и пользователей. Пожалуйста,
используйте рекомендованные батареи;
17. Используйте пылесос только в помещении;
18. Используйте пылесос только по назначению;
19. Если шнур питания поврежден, он должен быть
заменен на оригинальный.
В случае засорений убедитесь, что пылесос отключен
от зарядного устройства. Устраните засорения перед
дальнейшим использованием.
1. Не используйте пылесос вблизи нагревателей;
2. Перед использованием уберите большие и
острые предметы с пола. Не используйте для сбора
легковоспламеняющихся или горючих веществ.
1. Установка турбощетки (Рис. 5).
Установите турбощетку. Она подходит для всех типов
полов.
2. Установка удлиненной алюминиевой трубки (Рис. 6).
Она может соединяться напрямую с пылесосом или с
трубкой «до щелчка».
3. Установка и снятие контейнера для сбора пыли.
Нажмите на защелку и отсоедините контейнер (Рис. 7).
Вначале зацепите контейнер снизу и присоедините его
«до щелчка» к пылесосу (Рис. 8).
4. Установка и снятие аккумулятора.
• Нажмите на кнопку и снимите аккумулятор (Рис. 9);
• Установите аккумулятор на пылесос (Рис. 10).
5. LED индикатор заряда (Рис. 11).
• При работе LED индикатор показывает количество
остаточного заряда;
• При полном заряде индикатор полностью горит.
1. Очистка контейнера:
• Отсоедините контейнер от пылесоса;
• Для очистки контейнера нажмите на защелку (Рис 12).
• Выбросьте мусор в мусорное ведро. Выньте фильтр
из пылесборника, почистите его мягкой щеткой или
промойте водой. Вы должны полностью высушить
фильтр перед повторным использованием (Рис. 13).
2. Замена или очистка HEPA фильтра:
• Отсоедините контейнер от пылесоса;
• Вращайте верхнюю часть против часовой стрелки,
до тех пор, пока стрелка не совпадет с меткой OPEN.
Отсоедините верхнюю часть и достаньте губчатый и
HEPA фильтры (Рис 14).
• Очистите фильтры мягкой щеткой или промойте
их в холодной воде. Рекомендуется делать это при
снижении силы всасывания. После промывки дайте
фильтру высохнуть в течение минимум 12 часов перед
повторной установкой (Рис 15).
3. Соберите в обратном порядке.
:
,
.
Перед техническим обслуживанием отключайте
инструмент от сети питания!
• Каждый раз по окончании работы рекомендуется
очищать корпус инструмента и вентиляционные
отверстия от грязи и пыли мягкой тканью или
салфеткой. Устойчивые загрязнения рекомендуется
устранять при помощи мягкой ткани, смоченной
в мыльной воде. Недопустимо использовать для
устранения загрязнений растворители: бензин,
спирт, аммиачные растворы и т.п. Применение
растворителей может привести к повреждению
корпуса инструмента.
• Инструмент не требует дополнительной смазки.
• В случае неисправностей обратитесь в Службу
сервиса BORT GLOBAL LIMITED.
Старые электроприборы подлежат вторичной
переработке и поэтому не могут быть
утилизированы с бытовыми отходами! Поэтому
мы хотели бы попросить Вас активно
поддержать нас в деле экономии ресурсов и
защиты окружающей среды и сдать этот прибор в
приемный пункт утилизации (если таковой имеется).
Изготовитель: BORT GLOBAL LIMITED, Room 1501, 15/F., SPA Centre,
53-55 Lockhart Road, WANCHAI HONG KONG
Тел/Факс +85 258 194 891
Уполномоченное изготовителем лицо: ООО «Дизайн-строй»
125222, г. Москва, Пенягинская ул., д. 18, т +7 (499) 700-10-34


18
EXPLODED VIEW
A
A-1
A
C
1
112111098765
2
1
43 13 14
1
2
2
2
3
4
5
6
7
8
9
3
3
4
4
5
5
6
6
7
19
20
17
16
15
14
13
12111098765432
25
24
23
22
21
1
1
2
3
4
5
6
7
8
9
10
11
12
13
14
15
16
17181920
21
22
23 24 25
A-1
18
7
8 9 10
111213141516171819202122232425
1.
2. 3.
4. 5. 6. 7.
B
B

19
SPARE PARTS LIST
A. Dust Cup Assembly
1 Dust Cup Cover Assembly
2 Air inlet HEPA
3 Filter the microber cloth
4 Dust cup line card
5 Ventilation cover
6 Dust cup lock
7 Ventilation cover sealing strip
8 Cyclone cylinders
9 Cyclone cover
10 Dust cup sealing ring
11 Cyclone cover ring
12 Dust cup contact piece
13 Dust cup
14 Dust cup bottom seal
15 Dust cup bottom sponge
A-1. Dust Cup Cover Assembly
1 Lens
2 Decorative sheet
3 LED PCB
4 Body lock
5 Body lock spring
16 Dust cup bottom
17 Dust cup lock spring
18 Dust cup bottom lock
19 The female pin protector
20 The female pin seat
21 The dust suction cup
22 Suction lock spring
23 Suction lock
24 Suction seal
25 Suction block
26 The female pin
27 The female pin spring
28 Screw
29 Power line (red)
30 Power line (black)
6 Dust cup cover air ue
7 Light guide plate rubber
8 Dust cup cover
9 Ornament

20
B. Body Assembly
1 Middle bae seal
2 Middle bae
3 Led male contact piece
4 Led punch block
5 Motor seal
6 Motor
7 Motor support
8 Body
9 HEPA seal
10 HEPA bottom
11 HEPA inner cap
12 HEPA outer cover
13 Switch button
14 Switch button spring
C. Accessories
1 Brush assembly
2 Aluminum tube assembly
3 Battery assembly
4 Crossover sub
15 Switch
16 Switch support
17 DC power jack
18 Body bottom plate
19 Battery lock spring
20 Battery lock
21 Battery guide plate
22 Battery male contact piece
23 Batt. male contact piece holder
24 Holder cover
25 Body contact piece
26 Nylon cable ties
27 EVA
28 Screw
5 Charger
6 Charger base
7 Multi crevice nozzle
This manual suits for next models
1
Table of contents
Other Bort Vacuum Cleaner manuals

Bort
Bort BSS-1630-Premium User manual

Bort
Bort BSS-1415-Aqua User manual

Bort
Bort BSS-1230 User manual

Bort
Bort BSS-2400N User manual

Bort
Bort BSS-18DC-Multicyclone User manual

Bort
Bort BSS-1530N-Pro User manual

Bort
Bort BSS-1325 User manual

Bort
Bort BSS-1530-Pro User manual

Bort
Bort BSS-Vision700W User manual

Bort
Bort BSS-1440-Pro User manual

Bort
Bort BSS-1500-C User manual

Bort
Bort 91272270 User manual

Bort
Bort 98291797 User manual

Bort
Bort BSS-1530 BLACK User manual

Bort
Bort BSS-1518-Pro User manual

Bort
Bort BSS-2260-Twin User manual

Bort
Bort BSS-1425-PowerPlus User manual

Bort
Bort BSS-1010HD User manual

Bort
Bort BSS-3500-St User manual

Bort
Bort 91272294 User manual