Bourgini 18.2149.00.00 User manual

Gebruiksaanwijzing NL
Instructions EN
Mode d’emploi FR
Gebrauchsanleitung DE
Instrucciones de uso ES
18.2149.00.00 Multi Function Health Fryer 11L

© THE BOURGINI COMPANY B.V. WWW.BOURGINI.COM
Fig. 1
Fig. 2

Fig. 3

Fig. 4

Gebruiksaanwijzing NL 6
Bourgini service en garantie NL 11
Instructions EN 12
Bourgini service and warranty EN 17
Mode d’emploi FR 18
Service après-vente et garantie Bourgini FR 23
Gebrauchsanleitung DE 24
Bourgini Kundenservice und Garantie DE 29
Instrucciones de uso ES 30
Servicio postventa y garantía de Bourgini ES 35

6
VEILIGHEIDSAANWIJZINGEN
Lees voor gebruik de
gebruiksaanwijzing
aandachtig door. Bewaar de
gebruiksaanwijzing.
Het apparaat kan worden
gebruikt, gereinigd en
onderhouden door kinderen
vanaf 8 jaar indien ze onder
toezicht staan van een
persoon die verantwoordelijk
is voor hun veiligheid.
Houd het apparaat en het
netsnoer buiten het bereik
van kinderen onder de 8 jaar.
Kinderen mogen niet met het
apparaat spelen. Houd altijd
toezicht op kinderen om te
voorkomen dat ze met het
apparaat spelen.
Het apparaat kan worden
gebruikt door personen
met een fysieke, zintuiglijke,
mentale of motorische
handicap en door personen
zonder de benodigde
ervaring en kennis indien ze
onder toezicht staan van een
persoon die verantwoordelijk
is voor hun veiligheid of
instructies krijgen over
hoe het apparaat op een
veilige manier te gebruiken
is en indien ze de gevaren
begrijpen die met het
gebruik samenhangen.
• Dit apparaat is uitsluitend bedoeld voor
huishoudelijk gebruik.
• Laat het apparaat niet onbeheerd achter tijdens
gebruik.
• Gebruik het apparaat en de toebehoren
uitsluitend voor de beoogde doeleinden.
Gebruik het apparaat en de toebehoren niet
voor andere doeleinden dan beschreven in de
handleiding.
• Gebruik het apparaat niet als een onderdeel,
toebehoren, netsnoer of stekker beschadigd
of defect is. Laat een beschadigd of
defect onderdeel, toebehoren, netsnoer of
stekker door de leverancier of een erkend
servicecentrum vervangen.
• Gebruik het apparaat niet in de buurt van
voorzieningen die water bevatten zoals
badkuipen, douches en wastafels.
• Dompel het apparaat niet onder in water of
andere vloeistoffen. Als dit toch gebeurt,
haal dan zo snel mogelijk de stekker uit het
stopcontact. Verwijder het apparaat nooit
uit water of andere vloeistoffen, voordat de
stekker uit het stopcontact gehaald is. Een
apparaat dat in water of andere vloeistoffen
terecht is gekomen kunt u niet meer gebruiken.
• Zorg dat er geen water in de aansluitpunten
van het netsnoer en het verlengsnoer kan
komen.
• Houd het netsnoer uit de buurt van
warmtebronnen, olie en scherpe randen.
• Controleer voor gebruik altijd of de
netspanning overeenkomt met de spanning op
het typeplaatje van het apparaat.
• Sluit voor extra bescherming het apparaat
aan op een groep die beveiligd is door
een aardlekschakelaar met een nominale
aanspreekstroom van maximaal 30 mA.
• Bedien het apparaat niet door middel van
een externe tijdschakelaar of een apart
afstandsbedìeningssysteem.
• Wikkel het netsnoer en een eventueel
verlengsnoer altijd volledig af. Zorg dat het
netsnoer en een eventueel verlengsnoer niet
over de rand van een werkblad hangen, dat
deze niet per ongeluk verstrengeld kunnen
raken en dat niemand er over kan struikelen.
• Trek niet aan netsnoer om de stekker uit het
stopcontact te halen.
• Haal de stekker uit het stopcontact als het
apparaat niet in gebruik is.
• Gebruik het apparaat niet buitenshuis. Plaats
het apparaat op een stabiel en vlak oppervlak.
• Houd het apparaat Uit de buurt van
warmtebronnen. Plaats het apparaat niet op
hete oppervlakken of in de buurt van open
vlammen.
NL

7
• Zorg dat uw handen droog zijn voordat u het
apparaat aanraakt.
• Haal de stekker uit het stopcontact
voordat u het apparaat gaat monteren of
demonteren en voordat u reinigings- en
onderhoudswerkzaamheden aan het apparaat
gaat uitvoeren.
• Motor apparaten: pas op voor scherpe en/
of bewegende delen. Houd uw handen tijdens
gebruik, reiniging en onderhoud uit de buurt van
de bewegende delen.
• Verwarmingsapparaten: wacht totdat het
apparaat is afgekoeld voordat u de behuizing en
de onderdelen van het apparaat aanraakt.
Wees extra voorzichtig tijdens reiniging en onderhoud.
INTRODUCTIE
Deze Health Fryer biedt een eenvoudige en
gezonde manier om je favoriete voedsel eenvoudig
klaar te maken. Door het gebruik van hete, snelle
luchtcirculatie en een aparte boven grill is het
mogelijk om veel verschillende soorten gerechten
te maken. Voor het bereiden van de meeste
ingrediënten is er geen olie nodig, dit omdat het
voedsel door hete lucht wordt verhit.
Deze Health Fryer is een combinatie van hete lucht
oven en airfryer met een roterende mand. Naar
keuze en afhankelijk van het te bereiden voedsel
kan één van beide functies gebruikt worden.
WERKING EN BEDIENING
Afbeelding onderdelen beschrijving (figuur 1 & 2)
1. Bedieningspaneel
2. Behuizing
3. Bakplaat
4. Klep
5. Luchtuitlaat openingen
6. Roosters
7. Spit
8. Afneembare handgreep
9. Frituurmand
BESCHRIJVING VAN DE ONDERDELEN
3. Bakplaat
De bakplaat is tevens een opvangbak voor kruimels
e.d.
4. Klep
De klep kan losgehaald worden en daardoor
gemakkelijk worden gereinigd.
Installatie (zie figuur 3): De as, die zich aan de
onderkant van de klep bevindt, kan in het gat in de
basis worden geklikt.
Demonteren (zie figuur 3): De klep heeft een
openingshoek van ongeveer 70 graden. Om de klep
los te maken, duwt u in de richting van de pijl, zoals
in afbeelding 3 is aangegeven. Vervolgens trekt u
aan de klep zodat deze loskomt van de behuizing.
6. Roosters
De roosters kunnen niet alleen gebruikt worden
voor het bereiden van voedsel, maar ook voor het
opwarmen van gerechten zoals pizza. Als u vlees
wilt bakken op het rooster, is het raadzaam om met
wat olie, op een stukje keukenpapier, het rooster in
te vetten.
7. Spit
Het spit kan gebruikt worden voor braadstukken en
voor het bereiden van een hele kip.
Forceer de schacht in de lengterichting door het
midden van het vlees. Schuif de vorken op de as
van beide uiteinden in het vlees en vergrendel
ze vervolgens met de stelschroeven. Er zitten
inkepingen op de as voor de stelschroeven. Breng
de schroeven dichter bij het midden brengen als dat
nodig is, maar nooit helemaal naar de uiteinden toe.
Opmerking: zorg ervoor dat het gebraad of de
kip niet te groot is zodat deze vrij in de oven kan
draaien. Het maximale toegestane gewicht van de
kip of het gebraad is 1,2 kg.
8. Afneembare handgreep
De afneembare handgreep kan gebruikt worden
om gegaarde braadstukken of een gehele kip te
verwijderen uit de Health Fryer, die bereid zijn
met behulp van de spit. Plaatst de afneembare
handgreep onder het spit en til hem op. Doe dit door
de linkerkant eerst los te maken en haal het voedsel
voorzichtig eruit.
9. Frituurmand
Het roterende frituurmandje is geschikt voor het
bereiden van frites, geroosterde noten en andere
snacks. Gebruik de afneembare handgreep om het
frituurmandje te positioneren.
Het plaatsen van het mandje:
Het mandje moet horizontaal in de Health Fryer
worden geplaatst.
1. Steek de as van de linkerkant van het
frituurmandje in het daarvoor bestemde gat
van de Health Fryer. Zorg ervoor dat de as op
zijn plaats zit, zodat deze na der hand kan gaan
draaien.
2. Plaats de rechteras, van het frituurmandje, op
de hanger in de Health Fryer.
Opmerking: voor een juiste bereiding van de frites
NL

8
kan het mandje maar voor ongeveer 75% gevuld
worden. Dit komt overeen met ca. 700 gram
ovendiepvriesfrites. Anders kan de frites niet
roteren in het frituurmandje.
LET OP!
• Dompel de behuizing, die elektrische
componenten en de verwarmingselementen
bevat, nooit onder in water en houdt deze niet
onder de kraan.
• Vermijd dat er vloeistof in het apparaat komt
om een elektrische schok of kortsluiting te
voorkomen.
• Bedek de luchtinlaat en de luchtuitlaat niet
wanneer het apparaat in werking is.
• Let op met het gebruik van teveel olie op de
bakplaat. Dit kan voor brandgevaar zorgen.
• Raak de binnenkant van het apparaat niet aan
terwijl het in werking is.
WAARSCHUWING
• Plaats het apparaat niet tegen de muur of tegen
andere apparaten. Laat tenminste 10 cm vrije
ruimte op de achterkant en zijkanten en 10 cm
ruimte boven het apparaat vrij.
• Tijdens het frituren met hete lucht komt hete
stoom vrij via de lucht-uitlaatopeningen. Houd
uw handen en gezicht op een veilige afstand van
de stoom en de lucht-uitlaatopeningen.
• Alle toegankelijke oppervlaken kunnen heet
worden tijdens het gebruik.
• Het apparaat heeft ongeveer 60 minuten nodig
om af te koelen voor veilig opbergen of reinigen.
VOOR HET EERSTE GEBRUIK
1. Verwijder al het verpakkingsmateriaal
2. Verwijder alle stickers en labels van het
apparaat
3. Reinig de te gebruiken accessoires en de
binnenkant van de Health Fryer met warm
water, wat afwasmiddel en een niet-schurende
spons. Veeg de binnenkant en de buitenkant van
het apparaat schoon met een vochtige doek.
Dit is een olievrije friteuse die werkt op hete lucht,
niet vullen met olie of frituurvet.
KLAARMAKEN VOOR GEBRUIK
Plaats het apparaat op een stabiele, horizontale en
vlakke ondergrond.
Plaats het apparaat niet op een niet-hittebestendige
ondergrond. Plaats niets bovenop het apparaat, de
luchtstroom wordt verstoord en beïnvloedt het hete
luchtfrituurresultaat.
GEBRUIK VAN HET APPARAAT
Hete luchtfrituren
1. Steek de stekker in het stopcontact.
2. Doe de klep open.
3. Stop het voedsel dat gefrituurd moet worden in
de health fryer.
4. Sluit de klep. Al de icoon-lampjes zullen gaan
knipperen. Het aan/uit knopje blijft altijd
zichtbaar.
DE MENU’S (FIG. 4)
Icoon Functie uitleg
Druk deze knop in: het menuknopje is
ingeschakeld. Druk telkens deze knop
in voor het kiezen van het gewenste
bereidingsmenu.
Menuknop voor het maken van friet. Op het
scherm staat 180 graden, 20 minuten.
Menuknop voor het maken biefstuk.
Op het scherm staat 180 graden, 20
minuten.
Menuknop voor het maken van
kippenvleugels. Op het scherm staat
180 graden, 30 minuten.
Menuknop voor het maken van vis.
Op het scherm staat 180 graden, 18
minuten.
Menuknop voor het bereiden van
garnalen. Op scherm staat 160 graden,
12 minuten.
Menuknop voor het roosteren van kip.
Op het scherm staat 200 graden, 40
minuten.
Menuknop voor het maken van een cake.
Op het scherm staat 160 graden, 45
minuten.
Menuknop voor het bereiden van
gedroogd fruit. Op het scherm staat 45
graden, 4 uur.
Het is tevens mogelijk de tijd en de temperatuur te
verzetten. Bepaal de benodigde bereidingstijd voor
het ingrediënt (zie ‘Instellingen’ in dit hoofdstuk).
Stel de tijd in met “ “ , voor het verhogen
of verlagen van de bereidingstijd met 1 minuut,
met geluidseffect. Houd 2 sec. lang ingedrukt en
verhoog of verlaag met 1 minuut.
NL

9
Opmerking: De tijd kan ook aangepast worden
terwijl het apparaat in werking is.
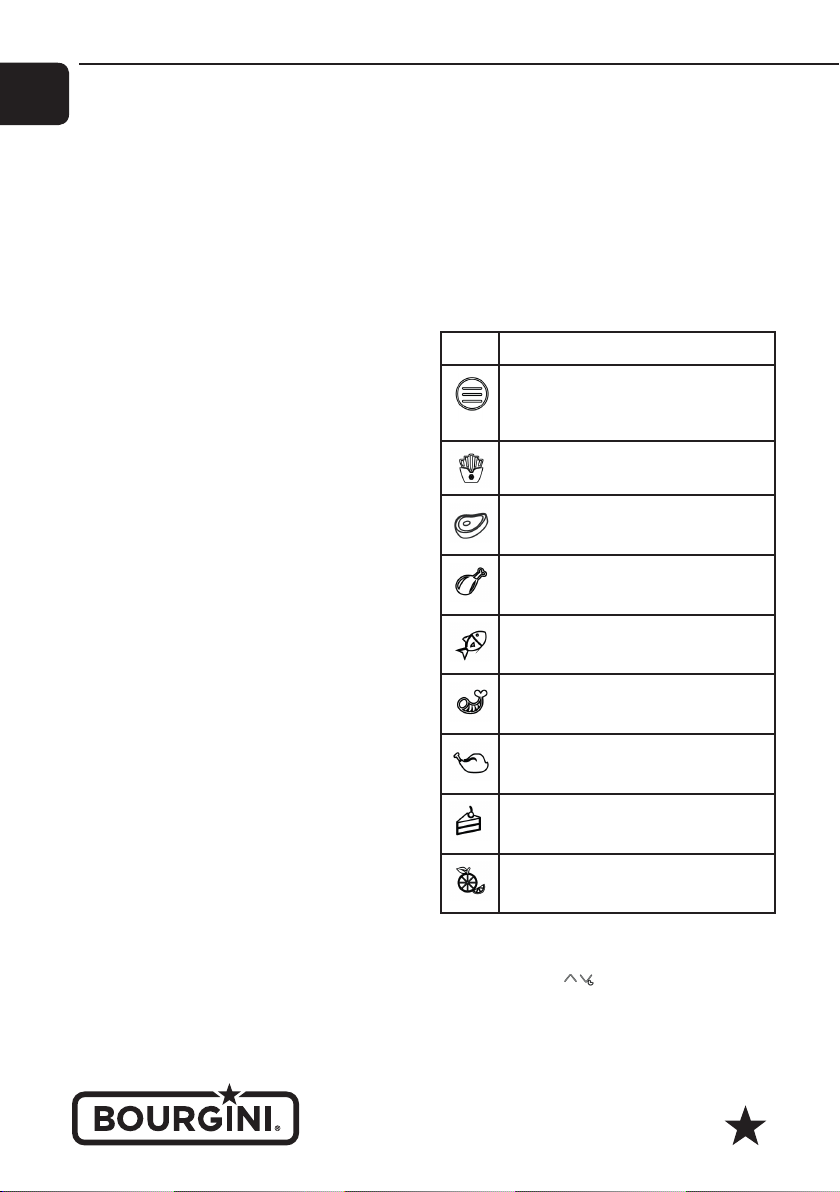
Het aanpassen van de temperatuur “ “ kan tot
5 ° C. Het verhogen of verlagen, wordt begeleid door
een geluidseffect. Houd 2 sec. lang ingedrukt, de
temperatuur zal verspringen met 5 ° C per keer. Met
de Health Fryer kunnen temperaturen tussen de
50-200 graden worden bereikt.
Opmerking: De temperatuur kan ook aangepast
worden terwijl het apparaat in werking is.
Na het instellen van de tijd en temperatuur, druk
op de “ “ knop (aan/uit- schakelaar knop) , de
elektrische verwarming en de ventilator beginnen
te werken, het aan / uit-lampje stopt met knipperen.
Wanneer de Health Fryer aan het verwarmen/
frituren is, dan is het aan/uit-knopje altijd aan, de
temperatuur- en tijdsweergave indicatoren zijn aan
en de tijd zal aftellen.
Opmerking: Druk tijdens de werking op de “aan/uit-
knop”, de ventilator en de elektrische verwarming
zullen stoppen, het aan / uit-lampje knippert
enkele seconden, druk op de “aan/uit-knop” en de
ventilator en de elektrische verwarming zullen weer
aangaan.
Als de motor uit is, na verwarmen, dan zal het
ventilator lampje enkele seconden knipperen. Het
verwarmingslampje zal continu aan staan, wanneer
de health Fryer aan het verwarmen is. Knippert
deze, dan wordt de Health Fryer niet verwarmd.
5. Wanneer een programma eindigt, zal de
zoemer 6 keer klinken. De tijd geeft “00” aan
op het scherm en het aan/uit-lampje zal
gaan knipperen. Open de klep en haal het
voedsel eruit met de afneembare handgreep of
ovenwanten.
Opmerking: Tijdens het hete lucht frituurproces
gaat het opwarmlampje aan en uit van tijd tot tijd.
Dit geeft aan dat het verwarmingselement is in- en
uitgeschakeld om de ingestelde temperatuur te
handhaven. Overtollige olie van de ingrediënten
wordt verzameld op de bodem, op de bakplaat.
6. Controleer of de ingrediënten klaar zijn. Als
de ingrediënten niet goed gaar zijn, plaats dan
het voedsel terug in de friteuse en sluit de
deur voordat u de tijd nogmaals voor een paar
minuten instelt.
Tijdens het frituren, wordt het te bereiden
voedsel heet en kan er stoom uit de Health Fryer
ontsnappen.
7. Wanneer een gerecht klaar is, kan de Health
Fryer meteen weer gebruikt worden voor het
bereiden van een nieuw gerecht.
INSTELLINGEN
Onderstaande tabel zal u helpen bij het selecteren
van basisinstellingen voor verschillende
ingrediënten.
Opmerking: houd er rekening mee dat deze
instellingen indicaties zijn. Omdat de ingrediënten
verschillen qua oorsprong, grootte, vorm en
merk, kunnen we niet garanderen wat de beste
samenstelling is voor uw ingrediënten. Dat is een
kwestie van uitproberen. Kleinere ingrediënten
vereisen meestal een iets kortere bereidingstijd dan
grotere ingrediënten.
• Een grotere hoeveelheid ingrediënten vereist
een langere bereidingstijd dan een kleinere
hoeveelheid ingrediënten.
• Voeg wat olie toe aan verse aardappelen voor
een krokant resultaat. Bak uw ingrediënten in de
hete luchtfriteuse binnen enkele minuten nadat
u de olie hebt toegevoegd.
• Bereid geen extreem vette ingrediënten.
• Snacks die in een oven kunnen worden bereid,
kunnen ook in de Health Fryer worden bereid.
• De optimale hoeveelheid voor het bereiden van
knapperige friet is 700 gram.
• Gebruik voorgebakken deeg om gevulde snacks
snel en gemakkelijk te bereiden. Voorgebakken
deeg vereist ook een kortere bereidingstijd dan
zelfgemaakt deeg.
• Plaats een bakvorm of ovenschotel in de Health
Fryer als u een cake of quiche wilt bakken
of als u kwetsbare ingrediënten of gevulde
ingrediënten wilt frituren.
• U kunt de Health Fryer ook gebruiken om
ingrediënten op te warmen. Om ingrediënten
opnieuw te verwarmen, stelt u de temperatuur
in op 150 ° C voor maximaal 10 minuten.
NL

10
min-
max
(g)
Tijd
(m)
Temp
(C)
Bereidings
wijze
Aardappel en friet
Dunne bevroren
friet
600-
750
15-
20
200 in mandje
Dikke bevroren
frieten
600-
700
20-
25
200 in mandje
Aardappelgratin 800-
1000
25-
30
200 op het
rooster
Vlees en gevogelte
Biefstuk 500-
800
10-
15
180 op het
rooster
Varkenskote-
letten
500-
800
10-
15
180 op het
rooster
Hamburger 400-
800
10-
15
180 op het
rooster
Worstenbroodje 400-
800
13-
15
200 op het
rooster
Kippenpootjes 400-
800
25-
30
180 op het
rooster
Kippenborst 400-
800
15-
20
180 op het
rooster
BBQ Spies 400-
600
18-
25
200 op het
rooster
Kip 500-
1000
30-
40
200 op het
rooster
Snacks
Gedroogd fruit 240 35 op het
rooster
Loempia’s 500-
800
8 -
10
200 op het
rooster
Bevroren kipnug-
gets
500-
1000
6 -
10
200 in het
mandje
Bevroren vis-
sticks
500-
800
6 -
10
200 op het
rooster
Kaashapjes 500-
800
8 -
10
180 in het
mandje
Gevulde groenten 400-
800
10 160 op het
rooster
Bakken
Taart 800 20-
25
160 op het
rooster
Quiche 800 20-
22
180 op het
rooster
Muffins 800 15-
18
200 op het
rooster
Zoete hapjes 800 20 160 op het
rooster
REINIGING EN ONDERHOUD
Maak het apparaat na elk gebruik schoon.
Gebruik geen metalen keukengerei of schurende
schoonmaakmiddelen om de bakplaat te reinigen,
omdat dit de antiaanbaklaag kan beschadigen.
Haal de stekker uit het stopcontact en laat het
apparaat afkoelen.
Opmerking: Open de klep en laat daardoor de Health
Fryer sneller afkoelen.
TIPS VOOR HET REINIGEN VAN DE BOURGINI
HEALTH FRYER
Buitenkant van de Health Fryer schoonmaken:
De buitenkant van de Health Fryer kan het beste
worden schoongemaakt met een vochtige doek.
Het mandje van de Health Fryer schoonmaken:
Het mandje van de Health Fryer kan in de
vaatwasser geplaatst worden. Daarnaast kan
het mandje ook gemakkelijk met de hand worden
schoongemaakt: Laat het mandje van de Health
Fryer 8 min in warm water met afwasmiddel weken,
hierna kunnen de etensresten met de zachte kant
van een sponsje worden weggehaald. Keer het
mandje om en maak de onderkant schoon met
de harde kant van het sponsje. Pas wel op dat je
de anti-aanbaklaag niet wordt beschadigd. Om
nare geurtjes te neutraliseren kan het mandje
ingesmeerd worden met citroensap, laat dit 35 min
intrekken en spoel het mandje goed af.
De pan (opvang bak) van de Health Fryer
schoonmaken:
De pan van de Health Fryer kan in de vaatwasser
geplaatst worden. Daarnaast kan de pan ook
gemakkelijk met de hand worden schoon gemaakt:
Laat de pan van de Health Fryer 8 min in warm
water met afwasmiddel weken, hierna kunnen
NL

11
de aangekoekte etensresten met de zachte kant
van een sponsje worden weggehaald. Gebruik
GEEN harde borstels, schuursponsjes of andere
gereedschappen, anders wordt de antiaanbaklaag
beschadigd. Om nare geurtjes te neutraliseren kan
het mandje ingesmeerd worden met citroensap, laat
dit 35 min intrekken en spoel het mandje goed af.
Het verwarmingselement schoonmaken met
citroensap:
Het verwarmingselement van de Health Fryer mag
nooit van zijn plaats gehaald worden.
HAAL DE STEKKER UIT HET STOPCONTACT.
Plaats de Health Fryer zodat het
verwarmingselement met een zacht sponsje
en een mild schoonmaakmiddel kan worden
schoongemaakt. Gebruik GEEN harde borstels,
schuursponsjes of andere gereedschappen, anders
wordt het verwarmingselement beschadigd. Om
bij lastige hoekjes te kunnen, kan een stokje met
een doekje eromheen gebruikt worden. Na het
schoonmaken moet het afgedroogd worden met
een zachte droogdoek. Voor het verwijderen van
moeilijk toegankelijk vetresten: Zet een schoteltje
in de Health Fryer met een heel dun laagje water (1
tot 3 millimeter). Snij een citroen in stukken en leg
deze op het schoteltje. Zet de Health Fryer 10 tot 12
minuten aan op 170 graden. Verwijder het schoteltje
en poest alles na met een vochtige doek en maak
het hierna droog.
Het verwarmingselement schoonmaken met
bakpapier:
Het verwarmingselement van de Health Fryer mag
nooit van zijn plaats gehaald worden. HAAL DE
STEKKER UIT HET STOPCONTACT. Plaats de Health
Fryer zodat het verwarmingselement met een zacht
sponsje en een mild schoonmaakmiddel kan worden
schoongemaakt. Gebruik GEEN harde borstels,
schuursponsjes of andere gereedschappen, anders
wordt het verwarmingselement beschadigd. Om
bij lastige hoekjes te kunnen, kan een stokje met
een doekje eromheen gebruikt worden. Na het
schoonmaken moet het afgedroogd worden met
een zachte droogdoek. Voor het verwijderen van
moeilijk toegankelijke vetresten: Laat de Health
Fryer onderste boven staan. En vul een spuitflesje
met 3 gram bakpoeder en 0,1 liter water en schudt
het goed zodat het goed gemengd is. Spuit de
bakpoederoplossing op het verwarmingselement en
wacht 30 minuten. Zet de Health Fryer weer rechtop
en vul de pan met een laagje water en zet deze
terug in de Health Fryer zet deze 25 minuten aan op
180 graden.
Opbergen
1. Koppel het apparaat los en laat het afkoelen.
2. Zorg ervoor dat alle onderdelen schoon en
droog zijn.
AFVALVERWIJDERING
Elektrische apparaten, accessoires en hun
verpakkingen moeten op een voor het milieu
verantwoorde wijze zoveel mogelijk worden
hergebruikt. Gooi deze materialen dus niet bij het
huisvuil. Alleen voor landen van de EU:
Volgens de Europese WEEE richtlijn
2002/96/EG voor afdanken van elektrische en
electronische oude apparaten moeten niet meer
bruikbare apparaten apart worden ingezameld
en op een milieu verantwoorde wijze worden
gerecycled.
BOURGINI SERVICE EN GARANTIE
Garantie wordt verleend gedurende 2 jaar vanaf
de aankoop datum volgens de kassabon, welke
tevens het garantiebewijs is. Voor garantie
wendt u zich tot de winkelier. Geen garantie voor
defecten welke het gevolg zijn van verkeerd
gebruik, ondeskundige demontage, schade
door vallen, stoten e.d. en schade door niet
tijdig ontkalken van apparaten welke met water
worden gebruikt. Indien bij een bepaald product
specifieke garantievoorwaarden worden vermeld,
hebben deze prioriteit boven de algemene
voorwaarden. De garantie is niet van toepassing op
gevolgschade. Voor vragen over het gebruik van
het product kunt u onze website raadplegen
www.bourgini.com.
DISCLAIMER
Wijzigingen voorbehouden; specificaties kunnen
zonder opgave van redenen worden gewijzigd.
NL

12
SAFETY INSTRUCTIONS
Read these instructions
carefully before use and
keep them in a safe place.
This appliance may be
used, cleaned and serviced
by children older than 8
years of age provided they
are supervised by a person
responsible for their safety.
Keep the appliance and
the power cord away from
children younger than 8.
Children are not allowed
to play with the appliance.
Children should always
be monitored to prevent
them from playing with the
appliance.
The appliance may be
used by persons with a
physical, sensory, mental
or motor disability and
by persons without the
necessary experience and
knowledge, provided they
are supervised by a person
responsible for their safety,
or when they are given
instructions on how to
safely use the appliance
and if understand the
dangers that come with the
use of the appliance.
• This appliance is only intended for normal
household use.
• Never leave the appliance unattended when in use.
• Only use the appliance and accessories for their
intended purposes. Do not use the appliance and
accessories for any other purposes than those
described in the instructions.
• Do not use the appliance when a part, accessory,
the power cord or plug is damaged or defective.
Only let the supplier or an acknowledged service
centre replace a damaged or defective part,
accessory, power cord or plug.
• Do not use the appliance near facilities containing
water, such as bath tubs, showers and wash
basins.
• Do not immerse the appliance in water or any
other liquid. If this nevertheless happens, unplug
the appliance from the wall socket as soon as
possible. Never remove the appliance from water
or other liquids before unplugging it from the wall
socket. You can no longer use an appliance that
has been immersed in water or other liquids.
• Make sure that water cannot get into the
connection points of the power cord nor the
extension cord.
• Always keep the power cord away from heat
sources, oil and sharp edges.
• Always check, before use, that the mains voltage
corresponds to the voltage on the rating plate of
the appliance.
• For extra safety, connect the appliance to
a group protected by a residential current
operated circuit breaker with a nominal
operating current of max. 30 mA.
• Never operate the appliance by means of an
external time switch or a separate remote
control system.
• Always unroll the power cord and extension cord
(when applicable) fully. Make sure that the power
cord and extension cord (when applicable) do not
dangle over the edge of the worktop to prevent
them from becoming entangled or somebody
accidentally tripping over them.
• Do not unplug the appliance by pulling the
power cord.
• Always unplug the appliance when not in use.
• Do not use the appliance outdoors. Place the
appliance on a stable and level surface.
• Keep the appliance away from heat sources. Do
not place the appliance on hot surfaces or near
open flames.
• Make sure your hands are dry before you touch
the appliance.
• Unplug the appliance before assembling or
disassembling it and before cleaning or servicing
the unit.
EN

13
• Engine driven appliances: beware of sharp and/or
moving parts. Always keep your hands away from
the moving parts when using, cleaning or servicing
the appliance.
• Heating devices: wait until the appliance has cooled
down before you touch the housing and parts of
the unit.
Be extra careful during cleaning and servicing.
INTRODUCTION
This Health Fryer provides an easy and healthy way
to prepare your food. Through the use of hot, fast air
circulation and a separate upper grill, it’s possible
to make many different kinds of dishes. Oil is not
needed for the preparation of most ingredients,
because the food is heated by the hot air.
This Health Fryer is a combination of a convection
oven and air fryer with a rotating basket. You can
choose between either function depending on the
food to be prepared.
OPERATION AND CONTROLS
Image components description (fig. 1 & 2)
1. Button Control Panel
2. Housing
3. Baking tray
4. Flap
5. Air outlet openings
6. Grill racks
7. Spit
8. Removable handle
9. Frying basket
DESCRIPTION OF THE COMPONENTS
3. Baking tray
The baking tray is also a collection tray for crumbs, etc.
4. Flap
The flap can be removed and therefore easily
cleaned.
Installation (fig. 3): The axle, which is located on the
bottom of the flap, can be clicked in the hole on the
base.
Disassembly (fig. 3): The flap has an opening angle of
about 70 degrees. In order to release the flap, push
in the direction of the arrow, as indicated in figure 3.
You subsequently pull on the flap so this is released
from the housing.
6. Grill racks
The grill racks can not only be used for preparing
food, but also for heating up dishes, such as pizza. If
you want to fry meat on the grill rack, it is advisable
to grease the grill rack with some oil on a piece of
paper towel.
7. Spit
The spit can be used for roasts and for preparing a
whole chicken.
Force the shaft lengthways through the middle of
the meat. Slide the forks on the axle of both ends
in the meat and subsequently lock them with the
set screws. There are notches on the axle for the
set screws. Bring the screws closer to the middle if
necessary, but never completely to the ends.
Note: make sure that the roast or the chicken is
not too big so it can rotate freely in the oven. The
maximum permitted weight of the chicken or the
roast is 1.2 kg.
8. Removable handle
The removable handle can be used to remove the
cooked roasts or a whole chicken from the Health
Fryer, which is prepared with the aid of the spit.
Place the removable handle under the spit and lift it
up. Do this by removing the left side first and take the
food out carefully.
9. Fryer basket
The rotating fryer basket is suitable for preparing
chips, roasted nuts and other snacks. Use the
removable handle to position the fryer basket.
Placing the basket:
The basket must be placed horizontally in the Health
Fryer.
1. Put the axle in the left side of the fryer basket
in the designated hole of the Health Fryer. Make
sure that the axle is correctly in place, so it can
then rotate.
2. Place the right axle of the fryer basket on the
hanger in the Health Fryer.
Note: for the chips to be cooked correctly, the basket
can only be about 75% full. This is equivalent to
approx. 700 grams of frozen oven chips. The chips
will not rotate properly in the fryer basket otherwise.
ATTENTION!
• Never submerge the housing, which contains the
electrical components and the heating elements,
in water and never hold them under the tap.
• Avoid liquid getting into the appliance in order to
prevent an electric shock or a short circuit.
• Do not cover the air intake and the air outlet
while the appliance is in operation.
• Avoid using too much oil on the baking tray. This
may be a fire hazard.
• Do not touch the inside of the appliance while it
is in operation.
EN

14
WARNING
• Do not place the appliance against the wall or
against other appliances. Leave at least 10 cm
space at the back and sides, and 10 cm space
above the appliance.
• When air frying the hot steam will be released
via the air outlet openings. Keep your hands and
face at a safe distance from the steam and the
air outlet openings.
• All accessible surfaces can become hot during
use.
• The appliance needs about 60 minutes to cool off
before safely storing or cleaning it.
BEFORE INITIAL USE
1. Remove all the packaging material.
2. Remove all stickers and labels from the
appliance.
3. Clean the accessories to be used and the inside
of the Health Fryer with warm water, some
washing-up liquid and a non-abrasive sponge.
Wipe the inside and the exterior of the appliance
clean with a damp cloth.
This is an oil-free fryer that works using hot air. Do
not fill with oil or frying fat.
PREPARING FOR USE
Place the appliance on a stable, horizontal and flat
surface.
Do not place the appliance on a surface that is not
heat-resistant. Do not place anything on top of the
appliance, as the air flow will be disrupted and affect
the air frying result.
USE OF THE APPLIANCE
Air frying
1. Insert the plug into the wall socket.
2. Open the flap.
3. Put the food that has to be fried in the health
fryer.
4. Close the flap. All the icon lights will start to
flash. The on/off button will always remain
visible.
THE MENUS (FIG. 4)
Icoon Functie uitleg
Press this button: the menu button is
enabled. Press the button repeatedly to
select the desired cooking menu.
Menu button for cooking chips. The
screen will display 180 degrees Celsius,
20 minutes.
Menu button for cooking steak. The
screen will display 180 degrees Celsius,
20 minutes.
Menu button for cooking chicken wings.
The screen will display 180 degrees
Celsius, 30 minutes.
Menu button for cooking fish. The screen
will display 180 degrees Celsius, 18
minutes.
Menu button for cooking prawns. The
screen will display 160 degrees Celsius,
12 minutes.
Menu button for roasting chicken. The
screen will display 200 degrees Celsius,
40 minutes.
Menu button for cooking a cake. The
screen will display 160 degrees Celsius,
45 minutes.
Menu button for preparing dried fruit.
The screen will display 45 degrees
Celsius, 4 hours.
It is also possible to change the time and the
temperature. Determine the required cooking time
for the ingredient (see ‘Settings’ in this chapter).
Set the time with “ “, to increase or decrease
the cooking time by 1 minute, with sound effect.
Press and hold the button for 2 sec. and increase or
decrease by 1 minute.
Note: The time can also be adjusted while the
appliance is in operation.
It’s possible to adjust the temperature “ “ by
5 °C. Increasing or decreasing is accompanied by
a sound effect. Press and hold for 2 sec. and the
temperature will skip 5 °C each time. Temperatures
between 50-200 degrees Celsius can be achieved
with the Health Fryer.
Note: The temperature can also be adjusted while the
appliance is in operation.
EN

15
After setting the time and temperature, press the
““-button (on/off switch button), the electric
heating and the fan will start to work, and the on/
off light will stop flashing. When the Health Fryer is
heating/frying, the on/off switch will always be on,
the temperature and time display indicators will be
on and the time will count down.
Note: If you press the “on/off button” during
operation, the fan and the electric heating will stop,
and the on/off light will flash a few seconds. Press
the “on/off button” and the fan and the electric
heating will turn on again.
When the motor is switched off, after heating, the fan
light will flash a few seconds. The heating light will
be switched on continuously when the Health Fryer
is heating. If it is flashing, the Health Fryer will not
be heated.
5. When a programme ends, the buzzer will sound
6 times. The time will display “00” on the screen
and the on/off light will start flashing. Open the
flap and take the food out with the removable
handle or oven gloves.
Note: During the air frying process, the preheat light
will turn on and off from time to time. This indicates
that the heating element is enabled and disabled in
order to maintain the set temperature. Excess oil
from the ingredients will be collected at the bottom
on the baking tray.
6. Check whether the ingredients are ready. If the
ingredients are not cooked properly, place the
food back in the fryer and close the door before
you set the time for a few minutes again.
While frying, the food to be cooked will become hot
and steam may be released from the Health Fryer.
7. When a dish is ready, the Health Fryer can be
immediately used again for the preparation of a
new dish.
SETTINGS
The table below will help you when selecting basic
settings for different ingredients.
Note: bear in mind that these settings are indications.
Because the ingredients differ in terms of origin, size,
shape and brand, we cannot guarantee what the best
settings are for your ingredients. That is a question
of trial and error.
Smaller ingredients usually require a slightly shorter
cooking time than larger ingredients.
• A larger quantity of ingredients requires a
longer cooking time than a smaller quantity of
ingredients.
• Add some oil to fresh potatoes for a crispy
result. Fry your ingredients in the hot air fryer
within a few minutes after you have added the oil.
• Do not cook extremely fatty ingredients.
• Snacks that can be cooked in an oven can also
be cooked in the Health Fryer.
• The maximum quantity for cooking crispy chips
is 700 grams.
• Use pre-baked dough in order to cook filled
snacks quickly and easily. Pre-baked dough also
requires a shorter cooking time than homemade
dough.
• Place a baking mould or oven dish in the Health
Fryer if you want to bake a cake or quiche or
if you want to fry fragile ingredients or stuffed
ingredients.
• You can also use the Health Fryer to heat up
ingredients. To heat up ingredients, set the
temperature at 150 °C for a maximum of 10
minutes.
EN

16
min-
max
(g)
Time
( m )
Temp
(C)
Preparation
Potato & Chips
Thin frozen chips 600-
750
15-
20
200 in the
basket
Thick frozen
chips
600-
700
20-
25
200 in the
basket
Potatoes au
gratin
800-
1000
25-
30
200 on the
grill rack
Meat and poultry
Steak 500-
800
10-
15
180 on the
grill rack
Pork chops 500-
800
10-
15
180 on the
grill rack
Hamburgers 400-
800
10-
15
180 on the
grill rack
Sausage rolls 400-
800
13-
15
200 on the
grill rack
Kippenpootjes 400-
800
25-
30
180 on the
grill rack
Chicken breast 400-
800
15-
20
180 on the
grill rack
BBQ skewer 400-
600
18-
25
200 on the
grill rack
Chicken 500-
1000
30-
40
200 on the
grill rack
Snacks
Dried fruit 240 35 on the
grill rack
Spring rolls 500-
800
8 -
10
200 on the
grill rack
Frozen chicken
nuggets
500-
1000
6 -
10
200 in the
basket
Frozen fish
fingers
500-
800
6 -
10
200 on the
grill rack
Cheese snacks 500-
800
8 -
10
180 in the
basket
Stuffed
vegetables
400-
800
10 160 on the
grill rack
Baking/Cooking
Cake 800 20-
25
160 on the
grill rack
Quiche 800 20-
22
180 on the
grill rack
Muffins 800 15-
18
200 on the
grill rack
Sweet snacks 800 20 160 on the
grill rack
CLEANING AND MAINTENANCE
Clean the appliance after each usage.
Do not use metal kitchen utensils or abrasive
cleaning products to clean the griddle because they
may damage the non-stick layer.
Before you start cleaning, remove the plug from the
socket and let the appliance cool down completely.
Note: Opening the cover allows the Health Fryer to
cool down more quickly.
TIPS TO CLEAN THE BOURGINI HEALTH FRYER:
Cleaning the outside of the Bourgini Health Fryer:
It’s best to clean the outside of the Bourgini Health
Fryer with a damp cloth.
Cleaning the basket of the Bourgini Health Fryer:
You can put the basket of the Bourgini Health Fryer in
the dishwasher. You can also easily clean the basket
by hand. Leave the basket of the Bourgini Health
Fryer to soak in warm water with a detergent for 8
minutes. After that, you can remove any food residue
with the soft side of a sponge. Turn over the basket
and clean the underside with the hard side of the
sponge. Be careful that you do not damage the non-
stick coating. You can rub lemon juice on the basket
to neutralise unpleasant smells. Leave it to rest for
35 minutes and then rinse the basket thoroughly.
Cleaning the pan (collection tray) of the Bourgini
Health Fryer:
You can put the pan of the Bourgini Health Fryer in
the dishwasher. You can also easily clean the pan by
hand. Leave the pan of the Bourgini Health Fryer to
soak in warm water with a detergent for 8 minutes.
After that, you can remove any food residue with
the soft side of a sponge. Do NOT use stiff brushes,
abrasive sponges or other tools, as these will
damage the non-stick coating. You can rub lemon
juice on the pan to neutralise unpleasant smells.
Leave it to rest for 35 minutes and then rinse the pan
thoroughly.
EN

17
Cleaning the heating element with lemon juice:
The heating element of the Bourgini Health Fryer
may never be removed. UNPLUG THE APPLIANCE.
Position the Bourgini Health Fryer in such a way
that the heating element can be cleaned with a
soft sponge and a mild detergent. Do NOT use stiff
brushes, abrasive sponges or other tools, as these
will damage the heating element. You can use a small
stick with a cloth wrapped around it to clean areas
that are hard to get to. After cleaning, the heating
element must be wiped dry with a soft tea towel. In
order to remove inaccessible fatty deposits, place a
saucer in the Bourgini Health Fryer with a little bit
of water (1 to 3 millimetres). Cut a lemon into pieces
and put them on the saucer. Switch on the Health
Fryer for 10 to 12 minutes at 170 degrees Celsius.
Remove the saucer, clean everything with a damp
cloth and wipe dry afterwards.
Cleaning the heating element with baking powder:
The heating element of the Bourgini Health Fryer
may never be removed. UNPLUG THE APPLIANCE.
Position the Bourgini Health Fryer in such a way
that the heating element can be cleaned with a
soft sponge and a mild detergent. Do NOT use stiff
brushes, abrasive sponges or other tools, as these
will damage the heating element. You can use a small
stick with a cloth wrapped around it to clean areas
that are hard to get to. After cleaning, the heating
element must be wiped dry with a soft tea towel. In
order to remove inaccessible fatty deposits, place
the Bourgini Health Fryer upside down. Fill a spray
bottle with 3 grams of baking powder and 0.1 litre of
water and shake it thoroughly to mix the ingredients
properly. Spray the baking powder solution onto the
heating element and wait for 30 minutes. Place the
Health Fryer upright again, fill the pan with a little
water, put it back in the Bourgini Health Fryer and
switch the Health Fryer on for 25 minutes at 180
degrees Celsius.
Storage
1. Disconnect the appliance and allow the
appliance to cool down completely.
2. Make sure that all components are clean and
dry.
WASTE DISPOSAL
Electrical appliances, accessories and their
packaging must be reused as much as possible in
an environmentally sound manner. Do not dispose of
these items together with your normal rubbish. Only
for EU countries:
According to the European 2002/96/EG WEEE
Guideline on the disposal of old electric and
electronic appliances, the appliances that are no
longer used must be collected and recycled in an
environmentally sound manner.
BOURGINI SERVICE AND WARRANTY
The warranty is valid for a period of 2 years from
the date of purchase as stated on your purchase
receipt, which also your proof of warranty. Please
turn to your retailer to claim your warranty. The
warranty shall not apply if the product is subjected
to incorrect use,, improperly disassembled,
damaged by falls, impacts or similar, or if damage
is caused due to failure to descale in good time
products that are manufactured for use with water.
Should a certain product be provided with specific
warranty terms and conditions, these shall receive
priority over general terms and conditions. The
warranty shall not apply to indirect damages.
Should you have any questions regarding the use of
the product, please consult our website at
www.bourgini.com
DISCLAIMER
Changes reserved; specifications are subject to
change without stating grounds for doing so.
EN

18
CONSIGNES DE SÉCURITÉ
Lisez attentivement le
mode d’emploi avant toute
utilisation. Conservez le
mode d’emploi.
Cet appareil peut êtreutilisé,
nettoyé et entretenu par des
enfants à partir de 8 ans
sous la supervision d’un
adulte responsable de leur
sécurité. Tenez l’appareil
et le cordon électrique hors
de portée des enfants de
moins de 8 ans. Les enfants
ne doivent pas jouer avec
l’appareil. Surveillez
toujours les enfants pour
éviter qu’ils ne jouent avec
l’appareil.
L’appareil peut être utilisé
par des personnes ayant un
handicap physique, sensoriel,
mental ou moteur et par
des personnes ne disposant
pas de l’expérience et des
connaissances nécessaires
à condition qu’elles soient
supervisées par une personne
responsable de leur sécurité
ou qu’elles reçoivent des
instructions sur la façon
d’utiliser cet appareil en toute
sécurité et qu’elles comprennent
les dangers qui vont de pair
avec son utilisation.
•Cet appareil est uniquement conçu pour un usage
ménager.
• Ne laissez pas l’appareil sans surveillance
pendant son utilisation.
• Utilisez l’appareil et ses accessoires uniquement
pour l’usage pour lequel il est conçu. N’utilisez pas
l’appareil et les accessoires pour un usage autre
que ceux décrits dans le mode d’emploi.
• N’utilisez pas l’appareil lorsqu’un de ses
composants, un accessoire, le cordon ou la
fiche sont endommagés ou défectueux. Faites
remplacer un composant, accessoire, cordon
ou fiche endommagés ou défectueux par le
fournisseur ou un réparateur agréé.
• N’utilisez pas l’appareil à proximité d’éléments
contenant de l’eau tels que baignoires, douches et
lavabos.
• Ne plongez pas l’appareil dans l’eau ou tout
autre liquide. Si cela se produit, débranchez
immédiatement l’appareil de la prise de courant.
Ne sortez jamais l’appareil hors de l’eau ou
autre liquide avant d’avoir débranché la fiche de
la prise de courant. Vous ne pouvez plus utiliser
un appareil qui est tombé dans l’eau ou un autre
liquide.
• Évitez que l’eau ne puisse pénétrer dans les points
de connexion du cordon et de la rallonge.
• Tenez le cordon à l’écart de sources de chaleur, de
produits huileux et de rebords coupants.
• Avant emploi, vérifiez toujours que le voltage de
votre domicile correspond a voltage indiqué sur
la plaque d’identification de l’appareil.
• Pour une meilleure protection, branchez l’appareil
sur un groupe protégé par un disjoncteur avec une
tension nominale de 30 mA maximum.
• N’alimentez pas l’appareil au moyen d’une
minuterie externe ou d’un système séparé de
commande à distance.
• Déroulez toujours entièrement le cordon et
éventuellement la rallonge. Veillez à ce que le
cordon et éventuellement la rallonge ne pendent
pas sur le rebord d’un plan de travail, qu’ils ne
risquent pas de s’emmêler et que personne ne
risque de se prendre les pieds dedans.
• Ne tirez pas sur le cordon pour débrancher la fiche
de la prise de courant.
• Débranchez la fiche de la prise de courant lorsque
l’appareil n’est pas utilisé.
• N’utilisez pas l’appareil à l’extérieur. Placez
l’appareil sur une surface stable et plane.
• Ne placez pas l’appareil à proximité de sources de
chaleur. Ne placez pas l’appareil sur des surfaces
chaudes ou à proximité d’un feu ou de flammes.
• Veillez à avoir les mains bien sèches lorsque vous
touchez l’appareil.
• Débranchez la fiche de la prise de courant avant
de monter ou de démonter l’appareil et avant
FR

19
d’effectuer des opérations de nettoyage ou
d’entretien.
• Appareils motorisés: faites attention aux parties
acérées et/ou mobiles. Pendant l’emploi, le
nettoyage et l’entretien, ne touchez pas les
parties mobiles.
• Appareils de chauffage: attendez que l’appareil
ait refroidi avant de toucher le coffrage et les
pièces.Soyez particulièrement vigilant lors du
nettoyage et de l’entretien.
INTRODUCTION
Ce Health Fryer est un moyen simple et sain
de préparer facilement vos aliments préférés.
L’utilisation de l’air pulsé et d’un grill supérieur
distinct permet de préparer de nombreux plats
différents. Il n’est pas nécessaire d’ajouter de l’huile
pour cuire la plupart des aliments, car ces derniers
sont chauffés grâce à l’air pulsé.
Ce Health Fryer associe un four à air pulsé et une
friteuse à air chaud dotée d’un panier rotatif. Il est
possible d’utiliser l’une des deux fonctions au choix
selon les aliments à préparer.
FONCTIONNEMENT
Description des pièces sur l’illustration (ill. 1 et 2)
1. Tableau de commande
2. Boîtier
3. Plaque de cuisson
4. Porte
5. Sortie d’air
6. Grilles
7. Broche
8. Poignée amovible
9. Panier à friture
DESCRIPTION DES PIÈCES
3. Plaque de cuisson
La plaque de cuisson sert également de bac
collecteur pour les miettes, etc.
4. Porte
La porte peut être détachée et donc facilement
nettoyée.
Montage (ill. 3): L’ergot qui se trouve en bas de la
porte doit être inséré dans l’encoche sur le socle.
Démontage (ill. 3): La porte a un angle d’ouverture
d’environ 70 degrés. Pour détacher la porte, il vous
suffit d’appuyer dans le sens de la flèche, comme
indiqué sur l’illustration n°3. Ensuite, tirez sur la
porte de sorte qu’elle se détache du boîtier.
6. Grilles
Les grilles servent non seulement à cuire des
aliments, mais aussi à réchauffer des plats, par
exemple des pizzas. Si vous souhaitez cuire de la
viande sur la grille, il est conseillé de graisser la
grille avec un peu d’huile à l’aide d’un morceau
d’essuie-tout.
7. Broche
La broche peut servir à préparer des rôtis et un
poulet entier.
Enfoncez la pointe au cœur de la viande dans le
sens de la longueur. Enfoncez les fourches aux deux
extrémités dans la viande et bloquez-les ensuite
à l’aide des vis de réglage. La broche est dotée
d’encoches pour les vis de réglages. Rapprochez
les vis du centre si nécessaire, mais ne les placez
jamais aux extrémités.
Remarque : veillez à ce que le rôti ou le poulet
ne soit pas trop gros pour qu’il puisse tourner
librement dans le four. Le poids maximal autorisé
pour la viande est de 1,2 kg.
8. Poignée amovible
La poignée amovible peut servir à sortir du Health
Fryer un rôti ou un poulet entier cuit à la broche.
Placez la poignée amovible sous la broche et
soulevez cette dernière. Pour cela, commencez
par détacher le côté gauche et retirez doucement
l’aliment de l’appareil.
9. Panier à friture
Le panier à friture rotatif convient pour cuire des
frites, faire griller des noix et préparer d’autres
en-cas. Utilisez la poignée amovible pour mettre le
panier à friture en place.
Mise en place du panier :
Le panier doit être placé à l’horizontale dans le
Health Fryer.
1. Enfoncez l’axe du côté gauche du panier à friture
dans l’encoche prévue à cet effet dans le Health
Fryer. Veillez à ce que l’axe soit correctement
placé pour qu’il puisse ensuite tourner
librement.
2. Placez l’axe droit du panier à friture sur le
crochet dans le Health Fryer.
Remarque : pour une bonne cuisson des frites, il
est conseillé de ne remplir le panier qu’à environ
75 %. Cela correspond approximativement à 700 g
de frites surgelées à cuire au four. Sinon les frites
risquent de ne pas tourner correctement dans le
panier à friture.
ATTENTION !
• Ne plongez jamais dans l’eau le boîtier qui
contient des composants électriques et une
résistance chauffante, et ne le passez pas sous
le robinet.
FR

20
• Veillez à ce qu’aucun liquide ne pénètre dans
l’appareil pour éviter tout choc électrique ou
court-circuit.
• Ne couvrez pas l’entrée et la sortie d’air lorsque
l’appareil fonctionne.
• Veillez à ne pas utiliser trop d’huile sur la
plaque de cuisson. Cela peut provoquer un
incendie.
• Ne touchez pas l’intérieur de l’appareil lorsqu’il
est allumé.
AVERTISSEMENT
• Ne placez pas l’appareil contre le mur ou contre
d’autres appareils. Laissez au moins 10 cm de
libre à l’arrière, sur les côtés et au-dessus de
l’appareil.
• Lorsque vous faites frire des aliments à l’air
pulsé, de la vapeur chaude sort par les sorties
d’air. Gardez vos mains et votre visage à une
distance de sécurité de la vapeur et des sorties
d’air.
• Toutes les surfaces accessibles peuvent
chauffer durant l’utilisation.
• L’appareil a besoin d’environ 60 minutes pour
refroidir avant d’être rangé et nettoyé en toute
sécurité.
AVANT LA PREMIÈRE UTILISATION
1. Retirez tout le matériel d’emballage.
2. Enlevez tous les autocollants et les étiquettes
de l’appareils.
3. Nettoyez les accessoires à utiliser et l’intérieur
du Health Fryer avec de l’eau chaude, un peu
de liquide vaisselle et une éponge non abrasive.
Nettoyez l’intérieur et l’extérieur de l’appareil
avec un chiffon humide.
Cet appareil est une friteuse sans huile qui
fonctionne à l’air pulsé, ne le remplissez pas d’huile
ou de graisse de friture.
PRÉPARATION AVANT L’EMPLOI
Installez l’appareil sur une surface horizontale,
plane et stable.
Ne placez pas l’appareil sur une surface non
résistante à la chaleur. Ne placez rien au-dessus
de l’appareil, car cela peut gêner le flux d’air et
influencer le résultat de la cuisson à air pulsé.
UTILISATION DE L’APPAREIL
FRITURE À AIR PULSÉ
1. Branchez la fiche dans la prise de courant.
2. Ouvrez la porte de l’appareil.
3. Mettez l’aliment à frire dans le Health Fryer.
4. Fermez la porte. Tous les voyants se mettent
à clignoter. Le bouton MARCHE/ARRÊT reste
toujours allumé.
LES MENUS (ILL. 4)
Icône Fonctions
Appuyez sur ce bouton : le bouton menu
est allumé. Appuyez plusieurs fois
sur ce bouton pour choisir la cuisson
souhaitée.
Bouton menu pour préparer des frites.
L'écran indique 180 degrés, 20 minutes.
Bouton menu pour préparer un bifteck.
L'écran indique 180 degrés, 20 minutes.
Bouton menu pour préparer des ailes
de poulet. L'écran indique 180 degrés,
30 minutes.
Bouton menu pour préparer du poisson.
L'écran indique 180 degrés, 18 minutes.
Bouton menu pour préparer des
crevettes. L'écran indique 160 degrés,
12 minutes.
Bouton menu pour rôtir un poulet.
L'écran indique 200 degrés, 40 minutes.
Bouton menu pour préparer un gâteau.
L'écran indique 160 degrés, 45 minutes.
Bouton menu pour déshydrater des
fruits. L'écran indique 45 degrés, 4
minutes.
Il est également possible de modifier le temps et
la température de cuisson. Choisissez le temps de
cuisson nécessaire pour l’ingrédient (voir le point «
Réglages » dans ce chapitre)
Réglez le temps avec “ “, pour augmenter
ou diminuer le temps de cuisson d’une minute.
Cela s’accompagne d’un signal sonore. Maintenez
le bouton enfoncé pendant 2 secondes pour
augmenter ou diminuer le temps de cuisson par
échelons d’une minute.
Remarque : Le temps peut également être modifié
lorsque l’appareil fonctionne.
Il est possible de modifier la température
““ par échelons de 5° C. L’augmentation ou
la diminution de la température est accompagnée
d’un effet sonore. Maintenez le bouton enfoncé
pendant 2 secondes pour augmenter ou diminuer
la température de 5 ° C à la fois. Le Health Fryer
FR
Table of contents
Languages:
Other Bourgini Fryer manuals

Bourgini
Bourgini 18.2042.00.00 User manual

Bourgini
Bourgini 18.2042.00.00 User manual

Bourgini
Bourgini 18.2030.00.00 User manual

Bourgini
Bourgini 18.2040.00.00 User manual

Bourgini
Bourgini 18.2147.00.00 User manual

Bourgini
Bourgini Health Fryer Plus User manual

Bourgini
Bourgini Health Fryer Pro XL User manual

Bourgini
Bourgini 18.2041.00.00 User manual

Bourgini
Bourgini 18.2143.00.00 User manual

Bourgini
Bourgini 18.1020.00.00 User manual