9
Before chopping ...
• pre-cut meat, cheese, onions, garlic,
carrots, chillies
• remove stalks from herbs, un-shell nuts
• remove bones, tendons and gristle from
meet.
For best results, please refer to the speed
settings recommended in the processing
table.
a) Carefully remove the plastic cover from
the blade (3). Caution: the blade is very
sharp! Always hold it by the upper plastic
part. Place the blade on the centre pin of
the bowl (4) and give it a turn to lock into
place. Always place the bowl on the anti-
slip base (5).
b) Place the food in the chopper bowl.
c) Attach the lid (2) onto the bowl with the
interlock (2c) positioned next to the bowl
handle. To lock the lid, turn it clockwise so
that the interlock engages with a «click»
above the handle.
d) Insert the motor part !into the coupling
(2a) until it locks. Make sure the pusher is
in place.
e) To operate, press switch ‚or „on the
motor part and take hold of the bowl with
your other hand.
f) After use, press buttons ‰to remove the
motor part. Remove the pusher.
g) Pressing the lid interlock (2c), turn the lid
(2) counter-clockwise to unlatch it and lift it
up.
h) Carefully take out the blade by turning and
pulling it, before removing the processed
food.
Mixing light dough
Using the blade (3), you may also mix light
dough like a pancake batter or a cake mixture
based on up to 250 g flour.
For a pancake batter, for instance, first pour
liquids into the bowl, then add flour and finally
eggs. Pressing the turbo switch „, mix the
batter until smooth.
Slicing / shredding
(see picture section Bwith processing table i
)
Using the slicing tools (6a), you can slice e.g.
cucumbers, onions, mushrooms, apples,
carrots, radishes, raw potatoes, courgettes,
cabbage.
Using the shredding tools (6b), you can shred
e.g. apples, carrots, raw potatoes, beetroot,
cabbage, cheese (soft to medium).
a) Place a tool (6a or 6b) into the tool holder
(6) and snap into position. Place the tool
holder on the centre pin of the bowl and
give it a turn to lock into place.
b) Attach the lid (2) onto the bowl with the
interlock (2c) positioned next to the bowl
handle. To lock the lid, turn it clockwise so
that the interlock engages with a «click»
above the handle.
c) Insert the motor part into the coupling until
it locks. Select speed settings according to
recommendations in picture (i).
d) Fill the food to be processed into the filling
tube. Never reach into the filling tube when
the appliance is switched on. Always use
the pusher (1) to feed in food.
e) Press switch
‚or „on the motor part to
operate.
f) After use, press buttons ‰to remove the
motor part.
g)
Pressing the lid interlock (2c), turn the lid
counter-clockwise to unlatch it and lift it up.
h) Take out the tool holder before removing
the processed food. To remove the tool,
push it up at the end that protrudes at the
bottom of the tool holder.
Cleaning the appliance
(see picture section C)
Clean the motor part ·and the whisk
gearbox Ëwith a damp cloth only. The lid
(2) can be cleaned under running water, but
do not immerse it in water, nor clean it in a
dishwasher.
All other parts can be cleaned in the dish-
washer.
When processing foods with colour (e.g.
carrots), the plastic parts of the appliance may
become discoloured. Wipe these parts with
vegetable oil before cleaning them.
Accessories
(available at Braun Service Centres; however
not in every country)
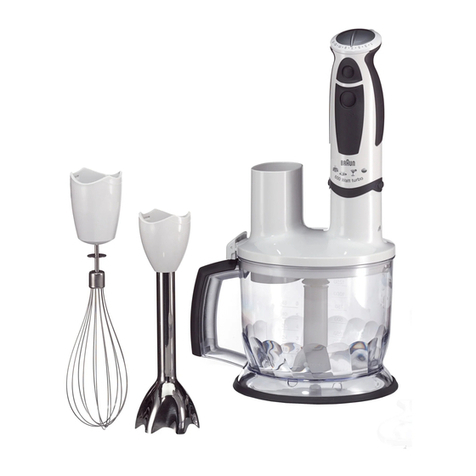
BC: Chopper attachment, perfectly suited
for chopping large quantities as well as for
preparing shakes, making light doughs and
crushing ice cubes.
HC: High-speed chopper, ideal for herbs,
onions, garlic, chilis, nuts etc.
Recipe example
Mayonnaise (use handblender)
200–250 ml oil,
1 egg (yolk and white),
1 tbsp. lemon juice or vinegar,
salt and pepper to taste
Put all ingredients into the beaker according
to the a.m. order. Introduce the handblender
to the base of the beaker. Pressing the turbo
switch „, keep the handblender in this
position until the oil emulsifies. Then, without
switching off, slowly move it up and down
until the mayonnaise is well combined.
Subject to change without notice.
Please do not dispose of the product in
the household waste at the end of its
useful life. Disposal can take place at a
Braun Service Centre or at appropriate
collection points provided in your country.
Guarantee
We grant a 2 year guarantee on the product
commencing on the date of purchase. Within
the guarantee period we will eliminate any
defects in the appliance resulting from faults
in materials or workmanship, free of charge
either by repairing or replacing the complete
appliance at our discretion.
This guarantee extends to every country
where this appliance is supplied by Braun or
its appointed distributor.
This guarantee does not cover: damage
due to improper use, normal wear or use as
well as defects that have a negligible effect
on the value or operation of the appliance.
The guarantee becomes void if repairs are
undertaken by unauthorised persons and if
original Braun parts are not used.
To obtain service within the guarantee period,
hand in or send the complete appliance with
your sales receipt to an authorised Braun
Customer Service Centre.
For UK only:
This guarantee in no way affects your rights
under statutory law.
99657835_MR5550_MFP_China.indd 999657835_MR5550_MFP_China.indd 9 20.10.10 12:2020.10.10 12:20


