manuals.online logo
Brands
  1. Home
  2. •
  3. Brands
  4. •
  5. Braun
  6. •
  7. Lighting Equipment
  8. •
  9. Braun 58186 Assembly instructions

Braun 58186 Assembly instructions

Other Braun Lighting Equipment manuals

Braun 59223 Assembly instructions

Braun

Braun 59223 Assembly instructions

Braun Aesculap OP930 Manual

Braun

Braun Aesculap OP930 Manual

Braun 58465 Assembly instructions

Braun

Braun 58465 Assembly instructions

Popular Lighting Equipment manuals by other brands

Life 39.9F70020C quick start guide

Life

Life 39.9F70020C quick start guide

EuroLite LED ML-20 user manual

EuroLite

EuroLite LED ML-20 user manual

LIGMAN OD-50141 installation manual

LIGMAN

LIGMAN OD-50141 installation manual

Home Accents Holiday 1002461144 instructions

Home Accents Holiday

Home Accents Holiday 1002461144 instructions

Experia IRiS Ripple Light instruction manual

Experia

Experia IRiS Ripple Light instruction manual

Erco Gecko Mounting instructions

Erco

Erco Gecko Mounting instructions

Inter-lux ZTA.100.Surface Installation and maintenance instructions

Inter-lux

Inter-lux ZTA.100.Surface Installation and maintenance instructions

Whelen Engineering Company TN Series installation guide

Whelen Engineering Company

Whelen Engineering Company TN Series installation guide

IKEA BJÖRKSPIREA manual

IKEA

IKEA BJÖRKSPIREA manual

Toolland PM 6640 instruction manual

Toolland

Toolland PM 6640 instruction manual

GTD GTD-LP200 user manual

GTD

GTD GTD-LP200 user manual

LIVARNO home 1105-W-UK manual

LIVARNO home

LIVARNO home 1105-W-UK manual

ProLights EclPar IPMFC user manual

ProLights

ProLights EclPar IPMFC user manual

Velvet EVO Series user manual

Velvet

Velvet EVO Series user manual

IDTOLIGHT GENT installation instructions

IDTOLIGHT

IDTOLIGHT GENT installation instructions

MAYTONI S35 installation manual

MAYTONI

MAYTONI S35 installation manual

MaxLite MLFP14DP4535 user manual

MaxLite

MaxLite MLFP14DP4535 user manual

SLV Elektronik 550621 instruction manual

SLV Elektronik

SLV Elektronik 550621 instruction manual

manuals.online logo
manuals.online logoBrands
  • About & Mission
  • Contact us
  • Privacy Policy
  • Terms and Conditions

Copyright 2025 Manuals.Online. All Rights Reserved.

Visit our website at: http://www.harborfreight.com
Email our technical support at: [email protected]
Owner’s Manual & Safety Instructions
Save This Manual Keep this manual for the safety warnings and precautions, assembly,
operating, inspection, maintenance and cleaning procedures. Write the product’s serial number in the
back of the manual near the assembly diagram (or month and year of purchase if product has no number).
Keep this manual and the receipt in a safe and dry place for future reference. 23b
When unpacking, make sure that the product is intact
and undamaged. If any parts are missing or broken,
please call 1-888-866-5797 as soon as possible.
Copyright©2022 by Harbor Freight Tools®. All rights reserved.
No portion of this manual or any artwork contained herein may be reproduced in
any shape or form without the express written consent of Harbor Freight Tools.
Diagrams within this manual may not be drawn proportionally. Due to continuing
improvements, actual product may differ slightly from the product described herein.
Tools required for assembly and service may not be included.
Read this material before using this product.
Failure to do so can result in serious injury.
SAVE THIS MANUAL.
Page 2 For technical questions, please call 1-888-866-5797. Item 58186
Specifications
Input Rating 5VDC, 1A
Battery Li-ion 18650 type 3.7V, 2600mAh
Charge Time 4 hours
IMPORTANT SAFETY INFORMATION
To prevent serious injury, FIRE, and EXPLOSION:
1. Contains Li-Ion battery. Battery must be
recycled or disposed of properly. Do not open,
crush, heat above 140° F or incinerate.
2. Keep dry. Do not open, drop, short-circuit,
incinerate, expose to temperatures higher
than 140° F, or charge/use if damaged.
3. Do not submerge Light.
4. People with pacemakers should consult their
physician(s) before use. Electromagnetic fields in
close proximity to heart pacemaker could cause
pacemaker interference or pacemaker failure.
5. Not a toy. Keep out of reach of children.
Charging Instructions
Read the ENTIRE IMPORTANT SAFETY INFORMATION section at the beginning of this document
including all text under subheadings therein before set up or use of this product.
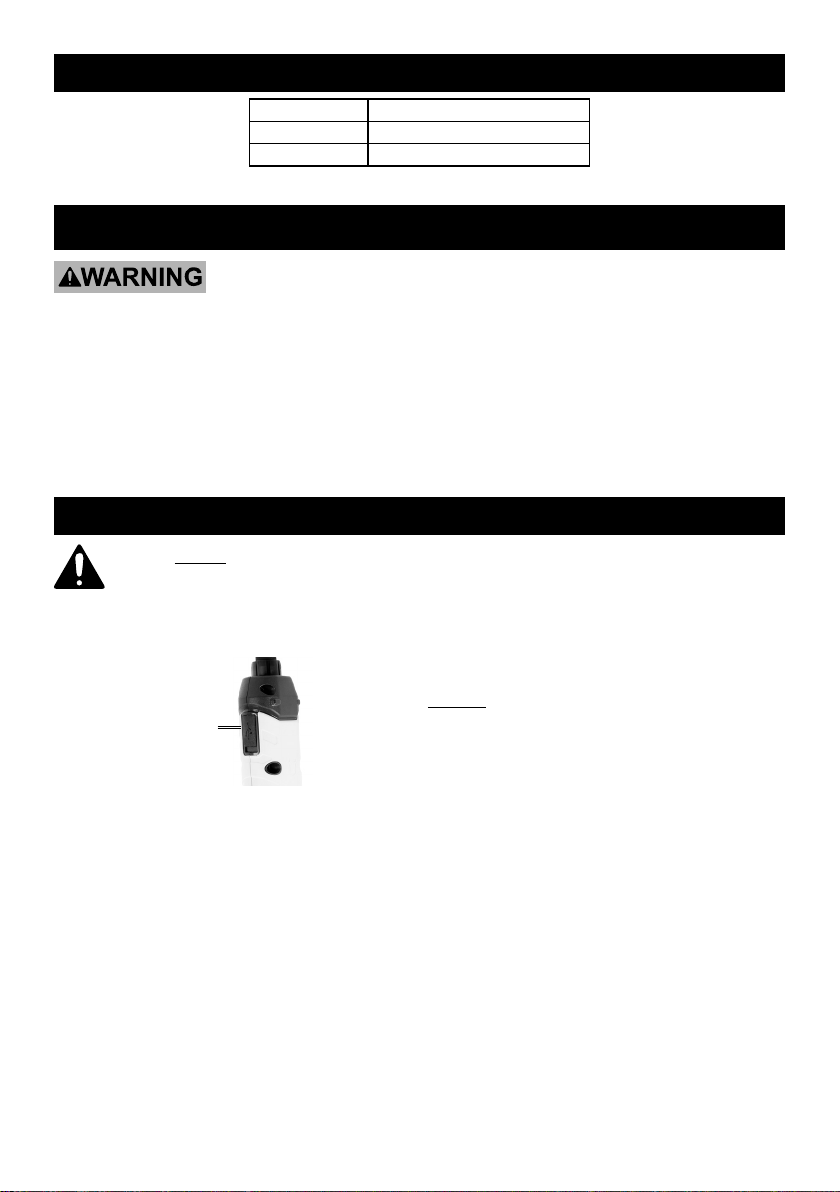
1. Insert the end of the Charging Cable into
the Charging Jack, located on the side of
the handle, under a cover. See below.
Charging
Jack
2. Plug Charging Cable into a powered USB port.
3. The Charging Indicator will blink Green
during charging. After approximately 4 hours
the Charging Indicator turns solid Green,
indicating the Work Light is charged and ready
for use. Unplug the Charging Cable.
NOTICE: Do not leave the Battery in a discharged state.
Charge the Battery every 3 months if the Work Light
is not in use. This will keep the Battery from wearing
down and add to its life. Do not charge the Work
Light for more than 4 hours. Overcharging will cause
overheating and shorten battery life. Do not charge
the Work Light at temperatures below 40° F.
Page 3For technical questions, please call 1-888-866-5797.Item 58186
Operation Instructions
Read the ENTIRE IMPORTANT SAFETY INFORMATION section at the beginning of this document
including all text under subheadings therein before set up or use of this product.
NOTE: Before using Work Light for the
first time, fully charge the Battery.
1. Press the Power Button once to turn on the light.
2. Press the Button again to switch to Normal mode.
3. Press the Button a third time to
switch to Full Power mode.
4. Press the Button a final time to turn the light off.
Power
Button
5. When finished using the Work Light,
store indoors away from children.
Note: If the light will not turn on, check that the
Battery Cap is tight. The Button may need to
be pressed forcefully to turn the light on.
Battery Removal
1. Use a screwdriver (sold separately) to remove
7 screws from the back of the light.
2. Remove 2 screws from the bottom of the light.
3. Remove 2 screws from the PCB
board above the battery.
4. Remove battery from housing.
5. Contains Li-Ion battery. Battery must be
recycled or disposed of properly.
26677 Agoura Road • Calabasas, CA 91302 • 1-888-866-5797
Limited 90 Day Warranty
Harbor Freight Tools Co. makes every effort to assure that its products meet high quality and durability
standards, and warrants to the original purchaser that this product is free from defects in materials
and workmanship for the period of 90 days from the date of purchase. This warranty does not apply to
damage due directly or indirectly, to misuse, abuse, negligence or accidents, repairs or alterations outside
our facilities, criminal activity, improper installation, normal wear and tear, or to lack of maintenance.
We shall in no event be liable for death, injuries to persons or property, or for incidental, contingent,
special or consequential damages arising from the use of our product. Some states do not allow the
exclusion or limitation of incidental or consequential damages, so the above limitation of exclusion
may not apply to you. THIS WARRANTY IS EXPRESSLY IN LIEU OF ALL OTHER WARRANTIES,
EXPRESS OR IMPLIED, INCLUDING THE WARRANTIES OF MERCHANTABILITY AND FITNESS.
To take advantage of this warranty, the product or part must be returned to us with transportation charges
prepaid. Proof of purchase date and an explanation of the complaint must accompany the merchandise.
If our inspection verifies the defect, we will either repair or replace the product at our election or we may
elect to refund the purchase price if we cannot readily and quickly provide you with a replacement. We will
return repaired products at our expense, but if we determine there is no defect, or that the defect resulted
from causes not within the scope of our warranty, then you must bear the cost of returning the product.
This warranty gives you specific legal rights and you may also have other rights which vary from state to state.
Record Product’s Serial Number Here:
Note: If product has no serial number, record month and year of purchase instead.
Note: Replacement parts are not available for this item. Reference UPC 193175503381.