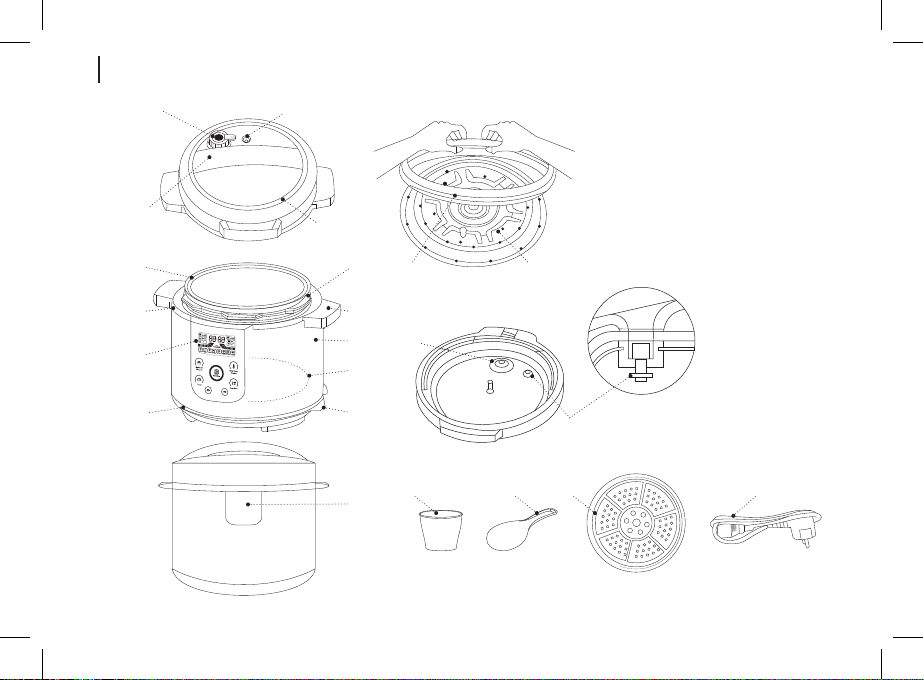
BRAYER BR2401 User manual

Instruction manual
Инструкция по эксплуатации
Multicooker BR2401
Мультиварка BR2401
brayer.ru

СОДЕРЖАНИЕ
EN......................................................................................................................................3
DE....................................................................................................................................23
RU ...................................................................................................................................46
KZ....................................................................................................................................70

3
EN
MULTICOOKER-PRESSURE
COOKER BR2401
The multicooker-pressure cooker is designed for
fast and high-quality cooking of food.
DESCRIPTION
1. Pressure limiting valve
2. 2. Float valve (pressure indicator)
3. 3. Lid handle
4. 4. Lid
5. 5. Cooking bowl
6. 6. The inner wall of the body
7. 7. Initial location of the lid
8. 8. Multicooker carrying handles
9. 9. Control panel/display
10. 10. Outer body
11. 11. Base
12. 12. Heating element
13. 13. Spoon shelf
14. 14. Drip container
15. 15. Silicone gasket
16. 16. Inner lid
17. 17. Inner part of pressure limiting valve
18. Inner part and scheme of oat valve (pressure
indicator)
ATTENTION!
For additional protection it is reasonable to install a
residual current device (RCD) with nominal operation
current not exceeding 30 mA into the mains. To install
RCD, contact a specialist.
EN
19. 19. Measuring cup
20. 20. Spoon
21. 21. Grid for steam cooking
22. 22. Power cord
Control panel/display (9)
23. «Program» button for choosing cooking programs
24. «Keep warm/Cancel» button for heat maintenance/
cancellation of the cooking program
25. «Functions» button for choosing additional
functions and programs
26. « » buttons for setting the pressure holding
time/delay time for the start of the cooking program
27. «Timer» button for turning on timer
28. Pressure setting button «High/Low pressure»
29. Cooking programs symbols
30. High/low pressure, functions and cooking programs
symbols
31. Digital symbols of the cooking time/timer operation
time
32. Multicooker light indicators

4
EN
1
3
5 6
78
9
10
11
12
13
14
19 20 21 22
2
4
15
17
16
18

5
EN
Программа
Быстрое
приготовление Поддержание тепла/
Отмена
ВыпечкаЙогуртОвощиРыбаМясо
ФункцииТаймер
ПастаСупРис
Приготовление
Быстрое
приготовление
Томление
Жарка
Пар
Тушение
Подогрев
Поддержание температуры
Рiс. 1
Рiс. 3
Рiс. 5
Рiс. 2
Рiс. 4
Рiс. 6
31
26
30 30
29 23
28 24
32
27 25

6
EN
SAFETY MEASURES AND OPERATION
RECOMMENDATIONS
Read the operation instruction carefully before using
the multicooker-pressure cooker and keep it for future
reference.
• Use the Multicooker for its intended purpose only, as it
is stated in this manual.
• Mishandling the Multicooker can lead to its breakage
and cause harm to the user or damage to his/her
property and it is not covered by warranty.
• Make sure that operating voltage of the Multicooker
indicated on the label corresponds to your home mains
voltage.
• The power plug is equipped with a grounding contact,
plug it into the socket with reliable grounding contact.
In case of short circuit the grounding reduces the risk of
electric shock.
• Contact an electrical technician, if you are not sure that
your sockets are installed properly and grounded.
• To prevent re do not use adapters designed for
connecting the plug to the mains socket without
grounding contact.
• In case of sparking in the mains socket and occurrence
of smell of burning, unplug the unit and apply to the
organization maintaining your home mains.
• If smoke appears from the body of the Multicooker,
unplug the unit and take measures to prevent re
spreading.
• Do not use the Multicooker outdoors.
• It is not recommended to use the unit during lightning
storms.
• Protect the unit from impacts, falling, vibrations and other
mechanical stress.
• Do not place the Multicooker next to the walls or close to
the kitchen furniture.
• Place the Multicooker keeping at least 20 cm gap
between the Multicooker body and the wall and at least
50 cm gap above the Multicooker.
• Before turning the multicooker on, always check the
condition of the silicone gasket on the inner lid, do not
use the multicooker if the silicone gasket is damaged.
• Before installing the cooking bowl, always check the
mobility of the temperature sensor located in the center
of the heating element.
• Do not turn the multicooker on without the installed
cooking bowl, always make sure there is enough liquid
in the cooking bowl. Follow the recommendations for
amount of dry food and required volume of liquid.
• Do not remove the cooking bowl while the multicooker is
operating.
• Make sure that the cooking bowl is always in direct
contact with the heating element. Foreign objects or food
pieces falling between the bowl and the heating element
will disrupt the correct operation of the multicooker.
• Before cooking, for example, meat with an outer layer of
skin, pierce the skin before cooking.
• Never leave the plugged-in Multicooker unattended.

7
EN
• Do not use the Multicooker in proximity to kitchen sink,
in bathrooms, near swimming pools or other containers
lled with water.
• If the multicooker is dropped into water, unplug it
immediately, and only then you can take the unit out
of water. Apply to the service center for testing and
repairing the multicooker.
• Do not use the Multicooker near heating appliances,
heat sources or open ame.
• Do not use the Multicooker in places where aerosols
are used or sprayed, and in proximity to inammable
liquids.
• Place the Multicooker on a at stable surface; do not
place it on the edge of a table. Do not let the power
cord hang from the edge of the table and make sure it
does not touch hot surfaces or sharp edges of furniture.
• During the operation do not touch hot surfaces of the
Multicooker.
• To avoid burns by hot steam, do not bend over the
pressure limiting valve and oat valve
• When using the multicooker, leave the lid open only
when frying food.
• •The «FRY» program allows only frying of food. Be
careful when frying food to avoid splash burns when
adding food to the hot bowl.
• Do not move the hot multicooker, turn it o, unplug it,
remove the bowl with food and wait until it cools down
completely. Move and carry the multicooker by holding
the handles on the body, do not use the handle on the
lid to carry the multicooker.
• To avoid getting burned by hot steam, be very careful
when opening the multicooker lid.
• Do not apply excessive eort when opening the lid of the
multicooker, make sure that the pressure inside the unit
is equal to atmospheric pressure. Do not try to open the
lid of the multicooker while cooking under pressure.
• When taking the cooking bowl out, use heat-resistant
kitchen potholders.
• To avoid damage of the non-stick coating of the cooking
bowl, when removing food, do not use metal objects, use
only kitchen tools intended for cookware with non-stick
coating. Do not cut food directly in the cooking bowl.
• Before cleaning the multicooker, remove the cooking
bowl and wait until the multicooker cools down
completely.
• Unplug the Multicooker before cleaning or when you
are not using it. When unplugging the Multicooker hold
only the power cord plug and carefully remove it from
the mains socket, do not pull the power cord — this can
lead to damage of the power cord or the socket or cause
short circuit.
• To avoid electric shock do not immerse the Multicooker
into water or any other liquids.
• Do not wash the Multicooker in a dishwashing machine.
• For children safety reasons do not leave polyethylene
bags, used as a packaging, unattended.
ATTENTION! Do not allow children to play with
polyethylene bags or packaging lm. Danger of
suocation!

8
EN
• The Multicooker is not intended for usage by children.
• Do not leave children unattended to prevent using the
unit as a toy.
• Do not allow children to touch the unit and the power
cord during the Multicooker operation.
• Place the unit out of reach of children during the
operation and cooling down.
• This unit is not intended for usage by physically or
mentally disabled persons (including children) or by
persons lacking experience or knowledge if they are not
under supervision of a person who is responsible for
their safety or if they are not instructed by this person
on the usage of the unit.
• Check the integrity of the power cord, the power plug
and the Multicooker body periodically.
• If the power cord is damaged, it should be replaced
by the manufacturer, a maintenance service or similar
qualied personnel to avoid danger.
• If the power cord is damaged, it should be replaced
with a power cord received from the manufacture or
service.
• Transport the Multicooker in the original package.
• Keep the unit out of reach of children and disabled
persons.
MULTICOOKER IS INTENDED FOR HOUSEHOLD
USE ONLY, DO NOT USE THE COFFEE MAKER FOR
COMMERCIAL OR LABORATORY PURPOSES.
BEFORE USING THE MULTICOOKER
After unit transportation or storage at low temperature
keep it for at least 3 hours at room temperature before
switching on.
• Unpack the Multicooker and remove all the packaging
materials.
• Keep the original package.
• Read the safety measures and operating
recommendations.
• Check the delivery set.
• Examine the Multicooker for damages, in case of
damage do not plug it into the mains.
• Make sure that the specications of power supply
voltage specied on the label correspond to the
specications of your mains.
• Take the handle (3) and turn the lid (4) clockwise until
bumping, remove the lid (4).
• Remove the cooking bowl (5).
• Wash the cooking bowl (5), measuring cup (19), spoon
(20), grid for steam cooking (21) with warm water and
a neutral detergent, rinse them under running water
and dry.
• Wipe the multicooker body (10) and the lid (4) with a
damp cloth, then wipe them dry.
THE PURPOSE OF THE BUTTONS ON THE
CONTROL PANEL (9) AND THE DISPLAY SYMBOLS
• The buttons (23, 24, 25, 26, 27, 28) on the control
panel (9) are touch-sensitive, you just need to touch

9
EN
the button to switch the necessary operation mode on,
each touch of the button is accompanied by a sound
signal.
«Program» button (23) for choosing cooking
programs
• By pressing the «Program» button (23), you can
choose a cooking program, and the symbols
(29), «Rice», «Soup», «Pasta», «Meat», «Fish»,
«Vegetable», «Yogurt», «Cake» will light up and will be
ashing on the display.
• The digital symbols (31) will indicate the pressure
holding time, for example, when choosing the program
«Pasta», the digital symbols (31) will display the value
«P: 05», which means the pressure holding time is 5
minutes (pic. 6).
• Use the « » buttons (26) to change the pressure
holding time.
• After choosing the pressure holding time, the
multicooker will turn on in 5 seconds.
«Keep warm/Cancel» button (24)
• To stop the cooking program, press the «Keep warm/
Cancel» button (24), the multicooker will be switched
to standby mode.
• When the multicooker is in standby mode, by pressing
the «Keep warm/Cancel» button (24) the keep warm
mode is activated, the digital symbols (31) will show
the time when the multicooker is operating in the keep
warm mode.
«Functions» button (25)
• By pressing the «Functions» button (25) you can choose
additional functions and cooking programs, and the
symbols (30) «Slow Cooke», «Steam», «Stew» , «Fry»
will light up and will be ashing on the display.
• After choosing the function and cooking program, the
multicooker will turn on in 5 seconds.
Buttons (26) for setting the pressure holding time/delay
time for the start of the cooking program « »
• By pressing the buttons (26) « » you can set the
pressure holding time or the delay time for the start of
the cooking program.
«Timer» button (27)
• Before setting the delay time for the start of cooking,
press the «Program» button (23) to choose a cooking
program.
• Press the «Timer» button (27), digital symbols (31) will
display the time «00:00» and the setting time «hours»
«00» will be ashing.
• By pressing the buttons (26) « », set the switch-on
delay time «hours», in 5 seconds the set time «hours»
will light constantly, and the digital symbols of the time
«minutes» «00» will be ashing.
• By pressing the buttons (26) « », set the switch-
on delay time «minutes», in 5 seconds the set time
«minutes» will light constantly.

10
EN
• The timer will start counting down the set switch-
on delay time, after the set time has passed, the
multicooker will turn on and start working with the set
cooking program.
• The maximum switch-on delay time is 24 hours.
Notes:
- you can rst choose the desired cooking program,
and then set the delay time for the start of cooking,
or rst set the delay time for the start of cooking, and
then choose the desired cooking program;
- setting the delay time for the start of cooking is not
available in the «Yogurt» and «Fry» programs.
«High Pressure/Low Pressure» button (28) for setting
the pressure during cooking
• By pressing the button (28) you can choose the modes
of cooking at high or low pressure, the cooking modes
are shown on the display with the ashing symbols (30)
«High Pressure» and «Low Pressure».
• After choosing the desired pressure for cooking food,
the multicooker will turn on in 5 seconds.
Notes: the choice of setting the pressure mode is not
available in the «Yogurt» and «Fry» cooking programs.
RULES FOR USING THE COOKING BOWL (5)
• Do not turn on the multicooker without the installed
bowl (5) and with no food in it.
• Overlling the bowl (5) with food can clog the inner
(17) part of the steam release valve (1), and lead to
excessive steam pressure inside the multicooker.
If there is not enough liquid, the required steam
pressure inside the multicooker will not be created
and may cause food to burn underneath.
• Follow the recommendations for amount of dry food
and volume of liquid, if necessary, pour at least 0.5-1
measuring cup (19) of liquid into the cooking bowl
(5).
• The total amount of food and volume of liquid should
not exceed 60% of the capacity of the inner volume
of the bowl (5). For foods such as dried vegetables,
beans, rice, cereal grains, the total amount of food
should not exceed 50% of the capacity of the bowl
(5) (g. 1).
• Use the cooking bowl (5) only in the multicooker. Do
not install or use the cooking bowl (5) on any heating
units or cooking surfaces. Do not insert any other
dishware into the multicooker, except for the bowl (5)
which is included in the delivery set.
• Do not use the bowl (5) for chopping food.
• Do not leave or store any foreign objects in the bowl
(5).
• Make sure that the surface of the heating element
and the bottom of the bowl (5) are always clean and
dry.
• Before placing the bowl (5) in the multicooker, always
check the mobility of the temperature sensor located
in the center of the heating element (12).
• Do not use metal objects that could damage the non-
stick coating of the bowl (5).

11
EN
• Place the lid (4) in the initial place of installation (7) (g.
4), turn the lid (4) counterclockwise until bumping.
• Check that the pressure limiting valve (1) is in the
«Closed» position, if it is in the «Open» position, turn it
clockwise or counterclockwise.
• Insert the power cord plug (22) into the connector on the
multicooker body (10).
• Insert the power cord plug (22) into an electrical socket.
• Press the «Program» button (23) to choose the «Rice»
cooking program, and the symbol (29) «Rice» will light
up and will be ashing on the display.
• Press the «Functions» button (25) to choose the «Slow
Cooke» program, and the symbol (30) «Slow Cooke» will
be ashing on the display, in 5 seconds the multicooker
will turn on in the «Rice» cooking program.
• The heating time depends on the amount of rice, the
more it is, the longer the heating time will be; after
heating, the multicooker will go into high pressure mode.
• The default pressure holding time is 7 minutes, you can
change the pressure holding time by pressing the «
» buttons (26), the longer the pressure holding
time is, the softer rice will be.
• For ordinary rice, you can set the pressure holding time
from 7 to 15 minutes. Sorts of rice vary, so the pressure
holding time should be tailored to your needs. For
example, wild rice of high nutrition value, can be cooked
for up to 20 minutes or longer.
• At the end of the «Rice» program, it is recommended to
wait for a while for the rice to steam before releasing the
pressure and opening the lid (4) of the multicooker.
• When removing food from the bowl (5), use the spoon
(20) or kitchen tools intended for cookware with non-
stick coating.
• Do not put the hot bowl (5) into cold water right
after cooking, let the bowl (5) cool down to room
temperature.
• After each preparation of food, wash the bowl (5) with
warm water and a neutral detergent, rinse it under
running water and dry it.
• The bowl (5) is not intended for washing in the
dishwashing machine.
FOOD COOKING PROGRAMS
• By pressing the «Program» button (23), you can
choose a cooking program, and the symbols
(29) «Rice», «Soup», «Pasta», «Meat», «Fish»,
«Vegetable», «Yogurt», «Cake» will light up and will be
ashing on the display.
• By pressing the «Functions» button (25) you can
choose additional functions and cooking programs, and
the symbols (30) «Slow Cooke», «Steam», «Stew» ,
«Fry» will light up and will be ashing on the display.
• After choosing the function and cooking program, the
multicooker will turn on in 5 seconds.
«Rice» program
• Rinse the rice and put it into the bowl (5), the minimum
amount of rice should be at least 1 measuring cup (19).
• Depending on your needs, add water from 1 to 1.5
measuring cups (19).

12
EN
• Press the «Keep warm/Cancel» button (24) to turn o
the program «Rice».
«Soup» Program
• The «Soup» program is intended for the preparation of
various broths or soups.
• Prepare the required food and put it in the bowl (5),
add the necessary quantity of water following the
recommendations in the section «RULES FOR USING
THE COOKING BOWL».
• Place the lid (4) in the initial place of installation (7) (g.
4), turn the lid (4) counterclockwise until bumping.
• Check that the pressure limiting valve (1) is in the
«Closed» position, if it is in the «Open» position, turn it
clockwise or counterclockwise.
• Insert the power cord plug (22) into the connector on
the multicooker body (10).
• Insert the power cord plug (22) into an electrical socket.
• Press the «Program» button (23) to choose the «Soup»
cooking program, and the «Soup» symbol (29) will light
up and will be ashing on the display.
• The default pressure holding time is 15 minutes, you
can change the pressure holding time by pressing the
«» buttons (26), the longer the pressure holding
time is, the softer the cooked food will be.
• In 5 seconds, the multicooker will turn on in the «Soup»
cooking program.
• The multicooker regulates the pressure and maintains
the temperature of the liquid, so the liquid does not
go into a strong boil. For example, when cooking
chicken broth, it will be transparent, if you need to
chop the cooked food, use a separate dish and add
the chopped food just before serving.
• Press the «Keep warm/Cancel» button (24) to turn o
the program «Soup».
«Pasta» program
• The cooking program «Pasta» is used for cooking
various types of pasta, noodles or for cooking
porridge.
• Place the pasta or noodles in the bowl (5) and add
the required quantity of water.
• When preparing products in the «Pasta» program,
it is recommended not to completely cover the
multivark with a lid (4).
• Insert the power cord plug (22) into the connector on
the multicooker body (10).
• Insert the power cord plug (22) into an electrical
socket.
• Press the «Program» button (23) to choose the
«Pasta» cooking program, and the «Pasta» symbol
(29) will be ashing on the display.
• The default pressure holding time is 5 minutes, you
can change the pressure holding time by pressing
the « » buttons (26).
• In 5 seconds, the multicooker will turn on in the
«Pasta» cooking program.
• Press the «Keep warm/Cancel» button (24) to turn o
the program «Pasta».

13
EN
«Meat» program
• The «Meat» cooking program is used for cooking meat
or stewed meat.
• Place the meat in the bowl (5), add spices and the
required quantity of water.
• Place the lid (4) in the initial place of installation (7) (g.
4), turn the lid (4) counterclockwise until bumping.
• Check that the pressure limiting valve (1) is in the
«Closed» position, if it is in the «Open» position, turn it
clockwise or counterclockwise.
• Insert the power cord plug (22) into the connector on
the multicooker body (10).
• Insert the power cord plug (22) into an electrical socket.
• Press the «Program» button (23) to choose the «Meat»
cooking program, and the «Meat» symbol (29) will be
ashing on the display.
• The default pressure holding time is 15 minutes, you
can change the pressure holding time by pressing the «
» buttons (26).
• In 5 seconds, the multicooker will turn on in the «Meat»
cooking program.
• Press the «Keep warm/Cancel» button (24) to turn o
the program «Meat».
«Fish» program
• The «Fish» cooking program is used to prepare sh
and sh broth.
• Place the sh in the bowl (5) and add the required
quantity of water.
• Place the lid (4) in the initial place of installation (7) (g.
4), turn the lid (4) counterclockwise until bumping.
• Check that the pressure limiting valve (1) is in the
«Closed» position, if it is in the «Open» position, turn it
clockwise or counterclockwise.
• Insert the power cord plug (22) into the connector on the
multicooker body (10).
• Insert the power cord plug (22) into an electrical socket.
• Press the «Program» button (23) to choose the «Fish»
cooking program, and the «Fish» symbol (29) will be
ashing on the display.
• The default pressure holding time is 5 minutes, you can
change the pressure holding time by pressing the «
» buttons (26), the pressure holding time should be
tailored to your needs.
• In 5 seconds, the multicooker will turn on in the «Fish»
cooking program.
• Press the «Keep warm/Cancel» button (24) to turn o the
program «Fish».
«Vegetable» program
• The «Vegetable» cooking program is used to prepare
vegetables or vegetable dishes.
• Place the vegetables in the bowl (5) and add the required
quantity of water.
• Place the lid (4) in the initial place of installation (7) (g.
4), turn the lid (4) counterclockwise until bumping.
• Check that the pressure limiting valve (1) is in the
«Closed» position, if it is in the «Open» position, turn it
clockwise or counterclockwise.

14
EN
• Insert the power cord plug (22) into the connector on
the multicooker body (10).
• Insert the power cord plug (22) into an electrical socket.
• Press the «Program» button (23) to choose the
«Vegetable» cooking program, and the «Vegetable»
symbol (29) will be ashing on the display.
• The default pressure holding time is 5 minutes, you can
change the pressure holding time by pressing the «
» buttons (26).
• In 5 seconds, the multicooker will turn on in the
«Vegetable» cooking program.
• Press the «Keep warm/Cancel» button (24) to turn o
the program «Vegetable».
«Yogurt» program
• Program for preparing yogurt.
• Before preparing yogurt, pour hot boiled water into the
bowl (5) for elimination of bacteria, after 2 minutes drain
the water and wipe the bowl (5).
• Pour fresh milk into the bowl (5), add yogurt
fermentation starter or one package of yogurt. Stir the
mixture thoroughly with the sterilized spoon (20); in
order to avoid damage of the non-stick coating, do not
use metal objects to stir the food.
• Install the bowl (5) into the multicooker.
• Place the lid (4) in the initial place of installation (7) (g.
4), turn the lid (4) counterclockwise until bumping.
• Check that the pressure limiting valve (1) is in the
«Closed» position, if it is in the «Open» position, turn it
clockwise or counterclockwise.
• Insert the power cord plug (22) into the connector on the
multicooker body (10).
• Insert the power cord plug (22) into an electrical socket.
• Press the «Program» button (23) to choose the «Yogurt»
cooking program, and the «Yogurt» symbol (29) will be
ashing on the display.
• The default pressure holding time is 8 minutes, you can
change the pressure holding time by pressing the «
» buttons (26), the pressure holding time should be
tailored to your needs.
• In 5 seconds, the multicooker will turn on in the «Yogurt»
cooking program.
• You can add jam, honey or canned fruit to the nished
yogurt.
Notes: setting the delay time for the start of cooking is not
available in the «Yogurt» program.
• Press the «Keep warm/Cancel» button (24) to turn o the
program «Yogurt».
«Cake» program
• The program is used for baking, for example, cupcakes.
• The default pressure holding time is 40 minutes, you can
change the pressure holding time by pressing the «
» buttons (26).
• Press the «Keep warm/Cancel» button (24) to turn o the
program «Cake».
Choice of a cooking mode with dierent pressures
• By pressing the button (28) you can choose the modes
of cooking at high or low pressure, the cooking modes

15
EN
are shown on the display with the ashing symbols (30)
«High Pressure» and «Low Pressure».
• «High pressure» (70-80kPa, 0.7-0.8 bar), in this
cooking mode, the temperature inside the slow cooker
rises to 160 ° C. High temperature signicantly reduces
the cooking time of products, for example, when
choosing the «Meat» program, the cooking time will
be 15 minutes. It is recommended to use the «Fast
cooking» cooking mode for hard cereals (beans, peas,
etc.), and the preparation of products that, under
normal conditions, take a long time to prepare, for
example, you can cook a jelly in about an hour.
• «Low Pressure» (40-50kPa, 0.4-0.5 bar), in this cooking
mode, the temperature inside the multivark rises above
100 ° C. The «cooking» mode is recommended for
the preparation of products with a soft structure, for
example, sh, poultry or vegetables.
• After choosing the desired pressure for cooking food,
the multicooker will turn on in 5 seconds.
Notes: the choice of setting the pressure mode is not
available in the «Yogurt» and «Fry» cooking programs.
• Press the «Keep warm/Cancel» button (24) to turn o
the multicooker.
«Slow Cooke» function
• In the «Slow Cooke» mode, you can remove the
pressure limiting valve (1) and the food will be cooked
as in a conventional multicooker.
• By pressing the «Functions» button (25) you can
choose the «Slow Cooke» function, the «Slow Cooke»
symbol (30) will be ashing on the display.
• After choosing the function, the cooking program starts
in 5 seconds.
• The default pressure holding time is 60 minutes, you
can change the pressure holding time by pressing the «
» buttons (26). Possible installation time is from
0.3 to 9 hours, the pressure holding time should be
tailored to your needs.
• Press the «Keep warm/Cancel» button (24) to turn o
the program «Slow Cooke».
«Fry» program
• Use the «Fry» program only for browning or frying food.
• The lid (4) of the multicooker must be opened, it is
forbidden to use the lid (4) even to partially cover the
multicooker; to cover the multicooker, you can use, for
example, a glass lid of a suitable size.
• Be careful when frying food to avoid splash burns when
adding food to the hot bowl (5).
• Insert the power cord plug (22) into the connector on
the multicooker body (10).
• Insert the power cord plug (22) into an electrical socket.
• By pressing the «Functions» button (25) you can
choose the «Fry» function, and the «Fry» symbol (30)
will be ashing on the display.
• In 5 seconds, the multicooker will turn on in the «Fry»
cooking program.

16
EN
• Press the «Keep warm/Cancel» button (24) to turn o
the program «Fry».
Steam cooking program «Steam»
• Use the «Steam» program to cook vegetables, seafood
or to heat up food.
• Install the grid (21) into the bowl (5) and put food on it.
• Pour some water into the bowl (5), at least two
measuring cups (19), required for intensive steam
generation.
• Place the lid (4) in the initial place of installation (7) (g.
4), turn the lid (4) counterclockwise until bumping.
• Check that the pressure limiting valve (1) is in the
«Closed» position, if it is in the «Open» position, turn it
clockwise or counterclockwise.
• Insert the power cord plug (22) into the connector on
the multicooker body (10).
• Insert the power cord plug (22) into an electrical socket.
• By pressing the «Functions» button (25) choose the
«Steam» function, and the «Steam» symbol (30) will be
ashing on the display.
• When the «Steam» program is chosen, the multicooker
will turn on in 5 seconds.
• The default operating time of the «Steam» program is
1 hour.
• Press the «Keep warm/Cancel» button (24) to turn o
the program «Steam».
«Stew» program
• Use the «Stew» program for cooking stewed meat.
• Place the meat in the bowl (5), add spices and the
required quantity of water.
• Place the lid (4) in the initial place of installation (7) (g.
4), turn the lid (4) counterclockwise until bumping.
• Check that the pressure limiting valve (1) is in the
«Closed» position, if it is in the «Open» position, turn it
clockwise or counterclockwise.
• Insert the power cord plug (22) into the connector on the
multicooker body (10).
• Insert the power cord plug (22) into an electrical socket.
• By pressing the «Functions» button (25) choose the
«Stew» program, and the «Stew» symbol (30) will be
ashing on the display.
• The default pressure holding time is 15 minutes, you can
change the pressure holding time by pressing the «
» buttons (26).
• In 5 seconds, the multicooker will turn on in the «Stew»
cooking program.
• Press the «Keep warm/Cancel» button (24) to turn o the
program «Stew».
PROGRAMS OF COOKING

17
EN
Program Time Default
temperature
(ºС)
Postponement
time
Temperatur
beibehalten
Position of the lid and valve
Default
time
Installation
Step
Schritt der Zeit
Rice 7 min 1-99 min 1 min 160 °С 1-24 h √ √
Soup 15 min 1-99 min 1 min 160 °С 1-24 h √ √
Pasta 5 min 1-99 min 1 min 160 °С 1-24 h √ √
Meat 15 min 1-99 min 1 min 160 °С 1-24 h √ √
Fish 5 min 1-99 min 1 min 160 °С 1-24 h √ √
Vegetables 5 min 1-99 min 1 min 160 °С 1-24 h √ √
Yogurt 8 min 5 h 30 min
- 9 h
30 min 40 °С 1-24 h × √
Cake 40 min 1-99 min 1 min 130 °С 1-24 h √ √
Slow Cook 60 min 30 min - 9 h 30 min 98 °С 1-24 h √ √
Fry 10 min 1-99 min 1 min 160 °С 1-24 h √ √
Steam 10 min 1-99 min 1 min 160 °С 1-24 h √ √
Stew 15 min 1-99 min 1 min 160 °С 1-24 h √ √
High Pressure It is recommended to use the cooking mode for hard cereals (beans, peas, etc.), and the preparation of products that, under normal conditions,
take a long time to prepare, for example, you can cook a jelly in about an hour.
Low Pressure The mode is recommended for the preparation of products with a soft structure, for example, sh, poultry or vegetables.

18
EN
USING THE MULTICOOKER
Placing foodstu, checking the silicone gasket (15),
the internal state of the valve (17 and 18), connecting
the multicooker to the electrical network
• Place food in the bowl (5), observing the recipe for
cooking and the section on how to use the cooking
bowl.
• I•nstall the bowl (5) with food into the multicooker.
• Check the condition of the silicone gasket (15) (g. 2)
• Remove the inner lid (16) and check for clogging or
remains of food on the inner part (17) of the pressure
limiting valve (1) and on the inner part (18) of the oat
valve (2) (Fig. 3)
• Install the inner lid (16) to its place.
• Place the lid (4) in the initial place of installation (7) (g.
4), turn the lid (4) counterclockwise until bumping.
• Check that the pressure limiting valve (1) is in the
«Closed» position, if it is in the «Open» position, turn it
clockwise or counterclockwise.
• Insert the power cord plug (22) into the connector on
the multicooker body (10).
• Insert the power cord plug (22) into an electrical socket,
you will hear a sound signal on the control panel (9),
the backlight of all control buttons and the display will
light up, the multicooker is in standby mode (g. 5).
• By pressing the «Program» button (23) you can choose
a cooking program.
• Symbols (31) show the default pressure holding time in
the cooking program.
• By pressing the buttons (26) « » in the cooking
programs, you can set the pressure holding time, and in
the «Timer» program, the delay time for the start of the
cooking program.
Notes: setting the delay time for the start of the cooking
program is not available in the «Yogurt» and «Fry» programs.
• By pressing the «Functions» button (25) you can choose
the functions and cooking programs.
• By pressing the button (28) you can choose the modes of
cooking at high or low pressure, the cooking modes are
shown on the display with the ashing symbols (30) «High
Pressure» and «Low Pressure».
• Use the «High Pressure» mode (70-80kPa) in the «Meat»
cooking program.
• Use the «Low Pressure» mode (40-50kPa) in the «Pasta»
cooking program.
• In 5 seconds, the multicooker will turn on to work
according to the set cooking program, while the display
will show the symbol of the cooking program (29), if you
have chosen the cooking mode with high or low pressure,
the symbols (30) will show the chosen pressure mode,
digital symbols (31) will show the pressure holding time,
two groups of symmetrical lights indicators (32) will move
towards the center of the display (g. 6).
• During heating, the oat valve (2) rises and blocks the
opening of the lid (4), the pressure will increase in the
bowl (5). When the pressure reaches the set level, a small
amount of steam will begin to ow out of the pressure
limiting valve (1), the digital symbols (31) will show the

19
EN
countdown of the time remaining until the end of the
cooking program.
• During the operation of the cooking program the
multicooker was in a state of increased or high
pressure, therefore, please do not move the
multicooker or try to open the lid (4).
• At the end of the cooking program, you will hear the
sound signals and the multicooker will turn to the warm
keeping mode, the digital symbols (31) will show the
operating time in the warm keeping mode.
• To turn o the multicooker in any operating mode, press
the «Keep warm/Cancel» button (24), the multicooker
will go into the standby mode.
• Remove the power cord plug (22) from the electrical
socket.
• How to open the lid (4) of the multicooker correctly
• Make sure the multicooker is switched o and the
power cord plug (22) is removed from the electrical
socket.
• Before opening the lid (4), the pressure inside the
multicooker must be relieved.
Rapid pressure relief:
- turn the handle of the pressure limiting valve (1)
to the «Open» position, at the same time it will
rise slightly and the steam will begin to come out
intensively from the multicooker, be careful to avoid
getting burned by the escaping hot steam;
- wait until the oat valve (2) goes down, only then you
can turn the lid (4) clockwise and remove it.
• Keep in mind that rapid pressure relief is not suitable
for food with large volume of liquid or with high starch
content (for example, soup, porridge, decoctions, etc.).
Natural cooling process of the multicooker:
- let the multicooker cool down naturally, and wait until
the oat valve (2) goes down, it can take from 10 to
25 minutes, depending on the ambient temperature;
- to speed up the cooling of the multicooker, you can
moisten, for example, a kitchen towel with cold water
and put it on the lid (4), when the oat valve (2) goes
down, you can open the lid (4).
Notes: if the oat valve (2) does not go down, this may be
due to remains of food sticking to it, in this case, make sure
that the pressure in the multicooker is relieved and press
the valve (2) with a thin object, for example, a chopstick.
• Take the lid (4) by the handle (3) and turn the lid (4)
clockwise until bumping and remove it.
• To avoid vacuum formation, always check the position of
the pressure limiting valve (1), it must be in the «Open»
position.
• Using potholders, remove the bowl (5) from the
multicooker, using the spoon (20) or other kitchen tool
suitable for non-stick surfaces, take out the cooked food.
CLEANING AND MAINTENANCE
• Switch the Multicooker o, unplug it (22), open the lid (4)
and let the Multicooker cool down.
• Clean the body (10) and the lid (4) with a slightly damp
cloth, then wipe it dry.

20
EN
• Do not immerse the multicooker body, the power
cord and the power cord plug into water or any other
liquids.
STORAGE
• Before putting the multicooker for long-term storage,
disconnect it from the mains, let the device cool down
• Clean the Multicooker before taking it away for
storage.
• Keep the unit in a dry cool place out of reach of
children and disabled persons.
Troubleshooting table
1 Malfunction Possible reason Solution
The lid of the
multicooker is
dicult to close
The inner lid with the
silicone gasket is not
correctly installed.
Check that the inner
lid and silicone
gasket are correctly
installed.
The oat valve is stuck
in the upper position.
Use a thin object to
push the oat valve
down.
• Remove the drip container (14), drain the liquid from
it, rinse, dry and reinstall it.
• Rinse the cooking bowl (5), measuring cup (19),
spoon (20) and grid (21) with warm water and neutral
detergent, rinse and dry them.
• Do not use metal objects or scouring pads, abrasive
cleaners or solvents to clean the multicooker and
cooking bowl (5).
• Thoroughly dry the cooking bowl (5) before placing it
in the multicooker.
• Remove the pressure limiting valve (1) from the lid
(4) by pulling it upwards, wash the valve (1), inspect
the valve installation location (1) on the lid (4), if there
is any dirt, remove it and wipe the valve installation
location (1) with a damp cloth.
• Remove the inner lid (16) (g. 3).
• Inspect the inner parts of the valves (17 and 18) for
dirt or remains of food, if any, remove them, wipe or
rinse the lid (4) from the inside and dry it.
• Remove the silicone gasket (15) from the inner lid
(16). Rinse the gasket (15) and the lid (16) with warm
water and a neutral detergent, rinse and dry them,
install the gasket (15) on the inner lid (16), install the
inner lid (g. 3) back to its place.
• If there is dirt on the inner wall of the body (6),
remove the dirt and wipe the surface with a slightly
damp cloth, then wipe it dry.
• Wipe the surface of the heating element (12) (only
when it is cold) with a soft, slightly damp cloth, do not
let water get inside the multicooker body.
Table of contents
Languages:
Other BRAYER Kitchen Appliance manuals

BRAYER
BRAYER BR1502 User manual

BRAYER
BRAYER BR1905 User manual

BRAYER
BRAYER BR1093WH User manual

BRAYER
BRAYER BR1903 User manual

BRAYER
BRAYER BR2403 User manual

BRAYER
BRAYER BR2404 User manual

BRAYER
BRAYER BR1095 User manual

BRAYER
BRAYER BR1090 User manual

BRAYER
BRAYER BR1093RD User manual

BRAYER
BRAYER BR1906 User manual

BRAYER
BRAYER BR2330 User manual

BRAYER
BRAYER BR1904 User manual

BRAYER
BRAYER BR2202 User manual

BRAYER
BRAYER BR2200 User manual

BRAYER
BRAYER BR1096 User manual

BRAYER
BRAYER BR2400 User manual

BRAYER
BRAYER BR2204 User manual

BRAYER
BRAYER BR1091 User manual

BRAYER
BRAYER BR1094 User manual

BRAYER
BRAYER BR1902 User manual