oneConcept 10028483 User manual

Pfannkuchenautomat
10028483 10028484

2
Sehr geehrter Kunde,
wir gratulieren Ihnen zum Erwerb Ihres Gerätes. Lesen Sie die folgenden Anschluss- und
Anwendungshinweise sorgfältig durch und befolgen Sie diese, um möglichen technischen
Schäden vorzubeugen. Für Schäden, die durch Missachtung der Sicherheitshinweise und
unsachgemäßen Gebrauch entstehen, übernehmen wir keine Haftung.
Technische Daten
Artikelnummer 10028483, 10028484
Stromversorgung 230 V ~ 50 Hz
Leistung 650 W
Sicherheitshinweise
• Lesen Sie sich alle Hinweise sorgfältig durch und bewahren Sie die Anleitung zum Nach-
schlagen gut auf.
• Kinder, physisch und körperlich eingeschränkte Menschen sollten das Gerät nur benut-
zen, wenn sie vorher von einer Aufsichtsperson ausführlich mit den Funktionen und den
Sicherheitsvorkehrungen vertraut gemacht wurden.
• Achten Sie darauf, dass Kinder nicht mit dem Gerät spielen.
• Reparaturen dürfen nur von geschulten Fachkräften durchgeführt werden.
• Prüfen Sie vor der Benutzung die Spannung auf der Geräteplakette und schließen Sie das
Gerät nur an Steckdosen an, die der Spannung des Geräts entsprechen.
• Ziehen Sie den Stecker aus der Steckdose wenn Sie das Gerät nicht benutzen.
• Ziehen sie den Stecker nicht am Kabel aus der Steckdose, sondern halten Sie ihn beim
Abziehen mit der Hand fest.
• Überprüfen Sie das Netzkabel regelmäßig auf Beschädigungen. Falls das Netzkabel be-
schädigt ist, muss es vom Hersteller, einem autorisierten Fachbetrieb oder einer ähnlich
qualizierten Person ersetzt werden.
• Die Backform wird im Betrieb sehr heiß. Berühren Sie sie nicht, um sich nicht zu verbrennen.
• Halten Sie das Gerät fern von Wärmequellen und Wasser.
• Benutzen Sie das Gerät nur in Innenräume und stellen Sie es auf eine hitze- und spritzbe-
ständige Oberäche, von der es nicht herunterfallen kann.
• Lassen Sie das Netzkabel nicht über den rand der Arbeitsäche hängen.
• Fassen Sie den Stecker nicht mit nassen Händen an.
• Wenn das gerät nass geworden ist, ziehen Sie umgehend den Stecker aus der Steckdose und
kontaktieren Sie den Kundendienst oder einen Fachbetrieb.
• Benutzen Sie das Gerät nicht in Feuchträumen.
• Sorgen Sie während des Betriebs für ausreichende Belüftung.
• Reinigen Sie das Gerät nach jeder Benutzung.
• Tauchen Sie das Gerät, das Netzkabel und den Stecker nie in Wasser oder andere Flüssig-
keiten.
• Schließen Sie das Gerät nicht an externe Timer oder ferngesteuerte Steckdosen an.

3
Geräteübersicht
1 Backform
2 Gehäuse
3 Gri
4 Ein/Aus-Schalter
Inbetriebnahme und Bedienung
Vor dem ersten Gebrauch
• Reinigen Sie die Ober äche der Backform mit einem feuchten Lappen.
• Wenn Sie das Gerät erstmalig benutzen kann ein unangenehmer Geruch entstehen. Die-
ser verschwindet von selbst, wenn Sie das Gerät öfter benutzen. Lüften Sie ausreichend.
• Die Heizung geht während der Benutzung mehrmals an und aus, um die Temperatur
konstant zu halten.
Bedienung
1. Fetten Sie die Backform mit etwas Öl oder Butter ein und stecken Sie den Stecker in
die Steckdose.
2. Sobald Sie das Gerät eingeschaltet haben leuchtet die Kontrollleuchte und das Gerät
wärmt sich auf.
3. Nach etwa 5 Minuten ist das Gerät aufgewärmt. Füllen Sie nun den Pfannkuchenteig
mit einer Spritz asche oder einer Kelle in die Vertiefungen. Sobald die Pfannkuchen an
der Oberseite getrocknet sind, drehen Sie sie mit einer Gabel um.
4. Die Backzeit hängt von der Teigbescha enheit und ihrer persönlichen Vorliebe ab. In
der Regel brauchen die Pfannkuchen zwischen 3-5 Minuten.
5. Sobald sie mit dem backen fertig sind, schalten Sie das Gerät aus und ziehen Sie den
Stecker aus der Steckdose.
6. Lassen Sie das Gerät vollständig abkühlen, bevor Sie es reinigen.

4
Reinigung und P ege
• Ziehen Sie den Stecker aus der Steckdose und lassen Sie das Gerät vollständig abkühlen.
• Reinigen Sie die Backform und das Gehäuse mit einem feuchten Lappen und etwas Spül-
mittel. Wischen Sie mit einem feuchten Tuch ohne Spülmittel nach und trocknen Sie das
Gerät sorgfältig ab.
• Verwenden Sie zur Reinigung keine Metallgegenstände oder Scheuerschwämme, um die
Backform nicht zu beschädigen.
• Tauchen Sie das Gerät niemals komplett in Wasser oder andere Flüssigkeiten.
Hinweise zur Entsorgung
Be ndet sich die linke Abbildung (durchgestrichene Mülltonne auf Rä-
dern) auf dem Produkt, gilt die Europäische Richtlinie 2002/96/EG.
Diese Produkte dürfen nicht mit dem normalen Hausmüll entsorgt wer-
den. Informieren Sie sich über die örtlichen Regelungen zur getrennten
Sammlung elektrischer und elektronischer Gerätschaften. Richten Sie
sich nach den örtlichen Regelungen und entsorgen Sie Altgeräte nicht
über den Hausmüll. Durch die regelkonforme Entsorgung der Altgeräte
werden Umwelt und die Gesundheit ihrer Mitmenschen vor möglichen
negativen Konsequenzen geschützt. Materialrecycling hilft, den Ver-
brauch von Rohsto en zu verringern.
Konformitätserklärung
Hersteller: CHAL-TEC GmbH, Wallstraße 16, 10179 Berlin, Deutschland.
Dieses Produkt entspricht den folgenden Europäischen Richtlinien:
2014/30/EU (EMV)
2014/35/EU (LVD)
2011/65/EU (RoHS)

5
Dear Customer,
Congratulations on purchasing this equipment. Please read this manual carefully and take
care of the following hints on installation and use to avoid technical damages. Any failure
caused by ignoring the mentioned items and cautions mentioned in the operation and ins-
tallation instructions are not covered by our warranty and any liability.
Technical Data
Item number 10028483, 10028484
Power supply 230 V ~ 50 Hz
Power consumtion 650 W
Safety Instructions
• Read all the safety and operating instructions carefully and retain them for future reference.
• Use this appliance solely in accordance with these instructions.
• This product is not designed for use by persons (including children) who have reduced phy-
sical, sensory or mental capacities or persons with no experience or knowledge, unless they
are instructed and supervised in the use of the appliance by a person responsible for their
safety. Children should be supervised to ensure that they do not play with the appliance.
• Have any repairs carried out solely by a qualied electrician. Never try to repair the ap-
pliance yourself.
• Before use please verify that the mains voltage is the same as indicated on the rating pla-
te of the appliance. Make sure that you always use an earthed wall socket to connect the
appliance. Always remove the plug from the wall socket when the appliance is not in use.
• Remove the plug from the wall socket by pulling the plug, not the power cord.
• Check the appliance‘s power cord regularly to make sure it is not damaged. Do not use
the appliance if the power cord is damaged. Have a damaged power cord replaced by a
qualied repair service.
• Certain parts of the appliance may get hot. Do not touch these parts to prevent burning
yourself. Make sure that the appliance has sucient space around it, and does not come
in contact with ammable material. The appliance must not be covered.
• Make sure that the appliance, the power cord or the plug do not make contact with hot
services, such as a hot hob or naked ame.
• Make sure that the appliance, the power cord and plug do not make contact with water.
• Never use the appliance outdoors and place the appliance on a at, stable surface. Never
allow the power cord to hang over the edge of the draining board, worktop or table.
• Make sure that your hands are dry before touching the appliance, power cord or plug.
Never use the appliance in a humid room.
• Do not pick up the appliance if it falls into water. Remove the plug from the wall socket
immediately. Do not use the appliance any more.
• Clean the appliance thoroughly after every use. Never immerse the appliance, the plug or
the power cord in water or other liquids.
• This appliance may not be used through an external timer or by means of a remote control.

6
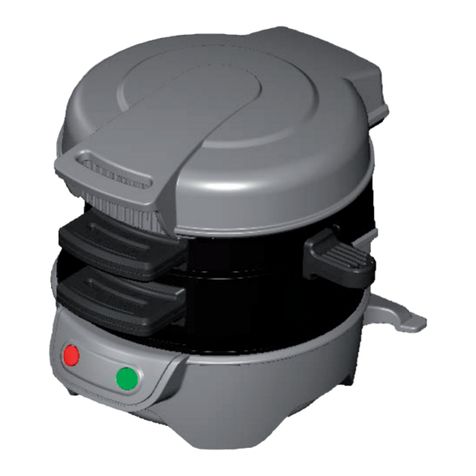
Product Description
1 Baking plate
2 Housing
3 Handle
4 On/O switch
Use and Operation
Before fi rst Use
• Clean the baking plate before using the appliance for the rst time.
• The appliance may emit a little smoke and a characteristic smell when you switch it on for
the rst time. This is normal, and will soon stop.
• Make sure the appliance has su cient ventilation.
• During use the heating element will switch on and o to keep the temperature of the
baking plate constant.
Getting Started
1. Grease the baking plate with a little oil or butter and put the plug into the wall socket.
2. Switch on the appliance by pressing the On/O switch. The indicator light will now illu-
minate. Wait until the heating plate has heated up su ciently (about 5 minutes). The
heating element will keep the baking plate at the correct temperature.
3. Pour the Dutch Po ertjes batter into the indentations in the baking plate. Pour quickly;
this will be easiest when you use a squeeze-bottle, gravy spoon, or jug.
4. Carefully turn the Dutch Po ertjes over using a fork or a shish kebab skewer once the
top surface becomes dry. The Dutch Po ertjes are ready once both sides tum golden
brown. The baking time will range between about 3 and 5 minutes, depending on the
type of batter and your personal preference, etc.
5. Once you have nished baking switch o the baking plate with the On/O switch.
6. Remove the plug from the wall socket, and allow the appliance to cool down completely
befor cleaning it.

7
Cleaning and Care
• Remove the plug from the wall socket, and alow the appliance to cool down completely.
• Clean the baking plate and the housing after each use. Use a damp cloth to clean the
plate, and dry it thoroughly. Remove the washing-up solution from the appliance with a
damp cloth, and then dry thoroughly.
• Never use metal implements or scourers to clean the baking plate. Be careful when using
metal objects to tum the Dutch Po ertjes or remove them from the baking plate; these
could damage the non-stick coating on the baking plate.
• Never immerse the appliance, plug or power cord in water. Never put the appliance in a dishwasher
Disposal Considerations
According to the European waste regulation 2002/96/EC this symbol
on the product or on its packaging indicates that this product may not
be treated as household waste. Instead it should be taken to the ap-
propriate collection point for the recycling of electrical and electronic
equipment. By ensuring this product is disposed of correctly, you will
help prevent potential negative consequences for the environment and
human health, which could otherwise be caused by inappropriate was-
te handling of this product. For more detailed information about recyc-
ling of this product, please contact your local council or your household
waste disposal service.
Declaration of Conformity
Producer: CHAL-TEC GmbH, Wallstraße 16, 10179 Berlin, Germany.
This product is conform to the following European Directives:
2014/30/EU (EMC)
2014/35/EU (LVD)
2011/65/EU (RoHS)

8
Gentile Cliente,
La ringraziamo per aver acquistato il nostro prodotto Klarstein. La preghiamo di leggere con
cura le seguenti istruzioni d’installazione e utilizzo del dispositivo e di seguirle per evitare
eventuali danni. Non ci assumiamo alcuna responsabilità per danni derivati da una mancata
osservazione delle avvertenze per la sicurezza e da un uso improprio del dispositivo.
Dati tecnici
Numero Articolo 10028483, 10028484
Alimentazione 230 V ~ 50 Hz
Potenza 650 W
Avvertenze
• Leggere attentamente le istruzioni e conservare il presente libretto per ogni consultazione.
• Bambini e persone con capacità siche, sensoriali o mentali ridotte possono utilizzare
il dispositivo solo dopo che una persona responsabile della loro sicurezza li ha messi a
conoscenza del funzionamento e delle norme di sicurezza relative al dispositivo.
• Assicurarsi che i bambini non giochino con il dispositivo.
• Le riparazioni devono essere eseguite solo da personale competente.
• Prima dell’uso assicurarsi che la potenza a diposizione corrisponde a quella indicata sulla
targhetta del dispositivo. Collegare il dispositivo esclusivamente a prese di corrente dalla
potenza conforme a quella richiesta.
• Disinserire la spina dalla presa di corrente in caso di inutilizzo prolungato.
• Non tirare il cavo per disinserire la spina, ma estrarla direttamente dalla base.
• Controllare regolarmente che il cavo di rete non presenti dei danni. In caso il cavo di rete sia
danneggiato, farlo sostituire dal produttore o da personale competente e qualicato.
• La piastra di cottura durante il funzionamento diventa molto calda; non toccarla per evitare
scottature.
• Tenere il dispositivo lontano da fonti di calore e dall’acqua.
• Utilizzare il dispositivo solo in ambienti chiusi e collocarlo su superci impermeabili e resistenti
al calore.
• Non lasciar pendere il cavo di rete sul piano di lavoro, in modo che non sia di intralcio e il
dispositivo possa cadere.
• Non maneggiare la spina con mani bagnate.
• In caso il dispositivo si sia bagnato, estrarre la spina dalla presa di corrente e contattare il
centro assistenza clienti o personale qualicato.
• Non utilizzare il dispositivo in ambienti umidi.
• Assicurarsi che durante l’uso ci sia suciente circolazione dell’aria.
• Pulire sempre il dispositivo dopo l’uso.
• Non immergere il dispositivo, il cavo di rete o la spina nell’acqua o in altri liquidi.
• Non collegare il dispositivo a prese di corrente o timer con comando a distanza.

9
Quadro generale
1 Piastra di cottura
2 Alloggiamento
3 Impugnatura
4 Tasto di accensione/
spegnimento
Messa in funzione e utilizzo
Primo utilizzo
• Pulire la super cie della piastra di cottura con un panno umido.
• Al primo utilizzo, è possibile che il dispositivo rilasci un odore poco gradevole. Questo
fenomeno scomparirà con l’uso. Assicurarsi che ci sia su ciente aereazione.
• Durante il funzionamento l’elemento riscaldante si accende e si spegne di frequente in
modo da mantenere costante la temperatura della piastra di cottura.
Utilizzo
1. Oliare o imburrare la piastra di cottura e inserire la spina nella presa di corrente.
2. Appena collegato, la spia luminosa si accende e il dispositivo inizia a riscaldarsi.
3. Dopo circa 5 minuti, il dispositivo si è riscaldato. Versare l’impasto negli stampi della pi-
astra di cottura utilizzando una spruzzetta o un mestolo. Appena la super cie dei pancake
si sarà rappresa, girare i pancake delicatamente dall’altro alto con una forchetta.
4. I tempi di cottura dipendono dalla consistenza dell’impasto e dai gusti personali. Normal-
mente sono su cienti 3-5 minuti.
5. A ne cottura, spegnere il dispositivo e disinserire la spina dalla presa di corrente.
6. Lasciar freddare completamente il dispositivo prima di pulirlo.

10
Pulizia e manutenzione
• Disinserire la spina dalla presa di corrente e far freddare completamente il dispositivo.
• Lavare la piastra di cottura e l’alloggiamento con un panno umido e un po’ di detergente.
Sciacquare con un panno umido, senza detergente e asciugare bene il dispositivo.
• Non utilizzare spugne o oggetti in metallo per la pulizia: potrebbero danneggiare la piastra
di cottura.
• Non immergere il dispositivo nell’acqua.
Smaltimento
Se sul prodotto è presente la gura a sinistra (il cassonetto mobile sbarra-
to), si applica la direttiva europea 2002/96/CE. Questi prodotti non possono
essere smaltiti con i ri uti normali. Informarsi sulle disposizioni vigenti sulla
raccolta separata di dispositivi elettrici e elettronici. Non smaltire i vecchi
dispositivi con i ri uti domestici. Grazie al corretto smaltimento dei vecchi
dispositivi si proteggono il pianeta e la salute delle persone da possibili
conseguenze negative. Il riciclo di materiali aiuta a diminuire il consumo di
materie prime.
Dichiarazione di conformità
Produttore: CHAL-TEC GmbH, Wallstraße 16, 10179 Berlino, Germania.
Questo prodotto è conforme alle seguenti direttive europee:
2014/30/UE (EMC)
2014/35/UE (LVD)
2011/65/UE (RoHS)

11
Chère cliente, cher client,
Toutes nos félicitations pour l’acquisition de ce nouvel appareil. Veuillez lire attentivement
les instructions de branchement et d’utilisation an d’éviter d’éventuels dommages tech-
niques. Le fabricant ne saurait être tenu pour responsable des dommages dus au non-
respect des consignes de sécurité et à la mauvaise utilisation de l’appareil.
Données techniques
Numéro d’article 10028483, 10028484
Alimentation électrique 230 V ~ 50 Hz
Puissance 650 W
Consignes de sécurité
• Veuillez lire les consignes attentivement et conserver ce mode d’emploi pour d’éventuelles
consultations ultérieures.
• Les enfants ainsi que les personnes dont les capacités physiques et mentales sont réduites
doivent utiliser l’appareil uniquement après avoir été entièrement sensibilisés aux consignes
de sécurité et aux fonctions de l’appareil par une personne responsable de leur sécurité.
• Veiller à ce que les enfants ne jouent pas avec l’appareil.
• Toute réparation doit être eectuée par un professionnel qualié.
• Vérier la tension que supporte l’appareil, indiquée sur la plaque signalétique. Ne brancher
l’appareil qu’à une prise dont la tension électrique correspond à la tension supportée par
l’appareil.
• Débrancher l’appareil lorsqu’il n’est pas utilisé.
• Ne pas tirer sur le cordon d’alimentation pour débrancher l’appareil. Tirer plutôt sur la che.
• Vérier régulièrement que le cordon d’alimentation n’est pas endommagé. Si le cordon
d’alimentation est endommagé, il doit être remplacé par le fabricant, un atelier autorisé ou
par un professionnel qualié.
• Le moule devient très chaud pendant le fonctionnement de l’appareil. Ne pas le toucher pour
ne pas se brûler.
• Éloigner l’appareil de l’eau et de toute source de chaleur.
• Utiliser l’appareil seulement en intérieur. Le placer sur une surface imperméable et résistante
à la chaleur, depuis laquelle il ne peut tomber.
• Ne pas laisser pendre le cordon d’alimentation sur le plan de travail.
• Ne pas toucher la che avec les mains mouillées.
• Si l’appareil a été mouillé, le débrancher immédiatement et contacter le service clients ou un
professionnel qualié.
• Ne pas utiliser l’appareil dans un environnement humide.
• Veiller à ce que la ventilation soit susante pendant l’utilisation de l’appareil.
• Nettoyer l’appareil après chaque utilisation.
• Ne jamais faire tremper l’appareil, le cordon d’alimentation ou la che dans de l’eau ou
d’autres liquides.
• Ne pas brancher l’appareil à une minuterie externe ou à une prise contrôlée à distance.

12
Aperçu de l’appareil
1 Moule
2 Boîtier
3 Poignée
4 Bouton marche/arrêt
Mise en marche et fonctionnement
Avant la première utilisation
• Nettoyer la surface du moule avec un chi on humide.
• Si l’appareil est utilisé pour la toute première fois, une mauvaise odeur peut se dégager.
Elle disparaîtra lorsque l’appareil aura été utilisé plusieurs fois. Veiller à ce que la venti-
lation soit su sante.
• Le système de chau age s’allume et s’éteint plusieurs fois pendant le fonctionnement de
l’appareil pour garder une température constante.
Fonctionnement
1. Graisser le moule avec un peu d’huile ou de beurre. Brancher ensuite l’appareil.
2. Dès que l’appareil est allumé, le témoin lumineux s’allume et l’appareil se met à chauf-
fer.
3. Après environs 5 minutes, l’appareil est su samment chaud. Remplir les creux avec
de pâte à pancake à l’aide d’une pissette ou d‘une louche. Dès que la partie supérieure
des pancakes est sèche, les retourner à l’aide d’une fourchette.
4. Le temps de cuisson dépend de la consistance de la pâte et de vos préférences. En
règle générale, les pancakes sont cuits en 3 à 5 minutes.
5. Une fois que vous avez terminé, éteindre et débrancher l’appareil.
6. Laisser refroidir l’appareil avant de le nettoyer.

13
Nettoyage et entretien
• Débrancher l’appareil et le laisser complètement refroidir.
• Nettoyer le moule et le boîtier avec un torchon humide et un peu de produit vaisselle.
Rincer avec un torchon humide sans produit vaisselle puis essuyer soigneusement.
• Ne pas utiliser d’objet en métal ou d’éponge à gratter lors du nettoyage pour ne pas en-
dommager le moule.
• Ne jamais tremper l’appareil dans de l’eau ou d’autres liquides.
Informations sur le recyclage
Vous trouverez sur le produit l’image ci-contre (une poubelle sur roues,
barrée d‘une croix), ce qui indique que le produit se trouve soumis à
la directive européenne 2002/96/CE. Renseignez-vous sur les disposi-
tions en vigueur dans votre région concernant la collecte séparée des
appareils électriques et électroniques. Respectez-les et ne jetez pas les
appareils usagés avec les ordures ménagères. La mise en rebut correcte
du produit usagé permet de préserver l’environnement et la santé. Le
recyclage des matériaux contribue à la préservation des ressources na-
turelles.
Déclaration de conformité
Fabricant: CHAL-TEC GmbH, Wallstraße 16, 10179 Berlin, Allemagne.
Ce produit est conforme aux directives européennes suivantes :
2014/30/UE (CEM)
2014/35/UE (LVD)
2011/65/UE (RoHS)

14
Estimado cliente:
Le felicitamos por la adquisición de este aparato. Lea con atención el siguiente manual y
siga cuidadosamente las instrucciones de uso con el n de evitar posibles daños técnicos.
La empresa no se responsabiliza de los daños ocasionados por un uso indebido del producto
o por haber desatendido las indicaciones de seguridad.
Datos técnicos
Número de artículo 10028483, 10028484
Suministro eléctrico 230 V ~ 50 Hz
Potencia 650 W
Indicaciones de seguridad
• Lea atentamente todas las indicaciones y conserve este manual de instrucciones para con-
sultas posteriores.
• Los niños y las personas con discapacidades físicas y psíquicas podrán utilizar el aparato si
previamente han sido instruidos por otra persona y se han familiarizado con el funcionamien-
to del aparato y con las indicaciones de seguridad del mismo.
• Asegúrese de que los niños no juegan con el aparato.
• Las reparaciones deberá realizarlas un servicio técnico autorizado.
• Compruebe que la toma de corriente a la que va a enchufar el aparato se adecua a la tensión
del mismo, indicada en su placa de especicaciones.
• Desenchufe el aparato cuando no lo utilice.
• No tire del cable para desenchufar el aparato, sino del cuerpo del enchufe.
• Compruebe que el cable de alimentación no está dañado. De haber algún deterioro, el cable
deberá ser sustituido por el fabricante o por un servicio técnico o persona autorizados.
• Durante el funcionamiento, la plancha estará muy caliente. No la toque para no quemarse.
• Mantenga el aparato alejado del agua y de fuentes de calor.
• Utilice el aparato solamente en espacios interiores y colóquelo en una supercie resistente al
calor y al agua de la que no pueda caerse.
• No deje el cable colgando de la supercie en la que está colocado el aparato.
• No toque el enchufe con las manos mojadas.
• Si el aparato se moja, desenchúfelo inmediatamente y contacte con el servicio de atención
al cliente o con un técnico.
• No utilice el aparato en espacios con mucha humedad.
• Asegúrese que durante su funcionamiento el aparato cuenta con suciente ventilación.
• Limpie al aparato tras cada uso.
• Nunca sumerja el aparato, el cable de alimentación ni el enchufe en agua ni en ningún otro
líquido.
• No conecte el aparato a un temporizador externo o a una toma de corriente con control re-
moto.

15
Descripción del aparato
1 Molde
2 Carcasa
3 Agarre
4 Interruptor encendido/
apagado
Puesta en marcha y manejo
Antes del primer uso
• Limpie la super cie de la plancha con un paño húmedo.
• Cuando utilice el aparato por primer vez es posible que detecte un olor extraño. Este irá
desapareciendo a medida que utilice la máquina. Asegúrese de ventilarla su cientemente.
• La función de calor se apaga y se enciende varias veces durante el funcionamiento de la
plancha para mantener la temperatura constante
Manejo
1. Engrase los moldes con un poco de aceite o mantequilla y enchufe el aparato.
2. Cuando el aparato esté encendido, el piloto se encenderá y la plancha comenzará a
calentarse.
3. Después de 5 minutos el aparato estará caliente. Añada entonces la masa de las torti-
tas a cada molde con una botella con dosi cador, un cucharón o una jarra. Cuando las
tortitas estén secas por la parte superior, deles la vuelta con un tenedor.
4. El tiempo de cocción depende del espesor de la masa y de su gusto personal. Normal-
mente las tortitas necesitarán de 3 a 5 minutos para hacerse.
5. Cuando las tortitas estén listas, apague el aparato y desenchúfelo.
6. Deje que la plancha se enfríe completamente antes de limpiarla.

16
Limpieza y cuidado
• Desenchufe el aparato y deje que se enfríe completamente.
• Limpie los moldes y la carcasa con un paño húmedo y un poco de jabón. Aclárelo con otro
paño húmedo sin jabón y a continuación séquelo todo completamente.
• Para las labores de limpieza no utilice objetos de metal ni esponjas abrasivas para no
dañar las placas.
• Nunca sumerja el aparato completamente en agua ni en ningún otro líquido.
Indicaciones para la retirada del aparato
Si el aparato lleva adherida la ilustración de la izquierda (el contene-
dor de basura tachado) entonces rige la normativa europea, directi-
va 2002/96/CE. Este producto no debe arrojarse a un contenedor de
basura común. Infórmese sobre las leyes territoriales que regulan la
recogida separada de aparatos eléctricos y electrónicos. Respete las
leyes territoriales y no arroje aparatos viejos al cubo de la basura do-
méstica. Una retirada de aparatos conforme a las leyes contribuye a
proteger el medio ambiente y a las personas a su alrededor frente a
posibles consecuencias perjudiciales para la salud. El reciclaje ayuda a
reducir el consumo
Declaración de conformidad
Fabricante: CHAL-TEC GmbH, Wallstraße 16, 10179 Berlin, Alemaia.
Este producto cumple con las siguientes directivas europeas:
2014/30/UE (EMC)
2014/35/UE (baja tensión)
2011/65/UE (refundición RoHS)
This manual suits for next models
1
Table of contents
Languages:
Other oneConcept Kitchen Appliance manuals

oneConcept
oneConcept 10030541 User manual

oneConcept
oneConcept 10030530 User manual

oneConcept
oneConcept 10030737 User manual

oneConcept
oneConcept 10026845 User manual

oneConcept
oneConcept 10013203 User manual

oneConcept
oneConcept Rockkorn User manual

oneConcept
oneConcept 10030023 User manual

oneConcept
oneConcept 10028322 User manual

oneConcept
oneConcept Candyland 2 User manual

oneConcept
oneConcept Icebreaker User manual