Brice 330IK Use and care manual

Model
330IK
Manual Gear Driven Gravity Feed Slicer
™
Operation and Safety Manual
™
Model
330IK

DECLARATION OF CONFORMITY
Slicer
Machine Model:
Serial Number:
Dated:
is built in conformity with the provisions of:
98/37/CEE Machinery Directive
EN 1974 Food processing machinery
- Slicing machines
- Safety and hygiene requirements.
EN 60204 Electrical equipment of industrial machines:
Part 1 - General Design
89/109/CEE Directive for the materials and things destined
to come into contact with food.
89/336/CEE Directive on Electromagnetic Compatibility
(EMC)
73/23/EEC Directive on low voltage.
SAFETY ISSUES
1. NEVER touch this machine without training and
authorisation from your supervisor.
2. Machine MUST BE on solid, level bench/table.
3. Guards MUST BE in place before plugging in and turning
on machine.
4. ALWAYS use the three-pronged plug provided.
5. NEVER use your hand to hold food stuffs in place on the
meat table.
6. NEVER touch the slicer blade when it is rotating.
7. KEEP hands, arms, hair and loose clothing CLEAR
of all moving parts.
8. Should the slicer jam, SWITCH OFF AND UNPLUG before
removing the obstruction.
9. SWITCH OFF AND UNPLUG the machine from its power
source before cleaning, sanitizing or servicing.
10. USE ONLY the attachments provided by the
manufacturer and designed for this machine.
YOUR SAFETY IS OUR PRIMARY CONCERN

Operation and Safety Manual ™
Model 330IK Manual Gear Driven Gravity Feed Slicer
Introduction
Introduction 1.1
Overview
This Operation and Safety Manual has been prepared to introduce you to the Brice Model
330IK manual slicer. It explains the operation, cleaning and maintenance of the slicer in
simple, clear terms and with an emphasis on your safety.
Throughout the Manual procedures are supported by illustrations showing the parts involved
and the recommended safe method of handling those parts.
A word to the wise
This Manual is really two sets of instructions in one - some sections are relevant to all Brice
slicers, while other sections only concern a particular slicer or range of slicers.
Make sure that you read this Manual carefully so that you are familiar with the features and
procedures that are unique to the slicer that came with it.
How this Manual is arranged
This Manual is made up of four sections:
• Introduction - which explains the Manual, itself, safety issues associated with using a
slicer, gives a brief introduction to the features and components of the slicer and steps
you through the installation of the machine;
• Operation - explains the use of the slicer;
• Cleaning - explains the procedures for keeping the slicer clean; and
• Maintenance - details those procedures that you can perform to ensure the trouble-free
operation of the slicer.
Conventions and Symbols used in this Manual
To reduce confusion, and to highlight important points and safety matters, we have estab-
lished some standard terms and symbols:
• “slicer”
Whenever we talk about the slicer, we mean the slicer that is covered in this Manual.
• “foodstuff”
We use the word “foodstuff” to refer to any kind of meat or other food that is usually
sliced on a slicer.
• “meat table”
This is the table (usually on the right side of the slicer) on which you place the foodstuff
to be sliced. On gravity-feed slicers the meat table is steeply angled.
• “meat grip”
The meat grip is the device that holds the foodstuff in position on the meat table. It is
usually attached to the meat table and moves with the foodstuff as it is sliced.
• “Last Slice device”
This device (where fitted) is usually part of the meat grip and is used to hold small and
hard-to-handle stubs of processed foodstuffs (particularly meats) so that they can be
sliced to the last slice.
• “thickness control”
This is the mechanism by which you control the slice thickness, and is usually a large
rotary control on the front of the machine. It may or may not be illuminated, depending on
the individual slicer.
• “sharpener”
When we talk about the sharpener, we mean a built-in blade sharpening or grinding
device that has a grinding stone and, optionally, a finishing stone.

Operation and Safety Manual
™
Model 330IK Manual Gear Driven Gravity Feed Slicer
SAFETY
WARNINGS
This is an electrical device that uses mains (either single phase 240 Volt or 3 phase 380 Volt)
power. It uses a high speed rotating blade that is extremely sharp. You must be careful in how
you handle the slicer at all times. The following special warnings must be complied with for
your own safety and the safety of others.
THERE ARE NO USER-SERVICEABLE ELECTRICAL COMPONENTS IN THIS SLICER. ALL
ELECTRICAL COMPONENTS ARE ELECTRICALLY ISOLATED TO EARTH AND ARE SEALED
FOR YOUR SAFETY. YOU MUST NOT ATTEMPT TO TOUCH ANY ELECTRICAL COMPONENTS
OR WIRES - YOU MAY EXPOSE YOURSELF TO THE RISK OF SERIOUS INJURY BY
ELECTROCUTION.
UNLESS OTHERWISE INDICATED, ANY CLEANING OR MAINTENANCE PROCEDURE MUST BE
PERFORMED WITH THE POWER TO THE SLICER SWITCHED OFF AND THE SLICER’S POWER
CORD DISCONNECTED FROM THE POWERPOINT. FAILURE TO TURN OFF AND DISCONNECT
POWER MAY RESULT IN SERIOUS INJURY CAUSED BY THE SLICER BEING ACCIDENTLY
TURNED ON DURING CLEANING OR MAINTENANCE.
Slicer blades are extremely sharp and can cut through fingers and hands just as easily as
products to be sliced.
WHENEVER YOU CARRY OUT ANY PROCEDURE THAT PLACES YOUR HANDS ON OR NEAR THE
SLICER BLADE YOU MUST WEAR SUITABLE PROTECTIVE HAND COVERINGS SUCH AS STEEL
MESH GLOVES TO PREVENT ACCIDENTAL INJURY FROM THE BLADE.
• The Special Note flag
This is an upside-down triangle with an exclamation mark inside it. It appears in the left
margin of the page, like this, whenever we want to draw your attention to an important
point.
• The “No Hands” warning flag
This is a circle with the outline of a hand and a black bar through the hand. It appears
wherever we want to warn you that either: you shouldn’t put your hands in or near a
particular component; or that you must wear steel mesh protective gloves to carry out a
particular procedure.
• The “Power” warning flags
There are two power warning flags. The first, a lightning bolt inside an upside-down
triangle, is used whenever we want to remind and warn you that the slicer is connected
to the mains power supply. The second warning flag is a circle with the outline of a
lighting bolt and a black bar through the bolt. It appears to remind you that a particular
procedure must be carried out with the power to the slicer turned off at the powerpoint
and the slicer’s power plug disconnected from the powerpoint.
1.2 Introduction
Operation and Safety Manual ™
Model 330IK Manual Gear Driven Gravity Feed Slicer
The Brice Model 330IK manual slicer has been designed for environments where a range of
different foodstuffs and slicing requirements must be met - from individual slices to large
batches. Its features include:
• Manufactured in anodised aluminium and stainless steel to resist oxidisation and
corrosion;
• Micrometric thickness control allows for cutting of slices from 0 to 24mm;
• Power Status light;
• Low voltage switching for added safety;
• Last slice device to minimise waste in slicing processed foodstuff stubs;
• Self-contained and built-in sharpening device with grinding and finishing stones;
• All bearings are self-lubricating and sealed-for-life;
• Powerful gear-driven blade;
• Safety cutout switches for centre plate;
• Fully-guarded blade and meat tray.
Components of the model range
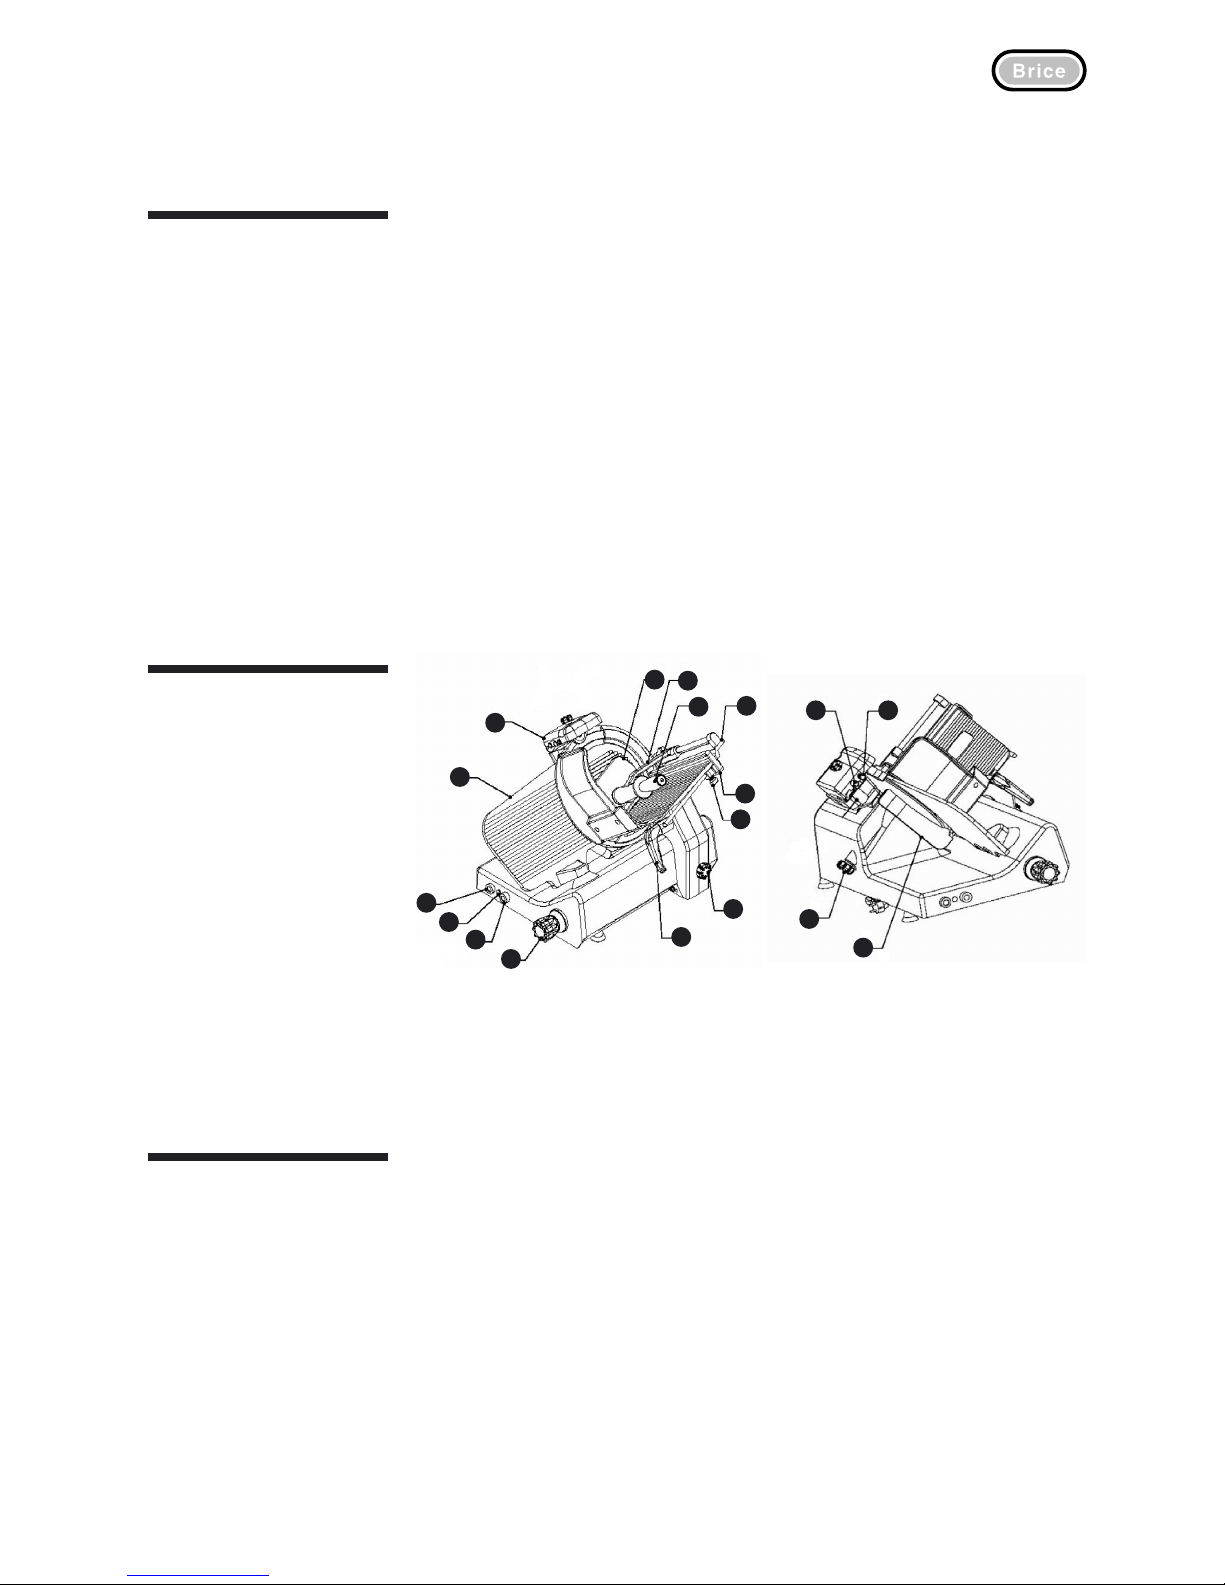
The following picture illustrates the main components of the slicer.
The Brice Model
330IK Gear
Driven Gravity
Feed manual
slicer
Introduction 1.3
1 ON switch
2 Power indicator
3 OFF switch
4 Thickness control
5 Meat table handle
6 Carriage securing knob
7 Product fence securing knob
8 Product fence
9 Food carriage
10 Meat grip handle
11 Last slice device arm
12 Meat grip/Last slice device
13 Sharpener housing
14 Thickness plate
15 Deburring stone lever
16 Sharpening stone button
17 Blade cover locking knob
18 Slice deflector
1
2
3
4
6
7
8
9
10
5
11
12
14
13
Installing the
slicer
Positioning the slicer
No matter where you put the slicer, you must allow at least as much space as the overall
dimensions indicate. Allowing an additional minimum of 20cm either side of the slicer will
make access for cleaning and maintenance easier.
Make sure that the surface that you intend placing the slicer on is solid, flat, level, dry and
smooth. Ideally, the surface should be between 80cm and 90cm high.
Electrical connections
The slicer connects to a single phase 240 Volts power supply using the power cord supplied.
Simply connect the plug on the end of the power cord to the power point.
16
17
18
15
Table of contents
Other Brice Kitchen Appliance manuals

Brice
Brice BRO150000 User manual

Brice
Brice FGSD107 Use and care manual

Brice
Brice 300IX Use and care manual

Brice
Brice GPR Use and care manual

Brice
Brice VA2000 Use and care manual

Brice
Brice OMATP32E Use and care manual

Brice
Brice CHIPPER Operator's manual

Brice
Brice 330IK SA Use and care manual

Brice
Brice 300IB Use and care manual

Brice
Brice CX30E Use and care manual


