Brickhouse Security Trek View User manual

Page 1 BrickHouse Security User’s Guide
Trek View HD
Nightvision Camera
User’s Guide

Trek View HD Nightvision Camera
The Trek View is a nightvision video recorder designed for use
in nearly any car or truck. Its internal DVR records .AVI video
and JPEG photos to an SD card, and allows for immediate
playback on its integrated LCD screen. Files can also be
transferred and viewed on any computer with a USB port
or SD card reader. The Trek View features a 4x digital zoom,
adjustable resolution, and motion activated recording.

Page 2 BrickHouse Security User’s Guide
Your box contains the HD
Nightvision Vehicle Camera, a
USB cable, an A/V cable, a DC
5V vehicle power adaptor, and a
windshield mount.

Page 3BrickHouse Security User’s Guide
67 5 4
11 12 1
1098
HDMI
3
2

Page 4 BrickHouse Security User’s Guide
1. SD/MMC Card Slot
2. Lens
3. LED Lights
4. OK
5. Menu
6. Power
7. HDMI Slot
8. Down
9. Up
10. Mode Button
11. USB Slot
12. TV Out

Page 5BrickHouse Security User’s Guide
RE SE T
17
15
16
13 14

Page 6 BrickHouse Security User’s Guide
13. Working (Blue) Indicator
Charging (Red) Indicator
14. Microphone
15. Speaker
16. Mount Hole
17. Reset

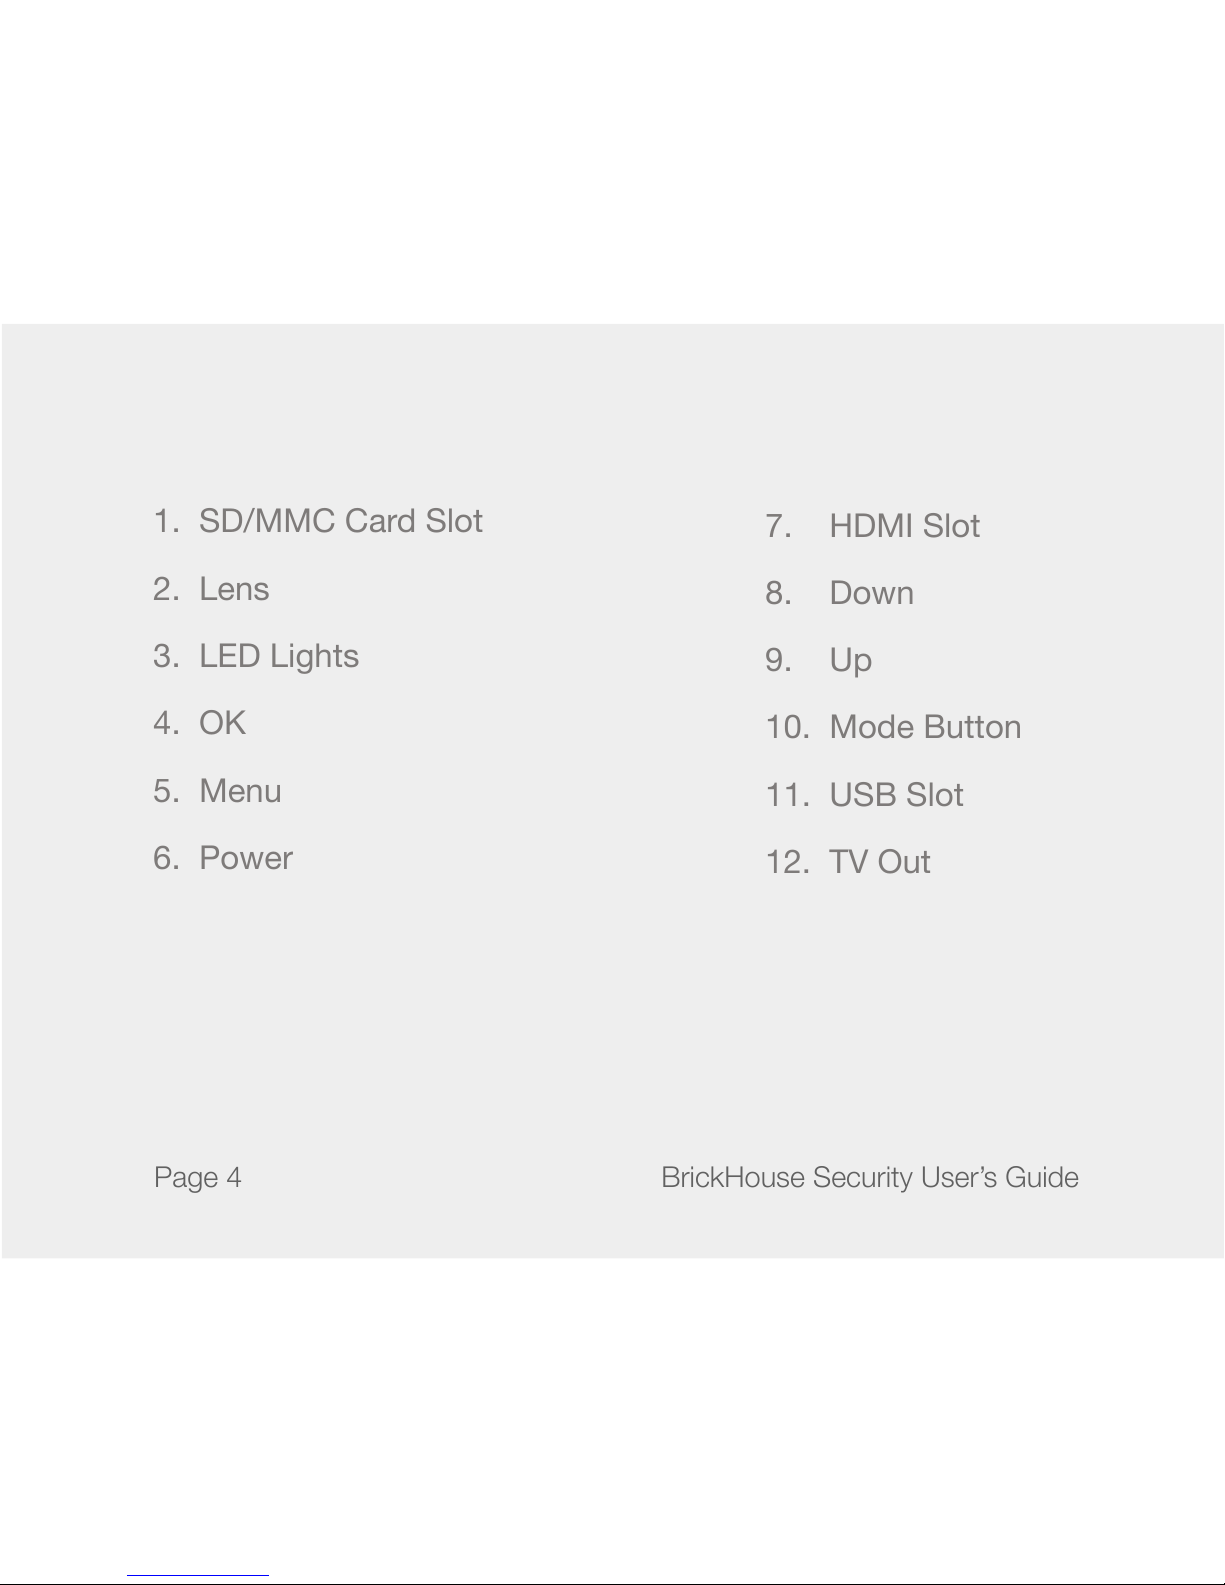
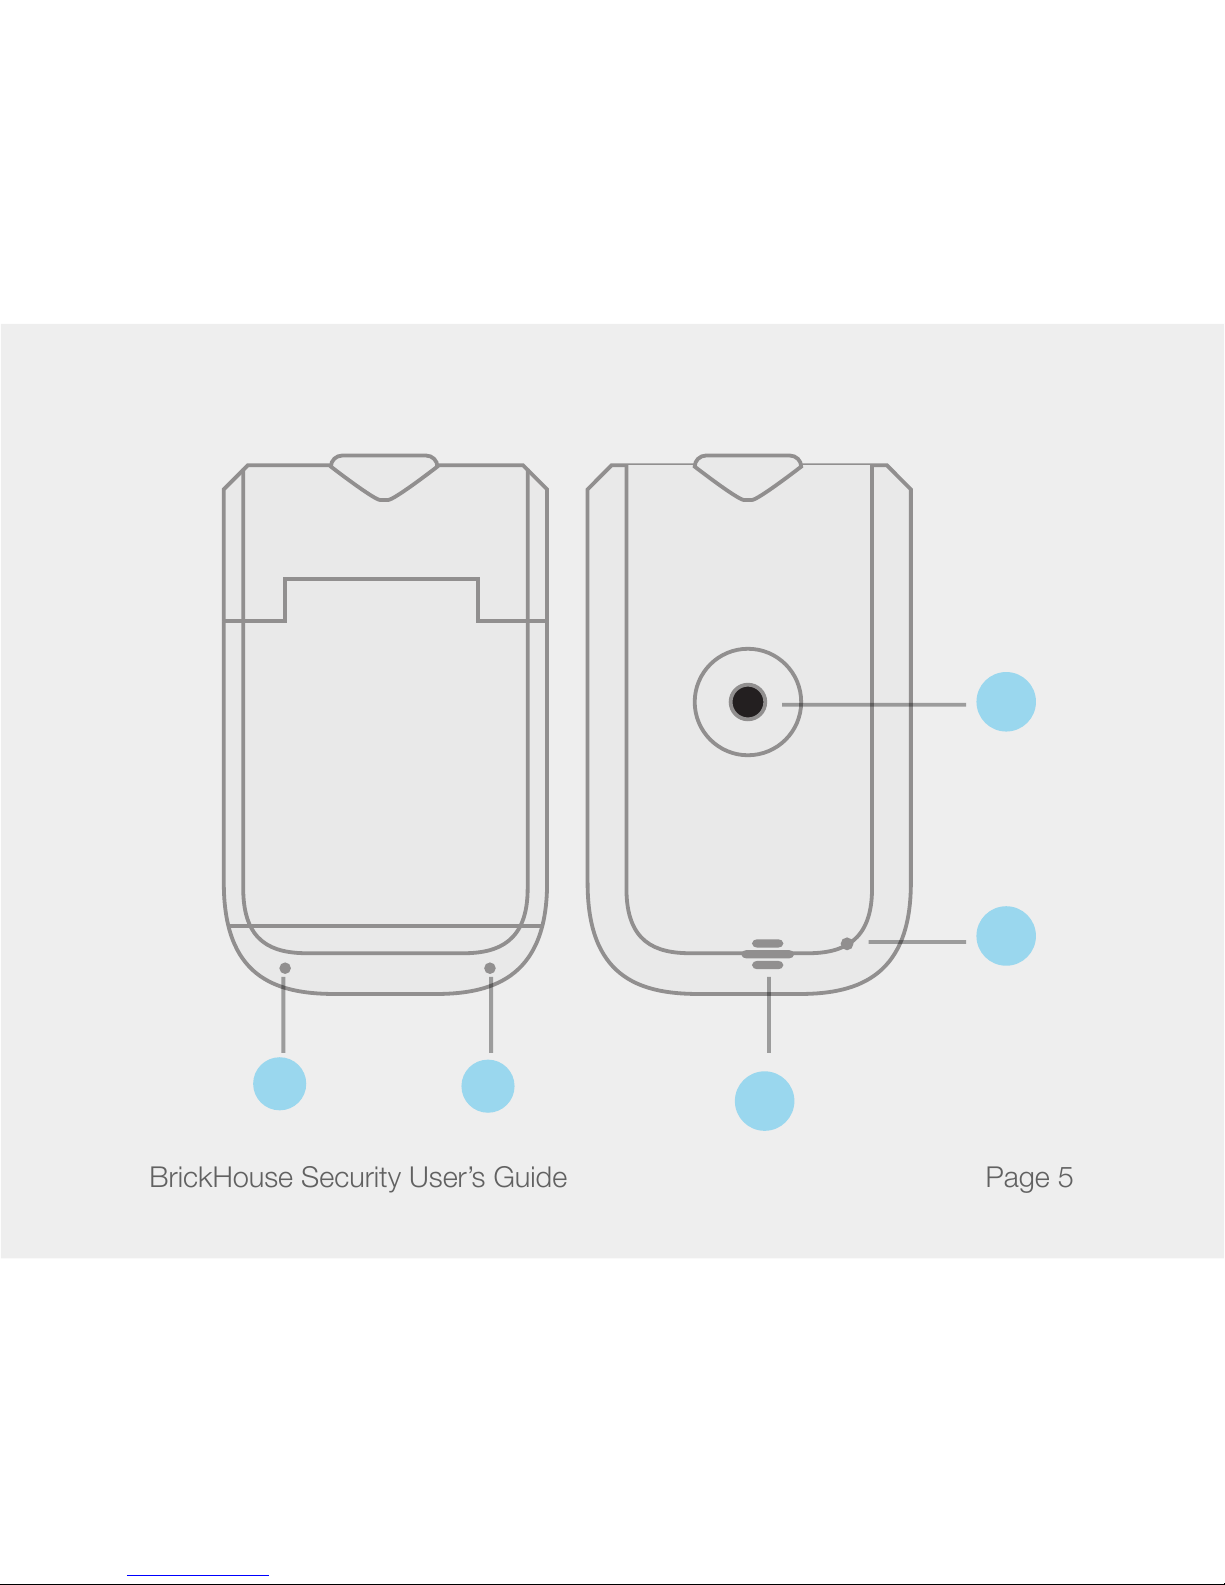
Page 7BrickHouse Security User’s Guide
Getting Started
Your device can be powered two ways: from its internal
battery, which is charged via USB, or by connecting it to
your vehicle’s power source. If you choose to use the internal
battery, charge the device for at least 12 hours before rst use.
The battery icon on the LCD screen will slowly ll up while
the device is charging and appear solid when it reaches full
capacity. If using the vehicle power adaptor, the device will
automatically power on when it receives power through your
car.
This device records to standard SD cards with up to 64 GB
capacities. Make sure your card is formatted as FAT 16/32, the
standard Windows format. If you aren’t sure how to format an
SD card, it can be done on the device itself, or you can nd
instructions here on how to do so on a PC: http://www.ehow.
com/how_2112408_format-memory-card.html.

Page 8 BrickHouse Security User’s Guide
To power the device on, press the POWER button. The device
will show a boot up image on the LCD and automatically enter
Video Standby mode.
Recording Video
To start recording, press the OK button while in the Video
Standby mode. There will be a short pause, and the timer in
the upper right corner of the screen will begin counting to
indicate the device is recording. Press the UP and DOWN
buttons to zoom in and out. Press the OK button again to stop
recording.
A timer in the upper right corner of the screen displays the
amount of recording time remaining on your memory card.
This time will vary, depending on your recording settings.

Page 9BrickHouse Security User’s Guide
Changing Recording Settings:
To view and change video settings, press the MENU button
while in Video mode. Press the UP or DOWN buttons to scroll
through choices and press the OK button to select what is
currently highlighted.
Movie Size: Movie Size allows you to change recording
resolution.
Date Stamp: Turn the time and date stamp on or off.
Motion Detect: Turn motion detection on or off.
Loop Rec: Turn loop recording on or off. When active, the
device will automatically erase the oldest le on the memory
card when it becomes full and begin recording in a new le.

Page 10 BrickHouse Security User’s Guide
Loop Time: Choose to record in 2 minute, 5 minute, or 10
minute clips when loop recording is active.
Continue: Choose how long recording will continue if the
device is disconnected from power; this means that if you have
the device connected to your vehicle for power, it will continue
recording this long when the car is powered off. Choose to
have this feature turned off, 10 minutes, or 20 minutes.
Video Sound: Turn audio recording on or off.

Page 11BrickHouse Security User’s Guide
Taking Photos
Press the MODE button while in Video mode to enter Photo
mode. A counter will appear in the upper right hand corner of
the screen that displays how many photos can be taken using
the device’s current settings. Press the UP and DOWN buttons
to zoom in and out. Simply press the OK button to take a
photo. The screen will ash and the device will make a shutter
sound to let you know a photo was captured. Press the UP and
DOWN buttons to zoom in and out.
Changing Photo Settings:
To view and change video settings, press the MENU button
while in Photo mode. Press the UP or DOWN buttons to scroll
through choices and press the OK button to select what is
currently highlighted.

Page 12 BrickHouse Security User’s Guide
Resolution: Choose the size and quality of your snapshots. 5
Mpx(megapixel), 3 Mpx, 2 Mpx, or 1 Mpx. Keep in mind that
the larger the image, the more memory it will use.
Quality: Choose Normal, Fine, or Super Fine.
Exposure: Adjust exposure time. Press DOWN to increase
exposure. Press UP to decrease exposure.
Driver Mode: Choose one of four settings. OFF means that
photos will only be taken when the OK button is pressed in
Photo mode. If in Self-timer mode, there will be a delay after
pressing the OK button before a photo is captured of 2 or 10
seconds. If Burst is chosen, 3 photos will be taken every time
the OK button is pressed in photo mode.
Date Stamp: Turn the time and date stamp on or off for photos.

Page 13BrickHouse Security User’s Guide
Recording Audio
Press the MODE button while in Photo mode to enter Audio
Standby mode. An image of a microphone and a timer will
appear on the screen. The timer in the upper right corner of
the screen displays how much recording time is left on the
memory card.
Press the OK button to begin recording audio. Press OK again
to stop.

Page 14 BrickHouse Security User’s Guide
Basic Specications
Audio/Video
Resolution 1280 x 720 848 x 480 640 x 480 Audio
Per GB of
Memory 15 min.15 min. 30 min. 13.5 hrs.
Photos
Size 1 Mpx 2 Mpx 3 Mpx 5 Mpx
Per GB of
Memory
760 720 690 590

Page 15BrickHouse Security User’s Guide
Reviewing Recorded Files From the Device
Press the MODE button again in Audio Standby mode to enter
Playback Mode. Press the UP and DOWN buttons to cycle
through les. Press the MENU button while viewing a le to
enter a menu containing options that allow you to edit, delete,
or protect a le from being deleted.
To play video or audio les, press the OK button when the le
is on the screen.
Press the MENU button to access the playback menu. Press
the UP or DOWN buttons to scroll through choices and press
the OK button to select what is currently highlighted.

Page 16 BrickHouse Security User’s Guide
Lock: Choose to Lock/Unlock one, Lock All, or Unlock All les.
Locked les cannot be deleted from the Trek View.
Delete: Delete the current le.
Slide Show: This option is only available for photos. It will play
back all photo les as a slideshow. To stop a slide show, press
the OK button.
Voice Memo: This option is only available for photos. Add a
voice memo to a photo.
Start-up Image: This option is only available for photos. Set
the current image to appear during system start-up.

Page 17BrickHouse Security User’s Guide
Customizing Settings
System Settings: In Video, Photo, or Playback mode, press
the MENU button and then the MODE button to access the
System Settings menu. Press the UP or DOWN buttons to
scroll through choices and press the OK button to select what
is currently highlighted.
Sounds: This brings up a sub-menu. Press the UP and DOWN
buttons to scroll through choices and press the MODE button
to change your current selection. Turn the shutter sound on
or off, choose one of three sounds that will play on system
startup or turn this feature off, turn the beep off that sounds
when a button is pressed, or change the volume of the beep.

Page 18 BrickHouse Security User’s Guide
Power frequency: Switch power frequencies, between 50 Hz
and 60 Hz. (note that 60 Hz is standard in the Americas).
Power Save: Choose to have the device automatically power
off if given no commands after 1, 3, or 5 minutes, or turn this
feature off.
Panel Protect: Choose to have the screen shut off after 30
seconds, 1 minute, or 2 minutes of not being given a com-
mand, or turn this feature off.
Date & Time: Set the system date and time and the format
in which it will be displayed. Use the MODE button to move
through elds and the UP and DOWN buttons to change a
value.

Page 19BrickHouse Security User’s Guide
Language: Choose from one of eleven languages.
TV Out: This is the format that will be used when connecting
the device to a monitor. Choose NTSC or PAL. NTSC is the
standard in North America.
Start-Up Image: Choose the image that will appear when the
system is booting up, or choose to turn this feature off.
Format: This will format the device’s SD card. FORMATTING
THE MEMORY CARD WILL ERASE ALL FILES STORED TO IT.
Table of contents
Other Brickhouse Security Dashcam manuals