Brinly CC-560 User manual

1007076 Rev. A
Owner's Manual
CULTIVATOR
MODEL:
CC-560
Assembly•
Operation•
RepairParts•
For use with Garden Tractors. A Sleeve Hitch
Accessory is required for operation. Wheel
weights and chains are also recommended.
This manual contains information for the safety
of persons and property. Read it carefully before
assembly and operation of the equipment!
Visit us on the web!
www.brinly.com
For the latest product updates and setup tips:
IMPORTANT

1007076 Rev. A 2
INTRODUCTION
SAFETY/OPERATION/MAINTENANCE
CONGRATULATIONSonthepurchaseofyournewBrinly-Hardy
Cultivator!Yourcultivatorisdesigned,engineeredandmanufacturedto
giveyouthebestpossibledependabilityandperformance.
CUSTOMER RESPONSIBILITIES
Pleasereadandretainthismanual.Theinstructionsenablesyouto
assembleandmaintainyourlawnaeratorproperly.Andplease,always
observethe“Safety”instructions.
TABLE OF CONTENTS
SAFETY/OPERATION/MAINTENANCE....................................... 2-3
PARTSBREAKDOWN.....................................................................4
ASSEMBLY................................................................................... 5-7
WARRANTY.....................................................................................8
PRODUCT COMPATIBILITY
Thiscultivatorisdesignedforusewithgardentractorsequippedwith
asleevehitch.Itmaybeusedtocultivateawiderangeofgarden
vegetablesoreldcrops.Itcanbesetupforstraddle-rowand/or
between-rowcultivation.
RECORD PURCHASE INFORMATION
Recordyourpurchaseinformationinthespacesprovidedbelow:
DATEOFPURCHASE:
COMPANYNAME:
COMPANYPHONE:
SERIALNUMBER:
TO HELP PREVENT BODILY INJURY DUE TO LOSS
OF STABILITY OR CONTROL:
•Donotexceedmaximumcapacityoftowingvehiclelisted
inthevehicleoperator'smanual.
•TowingthismachinebehindaZTR(ZeroTurningRadius)
mowerisnotrecommendedduetothesharpturningability
oftheZTR.DamagetothismachineortheZTRmayresult.
ZTR’stypicallyoperateathigherspeeds.Operatingabove5
mphmayresultindamagetothismachine.
SAFETY
Readthegeneralsafetyoperatingprecautionsinyourtowing
vehicleoperator'smanualforadditionalsafetyinformation.
PROTECT BYSTANDERS
•Keepbystandersawaywhenyouoperatethismachine.
•Beforeyoubacklookcarefullybehindforbystanders.
•Beforeyouoperateanyfeatureofthismachine,observe
yoursurroundingsandlookforbystanders.

1007076 Rev. A
3
SAFETY/OPERATION/MAINTENANCE
OPERATE SAFELY
•Usethismachineforintendedpurposeonly.
•Speedshouldalwaysbeslowenoughtomaintaincontrol.
Travelslowlyoverroughground.
•Donotletchildrenoranuntrainedpersonoperate
machine.
•Donotletanyone,especiallychildren,rideonthismachine
orthetowingvehicle.
•Checktowingvehiclebrakeactionbeforeyouoperate.
Adjustorservicebrakesasnecessary.
•Keepallpartsingoodconditionandproperlyinstalled.Fix
damagedpartsimmediately.Replacewornorbrokenparts.
Replaceallwornordamagedsafetyandinstructiondecals.
•Donotmodifythemachineorsafetydevices.Unauthorized
modicationstothetowingvehicleormachinemayimpairits
functionandsafety,andvoidthewarranty.
•Keepallnuts,boltsandscrewstight.
•Excessiveloadcancauselossoftractionandlossof
controlonslopes.Reduceweightwhenoperatingonslopes.
•Useonlyapprovedsleevehitches.Donotattachthis
machineexceptattheapprovedhitchpoint.
•Followthemanufacturer'srecommendationsforweight
limitsfortowedequipmentandusingonslopes.Use
counterweights,wheelweights,orchainsasdescribedinthe
towingvehicleoperator'smanual.
•Donotshifttoneutralandcoastdownhill.
KEEP RIDERS OFF TOWED ATTACHMENT
•Keepridersofftowedattachment.
•Ridersonanattachmentaresubjecttoinjury,suchas
beingthrownofftheattachmentduringsuddenstarts,stops
andturns.
•Ridersobstructtheoperator'sview,resultinginthe
attachmentbeingusedinanunsafemanner.
•Keepridersoffoftowbar.
KEEP BODY PARTS FROM UNDER TOW BAR
Beforedisconnectingthismachinefromtowingvehiclehitch:
•Stoponlevelground.
•Stoptowingvehicleengine.
•Locktowingvehicleparkbrake.
•Blockwheelsofthemachine.
•Makesurebodypartsarenotundertowbar.
OPERATION
•Cultivateataslowtractorspeed.
•Additionalweightisnotnormallyrequiredforcultivating
lightsoil.However,itisnecessarywhensoilisheavy,
crusted,and/orthicklyweeded,inordertoimprovethe
cultivator'spenetrationandstability.
•SeeFigure6forinstructionsonattachingconcreteblock
asadditionalweight.
•Cultivatingdepthcanbecontrolledbyuseoftheadjustable
GaugeShoes(7).
MAINTENANCE
•Thekeytoyearsoftrouble-freeserviceistokeepyour
Cultivatorcleananddry.
•NeverallowwetmaterialtoremainonCultivatorfor
extendedperiodsoftime.
•ForrustonGaugeShoes(7)andSpringShanks(6)apply
alightcoatofoil.ForrustonrestofCultivator,sandand
applyalightcoatofenamelpaint.
•Periodicallycheckallfastenersfortightness.
QUALITY CONTINUES WITH QUALITY SERVICE
Weprovideaprocesstoremedyyourquestionsorproblems.
Followthestepsbelowtogetanswerstoanyquestionsyou
mayhaveaboutyourproduct,ortoorderreplacementparts:
1.Refertoyourattachmentandmachineoperatormanuals.
2.InNorthAmericaandCanada,call1-877-728-8224and
provideproductserialnumberandmodelnumber.

1007076 Rev. A 4
PARTS BREAKDOWN
STOP
Installation Questions?
Missing Parts?
Replacement Parts?
Please call Customer Service
Department Toll Free
877.728.8224 or
customerservice@brinly.com
DON’T GO BACK
TO THE STORE!
ITEM NO. DESCRIPTION PART NO. QTY.
1 BrinlyDecal B-5922 1
2HitchBracket C-362-10 1
3 PullBar C-363-10 1
4FrameAngle 1007075-10 2
5FrameTieBar C-365-10 2
6 SpringShank C-352-10 7
7 GaugeShoeHalf C-367-10 4
8RodTie-Down C-368 1
9 TieStrap C-369-10 1
10 HexBolt1/2x1-1/2" 2M1624P 13
11 HexBolt1/2"x2" 2M1632P 1
12 CarriageBolt3/8"x1" 11M1216P 2
3
16 19
9
15
10
18
2
13
14
20
8
17
4
11
510
19
15
12
720 14
17
6
10
19
15
21 1
19
15
19
15
10
ITEM NO. DESCRIPTION PART NO. QTY.
13 PlowBolt7/16"x1-3/4" 15M1428P 2
14 HexNut3/8" 30M1200P 3
15 HexNut1/2" 30M1600P 14
16 HexNut7/16" 30M1400P 2
17 Lockwasher3/8" 40M1200P 3
18 Lockwasher7/16" 40M1400P 2
19 Lockwasher1/2" 40M1600P 14
20 Flatwasher3/8" 45M1313P 3
21 SpecialSpacer B-723P 7
1007076 Rev. A
5
ASSEMBLY
TOOLS REQUIRED:
9/16"Wrench(1)
3/4"Wrench(2)
11/16"Wrench(1)
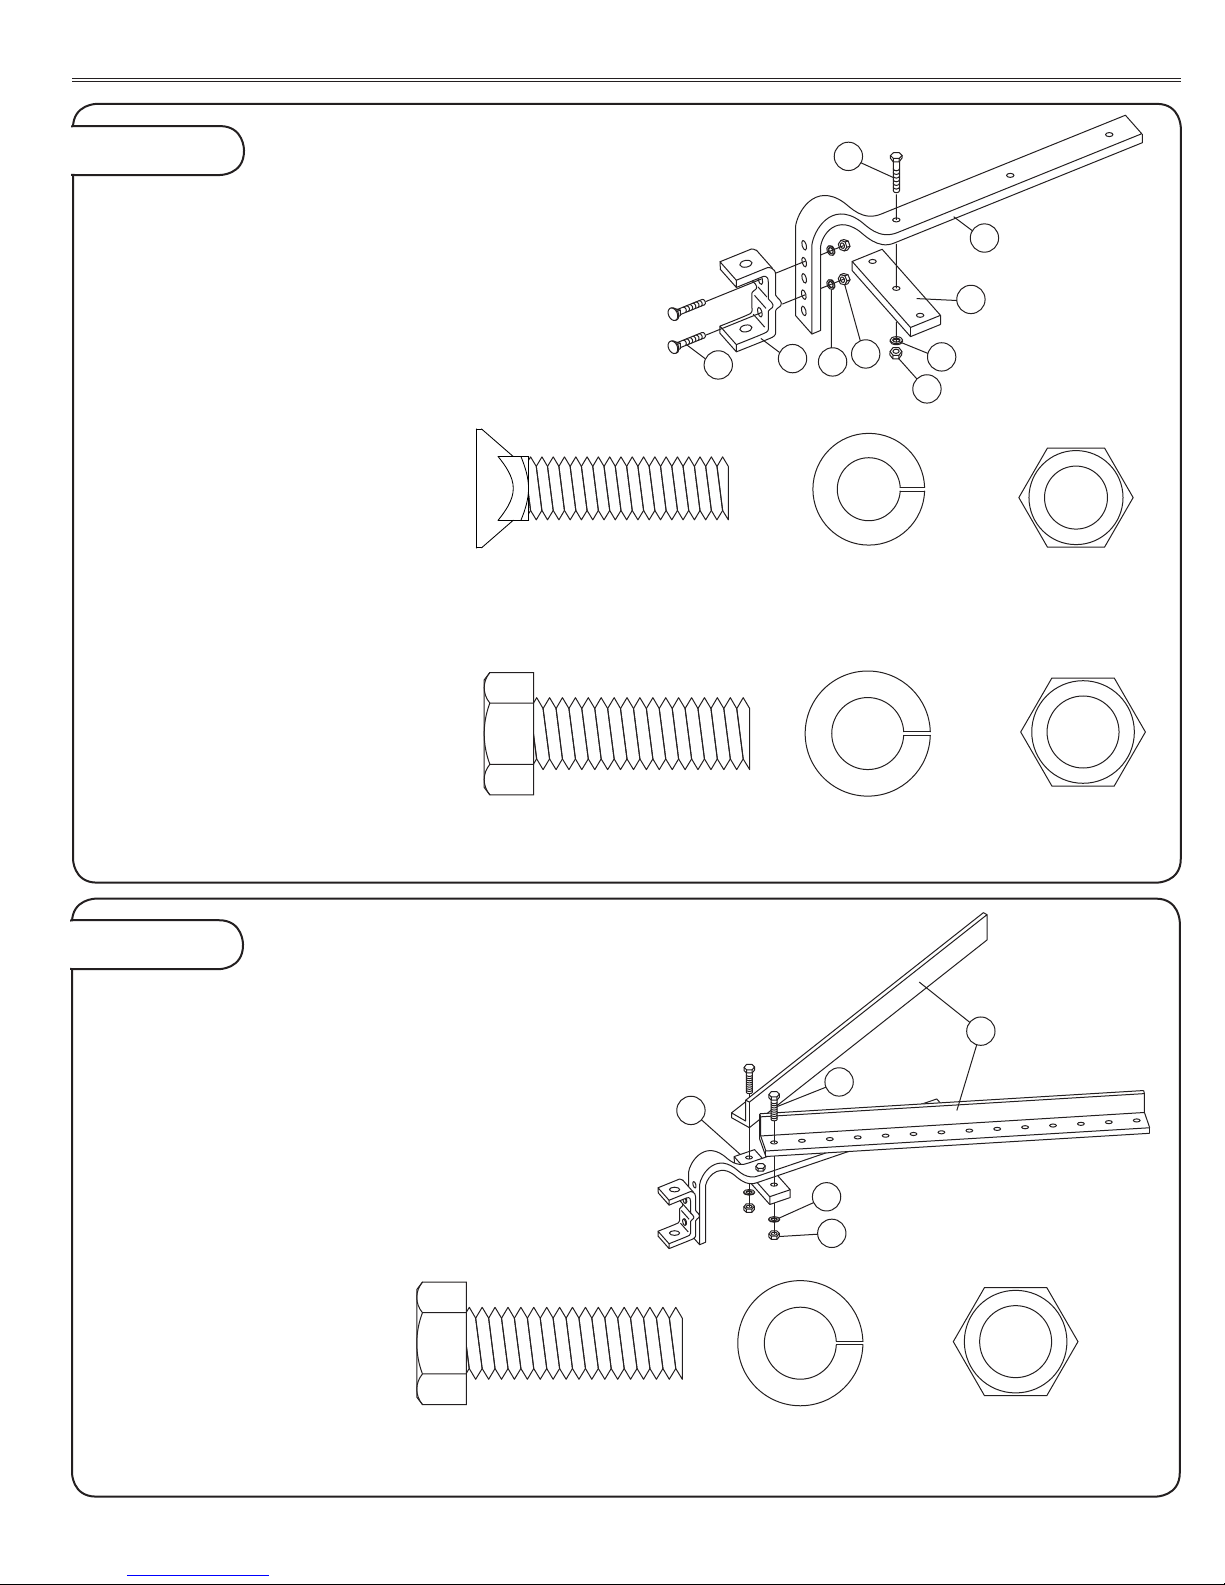
1a.LooselyassembleHitchBracket
(2)toPullBar(3)usingPlowBolts(13),
7/16"Lockwashers(18),and7/16"Nuts
(16)asshown.DONOTTIGHTEN.
NOTE: It is important to orient Plow
Bolts in direction shown.
1b.AssembleTieStrap(9)toPullBar
(3)using1/2"x1-1/2"Bolts(10),1/2"
Lockwashers(19),and1/2"Nuts(15).
Figure 1 HITCH BRACKET AND TIE
STRAP ASSEMBLY
(13)
PlowBolt,7/16"x1-3/4"
Qty.2
(10)
Bolt,1/2"x1-1/2"
Qty.1
(10)
Bolt,1/2"x1-1/2"
Qty.2
(18)
Lockwasher,7/16"
Qty.2
(19)
Lockwasher,1/2"
Qty.1
(19)
Lockwasher,1/2"
Qty.2
(15)
Nut,7/16"
Qty.2
(15)
Nut,1/2"
Qty.1
(15)
Nut,1/2"
Qty.2
2a.AssembleFrameAngles(4)toTieStrap(9)
using1/2"x1-1/2"Bolts(10),1/2"Lockwashers
(19),and1/2"Nuts(15).
Snugbutdonotfullytightenatthistime.
Figure 2 TIE STRAP/FRAME ANGLE
ASSEMBLY
3
16 19
9
15
10
18
2
13
10
19
15
9
4
1007076 Rev. A 6
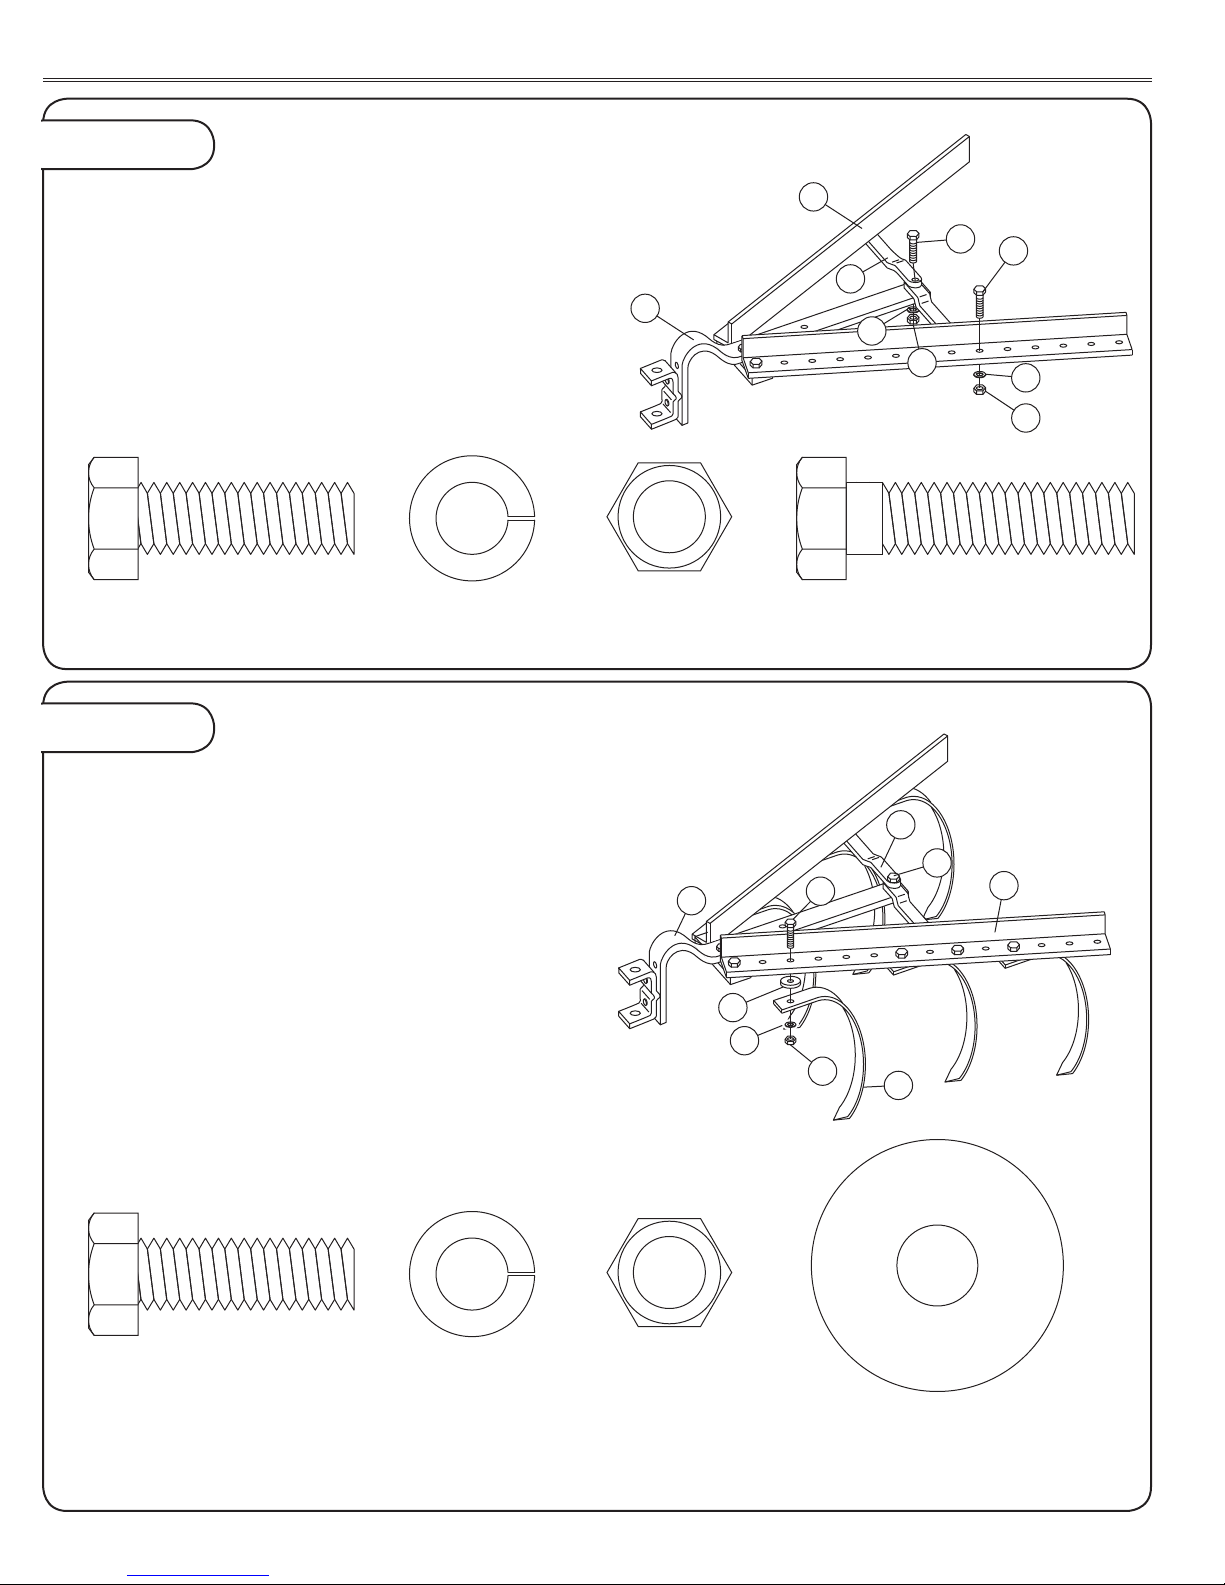
3a.AssembleTieBars(5)toFrameAngles(4)
using1/2"x1-1/2"Bolts(10),1/2"Lockwashers
(19),and1/2"Nuts(15).
3b.AssembleTieBars(5)toPullBar(3)using
1/2"x2"Bolt(11),1/2"Lockwasher(19),and1/2"
Nut(15).
3c.TightenhardwarefromStep2a.
4a.AssembleSpringShanks(6)toFrame
Angles(4)using1/2"x1-1/2"Bolts(10),Special
Spacers(21),1/2"Lockwashers(19),and1/2"
Nuts(15).
EnsureSpringShanksaresettorunstraightin
thedirectionoftravel.
4b.Whenassemblingforin-betweenrow
cultivation,theextraSpringShankwillbe
mountedinthecenterofthecultivator,using
thesameholeandhardwareusedtofastenTie
Bars(5)toPullBar(3),referencelocation(A)in
illustration.
Figure 3
Figure 4
FRAME TIE BAR ASSEMBLY
SPRING SHANK ASSEMBLY
ASSEMBLY
15
19
15
19
11 10
4
3
5
(10)
Bolt,1/2"x1-1/2"
Qty.2
(10)
Bolt,1/2"x1-1/2"
Qty.6
(11)
Bolt,1/2"x2"
Qty.1
(19)
Lockwasher,1/2"
Qty.3
(19)
Lockwasher,1/2"
Qty.6
(15)
Nut,1/2"
Qty.3
(15)
Nut,1/2"
Qty.6 (21)
SpecialSpacer
Qty.6(or7)
15
21
6
19
310 4
A
5
1007076 Rev. A
7
14
20
8
13
3
17
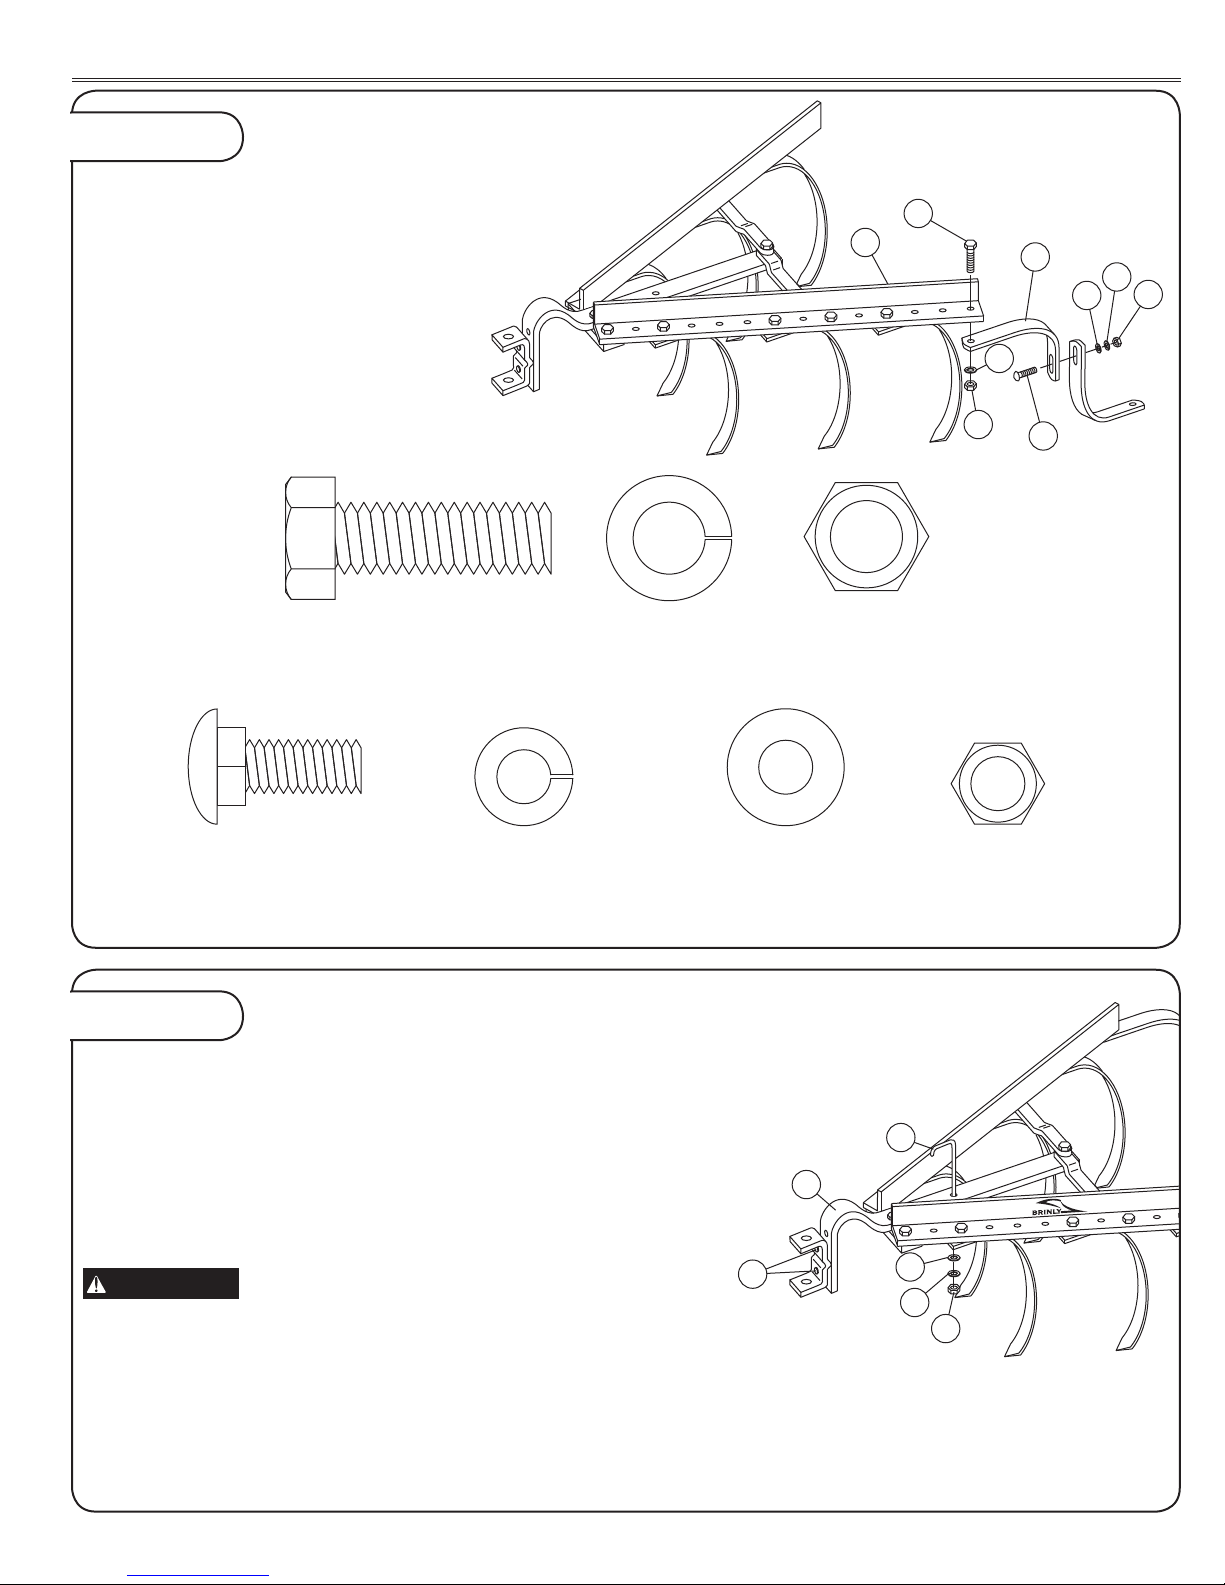
5a.AssembleoneoftheGaugeShoe
halves(7)toFrameAngle(4)using1/2"x
1-1/2"Bolts(10),1/2"Lockwashers(19),
and1/2"Nuts(15).Noteslotorientationin
illustration.
5b.AttachGaugeShoehalves(7)together
using3/8"x1"CarriageBolt(12),3/8"
Washer(20),3/8"Lockwasher(17),and
3/8"Nut(14).
6a.AttachCultivatortoyourTractorHitchinloweredposition.
6b.AdjustHitchBracketonCultivatortoobtaindesireddepthof
Cultivator.
6c.Cultivatorshouldbeparalleltoground.AdjustPlowBolts(13)to
levelCultivatorShanks.PullBar(3)maybeinvertedtoincreasedepth
ofcultivation.
6d.AdjustGaugeShoes(7)tomaintaindepth.Tighten all bolts
securely.
IMPORTANT
Cultivator must be stabilized to eliminate
"side to side" movement when cultivating crops. This is an
adjustment on the Sleeve Hitch, refer to Sleeve Hitch Manual for
instructions.
6e.Ifadditionalweightisneeded(seepage3)concreteblockshould
beattachedtothecenterofthePullBar(3)withtheRodTieDown(8),
3/8"PlainWasher(20),3/8"Lockwasher(17),and3/8"Nut(14).
Figure 5
Figure 6
GAUGE SHOE ASSEMBLY
MOUNTING ADJUSTMENT
ASSEMBLY
17 14
20
12
15
19
7
10
4
(10)
Bolt,1/2"x1-1/2"
Qty.2
(12)
CarriageBolt,3/8"x1"
Qty.2
(19)
Lockwasher,1/2"
Qty.2
(17)
FlatWasher,3/8"
Qty.2
(20)
Lockwasher,3/8"
Qty.2
(15)
Nut,1/2"
Qty.2
(14)
Nut,3/8"
Qty.2

1007076 Rev. A
ThelimitedwarrantysetforthbelowisgivenbyBrinly-Hardy
Companywithrespecttonewmerchandisepurchasedand
usedintheUnitedStates,itspossessionsandterritories.
Brinly-HardyCompanywarrantstheproductslistedbelow
againstdefectsinmaterialandworkmanship,andwillat
itsoption,repairorreplace,freeofcharge,anypartfound
tobedefectiveinmaterialsorworkmanship.Thislimited
warrantyshallonlyapplyifthisproducthasbeenassembled,
operated,andmaintainedinaccordancewiththeOperator’s
manualfurnishedwiththeproduct,andhasnotbeensubject
tomisuse,abuse,commercialuse,neglect,accident,
impropermaintenance,alteration,vandalism,theft,re,
water,ordamagebecauseofotherperilornaturaldisaster.
NormalWearPartsorcomponentsthereofaresubject
toseparatetermsasfollows:Allnormalwearpartsor
componentfailureswillbecoveredontheproductfora
periodof90days.
Partsfoundtobedefectivewithinthewarrantyperiodwill
bereplacedatourexpense.Ourobligationunderthis
warrantyisexpresslylimitedtothereplacementorrepair,
atouroption,ofpartsfoundtobedefectiveinmaterialand
workmanship.
HOW TO OBTAIN SERVICE:Warrantypartsreplacements
areavailable,ONLYWITHPROOFOFPURCHASE,through
ourPullBehindAccessoriesCustomerServiceDepartment.
Call877-728-8224.
Thislimitedwarrantydoesnotprovidecoverageinthe
followingcases:
Routinemaintenanceitemssuchaslubricantsandlters.•
Normaldeteriorationoftheexteriornishduetouseor•
exposure.
Transportationand/orlaborcharges.•
Thewarrantydoesnotincludecommercialand/orrental•
use.
No implied warranty, including any implied warranty
of merchantability of tness for a particular purpose,
applies after the applicable period of express written
warranty above as to the part as identied below.
No other express warranty whether written or oral,
except as mentioned above, given by any person or
entity, including a dealer or retailer, with respect to
any product, shall bind Brinly-Hardy Co. During the
period of the warranty, the exclusive remedy is repair or
replacement of the product as set forth above.
The provisions as set forth in this warranty provide
the sole and exclusive remedy arising from the sale.
Brinly-Hardy Co. shall not be liable for incidental or
consequential loss or damage including, without
limitation, expenses incurred for substitute or
replacement lawn care services or for rental expenses to
temporarily replace a warranted product.
Somestatesdonotallowtheexclusionorlimitationof
incidentalorconsequentialdamages,orlimitationsonhow
longanimpliedwarrantylasts,sotheaboveexclusionsor
limitationsmaynotapplytoyou.
Duringthewarrantyperiod,theexclusiveremedyis
replacementofthepart.Innoeventshallrecoveryofany
kindbegreaterthattheamountofthepurchasepriceofthe
productsold.Alterationofsafetyfeaturesoftheproductshall
voidthiswarranty.Youassumetheriskandliabilityforloss,
damage,orinjurytoyouandyourpropertyand/ortoothers
andtheirpropertyarisingoutofthemisuseorinabilitytouse
thisproduct.
Thislimitedwarrantyshallnotextendtoanyoneotherthan
theoriginalpurchaserortothepersonforwhomitwas
purchasedasagift.
HOW STATE LAW RELATES TO THIS WARRANTY:This
limitedwarrantygivesyouspeciclegalrights,andyoumay
alsohaveotherrightswhichvaryfromstatetostate.
IMPORTANT:TheWarrantyperiodstatedbelowbeginswith
thePROOFOFPURCHASE.Withouttheproofofpurchase,
theWarrantyperiodbeginsfromthedateofmanufacture
determinedbytheserialnumbermanufacturingdate.
CULTIVATOR WARRANTY PERIOD:
Thewarrantyperiodforthiscultivatorisasfollows:Frame
parts-2Years.SpringShanksarenormalwearitems-90
days.
MANUFACTURER'S LIMITED WARRANTY FOR
Pull Behind Accessories
Other Brinly Tiller manuals

Brinly
Brinly DD-550 Installation and operating instructions

Brinly
Brinly SA-400BH User manual

Brinly
Brinly SAT-40 BH User manual

Brinly
Brinly SAT-40 BH User manual

Brinly
Brinly SA2-40BH1-G User manual

Brinly
Brinly CC-1000 User manual

Brinly
Brinly SATY-40 BH User manual

Brinly
Brinly SA-400BH User manual

Brinly
Brinly SAT2-40BH-P User manual

Brinly
Brinly PA-40 BH User manual


