manuals.online logo
Brands
  1. Home
  2. •
  3. Brands
  4. •
  5. Brizo
  6. •
  7. Plumbing Product
  8. •
  9. Brizo RP92056 User manual

Brizo RP92056 User manual

RP92056
Siderna®
T60P080 Extension Kit
Juego de extensión T60P080
Siderna®
T60P080 Kit de rallonge
Siderna®
02/16/201692183 Rev. A 1
92183
This kit can provide up to an additional 1 3/4" of wall thickness.
Este juego de piezas puede proporcionar 1 3/4" adicional de grosor de pared.
Ce kit ajoute 1 3/4 po à l’épaisseur du mur.
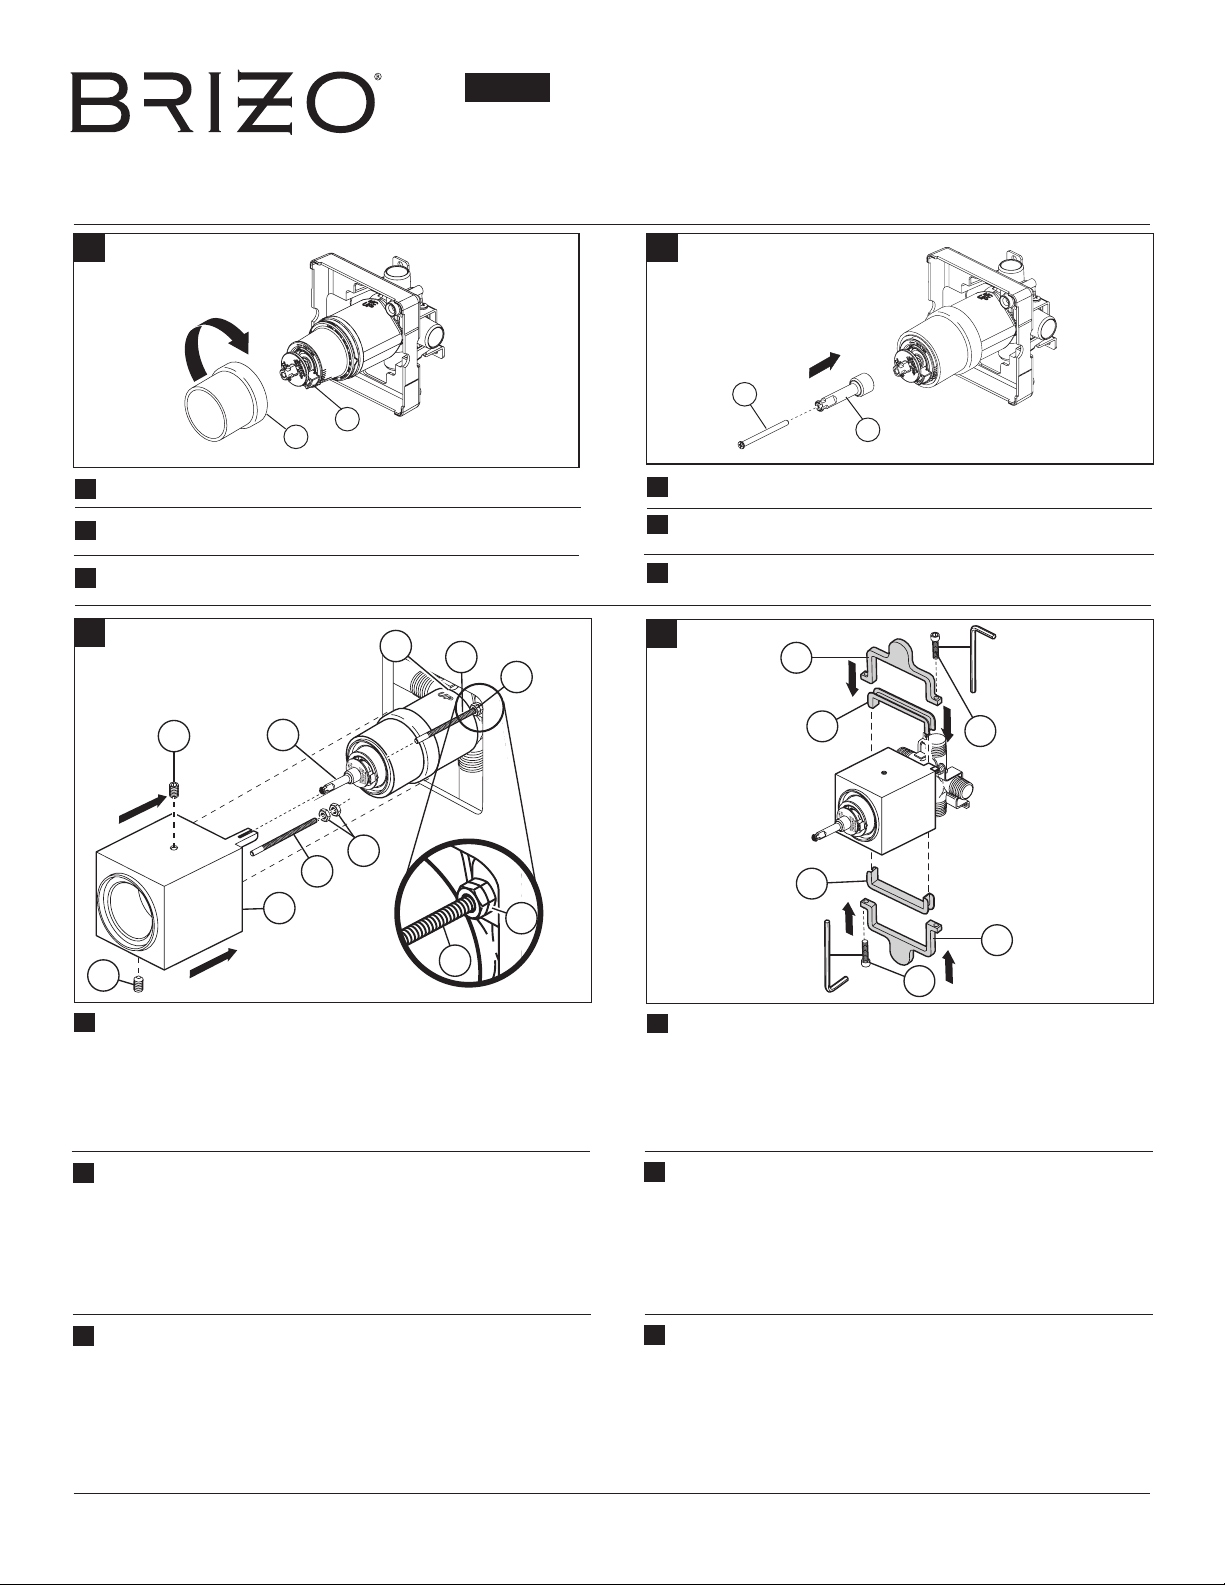
A. Press cartridge (1) into rough and secure using provided bonnet nut (2).
A.  Presioneelcartucho(1)enlaranurayjeusandolatuercacubierta
proporcionada (2).
A.  Pousserlacartouche(1)dansl’élémentrugueuxetxeràl’aidedel’écroudu
capot fourni (2).
1
2
2
B.  Placeextender(1)ontocartridgestemandsecureinplaceusingscrew(2).
B.  Coloquelaextrensión(1)enlaespigadelcartuchoyjeen
su sitio usando el tornillo (2).
B.  Placezlarallonge(1)surlatigedelacartoucheetxez-la
 enplaceàl’aidedelavis(2).
A. B.
1
D.
Assemblethetwomountingsleeves(13)andtwomountingplates(14).Slide the
mountingplateassembliesoverthetrimsleevesothatthetabs/plates(14)areat
thetopandbottomofthetrimsleeve,asshown.Threadscrews(15)intomounting
platesjustenoughtoassemblethetwosidestogether.Slidethemountingplates
backagainstthewall.
Itisimportantthattheroughbemountedlevelduetotheshapeofthisproduct.
Replaceshorterpinswithlongeranti-rotationpins(9)intotheholesontheroughbody
andsecurewithnuts(10).Slidetrimsleeve(11)overthecartridge,aligningthetwo
legsonthesleevewiththepins(9). Adjustpinssothatthesleeveispushedagainst
thestemextender(7).Trytheinstallationrstwithbothanti-rotationalpinsinplace.If
thetrimisnotsquare,removeonepinandtryagaintoseeifthetrimcanbesquared.
Ifitisstillnotsquareyoucantryremovingbothpinsandholdingthesleevesecure
withthetwosetscrews(12)provided.Tightensetscrews(12)tosecure.
C.
Esimportantequelatuberíadetrásdelaparedseinstaleniveladadebidoalaformadeeste
producto.Reemplacelospernosmáscortosconlosanti-rotacionalesmáslargos(9)enlos
agujeroseneltubodelacañeríayjeconlastuercas(10).Desliceelmanguitodeajuste
(11)porelcartucho,alineandolasdospiernasenelmanguitoconlospasadores(9).Ajuste
lasclavijasdemaneraqueelmanguitoquedepresionadocontralaextensiónparalaespiga.
Pruebelainstalaciónprimeroconlosdospasadoresanti-rotacionalesensusitio.Sielajuste
nocuadra,retireunpernoyvuelvaaintentarloparaversielajustepuedecuadrarse.Si
todavíanocuadrapuedeintentarquitandoambospasadoresysujetandojoelmanguito
conlosdostornillosdejación(12)incluidos.Aprietelostornillosdejación(12)parajar.
C.
Ilestimportantquelarobinetteriebrutesoitmontéedeniveauenraisondelaformedu
produit.Remplacezlesaxesanti-rotationcourtsquisetrouventdanslestrousducorpsde
larobinetteriebruteparlesaxesanti-rotationlongs(9)etxezceux-ciaveclesécrous(10).
Placezleboîtierdenition(11)surlacartoucheenprenantsoindefairecorrespondreses
deuxpattesaveclesaxes(9).Ajustezlesaxesdemanièrequelemanchonreposecontre
larallongedetige(7).Essayezd’installerleboîtieralorsquelesdeuxaxesanti-rotation
sontenplace.Sileboîtierdenitionn’estpasd’équerre,enlevezunaxeanti-rotationet
voyezsivouspouvezmaintenantmonterleboîtierdemanièrequ’ilsoitd’équerre.Sivous
n’yarrivezpas,vouspouvezenleverledeuxièmeaxeetxerleboîtieraveclesdeuxvisde
calage(12)fournies.Serrezlesvisdecalage(12)pourxerleboîtier.
D.
Ensambleloscasquillosdeinstalación(13)ydoschapasdeinstalación(14).
Deslicelosconjuntosdeplacademontajesobreelmanguitodeajustedemodo
quelaslengüetas/placas(14)estánenlapartesuperioryabajodelamanga
delaccesorio,comosemuestra.Enrosquelostornillos(15)enlaschapasde
instalaciónlosucienteparaensamblarjuntoslosdoscostados.Deslicelaschapas
deinstalaciónhaciaatrás,contralapared.
D.
Assemblezlesdeuxmanchons(13)etlesdeuxplaquesdemontage(14).Glisser
lesensemblesdeplaquesdemontagedanslemanchondegarnituredesorte
quelespattes/plaques(14)sontenhautetenbasdegarniture,commeillustré.
Introduisezlesvis(15)danslesplaquesdemontageetserrez-lesjusteassezpour
retenirles2côtésensemble.Replacezlesplaquesdemontagecontrelemuren
les faisant glisser.
D.
13
13 15
14
14
15
C.
12
12
11
10
9
8
7
9
9
10
10
C.
292183 Rev. A
Visite www.brizo.com para obtener las
instrucciones originales para la instalación.
Visitez www.brizo.com pour consulter les
instructions d’installation d’origine.
Visit www.brizo.com to nd original
installation instructions.
G. Installhandle(1)ontothestemextender(2),tightenset
screw(3)tosecurethehandle.
G. Instalelamanija(1)enlaextensióndelaespiga(2),aprieteeltornillode
ajuste(3)parajarlamanija.
G. Installezlamanette(1)surlarallongedetige(2)etserrezlavisde
 calage(3)pourxerlamanette.
G.
12
E.
Usingthemountingplates(14)asaguide,enlargeholearoundroughsothatplates
canbepushedupto1/8"intothewall.Tightenscrews(15).
F.  Placethecenterholeoftheescutcheon(16)overthetrimsleeveandcarefully
pushitbacktothemountingplates(14).Magnetsonthebackofthe
escutcheonwillkeepitinplace.
E.
Usandolasplacasdemontaje(14)comoguía,agrandeelagujeroalrededordela
plomeríapreliminar,demaneraquelasplacaspuedenserpresionadashaciaarriba
hasta1/8"enlapared.Aprietelostornillos(15).
F.
Coloqueeloriciocentraldelchapetón(16)sobreelcasquillodelaccesorioy
cuidadosamenteempujedenuevohastalaschapasdeinstalación(14).Los
imanesenlaparteposteriordelchapetónlomantendráensulugar.
E.
Enutilisantlesplaquesdemontage(14)pourvousguider,agrandissezletrouautour
delaplomberiebrutedesortequeleplaquespuissentêtreenfoncéesd’unmaximum
de1/8podanslemur.Serrezlesvis(15).
F.
Placezletrouaucentredelaplaquedenition(16)surlemanchondenitionet
ramenezcelle-cidoucementverslesplaquesdemontage(14)enlapoussant.
Lesaimantsàl’endosdelaplaquedenitionlamaintiendrontenplace.
1/8"
(3 mm)
14
15
14
15
E. F. 14
16
3

Other Brizo Plumbing Product manuals

Brizo RP81627 User manual

Brizo

Brizo RP81627 User manual

Brizo MULTICHOICE R60000 Series User manual

Brizo

Brizo MULTICHOICE R60000 Series User manual

Brizo MULTICHOICE R60000 Series User manual

Brizo

Brizo MULTICHOICE R60000 Series User manual

Brizo Sotria Series User manual

Brizo

Brizo Sotria Series User manual

Brizo Levoir 68498-GLLHP User manual

Brizo

Brizo Levoir 68498-GLLHP User manual

Brizo T609 Series User manual

Brizo

Brizo T609 Series User manual

Brizo RP6949570 User manual

Brizo

Brizo RP6949570 User manual

Brizo Venuto 64070LF User manual

Brizo

Brizo Venuto 64070LF User manual

Brizo 65105LF User manual

Brizo

Brizo 65105LF User manual

Brizo SENSORI T66632 Series User manual

Brizo

Brizo SENSORI T66632 Series User manual

Brizo VETTIS T66T088 User manual

Brizo

Brizo VETTIS T66T088 User manual

Brizo 8GA-ADD-240 User manual

Brizo

Brizo 8GA-ADD-240 User manual

Brizo Litze 68135 User manual

Brizo

Brizo Litze 68135 User manual

Brizo 65390LF-LHP User manual

Brizo

Brizo 65390LF-LHP User manual

Brizo 62858LF Series User manual

Brizo

Brizo 62858LF Series User manual

Brizo INVARI T65776LF-LHP Series User manual

Brizo

Brizo INVARI T65776LF-LHP Series User manual

Brizo R65800 User manual

Brizo

Brizo R65800 User manual

Brizo 65306LF-LHP Series User manual

Brizo

Brizo 65306LF-LHP Series User manual

Brizo BT01201 User manual

Brizo

Brizo BT01201 User manual

Brizo Litze T65735LF Series User manual

Brizo

Brizo Litze T65735LF Series User manual

Brizo Charlotte 65985LF User manual

Brizo

Brizo Charlotte 65985LF User manual

Brizo Baliza T60905 User manual

Brizo

Brizo Baliza T60905 User manual

Brizo Charlotte 65685LF-ECO User manual

Brizo

Brizo Charlotte 65685LF-ECO User manual

Brizo MultiChoice 60 Series User manual

Brizo

Brizo MultiChoice 60 Series User manual

Popular Plumbing Product manuals by other brands

Hansgrohe Axor Citterio M 34120000 Instructions for use/assembly instructions

Hansgrohe Axor

Hansgrohe Axor Citterio M 34120000 Instructions for use/assembly instructions

Triton COMBI 2180206H Installation and operating instructions

Triton

Triton COMBI 2180206H Installation and operating instructions

Franke ANIMA BS204 Installation and operating instructions

Franke

Franke ANIMA BS204 Installation and operating instructions

Crosswater US-BSW0101 installation instructions

Crosswater

Crosswater US-BSW0101 installation instructions

Weka 506.1820.50.00E ASSEMBLY, USER AND MAINTENANCE INSTRUCTIONS

Weka

Weka 506.1820.50.00E ASSEMBLY, USER AND MAINTENANCE INSTRUCTIONS

Felton ODYSSEY II O2HSKC installation guide

Felton

Felton ODYSSEY II O2HSKC installation guide

PEERLESS 76730 Series manual

PEERLESS

PEERLESS 76730 Series manual

Kohler K-T609 installation guide

Kohler

Kohler K-T609 installation guide

American Standard Cadet 2798 Series parts list

American Standard

American Standard Cadet 2798 Series parts list

Hans Grohe Talis E 7173200 Instructions for use

Hans Grohe

Hans Grohe Talis E 7173200 Instructions for use

American Standard Traditional Bidet 5065.010 Features & dimensions

American Standard

American Standard Traditional Bidet 5065.010 Features & dimensions

GATTONI KUBIK 2530 Installation and assembly

GATTONI

GATTONI KUBIK 2530 Installation and assembly

Sensea EASY 81989145 Assembly, Use, Maintenance Manual

Sensea

Sensea EASY 81989145 Assembly, Use, Maintenance Manual

KWC F3SV1011 Installation and operating instructions

KWC

KWC F3SV1011 Installation and operating instructions

DIAQUA Bilbao Slow Down Operating and installation instructions

DIAQUA

DIAQUA Bilbao Slow Down Operating and installation instructions

METHVEN PROMIX SHOWER MIXER installation guide

METHVEN

METHVEN PROMIX SHOWER MIXER installation guide

Pacific Bay PB-LU01 installation manual

Pacific Bay

Pacific Bay PB-LU01 installation manual

Kohler SIMPLICE 596T-4 installation instructions

Kohler

Kohler SIMPLICE 596T-4 installation instructions

manuals.online logo
manuals.online logoBrands
  • About & Mission
  • Contact us
  • Privacy Policy
  • Terms and Conditions

Copyright 2025 Manuals.Online. All Rights Reserved.