manuals.online logo
Brands
  1. Home
  2. •
  3. Brands
  4. •
  5. Broan
  6. •
  7. Fan
  8. •
  9. Broan 763 User manual

Broan 763 User manual

!
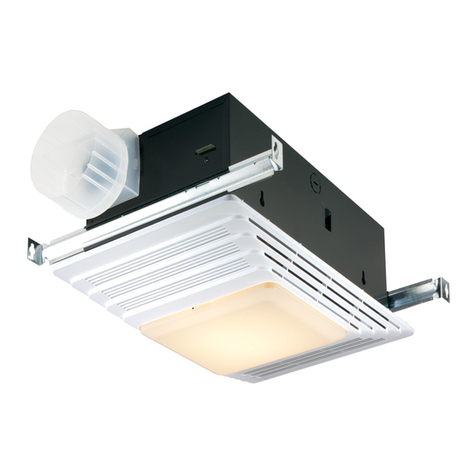
FAN/LIGHT COMBINATION VENTILATOR
MODEL 763 • 763N
WARNING
TO REDUCE THE RISK OF FIRE, ELECTRIC
SHOCK, OR INJURY TO PERSONS, OBSERVE
THE FOLLOWING:
1. Use this unit only in the manner intended by the
manufacturer. If you have questions, contact
the manufacturer at the address or telephone
number listed in the warranty.
2. Before servicing or cleaning unit, switch power
off at service panel and lock the service discon-
necting means to prevent power from being
switched on accidentally. When the service dis-
connecting means cannot be locked, securely
fasten a prominent warning device, such as a
tag, to the service panel.
3. Installation work and electrical wiring must be
done by a qualified person(s) in accordance
with all applicable codes and standards, includ-
ing fire-rated construction codes and standards.
4. Sufficient air is needed for proper combus-
tion and exhausting of gases through the flue
(chimney) of fuel burning equipment to prevent
backdrafting. Follow the heating equipment
manufacturer’s guideline and safety standards
such as those published by the National Fire
Protection Association (NFPA), and the Ameri-
can Society for Heating, Refrigeration and Air
Conditioning Engineers (ASHRAE), and the local
code authorities.
5. When cutting or drilling into wall or ceiling, do
not damage electrical wiring and other hidden
utilities.
6. Ducted fans must always be vented to the
outdoors.
7. If this unit is to be installed over a tub or shower,
it must be marked as appropriate for the appli-
cation and be connected to a GFCI (Ground Fault
Circuit Interrupter) - protected branch circuit.
8. Never place a switch where it can be reached
from a tub or shower.
9. This unit must be grounded.
CAUTION
1. For general ventilating use only. Do not use to
exhaust hazardous or explosive materials and
vapors.
2. This product is designed for ceiling installation
only. This product is designed for installation
in ceilings up to a 12/12 pitch. Ductwork must
point up. DO NOT MOUNT THIS PRODUCT IN
A WALL.
3. To avoid motor bearing damage and noisy and/
or unbalanced impellers, keep drywall spray,
construction dust, etc. off power unit.
4. Please read specification label on product for
further information and requirements.
Installer: Leave this manual with the
homeowner. Homeowner: Use and Care
information on page 4.
READ AND SAVE
THESE INSTRUCTIONS
TYPICAL INSTALLATIONS
HOUSING
CEILING
JOIST
MOUNTING TABS
GRILLE
CEILING
MATERIAL
POWER CABLE
HOUSING
CEILING
JOIST
MOUNTING TABS
GRILLE
CEILING
MATERIAL
POWER CABLE 4" ROUND
DUCT
ADDITIONAL
FRAMING
HOUSING MOUNTED TO ADDITIONAL FRAMING
Discharge 900to joists.
HOUSING MOUNTED DIRECTLY TO JOIST
2x6 (or larger) Discharge parallel to joists.
HOUSING
2 x 4
CEILING
JOIST or
TRUSS
MOUNTING
TABS
CEILING
MATERIAL
POWER CABLE ADDITIONAL
FRAMING
2 x 4
CEILING
JOIST or
TRUSS
GRILLE
HOUSING MOUNTED TO 2x4 TRUSS
Requires additional framing for mounting tabs.
Discharge parallel to joists.
HOUSING
MOUNTING
TABS
CEILING
MATERIAL
POWER CABLE ADDITIONAL
FRAMING
"
I
"
JOIST
"
I
"
JOIST GRILLE
HOUSING MOUNTED TO “I” JOIST
Requires additional framing for mounting tabs.
Discharge parallel to joists.
HOUSING
2 x 4
CEILING
JOIST or
TRUSS
MOUNTING TABS
CEILING
MATERIAL
POWER CABLE 4" ROUND
DUCT
ADDITIONAL
FRAMING
2 x 4
CEILING
JOIST or
TRUSS
GRILLE
HOUSING MOUNTED TO 2x4 TRUSS
Requires additional framing for mounting tabs.
Discharge 900to joists.
HOUSING
MOUNTING TABS
CEILING
MATERIAL
POWER CABLE 4" ROUND
DUCT
ADDITIONAL
FRAMING "
I
"
JOIST
"
I
"
JOIST GRILLE
HOUSING MOUNTED TO “I” JOIST
Requires additional framing for mounting tabs.
Discharge 900to joists.
*Additional framing must be a 2x6 (minimum height).
*
*
*
*
*
2
TYPICAL INSTALLATIONS
MOUNTING
TAB
GRILLE
SUSPENDED
CEILING MATERIAL
POWER
CABLE
4" ROUND
DUCT
HOUSING
SUSPENDED CEILINGS
Housing hung with wires - 3-point mount.
INSTALL THE HOUSING
- PLEASE NOTE -
THE FOLLOWING INSTALLATION ILLUSTRATIONS
SHOW 2 X 6 JOISTS. IF YOU HAVE A TRUSS OR
“I”-JOIST INSTALLATION, MOUNT THE VENTI-
LATOR TO THE ADDITIONAL FRAMING IN THE
SAME MANNER. (Additional framing must be a
2x6 (minimum height).
1. Choose the location for your fan in the ceil-
ing. For best possible performance, use the
shortest possible duct run and a minimum
number of elbows.
2. Position mounting
brackets against joist
so that bottom edge of
housing will be flush
with finished ceiling.
Additional positioning
feature for 5/8”, 1”,
& 1-1/4” thick ceiling
material:
Holes in corners of
housing are labeled with various ceiling
material thicknesses. Position housing so
bottom edge of joist is visible through a
matched set of holes. The housing is now in
the proper position for that ceiling material
thickness.
Additional positioning feature for 1/2” thick
ceiling material:
Bend two tabs, on side of housing,
900outward.
Lift housing until tabs contact underside of
joist.
Mark the keyhole slot on both mounting
brackets.
New Construction
5/8
1
1-1/4
TAB
HOLES
BOTTOM EDGE OF JOIST
3. Set housing aside and
drive nails partially into
joist at the top of both
keyhole marks.
4. Hang housing from nails
and pound nails tight.
To ensure a noise-free
mount, pound another
nail through the top hole
of each mounting tab.
1. Choose the location for your fan/light in the ceiling. For
best possible performance, use the shortest possible
duct run and a minimum number of elbows.
2. In attic, position mounting brackets against joist. Trace
outline of housing on ceiling material.
3. Set housing aside and cut ceiling opening slightly larger
than marked.
4. Place housing in opening so that its bottom edge is flush
with finished ceiling. Nail to joist through keyhole on both
sides. To ensure a noise-free installation, drive another
nail through the top hole of each mounting bracket.
5. Additional mounting holes are provided for installations
where access from above is inconvenient or not possible.
Nail or screw housing directly to joists or framing.
INSTALL THE HOUSING
INSTALL THE DUCTWORK
NOTE: The duct connector has a counter-balanced damper flap.
The flap will be “open” approx. 1” when duct connector is at-
tached to housing. This design permits insulation to be in direct
contactwithfan/lighthousingperUL(UnderwritersLaboratories)
standards.Theslightestbackdraft,however,willclosethedamper
flap, preventing air from entering unit or finished space.
1. Snap the damper/duct connector onto housing. Make sure
that tabs on the connector lock into slots in housing. Top of
damper/duct connector should be flush with top of housing.
NOTE: Make sure damper flap is in place inside of duct con-
nector. If it is not:

Squeeze top and bottom of connector
to

snap flap back into place.
2. Connect 4” round duct to damper/duct connector and extend
duct to outside through a roof or wall cap. Check damper to
make sure that it opens freely. Tape all duct connections to
make them secure and air tight.
Existing Construction
SWITCH BOX
LIGHT
FAN
DUAL CONTROL
(purchase separately)
WHITE
BLACK RED
GROUND
(bare)
WIRING
PLATE
120 VAC
LINE IN
BLUE BLACK
RECEPTACLE
(FAN)
WHITE
RECEPTACLE
(LIGHT)
CONNECT THE WIRING
1. Slide light reflector into front of grille opening. Plug light
into WHITE receptacle. Place grille / reflector combination
over protruding screw, and fasten in place using acorn nut
provided. HAND TIGHTEN acorn nut 1/4 turn after it is snug.
NOTE: If grille and light reflector are not snug to ceiling, use
a nut driver or pliers on acorn nut to snug grille to ceiling.
2. Install light bulb (not included). (See next page for type
and size for your model.) Insert one tab on light lens into
a slot in the grille / reflector combination. Squeeze other
tab slightly and snap into remaining slot.
ATTACH THE GRILLE
1. Wire unit following diagram. Run electrical cable as direct
as possible to unit. Do not allow cable to touch sides or
top of unit after installation is complete.
ADDITIONAL MOUNTING HOLES
FLUSH
1
2
3
5
4
67
12
11
13
15
8
9
17
16
18
10
14
KEY PART NO. DESCRIPTION
1 99111381
2 97005316
3 1101299
4 97014211
* 97014212
Light Lens
Acorn Nut
Bulb Holder
Light Reflector
Light Reflector (includes Key Nos. 3 & 4)
5 1100802
6 97014926
7 99080738
8 99111002
9 99260428
10 99150582
* 97020199
Grille
Motor Plate
Motor
Impeller
Motor Nut (2 req.)
Grille Screw
Blower Assembly (Includes Key Nos. 6, 7, 8, 9, 10)
11 99270982
12 99270981
13 98009612
* 97015171
Receptacle (Black)
Receptacle (White)
Wire Panel
Wire Panel Assembly (includes Key Nos. 11, 12, 13)
14 97014922
15 97014185
16 98008868
17 99150575
18 99150471
Housing /
Damper
Wiring Plate
Screw, #8-18 x .375
Ground Screw
* Not shown assembled.
Order replacement parts by “PART NO.” - not by “KEY NO.”
USE AND CARE
WARNING: DISCONNECT ELECTRICAL POWER SUPPLY AND LOCK OUT SERVICE PANEL BEFORE CLEANING OR SERVICING THIS UNIT.
BULB REPLACEMENT
Remove lens by gently depressing sides and pull down.
Use 100 Watt maximum incandescent bulb.
MOTOR LUBRICATION
The motor is permanently lubricated. Do not oil or disassemble motor.
CLEANING
TO CLEAN LENS AND GRILLE:
Remove light lens and bulb. Remove nut in center of reflector and lower assembly. CAUTION: Grille and reflector are separate units. Unplug light from WHITE receptacle.
Plastic parts can be cleaned with mild, soapy water (use a mild detergent, such as dishwashing liquid) and dried with a soft cloth. Do not use abrasive cloth, steel
wool pads, or scouring powders.
TO CLEAN FAN ASSEMBLY:
Unplug fan assembly (BLACK receptacle). To remove motor plate: Find the single tab on the motor plate (located next to the receptacles). Push up near motor plate tab while pushing
out on side ofhousing. Or insert a straight-bladescrewdriver into slotin housing (next to tab) and twist screwdriver. Gently vacuum fan, motor and interior of
housing.METALANDELECTRICALPARTSSHOULDNEVERBEIMMERSEDINWATER.
SERVICE PARTS
Discover other home ventilations on our website.

This manual suits for next models

1

Other Broan Fan manuals

Broan 345RSOBK User manual

Broan

Broan 345RSOBK User manual

Broan 670 User manual

Broan

Broan 670 User manual

Broan ERVS100S User manual

Broan

Broan ERVS100S User manual

Broan 678 User manual

Broan

Broan 678 User manual

Broan ZB80 User manual

Broan

Broan ZB80 User manual

Broan SMSK102 User manual

Broan

Broan SMSK102 User manual

Broan LP80F User manual

Broan

Broan LP80F User manual

Broan ULTRA Pro RB80LC User manual

Broan

Broan ULTRA Pro RB80LC User manual

Broan SOLITAIRE ULTRA-SILENT S110FLUE User manual

Broan

Broan SOLITAIRE ULTRA-SILENT S110FLUE User manual

Broan ULTRA Pro RB80L1 User manual

Broan

Broan ULTRA Pro RB80L1 User manual

Broan 744SFL User manual

Broan

Broan 744SFL User manual

Broan ULTRA SILENT QTR070 User manual

Broan

Broan ULTRA SILENT QTR070 User manual

Broan NUTONE QTREN Series User manual

Broan

Broan NUTONE QTREN Series User manual

Broan 678 User manual

Broan

Broan 678 User manual

Broan 512M User manual

Broan

Broan 512M User manual

Broan NuTone ULTRA Pro RN80C User manual

Broan

Broan NuTone ULTRA Pro RN80C User manual

Broan 576 User manual

Broan

Broan 576 User manual

Broan ULTRA Pro RB80L User manual

Broan

Broan ULTRA Pro RB80L User manual

Broan LOSONE SELECT L900L User manual

Broan

Broan LOSONE SELECT L900L User manual

Broan RB80C User manual

Broan

Broan RB80C User manual

Broan XB110HL User manual

Broan

Broan XB110HL User manual

Broan 345GOBK User manual

Broan

Broan 345GOBK User manual

Broan QTXE080C User manual

Broan

Broan QTXE080C User manual

Broan VENTILLATION FAN QTR100 User manual

Broan

Broan VENTILLATION FAN QTR100 User manual

Popular Fan manuals by other brands

Canarm IDL series Operation instructions and parts manual

Canarm

Canarm IDL series Operation instructions and parts manual

Vallox 279846 manual

Vallox

Vallox 279846 manual

Home Decorators Collection HEDLEY AM441-BN Use and care guide

Home Decorators Collection

Home Decorators Collection HEDLEY AM441-BN Use and care guide

System air DVS series manual

System air

System air DVS series manual

Ebmpapst W4E350-CN25-70 operating instructions

Ebmpapst

Ebmpapst W4E350-CN25-70 operating instructions

Swegon PARASOL Zenith 1200 quick guide

Swegon

Swegon PARASOL Zenith 1200 quick guide

Canvac Q Air CFK3301V use instructions

Canvac Q Air

Canvac Q Air CFK3301V use instructions

Holmes HT43R owner's guide

Holmes

Holmes HT43R owner's guide

NuTone 671R Specifications

NuTone

NuTone 671R Specifications

enervent Pallas HP eAir Series installation instructions

enervent

enervent Pallas HP eAir Series installation instructions

Bionaire BASF40LM instruction manual

Bionaire

Bionaire BASF40LM instruction manual

Jula 412-044 operating instructions

Jula

Jula 412-044 operating instructions

Craftmade Sterling STL60 installation guide

Craftmade

Craftmade Sterling STL60 installation guide

Savoy House 52-FAN-5CN-SN owner's manual

Savoy House

Savoy House 52-FAN-5CN-SN owner's manual

EuropAce EJF 7981V manual

EuropAce

EuropAce EJF 7981V manual

EDM 33934 instruction manual

EDM

EDM 33934 instruction manual

Alf ISIV-01 user manual

Alf

Alf ISIV-01 user manual

Vortice LINEO 100 Instruction booklet

Vortice

Vortice LINEO 100 Instruction booklet

manuals.online logo
manuals.online logoBrands
  • About & Mission
  • Contact us
  • Privacy Policy
  • Terms and Conditions

Copyright 2025 Manuals.Online. All Rights Reserved.