Broox RB-101 User manual

Solar Animal Repellent
USER MANUAL
RB-101
®

2
Thanks for choosing Broox animal repellent! Please make a careful
study of the manual and keep it for future reference. Solar energy
is used for charging the device battery. After initial charging via
USB cable the device will get charged via solar energy when it is
exposed to sufficient sunlight. The Passive Infrared sensor (PIR)
detects motion and triggers the ultrasonic speaker. Animals’ ears
are sensitive to the produced ultrasonic sound which makes them
to get scattered. Please kindly contact Broox costumer service
(contact@raymondbroox.com) and mention the kinds of animals
you want to repel to receive useful tips.
Please download the catalogue via above QR code

3
Important tips
1. Make sure that the batteries work well. It is strongly
recommended that the device get charged before the first
use. And the most effective way for reactivating the batteries
is as follow; charge the device via the USB cable which is inside
the package for 6 hours, unplug the device and repeat it for
another 6 hours, unplug it and repeat for the third time.
2. Next step is finding a proper place for installing the device as
it plays a great role in the result you get from the repellent.
Consider the following points when choosing the location of
the device.
a. Avoid installing the device in shadow, otherwise the
repellent does not charge adequately during the day and
the number of times for charging the device via USB cable
will increase.
b. Consider a place for the repellent where the animals tend
to enter your area.
c. There should not be anything in front of the repellent as
the motion detector should be able to detect the animals’
movement.
d. Based on the kind of the animal, sometimes it is better
to install the repellent above ground level (for bigger and
taller animals like deer) or put it close to the ground for
kinds of animals which move close to the ground or even
go under the ground. In both cases you should make sure
that the motion detector is able to detect the motion of
the animal.
3. After installing the device, the proper mode should be chosen
based on the kind of the animals you want to repel. This device
provides 5 different modes. Each of these modes get activated
when the PIR detects a motion.
4. Modes 1, 2 and 3 provides just ultrasonic sound, in different
ranges of frequencies.

4
Operation
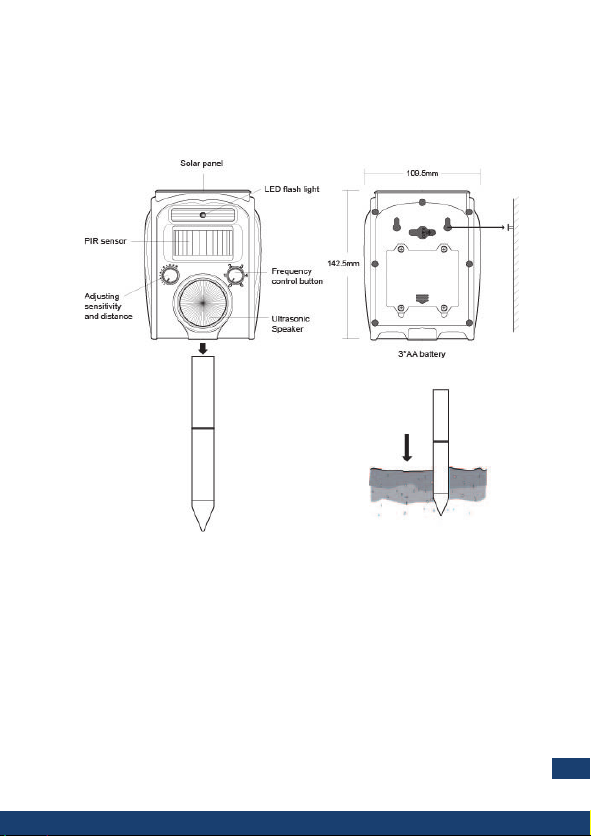
»The operation of this kind of repellent is based on producing
ultrasonic sound. different sound frequencies can be generated
by the device whenever an animal enters the PIR sensor range,
then the animal feels uncomfortable and runs away from the
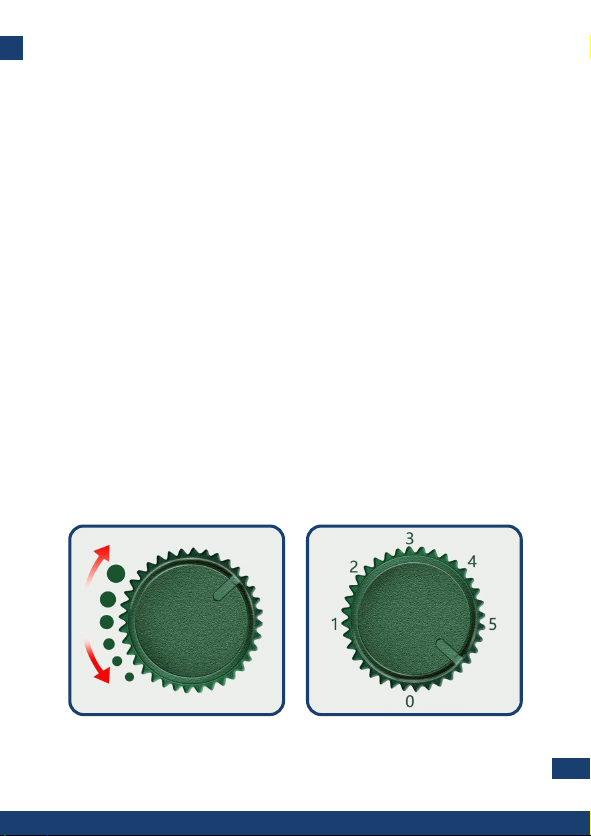
area. The sound frequencies are adjustable based on the animal
species to repel.
»A strong flashing LED is another feature which has been
considered for this device. This also gets activated when the
motion detector detects a motion and causes animals to get
scared and flee.
»For scaring wild animals, an alarm sound has been added on
mode 4 of the device.
5. Mode 4 contains flashing light as well as an alarm sound that
get activated simultaneously when a movement is detected
by PIR, which is the most effective way for repelling the
animals.
6. Mode 5 produces the ultrasonic sound and flashing light at
the same time.
7. Note that some animals may get used to the emitted ultrasonic
sound after some time, so make sure to change the device
mode every once in a while (mode 4 or 5 is recommended),
and set it in previous mode again after one or two days.
8. Notice that different kinds of animals may show different
reactions to one mode. So, if you see a mode does not work
for you, change the mode, and try another one. You will find
the best mode after some days.
9. The IP code of the repellent is IP44. It means that this repellent
works properly under normal rainfalls. If you have rainstorm,
please do not expose the device to heavy rain. Remove it and
reinstall it after the heavy rain ends.
10. Having patience is the key to get the suitable result from these
kinds of repellents. It usually takes 2-4 weeks to notice the
significant difference and perfect operation of them.

5
SET UP
There are two knobs on the device:
• Sensitivity knob (left knob)
• Frequency knob (right knob)
“Sensitivity” knob helps you to adjust the impact distance of the
ultrasonic waves. By turning the knob clockwise, the range of
protection of the device will increase.
“Frequency” knob is used for frequency selection. By turning the
knob clockwise, the frequency will increase.
Frequency ranges per mode, comes as follow:
• 0: OFF
• 1: 13.5KHZ-19.5KHZ for repelling animals like mice, rats,
dogs, foxes, martens etc.
• 2: 19.5KHZ-24.5KHZ for repelling animals like cats,
raccoons, badgers, skunks etc.
• 3: 24.5KHZ-45.5KHZ for repelling animals like bats, birds,
rodents etc.
• 4: Alarm and strong red LED flashing lights to scare wild
animals.
• 5: All functions together (mode 1, mode 2, mode 3) along
with strong flashing light.
Frequency knobSensitivity Knob

6
Assemble and Installation
1. Charge the device via the USB cable inside the package as
follow. Battery is included. Charge the repellent for six hours,
unplug the device and plug again and charge it for another
6 hours. Repeat it for the third time.
2. Consider a suitable place for the repellent regarding the points
mentioned in Important Tips section. The repellent can be
installed in a flowerbed, on the fence, against the wall, etc. for
bigger animals it is better to put the repellent above ground
level. The repellent should be set towards the area which should
get protected. As a reminder, the solar panel of the repellent
should be exposed to enough sunlight and the solar panel on
the top of the device should not be covered.
3. If the repellent is going to be mounted in the ground, insert
the rod carefully into the ground. It is suggested first dig a
hole and put the device in the ground to prevent any kind of
damage. Note that 12 cm of the rod should be out of the ground.
* Please send Email to contact@reymonbroox.com for further
guidance and advice.

7
- Assemble and Installation

8
Technical Specification
»Charging Light Indicator: While charging the repellent via the
USB cable the Indicator Light is RED, and it turns BLUE when
the device is fully charged.
»Green LED Light: Turns on whenever the repellent detects a
motion and gets activated
»Infrared Sensor Angle: 110 degree
»Detection Range: The repellent can detect the motion from
6-8 meters (20-25 Feet) depending on the size of the animal.
(the bigger the animal, the larger range will be protected by
the repellent.)
»Power Supply: Solar power + 3 X Ni-mH AA rechargeable batteries,
or 9V, 1A adapter. A USB cable can be found inside the package.
»Some notes to be considered:
»Turn off the repellent before charging it to prevent any damage to
the device. Furthermore, when the device is getting charged by
USB the PIR sensor will not work, even if the device is turned on.
»If it is some cloudy or rainy days in a row, the device will need
to get charged via the USB cable.

9
- Technical Specification

10
Battery Considerations
1. In case the repellent is not going to be used for a long
time (more than 1 month), the batteries will discharge. To
reactive the batteries, they must be charged 3-5 times before
reprocessing the repellent.
2. When the batteries that have been used for a long time and
get fully charged in a short time, it means that they need to
be changed with new batteries.
3. If the batteries need to be replaced, the batteries must be 3×
Ni-Mh or Ni-Cad AA, 1.2 V rechargeable batteries model and
should be placed in battery compartment. Better quality and
more capacity of batteries lead to better performance of the
repellent.
4. Rechargeable batteries need to be recycled because
they contain heavy metals that can be hazardous to the
environment. For recycling rechargeable batteries find
recycling facilities use Earth911’s Recycling Search or call
your local solid waste district or city hall. Also, some home
improvement or office stores often host a drop box from an
organization like Call2Recycle.
Caution
1. The frequency range generated by the device may be audible
by some individuals while it may not be recognizable to
some others. There is no harm for human or animals’ bodies
in either way. Just for providing comfort and avoiding any
inconvenience for children, try not to install the repellent in
children’s playground.
2. Do not cover the PIR sensor.
3. Use damp, soft cloth and mild soap diluted with water, to clean
the repellent. Do not use harsh chemicals or abrasive cleaning
agents that may damage the device.

11
Raymond Broox Inc.
www.raymondbroox.com
contact@raymondbroox.com

Raymond Broox Inc.
www.raymondbroox.com
contact@raymondbroox.com
CA,USA
Other manuals for RB-101
1
Table of contents