NÚMERO DE SERVICIO AL CLIENTE: 1-866-435-8665 T1219-11399
10-65
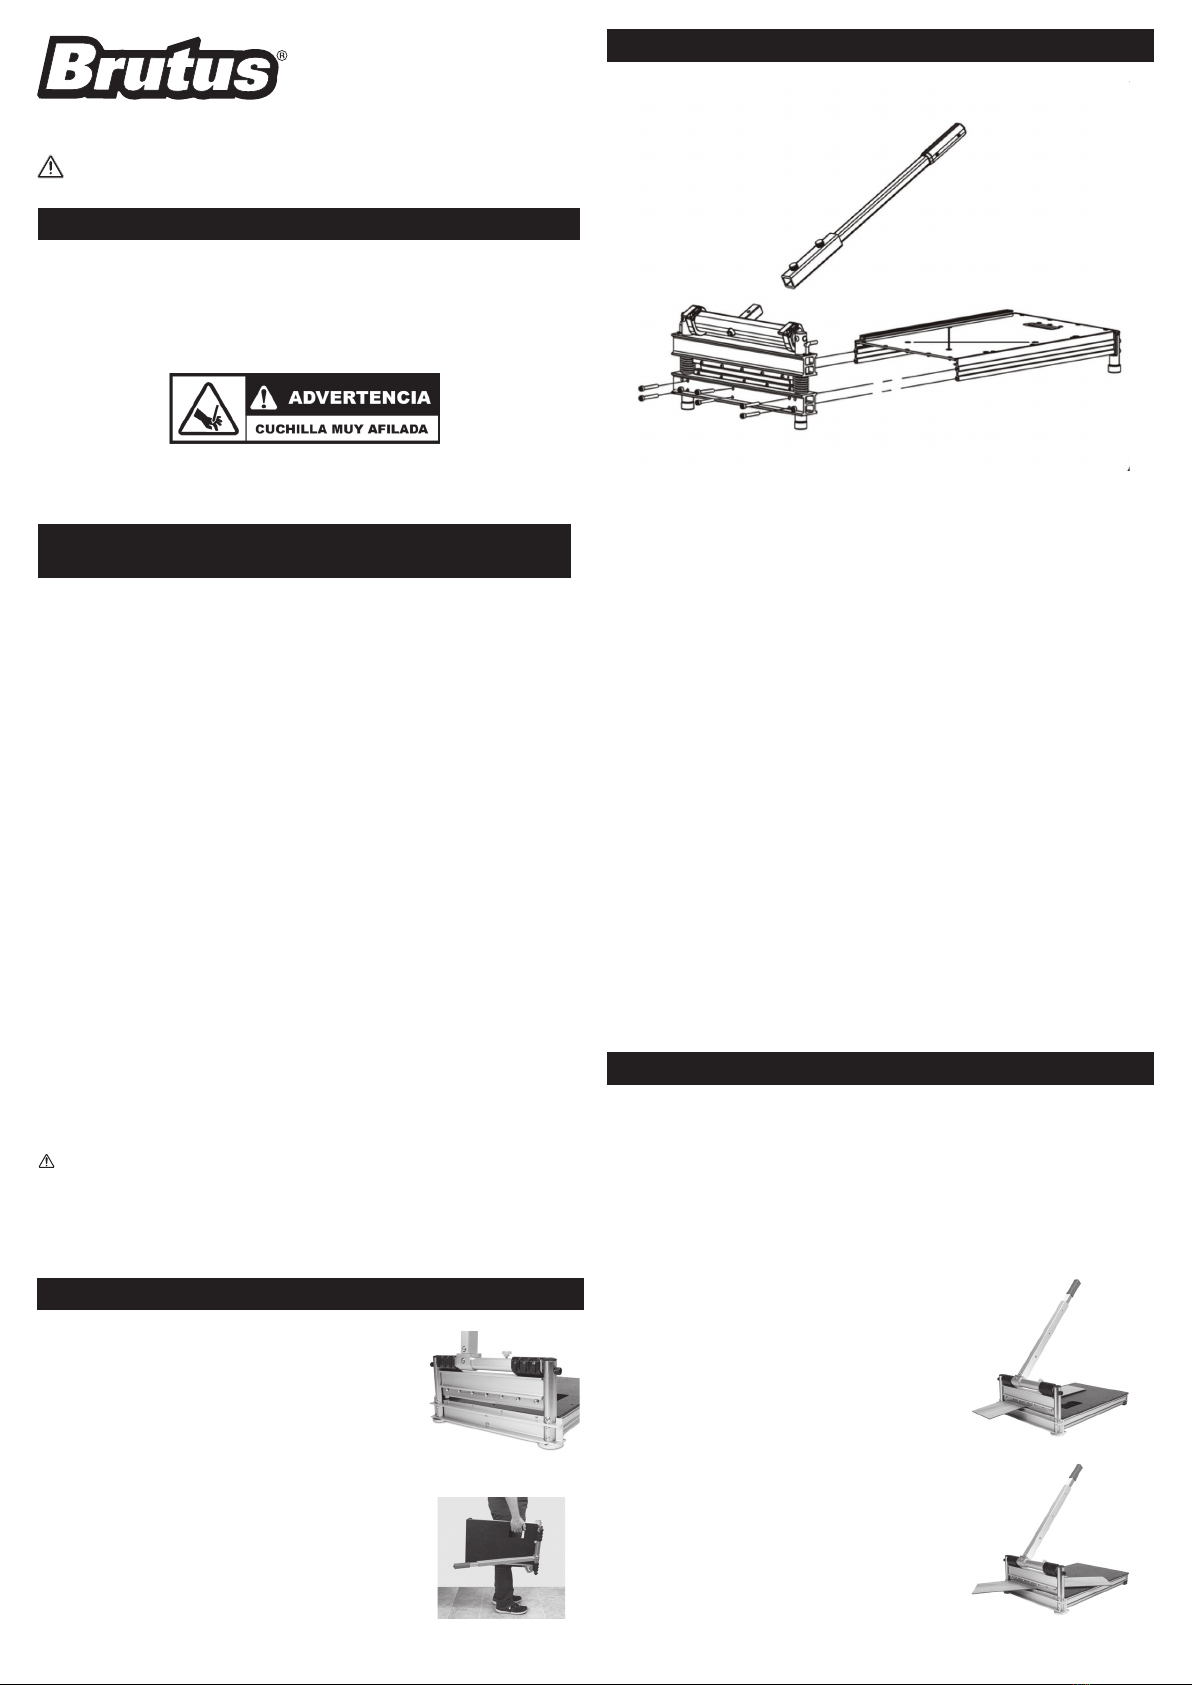
INSTRUCCIONES DE MONTAJE:
Las herramientas necesarias para el montaje (no incluidas):
Destornillador Phillips
Paso 1: Remueva los 6 tornillos ubicados en el extremo del marco de la base
de la mesa
• 4 tornillos exteriores con la llave Allen pequeña
• 2 tornillos centrales con un destornillador Phillips
Paso 2: Adjunte el ensamblaje de la cortadora a la base de la mesa
• Coloque la base de la mesa en su costado.
• Alineé el ensamblaje de la cortadora con la base de la mesa, dejando los
tornillos de la cuchilla mirando en dirección opuesta de la
base de la mesa.
• Asegure el ensamblaje de la cortadora con la base de la mesa con los 6
tornillos que removió en el paso 1.
Paso 3: Utilice los cuatro tornillos de los elementos de montaje para
asegurar la mesa plástica en el ensamblaje de la cortadora.
Paso 4: Adjunte la manija al ensamblaje de la cortadora
• Remueva el tornillo de la manija de extensión del ensamblaje de la
cortadora con la llave Allen.
• Coloque la manija sobre la extensión para la manija.
• Ajuste el tornillo con la llave Allen.
Paso 5: Adjunte el accesorio de la guía de ángulos
• Remueva el tornillo mariposa del costado derecho de la
base de la mesa.
• Ajuste la guía de ángulos en el poste esquinero.
• Atornille de nuevo el tornillo mariposa en su lugar.
CORTE
Advertencia: Mantenga el control de la manija. No permita que la manija
se regrese después de hacer el corte. No ponga los dedos contra el borde
afilado de la cuchilla en ningún momento.
PREPARACIÓN DEL CORTE
• Presione el botón en el extremo de la manija para extender la manija al
largo deseado.
• Ajuste el accesorio de guía para ángulos al ángulo deseado a medida
que lo necesite.
CORTE RECTO
• Inserte el piso entre la cuchilla de corte
y la base.
• Alineé con el accesorio de guía para
ángulos y sostenga el material. No
ponga los dedos contra el borde afilado
de la cuchilla en ningún momento.
• Empuje la palanca hacia abajo para
completar el corte.
CORTES EN ÁNGULO
• Ajuste el accesorio de guía para ángulos
en el ángulo deseado.
• Inserte el material entre la cuchilla de
corte y la base, contra el accesorio de
guía para ángulos. No ponga los dedos
contra el borde afilado de la cuchilla en
ningún momento.
• Empuje la palanca hacia abajo para
completar el corte.
LISTA DE PARTES:
REGLAS DE SEGURIDAD PARA EL CORTADOR
PARA MÚLTIPLES PISOS
ADVERTENCIA: EN CASO DE NO SEGUIR ESTAS REGLAS PODRÍA
RESULTAR EN LESIONES GRAVES, SI UTILIZA ESTA HERRAMIENTA
CON RESPETO Y PRECAUCIÓN REDUCIRÁ CONSIDERABLEMENTE LA
POSIBILIDAD DE LESIONES PERSONALES.
1. LEERY ENTENDER ÉSTE MANUAL DE OPERACIÓN ANTES DE UTILIZAR
EL cortador para múltiples pisos
2. Si usted no está familiarizado con la operación del
cortador para
múltiples pisos
, obtenga el consejo de un instructor calificado o llame
al 866-435-8665
3. Permanezca Alerta. No utilice el cortador mientras esté bajo la influencia
de medicinas, alcohol, o medicación
4. Siempre utilice gafas de protección para los ojos con escudos laterales
(ANSI Z87.1)
5. Mantenga el área de trabajo sin escombros.
6. Mantenga niños y personas no autorizadas lejos del
cortador para
múltiples pisos
y área de trabajo.
7. Asegúrese que la herramienta de corte esté segura. Opere solo en una
superficie firme o soporte solido.
8. Use la Herramienta adecuada. No fuerce el
cortador para múltiples
pisos
ni lo utilice para un trabajo para el cual no fue diseñado; utilice
sólo en materiales aprobados.
9. Mantenga el disco de corte afilado. Un disco de corte desgastado no se
desempeñará de manera apropiada.
10. Siempre mantenga las manos lejos de la Cuchilla mientras la utilice o la
transporte.
11. No haga cambios o mal utilice ésta herramienta de corte. El
cortador
para múltiples pisos
está construido con precisión; modificaciones no
especificadas en éste manual pueden causar una condición peligrosa.
12. Mantenga el cortador profesional para pisos de 630mm con cuidado.
Mantenga la cuchilla limpia. Siga instrucciones para lubricar y cambiar
accesorios.
13. Use solo accesorios recomendados. El uso de accesorios impropios
puede causar riesgos o herida.
14. Nunca deje el
cortador para múltiples pisos
desatendido. Asegure el
mango con la cadena cuando no esté
siendo utilizado.
ADVERTENCIA: Lea y comprenda todas las instrucciones.
GUARDE ESTAS INSTRUCCIONES PARA USAR COMO REFERENCIA EN EL FUTURO.
MANTENIMIENTO
CAMBIANDO LA CUCHILLA
• Use la llave Allen para remover los 7 tornillos
en el respaldo de la base del ensamblaje
del cortador.
• Sostenga la cuchilla desde cada extremo y
cuidadosamente saque la cuchilla del soporte
de la cuchilla. No ponga los dedos contra
el borde afilado de la cuchilla en ningún
momento.
• Coloque una cuchilla nueva en el soporte con el lado plano de la
cuchilla mirando hacia la mesa.
TRANSPORTE
• Deslice el pasador de bloqueo hacia la
izquierda para bloquear la cuchilla y apretar.
(Afloje y deslice hacia la derecha
para desbloquear)
• Use la abertura de sujeción manual en la mesa
para transportarla fácilmente.
1 Base de la mesa
1 Ensambladura de
la cortadora
1 Manija
1 Accesorio de la guía
de ángulos
1 Bolsa con material
de montaje
(1 llaves Allen y 4 tornillos)
ADVERTENCIA: Taladrar, aserrar, lijar y tratar madera con
maquinas podría exponerlo al polvo de madera, el cual es una
substancia conocida por el Estado de California como causante
de cáncer. Evite inhalar el polvo de madera o utilice una máscara
contra polvo u otros equipos de protección personal.Para más
información vaya a
www.P65Warnings.ca.gov/wood-dust.
Cortador para múltiples pisos - Instrucciones


