BT CALLER DISPLAY 1000 User manual

User Guide
Interactive screenphone

Please open this page for an ‘at a glance’
guide to your .

Please open this page for a further
‘at a glance’guide to your .

At a glance
New calls indicator
Visual alert for new calls.
Full QWERTY Keyboard
For use with E-Mail
directory and notepad.
Phone Line LED
Lights when the phone
line is unplugged.
Volume button
Adjusts the ringer and
speaker volumes.
Handsfree button
Use to dial and hold a
telephone conversation
without lifting the handset.
Mail
Lets you send and receive
E-Mail and send faxes.
Directory
Lets you access 150 name and
numbers stored in the directory.
Calls
Lets you access incoming,
outgoing and reminder list calls.
Save button
Save up to 4 screens of information
when connected to a service.
Retrieve button
Displays saved
information.
BT Services
Press for fast and easy use
of BT’s Select Services.
Town Centre
Fully ADSI compatible
allowing interactive access
to participating companies;
- Home Banking
- Home Shopping
- Information Services
Text size button
Press to choose between
3 different text sizes.
Multi Function buttons
Use to choose between the
options offered on screen.
Classified
Direct Dial national and
local advertisers.
Navigation Arrows
Lets you move the cursor
or highlight an option for
selection.
Enter button
Lets you make a selection.
Acts as the = button in
calculator mode.
Redial button
Redials the last number
you called.
eas icom
100 0
A
B
C
J
K
L
T
U
V
G
H
I
P
Q
R
S
D
E
F
M
N
O
W
X
Y
Z
23
1
564
897
0
✱
TEL:
Secrecy
Allows you to talk to someone
in the same room, without your
caller hearing you.
Recall button
For use with switchboards.
Assistant button
Use for the organiser and
calculator features.
1
New Calls : 0
New Mails : 0

eas icom
100 0
Telephone On/Off Hook
Attach your printer here
(available seperately)
Extension in use
Receiving information
Secrecy On/Off Password
Movement arrows
New Calls: 0
Number of new
calls received.
New Mails: 0
Number of new
mails received.
Attached telephone line cordMains power cable with 3-pin adaptor
10:24am
Time
AA text size
Battery low
8 APR
Today’s date.
printer
Your Screen
New Calls : 0
New Mails : 0

2
Send and receive E-Mail
The enables you to
send and receive E-Mail messages
around the world without needing a computer.
You can also send faxes direct to any standard
fax machine.
Personal Directory
Easily store and quickly access up
to 150 names and numbers, as well
as E-Mail addresses and fax numbers in the
directory.
Caller Display
You can view information about calls
you have received, making it easy to
track and deal with callers.
Town Centre
Saves time by providing a fast track
route to interactive home shopping
and services direct to your home.
Classified
Dial Direct for a complete and up-to-
date list of entries in the UK Yellow
Pages.You can search for companies on a national
or local basis.
Pull-out QWERTY keyboard
Compact keyboard lets you type
E-Mails, faxes and directory entries.
With the AAbutton (next to the screen), you
also have a choice of three on-screen text sizes.
Key features

3
In this guide
At a glance 1
Introduction 4
Installation 5
Using your 7
Mail 9
Calls 13
Directory 15
Town Centre 17
Classified 18
Assistant 19
Connecting to a switchboard 21
Maintenance 22
Help 23
Technical information 24
Index 25

User Guide
Interactive screenphone
A
B
C
J
K
L
T
U
V
G
H
I
P
Q
R
S
D
E
F
M
N
O
W
X
Y
Z
23
1
564
897
0
✱
TEL:
eas icom
1000
4
For your records
For warranty purposes, proof of purchase is
required, so please keep your receipt.
Personal Emergency Numbers
Date of purchase:
Place of purchase:
Serial number (on the base of the telephone):
Purchase price:
1
2
3
4
Introduction
Your has been designed for ease of use and made to the
high standards set by BT.
INSTALLATION
You can expect your to give you
many years of trouble-free service.
Please read the instructions carefully before use
and keep this User Guide for future reference.
Unpacking your
If anything is missing, please contact your place
of purchase immediately.
●with
telephone line cord attached
●Mains adaptor
●4 X AA size batteries
●User Guide

Plan the location of your
Make sure your is within 2
metres of the phone and mains sockets.
Turn your upside down.
Use the end of a ballpoint pen (or similar) to
remove the battery compartment cover.
Insert batteries as shown.
1 Insert back-up batteries
If you do not have modern phone sockets, call
Freefone 0800 800 150 and ask for a BT
engineer to come and fit the correct type. This
is a chargeable service.
5
Installation
Follow these steps to set up your ready for use.
Important
If there is a power failure and you do not have
back-up batteries fitted, the telephone will still
work normally, but the caller display function
will not operate and your ’s screen
will go blank. Information stored in the memory
will be lost.
2 Plug the mains power adaptor into
to the
3Connect the telephone line cord into
to the telephone line socket
INSTALLATION

6
TIME
Press TIME.
KEYPAD
Enter the time, using the 12-hour clock,
e.g. for 9.30, dial 0930. Press to select
AM or PM.
OK
Press OK to confirm the time.
EXIT
Press EXIT.
Press the button on the front of the
phone marked – +.
+Press for louder ringer volume.
–Press for softer ringer volume.
Your is now ready for use.
The screen comes on and asks you to dial BT
free to receive information into your phone that
will make BT Select Services easier to use.
Press buttons in order shown
DIAL
Press DIAL and follow the on-screen
prompts.
When you have stored the BT
information, you can access the range
of BT Select Services quickly and easily
by pressing the BUTTON to the left of
the screen with below it.
If the BT server is busy or unavailable
you can dial it manually later by phoning
0800 328 1949.
DATE
Press DATE.
KEYPAD
Enter the correct date, e.g. for
6 January 1999, dial 06 01 1999.
OK
Press OK to confirm the date.
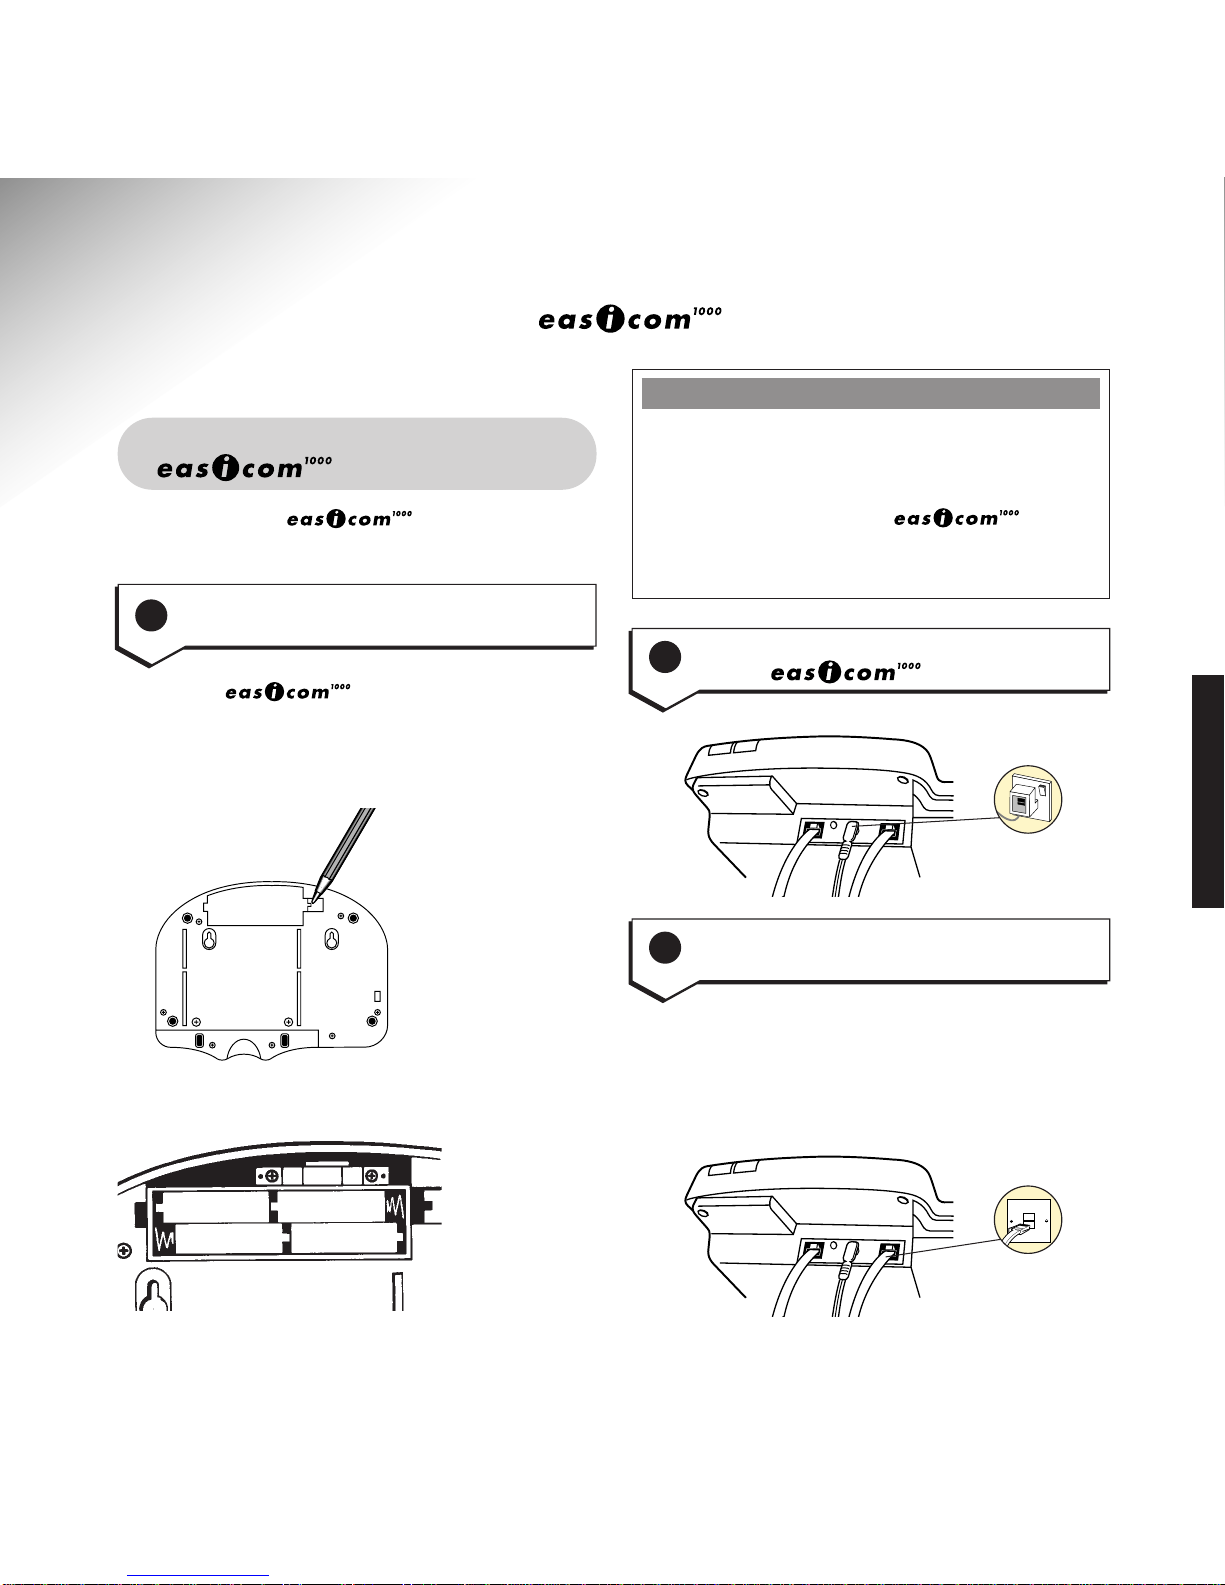
4Plug the power adaptor into a
socket and switch on
5Call BT free to download
important information
6 To set the date
7 To set the time
8 To set the ringer volume
INSTALLATION

7
Using your
To preview dial
To redial the last number
To adjust the screen contrast
To change the size of the
on-screen text
USING
To make a call
Making and receiving calls
Lift the handset.
KEYPAD
Dial the number you want.
You can dial your number and check
that it is correct before making the call.
Key in the number you want. It is
displayed on the screen.
DIAL
Press DIAL. The number is dialled.
The last number called is redialled.
Press buttons in the order shown
You can make the screen darker or
lighter to suit the lighting in your room.
Press the buttons to select the on-screen
prompts in the order shown below:
ASSISTANT then select s
SETTINGS or press 6, then
CONTRAST
Follow the on-screen prompts and use
the LEFT and RIGHT arrow buttons to
change the displayed settings.
DONE
Press DONE.
Press to change the text to one of
3 sizes. Leave the size you want
displayed on screen.

8
USING
To use secrecy
To make a handsfree call
To adjust the loudspeaker volume
Press buttons in order shown
You can make a call using the
loudspeaker, saving you from having to
pick up the handset.
Press the HANDSFREE button.
Dial the number.
During a handsfree call:
+Press to raise the volume
–Press to lower the volume
You can stop a caller from hearing you,
so that you can have a private
conversation with someone else in the
room.
Press SECRECY. The screen shows
(SECRECY). Your caller cannot hear you.
Press SECRECY to speak to your caller
again. The (SECRECY) disappears.

9
Mail
MAIL
To set up an E-Mail or fax
Please Note
When you enter your password a row
of asterisks (
*) will appear to keep this
information private.
Your can send and receive a total
of 70 Internet E-Mail messages for up to 5
separate users.
You can also type and send faxes to any
standard fax machine. However, you
cannot receive faxes on the .
To scroll through your messages, sending or
received, use the up and down arrows.
Press buttons in the order shown
The first time you use your
to send an E-Mail or fax,
you need to enter your details in the
set-up menu. Up to 5 different users
can store their details in the memory.
Press the MAIL button.
Use the ARROW buttons to highlight
SETTING.
SELECT
Press SELECT. Display shows the
USER DETAILS menu.
Use the ARROW buttons to highlight
your user number on the display.
SELECT
Press SELECT.
EDIT
Press EDIT.
KEYPAD
Enter the E-Mail ID Password and
Server numbers supplied with your
in order to register and
send/receive mail to your phone.
KEYPAD
Type your name next to FAX NAME.
This appears on the headers of all
faxes you send.
DONE
Press DONE to confirm your settings.
EXIT
Press EXIT.
IMPORTANT
Please remember that E-Mail messages are sent
and received via your telephone line. If you are
sending or receiving an E-Mail, you cannot use
your telephone at the same time.

You must have first followed the steps
in ‘To set up an E-Mail or fax’.
Press the MAIL button to open the mail
menu.
Use ARROW buttons to highlight
COMPOSE.
SELECT
Press SELECT.
KEYPAD
Enter the subject of your E-Mail on the
line starting ‘Subject’.
ADDRESS
Press ADDRESS.
You can send your E-Mail to up to 5
separate addresses.
E-Mail
Select E-Mail. Addresses previously
stored in the directory will be
displayed.
Either
Use the ARROW buttons to highlight
the address you want.
Or
KEYPAD
Type in the address details.
SELECT
Press SELECT. If you would like to
send to more than one person choose
additional addresses and press SELECT
each time up to a maximum of 5.
DONE
Press DONE.
KEYPAD
Type your message.
Your can send or receive
up to 30 lines per E-Mail and up to a
total of 70 messages.
10
MAIL
To create and send an E-MailTo turn OFF BT Call Waiting
Please turn off BT’s Call Waiting
service before sending or receiving
your mail, as an incoming call may
interfere with your messaging.
Lift the handset or press HANDSFREE.
KEYPAD
Key in #43# and wait for the voice
prompt to confirm that Call Waiting has
been switched off.
Hang up.
To turn Call Waiting back on
Lift the handset or press HANDSFREE.
KEYPAD
Key in ✱43# and wait for the voice
prompt to confirm that Call Waiting has
been switched on.
Hang up.

Press buttons in the order shown
You must have first followed the steps
in ‘To set up an E-Mail or fax’ so
that you have saved your E-Mail/Fax
account information.
Press the MAIL button.
SEND/
Press SEND/RECEIVE and check the
RECEIVE
user details shown are your own.
Press SEND/RECEIVE again. Please
note that any e-mail in your Outbox will
also be sent.
SEND/
Press SEND/RECEIVE and check that
RECEIVE
the E-Mail account information that
appears on screen is your own.
Or
Press SEND/RECEIVE again to receive.
A counter above the Inbox shows the
number of new messages waiting.
Use the arrow buttons to highlight the
INBOX, press SELECT.
Use the arrow buttons to highlight the
mail you want to read.
SELECT
Press SELECT to display the
E-Mail message.
11
MAIL
SEND
Press SEND TO OUTBOX to store your
TO
message ready for sending.
OUTBOX
Go to the Outbox, highlight that mail that
you would like to keep a copy of, press
COPY
COPY, a box will appear asking if you
SELECT
would like to copy to draft, press SELECT
and a copy of your mail will now be saved
in the draft log for future reference,.
SAVE
Select SAVE TO DRAFT to store your
TO DRAFT
mail for editing/sending later.
Or
To keep a copy of your E-Mail use
the ARROWS to highlight the mail
that you would like to keep.
COPY
Press COPY. A box will appear asking if
you would like to COPY TO DRAFT.
SELECT
Press SELECT and a copy of your mail
will now be saved in the draft log
for future reference.
SEND/
Press SEND/RECEIVE and check that
RECEIVE
the E-Mail account information shown on
the screen is your own.
SEND/
Press SEND/RECEIVE again to send.
RECEIVE
To receive an E-Mail
Received Messages
To keep a copy of your E-Mail

You can use the up and down ARROWS
or PAGE UP and PAGE DOWN on the
pull out keyboard to move through
your mail.
Press buttons in the order shown
You must have first followed the steps
in ‘To set up an E-Mail or fax’ above so
that you have saved your E-Mail/Fax
account information.
Press MAIL.
Use the ARROWS to highlight COMPOSE.
KEYPAD
Type the subject of your fax on the line
starting ‘Subject’.
ADDRESS
Press ADDRESS.
Use the ARROWS to highlight FAX.
If you have previously stored fax numbers
in the directory, they are shown.
SELECT
Press SELECT.
Use ARROWS to highlight names and
numbers from the fax directory.
SELECT
Press SELECT again to choose the
highlighted name and number.
The fax details now appear at the top of
the screen.
DONE
Press DONE to complete addressing
your fax.
KEYPAD
Type your fax message.
SEND
Press SEND TO OUTBOX to store your
TO
fax ready for sending.
OUTBOX
Or
SAVE
If you want to save your message for
TO
editing later, press SAVE TO DRAFT.
DRAFT
Press MAIL.
Go to the Outbox, highlight the fax that
you would like to keep a copy of, press
copy, a box will appear asking if you
would like to copy to draft, press
SELECT
SELECT and a copy of your fax will now
be saved in the draft log for future
reference. Use the ARROWS to
highlight the mail that you would like
to keep.
COPY
Press COPY. A box will appear asking if
you would like to COPY TO DRAFT.
SELECT
Press SELECT and a copy of your fax
will now be saved in the draft log
for future reference.
SEND
Press SEND. Check that the fax
account information that appears on
screen is correct.
SEND
Press SEND again to confirm and send.
12
MAIL
To send a fax
To keep a copy of your Fax

13
Press the CALLS button. Display shows
a 50 Number Incoming Calls List,
a 10 Number Outgoing Calls List
and the Reminder List where you
can set up to 60 Reminder Alarms.
SELECT
Press SELECT to highlight the list
you want.
Press the CALLS button. The display
shows the Calls Lists.
Use the ARROW buttons to highlight
the Incoming Calls, Outgoing Calls or
Reminder Alarms list.
SELECT
Press SELECT to highlight the entry
you want to delete.
DELETE
Press DELETE. A dialogue box asks
you to confirm.
YES/NO
Choose YES or NO to delete or to cancel
the delete command.
Calls
To view the Calls List
To delete a single entry in a Calls List
New Calls light
CALLS
Your works with BT Select
Services Caller Display and Caller Display with
Call Waiting. These are available on
subscription. For further information, call BT on
FREEfone 0800 800 150.
When you subscribe to Caller Display and Call
Waiting services, your will display
the number of the person calling as well as the
number of a caller who is trying to contact you
even if you are already using the line.
Caller Display
Your stores information on the
most recent incoming and outgoing calls giving
the time and date of each call. If you have stored
the name and phone number of the caller in the
directory, it will also display the name.
There is also a Reminder List which lets you set
up to 60 Reminder Alarms to your phone.
Press buttons in the order shown
The red Calls light comes on to let you
know when you have received new calls.

Call Waiting
Call Waiting lets you know if another caller is
trying to reach you when you are already on the
phone.
You hear a beep in the earpiece and
your screen displays
SWITCH.
SWITCH
Press SWITCH to put your first call on
hold and talk to your second caller.
SWITCH
Press SWITCH again to talk to your
first caller again.
If one call hangs up, you are automatically
connected to the remaining caller.
Press buttons in the order shown
Press the CALLS button. Display shows
the Calls Lists.
Use the ARROW buttons to highlight
the Incoming Calls, Outgoing Calls or
Reminder Alarms list you want to delete.
CLEAR ALL
Press CLEAR ALL. A dialogue box asks
you to confirm.
YES/NO
Press YES to delete or NO to cancel.
Caller Display Text messages
Your can also display text
messages sent via the Caller Display service.
These messages provide extra information about
the type of call you have received.
INTERNATIONAL
Call received from outside the UK.
UNAVAILABLE
The caller’s network does not operate a caller
display service.
WITHHELD
The caller has stopped their number from
being sent.
OPERATOR
The call has come via the operator.
PAYPHONE
The caller is ringing from a payphone.
RINGBACK
The telephone number that you have set on
Ringback is now free to receive your call.
14
To delete all entries in a calls list
To answer a call waiting whilst on
a call
CALLS

Your can store up to 150 names
and numbers, E-Mail addresses and fax
numbers in the directory.
Press buttons in the order shown
Press the DIRECTORY button.
NEW
Press NEW.
KEYPAD
Enter the name you want.
Move the cursor to the next line down.
KEYPAD
Enter the number you want.
Use the pullout keyboard to enter the
persons details.
SAVE
Press SAVE.
If you need to add a Pause to the number
you are storing, press the Pbutton on
the pull-out keyboard where you want
to Pause to be placed in the number.
The Pause will be shown as Pon the
display.
D RECTORY
15
Directory
To add an entry
To dial a directory entry
To delete an entry
Press the DIRECTORY button.
ARROWS
Press the ARROW buttons to scroll
through the list and highlight the name
you want.
DIAL
Press DIAL.
If you have more than one number
stored for the same name, a dialogue
box asks you to select the number you
want by highlighting it with the
ARROW buttons and then pressing
DIAL
the DIAL button again.
Press the DIRECTORY button.
Press the ARROW buttons to scroll
through the list and highlight the name
you want to delete.
DELETE
Press DELETE. A dialogue box asks
you to confirm the delete.
Use the ARROW buttons to highlight
YES to delete or NO to cancel.
YES
Press YES to confirm deletion.

Copying numbers into the
directory
Whenever you receive a number in the calls list,
you can copy it into your ’s directory.
When the Incoming or Outgoing Calls
List is displayed:
COPY
Press COPY and follow the on-screen
prompts to add the number to the
directory.
16
To copy a phone number
To set different ring tones for
directory entries (works with BT’s
Caller Display Service).
DIRECTORY
Press buttons in order shown
You can allocate up to 9 different ring
tones for entries in the
directory. For example, you could set
different tones for business or personal
numbers. You can set the ring tone for
new and existing entries.
Press the DIRECTORY button.
Either
Press the ARROW buttons to scroll
through the list to find an existing name.
Or
ADD
Press ADD to start a new entry.
RING
Press RING SOUND to hear a sample
SOUND
of the current ringer. Return to the
standard ringer sound, by pressing the
RING SOUND button until there is no
number shown next to it on the display.
SAVE
Press SAVE to save your entry with the
ringer sound that is highlighted.
Other manuals for CALLER DISPLAY 1000
13
Table of contents
Other BT Telephone manuals

BT
BT RELATE SMS User manual

BT
BT FREESTYLE 610 User manual

BT
BT CALLER DISPLAY 1000 User manual

BT
BT Featurephone User guide

BT
BT Freestyle 750 User manual

BT
BT FREELANCE 501 User manual

BT
BT ON-AIR 2300 SMS User manual

BT
BT PARAGON 400 PLUS User manual

BT
BT BT DECOR 310 USER GUIDE 310 User manual

BT
BT CCX 700 User manual