manuals.online logo
Brands
  1. Home
  2. •
  3. Brands
  4. •
  5. Bticino
  6. •
  7. Recording Equipment
  8. •
  9. Bticino 323008 User manual

Bticino 323008 User manual

323008
O2346B01CT-14W26
POWER
+
-
5 4 3 2
1
1. To fasten the body on the wall use
screw.
2. Insert the cover into body and
fasten it.
1
2
Don’t install in heat-source and damp
place.
• Installation notes
• Notes d’installation
• Notas de instalación
• Montaj notları
• Installation (way 1)
• Installation (mode 1)
• Instalación (modo 1)
• Montaj (yöntem 1)
1
2
• Installation (way 2)
• Installation (mode 2)
• Instalación (modo 2)
• Montaj (yöntem 2)
Isı kaynaklarının olduğu ve ıslak-rutubetli
ortamlara monte etmeyiniz.
1. Gövdeyi duvara monte etmek için
vida kullanınız.
2. Kapağı gövdeye yerleştiriniz ve
sabitleyiniz.
1. To fasten the bracket on the wall
use screw.
2. Buckle the top of body to the
bracket, then pull down the body
till hearing xed hintvoice.
1. Bağlantı parçasını duvara tespit
etmek için vida kullanınız.
2. Gövdenin üst kısmını bağlantı
parçasına geçiriniz ve bir çıtlama sesi
duyana kadar gövdeyi aşağı çekiniz.
1 – 3. Connect four internal unit
separately.
4. To connect four internal unit
connector of 323002.
5. Accessory power supply
connector 18 Vdc – 30 Vdc.
1 – 3. Dört dahili üniteyi ayrı ayrı
bağlayınız.
4. 323002’nin dört dahili ünite
konektörünün bağlanması.
5. Aksesuar güç kaynağı konektörü
18 VDC - 30 VDC.
• Description
• Description
• Descripción
• Açıklama
1 – 3. Connecter quatre postes
internes séparément.
4. Pour connecter le connecteur
de quatre postes internes de
323002.
5. Connecteur Alimentation 18
Vcc – 30 Vdc.
1 – 3. Conectar las cuatro unidades
interiores por separado.
4. Usar el conector de 323002
para conectar las cuatro
unidades interiores.
5. Conector alimentación
accesorio de 18 Vcc - 30 Vcc.
Ne pas installer à proximité de sources
de chaleur ni à un endroit humide.
No instalar cerca de fuentes de calor y en
lugares húmedos.
1. Pour fixer le corps au mur, utiliser
des vis.
2. Placer la couverture sur le corps et
la fixer.
1. Usar un tornillo para fijar el cuerpo
en la pared.
2. Insertar la tapa en cuerpo y fijar.
1. Pour xer le support au mur, utiliser
des vis.
2. Fixer le sommet du corps au
support, puis abaisser le corps
jusqu'au déclic.
1. Usar un tornillo para jar el soporte
en la pared.
2. Fijar la parte superior del cuerpo en
el soporte y luego bajar el cuerpo
hasta que se oiga un clic.
• Dismantle guide
• Guide démontage
• Guía desmontaje
• Sökme prosedürü
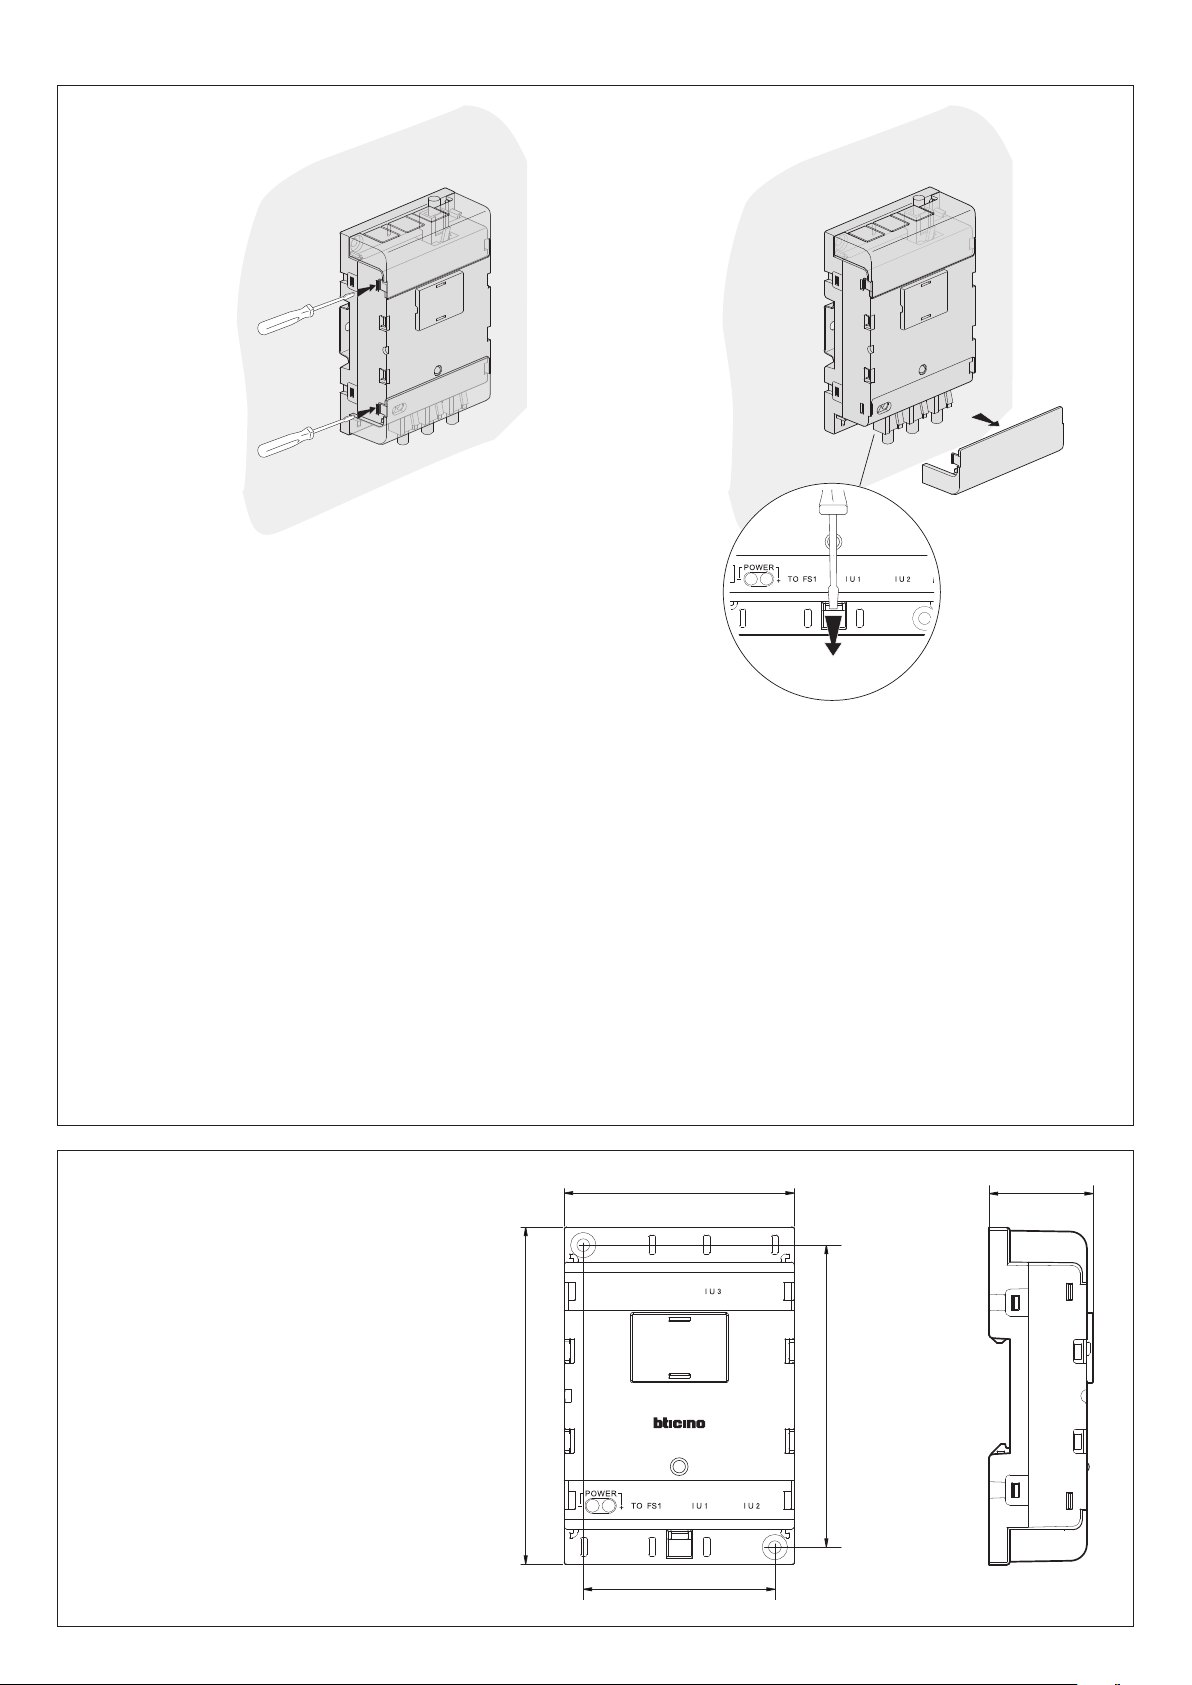
1. Use screw driver aim at the buckle and pull down to separate body and cover on
one side.
Repeat the rst step on the other side. Then use hand to take down the cover.
2. Same way to take o another cover.
3. Take o the cover
4. Use screw driver aim at the buckle and pull down, body will be released.
Attention
Don’t force to take off the cover by hand.
Reset the buckle before installation.
59,5 mm
72 mm
105 mm
94 mm
33 mm
- Power supply: 18 – 30 Vdc
- Current: standby < 40 mA (30 V);
work < 140 mA (30V)
- Consumption: standby < 1.2 W;
work < 4.2 W
2
1
2
3
4
- Güç kaynağı: 18 – 30 Vdc
- Akım: standby < 40 mA (30 V);
çalışır durum < 140 mA (30V)
- Güç Sarfiyatı: standby < 1,2 W;
çalışır durum < 4,2 W
1. Tornavida ucunu tokaya geçirerek aşağı çekiniz ve bir yanda gövde ve kapağı
birbirinden ayırınız.
Aynı prosedürü diğer yanda da tekrar ediniz. Daha sonra el yordamıyla kapağı alınız.
2. Başka bir kapağı çıkarmak için de aynı yöntemi kullanınız.
3. Kapağı çıkarınız.
4. Tornavida ucunu tokaya geçirerek aşağı
çekiniz, gövde serbest kalacaktır.
Dikkat:
Kapağı el ile çıkarmak için zorlamayınız.
Montaj öncesinde tokayı serbest hale getiriniz.
• Technical data
• Caractéristiques techniques
• Datos técnicos
• Teknik veriler
- Alimentateur: 18 – 30 Vdc
- Courant: stand-by < 40 mA (30 V);
fonctionnement < 140 mA (30V);
- Consommation: stand-by < 1,2 W;
fonctionnement < 4,2 W
- Alimentación: 18 – 30 Vdc
- Corriente: standby < 40 mA (30 V);
trabajo < 140 mA (30V)
- Consumo: standby < 1,2 W;
trabajo < 4,2 W;
1. Utiliser un tournevis dans la bouche et tirer vers le bas pour séparer corps et
couverture sur un côté.
Répéter la première opération de l'autre côté. Ensuite, abaisser manuellement la
couverture.
2. Procéder de même pour retirer une autre couverture.
3. Retirer la couverture.
4. Utiliser un tournevis dans la bouche et tirer vers le bas pour relâcher le corps.
Attention
Ne pas forcer pour retirer manuellement la couverture.
Effectuer le reset de boucle avant installation.
1. Usar un destornillador en el bloqueo y girarlo para separar el cuerpo y la tapa en
un lado.
Repetir el primer paso en el otro lado. Extraer manualmente la tapa.
2. Hacer lo mismo para desmontar la otra tapa.
3. Desmontar la tapa
4. Usar un destornillador en el bloqueo y girarlo para liberar el cuerpo.
Atención
No desmontar la tapa manualmente forzándola.
Restablecer la fijación antes de la instalación.

Other Bticino Recording Equipment manuals

Bticino 3460IR User manual

Bticino

Bticino 3460IR User manual

Bticino 346150 User manual

Bticino

Bticino 346150 User manual

Bticino TERRANEO T5562B User manual

Bticino

Bticino TERRANEO T5562B User manual

Bticino 368611 User manual

Bticino

Bticino 368611 User manual

Bticino 346850 User manual

Bticino

Bticino 346850 User manual

Bticino 346858 Instruction Manual

Bticino

Bticino 346858 Instruction Manual

Bticino SCART User manual

Bticino

Bticino SCART User manual

Bticino F429 User manual

Bticino

Bticino F429 User manual

Bticino 3465 User manual

Bticino

Bticino 3465 User manual

Popular Recording Equipment manuals by other brands

Broan VTSPEEDW Installation and user guide

Broan

Broan VTSPEEDW Installation and user guide

Toshiba Surveillix EAV Series quick start guide

Toshiba

Toshiba Surveillix EAV Series quick start guide

ICON Qcon ProX quick start guide

ICON

ICON Qcon ProX quick start guide

Axxess AX-AM-AU96 installation instructions

Axxess

Axxess AX-AM-AU96 installation instructions

Motrona ZU 251 Series operating instructions

Motrona

Motrona ZU 251 Series operating instructions

ITC Audio T-6202 Operation manual

ITC Audio

ITC Audio T-6202 Operation manual

Doug Fleenor Design PRE10E-A owner's manual

Doug Fleenor Design

Doug Fleenor Design PRE10E-A owner's manual

Roland SPD-S owner's manual

Roland

Roland SPD-S owner's manual

Grundfos CIU 300 Functional profile and user manual

Grundfos

Grundfos CIU 300 Functional profile and user manual

Newtons4th ADI40 Series Startup guide

Newtons4th

Newtons4th ADI40 Series Startup guide

DOEPFER MCV24 owner's manual

DOEPFER

DOEPFER MCV24 owner's manual

SyxthSense ITPF Product sheet

SyxthSense

SyxthSense ITPF Product sheet

CESVA LF010 user manual

CESVA

CESVA LF010 user manual

HDT HDSSFG20B instruction manual

HDT

HDT HDSSFG20B instruction manual

4Links EtherSpaceLink Series user manual

4Links

4Links EtherSpaceLink Series user manual

Frap Tools 333 user manual

Frap Tools

Frap Tools 333 user manual

White Rodgers 24A5X Series installation instructions

White Rodgers

White Rodgers 24A5X Series installation instructions

National Instruments VXI-USB user manual

National Instruments

National Instruments VXI-USB user manual

manuals.online logo
manuals.online logoBrands
  • About & Mission
  • Contact us
  • Privacy Policy
  • Terms and Conditions

Copyright 2025 Manuals.Online. All Rights Reserved.