manuals.online logo
Brands
  1. Home
  2. •
  3. Brands
  4. •
  5. Bticino
  6. •
  7. Recording Equipment
  8. •
  9. Bticino 368611 User manual

Bticino 368611 User manual

This manual suits for next models

1

Other Bticino Recording Equipment manuals

Bticino 3465 User manual

Bticino

Bticino 3465 User manual

Bticino TERRANEO T5562B User manual

Bticino

Bticino TERRANEO T5562B User manual

Bticino 346858 Instruction Manual

Bticino

Bticino 346858 Instruction Manual

Bticino 346850 User manual

Bticino

Bticino 346850 User manual

Bticino F429 User manual

Bticino

Bticino F429 User manual

Bticino 3460IR User manual

Bticino

Bticino 3460IR User manual

Bticino 346150 User manual

Bticino

Bticino 346150 User manual

Bticino 323008 User manual

Bticino

Bticino 323008 User manual

Bticino SCART User manual

Bticino

Bticino SCART User manual

Popular Recording Equipment manuals by other brands

ThermoFisher Scientific Dionex DRS 600 Installation checklist

ThermoFisher Scientific

ThermoFisher Scientific Dionex DRS 600 Installation checklist

Shure ANIUSB-Matrix user guide

Shure

Shure ANIUSB-Matrix user guide

Nady Audio HE-1 user guide

Nady Audio

Nady Audio HE-1 user guide

AUDAC APM 01 User manual & installation guide

AUDAC

AUDAC APM 01 User manual & installation guide

Teac GF-350 owner's manual

Teac

Teac GF-350 owner's manual

Fractal Audio MFC-101 MARK III owner's manual

Fractal Audio

Fractal Audio MFC-101 MARK III owner's manual

bmcm USB-OI16 manual

bmcm

bmcm USB-OI16 manual

HHB BurnIT CDR-830 Service manual

HHB

HHB BurnIT CDR-830 Service manual

GE VersaMax IC200CPUE05 manual

GE

GE VersaMax IC200CPUE05 manual

IntesisBox MH-RC-MBS-1 user manual

IntesisBox

IntesisBox MH-RC-MBS-1 user manual

Attero Tech unD4l user manual

Attero Tech

Attero Tech unD4l user manual

Sennheiser UI 765 instruction manual

Sennheiser

Sennheiser UI 765 instruction manual

Sony RCD-W1 Operating Instructions  (primary... Service manual

Sony

Sony RCD-W1 Operating Instructions (primary... Service manual

Roland Planet-P  MKS-10 owner's manual

Roland

Roland Planet-P MKS-10 owner's manual

Roland BOSS GT-PRO Turbostart

Roland

Roland BOSS GT-PRO Turbostart

8x8 Inc Valcom V-2001A manual

8x8 Inc

8x8 Inc Valcom V-2001A manual

Waves SUB Align user guide

Waves

Waves SUB Align user guide

Mitsubishi Electric MAC-334IF-E installation manual

Mitsubishi Electric

Mitsubishi Electric MAC-334IF-E installation manual

manuals.online logo
manuals.online logoBrands
  • About & Mission
  • Contact us
  • Privacy Policy
  • Terms and Conditions

Copyright 2025 Manuals.Online. All Rights Reserved.

368611 - 368811
Kit Video
Manuale installatore • Installation manual
2
Video - Kit
3
65
3 4
21
160 – 165 cm
20
160
135
BUS PL S+ S−
BUS
4
8
7
(-20) – (+20) °
(-20) – (+20)°
❶ ❷ ❸
❶
❷
❸
❹ ❺
Video - Kit
5
9
❶ ❷ ❸
6
•La telecámara no debe ser instalada delante de fuentes luminosas grande en lugares en donde el
individuo filmado se encuentre demasiado en contraluz. Para solucionar los problemas descritos
antes, es aconsejable modificar la altura de instalación de la telecamera, de 160 – 165 cm a 180
cm y enfocar el objetivo hacia abajo para optimizar la calidad de la filmación.
Nota: las telecámaras con sensor CMOS en colores presentan, en condiciones de escasa lumi-
nosidad, una sensibilidad inferior respecto a las telecámaras en blanco/negro. Por lo tanto es
aconsejable en ambientes escasamente iluminados prever una fuente de iluminación extra.
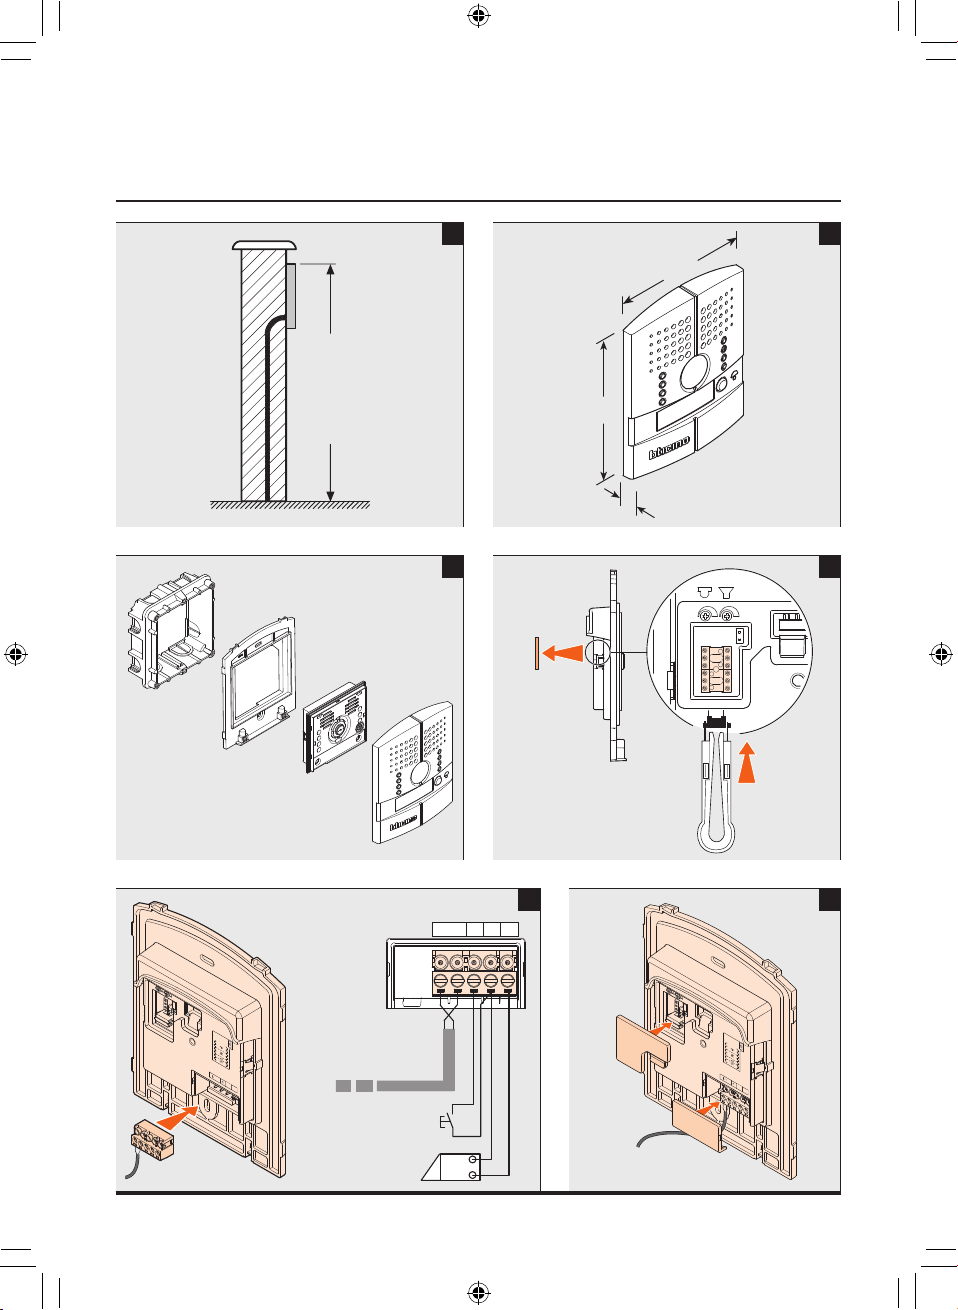
•La telecamera non deve essere installata di fronte a grandi sorgenti luminose, oppure in luoghi
dove il soggetto ripreso rimanga molto in controluce. Per risolvere i problemi precedentemente
descritti si consiglia di variare l’altezza di installazione della telecamera, solitamente 160 – 165
cm, ad un’altezza di 180 cm e di orientare l’obiettivo verso il basso in modo da migliorare la qua-
lità delle riprese.
Nota: Le telecamere con sensore CMOS a colori presentano, in condizioni di scarsa luminosità,
una sensibilità inferiore rispetto alle telecamere in bianco/nero. Si consiglia pertanto, in ambienti
poco illuminati di prevedere una fonte di illuminazione aggiuntiva.
•La télécaméra ne doit pas être installée en face de fortes sources lumineuses, ou bien dans des
endroits où le sujet pris reste très à contre-jour. Pour résoudre les problèmes précédemment dé-
crits, il est conseillé de porter la hauteur d’installation de la télécaméra, normalement 160 – 165
cm, à une hauteur de 180 cm et d’orienter l’objectif vers le bas de façon à améliorer la qualité des
prises de vue.
Nota: les télécaméras avec capteur CMOS couleurs présentent, dans des conditions de faible lu-
minosité, une sensibilité inférieure aux télécaméras noir/blanc. Il est donc conseillé, dans des mi-
lieux peu éclairés, de prévoir une source de lumière supplémentaire.
•The camera must not be installed in front of large light sources, or in places where the subject viewed
remains in deep shadow. To solve the problems described above change the height at which the cam-
era is installed, normally 160 to 165 cm, to a height of 180 cm, and face the lens downwards to improve
the quality of the views.
Note: in poor lighting conditions cameras with colour CMOS detector are less sensitive than black/
white cameras. An extra lighting source should be added in poorly lit rooms.
•Die Kamera darf nicht vor starken Lichtquellen oder an Orten installiert werden, wo das Subjekt sich
im Gegenlicht befindet. Um die zuvor erwähnten Probleme zu lösen, empfehlen wir die Installations-
höhe der Kamera zu ändern, d.h. sie anstatt auf 160 – 165 cm Höhe, auf 180 cm Höhe zu installieren
und das Objektiv nach unten zu orientieren, um die Aufnahmequalität zu verbessern.
Bemerkung: Farbkameras mit CMOS-Aufnahmeelement besitzen bei schlechter Beleuchtung eine ge-
ringere Empfindlichkeit als Schwarz/Weiß Kameras. Wir empfehlen daher eine zusätzliche Beleuch-
tungsquelle vorzusehen.
Video - Kit
7
•Installeer de camera niet tegenover grote lichtbronnen of op plaatsen waar de opname van het on-
derwerp door sterk tegenlicht wordt gestoord. Voorgaande problemen zijn op te lossen door de ca-
mera op een hoogte van 180 cm te installeren (in plaats van 160 – 165 cm) en het objectief omlaag te
richten zodat de kwaliteit van de opnames beter zal zijn.
Opmerking: camera’s met kleuren-CMOS-sensor zijn bij een zwakke verlichting minder gevoelig dan
zwart-wit camera’s. Daarom is het raadzaam om zwak verlichte omgevingen van extra verlichting te
voorzien.
•A câmara não deve ser montada diante de fortes fontes de luz, ou então em lugares onde o elemen-
to que deve ser filmado fique muito em contraluz. Para resolver os problemas supramencionados re-
comenda-se variar a altura da instalação da câmara, que habitualmente é de 160 – 165 cm, para uma
altura de 180 cm e orientar a objectiva para baixo a fim de melhorar a qualidade das filmagens.
Nota: as câmaras com sensor CMOS em cores apresentam, quando há pouca luminosidade, uma
sensibilidade inferior em relação às câmaras em branco e preto. Portanto, recomenda-se, quando
os ambientes forem pouco iluminados providenciar uma fonte de iluminação adicional.
•Η κάμερα δεν πρέπει να εγκαθίσταται απέναντι από μεγάλες φωτεινές πηγές, ή σε χώρους όπου η λήψη
του καλούντος γίνεται κόντρα στο φως. Για την επίλυση των προηγούμενα αναφερθέντων προβλημάτων
συνιστάται να μεταβάλλεται το ύψος εγκατάστασης της κάμερας, συνήθως 160 – 165 εκ, σε ένα ύψος
180 εκ και να προσανατολίζεται ο φακός προς τα κάτω έτσι ώστε να βελτιώνεται η ποιότητα της λήψης.
Σημείωση: Οι κάμερες με έγχρωμο αισθητήρα CMOS παρουσιάζουν, σε συνθήκες ελλιπούς φωτεινό-
τητας, μία χαμηλότερη ευαισθησία σε σχέση με τις ασπρόμαυρες κάμερες. Κατ’ επέκταση συνιστάται,
σε λίγο φωτισμένους χώρους να προβλέπεται πρόσθετη πηγή φωτισμού.
•Телекамера не должна устанавливаться напротив больших источников света или в местах, где
снимаемый объект находится против света. Для решения описанных выше проблем рекомен-
дуется изменить высоту установки телекамеры, которая, как правило, составляет 160-165 см,
на значение 180 см, и направить объектив вниз для улучшения качества съемки.
Примечание: В условиях недостаточной освещенности цветные телекамеры с датчиком CMOS
обладают более низкой чувствительностью по сравнению с черно-белыми телекамерами. В
связи с этим в слабо освещенных местах рекомендуется использовать дополнительные ис-
точники света.
•Kamera, büyük ışık kaynaklarının önüne veya kaydedilen kişinin aşırı ışığa karşı durduğu yerlere mon-
te edilmemelidir. Yukarıda belirtilen problemleri çözmek için kameranın genelde 160 - 165 cm olan
montaj yüksekliğini 180 cm’lik bir yükseklik olarak değiştirmeniz ve kayıt kalitesini iyileştirecek şekilde
objektifi aşağı doğru yönlendirmeniz tavsiye edilir.
Not: CMOS sensörlü renkli kameralar, düşük ışık şartlarında siyah/beyaz kameralara göre daha az
hassasiyet sunarlar. Bu nedenle, az aydınlanan ortamlarda ek bir ışık kaynağının öngörülmesi tavsiye
edilir.
8
•Kamera nie może być instalowana naprzeciwko silnych źródeł światła lub w miejscach, gdzie ob-
serwowany obiekt pozostaje w głębokim cieniu (lub “pod światło”). Aby temu zapobiec, można
zmienić wysokość zainstalowania kamery (na przykład 180 cm zamiast zalecanych 160 – 165 cm)
i skierować obiektyw w dół, aby uzyskać lepszą jakość obrazu.
Uwaga: w warunkach słabego oświetlenia kolorowe kamery CMOS są mniej czułe niż kamery
czarno-białe. W miejscach i pomieszczeniach słabo oświetlonych zalecane jest zamontowanie
dodatkowego oświetlenia.
•

180160-165
   CMOS   


Video - Kit
9
30 mm
168 mm
150 mm
160 – 165 cm
❷
❶
•Installazione del posto interno •Handset installation •Installation du poste interne •Installation
der Hausstation •Instalación de la unidad interior •Installatie van het intern punt •Instalação da
unidade interna •Εγκατάσταση της εσωτερικής θέσης •Установка внутреннего блока •Dahili üni-
te kurma •Instalacja miejsca wewnętrznego • •
•Altezza consigliata salvo diversa normativa vigente
•Recommended height, unless different regulations are specified
•Hauteur conseillée sauf autre norme en vigueur
•Empfohlene Höhe falls die gesetzlichen Vorschriften nichts anderes vorschreiben
•Altura recomendada salvo normativa vigente diferente
•Aanbevolen hoogte behoudens andere normen in voege
•Altura aconselhada a não ser se a norma em vigor for diferente
•Συνιστούμενο ύψος πλην διαφορετικής ισχύουσας νομοθεσίας
•Рекомендуемая высота, если нет других норматив-ных предписаний
•Yürürlükteki kanunlarca farklı şekilde belirlenenler hariç olarak, tavsiye edilen yükseklik
•Zalecana wysokość z zastrzeżeniem innych obowiązujących przepisów
 •
10
12
4
5
6
789
10
11
3
12
1•Display
•Display
•Moniteur
•Display
•Pantalla
•Display
•Ecrã
•Οθόνη
•Дисплей
•Ekran
•Wyświetlacz
 •
2•Microfono
•Microphone
•Micro
•Mikrofon
•Micrófono
•Microfoon
•Microfone
•Mικρόφωνο
•Микрофон
•Mikrofon
•Mikrofon
 •
3•Accensione posto esterno/ciclamento
•Switching on entrance panel/cycling
•Allumage poste externe/cyclage
•Einschalten einer Türstation/Taktierung
•Encendido de la placa exterior/visualización
cíclica de telecámaras
•Inschakeling extern punt/cyclusopvolging
•Ligação unidade externa/mudança cíclica
•Άναμμα εξωτερικής θέσης/έναρξης κύκλου
•Включение наружной точки / циклирование
•Dış ünite/periyodik işletme çalıştırılması
•Włączenie miejsca zewnętrznego/ przewijanian
 •
4•Accensione luci scale
•Switching on staircase lights
•Allumage lumière escaliers
•Treppenlicht einschalten
•Encendido de la luz de la escalera
•Inschakeling lichten trapzaal
•Ligação das luzes escadas
•Άναμμα φώτων σκάλας
•Включение света на лестницах
•Merdiven ışıklarının yakılması
•Włączenie światła na klatce schodowej
 •
5•Volume (altoparlante)
•Volume (Loudspeaker)
•Volume (haut-parleur)
•Lautstärke (Lautsprecher)
•Volumen (Altavoz)
•Volume (Luidspreker)
•Volume (Altifalante)
•Ένταση (ηχείου)
•Звук (громкоговорители)
•Ses yüksekliği (hoparlör)
•Natężenie dźwięku (głośnik)
 •
6•Tasto di connessione + Led
•Connection key + Led
•Touche de connexion + Led
•Schalttaste + Led
•Tecla de conexión + Led
•Toets aansluiting + Led
•Tecla de conexão + Led
•Πλήκτρο σύνδεσης + Led
•Кнопка подключения + Светодиод
•Bağlantı tuşu + Led
•Klawisz łączący + Led
 •