BUCKINGHAM MFG 488W Product manual

PN 230268 – 488Instructions –Warnings.dOC (06/09/11)
1
Buckingham Mfg. Co.Inc.
INSTRUCTIONS / WARNINGS 488 SERIES –SuperSqueeze
DESCRIPTION:
Model 488W Series – Wood Pole Fall Restriction Device (WPFRD) with Woven Inner Strap for Distribution Poles.
Model 488R Series – Wood Pole Fall Restriction Device (WPFRD) with Rope Inner Strap for Distribution Poles.
Model 488TW Series – Wood Pole Fall Restriction Device (WPFRD) with Woven Inner Strap for Transmission Poles.
Model 488RT Series – Wood Pole Fall Restriction Device (WPFRD) with Rope Inner Strap for Transmission Poles.
A
B
C
D
E
F
G
I
J
K
H
A – Locking Carabiners
B – Inner Strap (Woven)
C – Outer Strap (Brown Neoprene Impregnated Nylon)
D – Cam Assembly LAD
E – D-ring
F – Friction Buckle
G – Serrated Rotosnap
H –Cleat
I – Riveted End
J – Outer Strap Fold Over
K – Outer Strap Handle
L – Rope Tail
M – Wear Guard
N – Grommets
O – Inner Strap (Braided Rope)
P – LAD
L
M
N
A
P
O
G

PN 230268 – 488Instructions –Warnings.dOC (06/09/11)
2
PRIOR TO USE:
This equipment is intended for use by properly trained professionals only.
Know the job and the regulations governing requirements and select proper equipment.
Manufacturer’s instructions shall be provided to users with this product. Read all instructions and warnings provided
by Buckingham and included with the product.
Visually inspect the SuperSqueeze and all related equipment before each use. (See inspection below)
INSPECTION:
Prior to use, carefully inspect equipment for indications of wear and /or deterioration. The inspection should include, but not be
limited to the following:
1. All hardware and connecting devices are clean and functioning properly, are free of cracks, deformation, burrs,
excessive wear, or modifications. Snap hook and Carabiner gate freely opens and closes without binding. All bolts and
locking nuts are in place and securely tightened and outer (brown) strap removable fasteners are in place and securely
tightened.
2. The cam locks on the Outer Strap when the SuperSqueeze is properly adjusted on the pole and the user’s weight is on
the unit.
3. All straps are free from defects including kinks, knots, cuts, cracks, burns, abrasions, broken strands, excessive wear,
chemical exposure and ice, mud, snow, etc. buildup. If buildup on straps or component assemblies is noted, remove
buildup. One method of removal from the straps is to run the cam assembly along the length of the outer (brown) strap,
the LAD along the length of the inner (rope) or the friction buckle along the length of the inner (Woven) strap. Ensure
component assemblies are clean and free of any debris. NOTE: Prior To and While in Use, particularly in extreme
weather conditions (i.e. blizzards, high winds, etc.) – guard against debris (pebbles, twigs, packed snow, ice, mud,
etc.) becoming lodged in any of the component assemblies as well as any buildup on the straps, as debris / build up
could block or restrict proper function. If noted, ensure unit is clear. Test for slippage by connecting and properly
adjusting the SuperSqueeze to the pole and your body belt. While grasping the pole shift your weight into the
SuperSqueeze. The SuperSqueeze should cinch tightly around the pole verifying its adequacy for ascent or descent.
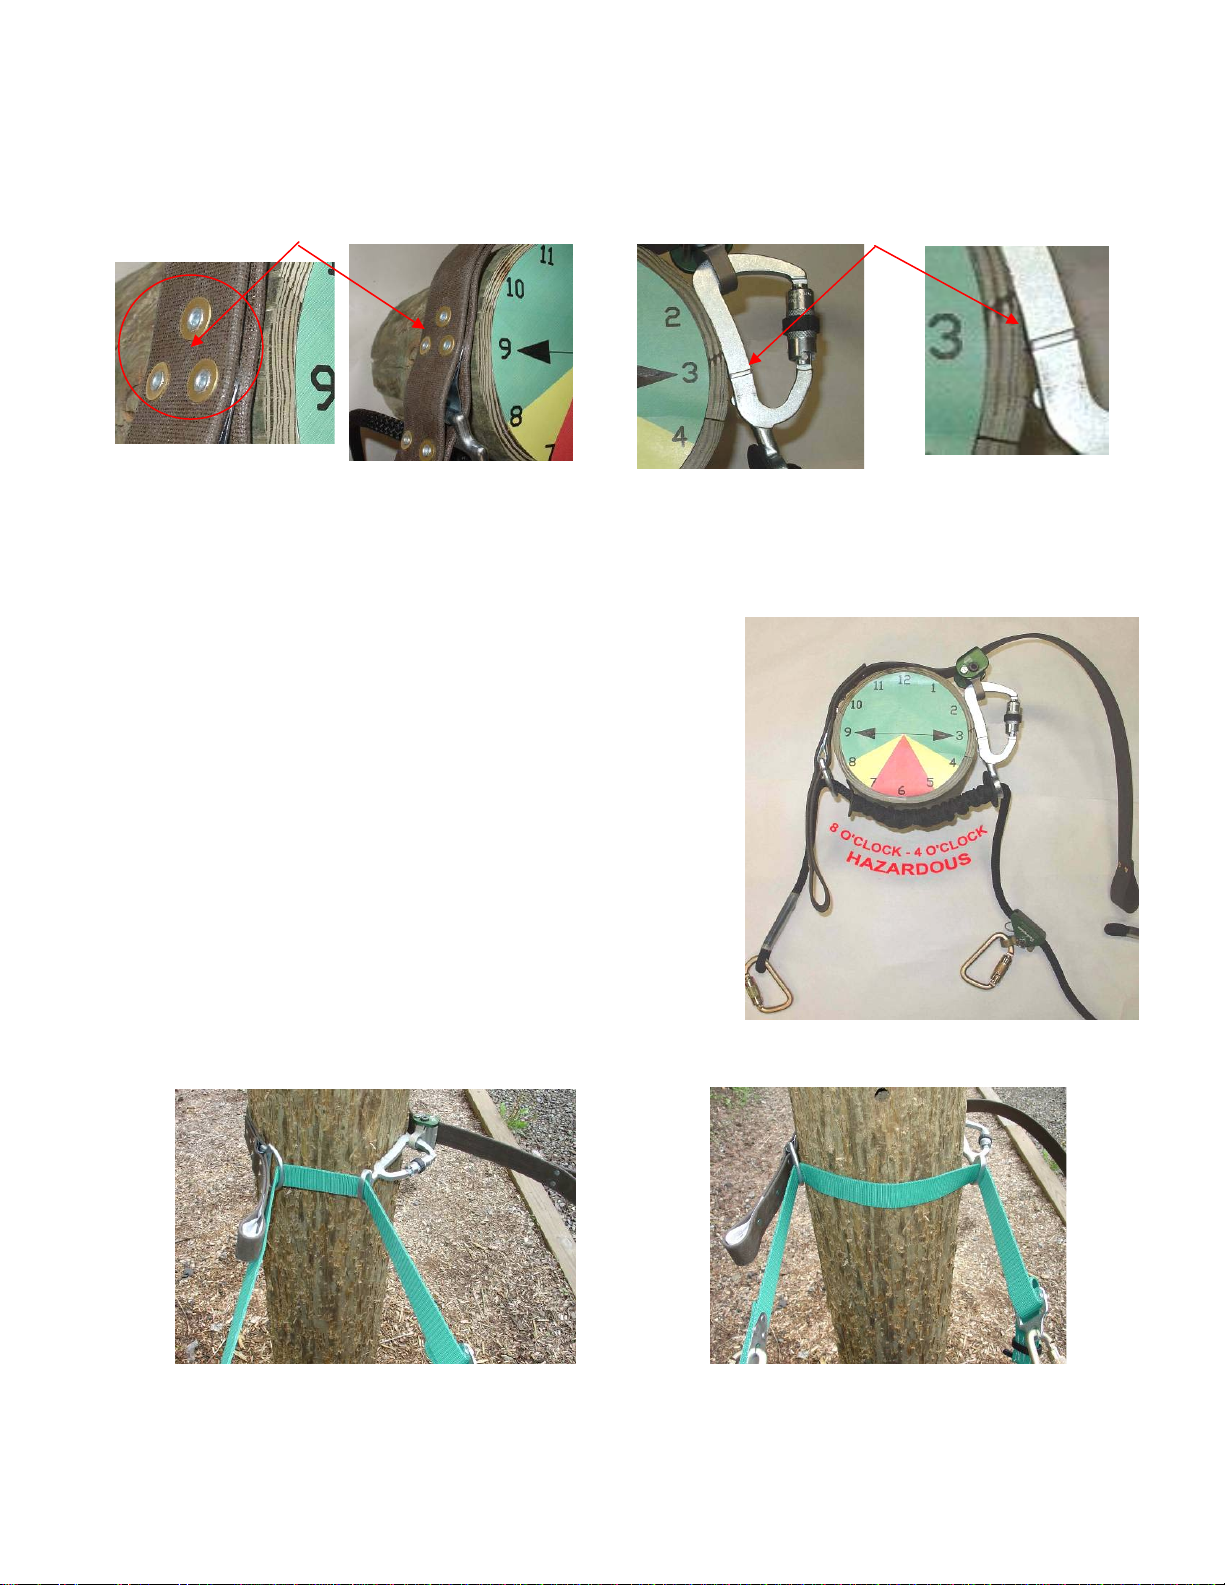
4. Both Inner and Outer Straps are not worn to the point of showing the warning center.
Remove from service, destroy, discard and replace immediately any unit that does not pass the above inspection.
Operation:
1. HOW TO MOUNT THE SUPERSQUEEZE ON THE BODY BELT:
The user must connect each Locking Carabiner / Snap Hook of the Inner Strap
(Rope or Woven to each of the body belt D-rings. (See Figure 1 at right)
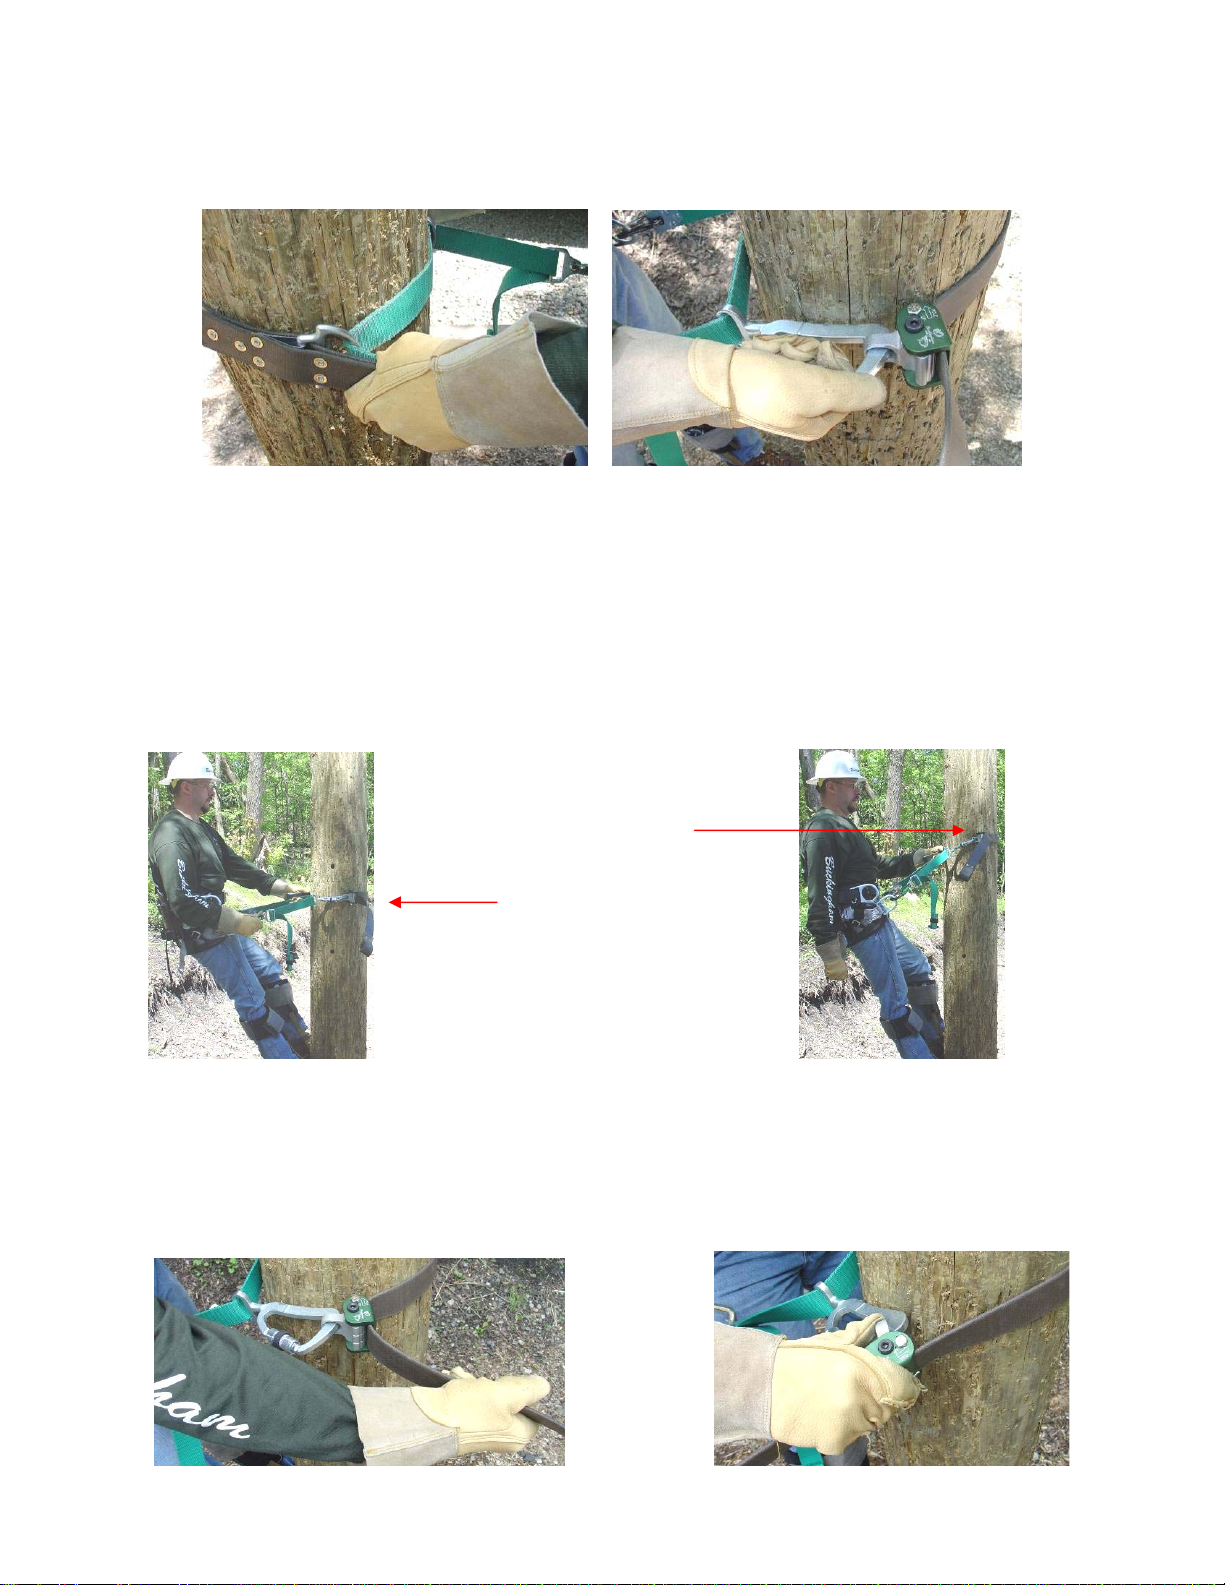
2. HOW TO MOUNT THE SUPERSQUEEZE ONTO THE POLE TO
BEGIN:
The SuperSqueeze can be mounted onto the pole for either a right handed or left handed user. The User can hold the
Outer (brown) Strap Handle in one hand and the Serrated Rotosnap in the opposite or vice versa. Wrap the Outer Strap
around the back of the pole and connect the Serrated Rotosnap to the eye of the Cam Assembly.
Note: Proper operation requires gate of the Serrated Rotosnap to be fully rotated prior to opening.
Users Choice
Cam Assembly / Rotosnap mounted on the right side of the pole (Figure 2a).
or
Outer Strap Handle / D-ring mounted on the right side of the pole (Figure 2b).
Fig.1
Fig.2a
Fig.2b

PN 230268 – 488Instructions –Warnings.dOC (06/09/11)
3
3. HOW TO ADJUST THE LENGTH OF THE OUTER STRAP:
The position of the SuperSqueeze hardware components on the pole is critical for proper operation. The triangular rivet
pattern on the D-ring side of the Outer Strap and the Serrated Rotosnap Locator Rib are used as locators to position the
hardware on the pole (See Figures 3a and 3b).
Triangular River Pattern Fig. 3a Serrated Rotosnap (Locator Rib) Fig. 3b
Consider the circumference of the pole to be the face of a clock. Place the triangular rivet pattern of the Outer (brown) Strap at
the 3:00 or 9:00 o’clock position on one side and the Serrated Rotosnap Locator Rib at either 9:00 or 3:00 o’clock position on
the opposite side.
Fig. 4
Ideal Placement – 3 and 9 o’clock positions. Never allow the locators to
Fall within the hazardous zone defined by the 4:00 to 8:00 o’clock positions.
(see Figure 4)
To adjust the Outer strap to the proper circumference, slide the Cam
assembly along the Outer strap until the hardware is properly located
on the pole as shown in Figures 3a, 3b and 4
It is imperative that the hardware be properly adjusted around the
pole. Failure to do so could result in a fall.
Incorrect Adjustment Correct Adjustment
Note: When climbing, the Cam Assembly must be kept clear of all obstructions that could block the operation of the assembly.

PN 230268 – 488Instructions –Warnings.dOC (06/09/11)
4
4. A. HOW TO ADJUST THE INNER STRAP (ROPE)
1. The Inner strap should be continually snug around the pole at all times. To make the strap longer
(to go out to the end of a cross arm or to put the user further away from the pole) place one hand behind the
pole and lean slightly toward the pole taking tension off the strap to relax tension on the cam lever, slowly
depress the cam lever towards the pole while leaning back slowly, until you have the desired length. (See
Figure 5 and 6 below)
2. To shorten the Inner Strap, place one hand behind the pole and lean slightly towards the pole while pulling
the free end of the rope through the cam lever, until you have the desired length. (See Figure 5 and 6)
To Lengthen To Shorten
B. HOW TO ADJUST THE INNER STRAP (WOVEN WEB)
1. The Inner strap should be continually snug around the pole at all times. To make the strap longer
(to go out to the end of a cross arm or to put the user further away from the pole) place one hand behind the
pole and lean slightly toward the pole taking tension off the strap then pull back on the Friction Buckle to
obtain the desired length. (See Figure 7)
2. To shorten the Inner Strap, place one hand behind the pole and lean slightly toward the pole taking tension
off the strap, pull the end of the strap through the Friction Buckle toward the pole, until you have the desired
length. (See Figure 8)
To Lengthen To Shorten
5. HOW TO ADJUST THE SUPERSQUEEZE TO CLIMB
a) Attach each of the two Locking Carabiners of the SuperSqueeze to each side D- ring of your body belt ensuring the
gates are completely closed and facing outwards.
b) Place the outer strap of the SuperSqueeze around the pole and attach the Serrated Rotosnap of the inner strap to the
eye of the cam. Position the hardware components at 3:00 and 9:00.
c) While at ground level with the SuperSqueeze even with the D-rings of your body belt, adjust the inner strap (Rope
or woven web) so you are in an ideal climbing position. This is typically measured by placing your elbow into your
stomach with fingers outstretched touching the pole.
Fig. 5 Fig. 6
Fig. 7 Fig. 8

PN 230268 – 488Instructions –Warnings.dOC (06/09/11)
5
6. HOW TO HOLD THE SUPERSQUEEZE WHEN READY TO CLIMB:
a) Just prior to initiating the climb and with the SuperSqueeze properly adjusted at the 3:00 and 9:00 position, grasp
the Outer Strap Handle with one hand and the Serrated Rotosnap in the other. Spread the hardware approximately
1” away from the pole and lift the SuperSqueeze to chest height. (NOTE: the SuperSqueeze must remain snug to the
pole). (See Figures 9 and 10)
7. HOW TO HITCHHIKE:
a) To initiate the ascent, set the 1st climber gaff approximately 10” up the pole and the 2nd climber gaff approximately
10” above the first. With the gaffs set, flip the SuperSqueeze up to chest height (See Figure 12) using either forearm
and elbow motion or shoulder and arm motion.
b) With the SuperSqueeze adjusted around the pole at chest height take a short step or two with climbers to ascend.
Then with the gaffs set, again flip the SuperSqueeze up to chest height (See Figure 12). Repeat procedures
NOTE: The Inner strap (Rope or Woven Web) must always be snug around the pole when climbing. In addition
shortening the Inner Strap and by flipping the SuperSqueeze shorter distances makes climbing less strenuous. Flipping
the strap approximately the same distance that you can bend your elbows may reduce stress on your body.
ADJUSTING THE SUPERSQUEEZE TO THE CIRCUMFERENCE OF THE POLE.
a) Pole circumference changes encountered as you ascend or descend the pole requires outer strap length adjustment to
keep the hardware in the 3 and 9 o’clock positions.
b) To shorten, grasp the outer strap (brown) behind the Cam assembly and pull towards the back of the pole (away from
your body). This will cause the Cam assembly to adjust towards the pole shortening the outer strap (See Figure 13).
c) To lengthen, lean slightly toward the pole taking tension off the strap to relax tension on the cam lever, slowly depress
the cam lever towards the pole (See Figure 14) while leaning back slowly, until you have the desired length.
To Shorten To Lengthen
Keep the SuperSqueeze between the
waist and chest as you hitchhike
Waist
Chest
Fig. 9 Fig. 10
Fig. 11 Fig. 12
Fig. 13
Fig. 14

PN 230268 – 488Instructions –Warnings.dOC (06/09/11)
6
9. TO REMOVE THE INNER STRAP (WOVEN WEB) FROM THE SUPERSQUEEZE FOR CHANGE OUT:
a) Remove the Locking Carabiner from the woven web (Figure 15).
b) Slide the woven web out of the D-ring (Figure 16).
c) Disconnect the Serrated Rotosnap from the eye in the Cam assembly (Figure 17).
d) Slide the Serrated Rotosnap off of the woven web (Figure 18-20).
e) To reassemble the woven web to the SuperSqueeze, reverse the steps above.
NOTE: When reassembling the Inner Strap to the Outer Strap ensure the fold over on the Woven Web and the lettering
“THIS SIDE OUT” on the Friction Buckle are facing out on the Woven Strap when the SuperSqueeze is connected
to body belt D-rings.
Fig. 15 Fig. 16 Fig. 17
Fig. 18
Fig. 19 Fig. 20

PN 230268 – 488Instructions –Warnings.dOC (06/09/11)
7
10. TO REMOVE THE INNER STRAP (ROPE) FROM THE SUPERSQUEEZE FOR CHANGE OUT:
a) Remove the Locking Carabiner from the rope (Figure 21).
b) Slide the rope out of the D-ring (Figure 22).
c) Disconnect the Serrated Rotosnap from the eye in the Cam assembly (Figure 23)
d) Slide the Serrated Rotosnap off of the rope (Figure 24-29).
e) NOTE: To reassemble the rope to the SuperSqueeze, reverse the steps above.
BUCKINGHAM MFG. CO.
BINGHAMTON, NY
www.buckinghammfg.com
1-800-937-2825
Fig. 21 Fig. 22
i1
Fig. 23
Fig. 24
Fig. 25 Fig. 26 Fig. 27
Fig. 28 Fig. 29
This manual suits for next models
4
Table of contents
Other BUCKINGHAM MFG Safety Equipment manuals
Popular Safety Equipment manuals by other brands

Malta Dynamics
Malta Dynamics C7002-G2 instruction manual

Reer
Reer SAFEGATE M SG BOX RST instruction manual

MSA
MSA AirMaXX SL Series quick start guide

Honeywell
Honeywell NORTH OPENGO ABEKP15 instructions

KRATOS SAFETY
KRATOS SAFETY KS 8000 installation manual

Guardian Fall Protection
Guardian Fall Protection 10819 manual