Burg Seoul Operator's manual

QUICK STARTER GUIDE
Seoul

INDEX
Burg 14
1 - 17
ENGLISH

Your watchphone
Keys and parts
SIM card slot
Microphone
Green key *
Red key **
Signal indicator
Watch knob (adjust/set time)
USB headset connector/
USB charger connector
Loudspeaker
Keypad ***
Movement
A
B
C
D
E
F
G
H
I
J
1
A B C D E F G
H
I
J
*Green key - OK / Dial / Speed dail setting
**Red key - On / Off / End / lock&unlock keypad
***Press and hold 8 key for " ", and 9 key for "#"

First time use
1. Insert sim card
Always make sure the watch phone is switched off while putting in
and taking out the SIM card. Taking out and inserting the SIM card
while the watch phone is switched on can cause damage to the
watch phone and SIM.
Chip up
12
2

Red: Battery charging
Blue: Battery fully charged
The initial state of the battery is charged
about 25%.Please empty the battery fully
and charge to full battery for the rst 3
times to achieve the best use of the battery.
2. Charge the battery
PC
3
First time use

PIN is activated if the indicator light is solid red when start up.
Enter your PIN code using the keypad on the Watch phone.
Press the green key to conrm.
The phone will sound the welcome chime.
3. Switch on/off
4. SIM password security (when required)
Long press
the red key
press the
reset button
As there is no screen to display the numbers you input, it is suggested
to de-activate the pin function.
Forced shutdown only
4
1
2
3
4
First time use

LED indicator Explanation
SIM card is not inserted or
SIM card is not valid.
Weak signal or no signal
Good signal
PIN is activated. Ready to enter
PIN or PUK code
On/Off or incoming call
Low battery
Battery charging
Battery is fully charged
Speed dial setting mode
Speed dial setting saved
Speed dial setting failed
5
Signal indicator
Red ashing
(10 seconds interval) at standby mode
Yellow ashing
(10 seconds interval) at standby mode
Blue ashing
(10 seconds interval) at standby mode
Red ashing
(8 seconds interval, three ashes each time)
Solid red when start up
Three colors alternately ashing
Solid red (watch mode)
Solid blue (watch mode)
Solid yellow
Blue ash in speed dial
Red ash in speed dial mode

In standby mode press the Red key, you will hear the lock/unlock
sound.
Continuosly press the Red key until you hear the water sound.
To make a call enter the phone number and press the green key .
To answer a call press the green key
To reject a call, press the red key
To call/ to receive a call
To set up a speed dial number
To lock/ unlock the keypad
Standby mode
6
1
2
3
4
Long press green key; the signal indicator becomes yellow.
Press the speed dial number you want to set (1 to 9). Press green key to
conrm.
Blue light will light up.
Press the contact number you want to set as speed dial.
Basic functions

To turn on/off voice count function
FM radio
1
2
5
6
7
Press green key to conrm, if accepted the yellow light will light
up; if not accepted the red light will ash.
After setting the speed dial press the red button to return to the
standby function.
long press choosen speed dial number to make a phone call
Activate FM
Plug in the headset (will be used as FM antenna), unlock the keypad, press “2
+ green key” to activate the FM.
Function key
“0”key: On /Off voice
“1”key: Auto search next channel
Basic functions
In standby mode press ‘00080’ followed by the green key to turn on/off
the voice count function. When this function is activated, the phone will
speak the phone number of the incoming/outgoing call.
7

3
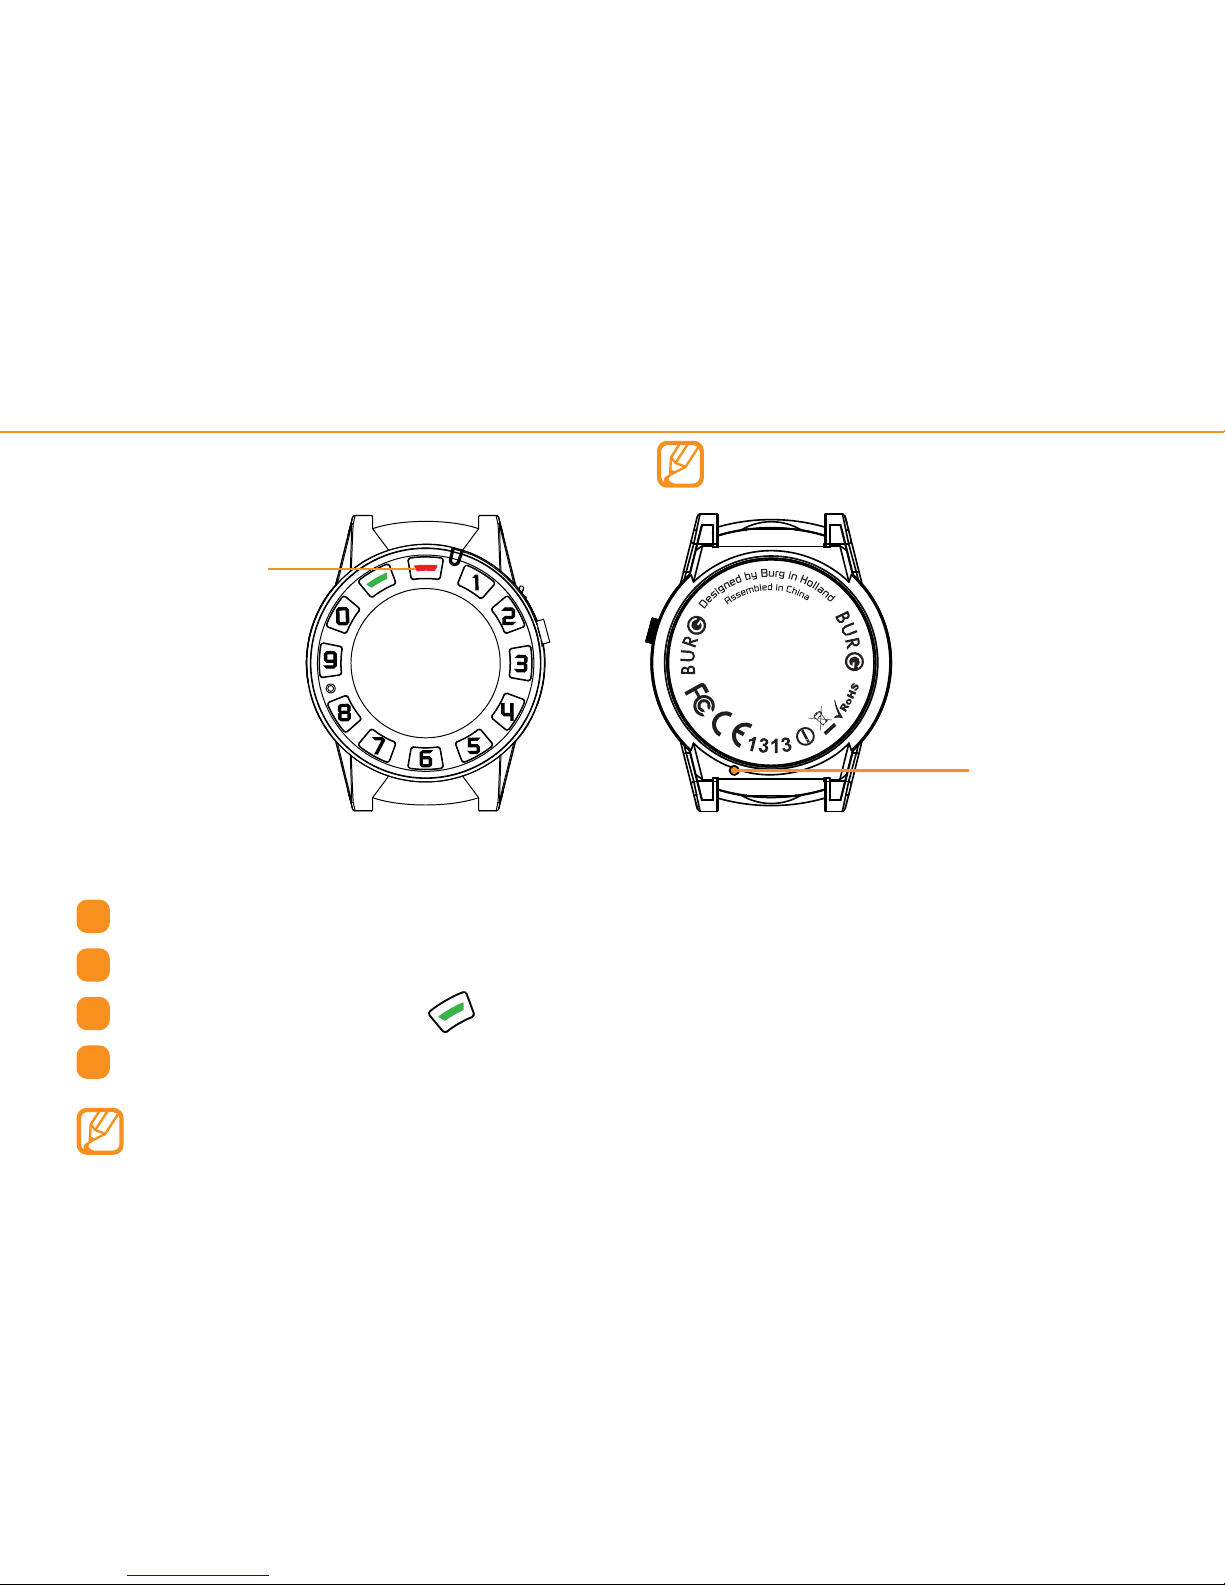
“2”key: Activate loudspeaker
“3”key: Volume up
“4”key: Volume down
Deactivate FM
Press the Red key to deactivate FM
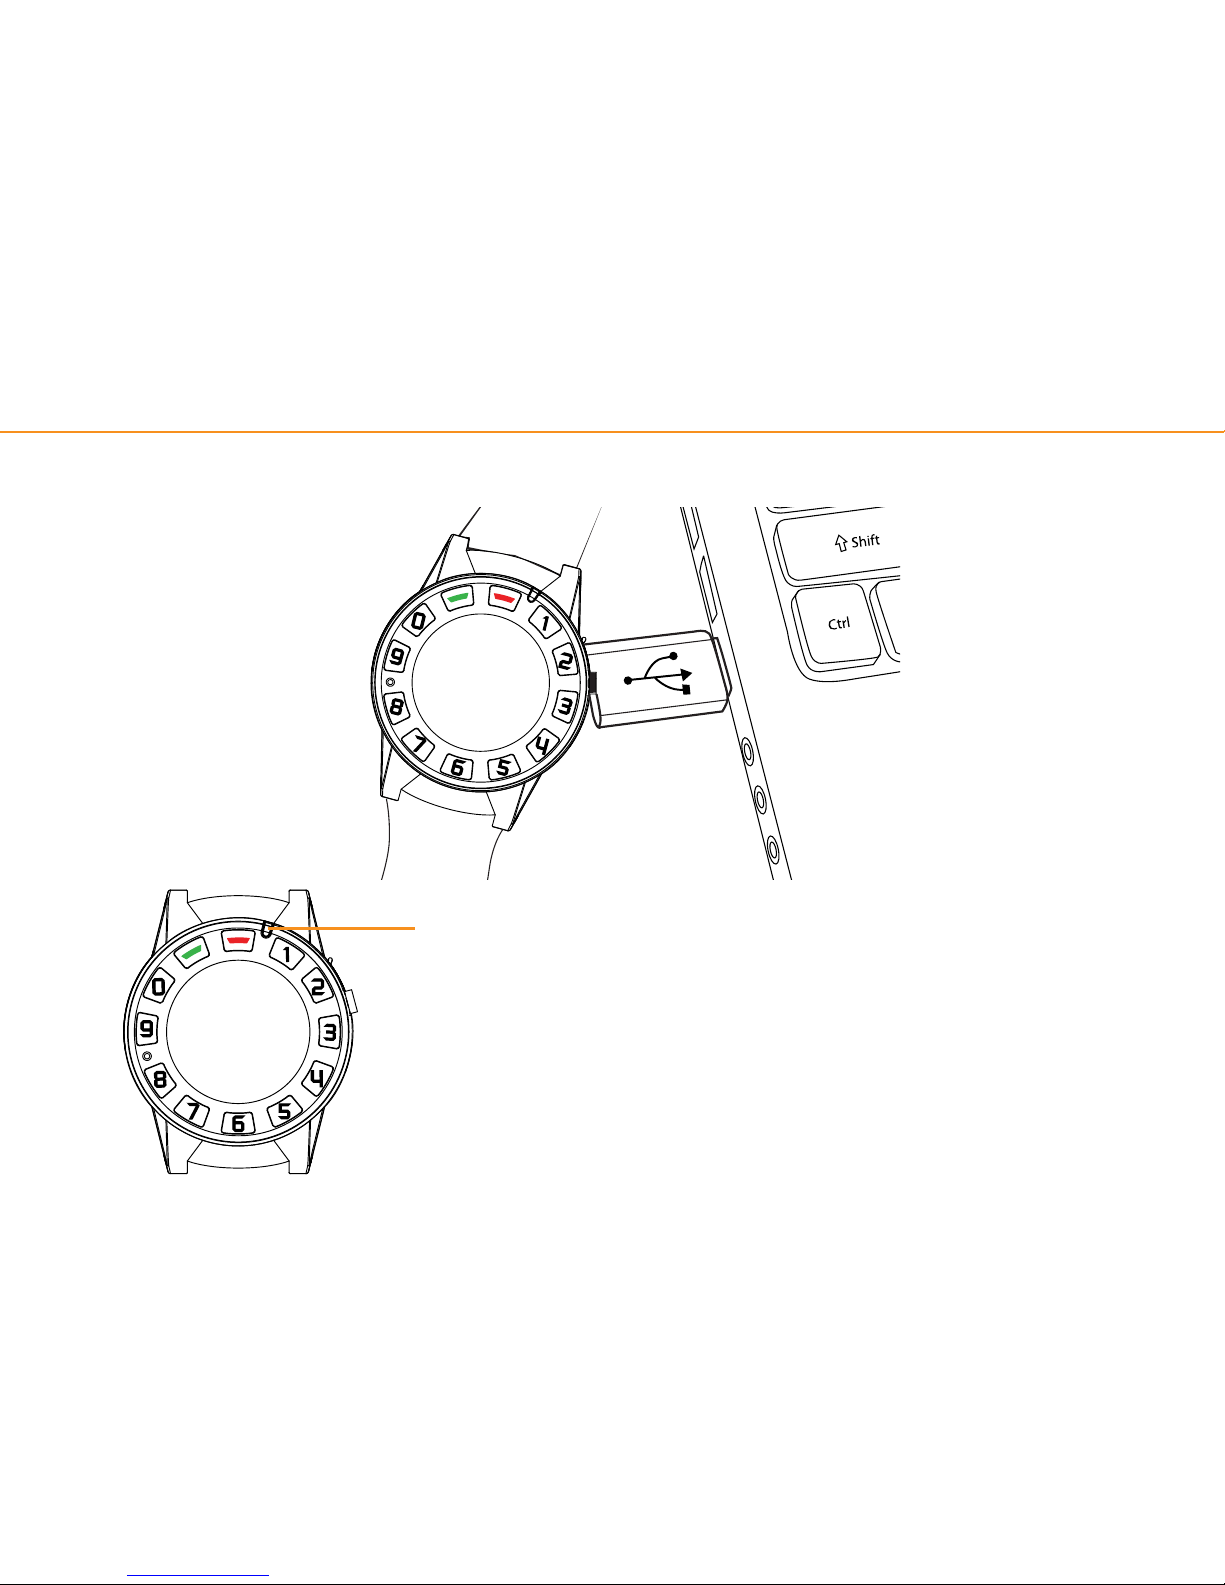
Bluetooth settings
First turn on the bluetooth device so it can be searched
Unlock the keypad, press “1 + green key” to switch on the
Bluetooth, and at the same time Bluetooth settings mode will be
activated, Yellow light will light up.
Search Bluetooth audio device
While in Bluetooth settings mode, it will search audio devices automatically.
When a new device is found, Red light will light up;
When no device is found, indicator light will be off and it will quit the
Bluetooth settings mode, press “1 + green key” key to search again.
Basic functions
Bluetooth
1
1.1
1.2
8

Connect device
After pair success, press the green key to connect. if the device need input
password (you can nd the password in bluetooth device menu), blue light on,
input the password.
Yellow light will light up shortly when connect success, it will automatically quit
the Bluetooth settings mode (yellow light will off), it’s now connected.
Keypad light will off when pair failed, input the password, then press the
green key to connect again.
Quit the Bluetooth settings mode
Continuosly press the Red key till the yellow light off. The Bluetooth of the
device will still be on.
1.3
2
1.4
1.5
Basic functions
To reconnect bluetooth device after connection has been broken it might take
slightly more time to connect, FM fuction can not use in bluetooth mode. 9
Pair device
After device found (red light on), press the green key to activate pair mode
Light will turn off when pair success;
Keypad light will be off when pair failed, press green key to pair again.
Switch off Bluetooth
Unlock the keypad, press “0 + green key” to switch off the Bluetooth

Basic functions
10
Track my Burg
For more information about your Watch Phone download the complete manual
from our website.
Check with your local Burg shop or contact your distributor to make sure the
tracking service is available in your country.
1
2
3
4
5
6
Purchase the ‘Track my Burg’ activation card at your local Burg shop.
Visit your local BURG website to register and activate your BURG
account.
Click on the link Create account to start registration or ll in your
username and password if you have already a BURG tracking
account.
Insert the required information.
A conrmation email will be send, click the link to activate the
account.
After you pressed the conrmation link you can log in with your
Username and Password.

Basic functions
11
After rst time log in you need to set up your Track My BURG
account and add your device.
7
Please accept the disclaimer to go to the next step.
8
Congure your device.
9
10
11
Your device is added and
congurated now.
Activate your account with the
information on your purchased
‘Track my Burg’ activition card
by clicking on the ‘Enter voucher
code’ on the website.

12
WARNING AND DISCLAIMER
Do not use or place the Watch Phone under water. Avoid dropping it or stepping
on it. Switch your watch phone off in aircraft, near medical equipment, fuel,
blasting areas, or chemicals. Your watch phone and its accessories are not toys.
Keep it out of the reach of small children and pets! Please stop the car before
making or answering phone calls.Do not attempt to repair the watch phone
yourself in case of damage or malfunction, as this will void the warranty. The
device complies with RF specications when the device used at 1.5cm form your
body. Use careful with the earphone maybe possible excessive sound pressure
from earphones and headphones can cause hearing loss.
CAUTION
RISK OF EXPLOSION IF BATTERY IS REPLACED BY AN INCORRECT TYPE.
DISPOSE OF USED BATTERIES ACCORDING TO THE INSTRUCTIONS.
DECLARATION OF CONFORMITY
"Hereby, Burg China Connection declares that this product is in compliance with
the essential requirements and other relevant provisions of Directive 1999/5/EC.
For more information about your Watch Phone download the
complete manual from our website
Product and safety information

13
FCC Declaration
1. This device complies with Part 15 of the FCC Rules. Operation is subject to the
following two conditions:
(1) This device may not cause harmful interference.
(2) This device must accept any interference received, including interference that
may cause undesired operation.
2. Changes or modications not expressly approved by the party responsible for
compliance could void the user's authority to operate the equipment.
NOTE:
This equipment has been tested and found to comply with the limits for a Class B
digital device, pursuant to Part 15 of the FCC Rules. These limits are designed to
provide reasonable protection against harmful interference in a residential
installation.
This equipment generates uses and can radiate radio frequency energy and, if not
installed and used in accordance with the instructions, may cause harmful
interference to radio communications. However, there is no guarantee that
interference will not occur in a particular installation. If this equipment does cause
harmful interference to radio or television reception, which can be determined by
turning the equipment off and on, the user is encouraged to try to correct the
interference by one or more of the following measures:
FCC Declaration

14
FCC Declaration
Reorient or relocate the receiving antenna.
Increase the separation between the equipment and receiver.
Connect the equipment into an outlet on a circuit different from that to which the
receiver is connected.
Consult the dealer or an experienced radio/TV technician for help.
SAR Information Statement
Your wireless phone is a radio transmitter and receiver. It is designed and
manufactured not to exceed the emission limits for exposure to radiofrequency
(RF) energy set by the Federal Communications Commission of the U.S.
Government. These limits are part of comprehensive guidelines and establish
permitted levels of RF energy for the general population. The guidelines are based
on standards that were developed by independent scientic organizations
through periodic and thorough evaluation of scientic studies. The standards
include a substantial safety margin designed to assure the safety of all persons,
regardless of age and health. The exposure standard for wireless Smart Watch
employs a unit of measurement known as the Specic Absorption Rate, or SAR. The
SAR limit set by the FCC is 1.6 W/kg. * Tests for SAR are conducted with the phone
transmitting at its highest certied power level in all tested frequency bands.
Although the SAR is determined at the highest certied power level, the actual SAR

15
FCC Declaration
level of the phone while operating can be well below the maximum value. This is
because the phone is designed to operate at multiple power levels so as to use
only the power required to reach the network. In general, the closer you are to a
wireless base station antenna, the lower the power output. Before a phone model
is available for sale to the public, it must be tested and certied to the FCC that it
does not exceed the limit established by the government adopted requirement for
safe exposure. The tests are performed in positions and locations (e.g., at the Mouth
and worn on the Wrist) as required by the FCC for each model. The highest SAR
value for this Watch phone when tested for use at the Mouth is 0.362 W/Kg and
when worn on the Wrist, as described in this user guide, is 0.517 W/Kg(Wrist-worn
measurements differ among phone models, depending upon available
accessories and FCC requirements). While there may be differences between the
SAR levels of various phones and at various positions, they all meet the
government requirement for safe exposure. The FCC has granted an Equipment
Authorization for this model phone with all reported SAR levels evaluated as in
compliance with the FCC RF exposure guidelines. SAR information on this model
phone is on le with the FCC and can be found under the Display Grant section of
http://www.fcc.gov/ oet/fccid after searching on
FCC ID: YLABURG14 Additional information on Specic Absorption Rates (SAR) can
be found on the Cellular Telecommunications Industry Asso-ciation (CTIA) web-site

16
FCC Declaration
at http://www.wow-com.com. * In the United States and Canada, the SAR limit for
Smart Watch used by the public is 1.6 watts/kg (W/kg) averaged over one gram
of tissue. The standard incorporates a sub-stantial margin of safety to give
additional protection for the public and to account for any variations in
measurements.
Device is restricted to worn on the wrist operations.

G14MEN40408 17
You can also nd the after sale details on our burg website:
www.burgsmartwatch.com
Discover more

© 2014 Burg China Connection. All rights reserved.
Designed by BURG in Holland , Assembled in China
This manual suits for next models
1
Table of contents
Other Burg Watch manuals