Busa BSP MAX II PM-X00-710 User manual

PM-X00-710/PM-X00-715-IR-12.13
SURGICAL POWER & ACCESSORIES


3
able of Contents
Introduction Page 4
Intended Use Page 4
Warnings Page 5
Cautions Page 5
Notes Page 5
Explanation of Symbols Page 6
Features Page 6
Battery Pack - Installation & Removal Page 7
Troubleshooting Page 8
Cleaning Recommendations Page 9
Sterilization Recommendations Page 10
Specifications Page 12
Warranty Page 12
Return Goods Policy Page 13
Product Disposal Page 14
Product Ordering Information Page 14

4
Thank you for choosing BUSA®Surgical Power & Accessories as supplier of your large bone power system.
The information and procedures described in this manual are intended to assist medical professionals in
the safe and effective use, care, cleaning, sterilization and long-term maintenance of BSPMAX™ II arge
Bone Power System.
Introduction
The BSPMAX™ II 9.6V Battery Pack PM-X00-710 and 12V Battery Pack PM-X00-715 are intended for use with
the BSPMAX™ II handpieces only. Charge these battery packs on the BSPMAX™ II 4-Bay Power Unit PM-X00-
520 (110 volt) unit or PM-X00-522 (230 volt) unit configured with the Standard Battery Pack Charging Bay
PM-X00-731 only.
Intended Use

5
• Only trained and experienced medical
professionals should use this equipment. Failure
to comply with the BSPMAX™ II Instructions for
Use may result in patient and/or medical staff
injury.
• DANGER - Explosion Hazard. DO NOT use in
atmospheres containing flammable gasses
(anesthetics, etc) with concentrations within
explosive limits.
• Use of eye protection is required while operating
equipment.
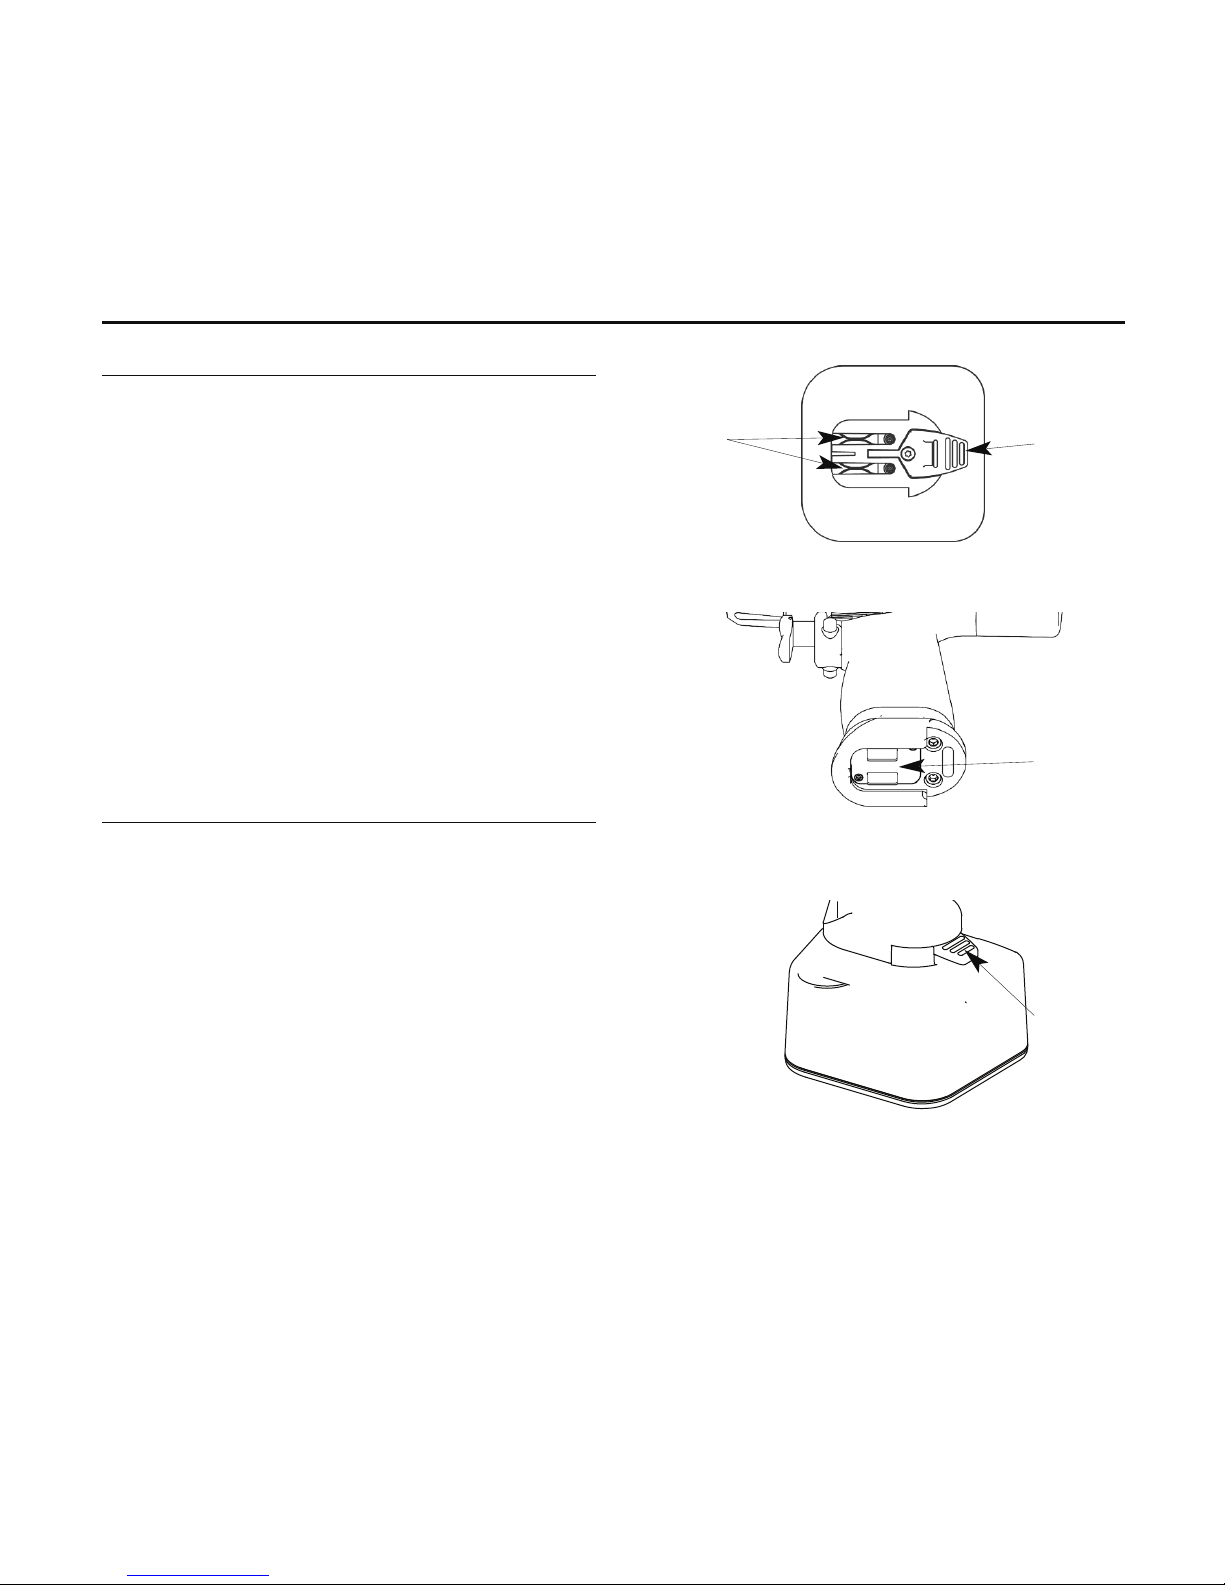
• Inspect battery pack case for cracks prior to use.
Do not use a damaged battery pack.
• DO NOT expose battery packs to fire or incineration.
• DO NOT allow battery pack contacts to contact
metal objects. Contact with metal objects may
result in electrical shock or a burn injury to the user.
• Under certain classifications of risk, the World Health
Organization (WHO), or local regulatory authorities
recommend special CJD (Creutzfeldt-Jakob Disease)
inactivation processing procedures. Consult WHO and
local regulations for further information.
• Battery packs contain nickel cadmium, which must
be recycled or disposed of properly. See product
disposal instructions.
• DO NOT store battery packs on handpieces.
Batteries will discharge if they are connected to the
handpiece even though the handpiece is not
running and will cause irreparable damage to the
battery cells.
• DO NOT use battery packs while warm. Allow
adequate time for cooling prior to use. Cool by
exposure to room temperature.
• REMOVE battery packs from charging bays when
4-Bay Power Unit is off to avoid battery discharge
and/or damage.
• Recharge battery packs before each use to ensure
maximum running time.
• The charge cycle takes approximately 5-60 minutes.
• The expected run time of a fully charged battery
pack is approximately 3-15 minutes depending on
surgical demand and battery type.
• Only use battery packs that have been charged
within 48 hours.
• Store battery packs on an activated charger where
they will maintain a full charge, until they are sterilized.
Warnings Cautions
Notes

6
Battery Pack
Contacts
•Battery Pack Case – Housing for rechargeable sterilizable batteries that provide power to the handpiece.
•Battery Contacts – Conducts charge from Charging Bay to the battery pack and distributes charge to
handpiece.
•Battery Pack Latch – Secures the battery pack to the handpiece. Depress the battery latch to release the
battery pack from the handpiece.
Battery Pack
Latch
Battery
Pack Case
Author zed representat ve n the European commun ty.
Batch code.
Catalog number.
Caut on.
Conforms w th the essent al requ rements of the European
commun ty d rect ves w th Brasseler USA Med cal's not f ed body.
Date of manufacture.
Do not d scard. D spose of product
or recycle n accordance w th local
laws and regulat ons.
Manufacturer.
N ckel-Cadm um
rechargeable batter es.
Temperature l m t.
P
g
h
Y
C
N
M
l
Explanation of Symbols
Ni-Cd
Features

7
B ttery P ck Inst ll tion:
• Rotate trigger to the SAFE mode.
• Align the battery pack contacts on the top of the
battery pack with the battery receptacle on the
handpiece.
• Slide a battery pack into the battery receptacle until
the battery latch snaps indicating the battery pack is
secure.
• Rotate trigger to the RUN mode.
• Test the handpiece and battery pack by depressing
the trigger.
• Rotate trigger to the SAFE mode when not in
operation.
B ttery P ck Remov l:
• Rotate trigger to the SAFE mode.
• Press down on the battery pack latch and slide
battery pack out of the handpiece.
• Always remove battery pack when not in use.
Battery Pack - Installation & Removal
Battery
Receptacle
Battery Pack
Latch
Battery Pack
Contacts
Battery Pack
Latch

8
roubleshooting
Symptom Potential Cause Solution
Battery pack will not connect
properly to handpiece.
There is debris in the battery receptacle. See cleaning recommendations.
Battery pack contacts are damaged. Replace battery pack.
Battery pack latch is damaged. Replace battery pack.
Battery receptacle is damaged. Send handpiece to Brasseler U.S.A. edical, LLC, for service.
Battery pack malfunctions. Over sterilization of battery pack. Replace battery pack.
End of life cycle for battery pack. Replace battery pack.
Subjected to a dry cycle. Replace battery pack.
4-Bay Power Unit fuses are open/blown. Replace with appropriate rated fuses. See 4-Bay
Power Unit instructions for use.
Battery pack cannot be
removed from handpiece.
Battery pack latch is damaged. Send handpiece and battery pack to Brasseler U.S.A.
edical, LLC, for service.
Battery receptacle is damaged. Send handpiece and battery pack to Brasseler U.S.A.
edical, LLC, for service.
Battery pack is fully charged but
won’t run.
Battery pack malfunctioned. Replace battery pack.
Handpiece malfunctioned. Send handpiece to Brasseler U.S.A. edical, LLC, for service.

9
Cleaning Recommendations
W rnings:
• Clean, charge and sterilize battery packs before every
use.
C utions:
• Follow universal precautions for protective apparel
when handling and cleaning contaminated battery
packs.
• Remove battery pack from contaminated
handpiece prior to cleaning and sterilization.
• DO NOT immerse a battery pack in any liquid.
Contact corrosion may occur resulting in decreased
performance of the battery pack and or handpiece.
• Do not clean battery packs in an automated
disinfecting washer or an ultrasonic cleaner.
• DO NOT use disinfectants with pH levels higher
than 10.5. Higher concentrations greater than
10.5 may cause cracks in the housing material.
• DO NOT clean the battery pack contacts with
abrasives.
• Dry battery packs before charging to avoid damage
to the battery packs and charger.
Cle ning Procedures:
1. Remove battery pack from the handpiece.
2. Inspect the battery pack case for cracks. Remove
damaged battery pack from service.
3. Wipe the battery pack case clean using a clean
lint-free soft cloth lightly dampened with a
hospital grade enzymatic disinfectant having a pH
range of 6.5 to 10.5.
4. Rinse the battery pack thoroughly under running
tap water.
5. Dry the battery pack with a clean lint-free soft cloth.
6. Clean battery pack contacts using a cotton swab
lightly with isopropyl alcohol. DO NOT clean the
battery pack contacts with abrasives.
7. Ensure battery pack and battery pack contacts are
completely dry before charging or using battery
pack.
8. Fully charge battery pack.
9. Sterilize as directed. See Sterilization
Recommendations section.

10
Sterilization Recommendations
Steam sterilization has been found to be both safe
and effective for the sterilization of BSPMAX™ II arge
Bone Power System battery packs. The battery packs
are capable of withstanding the recommended
exposure times and temperatures of steam
sterilization.
W rning:
• The use of disinfecting solutions for an exterior
instrument wipe will not sterilize equipment.
C utions:
• DO NOT sterilize battery packs with Ethylene Oxide
(ETO).
• DO NOT sterilize battery packs in cold sterilization
like CIDEX®.
• DO NOT “Peel Pack” battery packs for
sterilization. Sterilization in a sealed pouch traps
moisture which can cause damage.
• DO NOT sterilize battery pack while connected to
the handpiece.
• DO NOT sterilize a battery pack if damage (cracks
in the case) is apparent.
• DO NOT leave battery packs in a hot sterilizer for
more than the prescribed time as shortened
battery life will result.
• After sterilization, always allow battery packs to cool
for at least one hour before use.
Failure to comply may result in damage and a
shortened battery pack life.
• Charging of battery packs should be completed
prior to sterilization.

11
Steam Sterilization Minimum
Temperature
Minimum Exposure
Time
Dry Time
Pre Vacuum (Wrapped) 270° F (132° C) 3 inutes No Dry Time
Steam Gravity* 270° F (132° C) 3 inutes No Dry Time
Parameters for Steam Sterilization of BSPMAX™ II Battery Packs
Notes:
• These processes have been validated as being capable of cleaning and sterilizing BSPMAX™ II battery packs.
• The sterilizer manufacturer’s written instruction for cycle parameters, load configuration and AAMI guidelines
for steam sterilization should be followed.
Sterilization Recommendations (continued)
BSPMAX™ II battery packs have been validated for sterilization in a STERRAD®gas plasma system.
Sterilize per STERRAD®user instructions.
Note: After minimum sterilization exposure time immediately remove battery pack. Allow to air dry and cool
for at least one hour before use.
*Unwrapped only
Other Sterilization Option

12
Warranty
Contact your distributor for details regarding warranty.
9.6V Battery Pack
PM-X00-710
12V Battery Pack
PM-X00-715
Weight 1.0lb (.45kg) 1.45lb (.66kg)
Voltage 9.6Vdc 12Vdc
Charging Time 5-60 inutes 5-60 inutes
Run Time Fully Charged 3-10 inutes 3-15 inutes
Working Temperature 32°F - 122°F (0°C - 50°C) 32°F - 122°F (0°C - 50°C)
Type Nickel Cadmium (Ni-Cd) Nickel Cadmium (Ni-Cd)
Specifications
Operating:
• Ambient temperature : 50°F to 70°F (10°C to 21°C)
• Relative Humidity 30% - 75%
• Atmospheric Pressure: 700hPa to 1060hPa
ransport :
• Ambient temperature : -4°F to 158°F (-20°C to 70°C)
• Relative Humidity 10% - 100%
• Atmospheric Pressure: 500hPa to 1060hPa
Environmental Requirements

13
Return Goods Policy
Contact your distributor regarding returned goods policy.

14
Product Disposal
Dispose of product or recycle in accordance with local laws and regulations.
BUSA®SURGICAL OWER & ACCESSORIES OFFERS A COM LETE LINE OF CUTTING ACCESSORIES (SAW
BLADES/RAS S, BURS, K-WIRES, STEINMANN INS, TWIST DRILLS AND ORTHA AEDIC IN ACKS).
HANDPIECES
M-X08-700 MODU AR DRI /REAMER
M-X12-700 SAGITTA /OSCI ATOR SAW
M-X14-700 RECIPROCATOR/STERNUM SAW
ATTACHMENTS - DRIVERS
M-X08-701 PIN DRIVER
M-X08-702 WIRE DRIVER
ATTACHMENTS - DRILLS
M-X08-905 TRINK E/AO®
M-X08-910 1/4 IN JACOBS®CHUCK W/ KEY
M-X08-915 5/32 IN JACOBS®CHUCK W/ KEY
M-X08-920 HUDSON®
M-X08-925 ZIMMER®
M-X08-930 1/4 IN KEY ESS CHUCK
M-X08-935 3 MM KEY ESS CHUCK
M-X08-940 ZHS - ZIMMER®/HUDSON®/STRYKER®
UNIVERSA
ATTACHMENTS - REAMERS
M-X08-911 1/4 IN JACOBS®HI TORQUE W/ KEY -
EXTENDED ENGTH
M-X08-950 HUDSON®- EXTENDED ENGTH
M-X08-955 ZIMMER®- EXTENDED ENGTH
M-X08-960 AO®- EXTENDED ENGTH
M-X08-965 ZHS - ZIMMER®/HUDSON®/STRYKER®
UNIVERSA - STANDARD ENGTH
M-X08-970 1/4 IN JACOBS®HI TORQUE W/ KEY -
STANDARD ENGTH
ATTACHMENT - STERNUM SAW GUARD
M-X14-901 STERNUM SAW GUARD
ACCESSORIES
M-X00-520 4-BAY POWER UNIT 110V
M-X00-521 CHARGING BAY COVER
M-X00-522 4 BAY POWER UNIT 230V
M-X00-710 9.6V BATTERY PACK
M-X00-715 12V BATTERY PACK
M-X00-731 STANDARD BATTERY PACK CHARGING BAY
M-X00-770 STERI IZATION CASE – 3 HANDPIECES
PM-X08-000 1/4 IN JACOBS®CHUCK KEY
PM-X08-001 5/32 IN JACOBS®CHUCK KEY
Product Ordering Information


Emergo Europe
Molenstraat 15
2513 BH The Hague
The Netherlands
Tel: +31 (0) 70-345-8570
Fax: +31 (0) 70-346-7299
Brasseler U.S.A. Medical, C
One Brasseler Boulevard • Savannah, GA 31419
800-569-6738 Ext. 7050 • 912-921-7578 (fax)
BUSAMedical.com
Br sseler U.S.A. Medic l, LLC, h s implemented qu lity m n gement system th t is certified under ISO 13485:2003. AO® is registered
tr dem rk of AO Technology AG. CIDEX® nd STERRAD® re registered tr dem rks of Adv nced Steriliz tion Products®, Division of
Ethicon, Inc., Johnson & Johnson Comp ny. Hudson® is registered tr dem rk of Hudson Industries, Inc. J cobs® is registered
tr dem rk of J cobs Chuck M nuf cturing Comp ny. Stryker® is registered tr dem rk of Stryker Corpor tion. Zimmer® is registered
tr dem rk of Zimmer, Inc. Br sseler U.S.A. Medic l, LLC, is not ffili ted with ny of the bove nd m kes no cl im to copyrights or
tr dem rks which re the property of these comp nies. BUSA® nd BSPMAX™ re tr dem rks of Peter Br sseler Holdings, LLC, or its
ffili tes. All other tr dem rks re tr dem rks of their respective owners or holders. Colors, specific tions nd product v il bility subject
to ch nge. BUSA® Surgic l Power & Accessories products re sold by Br sseler U.S.A. Medic l, LLC, One Br sseler Boulev rd, S v nn h,
Georgi 31419, United St tes.
This manual suits for next models
1
Table of contents