Bush LUNAR User manual


LUNAR
Introduction and Contents
Thank you for buying this Bush product, which is designed to give you many years of
trouble-free service. You may already be familiar with using a similar unit, but please
take time to read these instructions, as they are designed to familiarise you with the
unit’s many features and to ensure you get the very best from your purchase.
Safety is important
Your safety and the safety of others are important. Please therefore, ensure you read
the “Safety Instructions” before you operate this unit.
Warranty
In the unlikely event that your product fails to work normally, please call the below free
phone number to discuss the problem with one of our qualified service engineers.
Bush Warranty: 1300 055 518
- 2 -

LUNAR
- 3 -
Safety Instructions
General Safety Considerations
Cleaning
Electrical Information
1) The nameplate artwork is located at the bottom or rear of the apparatus.
2) The apparatus shall not be exposed to dripping or splashing and that no objects
filled with liquids, such as vases, shall be placed on apparatus.
3) The mains plug or adapter of the apparatus shall be disconnected from the mains,
when completely disconnecting the unit.
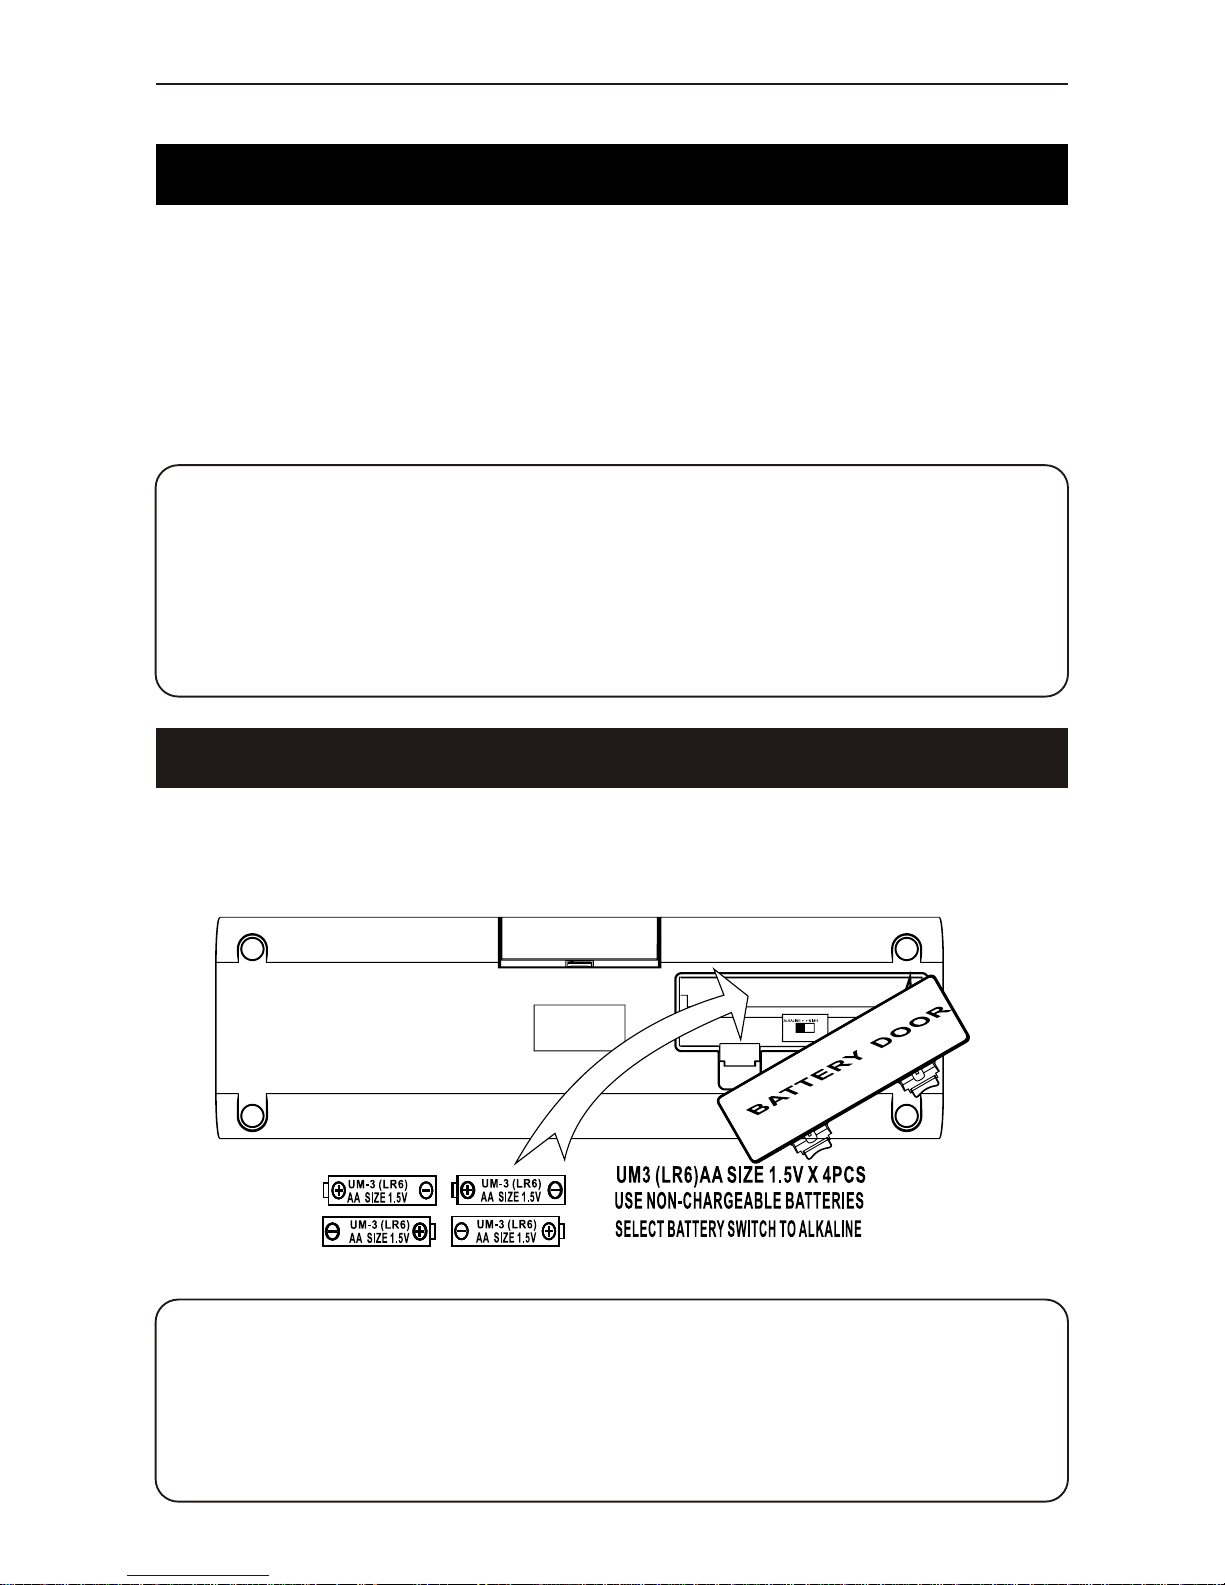
4) Batteries shall not be exposed to excessive heat such as sunshine, fire or the like.
Attention should be drawn to the environmental aspects of battery disposal.
5) Excessive sound pressure from earphones and headphones can cause hearing loss.
6) A minimum distance of 10cm around the apparatus is sufficient ventilation;
7) The ventilation should not be impeded by covering openings with items such as
newspaper, table-cloths, curtain etc;
8) No naked flame sources such as lighted candles should be placed on the apparatus.
9) Only use the apparatus in moderate climates.
10) Please read these operating instructions before you attempt to use the DAB+
Bluetooth Speaker.
11) Please ensure that all electrical connections (including the mains plug, extension
leads and interconnections between pieces of equipment) are properly made in
accordance with the manufacturer’s instructions.
12) Switch off and remove the mains plug when making or changing any connections.
13) Please consult your dealer if you are ever in doubt about the installation, operation
or safety of your DAB+ Bluetooth Speaker.
14) Don’t continue to operate the DAB+ Bluetooth Speaker. If you are ever in doubt
about it working normally, or if it is damaged in any way. Switch it off, withdraw the
plug from the mains and consult your dealer.
15) Don’t remove any fixed covers as this may expose you to dangerous voltages.
16) Don’t leave the DAB+ Bluetooth Speaker, switched ON when it is unattended for
long periods of time, unless it is specifically stated that it is designed for unattended
operation or has a standby mode.
17) Make sure that other people in your household are conversant with the DAB+
Bluetooth Speaker.
18) Under the influence of electrostatic phenomenon, the product may malfunction and
require user to reset
1. Ensure that the mains supply is disconnected before the unit is cleaned.
2. Do not use any liquids or aerosol cleaners, as this may damage the unit.
3. The unit should be cleaned with a soft, damp cloth.
Make sure that the voltage of your electricity supply is the same as that indicated on the
rating plate of the power supply unit supplied with your product. It requires a compatible
mains supply.
Do not use any other supply.
Under the influence of electrostatic phenomenon, the product may malfunction and
require the user to reset.

LUNAR
- 4 -
Your DAB+ Bluetooth Speaker

LUNAR
- 5 -
Interference free reception
Analogue systems suffer from an effect called “multipath distortion”. This is caused
because waves do not behave in an orderly fashion, but bounce and reflect off buildings
etc. DAB+ sees this as an advantage and uses the direct and reflected signals to actually
reinforce the end result, allowing for better service more of the time.
No need to re-tune
A single DAB+ frequency can be used to cover the whole of the Australia, so solving
many of the problems experienced with the earlier analogue system. DAB+ scans
automatically and tunes-in all of the available stations in your area.
Scrolling text
Broadcasters can transmit text to your radio. This way you can read the name of the DJ,
artist, song title or any other information they choose.
DAB+ was developed in Europe by a consortium of broadcasters and manufacturers.
DAB+ uses digital compression techniques to transform the source material, i.e. music
and speech, into better quality audio.
What is DAB+

LUNAR
- 6 -
Connect the small end of adapter to main unit DC IN and insert the main plug of adapter
into standard AC wall socket. Press the STANDBY button to power on the unit.
Connecting AC Power
Set up your line in port (AUX IN)
CONNECTION:
1. Plug a 3.5 mm audio cable (not included) into your MP3 or MP4 player aux out or
phones port and connect the other end (3.5mm jack) into the AUX-IN port at the
rear of DAB+Bluetooth Speaker.
2. Make sure both units are turned on.
3. Press the MODE button of DAB+ Bluetooth Speaker to change source to AUX
mode.
4. Set your device to start playing.
5. This will allow you to transmit sound through your DAB+ Bluetooth Speaker.
This will allow you to transmit sound through your DAB+ Receiver speakers.
Aux-In (Line-In / Audio-In) Connection
Warning!
1) The DAB+ Bluetooth Speaker is designed to operate from a mains supply of
AC 240V~50Hz.If the plug of adapter not fit properly, turn it over and again.
Do not force it.
2) When the DAB+ Bluetooth Speaker is not used for long periods of time,
please turn offu nit power and remove the adapter from the wall outlet and
unplug from the DAB+ Bluetooth Speaker.
AUX IN
VIDEO
OUT
DC 6V
AUX IN
VIDEO
OUT
DC 6V
AC 240V 50Hz

LUNAR
- 7 -
Before installing batteries (not included), ensure that the unit is disconnected from the
mains supply.
Remove the battery compartment cover on the back of the DAB+ Receiver by carefully
pushing the two lugs down.The battery cover can then be lifted away. Select the battery
switch (Alkaline or NI-MH) in the batteries compartment. Fit the 1.5V (UM3) x 4 pcs
batteries (not included), referring to the polarity markings. Finally, replace the cover.
For battery operation, remove the adapter from the wall outlet and unplug from the
DAB+Receiver.
Connecting AC Power
1) We recommend the use of High Quality batteries.
2) Select the battery switch to Alkaline position.
Please be aware alarm will not work in battery mode.
3) Follow the “Battery Operation” to insert correct batteries.
Using Non-Rechargeable Batteries
Warning!
1. There is danger of explosion if batteries are incorrectly replaced.
2. Select correct the type batteries of battery switch. Danger of explosion if
batteries are incorrectly battery switch setting.
3. Using Non-chargeable battery, the batteries switch must set to Alkaline position.
4. Using chargeable battery, the batteries switch must set to NiMh position.
5. Replace batteries with the same equivalent type only.
Warning!
1. There is danger of explosion if batteries are incorrectly replaced.
2. There is danger of explosion if battery switch has the wrong setting.
3. When using Non-chargeable battery, the batteries switch must set to Alkaline
position.
4. Please replace batteries with the same equivalent type only.

LUNAR
- 8 -
The preferred rechargeable battery type use NIMH AA size.
1) A fully charged battery, depending on its capacity will take approximately 15 - 20
hours for a full charge.
2) Charging of the batteries is possible with the radio powered on or off as long as it
is connected to the mains supply.
3) With the unit connected to a mains supply move the batteries switch to NiMH
position. The “Insert Battery” indicator will show on display. At this moment, install
rechargeable battery into the batteries compartment.
4) Insert 4 x AA size rechargeable batteries into the battery compartment observing
the correct polarity as indicated inside the battery compartment. The “Batt
Charging” show on display and the battery charging start.
5) After approximately 15 - 20 hours, the “Batt Charged” show on display and the
batteries are fully charged.
6) Remove the adapter from the back of the unit to operate the unit.
Using Rechargeable Batteries NIMH
Warning!
There is danger of explosion if use non-rechargeable batteries with the NIMH
switch set. Overtime batteries will loose the charge, please always remember
to check the Batteries.
Please be aware alarm will not work in battery mode.
Warning!
1) The charge current in this unit has been optimized for overnight charging of
NI-MH rechargeable batteries. NiCad batteries can be used but the charge time
will need to be reduced.
2) If using rechargeable batteries, select the batteries switch to NiMh position. At
the time display will show “Insert Battery”.
3) After installing battery, the “Batt Charging” show on display.
4) “Batt charged” show on display that the rechargeable batteries fully charged.

LUNAR
- 9 -
Follow the previous page “Connecting AC Power” & “Battery Operation”. Press the
STANDBY button to power on / off the DAB+ Bluetooth Speaker.
Main Operation
Power On / Off
Insert the AC power or batteries. The DISPLAY will illuminate and “WELCOME” will
be displayed. Press STANDBY button to turn on your DAB+ Bluetooth Speaker for
the first time DAB+ mode is selected automatically and “Autotune Full scan” will
show on display.
The following screen will be displayed a bar graph indicates the progress of the search
- the number of stations found increases as the scan progresses.
Switching On for the first time
After you turn on your DAB+ Bluetooth Speaker, press the MODE button to select
different sources.
Switching Difference Source DAB+ / FM / AUX / iPod / BT
After you turn on your DAB+ Bluetooth Speaker and use the < / > buttons to increase
or decrease the volume sound.
Using the Volume Control
The aerial should be extended to ensure good reception in both DAB+ and FM radio
modes. It may be necessary to alter the position of the DAB+ Bluetooth Speaker, and /
or aerial to achieve the best signal.
Adjusting the Antenna
After you turn on your DAB+ Bluetooth Speaker, press the EQ button frequency to
select different EQ sound effect ROCK / POP / JAZZ / CLASSICAL / FLAT.
EQ Sound Effect

LUNAR
- 10 -
Operate DAB+ Radio
Using DAB+ Stations
1. Power on your DAB+ Bluetooth Speaker, the DAB+ mode should be selected
automatically.
Scanning for DAB+ Stations
Due to the nature of a DAB+ Bluetooth Speaker, additional stations and services
regularly become available. If you wish to see if there have been any new DAB+
stations introduced in your area you can initiate a search. Hold the SCAN button to
activates earch for stations. This will take approximately 15 - 30 seconds.
Storing DAB+ Presets
You can preset up to 10 DAB+ stations for easy access as follows:
1. Tune to the station you wish to preset (see Changing DAB+ Stations).
2. Press and hold the PRESET button, the preset station 1 will show on DISPLAY.
Recalling a Preset Station
You can select to 10 DAB+ stations for easy access as follows:
1. Press the PRESET button once, the preset station 1 will show on DISPLAY.
2. Use the < / > buttons to select the store position.
3. Press the SELECT button to confirm.
3. Use the < / > buttons to select the store position.
4. Press the SELECT button to save the current station into the specified preset. The
saves preset number will show on display.
2. Press TUNE button once. Use the < / > buttons to move through the station list.
3. Press the SELECT Button to confirm selection & start listening.
4. When a station has been selected and the display will show the information of the
radio station.
Warning!
If the DAB+ Bluetooth Speaker, does not turn onto DAB+ mode, press the MODE
button to select DAB+ mode.
Warning!
If you have not already stored a DAB+ station in one of the presets [Empty] will be
displayed. The DISPLAY will revert to the previously selected station after a few
second.

LUNAR
- 11 -
DAB+ Station Text Information
Using the DAB+ Station Information
It is possible to change the information that is displayed on the second line of the
DISPLAY when listening to a DAB+ station. There are more types of information
available as listed below with examples to the right. To change the information
displayed press the INFO button repeatedly.
The information show on second line of display below:-
1. Text scrolling = Information supplied by the DAB+
station. It may comprise information on music titles or
details of the programmed and is provided by the
broadcaster.
2. MultiplexName = This is will show the multiplex text
that is broadcasting the programmed you are listening.
3. Signal Information = This shows the digital bit-rate
and the signal mode.
4. Channel and Frequency = This displays the channel
number and the transmission frequency.
5. Program Type (PTY) = This is a description of the
type of programmed provided by the DAB+ station
and is provided by the broadcaster.
6. Signal Bar = Show the transmission signal level.
7. Signal Error Rate = If the transmission signal contains
errors the system can appl ycorrection. The amount of
signal correction can be displayed as a numerical
value between 0 and 99. As the value increases, you
will hear the signal degrade. To improve reception, try
adjusting the position of the antenna. Please note a
signal error rate of 30 or more will make the station
un-listenable.
8. Time = Display time is provided by the broadcaster so
will be accurate.
9. Date = Display date is provided by the broadcaster so
will be accurate.

LUNAR
- 12 -
DAB+ Menu Order
Using the MENU Control (DAB+ mode)
The MENU control allows you to change some of the system options on your DAB+
Receiver. These options are arranged in a menu structure as shown below.

LUNAR
- 13 -
Pressing the MENU button will enter the menu control. Press the < / > buttons to scroll
through the options is described below.
DAB+ Menu Order Continued
The MENU Comment (DAB+ mode)
1. Press the MENU button to access the menu control
2. Use either the < / > buttons until “Full scan” displayed.
3. Press the SELECT button to activate a full scan search for stations
Full Scan
It is possible to manually tune to a specific channel / frequency and add this to the
station list. This function can be used to obtain the optimum reception for a specific
Channel/frequency, taking into account the position of the aerial.
1. Press the MENU button to access the menu control
2. Use either the < / > buttons until “Manual tune” displayed.
3. Press the SELECT button to access and the channel / frequency show on display.
4. Use either the < / > buttons to select the desired channel / frequency.
5. Press the SELECT to confirm.
6. Adjust the position of the antenna to obtain the optimum signal strength.
Manual Tune
DRC adds or removes a degree of compression to compensate for the differences in
the dynamic range between radio stations. For example, a station broadcasting popular
music may have a high level of compression applied since the emphasis is on a
constant high listening level. The station broadcasting classical music will have little or
no compression as the listener requires all of the highs and lows in the music to define
the detail.
There are three levels of compression:
• DRC high = Maximum compression applied (this is the default)
• DRC low = Low compression applied
• DRC off = No compression applied
The best way to determine which of these settings suits you best is to experiment with
them on a variety of source material.
1. Press the MENU button to access the menu control.
2. Press either the < / > buttons until “DRC” displayed.
3. Press the SELECT button to access “DRC value”.
4. Use the < / > buttons to select between the three DRC values. The available options
appear on second line of the DISPLAY. When the required DRC value is displayed
press SELECT button to confirm.
5. You should be able to hear the difference in compression immediately.
Dynamic Range Control (DRC)

LUNAR
- 14 -
1. In MENU order, use the < / > buttons until “System” displayed. Press SELECT
button.
2. Press the < / > buttons until “Date / Time” displayed , use < / > buttons and
SELECT button to adjust correct digit.
3. Go to “ Date / Actual Time Setting” page for detail setting control.
DAB+ Menu Order Continued
System - Date / Time ( See Date / Actual Time Setting)
1. In MENU order, use the < / > buttons until “System” displayed. Press SELECT
button.
2. Press the < / > buttons until “12H / 24H” displayed, use < / > buttons and SELECT
button to adjust correct digit.
3. Go to “ 12 / 24 Hour Format Setting” page for detail setting control.
System - 12H / 24H (See 12 / 24 Hour Format Setting)
1. In MENU order, use the < / > buttons until “System” displayed. Press SELECT
button.
2. Press the < / > buttons until “Alarm” displayed, use < / > buttons and SELECT
button to adjust correct digit.
3. Go to “Alarm Time Setting” page for detail setting control.
System - Alarm (See Alarm Time Setting)
1. In MENU order, press the < / > buttons until “System” displayed. Press SELECT
button.
2. Press the < / > buttons until “Backlight” displayed, use < / > buttons and SELECT
button to adjust correct digit.
3. Go to “Backlight Setting” page for detail setting control.
System - Backlight (See Display Backlight)
1. In MENU order, use the < / > buttons until “System” displayed. Press SELECT
button.
2. Press the < / > buttons until “SW version” displayed.
3. Go to “Checking Software Version” page for detail.
System - SW version (See Check Software Version)

LUNAR
- 15 -
In Power on mode, press the MODE button to select FM mode. You may hear
background noise as no station has been tuned in. The DISPLAY will show the
frequency of FM station.
Operate FM Radio
Using the FM Radio
1. Press and hold SCAN button for a few seconds to automatically search for the
next available station.
2. If the reception is poor, use the Manual Tuning to fine-tune the station. If the
reception does not improve, try altering the position / length of the aerial. If the
reception is still poor, scan again to determine whether a stronger signal exists for
the desired frequency.
3. When you have tuned into the desired frequency/station, you can save it in one of
the ten preset locations.
Automatic Tuning of FM mode
1. In FM mode, press TUNE button once and use the < / > buttons (press or hold) to
manually scan through the frequency band.
2. If the reception does not improve, try altering the position / length of the aerial. If the
reception is still poor, scan again to determine whether a stronger signal exists for
the desired frequency.
3. When you have tuned into the desired frequency/station, you can save it in one of
the ten preset locations, see below.
Manual Tuning of FM mode
You can preset up to 10 FM stations for easy access as follows:
1. Tune to the station you wish to preset (see Using the FM Radio).
2. Hold the PRESET button once, the preset station 1 will show on DISPLAY.
3. Use the < / > buttons to select the store position.
4. Press the SELECT button to save the current station into the specified preset.
Storing FM Presets
You can select to 10 FM stations for easy access as follows:
1. Press the PRESET button once, the preset station 1 will show on DISPLAY.
2. Use the < / > buttons to select the store position.
3. Press the SELECT button to confirm.
Recall a Preset Station
Warning!
1. If you have not already stored a FM station in one of the presets [Empty] will be
displayed. The DISPLAY will revert to the previously selected station after a few
second?
2. If RDS information is available, the display will then show the radio station name.
3. If you tune to an FM stereo station and the ST indicator will be light.

LUNAR
- 16 -
FM Station Text Information
Changing the FM Station Information
It is possible to change the information that is displayed on the second line of the
DISPLAY when listening to a FM station (RDS mode). There are more types of
information available as listed below with examples to the right. To change the
information displayed press the INFO button repeatedly.
The information show on second line of display below:-
1. Radio Text = This is scrolling teinformation supplied
by the station It may compriseinformation on music
titles or details of theprogram and is provided by the
broadcaster.
2. Program Type (PTY) = This is a descriptiof the type
of program provided by the FM statioand is provided
by the broadcaster.
3. Radio Frequency = This is informatioof radio
frequency supplied by the FM station.
4. Signal Bar = Show the transmission signal level.
5. Time = Display time is provided by the broadcaster
so will be accurate.
6. Date = Display date is provided by thebroadcaster
so will be accurate.

LUNAR
- 17 -
FM Menu Order
Using the MENU Control (FM mode)
The MENU control allows you to change some of the system options on your DAB+
Bluetooth Speaker. These options are arranged in a menu structure as shown below.

LUNAR
- 18 -
Pressing the MENU button will enter the menu control. Use the </>buttons to scroll
the options described below.
FM Menu Order Continued
The MENU Comment (FM mode)
Press STANDBY button to power down the unit, the clock will show on display.
Pressing the MENU button will enter the menu control. Use the </>buttons to scroll
the options described below.
STANDBY Mode Menu & Alarm Checking
The MENU Comment (STANDBY mode)
1. Press the MENU button to enter menu order.
2. Pressing the < / > buttons to “Date / Time” “12H / 24H” “Alarm” “Backlight” “ SW
version” displayed, use < / > buttons and SELECT button to adjust correct digit.
3. You can go to next page “Date / Actual Time Setting” “12/24 Hour format Setting”
“Alarm Time Setting” “Display Backlight” “Checking Software Version” for detail.
System - “Date / Time” “12H / 24H” “Alarm” “Backlight” “ SW version”
1. Press STANDBY button to power down the unit, the clock will show on display.
2. Pressing the ALARMS button check Alarm1 / Alarm 2 time & wake up source.
3. Go to “Alarm Time Setting-Checking Alarm Time” page for detail setting control.
CHECK ALARM TIME & SETTING
1. Press the MENU button to access the menu control
2. Press either the < / > buttons until “Scan setting” is displayed.
3. Press the SELECT button to access.
4. Press either the < / > buttons to select “All station” or “Strong stations” (this is
the default).
5. Press the SELECT button to confirm.
6. Next time use FM scan function will be search by the setting.
Scan setting
1. Press the MENU button to access the menu control
2. Press either the < / > buttons until “Audio setting” is displayed.
3. Press the SELECT button to access.
4. Press either the < / > buttons to select “Forced mono” or “Stereo allowed” (this is
the default).
5. Press the SELECT button to confirm.
Audio setting
1. Press the MENU button to enter menu order. Press the < / > buttons until “System”
displayed. Press SELECT button
2. Pressing the < / > buttons to “Date / Time” “12H / 24H” “Alarm” “Backlight” “ SW
version” displayed, use < / >buttons and SELECT button to adjust correct digit.
“Date / Time”= See next page “Date / Actual Time Setting”
“12H / 24H” = See next page “12/24 Hour Format Setting”
“Alarm” = See next page “Alarm Time Setting”
“Backlight” = See next page “Display Backlight”
“SW version” = See next page “Checking Software Version”
System - “Date / Time” “12H / 24H”“Alarm” “Backlight” “ SW version”

LUNAR
- 19 -
When receiving DAB+/ FM stations the broadcast stations provide the correct time.
The broadcast stations set your actual clock time, so it will always be accurate.
Date / Actual Time Setting
1. Turn on the unit to DAB+/ FM mode. Press the MENU button to enter.
2. Use the < / > buttons to select SYSTEM mode and press SELECT button to enter.
No need the step 2 if unit turn to STANDBY mode.
3. Uses the < / > buttons select to “12H / 24H” and press SELECT button.
4. Uses the < / > buttons select to correct hour format and press SELECT button to
confirm.
12 / 24 Hour Format Setting
Using Sleep Function
1. Turn on the unit and press the MODE button to select DAB+ / FM.
2. Waiting a few minute the time will auto up day.
Auto Update the Clock Time
While music is playing, hold the INFO button until sleep time shows on display. The
unit will continue to play the music for 90 minutes and after the sleep time the unit will
be automatic off.
Sleep Function
During the music playing, hold the INFO button until sleep time show on display. Use
the < / > buttons to select sleep time “90 -80-70-60-50-40-30-20-10-Off ”. Press the
SELECT button to confirm.
Change the SLEEP Time
If you want manual set the Time / Day / Month / Year, please see following step:-
1. Turn on the unit to DAB+ / FM mode. Press the MENU button to enter.
2. Use the < / > buttons to select SYSTEM mode and press SELECT button to enter.
No need the step 2 if unit turn to STANDBY mode.
3. Use the < / > buttons select to “Date / Time” press SELECT button.
4. Use the < / > buttons to adjust the Year and press SELECT button to confirm.
5. Use the < / > buttons to adjust the Month time and press SELECT button to confirm.
6. Use the < / > buttons to adjust DAY and press the SELECT button to confirm.
7. Use the < / > buttons to adjust the Hour time and press SELECT button to confirm.
8. Use the < / > buttons to adjust the Minute time and press SELECT button to save
all setting.
Manual Set the Clock / Date
Warning!
When operating on Batteries, clock and alarms will not function. This is to
save power.

LUNAR
- 20 -
You can select two-alarm time settings and wake to BEEP / iPod / FM / DAB / sound.
1. Turn on the unit to DAB+ / FM mode. Press the MENU button to enter.
2. Use the < / > buttons to select SYSTEM mode and press SELECT button to enter.
No need the step 2 if unit turn to STANDBY mode.
3. Use the < / > buttons to select “Alarm” and press the SELECT button to enter.
4. Press the ALARMS button to select alarm1 / alarm2 setting mode and press
SELECT button to confirm.
5. Use the < / > buttons to select the alarm active or deactivate and press SELECT
button to confirm.
6. Use the < / > buttons to select alarm call on Daily / Weekly / Weekend / Once and
press SELECT button to confirm.
7. Use the < / > buttons to select alarm volume and press SELECT button to confirm.
8. Use the < / > buttons to adjust the alarm hour time and press
button to confirm.
9. Use the < / > buttons to adjust the alarm minute time and press SELECT button to
confirm.
10. After all setting, the alarm will be automatic active and alarm icon will show on display.
You can other choose to set the alarm time:-
Press the ALARM button to alarm checking mode and follow above steps 4 ~ 10.
The alarm wake up source will automatically turn off after one hour if the unit is
wakened by alarm on function.
During alarm sounding, press STANDBY button once to stop alarm sound and auto
repeat next time (except alarm wake up on ONCE mode)
Alarm Time Setting
Shut Off the Alarm Sound
When an alarm sounds, pressing SNOOZE button will temporarily silence the alarm
for 10 minutes. At this moment, the alarm icon will blinks on display.
Using Snooze Function
Warning!
1. Daily: the alarm will be repeated each day at the same time.
2. Weekly: the alarm will repeat from Monday to Friday at the same time.
3. Weekend: the alarm will repeat from Saturday to Sunday at the same time.
4. Once: the alarm will wake up once only and will not repeat.
Warning!
1. If you activate an alarm, the alarm icon will show on display.
2. If you wish to be woken up by radio, ensure that a radio station is tuned.
3. If you wish to be woken up by DAB+ Bluetooth Speaker, ensure that there is
no station signal, the unit will switch to BEEP mode automatically.
4. In batteries operation, there is no alarm wake up function
Table of contents
Other Bush Radio manuals
Popular Radio manuals by other brands

Sangean
Sangean Pocket 320 operating instructions

Sangean
Sangean WFT-1D+ manual

Boston Acoustics
Boston Acoustics Solo II Owner's manual/safety instructions/compliance information

Fisher
Fisher 610 Series operating instructions

Roberts
Roberts R881 user guide

Antique Automobile Radio
Antique Automobile Radio 172014B Installation and operating instructions