bestmin Installations-Set
Filterkopf mit Außengewinde (inkl. Aquastop
und Rückflussverhinderer)
Wandhalterung (Befestigungsmaterial im
Lieferumfang nicht enthalten)
Filterkerze (bestmin M)
Einbau- und Bedienungsanleitung
Zubehör:
Anschlussschlauch 1.500 mm (³⁄8"׳⁄8"
oder ³⁄8"× ¾")
Anschlussschlauch 1.500 mm mit Kugelhahn
(³⁄8"׳⁄8"oder ³⁄8"× ¾")
bestflush (Entlüftungsventil)
bestflush PLUS (Entlüftungsventil mit
integriertem Aquameter)
Aquameter Wasserzähler ³⁄8"IG׳⁄8"
mit Überwurfmutter, externes Display zur
Wandbefestigung
1 Lieferumfang
1–4: Erstinstallation einer neuen Filterkerze
3–4: Austausch einer Filterkerze
1 Überprüfung der Wasserfließrichtung (unter Berücksichtigung der angege-
benen Pfeile auf dem Filterkopf)
2 Anschließen von Eingangs- und Ausgangsschlauch
3 Eindrehen der Filterkerze in den Filterkopf, um Filter zu entlüften
4 Rausdrehen der Filterkerze aus dem Filterkopf und Ausgangsschlauch mit
der Maschine verbinden; Eindrehen der Filterkerze in den Filterkopf; Filter
ist nun betriebsbereit
2 Technische Daten
C
B A
E
FD
2 3 4
1
2
3
5
6
7
4
7
2
1
3
4
8
9
1
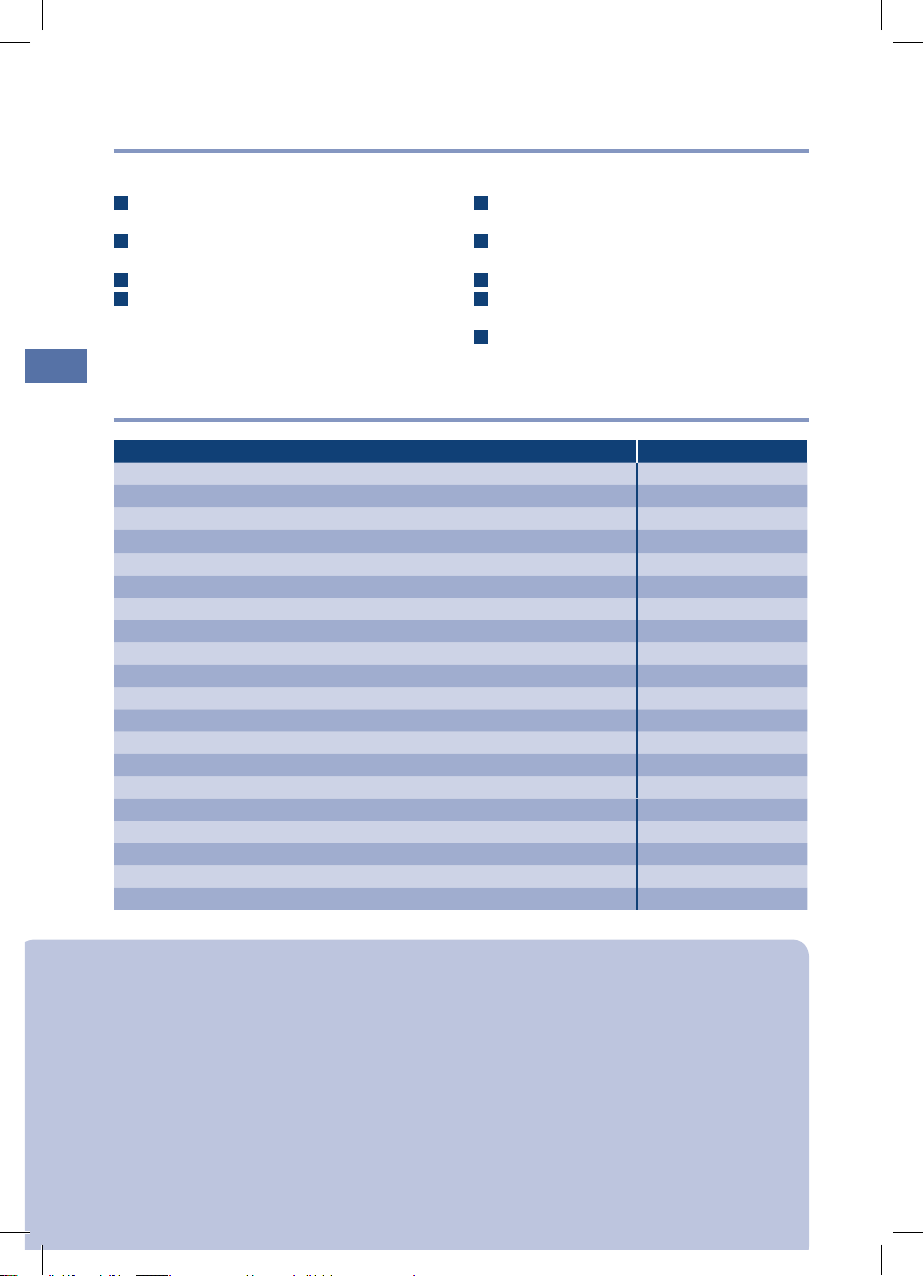
bestmin Typ M
Anschlussgewinde (in/out) 3/8"
Nenndurchfluss [l/h] 180
Druckverlust bei Nenndurchfluss [bar] 0,8
Typische Kapazität [Liter] 10.000*
Partikelfiltration [µm] 20
Arbeitsdruckbereich, min.–max. [bar] 2– 8
Fließdruck [bar] > 1,2
Wassertemperatur, min.–max. [°C] 4– 30
Umgebungstemperatur bei Betrieb, min.–max. [°C] 4– 40
Umgebungstemperatur bei Lagerung/Transport [°C] -20– 50
Gesamthöhe ohne Bügel A [mm] 465
Gesamthöhe mit Bügel B [mm] 500
Anschlusshöhe C [mm] 425
Abstand zum Boden D [mm] 65
Einbaulänge E [mm] 125
Filterkerzen Ø F [mm] 130
Gewicht (trocken/nass) ca. [kg] 4/4,5
Betriebslage horizontal oder vertikal
Bestell-Nr. Installations-Set FS26M01A00
Bestell-Nr. Filterkerze FS26M00A00
8
9
5
6
* max. 12 Monate
Purga de aire/enjuague (ES):
El aire que se encuentra en el sistema de optimización del agua bestmin debe eli-
minarse antes de la puesta en marcha. Para ello, dependiendo de la instalación,
hay diferentes opciones:
Opción 1: Purga de aire/enjuague a través del aparato consumidor (por
ejemplo: máquina expendedora de agua)
En caso de que el aparato consumidor conectado (por ejemplo, máquina expen-
dedora de agua) disponga de una función para poner en marcha bujías filtrantes,
siga las instrucciones del menú de la pantalla. ¡Tenga en cuenta las instrucciones
de manejo del aparato consumidor!
Opción 2: Recomendada: Enjuague a través del bestflush o del bestflush PLUS
En caso de que, por motivos de la instalación, no sea posible la opción 1, se pue-
de realizar una purga de aire a través de bestflush o bestflush PLUS. Para la insta-
lación y el uso ver las instrucciones de montaje y manejo de bestflush o bestflush
PLUS. Purgue la bujía filtrante bestmin hasta que el agua filtrada salga clara y sin
burbujas. (Colocar debajo un recipiente como mínimo de 4 litro)
Opción 3: Purga de aire/enjuague a través del tubo flexible de salida
En caso de que no se pueda realizar la purga de aire mediante
una de las opciones mencionadas arriba, se puede purgar la bu-
jía filtrante bestmin a través del tubo flexible de salida. Para ello,
suelte el tubo de salida del aparato consumidor (por ejemplo,
máquina expendedora de agua). Introduzca el extremo en un re-
cipiente (mín. 4 litro). Purgue el aire de la bujía filtrante bestmin
abriendo la entrada de agua. Purgue la bujía filtrante bestmin hasta
que el agua filtrada salga clara y sin burbujas.A continuación, vuel-
va a montar el tubo flexible de salida en el aparato consumidor.
8 Garantía
Los sistemas de optimización de agua bestmin están garantizados por water+more
by BWT durante 2 años. Sólo existe derecho a prestación de garantía en caso de
que se tengan en cuenta y se cumplan las indicaciones de este manual.
9 Obligaciones del usuario
Usted ha adquirido un producto duradero y fácil de conservar. No obstante, todos
los aparatos técnicos requieren la realización periódica de trabajos de conserva-
ción para seguir funcionando correctamente.
El agua potable es un alimento. Por tanto, son elementales las precauciones
higiénicas a la hora de realizar los trabajos de conservación.
Comprobación de la estanqueidad: diariamente
Cambio de la bujía filtrante: como máximo al cabo de 12 meses (independien-
temente de la capacidad restante)
Cambio de la cabeza filtrante: al cabo de 5 años (ver el adhesivo de montaje)
Cambio de los tubos flexibles blindados: al cabo de 5
Según la norma DIN 1988, el cambio de las piezas de desgaste debe realizarlo el
personal técnico especializado (comercio especializado o servicio técnico). Se su-
prime el mantenimiento en caso de que se cambie la bujía filtrante regularmente.
!49