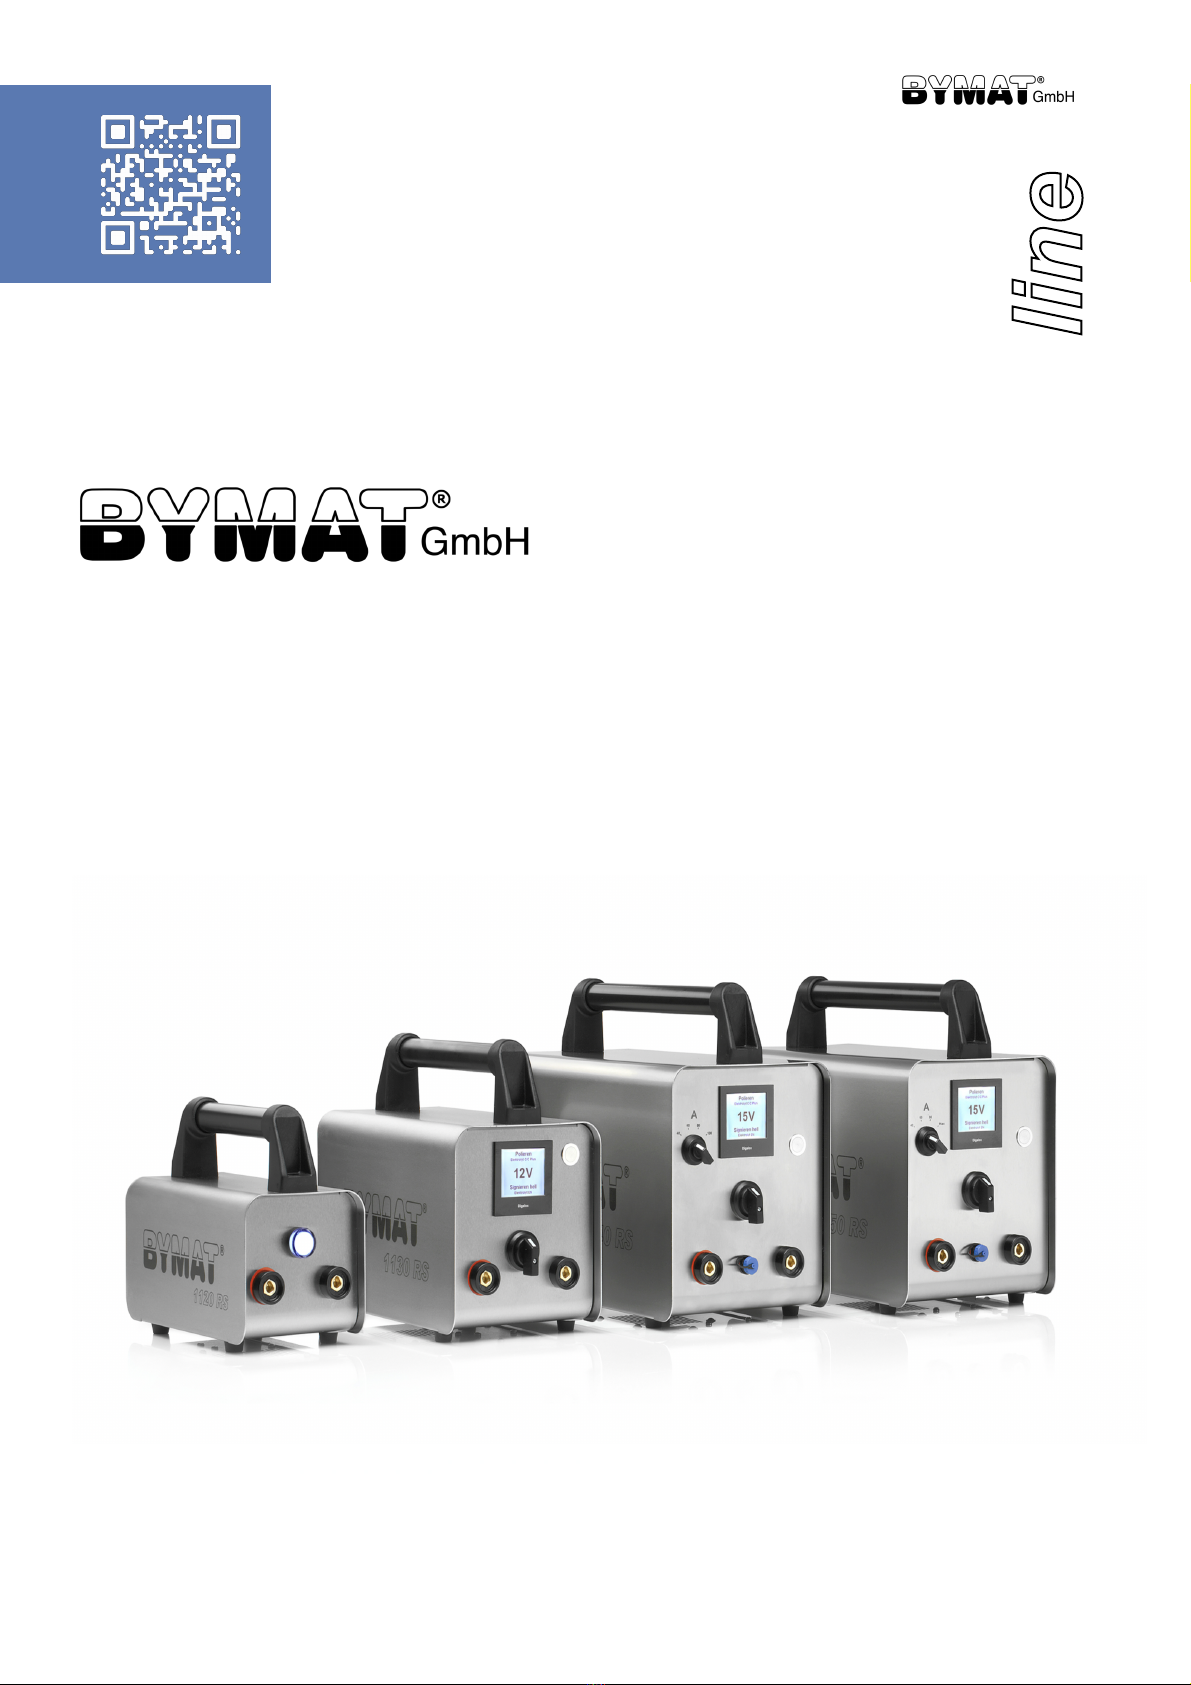
Bymat Brushline 1150 RS User manual

User manual
1120 RS / 1130 RS / 1140 RS / 1150 RS
Brush
line

DESCRIPTION OF THE DEVICE:
Model:
Device number:
Year of construction:
checked by:
Neusser Strasse 106
D - 41363 Jüchen
Tel .: +49 (0) 21 65/87 28 - 0
Faks: +49 (0) 21 65/87 28 - 28
www.bymat.de / www.bymat.com
Your contact:
Internal Sales / template orders:
Mrs. Beate Hoenen
Tel.: +49 (0) 21 65 / 87 28 -0
Technology:
Production
Tel .: +49 (0) 21 65/87 28 -17
Accounting:
Mrs. Ella Wirtz
Tel .: +49 (0) 21 65/87 28 -15
Sales:
Mr. Ralf Joncker
Tel.: +49 (0) 172 / 790 65 95
Foreign Sales:
Mr. Marcus Laumen
Tel.: +49 (0) 172 / 972 00 91
Managing Director:
Mr. Björn Byhahn
Tel.: +49 (0) 174 / 321 99 44
User manual
GB

FEATURES / SPECIFICATIONS:
1120 RS
1130 RS
1140 RS
1150 RS
Cleaning
X
X
X
X
Polishing
X
X
X
Embossing dark
X
X
X
Embossing light
X
X
X
Fixed voltage
X
X
X
X
General Data
Dimensions
W x H x L in mm
295x145x230
360x185x295
435x215x350
435x215x350
Weight (Kg)
7,9
11,9
17,2
23,5
Rating
800 VA
800 VA
1200 VA
2500 VA
Output current
80 A
80 A
100 A
200 A

User manual Bymat 1120 RS
Commissioning
Connecting the device:
Connect power cable of the Cleaning and Embossing device to an appropriate power source and turn on
using the on/off switch on the back of the machine.
Connect the black wire to the black terminal connector on the front panel and connect the carbon stamp/
brush at the other end.
Connect the ground cable with the red mark on the red socket on the front panel and attach the
grounding clamp to the work piece.
Do not apply any external voltages to the component to be cleaned!
Do not use in wet areas and protect against moisture and splashes!
Cleaning with the brush
To remove the oxide layer, switch the machine on.
Ensure the brush is fitted with a brush head in good condition.
The brush is connected using the accompanying black ground cable to the black connector of the
machine. The red-marked ground wire must be connected to the work piece via the ground clamp.
Decant a little of the corresponding electrolyte (Electrolyte A / B / C / C Plus or LF) into the wide neck
receptacle provided and immerse the brush. Brush over the oxide layer to be treated until it has all
been removed.
After prolonged use the brush may become too warm. If this occurs, cool it in water bath,
or use a second brush.
Remove the electrolyte of the entire metal surface and neutralize the surface with a cloth soaked
in Neutralizer.
Tips for optimal cleaning
The BYMAT brushes are ideal for cleaning hard-to-reach areas. The short brush makes it easier
to get into sharp corners and around fine detail.
The longer brush is better for cleaning large areas.
To avoid short circuiting the machine, change the brush end before all the brush fibers are
depleted.
Working with chemicals can lead to hazards. It is required to wear an acid apron, tightly
fitting acid resistant goggles and gloves. It is also required to have sufficient extraction/
ventilation around the work piece or to wear a suitable respirator.
Please refer to the safety data sheets of the individual electrolytes.
NOTE: After switch off please wait min. 1 minute before restarting the machine.

User manual Bymat 1130 RS
The Bymat 1130 RS machines are designed to be used for the cleaning and polishing of stainless steel
welds and the embossing of stainless steel and other conductive materials.
All persons using this equipment should familiarize themselves with these instructions before using the
equipment.
Before using this equipment please check:
The mains cable is in good condition and is undamaged. The mains plug is securely fitted.
The red and black cleaning leads are in a good condition. The brush / anode is in good
condition. The area to be cleaned is free from oil and dirt etc
Prior to use:
Connect the machine to the mains power supply but leave the machine switched off.
NOTE: After switch off please wait min. 1 minute before restarting the machine.
Connect one end of the black cable to the black socket on the front of the machine
Connect the other end of the black cable to the brush / anode
Connect the end of the earth cable to the red rounded socket on the front of the machine
Connect the earth clamp to the workpiece
WARNING
Under NO circumstances should the solutions be swallowed.
Should the solutions come into contact with the eyes wash immediately with
copiousamounts of clean water
Cleaning
1. Switch the machine on by means of the switch located on the back of the machine
2. Turn the 3 position switch on the front of the machine to position number 1: 10,5 volts will be
displayed in the display also located on the front of the machine.
3. The brush is connected using the accompanying black cable to the black connector
of the machine.
4. Select the cleaning solution required for the weld area to be cleaned
(Electrolyte A / B / C / C Plus or LF), shake the solution vigorously and pour the required
amount into the wide mouth container.
5. Attach the earth clip to the part to be cleaned
6. Dip the brush complete with the carbon fiber in the wide-necked container until the fiber is
complete soaked.
7. Gently stroke the brush over the weld area, the electrolytic process will clean the weld.
8. After cleaning with a spray bottle, spray Neutralyt onto the cleaned area.
Then wipe off with plenty of water.
During prolonged use the brush may become hot, simply disconnect it from the cable and
cool in a bucket of water or under a tap, dry the brush, replace the brush tip and reconnect
to the black cable, or use another brush.
CAUTION
To avoid short circuiting the machine, change the brush end before all the brush fibers are
depleted. Whilst using chemicals an acid resistant apron, gloves and suitable eye
protection should be worn. Avoid getting solutions on your skin, if you do get the
solutions on your skin, rinse off with plenty of clean water. Low alloy steels, residual
cooling liquid, drilling oil and similar substances can result in chemical reactions.

Polishing
1. Switch the machine on by means of the switch located on the back of the machine
2. Turn the 3 position switch on the front of the machine to position number 2: 14 volts will be
displayed on the meter also located on the front of the machine.
3. The brush is connected using the accompanying black cable to the black connector
of the machine.
4. The red-marked ground wire must be connected to the work piece via the ground clamp.
5. Deacant a little of the corresponding electrolyte (Electrolyte C or Electrolyte C Plus for
polishing) into the wide neck receptacle provided and immerse the brush.
6. Dip the brush complete with the carbon fiber in the wide-necked container until the fiber is
complete soaked.
7. Brush over the area to be polished several times until the desired finish is achieved.
8. After polishing with a spray bottle, spray Neutralyt onto the cleaned area.
Then wipe off with plenty of water.
During prolonged use the brush may become hot, simply disconnect it from the cable,
remove the brush and cool in a bucket of water or under a tap, dry the brush, replace the
brush tip and reconnect to the black cable, or use another brush.
CAUTION
To avoid short circuiting the machine, change the brush end before all the brush fibers are
depleted. Whilst using chemicals an acid resistant apron, gloves and suitable eye
protection should be worn.
Avoid getting solutions on your skin, if you do get the solutions on your skin, rinse off
with plenty of clean water.
Please refer to the material safety data sheets of the individual electrolytes.
Low alloyed steels, residual coolant, drilling oil and similar substances may cause chemical reactions.
Embossing light
Please use the embossing stamp with 90-degree anode (Art.-no.: 5025 ST)
1. Cover the carbon anode with a white felt strip and fasten with an O ring
2. Switch the machine on by means of the switch located on the back of the machine
3. Turn the 3 position switch on the front of the machine to position number 2:
14 volts will be displayed on the meter also located on the front of the machine.
4. Attach the earth clip to the part to be embossed.
5. Select Electrolyte EN and shake vigorously, pour a few drops of the electrolyte directly onto the
felt
6. Position the template into the required spot and gently move the anode backwards and forwards
over the template for 2 to 4 seconds.
7. After the embossing is complete wipe the surface with a cloth soaked in Neutralizer
CAUTION
To avoid short circuiting the machine, change the brush end before all the brush fibers are
depleted. Whilst using chemicals an acid resistant apron, gloves and suitable eye
protection should be worn. Avoid getting solutions on your skin, if you do get the
solutions on your skin, rinse off with plenty of clean water. Low alloy steels, residual
cooling liquid, drilling oil and similar substances can result in chemical reactions.
Should you have any doubts or queries regarding the use of this equipment please contact your local
supplier for advice.

Embossing dark
For this please use the embossing stamp with 90-degree anode (Art.-no.: 5025 ST)
1. Cover the carbon anode with a white felt strip and fasten with an O ring
2. Switch the machine on by means of the switch located on the back of the machine
3. Turn the 3 position switch on the front of the machine to position number 3:
12 volts will be displayed on the meter also located on the front of the machine.
4. Attach the earth clip to the part to be embossed.
5. Select Electrolyte ET or EC-S and shake vigorously, pour a few drops of the electrolyte directly
onto the felt
6. Position the template into the required spot and gently move the anode backwards and forwards
over the template for 2 to 4 seconds.
7. After the embossing is complete wipe the surface with a cloth soaked in Neutralizer.
Every time use a separate felt strip, otherwise it could happen that you will blacken your
component.
Tips for handling templates.
Each electrolyte contains salts. The templates can become clogged with these salts. Therefore,
you should clean the templates after every use with
clean water and washing up liquid.
Please never clean with chemical cleaners (benzine, acetone, etc.),
this destroys the template.
CAUTION
NOTE: Never use the brush in position no. 3
To avoid short circuiting the machine, change the brush end before all the brush fibers are
depleted. Whilst using chemicals an acid resistant apron, gloves and suitable eye
protection should be worn.
Avoid getting solutions on your skin, if you do get the solutions on your skin, rinse off
with plenty of clean water.
For embossing dark or light the correct electrolytes for the grade of substrate material needs to
be used.
(See Below)
Embossing Dark:
ET - Vanadium Steels
EC - Chrome Vanadium Steels
EM - Brass Copper and Tin
EA -Aluminium
Embossing Light:
EN -Allmaterials

User manual Bymat 1140 RS / 1150 RS
The Bymat 1140 RS / 1150 RS machines are designed to be used for the cleaning and polishing of
stainless steel welds and the embossing of stainless steel and other conductive materials.
All persons using this equipment should familiarize themselves with these instructions before using the
equipment.
Before using this equipment please check:
The mains cable is in good condition and is undamaged. The mains plug is securely fitted.
The red and black cleaning leads are in a good condition. The brush / anode is in good
condition. The area to be cleaned is free from oil and dirt etc
Prior to use:
Connect the machine to the mains power supply but leave the machine switched off.
NOTE: After switch off please wait min. 1 minute before restarting the machine.
Connect one end of the black cable to the black socket on the front of the machine
Connect the other end of the black cable to the brush / anode
Connect the end of the earth cable to the red rounded socket on the front of the machine
Connect the earth clamp to the workpiece
WARNING
Under NO circumstances should the solutions be swallowed.
Should the solutions come into contact with the eyes wash immediately with
copiousamounts of clean water
Cleaning
1. Switch the machine on by means of the switch located on the back of the machine
2. Turn the 3 position switch on the front of the machine to position number 1: 10,5 volts will be
displayed in the display also located on the front of the machine.
3. The brush is connected using the accompanying black cable to the black connector
of the machine.
4. Select the cleaning solution required for the weld area to be cleaned
(Electrolyte A / B / C / C Plus or LF), shake the solution vigorously and pour the required
amount into the wide mouth container.
5. Attach the earth clip to the part to be cleaned
6. Dip the brush complete with the carbon fiber in the wide-necked container until the fiber is
complete soaked.
7. Gently stroke the brush over the weld area, the electrolytic process will clean the weld.
8. After cleaning with a spray bottle, spray Neutralyt onto the cleaned area.
Then wipe off with plenty of water.
During prolonged use the brush may become hot, simply disconnect it from the cable and
cool in a bucket of water or under a tap, dry the brush, replace the brush tip and reconnect
to the black cable, or use another brush.
CAUTION
To avoid short circuiting the machine, change the brush end before all the brush fibers are
depleted. Whilst using chemicals an acid resistant apron, gloves and suitable eye
protection should be worn. Avoid getting solutions on your skin, if you do get the
solutions on your skin, rinse off with plenty of clean water. Low alloy steels, residual
cooling liquid, drilling oil and similar substances can result in chemical reactions.

Polishing
1. Switch the machine on by means of the switch located on the back of the machine
2. Turn the 3 position switch on the front of the machine to position number 2: 14 volts will be
displayed on the meter also located on the front of the machine.
3. The brush is connected using the accompanying black cable to the black connector
of the machine.
4. The red-marked ground wire must be connected to the work piece via the ground clamp.
5. Deacant a little of the corresponding electrolyte (Electrolyte C or Electrolyte C Plus for
polishing) into the wide neck receptacle provided and immerse the brush.
6. Dip the brush complete with the carbon fiber in the wide-necked container until the fiber is
complete soaked.
7. Brush over the area to be polished several times until the desired finish is achieved.
8. After polishing with a spray bottle, spray Neutralyt onto the cleaned area.
Then wipe off with plenty of water.
During prolonged use the brush may become hot, simply disconnect it from the cable,
remove the brush and cool in a bucket of water or under a tap, dry the brush, replace the
brush tip and reconnect to the black cable, or use another brush.
CAUTION
To avoid short circuiting the machine, change the brush end before all the brush fibers are
depleted. Whilst using chemicals an acid resistant apron, gloves and suitable eye
protection should be worn.
Avoid getting solutions on your skin, if you do get the solutions on your skin, rinse off
with plenty of clean water.
Please refer to the material safety data sheets of the individual electrolytes.
Low alloyed steels, residual coolant, drilling oil and similar substances may cause chemical reactions.
Embossing light
Please use the embossing stamp with 90-degree anode (Art.-no.: 5025 ST)
1. Cover the carbon anode with a white felt strip and fasten with an O ring
2. Switch the machine on by means of the switch located on the back of the machine
3. Turn the 3 position switch on the front of the machine to position number 2:
14 volts will be displayed on the meter also located on the front of the machine.
4. Attach the earth clip to the part to be embossed.
5. Select Electrolyte EN and shake vigorously, pour a few drops of the electrolyte directly onto the
felt
6. Position the template into the required spot and gently move the anode backwards and forwards
over the template for 2 to 4 seconds.
7. After the embossing is complete wipe the surface with a cloth soaked in Neutralizer
CAUTION
To avoid short circuiting the machine, change the brush end before all the brush fibers are
depleted. Whilst using chemicals an acid resistant apron, gloves and suitable eye
protection should be worn. Avoid getting solutions on your skin, if you do get the
solutions on your skin, rinse off with plenty of clean water. Low alloy steels, residual
cooling liquid, drilling oil and similar substances can result in chemical reactions.
Should you have any doubts or queries regarding the use of this equipment please contact your local
supplier for advice.

Embossing dark
For this please use the embossing stamp with 90-degree anode (Art.-no.: 5025 ST)
1. Cover the carbon anode with a white felt strip and fasten with an O ring
2. Switch the machine on by means of the switch located on the back of the machine
3. Turn the 3 position switch on the front of the machine to position number 3:
12 volts will be displayed on the meter also located on the front of the machine.
4. Attach the earth clip to the part to be embossed.
5. Select Electrolyte ET or EC-S and shake vigorously, pour a few drops of the electrolyte directly
onto the felt
6. Position the template into the required spot and gently move the anode backwards and forwards
over the template for 2 to 4 seconds.
7. After the embossing is complete wipe the surface with a cloth soaked in Neutralizer.
Every time use a separate felt strip, otherwise it could happen that you will blacken your
component.
Tips for handling templates.
Each electrolyte contains salts. The templates can become clogged with these salts. Therefore,
you should clean the templates after every use with
clean water and washing up liquid.
Please never clean with chemical cleaners (benzine, acetone, etc.),
this destroys the template.
CAUTION
NOTE: Never use the brush in position no. 3
To avoid short circuiting the machine, change the brush end before all the brush fibers are
depleted. Whilst using chemicals an acid resistant apron, gloves and suitable eye
protection should be worn.
Avoid getting solutions on your skin, if you do get the solutions on your skin, rinse off
with plenty of clean water.
For embossing dark or light the correct electrolytes for the grade of substrate material needs to
be used.
(See Below)
Embossing Dark:
ET - Vanadium Steels
EC - Chrome Vanadium Steels
EM - Brass Copper and Tin
EA -Aluminium
Embossing Light:
EN -Allmaterials

Warranty
THIS WARRANTY CERTIFICATE IS ONLY FOR NEW PRODUCTS PURCHASED AND USED IN
EUROPE.
In other countries, please contact the dealer where you purchased the product.
The Bymat warranty states that, at the time of delivery, The product is free from material defects and that
the machine (excluding consumables e.g. cable, stamp etc.) is guaranteed for the original purchaser for a
period of two years from the date of original purchase.
During the warranty period, should the machine be shown to be faulty, the machine will be repaired within
a reasonable time frame using genuine Bymat replacement parts. If the machine cannot be repaired it will
replaced with the same or an equivalent Bymat model.
To take a warranty claim the unit must be returned to the supplying dealer or Bymat, together with proof
of purchase or purchase evidence on which the date of purchase is shown. Providing the fault is shown to
be due to material defect or poor workmanship, you will not be charged for materials and labour costs.
Due to the possibility of loss or damage during shipment, the goods must be proberly packaged and it is
recommended that they be shipped by a reputable carrier that will provide proof of receipt and tracking
information.
No liability is accepted for loss, or damage of goods in transit whilst being returened to dealer/
manufacturer.
Under this warranty, the customer has no right to repair or replacement if:
1. The product was damaged due to improper, rough or careless treatment;
2. The product was damaged by fire or other natural disaster.
3. The product was caused by improper repair or adjustment made by any anauthorised body or
was not carried out by Bymat. (An authorised body is any company authorized by Bymat to
perform remedial work to Bymat equipment)
4. The remedial work is carried out on special equipment, accessories, consumables or wearing
parts (cables, stamp, carbon anodes etc.)
5. Proof of purchase is not provided or
6. The warranty period has expired
This warranty is non-transferrable.
Either this warranty nor any other warranty and / or guarantee, either exclusively expressly agreed or
required by law or otherwise, including statutory warranty, condition of merchantability or fitness for a
particular purpose shall extend beyond the warranty period stated herein.
This warranty does not affect your statutory rights.
Maintenance and Cleaning
Before working on the device disconnect from the mains by physically unplugging from the power supply
socket.
After each use:
- Wipe the cables and cover with a damp cloth to remove residues of the electrolyte.
- After use wash templates under running water to prevent crystal formation.
Bymat take every care in the manufacture of their product but should the unit fail due to faulty
materials or poor workmanship, any repairs must be carried out by Bymat
or their authorised agents, otherwise any warranty becomes void.
For all inquiries and spare parts orders please quote the machine type which can be found on the
nameplate which can be found on the rear of the machine (for example 1140 RS).

Parts and Accessories
The devices are intended only for the electrochemical cleaning and polishing welds,
removing oxide layers at weld seams, for light and dark embossing of electrically
conductive surfaces and electroplating / metal deposition.
The function is only guaranteed with original accessories.
Any other use beyond this is not regarded as the intended purpose. Accessories or
attachments that are not recommend by the manufacturer may not be used. Any damage
arising from use outside of that which is intended shall not be liable to the manufacturer.
Intendent use also includes and requires the following:
- Following the operating instructions
- The required inspection and maintenance requirements
- The wearing of protective clothing, including gloves and safety glasses.
Conservation
Environmental precautions:
Do not discharge electrolytes into ground/surface water or into drains.
Methods for cleaning up:
Soak up with inert absorbent material (eg acid binder). The residual material is to be disposed of properly.
(For details, please refer to the safety data sheet)
Disposal:
Electrolytes must be disposed of in a neutralization plant, in accordance with local supply authority
regulations, chemical / physical treatment.
Disposal of electrical & electronic products by industrial users
(Applicable only to the countries of the European Union)
The symbol on the product or its packaging indicates that this product should not be
treated as normal household waste, but must be taken to a collection point for the
recycling of electrical and electronic equipment. By helping to dispose of this product
correctly, you are protecting the environment and the health of those around you.
Environment and health are endangered by incorrect disposal. Material recycling helps to
reduce the consumption of raw materials. For more information about recycling this
product, contact your local municipality, municipal waste disposal service or the store
where you purchased the product.
This manual suits for next models
3
Table of contents
Other Bymat Cleaning Equipment manuals