C-Pen TS1 User manual

Quick Start Guide
Snabbstartguide
Kurzanleitung
Guía de inicio rápido
Guide de démarrage rapide
руководство по быстрому запуску


1
Contents / Innehåll / Inhalt / Contenido /
Contenu / Содержание
English......................................2
Svenska.....................................4
Deutsch.....................................6
Español......................................8
Française..................................10
русский...................................12
Declaration of Conformity..............15
A B
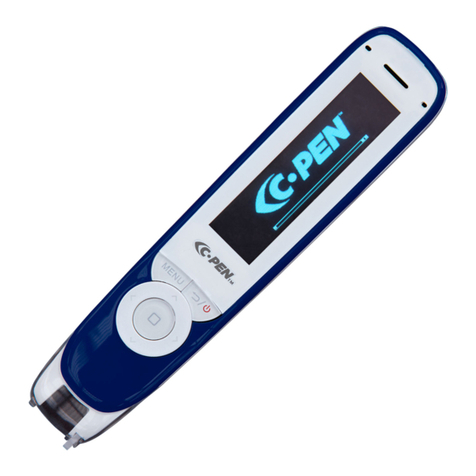
Function button Automatic trigger
Funktionsknapp Skanningsknapp
Funktionsschaltfläche Automatischer Auslöser
Botón function Disparador automatic
Bouton de function Déclencheur automatique
Функциональная клавиша Автоматический запуск

2
Thank you for choosing C-PEN™. With the C-Pen you may scan text
and digits. Text editors, e-mail clients, business software and web
browsers are all examples of programs able to receive text from
the C-Pen. You can collect text from books, magazines,
documents, invoices etc. simply by scanning the text with the
C-Pen. The text will be inserted exactly where you want it. Just
place the cursor in your favourite application and scan with the
C-Pen.
Contents of the Box
–C-Pen TS1
–C-Pen DVD with software
–Quick Start Guide
Install the C-Pen Core Software
IMPORTANT! Do NOT connect the C-Pen before the software is
installed.
In the package you will find a DVD which contains the installation
program.
–Close all open applications on the PC.
–Insert the DVD in your CD-ROM/DVD drive. The installation
starts automatically. If the installation does not start, browse
to your CD-ROM drive and double click the file setup.exe.
–Follow the instructions on the screen. A message is displayed
when the installation is complete.
–The C-Pen Core software will automatically launch after the
installation has been completed.
If you have lost the DVD you can download the latest version of
the C-Pen Core software directly from
http://www.cpen.com/latest.
The C-Pen Core software is the main software that will make it
possible to scan text to the cursor.
When the C-Pen Core software is started you will find the C-Pen
tray icon in the Windows system tray. This icon indicates that the
C-Pen Core software is running properly.
Connect the C-Pen
Connect the C-Pen to your computer with the USB cable. To see
the connection status, point the mouse cursor at the C-Pen tray
icon to display the C-Pen Core status window.

3
How Do I Use the C-Pen?
The C-Pen Core software will display the text you scan. The
scanned text will be inserted at the cursor position. This means
that you can scan text into any standard program.
This is an example on how to scan text into MS Word.
–First check that the C-Pen Core status windows reports that
your C-Pen is connected.
–Start MS Word.
–Place the cursor where you want the text to appear. Do NOT
click anywhere else as this will move the cursor and make your
program window “passive”.
–Place the tip of the C-Pen a few millimetres before the first
character of the text. Press the C-Pen gently towards the paper
and start moving it along the text line. Try to keep a steady
line! Lift the C-Pen from the paper when you have scanned the
last character.
–The text you just scanned will instantly be inserted into MS
Word.
The text is fully editable, e.g. you can change font type and size
in MS Word to customise the text. There is a video on the website
that describes how it works in more detail.
Note that there is a small automatic trigger at the tip of the C-
Pen. This activates the scanning when the C-Pen is pressed
against the paper. It is important that the trigger is pressed in
during the complete scan.
The automatic trigger is shown in the picture on page 1.
Switching the C-Pen On and Off
The C-Pen is always turned on when the USB cable is connected to
a computer which is turned on.
The C-Pen will automatically turn off when you turn off the
computer, or if you disconnect the USB cable.

4
Tack för att du har valt C-PEN™. Med C-Pen kan du skanna text
och siffror. Exempel på program som kan ta emot data från C-Pen
är ordbehandlings-program, e-postklienter, ekonomiprogram och
webbläsare. Du kan enkelt spara tryckt text med C-Pen från
böcker, tidskrifter, dokument, fakturor etc. Texten kan infogas
precis där du vill ha den genom att placera markören i ditt
favoritprogram och skanna texten med din C-Pen.
Lådans innehåll
–C-Pen TS1
–C-Pen DVD med mjukvara
–Snabbstartguide
Installera C-Pen Core-mjukvaran
Viktigt! Anslut INTE C-Pen innan mjukvaran är installerad.
I förpackningen finns en DVD vilken innehåller
installationsmjukvaran.
–Stäng alla öppna program på datorn.
–Sätt in DVD-skivan i din CD-ROM/DVD-läsare. Installationen bör
starta automatiskt. Om den inte gör detta får du leta upp din
CD-ROM-läsare i din utforskare och dubbelklicka på filen
setup.exe.
–Följ instruktionerna på skärmen. Ett meddelande visas när
installationen är klar.
–Mjukvaran C-Pen Core kommer att starta automatiskt när
installationen är klar.
Om du inte har kvar din DVD kan du ladda ner den senaste
versionen av C-Pen Core från http://www.cpen.com/senaste.
Mjukvaran C-Pen Core gör det möjligt att skanna text till
markören.
När mjukvaran C-Pen Core är igång visas ikonen C-Pen i
aktivitetsfältet för Windows. Denna ikon indikerar att C-Pen Core-
programmet är i gång.
Anslut C-Pen
Anslut C-Pen till din dator med USB-kabeln. För att kontrollera
statusen hos uppkopplingen kan du föra muspekaren över C-Pen-
ikonen i aktivitetsfältet. Ett statusfält kommer då att
presenteras.

5
Hur använder jag C-Pen?
C-Pen Core-mjukvaran kommer att visa den skannade texten. Den
skannade texten kommer att infogas vid markörens position i det
aktiva fönstret. Detta innebär att du kan skanna text till alla
standardprogram.
I det följande exemplet beskrivs hur du kan skanna text till MS
Word.
–Kontrollera först att C-Pen-ikonen visas i aktivitetsfältet.
–Starta MS Word.
–Placera markören där du vill att den skannade texten skall
hamna. Klicka INTE någon annanstans efter detta, då det
kommer att flytta markören och göra att MS Word inte längre är
det ”aktiva fönstret”.
–Placera spetsen av C-Pen några millimeter före det första
tecknet (bokstav, siffra, …). Tryck C-Pen lätt mot papperet och
drag den längs textraden. Försök att hålla en rak linje. Lyft C-
Pen från papperet när du har skannat sista tecknet.
–Texten du precis läste in kommer att presenteras direkt i MS
Word.
Du kan ändra den inlästa texten helt enligt dina önskemål, t.ex.
teckensnitt och -storlek. Det finns en video på hemsidan som
beskriver hur det fungerar mer detaljerat.
Notera att det finns en automatisk skanningsknapp på spetsen av
pennan. Denna knapp startar skanningen när pennan trycks mot
papperet. Det är viktigt att den förblir intryckt under hela
skanningen. Placeringen av skanningsknappen syns i bilden på
sidan 1.
Starta och stänga av C-Pen
C-Pen är alltid igång när USB-kabeln är ansluten till en dator som
är igång.
C-Pen kommer att stängas automatiskt när du stänger datorn eller
när du drar ur USB-kabeln.

6
Vielen Dank, dass Sie sich für C-PEN™ entschieden haben. Mit dem
C-Pen können Sie Text und Zahlen scannen. Texteditoren, E-Mail-
Clients, Business-Software und Webbrowser sind Beispiele für
Programme, die Text von C-Pen empfangen können. Sie können
Text von Büchern, Zeitschriften, Dokumenten, Rechnungen usw.
erfassen, indem Sie einfach den Text mit dem C-Pen scannen. Der
Text wird exakt an der gewünschten Stelle eingefügt. Sie müssen
nur den Cursor in Ihrer favorisierten Anwendung platzieren und
den Text mit dem C-Pen scannen.
Lieferumfang
–C-Pen TS1
–C-Pen DVD mit Software
–Kurzanleitung
Installation der C-Pen Core-Software
WICHTIG! Schließen Sie den C-Pen NICHT an, bevor die Software
installiert ist.
In der Verpackung befindet sich eine CD-ROM, auf der das
Installationsprogramm enthalten ist.
–Schließen Sie alle offenen Anwendungen auf Ihrem PC.
–Legen Sie die CD-ROM in das CD-ROM/DVD-Laufwerk ein. Die
Installation wird automatisch gestartet. Wenn die Installation
nicht startet, wechseln Sie zum CD-ROM Laufwerk und
doppelklicken auf die Datei setup.exe.
–Befolgen Sie die Anweisungen auf dem Bildschirm. Sobald die
Installation abgeschlossen ist, wird eine Mitteilung angezeigt.
–Nach Abschluss der Installation startet die C-Pen Core-Software
automatisch.
Wenn Sie Ihre CD verloren haben, können Sie die aktuelle Version
der C-Pen Core-Software direkt unter
http://www.cpen.com/latest.
Die C-Pen Core-Software ist die Haupt-Software, die das
Einscannen von Text an der Cursorposition ermöglicht.
Wenn die C-Pen Core-Software gestartet ist, ist das C-Pen-Symbol
auf der Windows-Taskleiste zu sehen. Das Symbol zeigt an, dass
die C-Pen Core-Software ordnungsgemäß funktioniert.
Anschließen des C-Pens
Schließen Sie den C-Pen mit dem USB-Kabel an Ihren Computer
an. Um den Verbindungsstatus zu sehen, platzieren Sie den Cursor
7
auf das C-Pen-Symbol, um das C-Pen Core-Statusfenster
anzuzeigen.
Verwendung des C-Pen
Die C-Pen Core-Software zeigt den von Ihnen gescannten Text an.
Der gescannte Text wird an der Cursorposition eingefügt. Das
bedeutet, dass Sie Text in jedes Standardprogramm scannen
können.
Nachfolgend wird ein Beispiel für das Scannen in MS Word
aufgezeigt.
–Überprüfen Sie als erstes, ob das C-Pen Core-Statusfenster
anzeigt, dass der C-Pen verbunden ist.
–Starten Sie MS Word.
–Platzieren Sie den Cursor an der Stelle, an der der Text
erscheinen soll. Klicken Sie NICHT auf eine andere Stelle, da
der Cursor sich dadurch bewegt und das Programmfenster
„passiv“ wird.
–Platzieren Sie die Spitze des C-Pen einige Millimeter vor dem
ersten Buchstaben des Textes. Drücken Sie den C-Pen vorsichtig
in Richtung Papier und bewegen Sie ihn die Textzeile entlang.
Versuchen Sie, eine gerade Linie zu halten. Nachdem Sie die
letzte Ziffer gescannt haben, heben Sie den C-Pen vom Papier
ab.
–Der gerade von Ihnen gescannte Text wird sofort in MS Word
eingefügt.
Der Text ist vollständig bearbeitbar. Sie können beispielsweise
Schriftart und –größe in MS Word ändern, um den Text
anzupassen. Ein Video auf der Website beschreibt die Funktionen
ausführlicher.
Bitte beachten Sie, dass an der Spitze des C-Pen ein kleiner
automatischer Auslöser vorhanden ist. Dieser Auslöser aktiviert
den Scanvorgang, wenn der C-Pen gegen das Papier gedrückt
wird. Es ist wichtig, dass der Auslöser während des kompletten
Scanvorgangs gedrückt bleibt. Der automatische Auslöser ist im
Bild auf Seite 1 dargestellt.
Ein- und Ausschalten des C-Pen
Wenn das USB-Kabel an einen eingeschalteten Computer
angeschlossen ist, ist der C-Pen stets eingeschaltet.
Der C-Pen wird automatisch ausschaltet, wenn Sie den Computer
ausschalten, oder wenn Sie das USB-Kabel abziehen.

8
Gracias por elegir C-PEN™. Con C-Pen, puede digitalizar texto y
números. Editores de texto, clientes de correo electrónico,
software de negocios y navegadores web son algunos ejemplos de
programas que pueden recibir texto desde C-Pen. Puede recopilar
texto de libros, revistas, documentos, facturas, etc., simplemente
digitalizándolo mediante C-Pen. El texto se insertará exactamente
donde usted desee. Simplemente coloque el cursor en su
aplicación favorita y digitalice con C-Pen.
Contenido de la caja
–C-Pen 3.0
–DVD de C-Pen con software
–Guía de inicio rápido
Instalación del software C-Pen Core
¡IMPORTANTE! NO conecte C-Pen antes de instalar el software.
En el paquete encontrará un CD-ROM que contiene el programa de
instalación.
–Cierre todas las aplicaciones del PC.
–Inserte el CD-ROM en la unidad de CD-ROM/DVD. La instalación
se iniciará automáticamente. Si la instalación no se inicia,
navegue hasta la unidad de CD-ROM y haga doble clic en el
archivo setup.exe.
–Siga las instrucciones de la pantalla. Se mostrará un mensaje
cuando la instalación se haya completado.
–El software C-Pen Core se iniciará automáticamente una vez
finalizada la instalación.
Si ha perdido el CD, puede descargar la última versión del
software C-Pen Core directamente desde
http://www.cpen.com/latest.
El software C-Pen Core es el software principal que hará posible
digitalizar texto y enviarlo hasta su cursor.
Al iniciar el software C-Pen Core, encontrará el icono de C-Pen en
la bandeja del sistema de Windows. Este icono indica que el
software C-Pen Core se está ejecutando correctamente.
Conexión de C-Pen
Conecte C-Pen a su equipo mediante el cable USB. Para ver el
estado de la conexión, coloque el cursor del ratón en el icono de
bandeja de C-Pen con el fin de visualizar el estado de C-Pen Core.

9
Cómo utilizar C-Pen
El software C-Pen Core muestra el texto digitalizado. El texto
digitalizado se insertará en la posición del cursor. Esto significa
que puede digitalizar texto y enviarlo a cualquier programa
estándar.
A continuación figura un ejemplo de cómo digitalizar texto en MS
Word.
–En primer lugar, compruebe que C-Pen esté conectado en la
ventada de estado de C-Pen Core.
–Inicie MS Word.
–Coloque el cursor en el punto en el que desee que aparezca el
texto. NO haga clic en ningún otro lugar, ya que, de lo
contrario, el cursor se moverá y hará que la ventana del
programa deje de ser la ventana activa.
–Coloque la punta de C-Pen unos milímetros antes del primer
carácter del texto.
–Presione C-Pen suavemente contra el papel y comience a
moverlo sobre la línea de texto. Intente trazar una la línea
continua. Levante C-Pen del papel cuando haya digitalizado el
último carácter.
–El texto que acaba de digitalizar se insertará inmediatamente
en MS Word.
El texto es totalmente editable, es decir, puede cambiar el tipo
de fuente y el tamaño en MS Word para personalizarlo. Un video
en el sitio web encontrará una descripción más detallada del
funcionamiento.
Tenga en cuenta que C-Pen incorpora un pequeño disparador
automático en la punta. Este disparador activa la digitalización al
presionar C-Pen contra el papel. Es importante que el disparador
se mantenga presionado durante toda la digitalización. El
disparador automático se muestra en la imagen de la página 1.
Encendido y apagado de C-Pen
C-Pen siempre se enciende al conectar el cable USB a un equipo
encendido.
El C-Pen se apagará automáticamente cuando se apaga el
ordenador o si desconecta el cable USB.

10
Merci d'avoir choisi C-PEN™. Avec votre C-Pen, vous allez pouvoir
numériser du texte et des chiffres. Les éditeurs de texte, les
clients de messagerie, les logiciels d'entreprise et les navigateurs
Web sont des exemples de programmes capables de recevoir du
texte du C-Pen. Il vous est possible de recueillir le texte des
livres, magazines, documents, factures, etc. simplement en
numérisant le texte avec votre C-Pen. Le texte sera inséré
exactement où vous le souhaitez. Placez simplement le curseur
dans votre application favorite et numérisez avec votre C-Pen.
Contenu de la boîte
–C-Pen TS1
–DVD C-Pen avec logiciel
–Guide de démarrage rapide
Installer le logiciel C-Pen Core
IMPORTANT! Ne connectez PAS le C-Pen avant l'installation du
logiciel.
Dans votre boîte d'emballage, vous trouverez un CD-ROM qui
contient le programme d'installation.
–Fermez toutes les applications ouvertes sur le PC.
–Insérez le CD-ROM dans votre lecteur CD-ROM/DVD.
L'installation démarre automatiquement. Si elle ne démarre
pas, parcourez votre lecteur CD-ROM et double-cliquez sur le
fichier setup.exe.
–Suivez les instructions à l'écran. Un message s'affiche lorsque
l'installation est terminée.
–Le logiciel C-Pen Core se lancera automatiquement une fois
l'installation terminée.
Si vous avez perdu votre CD, vous pouvez télécharger la version la
plus récente du logiciel C-Pen Core directement depuis
http://www.cpen.com/latest.
Le logiciel C-Pen Core est le logiciel principal qui permettra de
numériser du texte là où se trouve le curseur.
Une fois le logiciel C-Pen Core démarré, une icône C-Pen apparaît
dans la barre d'état système de Windows. L'icône indique que le
logiciel C-Pen Core fonctionne correctement.
Connecter le C-Pen
Connectez le C-Pen à votre ordinateur via le câble USB. Pour
afficher l'état de la connexion, pointez le curseur de la souris sur

11
l'icône C-Pen dans la barre d'état système pour faire apparaître la
fenêtre d'état de C-Pen Core.
Comment se sert-on du C-Pen?
Le logiciel C-Pen Core affiche le texte que vous numérisez. Le
texte numérisé sera inséré à la position du curseur. Ce qui veut
dire que vous pouvez numériser du texte dans n'importe quel
programme standard.
Voici un exemple qui vous explique comment numériser du texte
dans MS Word.
–Tout d'abord, vérifiez que la fenêtre d'état de C-Pen indique
que votre C-Pen est connecté.
–Démarrez MS Word.
–Placez le curseur là où vous voulez voir le texte apparaître. Ne
cliquez PAS ailleurs, sinon le curseur changera de position et la
fenêtre du programme sera considérée comme « passive ».
–Placez la pointe du C-Pen quelques millimètres avant le premier
caractère du texte.
–Appuyez délicatement le C-Pen contre la feuille et déplacez-le
le long de la ligne de texte. Veillez à garder une trajectoire en
ligne droite ! Relevez le C-Pen de la feuille une fois le dernier
caractère numérisé.
–Le texte que vous venez de numériser sera inséré
instantanément dans MS Word.
Le texte est complètement modifiable, par exemple, vous pouvez
modifier le type et la taille de la police dans MS Word pour
personnaliser le texte. Une vidéo du site Web décrit le
fonctionnement du C-Pen plus en détails.
Notez qu'un petit mécanisme de déclenchement automatique se
trouve sur la pointe du C-Pen. Il active la numérisation lorsque le
C-Pen est appuyé contre le papier. Vous devez exercer une
pression sur le mécanisme pendant toute la durée de la
numérisation. Le mécanisme de déclenchement automatique est
illustré sur l'image située page 1.
Allumer et éteindre le C-Pen
Le C-Pen est toujours activé lorsque le câble USB est connecté à
un ordinateur qui est allumé.
Le C-Pen s'éteindra automatiquement quand vous arrêtez
l'ordinateur, ou si vous débranchez le câble USB.

12
Благодарим вас за выбор C‐PEN™. C‐Pen позволяет сканировать
текст и цифры. Текст, считываемый сканером C‐Pen, могут
получать текстовые редакторы, бизнес‐приложения и веб‐
браузеры. Вы можете переносить текст из книг, журналов,
документов, счетов, просто сканируя его с помощью C‐Pen.
Текст будет вставлен именно там, где это необходимо.
Поместите курсор в необходимую позицию вашего приложения
и отсканируйте текст, используя сканер C‐Pen.
Содержимое коробки
− сканер C‐Pen TS1
− DVD с программным обеспечением C‐Pen
− руководство по быстрому запуску
Установка программного обеспечения C‐Pen Core.
ВНИМАНИЕ! НЕ подключайте сканер C‐Pen до окончания
установки программного обеспечения.
В комплект поставки входит DVD, на котором содержится
программа установки.
− Закройте все открытые на компьютере приложения.
− Вставьте DVD в привод CD‐ROM/DVD. Установка начнется
автоматически. Если установка не начинается, откройте в
проводнике привод CD‐ROM и дважды нажмите на файл
setup.exe.
− Следуйте инструкциям на экране. По завершении установки
на экране появится сообщение.
− Программное обеспечение C‐Pen Core запускается
автоматически по завершении установки.
Если вы потеряли установочный DVD, последняя версия C‐Pen
Core может быть загружена непосредственно с сайта
http://www.cpen.com/latest.
Программное обеспечение C‐Pen Core реализует возможность
сканирования текста и его вставки в место нахождения
курсора.
По завершении установки C‐Pen Core значок программы C‐Pen
будет отображаться в области пиктограмм панели задач
Windows. Значок указывает на то, что программное
обеспечение C‐Pen Core функционирует корректно. См.
изображение справа.

13
Подключение сканера C‐Pen
Подключите сканер C‐Pen к компьютеру с помощью USB‐
кабеля. Для просмотра статуса подключения наведите курсор
мыши на значок C‐Pen в области пиктограмм так, чтобы
отобразилось окно статуса C‐Pen Core.
Использование сканера C‐Pen
Программное обеспечение C‐Pen Core отображает сканируемый
текст. Отсканированный текст будет вставлен в месте
расположения курсора. Это значит, что вы можете сканировать
текст в любую стандартную программу.
Ниже приведен пример сканирования текста в MS Word.
– Для начала убедитесь, что в окне статуса C‐Pen Core
указано, что сканер C‐Pen подключен.
– Откройте MS Word.
– Поместите курсор в то место, куда нужно вставить
сканируемый текст. Не нажимайте клавиши мыши в других
областях экрана, так как при этом курсор сдвинется, а окно
программы станет неактивным.
– Поместите кончик сканера C‐Pen в нескольких
миллиметрах от первого знака сканируемого текста.
Слегка прижмите сканер C‐Pen к бумаге и начните
перемещать вдоль линии текста. Старайтесь перемещать
устройство с постоянной скоростью! Поднимите сканер C‐
Pen по завершении сканирования последнего знака.
– Отсканированный текст будет немедленно перенесен в MS
Word.
Текст можно редактировать, т.е. вы можете изменять тип и
размер шрифта в MS Word. На веб‐сайте имеется видеоролик,
описывающий механизм работы более подробно.
Обратите внимание, что на кончике сканера C‐Pen
расположена небольшая контактная площадка. Ее нажатие
активирует сканирование, когда сканер C‐Pen прижат к бумаге.
Важно сохранять нажатие на протяжении всего периода
сканирования.
Контактная площадка показана на рисунке 1.
Включение и выключение сканера C‐Pen
Сканер C‐Pen включен всегда, когда кабель USB подключен к
работающему компьютеру.
Сканер C‐Pen выключится автоматически при выключении
компьютера или отсоединении кабеля USB.

14

15
Declaration of Conformity
C Technologies AB
Traktorvägen 11
SE-226 60 Lund
Sweden
hereby declares that the product C-Pen TS1 (product No. CT151056)
complies with the EMC directive 89/336/EEC, fulfilling the requirements of
the standards:
EN 55022:2006/A1:2007
EN 55024:1998/IS1:2007
EU directive EN 60950-1:2006 (the Low Voltage Directive)
EN 61000-3-2:95 A1-A2+A14
EN 61000-3-3:1995 A1
EU directive 2002/95/EC (the RoHS Directive) (For more details see
below.)
Lund, 2012-09-03
Peter Johansson
CEO
C Technologies AB
FCC Statement
Radio and Television Interference Statement
This device complies with Part 15 of the FCC Rules. Operation is subject to
the following two conditions: (1) this device may not cause harmful
interference, and (2) this device must accept any interference received,
including interference that may cause undesired operation.
NOTE: This equipment has been tested and found to comply with the limits
for a Class B digital device, pursuant to Part 15 of the FCC Rules.
These´limits are designed to provide reasonable protection against
harmful interference in a residential installation. This equipment
generates, uses and can radiate radio frequency energy and, if not
installed and used in accordance with the instructions, may cause harmful
interference to radio communications. However, there is no guarantee
that interference will not occur in a particular installation. If this
equipment does cause harmful interference to radio or television
reception, which can be determined by turning the equipment off and on,
the user is encouraged to try to correct the interference by one or more of
the following measures:
Reorient or relocate the receiving antenna.

16
Increase the separation between the equipment and receiver.
Connect the equipment into an outlet on a circuit different from that to
which the receiver
Consult the dealer or an experienced radio/TV technician for help.
The user may find the following booklet, prepared by the Federal
Communications Commission, helpful: How to Identify and Resolve Radio
and TV Interference Problems. This booklet is available from the U.S.
Government Printing Office, Washington, DC 20402.
WARNING! This equipment has been certified to comply with the limits for
a Class B digital device under Part 15 of FCC Rules. This peripheral may
only be attached to a computer certified to comply with the Class B limits.
Operation with a non-certified computer is likely to result in interference
to radio and TV reception. Any changes or modifications to this equipment
not expressly approved by the manufacturer could void the user’s
authority to operate this equipment.
GOST
This device complies with the requirements of the following Russian
standards:
GOST R MEK 60950-1-2005
GOST R 51318.22-99
GOST R 51318.24-99
GOST R 51317.3.2-2006 (section 6, 7)
GOST R 51317.3.3-2008
REACH
REACH is a European Union Regulation of 18 December 2006. REACH
addresses the production and use of chemical substances, and their
potential impacts on both human health and the environment. REACH also
addresses the continued use of chemical “substances of very high concern”
(SVHC) because of their potential negative impacts on human health or the
environment.
Based on information provided by our suppliers this product meets the
requirements of REACH.
RoHS Declaration
Based on information provided by our suppliers this product meets the
requirements of RoHS.
The maximum concentration value of the prohibited six substances of
“RoHS Directive” do not exceed the following:
–Cadmium and its compounds: 0.01% (100 ppm) by weight
in´homogeneous materials.
–Lead and its compounds, Mercury and its compounds, Hexavalent
chromium and its compounds, Polybrominated biphenyls (PBB),
Polybrominated diphenyl ethers (PBDE): 0.1% (1000 ppm) by weight in
homogeneous materials.
Homogeneous material means a unit that cannot be mechanically
disjointed in single materials.

17
The term “homogeneous” is understood as “of uniform composition
throughout”. Examples of “homogeneous materials” are individual types of
plastics, glass, metals, alloys, paper, board, resins, and coatings.
UL Statement
ETL listed 3074926
Conforms to ANSI/UL 60950-1-2007
Certified to CAN/CSA-C22.2 No. 60950-1-07
WEEE Notice
The Directive on Waste Electrical and Electronic Equipment (WEEE) which
entered into force as European law on 13th February 2003 resulted in a
major change in the treatment of electrical equipment at end-of-life The
purpose of this Directive is as a first priority the prevention of WEEE and in
addition to promote the reuse recycling and other forms of recovery of
such wastes so as to reduce disposal. The WEEE logo on the product or on
its box indicates that this product must not be disposed of or dumped with
your other household waste. You are liable to dispose of all your electronic
or electrical waste equipment by relocating over to the specified
collection point for recycling of such hazardous waste. Isolated collection
and proper recovery of your electronic and electrical waste equipment at
the time of disposal will allow us to help conserving nature resources.
Moreover proper recycling of the electronic and electrical waste
equipment will ensure safety of human health and environment. For more
information about electronic and electrical waste equipment disposal
recovery and collection points please contact your local city centre
household waste disposal service shop from where you purchased the
equipment or manufacturer of the equipment.

Hardware, firmware and software by C Technologies AB.
Copyright © 2000 - 2012 C Technologies AB. All rights reserved.
C Technologies and C-PEN are trademarks or registered
trademarks of C Technologies AB and/or Anoto Group AB.
E-mail: [email protected]
Web: www.cpen.com
Optical Character Recognition:
ABBYY® FineReader 8 / 10 © ABBYY 2010.
ABBYY is a registered trademark of ABBYY Software Ltd.
Windows® is a trademarks, property of its owners.
AM251144
Other manuals for TS1
1
Table of contents
Languages:
Other C-Pen Scanner manuals

C-Pen
C-Pen EXAMREADER User manual

C-Pen
C-Pen C900W User manual

C-Pen
C-Pen EXAMREADER User manual

C-Pen
C-Pen Connect BT10 User manual

C-Pen
C-Pen FBA_7350085370028 User manual

C-Pen
C-Pen 800C User manual

C-Pen
C-Pen ReaderPen Secure User manual

C-Pen
C-Pen ReaderPen User manual

C-Pen
C-Pen EXAMREADER User manual

C-Pen
C-Pen 3.5 User manual