C-Tech EDC-3A User manual

I
MARSHALL COMPACTOR EDC-3A
I
CONTENTS
I. Description ......................................................................................................................................................1
II. Technical specifications .................................................................................................................................1
III. Preparation .....................................................................................................................................................1
IV. Operation .........................................................................................................................................................2
V. Manual hammer lifting device .......................................................................................................................3
VI. Common faults and trouble-shooting ............................................................................................................4

-1 -
I. Description
The Marshall compactor EDC-3A is used to make asphalt mixture specimens by standard compaction
method for testing the physical and mechanical properties of asphalt mixture in the laboratory. It is
suitable for the forming of Φ152.4mm (±0.2mm) × 115mm / Φ101.6mm (±0.2mm) × 63.5mm
cylindrical specimens used in Marshall test and indirect tensile test. EDC-3A has a manual lever
hammer lifting device.
II. Technical specifications
Power supply
Three-phase three-wire 380V, 0.3KW
Drop height
457mm±1.5mm
Hammer weight
10210g±10g/4536g±9g
Compaction speed
55±5 times/min
Preset compaction times
Maximum 9999times
Controller form
Digital display
Phase sequence protection: not available
Hammer lifting device: manual lever convenient hammer lifting device,
electric hammer lifting device and die ring automatic pressing device
Specimen size
Φ152.4mm(±0.2mm)×115mm/ Φ101.6mm(±0.2mm)×63.5mm
The Marshall compactor EDC-3Asupports both φ152.4mm(±0.2mm)×115mm and φ101.6mm
(±0.2mm)×63.5mm cylindrical specimens used in Marshall test and indirect tensile test. EDC-3A
has two sizesof hammer weight.
III. Preparation
①.Weigh asphalt mixture prepared evenly for the amount required of a specimen (about
1200g/4050g). When the density of the asphalt mixture is known, it can be calculated according
to the standard size of the specimen and multiplied by 1.03 to obtain the required amount of
the mixture.
②.During the specimen preparing, in order to avoid the mixture temperature drop, should put the

-2 -
mixture along with the tray in the oven for heat insulation. Fetch out the preheat test mold and
sleeve from the oven, wipe the sleeve, base and the bottom of the hammer by cotton yarn with
a little grease. Install the test mold on the base, and pad a round small oil absorbent paper,
shovel the mixture into the mold from four direction according to quartering, pound 15 times
along the surroundings and 10 times in middle with slotting tool or large screwdriver. After pound,
flat the asphalt mixture to a convex circular surface. For large Marshall specimens, the mixture
should be added in twice, the pound times each time the same as above.
③.Insert the thermometer to near the center of the mixture, and check the temperature of the
mixture.
④. After the mixture temperature meets the requirements of compaction temperature, fix the mold
along with base on the compaction table, pad a round paper with small absorbent above the
mixture, and then insert the compaction head equipped with compaction rammer and guide rod
into the mold, turn on the compactor to start test.
IV. Operation
Before test, firstly connect through three-phase 380V power, and check whether the input and
working output aviation plug connected firmly.
①.Turn on the power switch. The upper screen is a counter that records the current compaction
times, and the lower screen shows the preset compaction times. According to actual needs,
press SET to preset the compaction times, and use + or - to adjust the value. Press RESET to
reset the counter.
-3 -
②.Pull the handle of the press molding device inward to compress the test tube. Then hold the
handle of the hammer with your hand, and slowly turn the bayonet lock to make the hammer
and guide rod fall. Touch the jog button by hand to observe the transmission wheel, forward and
reverse. (Note: the carrying hammer block is running counterclockwise to rotate forward,
otherwise, change the phase sequence of the power cable, and you can arbitrarily exchange two
of them.)
③. After everything is normal, press the "Start" button and the compactor starts to work.
④.When the specimen has been compacted on one side, remove the sleeve, turn the mold over,
and then compact the other side in the same manner and number of times.
⑤.After compaction finished, immediately remove the upper and lower paper with tweezers.
Measure the height of the specimen from the upper side of the mold by caliper, and calculate
the height of the specimen, if the specimen does not conform to the requirements will be
discarded. And adjust the mixture weight of specimen according to the following formula, to
guarantee the height of specimen conforms to 95.3mm±2.5mm or 63.5mm±1.3mm.
⑥.Finally remove the test cylinder and base, place the specimen horizontally and cool to room
temperature (no less than 12 hours), and then eject on the sample extruder.
⑦.After test finished, clean the mold for next test use. Wipe clean the machine, coat with lubricant
on the guide rod, compaction rammer and
driving wheel. Cut off the power of the
distribution box, turn off the power switch.
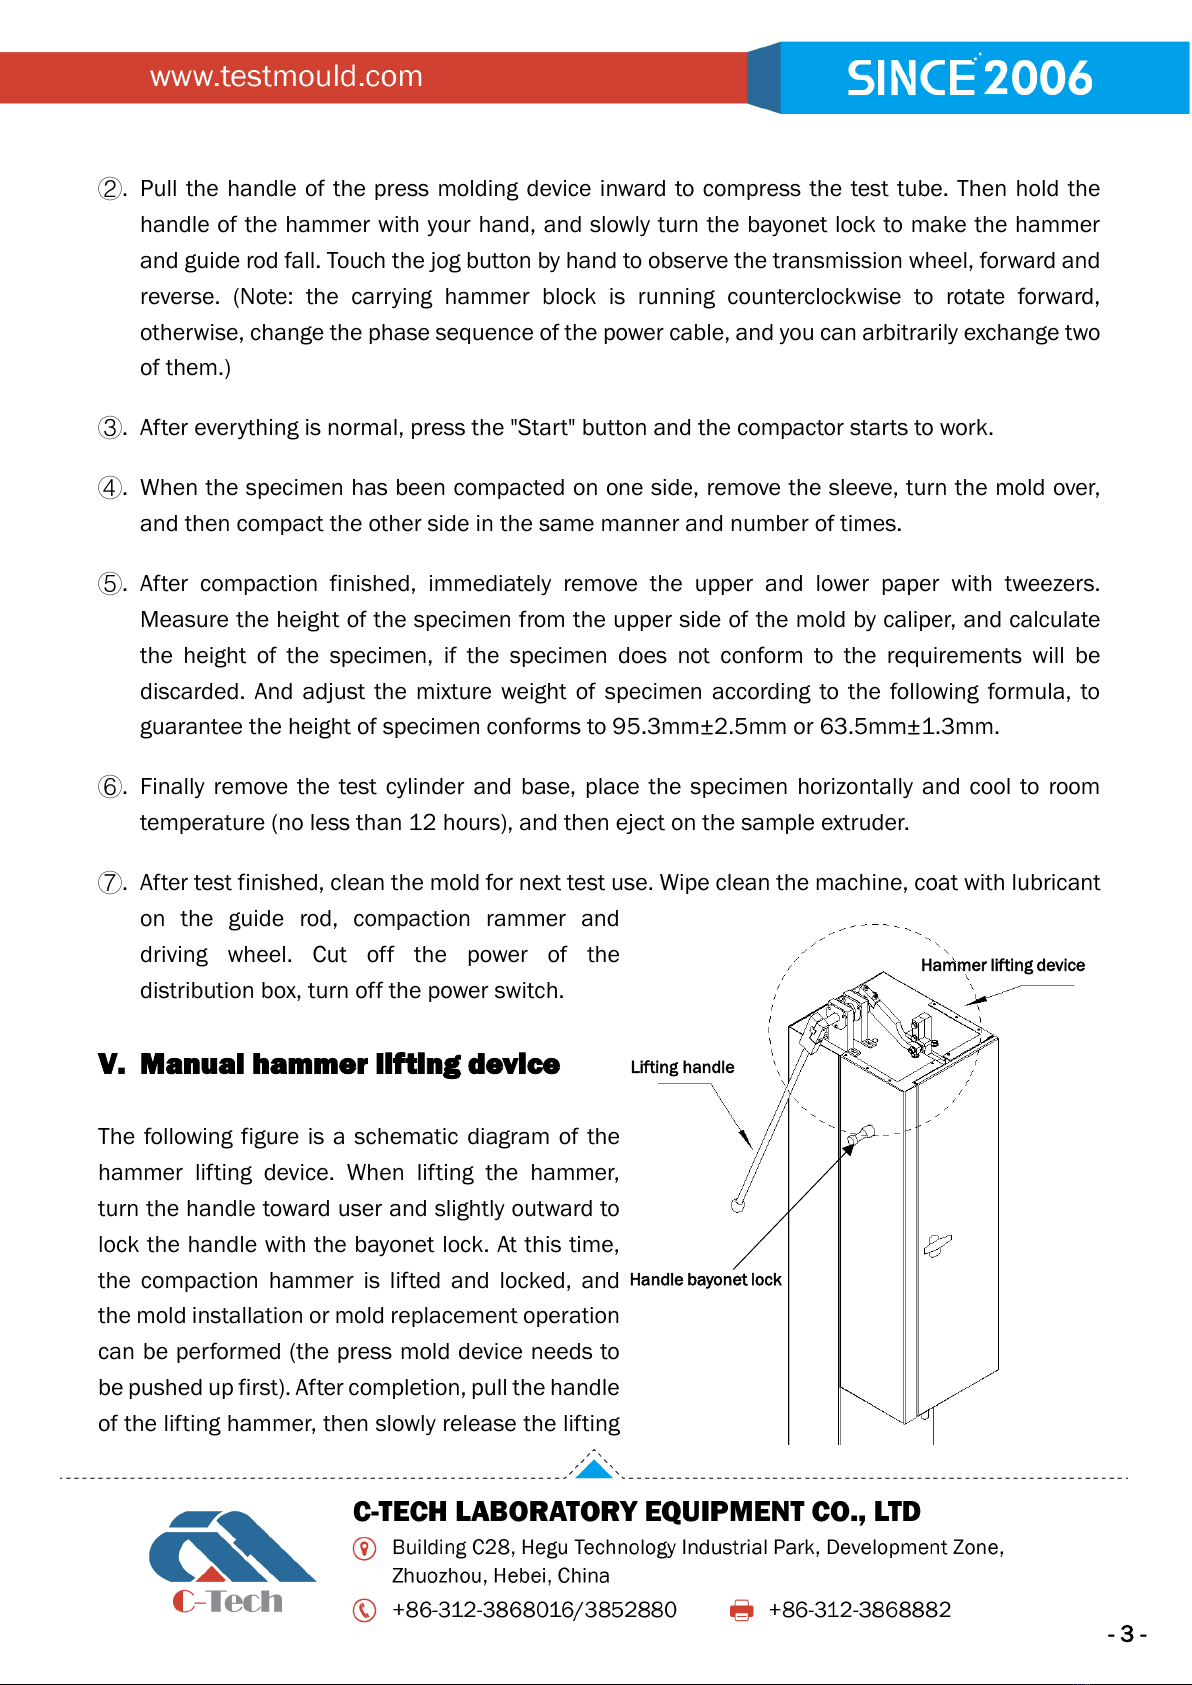
V. Manual hammer lifting device
The following figure is a schematic diagram of the
hammer lifting device. When lifting the hammer,
turn the handle toward user and slightly outward to
lock the handle with the bayonet lock. At this time,
the compaction hammer is lifted and locked, and
the mold installation or mold replacement operation
can be performed (the press mold device needs to
be pushed up first). After completion, pull the handle
of the lifting hammer, then slowly release the lifting
Hammer lifting device
Lifting handle
Handle bayonet lock
-4 -
hammer.
Replace the die ring
①. Pull the handle to raise the hammer rod to the highest position.
②. Use a wrench or socket to remove the guide rod's fixing piece.
③.Take out the guide rod horizontally from the inside to the outside.
④. Replace the die ring under the compactor.
⑤.Install the new hammer rod and hammer from the square opening on the top of the compactor,
then install the guide rod fixing piece, and tighten it with M10 screws up and down.
⑥. Loosen the wrench, put down the hammer rod, and the replacement is completed.
VI. Common faults andtrouble-shooting
No.
faults
Trouble-shootings
1
The hammer is not lifted or the
hammer separates.
Check whether the driving chain is loose, if so please adjust the
adjusting bolt;
Check whether the clips on hammer are damaged, need to be
replaced or not;
Whether the carrying hammer block and releasing hammer key are
wear too much.
2
The screen displays abnormal or
does not count.
Check the proximity switch on driving wheel, whether it is loose or
the proximity distance is too long.
3 After the power on, the screen does
not display.
Check whether the power is normal or the insurance tube in
distribution box is fusing.
4
In the process of lifting hammer,
the guide rod is lifted cannot
escape.
Check whether the chain is too loose, whether there is lack of
lubricant on the guide rod or too much dirt.

- 5 -
Table of contents
Other C-Tech Industrial Equipment manuals


