Ca Go All-Weather-Top User manual

All-Weather-Top
Assembly instructions
EN

2
Safety notices ................................................................................................................
General information .....................................................................................................
Intended use ...................................................................................................................
Scope of delivery ...........................................................................................................
Pre-assembly ...............................................................................................................
Installing the centre section ......................................................................................
Installing the side panels ............................................................................................
Installing the rear section ..........................................................................................
Installing the sun screen ............................................................................................
General notes on care ................................................................................................
Statutory warranty / guarantee .............................................................................
The present assembly instructions is the translation of the original assembly
instructions.
Contents

3
Notice
Provides information about how
to handle the product or refers to
a passage in the user manual that
deserves special attention.
Safety notices
This user manual contains various types of notice.
The notices are designed as follows:
Danger
Potential hazards for your health
and the health of your co-riders and
other road users if you fail to observe
the respective instructions or do not
take corresponding precautions.
Caution
Warns you about incorrect
behaviour that can result in
material and environmental
damage.
Separate instructions
Refers you to other assembly
instructions for your FS200 Life
which describe the respective
assembly step in more detail if
needed.

4
The All-Weather-Top is the uncomplicated sun top and rain cover for your
FS200 Life. It protects your kids from the weather as they sit in the transport
box. It can be adapted in numerous ways, all described in these
assembly instructions.
Fig.1
Fig.2
The Ortho-Safety-Collar is an
integral
part of the All-Weather-Top
and must be mounted to the
FS200 Life to be able to use the
All-Weather-Top as intended.
General information

5
The All-Weather-Top is intended solely
as weather
protection. It is not suit-
able for the attachment of loads, for
supporting the FS200 Life on it, or to
use it to lift or move the FS200 Life.
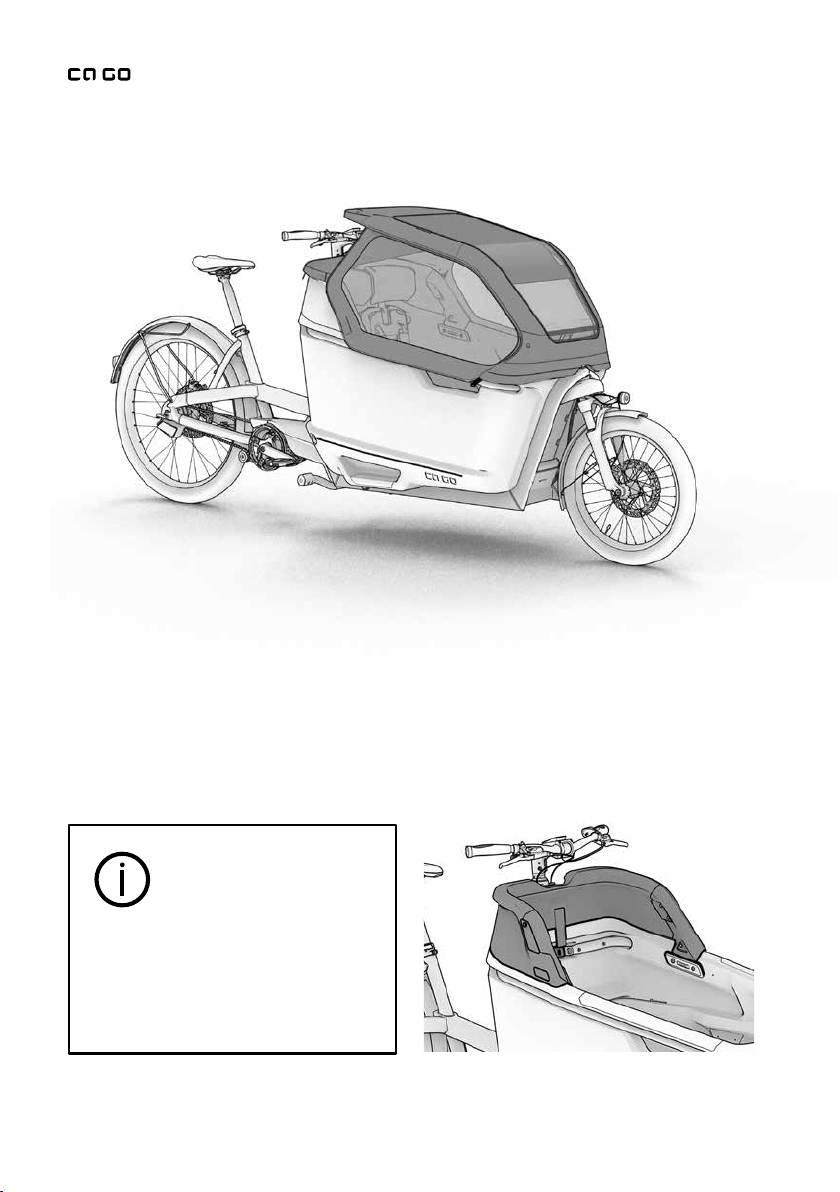
Intended use
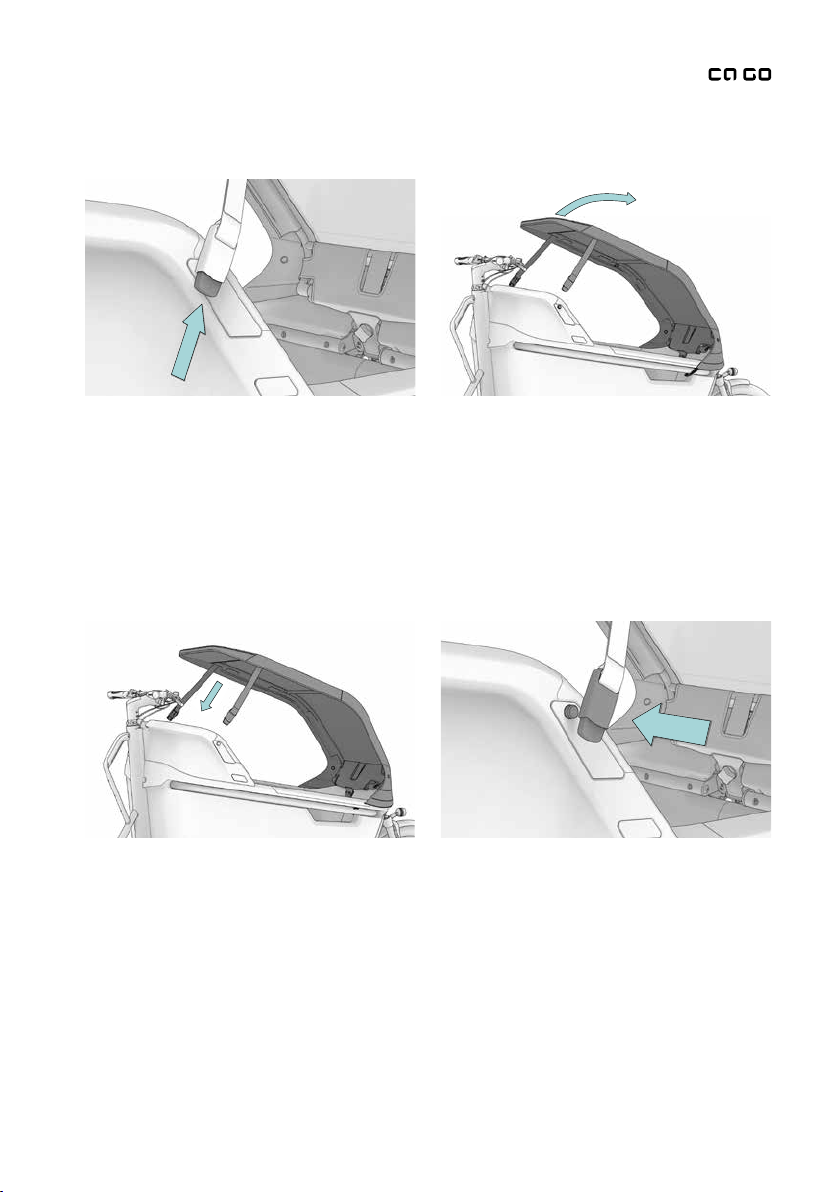
The All-Weather-Top can only be
used on rides when closed. This
means the two Fidlock® closures
on the rear left and rear right must
be engaged in the knobs in the top
section of the ortho safety collar.
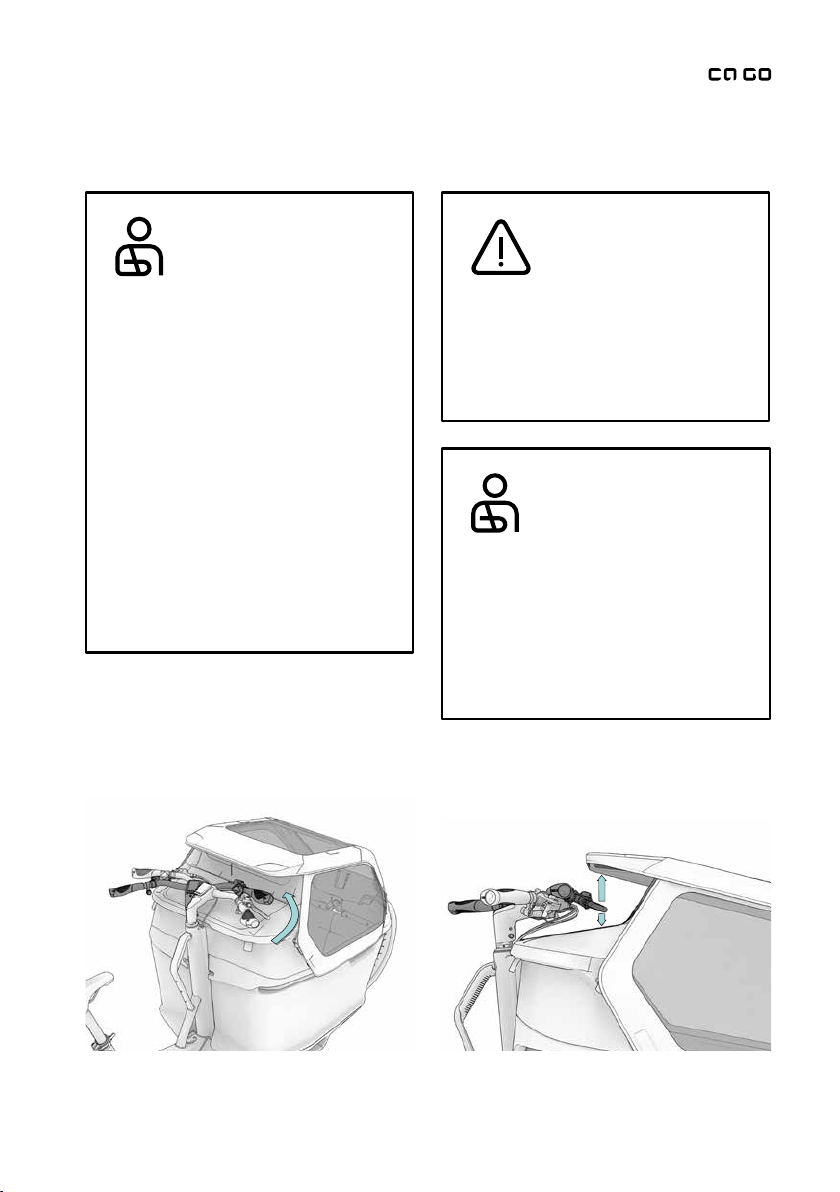
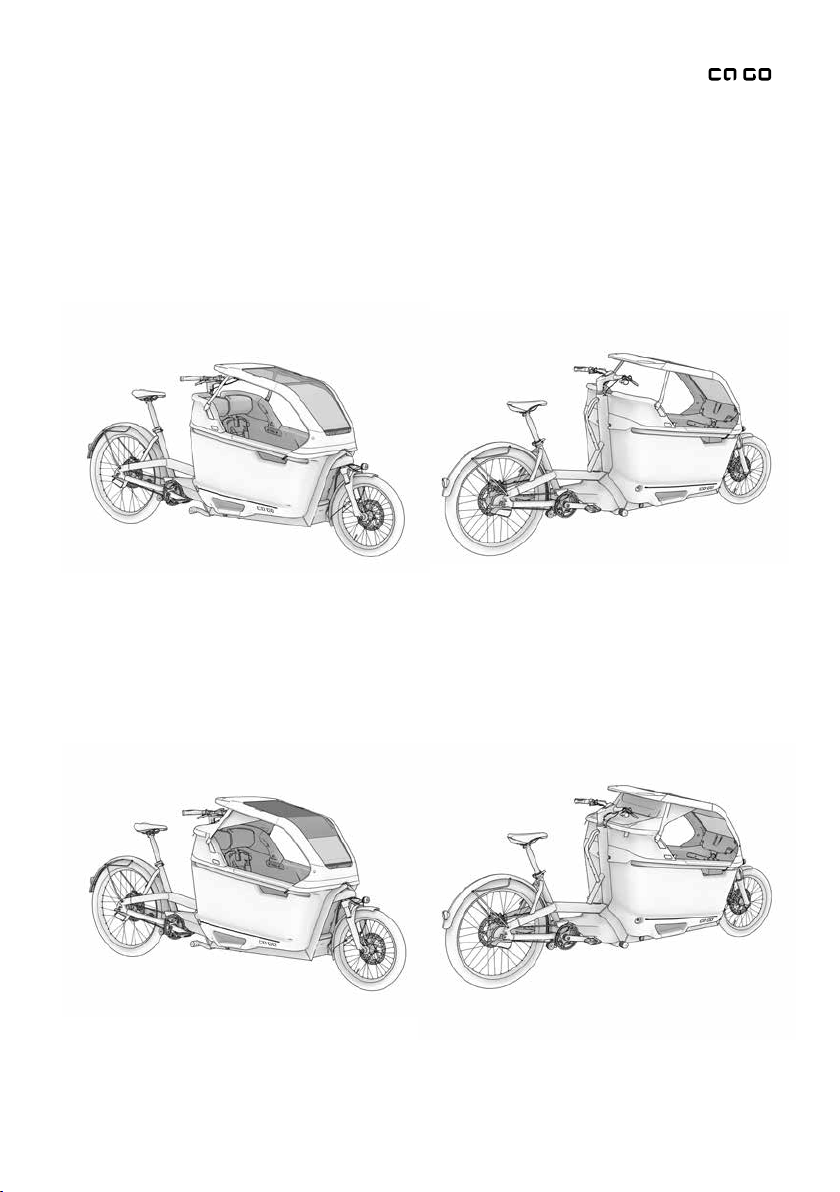
If the All-Weather-Top is open or
only partially closed, the view to-
ward the front can be signiicantly
impacted. The
FS200 Life
could be
strongly affected by gusts of wind.
The freedom of movement of the
handlebar could obstructed (Figs.
4 and 5). This could lead to serious
crashes and accidents.
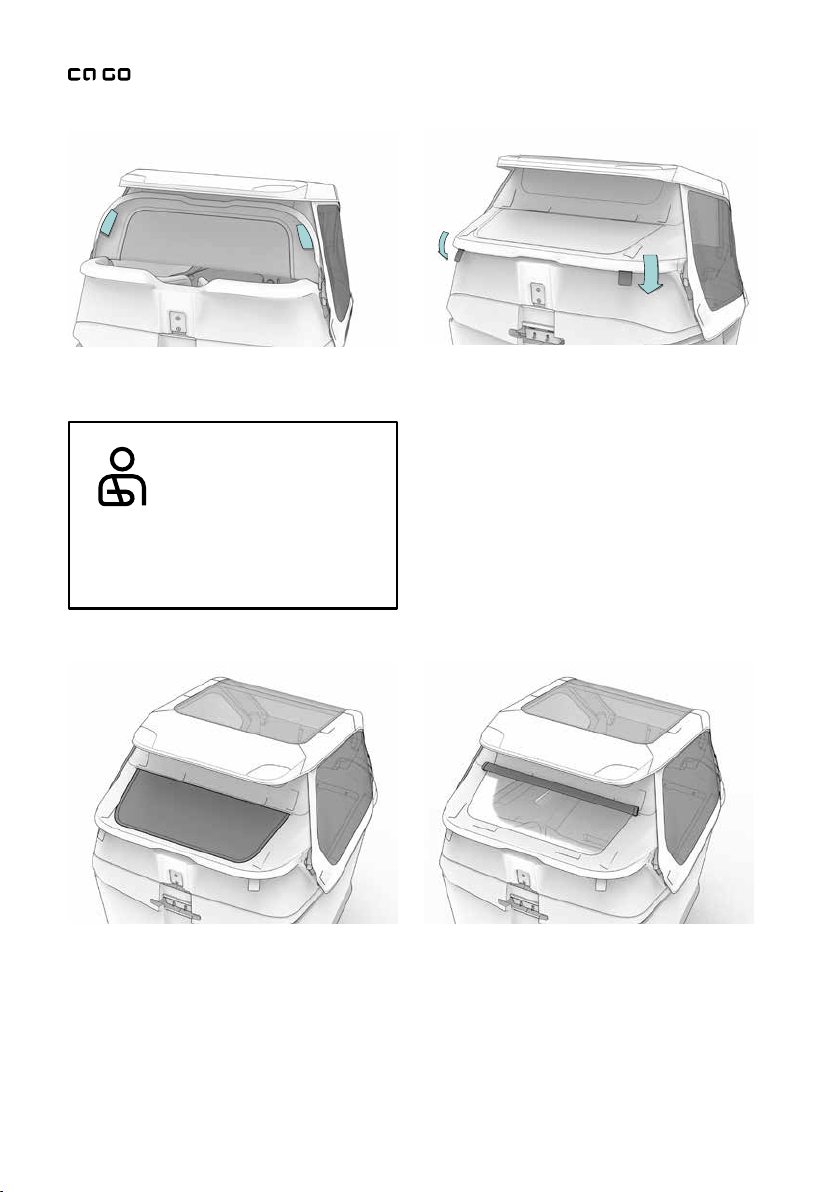
Independently from the All-Weather-
Top, a suitable child seat (suitable
for the respective age and weight)
must be installed for every child
transported with the FS200 Life.
We strongly recommend using
bicycle helmets.
Fig.3 Fig.4

6
Scope of delivery
1Sun screen
2Left side panel
3Centre section with integrated
aluminium frame
4Right side panel
5Rear section
6Adapter plate ( piece)
7Tommy screw ( piece)
8Fidlock® counterpiece ( pieces)
9Round head ( pieces)
10 M countersunk head screw
( pieces)
11 M sleeved screw ( pieces) and
M pan head screw ( pieces)
Fig.5
The All-Weather-Top consists of:
23
5
6
7
8
9
10
11
4
Assembly requires the following
additional tools:
Allen key, 5mm and 3mm
1

7
The All-Weather-Top is opened to allow the children to mount and dismount
the box. To do this, open the Fidlock® closures using the pushbutton under-
neath the locking mechanism (Fig.6). The all-weather-top springs open
toward the front (Fig.7).
The All-Weather-Top is to be closed before every ride. To do this, grab the
All-Weather-Top on both Fidlock® closures and pull it down (Fig.8).
Then press the closures onto the Fidlock® counterpieces on the sides of the
Ortho-Safety-Collar
until they engage noticeably and with an audible click
(Fig.9).
Fig.6 Fig.7
Fig.8 Fig.9

8
Depending on the weather conditions, the All-Weather-Top can be used either
as a complete
set, with the side panels removed and/or with the rear section
removed. The sun screen can be inserted as needed.
Typical applications
Fig.10: All-Weather-Top complete
Fig.11: All-Weather-Top without rear section

9
Fig.12: All-Weather-Top without rear section, without side panels
Fig.13: All-Weather-Top without side panels, with sun screen

10
The rear section of the All-Weather-
Top has two tie straps, which are
used to pull the rear section rain-
tight
over the top edge of the
Ortho-Safety-Collar (Fig.15).
Fig.14: Rear section open Fig.15: Rear section closed
Fig.16: Viewing panel closed
The rear section of the All-Weather-Top has a viewing panel with a textile sight
screen that can be used either open or closed. The sight screen is either closed
or rolled up tightly and fastened with Velcro straps (Figs.16 and 17).
Fig.17: Viewing panel open
Always ride with the rear section
closed. Observe the sewn-in safety
notice (Fig.14).

11
The side panels of the All-Weather-Top are kept in place on the left and ride
sides by integrated magnets in the lower area of the Ortho-Safety-Collar
(Fig.18). To make it easier, for instance, to put luggage in the transport box,
both side panels can be folded upward and fastened in that position by Velcro
straps and magnets (Fig.19).
Fig.20
Fig.19
The sun screen of the All-Weather-Top
can be fastened in various positions on
the inside with several Velcro straps
(Fig.20). When it is not needed, it can
be stowed away in the integrated
zipper pocket in the roof liner of the
All-Weather-Top (Fig.21).
Fig.21
Fig.18

12
First remove the M6 screws of the fastening clamp of the transport box using
a 5mm Allen key (Fig.22).
Place the oblong holes of the adapter plate 6of the All-Weather-Top in front
of the fastening clamp and align it with the threads in the frame.
Carefully screw in the M6 screws, making sure they go in straight (Fig.23).
Correct the alignment of the adapter plate if necessary. Tighten the M6
screws to 6–8 Nm.
On the side of the ortho safety collar, remove the thread caps (Fig.24) and
screw in the Fidlock® counterpieces 8hand-tight (Fig.25).
Fig.22
Fig.24
Fig.23
Fig.25

13
Place the round heads 9on the M5
countersunk head screws 10 . These
are then screwed into the under-
side of each rail (side opening of the
transport box) on the left and right
sides to a tightening torque of 4 to
5Nm (Fig.26).
Fig.26
Fig.27 Fig.28
Fig.29 Fig.30
If the All-Weather-Top is supplied separately from the transport box, the
centre section 3needs to be assembled irst before use.
We recommend you
perform
this task on a soft and smooth support surface to prevent scratching
the windows. When the lashing straps are open, the bars can be moved inside
the tunnel bags to access the joints.
To do this, fold open the centre section (Figs.27 and 28) and push the left and
right tube connections into each other (Fig.29). The tube connections are then
fastened with one M4 sleeved screw and one M4 pan head screw 11 per side
(3mm Allen key) (Fig.30).

14
Open the Velcro strap of the textile
belt strap, stretch it over the aluminium
frame and close it again. Following
this, pull the end of the belt strap
through the loop (Figs.33–37). The
belt strap limits the angle by which
the All-Weather-Top folds open to
the front and prevents the metal
parts of the All-Weather-Top from
hitting the frame of the FS200 Life.
Fig.31
Fig.33
Now stretch the centre section of the All-Weather-Top over the aluminium
frame using the lashing straps in the front (Figs.31 and 32).
Fig.32
Fig.34
Fig.35 Fig.36
Fig.37

15
Guide the front rubber cord around the headset of the FS200 Life and under-
neath the transport box EPP material (Fig.40). Following this, hook the rubber
cord into the round heads 9screwed into the left- and right-side openings of
the transport box (Fig.41).
To remove the All-Weather-Top, open the Fidlock® closures; the All-Weather-
Top springs open toward the front. Now remove the rubber cords from the
left and right round heads. Unhook the rubber cord from the head set. Finally,
undo and remove the tommy screw and carefully lift out the All-Weather-Top.
To fasten the All-Weather-Top, push the front metal tongue into the adapter
plate in the transport box (Fig.38). Following this, screw in the tommy
screw and tighten it hand-tight (Fig.39). The textile belt strap can be
fastened as needed by a Velcro strap, allowing to control the opening angle
of the All-Weather-Top.
Installing the centre section
Fig.38 Fig.39
Fig.40 Fig.41

16
Fig.42 Fig.43
Pull the zippers of the side panels 2and 4closed toward the front (Fig.42).
Close the snap fasteners in the front area of the side panels. While doing so,
turn the inside of the side panels outward (Fig.43) and fasten it to the inside
of the centre section
3
. This will ensure that rain always runs off to the outside
and does not low into the transport box.
Finally, ix the Velcro strap of the side panels to the Fidlock® strap from the
outside.
Installing the side panels

17
Installing the rear section
Fig.44 Fig.45
Pull the zipper of the rear section 5in the roof area toward the right to close
it (Fig.44), then velcro the sides to the Fidlock® Velcro straps from the inside
(Fig.45).
Integrated into the lower edge of the rear section are a rubber band and two
tie straps (Fig.45), which are used to pull the rear section rain-tight across the
top edge of the Ortho-Safety-Collar.
Before every ride, check that the
rear section is installed correctly
on the Ortho-Safety-Collar. When
the All-Weather-Top is closed, the
handlebar must be fully movable
without obstructions. Otherwise
there is a risk of crashes and acci-
dents (Fig.46)!
Fig.46

18
Installing the sun screen
Fig.47
Fig.48
Using several Velcro straps, the sun screen 1can be fastened to the inside of
the All-Weather-Top in various positions (Fig.47).
It is thus possible to shade smaller or larger areas inside the transport box as
needed. The sun screen can optionally also be velcroed to the Fidlock® strap,
making it into a side sun screen (Fig.48).

19
General notes on care
Never use aggressive cleaning
agents, acids or solvents to clean the
All-Weather-Top. Such substances
can corrode surfaces or damage the
belts. This may affect the stability of
the components.
Statutory warranty / guarantee
Service
The legal statutory warranty applies. You can ind more details
on the guarantee on our website:
www.cagobike.com/en/warranty
Export to the USA and Canada is not permitted (product liability)!
If you have questions concerning this user manual, please contact your
Ca Go dealer or your Ca Go service team.
Do not use abrasive sponges or
media, as these may scratch the
window areas.
The appearance of the materials
may change slightly over time.
Please note that the vehicle should
be protected from effects of the
weather as best as possible.

Item no. 930 005 30
Managing directors: Franc Arnold
Company register
Court of record: District Court Koblenz / register no.: HRB 26998 / VAT Id no. DE326206636
Responsible for distribution and marketing of the user manual: Ingo Kahnt
Ca Go Bike GmbH reserves the right to change product speciications without prior notice.
Typographical errors, mistakes and modiications reserved. Version of 03/2023
©Reproduction, reprint and translation, as well as any use for economic purposes (including as extracts, in print or electronic form)
without prior written approval is forbidden.
Published by:
Ca Go Bike GmbH
Am Autobahnkreuz 7
56072 Koblenz
Germany
+49 261 914090-600
info@cagobike.com
www.cagobike.com
Table of contents
Other Ca Go Bicycle Accessories manuals

Ca Go
Ca Go Ergonomic-Child-Seat User manual

Ca Go
Ca Go Lockable Cargo Box Lid User manual

Ca Go
Ca Go Cover & Carry Bag User manual

Ca Go
Ca Go Ortho-Safety-Collar User manual

Ca Go
Ca Go Bike Garage User manual

Ca Go
Ca Go Mounting Set for ISOFIX Compliant Child... User manual

Ca Go
Ca Go Infant-Sling-Mount User manual