CADO LEAF 320i User manual

120
Air Purifier
AP-C320i
320i
Instruction Manual
Manuel d'instructions
Bedienungsanleitung
Manuale di istruzioni
Instrukcja obsługi
Manual de utilizare

ENGLISH ........................................................2
Make sure you read this document, as well as the attached “Safety Precautions”, before
using the appliance.
FRANCAIS....................................................26
Assurez-vous de lire ce document, ainsi que les "Précautions de sécurité" fournies,
avant d'utiliser l'appareil.
DEUTSCH.....................................................50
Bitte lesen Sie dieses Dokument und die beigefügten „Sicherheitshinweise“ vor
Benutzung des Geräts unbedingt durch.
ITALIANO .....................................................74
Assicurarsi di leggere il presente documento, oltre alle “Precauzioni sulla sicurezza”,
prima di utilizzare l’apparecchio.
POLSKI.........................................................98
Przed rozpoczęciem użytkowania urządzenia należy przeczytać niniejszy dokument, a
także dołączony dokument „Zasady dotyczące bezpieczeństwa”.
ROMÂNĂ...................................................122
Asiguraţi-vă că citiţi acest document, precum şi „Măsuri de precauţie pentru siguranţă”
ataşate, înainte de a utiliza aparatul.

Instruction Manual

3
EN
Table of Contents
Overview.................................................. 4
Assembly of base unit............................5
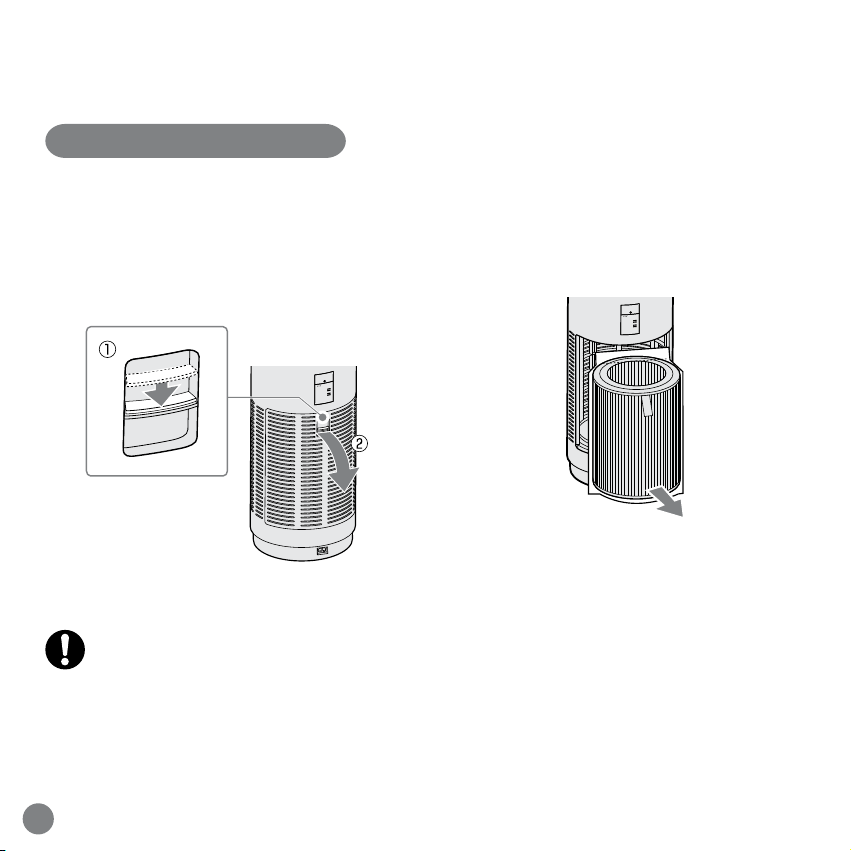
Installing a lter .......................................5
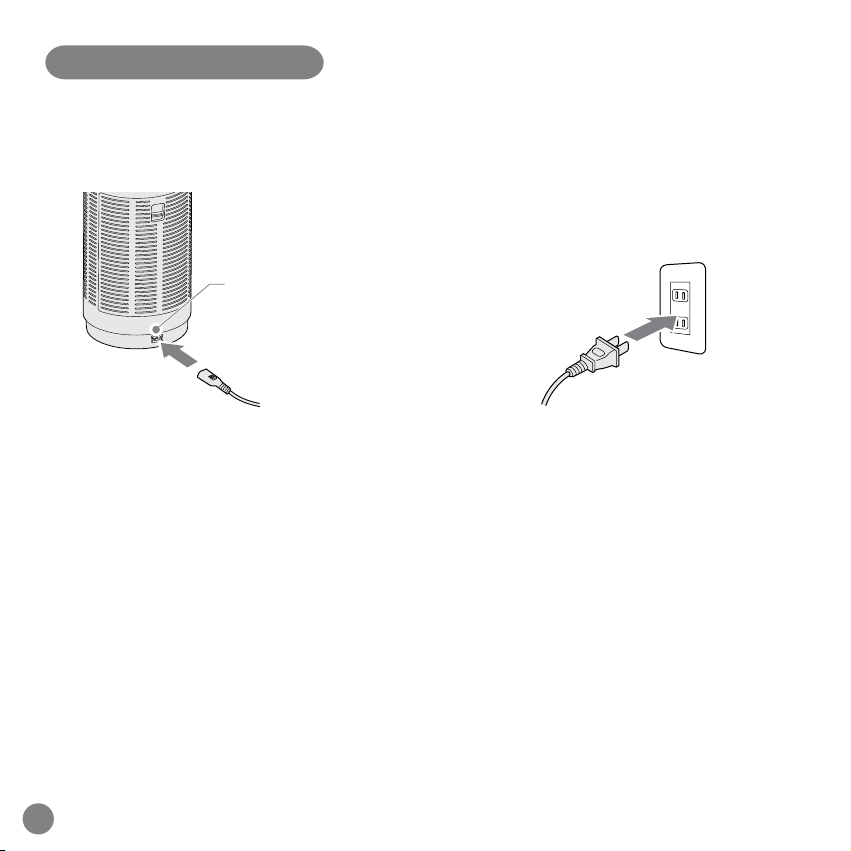
Connecting power...................................7
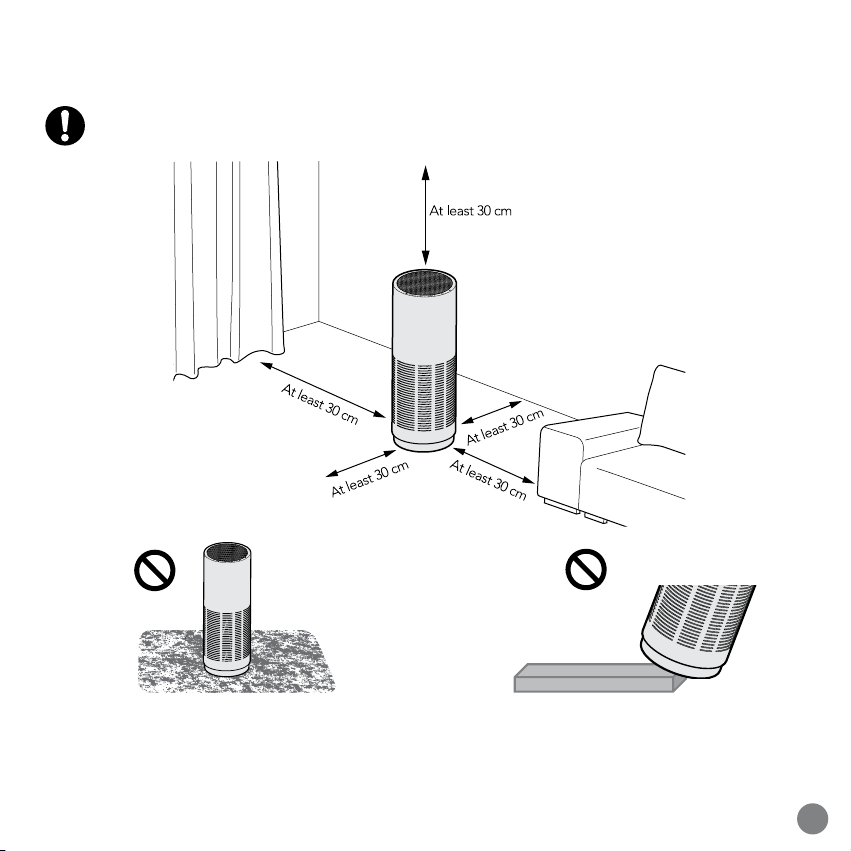
Notes on Installation ..............................8
Operating Instructions...........................9
Control panel...........................................9
Starting operation.................................... 9
Changing operation mode ....................10
Manual mode.........................................11
Timer operation.....................................11
Photocatalytic lamp ...............................12
Dimmer function.................................... 12
Light-off function ................................... 12
Odor & dust monitor .............................13
Notes on odor sensor and
dust sensor.............................................13
Cleaning Procedure..............................14
Base unit ................................................14
Cleaning of lter .................................... 16
Filter replacement notice.......................16
Filter replacing method ......................... 17
Information on lter............................... 18
Initialization of Filter Replacement
indicator................................................. 19
Troubleshooting....................................20
Specifications........................................24

Overview
This product does not eliminate all harmful substances in the air
(for instance the product is not capable of removing carbon monoxide that is contained in
cigarette smoke).
This product does not ventilate a room either. Periodically ventilate the room when using the
product in a closed room.
4EN
Illumination intensity
sensor
Control panel
Air inlet
Power cord
Photocatalytic
lamp
(Inside)
Odor & dust
monitor
Air outlet
Handle
Sensor cover
Filter cover
Cover switch
Filter
Odor sensor
/ dust sensor
(Inside)

Assembly of base unit
Installing a filter
1. Slide down the cover switch located on the
rear side of the base unit and remove the
lter cover.
2. Take out the lter from the plastic bag.
• Always turn the power of the base unit OFF when installing a lter.
• Take the lter out of the plastic bag when installing a new lter.
5
EN

3. Cut open the plastic bag containing the
lter and take out the lter.
4. Face the ribbons outward and insert
the lter deep into the base unit to
set.
Ribbons
5. Close the lter cover.
Fit the cover onto the base unit while the
cover switch is still slided down.
The product cannot start operating if
the lter cover is not properly installed
(Power indicator ashes slowly).
6EN

Connecting power
1.
Connect the power cord to the power cord
connecting port.
Power cord
connecting port
2. Insert the power plug into the power
outlet.
All indicators as well as the odor & dust
monitor ash for about 2 seconds when
the power is connected normally.
7
EN

8EN
Notes on Installation
In order to ensure that the air circulates well, do not place any objects around the base unit
and secure a space of at least 30 cm.
Do not use the product on carpets or rugs
with long piles. The unit may tilt or air inlet
may be blocked by dust or the like and cause
malfunction.
Do not use the product at a location on an
incline, unstable location or high location. Such
locations present risk of falling, bumbling or
malfunction.
No! No!

9
EN
Operating Instructions
Control panel
Power indicator
Operation
mode indicator
Air volume
indicator
Illumination
intensity sensor
Timer
indicator
Power button
Mode button
Air Volume button
Timer button
Light-off button
Filter replacement indicator
(red) / Wi-Fi indicator (green)
* Available with models that
feature Wi-Fi function only.
Starting operation
Push the Power button.
The indicator turns on and the product starts to operate in the Auto mode .
The indicator turns off and the product stops operating when the Power button is pressed while the
product is in operation.

10 EN
Changing operation mode
Press the Mode button while the appliance is in operation.
The Operation mode (indicator) switches in the following sequence.
(Auto) (Rapid)(Eco)
Information on operating modes
Auto
The product ordinarily operates in this mode.
The condition of the room is detected by sensors and
the product operates with the air volume switched
between Low, Middle and High automatically.
Eco
This mode is used when there is little contamination of
air, such as during night time.
Only the Power button and the indicator for the Eco
mode are turned on and the product operates with Low
air volume (the photocatalytic lamp is turned off).
Rapid
This mode is used to quickly clean air.
The product operates with even stronger air volume
than the High setting and automatically switches to the
Auto mode two hours later.
The Operation mode and the Manual mode cannot be set at the same time.

11
EN
Manual mode
Press the Air Volume button while the appliance is in operation.
The air volume can be set according to the preference of the user, irrespective of the degree of air
contamination in the room.
The Manual mode (indicator) switches in the following sequence.
(Low) (Middle) (High)
The Manual mode and the Operation mode cannot be set at the same time.
Timer operation
Press the Timer button while the appliance is in operation.
The power of the product is automatically turned off when the designated time elapses.
The Timer (indicator) switches in the following sequence.
OFF (turned off)
1 h 4 h 8 h
All of the Timer indicators turn on when the 24 hour timer operation is started by the cado
sync application. When the Timer button on the base unit is pressed under this condition,
all of the Timer indicators are turned off and the 24-hour timer operation triggered by the
cado sync application is released.

12 EN
Photocatalytic lamp
• The photocatalytic technology that reacts with visible light has been adopted for the activated
carbon contained in the lter.
• A high intensity blue LED is used for the lamp inside the product, which does not present any
impact on human body as is the case with lamps of ultraviolet type, but since the intensity of the
light is strong, the power of the base unit must be turned off and the user must avoid looking
directly at the light when removing the lter, as in when replacing the lter.
Dimmer function
The brightness of the surrounding area is detected by the illumination intensity sensor, which is
located on the control panel. When the surrounding becomes dark, the control panel indicators,
odor & dust monitors, air outlet lamp are automatically dimmed.
Light-off function
Pressing the Light-off button turns off the Odor & Dust monitor and the exhaust
port lamp. Pressing the button again turns them back on.
When the surrounding becomes dark while the Light-off feature is activated, the photocatalytic
lamp inside the base unit also turns off.
Odor & dust
monitor
Illumination
intensity sensor
Photocatalytic lamp
(Inside)
Control panel
indicators
Air outlet lamp

13
EN
Odor & dust monitor
The condition of the air is detected by built-in sensors and the air environment is displayed by the
three colors of blue, yellow and orange.
Monitor color Air environment of the room
Blue Clean
Yellow Slightly polluted
Orange Polluted
Notes on odor sensor and dust sensor
• The odor sensor detects odor primarily of cigarettes, cosmetic products and the like.
• The odor sensor may react to gas and alcohol contents from sprays or changes of temperature
and humidity. It may not react to some odor components.
Dust sensor may react to changes of temperature and humidity.
• The odor sensor detects relative condition of the air in the room. This means that even when the
odor is strong, the sensor may not react if there is no variation in the strength of such odor.
• Dust sensor detects to house dust (such as pollen), cigarette smoke and the like.
• The product is unable to perform accurate detections during the rst ve minutes after the
power cord is connected, as sensors are initialized during this period. Furthermore, it is
recommended that the power cord is connected when the air in the room is clean (such as when
there is no cigarette smoke), since the operation references the condition of the air at the time
of initialization.

14 EN
Cleaning Procedure
• Continuing to use the product without cleaning can result in accumulation of dust and the air
purier may not be able to provide full performance. Clean the product periodically (Once or
more per month is recommended).
• Failure to clean the product periodically may void the manufacturer warranty when any
malfunction occurs due to contamination or the like.
Stock a supply of soft cloth, cotton swab,
vacuum cleaner and the like available on the
market for your convenience.
Do not use hard brush.
The base unit may be scratched.
Use neutral detergent diluted water to deal
with stubborn stains.
• Do not use any detergent other than
neutral detergent. The base unit may
be scratched.
• Thoroughly remove neutral detergent
with cloth or the like after cleaning.
• Remove lter before cleaning the
base unit to prevent liquid splashing
on the lter.
Base unit
1. Turn off the power of the base unit and pull out the power cord from the power outlet.
OFF

15
EN
2. Use soft cloth to wipe off dust on the base
unit.
3. Vacuum dust on and inside the air inlet
and air outlet, as well as inside the base
unit by using a vacuum cleaner or the like.
Alternatively, use a soft cloth and wipe
them off.
4. Remove the dust attached on the sensor
cover with a cotton swab or the like.

16 EN
Cleaning of lter
The screen section on the side of the lter functions as a prelter. Regularly clear dust attached on
the screen with a vacuum cleaner or the like. Alternatively, use a soft cloth and wipe them off.
Filter replacement notice
The Filter Replacement indicator turns on red when the lter needs to be replaced.
Replace with a new lter.
• The Filter Replacement indicator operates also as the Wi-Fi Connectivity indicator.
When the indicator is turned on or ashing in green, it is indicating the Wi-Fi connectivity
status.
• The lter replacement timing can also be veried by using the cado sync application.

17
EN
Filter replacing method
Refer to “Assembly of base unit” to remove the old lter and replace it with a new lter.
OLD
NEW

18 EN
Information on filter
• The lter is a consumable item and must be purchased and replaced periodically.
• The replacement timing of the lter can vary depending on the environment in which the
product is used, but the rough standard is once every six months to a year.
• The replacement timing may be shorter when the product is used at a location with heavily
polluted air.
• Depending on the environment in which the product is used, odor may be generated by the
lter after a several weeks to a few months, requiring lter replacement.
• When the odor becomes noticeable, replace the lter or dry in the sun, which sometimes
improves the condition (this is not a promise of performance recovery).

19
EN
Initialization of Filter Replacement indicator
The Filter Replacement indicator remains on even when the lter has been replaced. Initialize the
Filter Replacement indicator by performing the following procedure.
Follow the same initialization procedure described below also when the lter is replaced
before the Filter Replacement indicator comes on.
1. Press the Power button to turn on power
of the base unit.
ON
2. Press and hold down the Light OFF
button for about 5 seconds and the Filter
Replacement indicator starts to ash in
red.
5 sec
3. Immediately press the Light OFF button
again briey and the Filter Replacement
indicator will turn off and the initialization
process is completed.
Other manuals for LEAF 320i
1
This manual suits for next models
1
Table of contents
Languages:
Other CADO Air Cleaner manuals

CADO
CADO AP-C200 User manual

CADO
CADO LEAF portable User manual

CADO
CADO LEAF 120 User manual

CADO
CADO MP-C20U User manual

CADO
CADO AP-C710S User manual

CADO
CADO LEAF 320i User manual

CADO
CADO AP-C300 User manual

CADO
CADO Leaf Portable MP-C30 User manual

CADO
CADO AP-C310 User manual

CADO
CADO LEAF 200 User manual
Popular Air Cleaner manuals by other brands

Ivation
Ivation IVADGOZHEPA user guide

Russell Hobbs
Russell Hobbs Mountain breeze 12746 Instructions and guarantee

Blueair
Blueair Classic 280i user manual

dreo
dreo Macro Max S user manual

FilterStream
FilterStream AirTamer Professional A710 instruction manual

Clean Air Optima
Clean Air Optima Compact Smart CA-503B user manual