Camtree G-PM Quick start guide


INTRODUCTION
Matching components to build a quality Kit saves shopping me, inial cost and most of all the components
are designed to work in concert with each other. In keeping with new image capture technology our
CAMTREE Power Mount Gripper is a smart choice for today’s shooters who demand flexibility and perfor‐
mance for all their digital media producons.
DETAILSOFTHEPACKAGE
Please inspect the contents of your shipped package to ensure you have received all that is pictured and
listed below.
KitIncludes:
Hard Case
5* Rubber Grippers
2* Rope Hooks
Aluminum rods
Camera Mounng
Plaorm
75mm Bowl Head
3* Ball Tilt Head
2* Rope
1/4” & 3/8” Camera
Mounng Bolt
ASSEMBLINGOFCAMTREEPOWERMOUNTGRIPPER
The Power Mount Gripper’s vacuum‐actuated industrial grade sucon cup mounts can be affixed to
just about any smooth surface on any vehicle. They provide a solid, stable, adjustable base for the 3
variable length legs. With a few pumps of the large pin on the side of each unit, sucon mounts are
good to go.
Screw in the Ball Tilt Head on sucon cups. Adjustable Ball Tilt Heads allow for an extensive range of
lockable posions for the Aluminium Rods.

Screw in camera mounng plaorm to Rods.
Tighten the knob of Ball Tilt Head to lock it in a posion.
Now fix both the sucon cup with metal loops on your vehicle.
Aach one end of Rope with metal Hooks to camera mounng plaorm and another end to Metal loop
of Sucon cup. Tighten the Rope properly.
Three adjustable length legs screw into the adjustable locking ball lt heads at the top of the 3 sucon
cup mounts. Three rods are provided for each length – 3”, 6” & 12”. These rods can be linked together in
any combinaon you need to create the perfect length Power Mount Gripper. Rods are to fit your
shoong situaon, posioning the gripper unit at a variety of distances and angles from the vehicle.

Now loosen the four Allen bolts on Camera plaorm, align 75mm bowl with it. Re‐insert the bolts and
ghten with Allen key properly.
Now mount your Fluid Head (NOTIncluded) on Bowl Head. And then secure your camera set up on fluid
head.
YourCamtreePowerMountGripper
Alldressedupandreadytogo.
To use the Rope Hooks, press the lever to loosen the rope. Remove the metal hook from Metal loop of
sucon cups.

The built‐in low sucon indicator helps to insure that the Power Mount
Gripper remain securely aached to your vehicle. To release the sucon
cup, just li one or both of the tabs on the sides of the sucon cups.
Aach the Rope Hooks to your vehicle, then aach metal hooks to Rope Hooks and ghten the rope
properly to secure your gripper.
You can also aach your camera set up directly to camera mounng
plaorm with provided screw.
YOURCAMTREEPOWERMOUNTGRIPPER
ALLDRESSEDUPANDREADYTOGO.

WARRANTY
We offer a one year warranty for our products from the date of purchase.
We will repair or replace your product, free of charge, in the event of a defect in materials or crasmanship
obtained during normal use or handling based on the user manual. Please note that we will not cover any
shipping costs for returning the product to us. If any VAT or import dues are applied to the return, we will
also charge these costs to the customer.
The warranty does not include, by the way of example, damage caused by products that we do not supply or
from mishandling in transit, accident, misuse, neglect, lack of care of the product , or service by anyone other
than our company.
We are not liable for incidental or consequenal damages resulng from the use of the unit or occurring due
to any breach of this warranty.
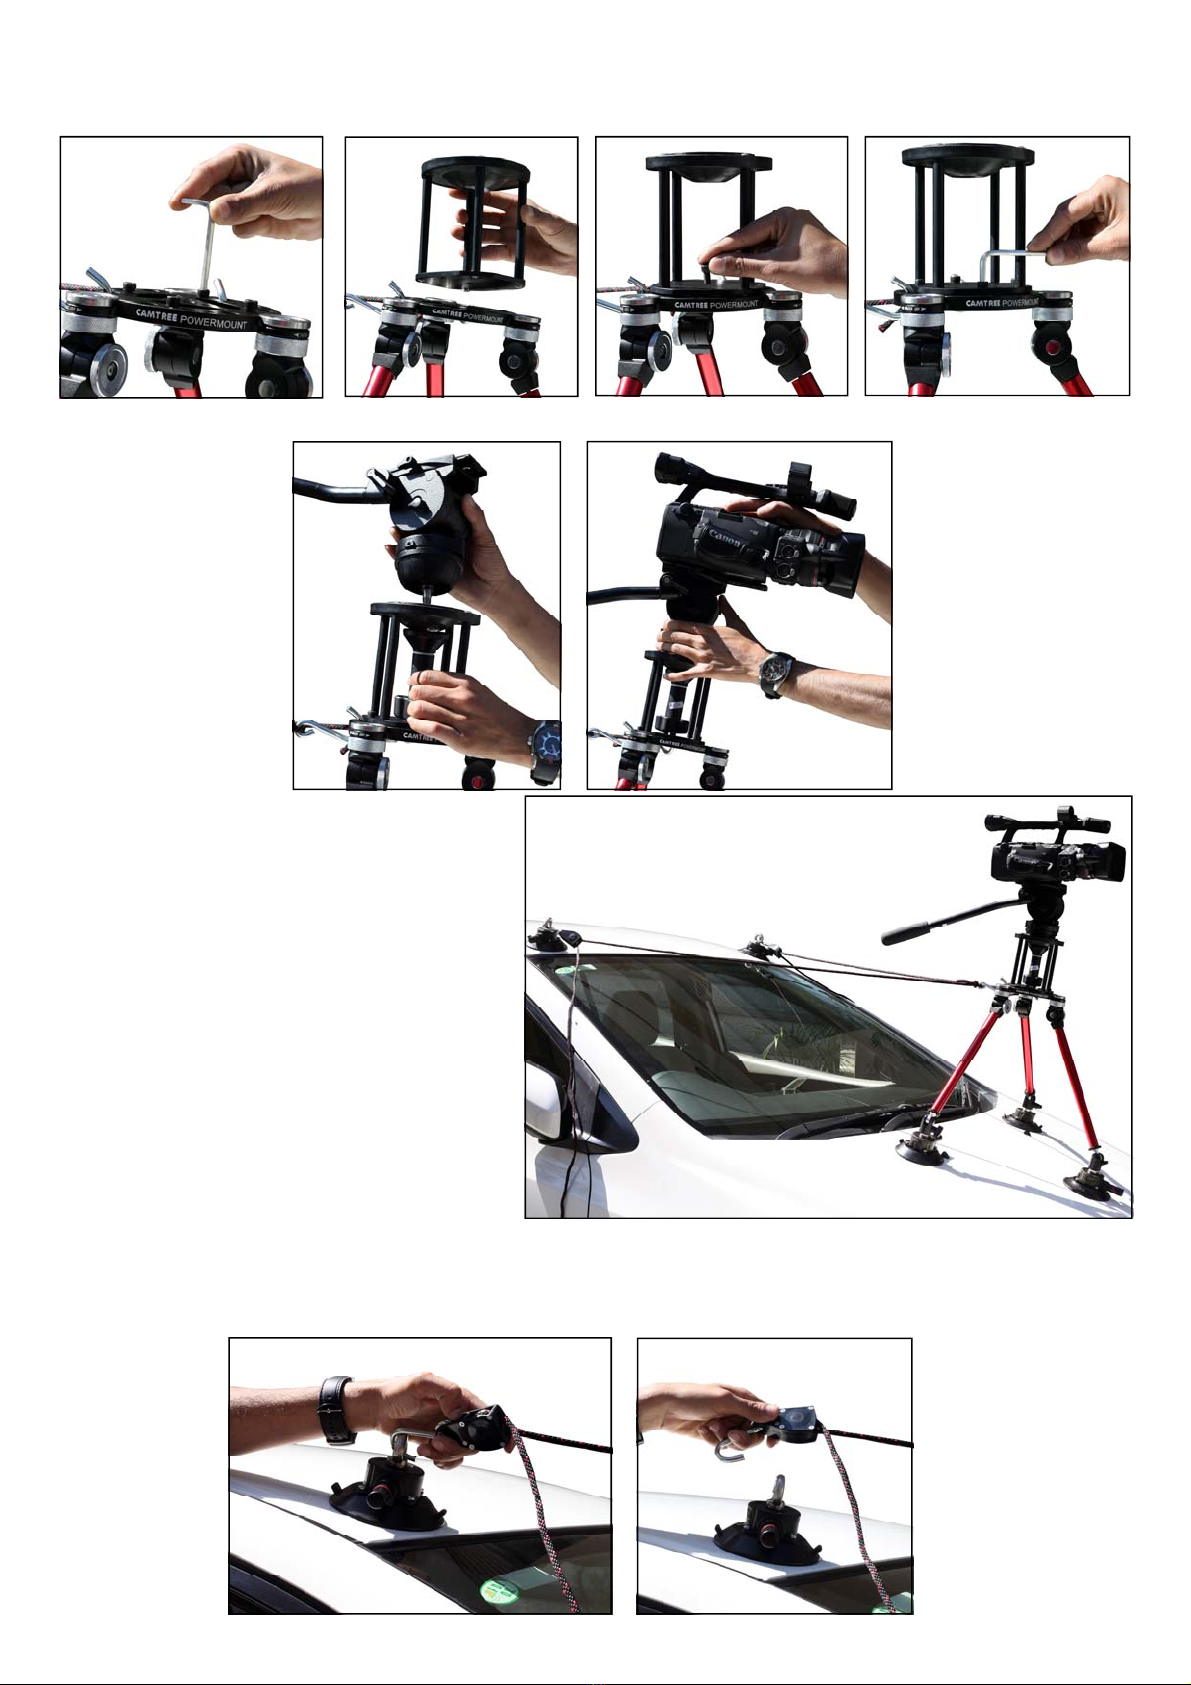
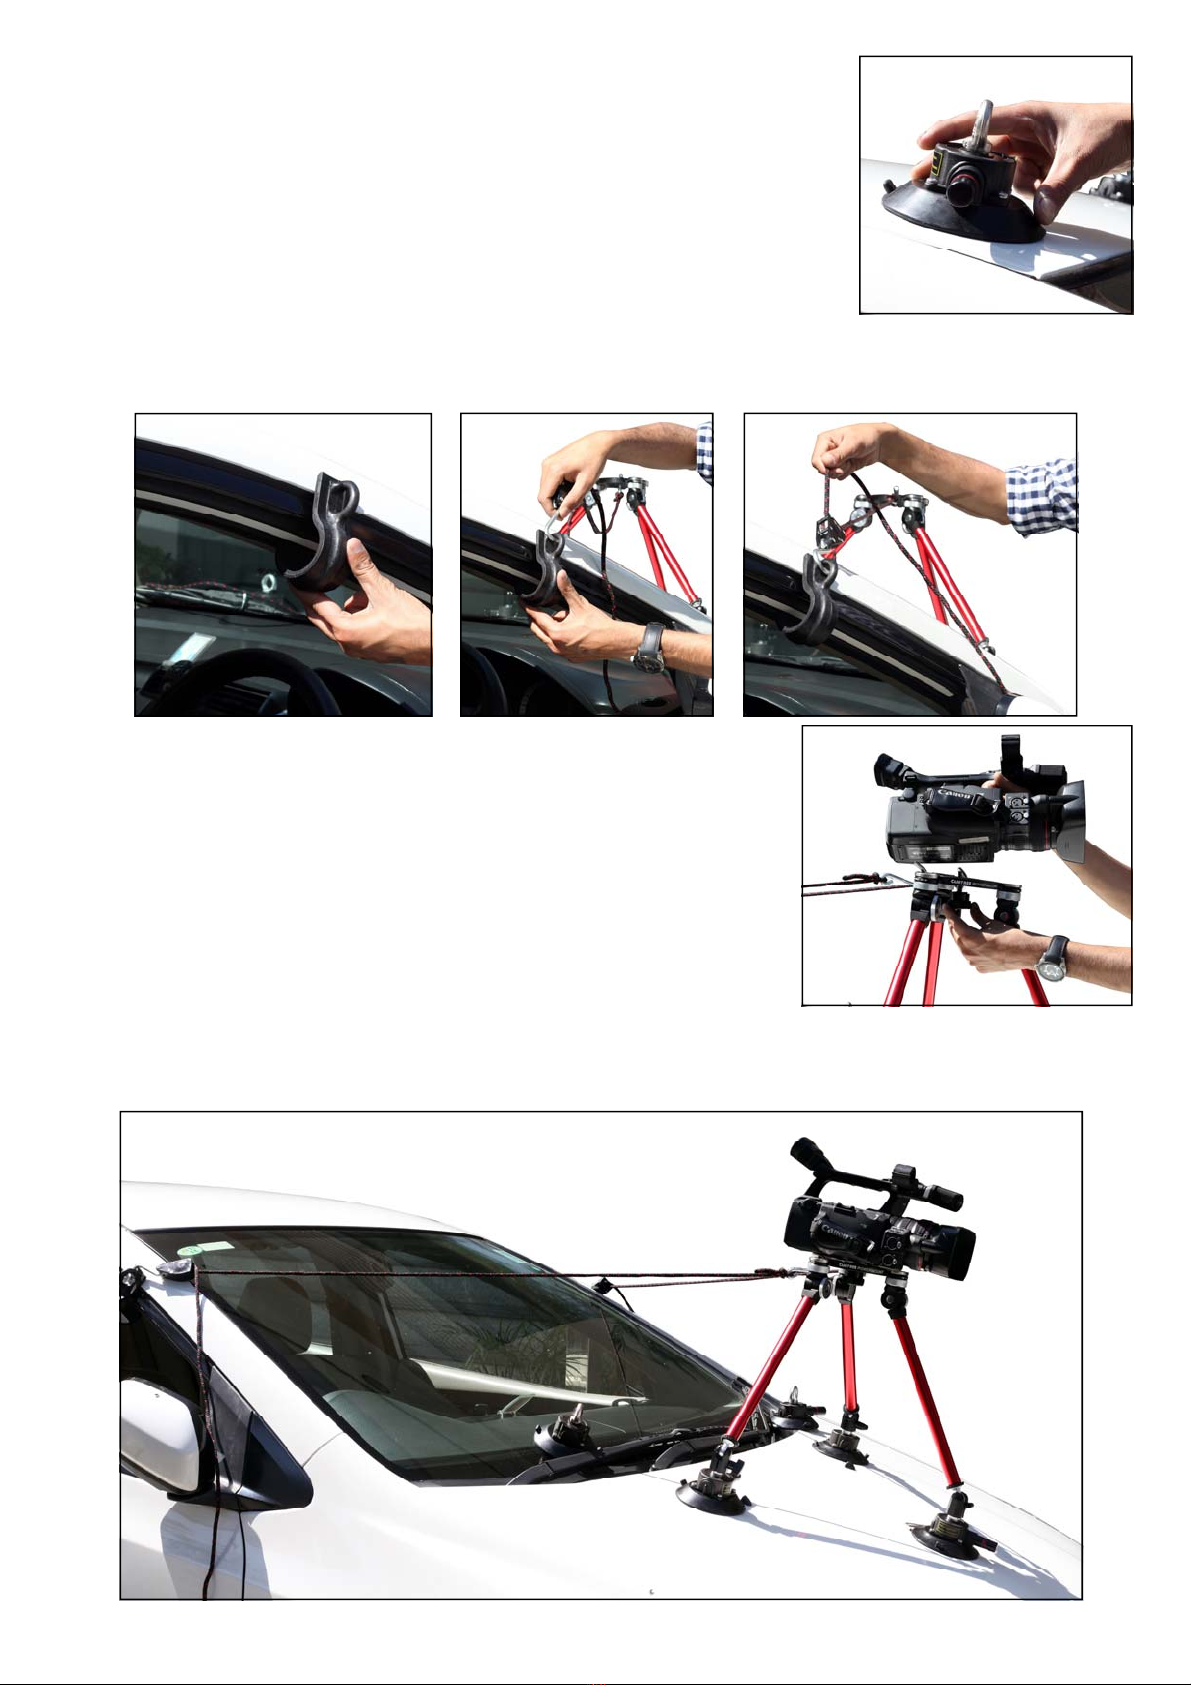
The Camera mounng plaorm of the Power Mount Gripper has three leg aachment points that are
each fied with two posive locking ratchet joints, one for lt and one for swivel. Each locking ratchet
joint has a quick turn knurled lock ring foe easy adjustment. You can unlock and lock each joint with a
slight twist.
To adjust the lt or swivel of each leg, first make sure the lock ring on the appropriate joint is in the UN‐
LOCK posion, then adjust the posion of the leg as per the need. And then turn the lock ring back in the
LOCK direcon so that the camera won’t shake from joint movement while the vehicle is in moon.
SwivelAdjustments
TiltAdjustments

Replacement parts of the product will be provided at nominal cost (covering the cost price of the replace‐
ment parts only) to the customers aer the Warranty Period has expired. We will cover
the complete cost of sending replacement parts within the warranty period. Aer that, Nominal cost of the
product & Actual shipping cost will be charged.
Do not send the unit to us without first geng a response and geng the approval to send back the item.
In case of any kind of dissasfacon, we urge you toContact usimmediately and we shall do our
Best to help you out. For any other assistance you can reach us via email.
For any other assistance you can reach us via email.
Other manuals for G-PM
1
Table of contents
Other Camtree Professional Video Accessories manuals