Capelec CAP2600 User manual

Rev A
1130, rue des Marels
FR 34000 MONTPELLIER
Phone: (33) 0 467 156 156
Fax: (33) 0 467 224 224
e-mail: contact@capelec.fr
www.capelec.fr
USER MANUAL
CAP2600 WORKSHOP™
Expert | Universal headlight beam tester


Edit: 30/07/19 | Rev A | Page: 1
Contents
Introduction...................................................................................................................................................2
Section 1: COMMISSIONING..........................................................................................................................3
I. Area of use..............................................................................................................................................3
II. Installation and commissioning.............................................................................................................3
2.1 Assembly instructions......................................................................................................................3
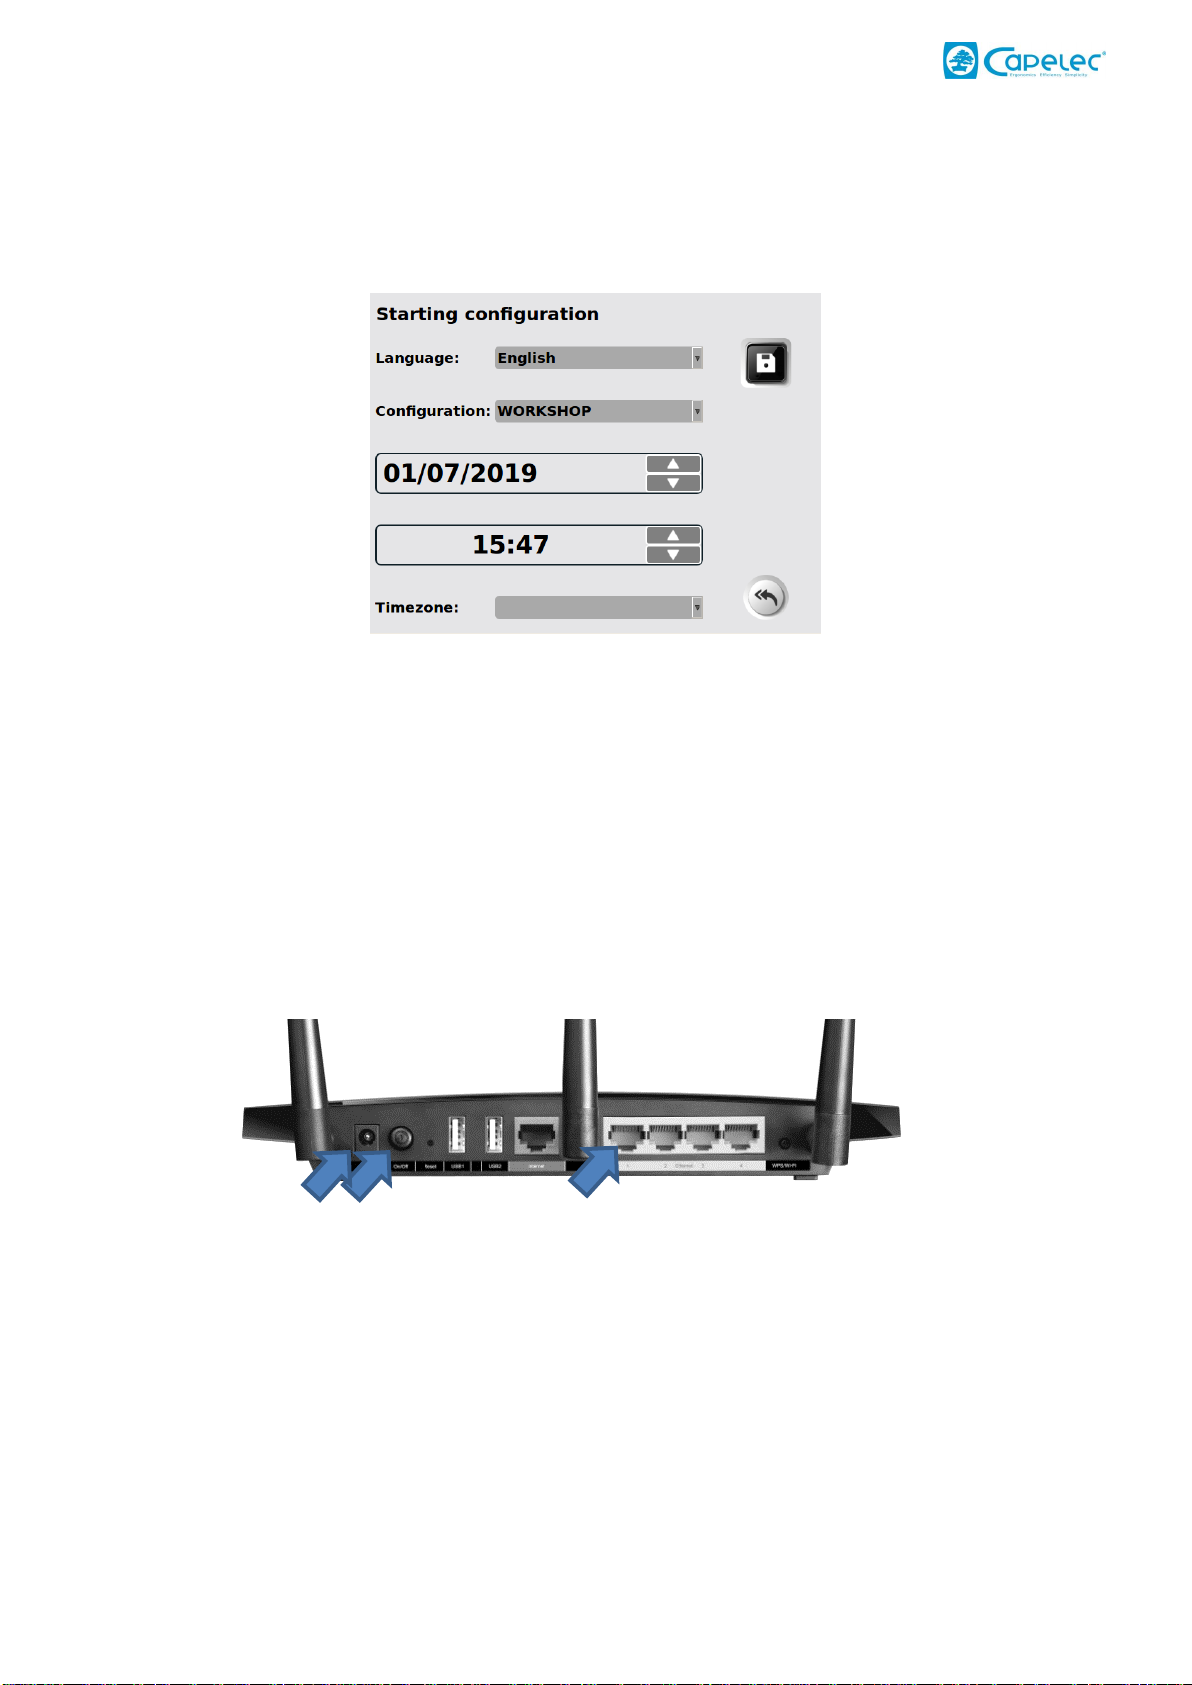
2.2 Configuration: first start up .............................................................................................................5
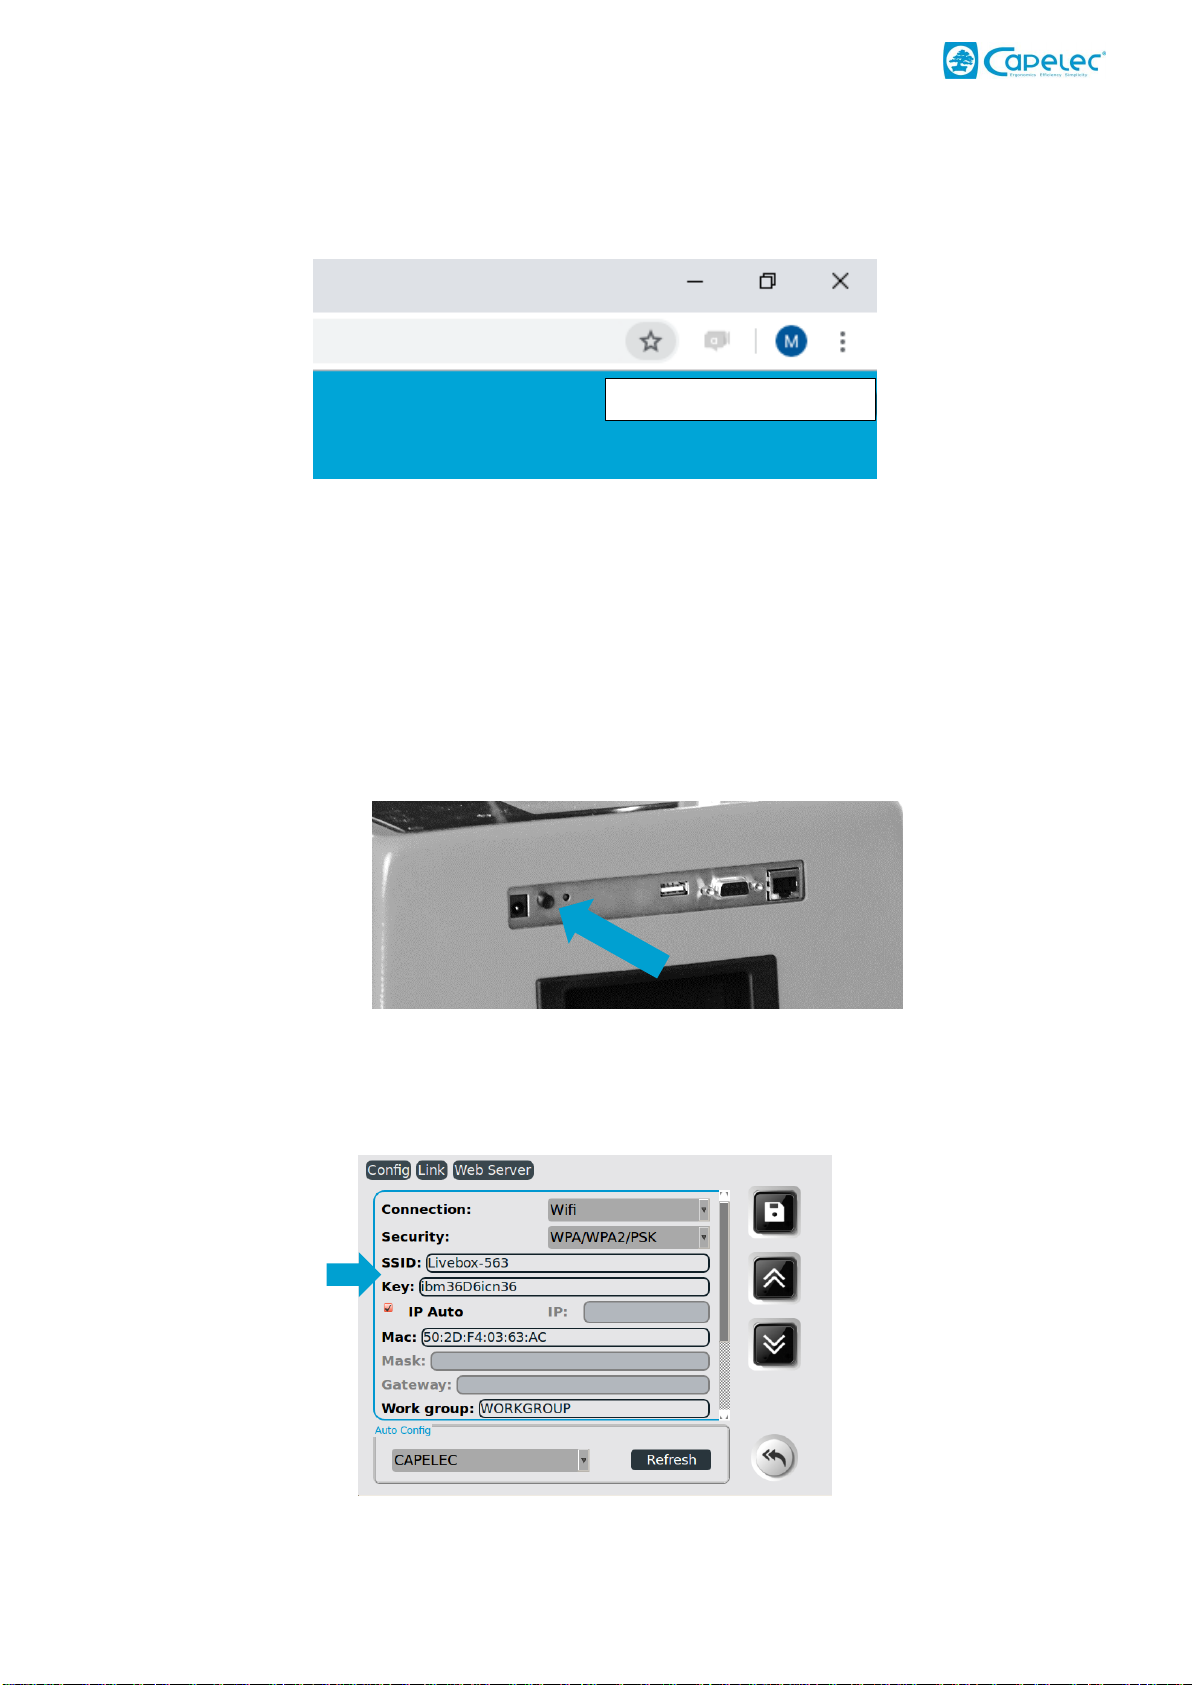
2.3 Computer links.................................................................................................................................5
2.4 Without a connection......................................................................................................................9
2.5 Customising and entering the garage header ...............................................................................10
Section 2: USER MANUAL ............................................................................................................................11
I. Overview...............................................................................................................................................11
II. Positioning the CAP2600 Workshop™.................................................................................................14
2.1 Vehicle preparation .......................................................................................................................14
2.2 Positioning in the vehicle length axis ............................................................................................15
2.3 Positioning the optical block in front of the headlamp.................................................................16
III. Lamp inspection..................................................................................................................................17
3.1 Inspection sequence......................................................................................................................17
3.2 Expert report..................................................................................................................................23
3.3 Advice when using the expert function.........................................................................................27
IV. Configuration......................................................................................................................................28
V. Care and maintenance recommendations..........................................................................................29

Edit: 30/07/19 | Rev A | Page: 2
Introduction
Thank you for having purchased the CAP2600 Workshop™ headlamp adjustment system. It has embedded
image processing technology developed by CAPELEC. It is a powerful expert system for adjusting and
checking lighting.
It is compatible with all headlamp lighting technologies installed on heavy and light road vehicles of the
M1, M2 and N1 categories (vehicles with a gross vehicle weight of less than 3.5 tonnes)
Please read this manual carefully before using the CAP2600 WORKSHOP™.
Keep it in a safe place to be able to consult it if necessary.
Note: The information in this document is subject to change without notice. CAPELEC cannot be held liable for direct or indirect
damage of any type, nor for losses or costs incurred through non compliant use.
WARNING
Precautions for use: the CAP2600 WORKSHOP™ lens must never be exposed to sunlight. The concentration of sunlight can
cause heating and a risk of damaging the equipment and/or burns.

Edit: 30/07/19 | Rev A | Page: 3
Section 1: COMMISSIONING
I. Area of use
Unlike other headlamp beam testers, the CAP2600 WORKSHOP™ does not need to define a work zone
and qualify it. It features innovating and unique technology: the "ANYWHERE" ground compensation
system. The CAP2600 WORKSHOP™ can therefore be used anywhere in your workshop.
II. Installation and commissioning
2.1 Assembly instructions
The CAP2600 WORKSHOP™ is delivered assembled and calibrated.
-Unpacking the CAP2600 WORKSHOP™

Edit: 30/07/19 | Rev A | Page: 4
-Cut the collar and keep the rubber stop.
-Caution: do not allow the metal cable to slip into the column
-Attach the metal cable onto the optical block
-Screw the upper stop to the top of the column

Edit: 30/07/19 | Rev A | Page: 5
2.2 Configuration: first start up
When you first activate the CAP2600 WORKSHOP™, you must select the language, the configuration
(France WS by default), and check the basic parameters: date, time and time zone.
2.3 Computer links
The CAP2600 WORKSHOP™ can be used with or without a computer connection. If you want to connect
your device, you can do so via the CAPELEC router or via your own WIFI network.
Connection to the preconfigured CAPELEC router
The CAP2600 WORKSHOP™ is delivered with a router configured for automatic WIFI connection as an
option. It is used to access the WEB interface and generate the expert report.
-Connect the router to the computer network (1), connect the power supply (2) and then turn on
the power (3)
1
2
3

Edit: 30/07/19 | Rev A | Page: 6
-Start the CAP2600 WORKSHOP™
-The WIFI icon (1) and the WEB interface address (2) appear on the home page
-Open a web browser and enter the displayed address
1
2

Edit: 30/07/19 | Rev A | Page: 7
-Add this page to the favourites
Connection to a WIFI network
The CAP2600 WORKSHOP™ can be connected to your WIFI network. It is used to access the WEB interface
and generate the expert report.
-Start the CAP2600 WORKSHOP™
-Go to "Config / Link" and enter the password "2345"
-Go to "Web server" and enter your SSID and key
Bookmark this page

Edit: 30/07/19 | Rev A | Page: 8
For networks with DHCP, keep the "IP AUTO" configuration, otherwise switch to static IP by
unchecking "IP AUTO" and enter an IP address
-Restart the CAP2600 WORKSHOP™
-The WIFI icon (1) and the WEB interface address (2) appear on the home page
-Open a web browser and enter the address
-Add this page to the favourites
1
2

Edit: 30/07/19 | Rev A | Page: 9
2.4 Without a connection
The expert CAP2600 WORKSHOP™ headlamp beam tester can be used without a connection. The built-
in thermal printer makes it possible to print simplified reports.
-Start the CAP2600 WORKSHOP™
-Go to "Config / Link" and enter the password "2345"
-Select "Printer"
-Restart the CAP2600 WORKSHOP™
Bookmark this page

Edit: 30/07/19 | Rev A | Page: 10
2.5 Customising and entering the garage header
From the headlamp beam tester
Go to "Config / Company name" and enter your company name
From the WEB interface
Go to "Settings" and enter the company name in the header and add the logo

Edit: 30/07/19 | Rev A | Page: 11
Section 2: USER MANUAL
I. Overview
1.1 Touch screen display
For optimum use, the use of the stylus is recommended.
Battery charge level
WIFI Signal
USB memory
Turn off the machine
Inclinometer function
Quick restart
WEB interface address

Edit: 30/07/19 | Rev A | Page: 12
1.2 The main functions
At start up, you have direct access to the 6 CAP2600 WORKSHOP™ functions:
Start
Used to draw up the dipped-beam headlamp report, to print a result ticket and to access the WEB
interface expert report.
Dipped beam
It is used to accurately adjust the dipped-beam headlamps: dip angle, lateral angle and light intensity
measurement.
High beam
It is used to adjust the high beam: dip angle, lateral angle and light intensity measurement.
Fog lamps
It is used to adjust the fog lamps: dip angle and light intensity measurement.
AFS calibration
It is used to calibrate the AFS function. A specific diagnosis tool is required to interact with the calculator.
Configuration
This menu gives access to several sub-menus used to configure the different CAP2600 WORKSHOP™
functions, such as the printer mode, the date and time etc.

Edit: 30/07/19 | Rev A | Page: 13
1.3 Power supply
The CAP2600 WORKSHOP™ runs on lithium-iron batteries. In continuous operation the autonomy is
estimated at about ten hours.
The charger supplied with the device has a charge indicator.
CHARGERS
The charger disconnection device is the adapter block. It must remain accessible.
A charger different from the originally supplied charger must not be used under any circumstances.
BATTERIES
The batteries must be replaced using original parts.
Recycle the batteries in compliance with the laws and regulations applicable to your country. Do not dispose of them in the
wild or in a dustbin. Depending on regulations, it may be prohibited to incinerate, bury or dispose of them in landfills.
For further information, please contact the competent authorities.

Edit: 30/07/19 | Rev A | Page: 14
II. Positioning the CAP2600 Workshop™
2.1 Vehicle preparation
The following information is provided as a recommendation. Please refer to applicable regulations.
For light vehicles:
Preparation:
-Check the tyre pressure
-When the vehicle is fitted with a manual beam adjustment system (in the passenger compartment
or on the headlight inserts), select the position intended by the manufacturer depending on the
load
-When the vehicle is fitted with an adaptive lighting system (AFS), deactivate it by selecting "dipped
beams"
-When the vehicle is fitted with a headlamp cleaning system, check its operation and clean the
insert if necessary.
For heavy goods vehicles:
Vehicle preparation:
Before the inspection,
-Set the load compensation system to the appropriate position
-Disable the AFS
-Clean the headlamp inserts
Vehicle and headlamp beam tester position:
-Position the vehicle with the wheels straight without using the parking brake (a wheel chock can
be used).
-The engine will be left running if necessary to maintain the air suspension

Edit: 30/07/19 | Rev A | Page: 15
2.2 Positioning in the vehicle length axis
- Position the CAP2600 WORKSHOP™ in front of
the centre of the vehicle, so that the lens is
located between 20 cm and 80 cm in front of each
lamp.
- Identify two fixed points on the vehicle,
symmetrically placed in relationship to the central
axis (for example: upper left and right corners of
the windscreen, non-deformed bonnet angles,
windscreen wiper nozzles if their base is not
deformed).
- Pivot the box to place the laser line on the
selected fixed points on the vehicle.
- Start the measurement procedure. During this
phase you will move the CAP2600 WORKSHOP™
in front of the headlight while keeping the angle
obtained with the laser. It is advisable to check its
position in relation to the vehicle between each
lamp.
WARNINGS
- Laser radiation
- Class 2M laser device
- Do not look directly into the beam nor directly observe using optical instruments.
- The vehicle must be empty of occupants when the laser beam is being adjusted.
- Laser adjustment must be used momentarily.

Edit: 30/07/19 | Rev A | Page: 16
2.3 Positioning the optical block in front of the headlamp
The positioning assistance optimises the optical block alignment in front of the lamp. It is activated
automatically before each measurement. The indications displayed on the screen guide the user. When
the optimum position is reached, "validated" is displayed. The CAP2600 WORKSHOP™ automatically
moves to the next step.
The work method:
1 - Place the headlamp adjustment system in front of the headlamp below the centre of the lamp.
2 - Follow the instructions on the screen to align the optical block at the correct height.
3 - Place the optical block taking into account the assistance until "validated" is displayed on the screen.
1
2
3
4
1
2
3
4

Edit: 30/07/19 | Rev A | Page: 17
WARNINGS
During this operation make sure that the CAP2600 WORKSHOP™ lens is not exposed to a parasite external light source (sunlight,
spotlight, etc.) which could cause incorrect positioning.
III. Lamp inspection
3.1 Inspection sequence
In the start menu , the CAP2600 WORKSHOP™ will guide you through the entire headlamp
inspection process. The sequence of steps is described in the following section.
Step 1: Enter the vehicle registration plate
From the WEB interface, enter the vehicle registration plate (1) and click "Send" (2).
The plate appears on the headlight beam tester screen and in the "vehicle to be processed” column.
Validate by pressing to start a complete procedure.
2
1

Edit: 30/07/19 | Rev A | Page: 18
Note: You can also manually enter a registration plate directly on the CAP2600 WORKSHOP™ by clicking
.
Step 2: Vehicle slope measurement using the ANYWHERE module
Position the ANYWHERE modules as close as possible to the vehicle wheels on the left side as shown
below. Module A (laser) on the front wheel and module B (target) on the rear wheel.
To activate the module A laser, press the switch for 2 seconds. Point it to the module B target line.
Press the switch again to validate. The laser flashes 3 times and sends the measurement. Then it turns off
automatically.
Other manuals for CAP2600
1
Table of contents
Other Capelec Test Equipment manuals
Popular Test Equipment manuals by other brands

AquaLabo
AquaLabo ORCHIDIS FLOTTATEST user manual

pico Technology
pico Technology PicoScope 3000D Series quick start guide

Gossen MetraWatt
Gossen MetraWatt PROFITEST PRCD operating instructions

Kingfisher
Kingfisher KI7343C-InGaAs quick start guide

Burster
Burster DIGIFORCE 9311 Operation manual

Vanguard Instruments Company
Vanguard Instruments Company SGT-600 user manual