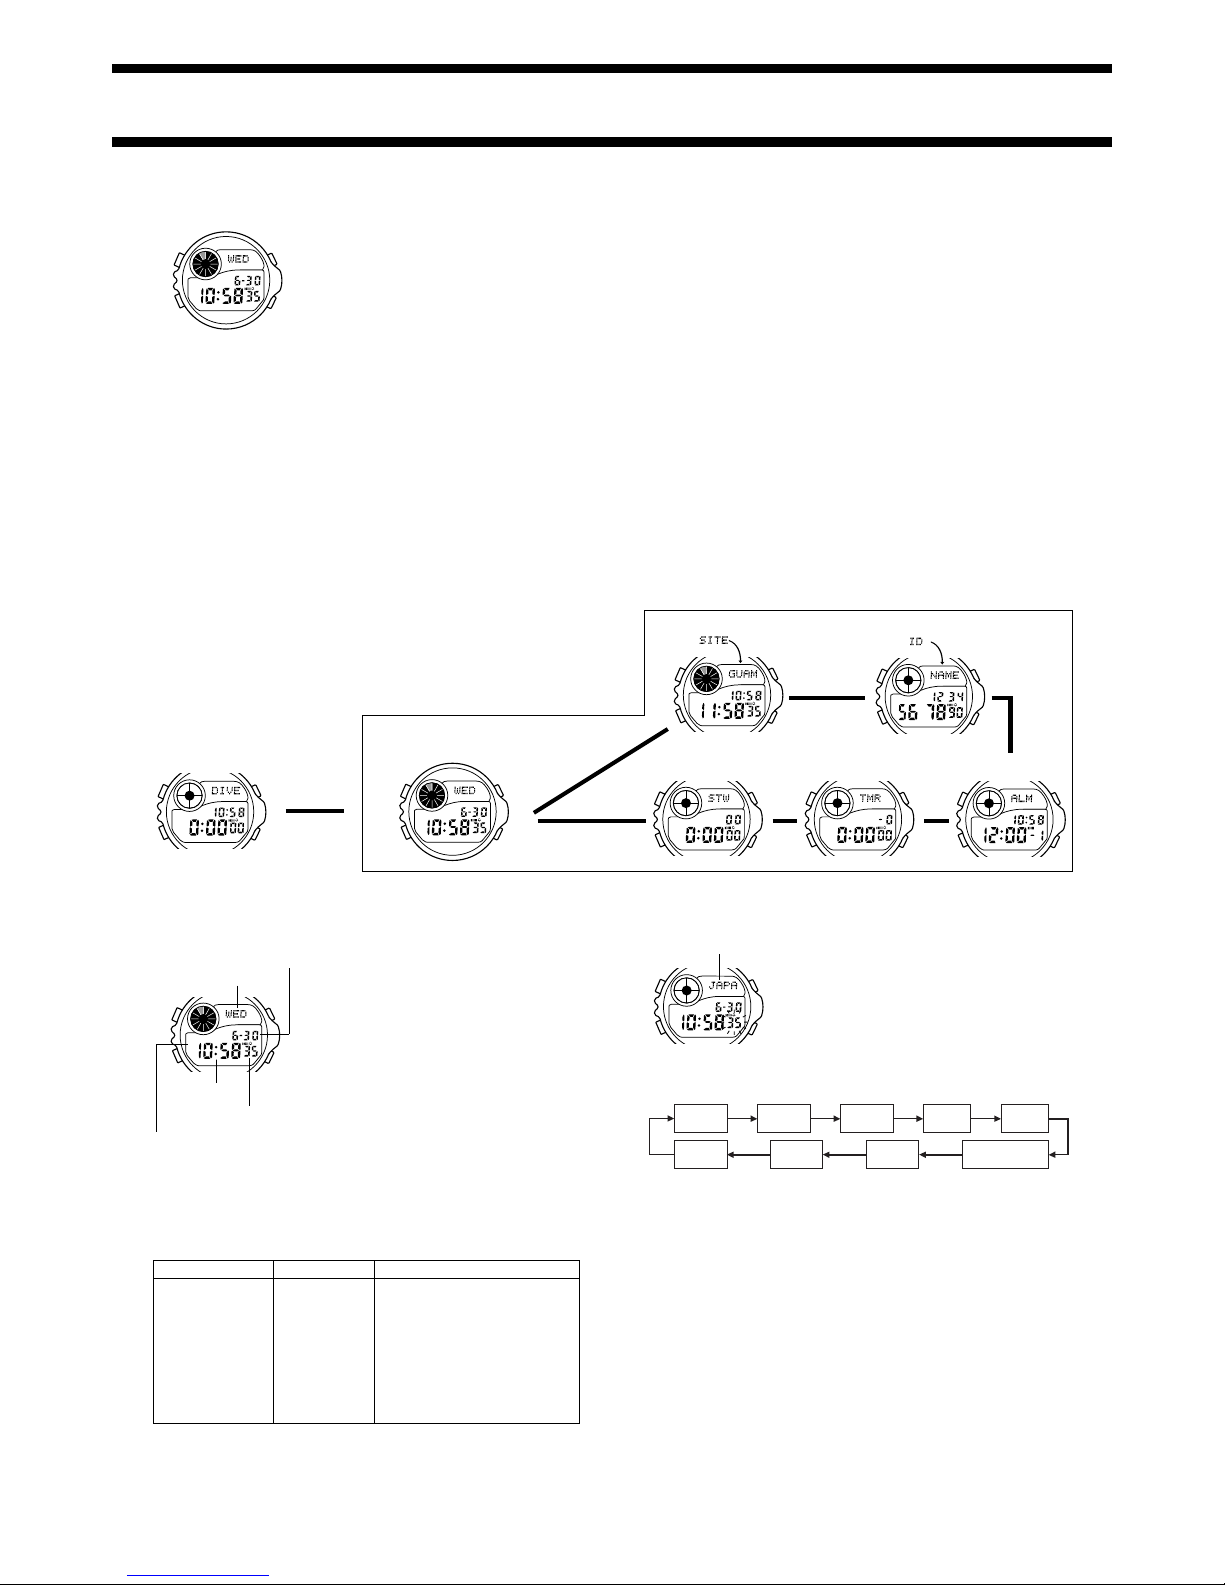
Casio 2036 User manual

2036-1
Module No. 2036
M
AB
C
P
ABOUT THIS MANUAL
•Button operations are indicated using the
letters shown in the illustration.
•Eachsectionofthismanualprovidesyouwith
the information you need to perform
operations in each mode. Further details and
technical information can be found in the
“REFERENCE” section.
(MODE)
Warning!
Note the following important points concerning Identification Mode data
stored in the memory of this watch.
•SCUBA diver certificate number, passport number, and emergency
contact number data stored in the memory of this watch can be
misused whenever the watch is in the hands of another party.
•To protect against the misuse of SCUBA diver certificate number,
passport number, and emergency contact number data, input them
in coded form that cannot be understood by others.
•Make sure you correctly input your name and blood type data. Once
you input your data, take care that the watch is not borrowed by
another person. Otherwise, emergency medical personnel may
assume that your data applies to the person who borrowed the
watch.
•The default blood type screen setting when you first purchase the
watch or after you change the battery is “A” for the blood type and
“Rh *” for the Rh factor. To avoid problems caused by display of
the wrong blood type, we recommend that you input your correct
blood type data as soon as possible after purchasing the watch
and after having the battery replaced.
•CASIO COMPUTER CO., LTD. shall not be held liable to you or any
third party for any losses or damages suffered through the misuse
of data stored in the memory of this watch.
GENERAL GUIDE
P
P
P
P
Site Mode
Press M.
Identification Mode
Alarm Mode
Countdown
Alarm Mode
Stopwatch Mode
▲
▲
▲
▲
M
AB
C
P
TIME
P
DIVE
▲
▲
Dive Time
Measurement
Mode
Hold down M.
Timekeeping Mode
▲
▲
•Press Mto change from mode to mode.
•While in any mode hold down Mfor one second, to enter the Dive Time
Measurement Mode.
•In any mode, press Bto illuminate the display.
TIMEKEEPING MODE
In addition to normal timekeeping, use the
Timekeeping Mode to set the current time and
date. You can also view the Dive Time
Measurement Mode log data.
•See the section of this manual that describes
the Dive Time Measurement Mode for
information about log data.
Read This Before You Set the Time and Date!
The times displayed in the Timekeeping Mode and Site Mode are linked.
Because of this, make sure you select a “Home Site” (the site whose time
and date you are setting), before you set the date and time. You can use
any one of the 10 snorkeling and scuba diving sites pre-programmed in
watch memory, or you can create your own.
Important!
If the site you want to use as your Home Site is not in the above list, use
the procedure under “Changing Site Data” to edit the pre-programmed site
data.
Site Name GMT Differential Location
CAYMAN
GALAPAGOS
GBR
GUAM
HAWAII
JAPAN
MAURITIUS
MALDIVES
RED SEA
TAHITI
Caribbean Ocean
West Pacific Ocean
Coral reef north east of Australia
East Pacific Ocean
Central Pacific Ocean
East Pacific Ocean
West India Ocean
North India Ocean
Red Sea
South Pacific Ocean
–5
–6
+10
+10
–10
+9
+4
+5
+2
–10
M
AB
C
P
Day of week
Month – Day
Hour : Minutes
PM indicator
Seconds
To set the time and date 1. IntheTimekeeping Mode, hold down Auntil
the seconds digits start to flash.
2. While the seconds digits are flashing, press
Cto reset the seconds to 00.
•Pressing Cwhile the seconds count is in
the range of 30 to 59 resets the seconds to
00 andadds1totheminutes.Intherange
of 00 to 29, the minutes count is
unchanged.
3. Press Mto move the flashing in the sequence shown below to select
other settings.
Seconds Hour Minutes
Site
Name
Year
DST
On/Off
12/24-Hour
format
MonthDay
•See “Daylight Saving Time (DST)” for details on DST On/Off setting.
4. Press Muntil the site name is flashing on the display.
5. Use Band Cto scroll through the site names until the one you want
to set as your Home Site.
•PressingCscrollsforward,whileBscrollsbackthroughsitenames.
•See “Read This Before You Set the Time and Date!” for a list of site
name.
6. Press Muntil the hour setting is flashing on the display.
7. Press Cto increase the setting or Bto decrease it.
8. Repeat steps 6 and 7 to set the minutes, year, month, and day.
•When the 12/24-hour setting is selected, press Cto toggle between
12-hour (12H) and 24-hour (24H) timekeeping.
9. Press Ato return to the current time screen.
Daylight Saving Time (DST)
Daylight Saving Time automatically advances the time setting by one hour
from Standard Time. Remember that not all countries or even local areas
use Daylight Saving Time.
M
AB
C
P
Site name

2036-2
To toggle your Home Site time between DST and Standard Time
1. IntheTimekeeping Mode, holddownAuntil
the seconds digits start to flash.
2. Press Mtwice to move the flashing to the
DST On/Off setting.
3. Press Cto toggle Daylight Saving Time
(O) and standard time (OFF).
4. PressAtoreturntothecurrenttimescreen.
•The DST indicator appears on the display
to indicate that daylight saving time is
turned on.
DIVE TIME MEASUREMENT MODE
The Dive Time Measurement Mode lets you
measure the total time you spend underwater
while diving or snorkeling, and the amount of
timespentonthesurface(surfaceinterval).The
watch also stores one set of diving time data
(total dive time and dive start time) into log
memory for later recall.
Warning!
For your own safety, never operate the
buttons of the watch while underwater or
while on the water’s surface. Perform button
operations in a safe place after leaving the
water.
Before Diving/Snorkeling
•Be sure to check if the battery power is low (check for low light
intensity, a dim display, or the flashing indicator). If it is, do not
use the watch for diving/snorkeling.
•Make sure that the watch is set to the correct time.
•Check the glass, case and band for cracks or chips.
•Make sure that the band is fastened securely around your wrist.
While Diving/Snorkeling
•Always use the “buddy system” when diving – never dive alone.
•Checkto make sure that timer operation is being performed properly.
•Take care when diving/snorkeling near rocks or coral to avoid
scratching the watch.
After Diving/Snorkeling
To avoid corrosion, rinse your watch thoroughly with fresh water to
remove salt water, dirt, etc. When possible, soak the watch in fresh
water overnight to make sure that all salt is removed.
Using the Dive Time Measurement Mode
1. Before diving/snorkeling, switch to the Dive
Time Measurement Mode by holding down
Mfor at least one second.
2. Tostartthe divetimemeasurement operation,
press C.
3. To stop the measurement, hold down Cfor
at least one second (until the watch emits a
long beep).
4. To re-start timing from the dive time shown
on the display, press C.
•You can repeat steps 3 and 4 as many
times as you like.
5. To clear the Dive Time Measurement Mode,
stop the measurement operation (step 3,
above) and then press A.
Notes
•Timing of the surface interval starts whenever you hold down Cto stop
the dive time measurement operation in step 3, above. This timing is
performedinternally,and it isnot indicated on theDiveTimeMeasurement
Mode screen. For details on how to view surface interval data, see
“Viewing Log Data”.
•Do not recall log data while a dive time measurement is stopped
and you plan to re-start it. If you do, the dive time to that point will be
stored into memory and the data will be cleared when you exit the Dive
Time Measurement Mode.
Viewing Log Data 1. HolddownMfor at least onesecondto enter
the Timekeeping Mode from the Dive Time
Measurement Mode.
2. Holddown Cto displaytheLog Data screen.
The Log Data screen remains visible as long
as you hold down C. When you release C,
the normal Timekeeping Mode screen
returns.
•The surface interval continues to be timed
until you re-start dive time measurement
or until the surface interval reaches 24
hours.
M
AB
C
TIME
P
DIVE
Current time
Mode indicator
Dive time
M
AB
C
P
DST
DST indicator
M
AB
C
TIME
P
P
DIVE
Dive start time
Current time
Dive time
(hours : minutes seconds)
Clearing the Log Data Memory
Log data in memory is automatically replaced
by the newest measurement. Use the following
operation if you want to manually clear the log
data memory.
1. While in the Timekeeping Mode, hold down
Cto display the Log Data screen.
2. WhileholdingdownC, press Ato clear the
log data memory.
•At this time, the display clears so that no
data is shown.
SITE MODE
The Site Mode lets you view the current time in
any one of 10 different sites.Your watch comes
pre-programmed with site data (site name and
GMT differential) for famous snorkeling and
diving sites around the world. You can use this
site data as it is or change it to suit your needs.
Viewing the Time in Another Site
In the Site Mode, press Cto scroll forward
through the site data.
Changing Site Data
Sitedata consists of the site name, DST setting,
and the GMT differential of the site. Changing
site data causes its time to be set automatically
in accordance with the GMT differential.
•You cannot change the site data of the site that is set as your Home Site
in the Timekeeping Mode.
To change site data 1. Inthe Site Mode, use Ctodisplay the name
of the site whose data you want to change.
2. Holddown Auntil the cursor appears on the
display.
•Ifyour Home Siteison the display, pressing
Acausesthe indicator HOME to appear,
without the cursor.
3. Use Mto move the cursor to the location of
the site name character you want to change.
4. Use Band Cto scroll through characters at the cursor position. Each
pressof these buttons scrolls through characters in thesequenceshown
below.
-
)
Press C.Press B.
(space)
1
to
0
A
to
Z
( / .
5. Repeat steps 3 and 4 to input all the characters of the site name.
•To delete a character, input a space.
•A site name can be up to 14 characters long.
6. After you input the site name, press Muntil
thecurrent DST/Standard Timesetting starts
flashing on the display.
•Oindicates DST and OFF indicates
Standard Time.
•The site name area has spaces for 14
characters, so you must continue to press
Muntil you get past the 14th character.
7. Press Cto toggle between DST (O) and
Standard Time (OFF).
8. Press Mand the current GMT differential starts to flash.
9. Press Cto increase the setting or Bto decrease it.
•See“TIME ZONETABLE” forGMT differentialinformationfora number
of time zones and cities.
10.Press Ato return to the Site Time screen.
Switching a Site Time between DST and Standard Time
1. In the Site Mode, display the name of the site whose DST/Standard
Time setting you want to change.
2. Hold down Auntil the cursor appears on the display.
3. PressM14 times until the DST/Standard Time setting screen appears,
with either Oor OFF flashing.
4. Press Cto toggle the setting between DST (O) and Standard Time
(OFF).
5. Press Ato return to the Site Time screen.
M
AB
C
INTERVAL
TIME
P
LOG DIVE
Dive start time
Surface interval
(hours : minutes)
Dive time
M
AB
C
INTERVAL
TIME
LOG DIVE
M
AB
C
P
P
Mode indicator
Site name
Current time
Current time in the
selected site
M
AB
C
P
P
Cursor
M
AB
C
GMT
GMT differential

2036-3
IDENTIFICATION MODE
With the Identification (ID) Mode, you can store
your name, SCUBA diver certificate number,
emergency contact number, passport number,
and blood type.
About Identification Mode Data
•The Identification Mode has five pre-
programmed data titles: NAME (name),
C CARD (SCUBAdiver certificatenumber),
EMERGENCY NO. (emergency contact
number),PASSPORT (passport number),
and BLOOD TYPE (blood type).
•Except for BLOOD TYPE, you can input
16 characters (letters, numbers, symbols) in
the text area and 10 digits in the number area.
•In the case of BLOOD TYPE, you can input a blood type (ABO)
and Rh factor.
Viewing Identification Mode Data
In the Identification Mode, each press of Cscrolls through the data in the
sequence shown below.
NAME C CARD EMERGENCY NO.
PASSPORTBLOOD TYPE
•In the Text Area, the title alternates with the input text.
Inputting Text and Numbers
The following procedure is the same for NAME, C CARD,
EMERGENCY NO., and PASSPORT data.
1. In the Identification Mode, display the title of
the data you want to input.
2. Hold down Auntil the cursor appears in the
text area.
•If you do not want to input text into the text
area,press M16 times to move the cursor
to the number area and jump to step 7.
3. Use Band Cto change the character at the cursor position in the text
area. The character changes in the following sequence.
-
)
Press C.Press B.
(space)
1
to
0
A
to
Z
( / .
4. Whenthecharacteryouwant is at the cursor position, pressMto move
the cursor to the right.
5. Repeat the steps 3 and 4 until your text is complete.
6. After you input text, use Mto move the cursor to the number area.
•The text area in the Identification Mode can hold up to 16 characters.
When the cursor is located at the 16th space of the text area, moving
the cursor to the right causes it to jump down to the first digit in the
number area. When the cursor is at the 10th digit of the number area,
moving it to the right causes it jump back up to the first character of
the text area.
7. Use Band Cto change the character (hyphen, number, or space) at
the cursor position in the number area. The character changes in the
following sequence.
x
(space)
0
to
9
Press C.
Press B.
8. Whenthecharacteryouwant is at the cursor position, pressMto move
the cursor to the right.
9. Repeat steps 7 and 8 until you complete number input.
10.Press Ato store your data and return to the Identification Mode data
screen (without the cursor).
Inputting Your Blood Type
1. In the Identification Mode, display the
BLOOD TYPE title.
2. Holddown Auntil the blood typeABOstarts
to flash.
3. UseBand Cto scroll through the available
blood type in the following sequence.
A B O AB
Press C.
Press B.
4. Press Mto advance to specification of the Rh factor.
•At this time the current Rh factor (xor *) will flash on the display.
5. Press Cto select either x(negative) or *(positive).
6. PressAto store yourdataand return to the BLOOD TYPE screen.
Editing Identification Mode Data (except Blood Type Data)
1. In the Identification Mode, scroll through the data and display the one
you want to edit.
2. Hold down Auntil the cursor appears in the text area.
3. Use Mto move the cursor to the character you want to change.
4. Use Band Cto change the character.
•For details on inputting characters, see “Inputting Text and Numbers”
(step 3 for text input and 7 for number).
5. After making the changes that you want, press Ato store them and
return to the Identification Mode data screen.
Deleting Identification Mode Data (except Blood Type Data)
1. In the Identification Mode, scroll through the data and display the one
you want to delete.
2. Hold down Auntil the cursor appears in the text area.
3. Press Band Cat the same time to clear the data.
•At this time the cursor appears in the text area, ready for input.
4. Input data or press Ato return to the Identification Mode data screen.
ALARM MODE
You can set the hour and minutes for three
separate DailyAlarms. When the DailyAlarm is
turned on, the alarm sounds for 20 seconds at
the preset time each day. Press any button to
stop the alarm after it starts to sound.
When the Hourly Time Signal is turned on, the
watch beeps every hour on the hour.
•Themode indicator (ALM) indicatesan alarm
screen.SIG appearsin place ofALM when
the Hourly Time Signal screen is shown.
Setting an Alarm Time
1. In the Alarm Mode, press Cto select the
alarm whose time you want to set.
Alarm 1 Hourly Time Signal
Alarm 2 Alarm 3
2. After you select an alarm, hold down Auntil the hour digits of the alarm
time start to flash.
•This operation automatically turns on the alarm.
3. Press Mto move the flashing in the sequence shown below to select
other settings.
On/OffHour Minutes
4. While hour or minutes is flashing, press Cto increase the setting or B
to decrease it.
•When the On/Off setting is flashing, press Cto turn the alarm on
(ON) and off (OFF).
•When setting the alarm time using the 12-hour format, take care to
set the time correctly as a.m. (no indicator) or p.m. (Pindicator).
5. Press Ato return to the alarm display screen.
Testing the Alarm
In the Alarm Mode, hold down Cto sound the alarm.
Turning an Alarm On and Off
1. In theAlarmMode,pressCto select the alarm youwanttoturn on or off.
2. Hold down Auntil the hour digits of the alarm time start to flash.
3. Press Mtwice to select alarm On/Off setting.
•Alarm On/Off setting is selected when the ON or OFF setting is
flashing.
4. Press Cto turn it on (ON) and off (OFF).
5. Press Ato return to the alarm display screen.
•The alarm on indicator ( ) is on the alarm display screen when the
alarm is turned on.
•In other modes (besides the Alarm Mode), the indicator remains
on the display as long as at least one of the alarms is on.
Turning the Hourly Time Signal On and Off
1. In the Alarm Mode, press Cto select the
Hourly Time Signal.
2. Hold down Auntil the ON indicator starts
to flash on the display in place of SIG.
3. Press Cto turn it on (ON) and off (OFF).
4. Press Ato return to the Hourly Time Signal
display screen.
•The hourly time signal on indicator ( )
appears on the display whenever the
Hourly Time Signal is turned on.
M
AB
C
Text area
Mode indicator
Title
Number area
M
AB
C
Cursor
M
AB
C
Blood type ABO
Rh factor
M
AB
C
P
P
Mode indicator
Hour : Minutes
Alarm No.
Current time
M
AB
C
P
Hourly time signal
on indicator

2036-4
COUNTDOWN ALARM MODE
The countdown timer can be set within a range
of 1 second to 24 hours. When the countdown
reaches zero, an alarm sounds.
•You can also select auto-repeat, which
automaticallyrestarts the countdown from the
original value you set whenever zero is
reached.
Setting the Countdown Time
1. In the Countdown Alarm Mode, hold down
Auntilthe hours digit of the countdown time
starts to flash.
2. Press Mto move the flashing in the sequence shown below to select
other settings.
SecondsHours Minutes
3. Whilehours, minutes, or secondsdigitsare flashing, pressCtoincrease
the setting.
•To set the starting value of the countdown time to 24 hours, set
0:00 00.
4. Press Ato return to the countdown alarm display screen.
Using the Countdown Timer
PressCwhilein the CountdownAlarmMode to start the countdown timer.
•When the end of the countdown is reached and auto-repeat is turned off,
the alarm sounds for 10 seconds or until you stop it by pressing any
button. The countdown time is automatically reset to its starting value
after the alarm stops.
•Press Cwhile a countdown operation is in progress to pause it. Press
Cagain to resume the countdown.
•To completely stop a countdown operation, first pause it (by pressing
C), and then press A. This returns the countdown time to its starting
value.
Turning Auto-repeat On and Off
1. In the Countdown Alarm Mode, hold down
Auntilthe hours digit of the countdown time
starts to flash.
2. Press Bto turn auto-repeat on (AUTO
displayed) and off (AUTO not displayed).
3. Press Ato return to the countdown alarm
display screen.
•When the end of the countdown is reached and auto-repeat is turned
on, the alarm sounds, but the countdown starts again automatically
whenever the countdown reaches zero. You can stop timing by
pressing C, and manually reset to the starting countdown time by
pressing A.
•Normally, an alarm tone sounds for 10 seconds when the end of the
countdown is reached. If you use auto-repeat with start time of 10
seconds or less, the watch beeps once.
STOPWATCH MODE
TheStopwatch Mode lets you measure elapsed
time, split times, and two finishes. The range of
the stopwatch is 23 hours, 59 minutes, 59.99
seconds.
M
AB
C
Mode indicator
1/10 second
Hours : Minutes
Seconds
M
AB
C
AUTO
M
AB
C
1/100 second
Hours : Minutes
Mode indicator
Seconds
First runner
finishes. Second runner finishes.
Record time of first
runner.
Record time of
second runner.
(a) Elapsed Time
CC C C A
Start Stop Re-start Stop Clear
(b) Split Time
CA A C A
Start Split Split release Stop Clear
(c) Two Finishes
CA C A A
Start Split Stop Split release Clear
J J J J
J J J J
J J J J
BACKLIGHT
The backlight uses an EL (electro-luminescent)
panel that causes the entire display to glow for
easy reading in the dark. The watch’s auto light
switchautomatically turns on the backlightwhen
you angle the watch towards your face.
•The auto light switch must be turned on
(indicatedby the auto light switchonindicator)
for it to operate.
Turning on the Backlight manually
In any mode, press Bto illuminate the display for about two seconds.
•The above operation turns on the backlight regardless of the current
auto light switch setting.
About the Auto Light Switch
Turning on the auto light switch causes the backlight to turn on for about
two seconds, whenever you position your wrist as described below in any
mode.
•See “Backlight Precautions” for other important information about using
the backlight.
Moving the watch to a position that is parallel to the ground and then
tiltingittowardsyoumore than 40 degrees causes the backlight to light.
Warning!
•Never try to read your watch when mountain climbing or hiking in
areas that are dark or in areas with poor footing. Doing so is
dangerous and can result in serious personal injury.
•Never try to read your watch when running where there is danger of
accidents, especially in locations where there might be vehicular
or pedestrian traffic. Doing so is dangerous and can result in serious
personal injury.
•Never try to read your watch when riding on a bicycle or when
operating a motorcycle or any other motor vehicle. Doing so is
dangerous and can result in a traffic accident and serious personal
injury.
•When you are wearing the watch, make sure that its auto light switch
is turned off before riding on a bicycle or operating a motorcycle or
any other motor vehicle. Sudden and unintended operation of the
auto light switch can create a distraction, which can result in a traffic
accident and serious personal injury.
To turn the auto light switch on and off
In the Timekeeping Mode, hold down Bfor two seconds to turn the auto
light switch on (
AUTO
displayed) and off (
AUTO
not displayed).
•In order to protect against running down the battery, the auto light switch
is automatically turned off approximately six hours after you turn it on.
Repeat the above procedure to turn the auto light switch back on if you
want.
•Theauto light switch on indicator (
AUTO
)is on the display in all modes
while the auto light switch is turned on.
REFERENCE
This section contains more detailed and technical information about watch
operation.It also containsimportant precautions andnotes about thevarious
features and functions of this watch.
Graphic Area and Text Area
•The graphic area shows the passage of
minutes in the Timekeeping, Dive Time
Measurement, Site, Countdown Alarm, and
Stopwatch Modes, and the Log Data screen.
A segment appears in the graphic area each
time five minutes pass.
•The text area can show up to four characters,
so longer text scrolls continually from right to
left.
M
AB
C
P
AUTO
Auto light switch
on indicator
Parallel to
ground
More
than
40
°
M
AB
C
P
Graphic area
Text area

2036-5
Auto Return Feature
•After you perform an operation in any mode (except for the backlight
operation), pressing Mreturns to the Timekeeping Mode.
•If you leave a screen with flashing digits or cursor on the display for two
orthree minuteswithoutperforming anyoperation,the watch automatically
savesanything you haveinputup to thatpointand exits the settingscreen.
•If you leave the watch in Site and Identification Modes for about one
hour without performing any operation, it automatically changes to the
Timekeeping Mode.
Data and Setting Scrolling
The Band Cbuttons are used in various modes and screens to scroll
through data on the display. In most cases, holding down these buttons
during a scroll operation scrolls through the data at high speed.
12-hour/24-hour Timekeeping Formats
The 12-hour/24-hour timekeeping format you select in the Timekeeping
Modeis also appliedinthe DiveTimeMeasurement, Site,andAlarm Modes.
•With the 12-hour format, the P(PM) indicator appears to the left of the
hour digits for times in the range of noon to 11:59 pm. No indicator is
shown from midnight to 11:59 am.
•With the 24-hour format, times are indicated in the range of 00:00 to
23:59, with 24 indicator.
Timekeeping Mode Notes
•The day of the week is automatically displayed in accordance with the
year, month, and day settings.
•The year can be set in the range of 1995 to 2039.
•The watch’s built-in full automatic calendar automatically makes
allowances for different month lengths and leap years. Once you set the
date,there should be no reason to change it except after thereplacement
of the watch’s battery.
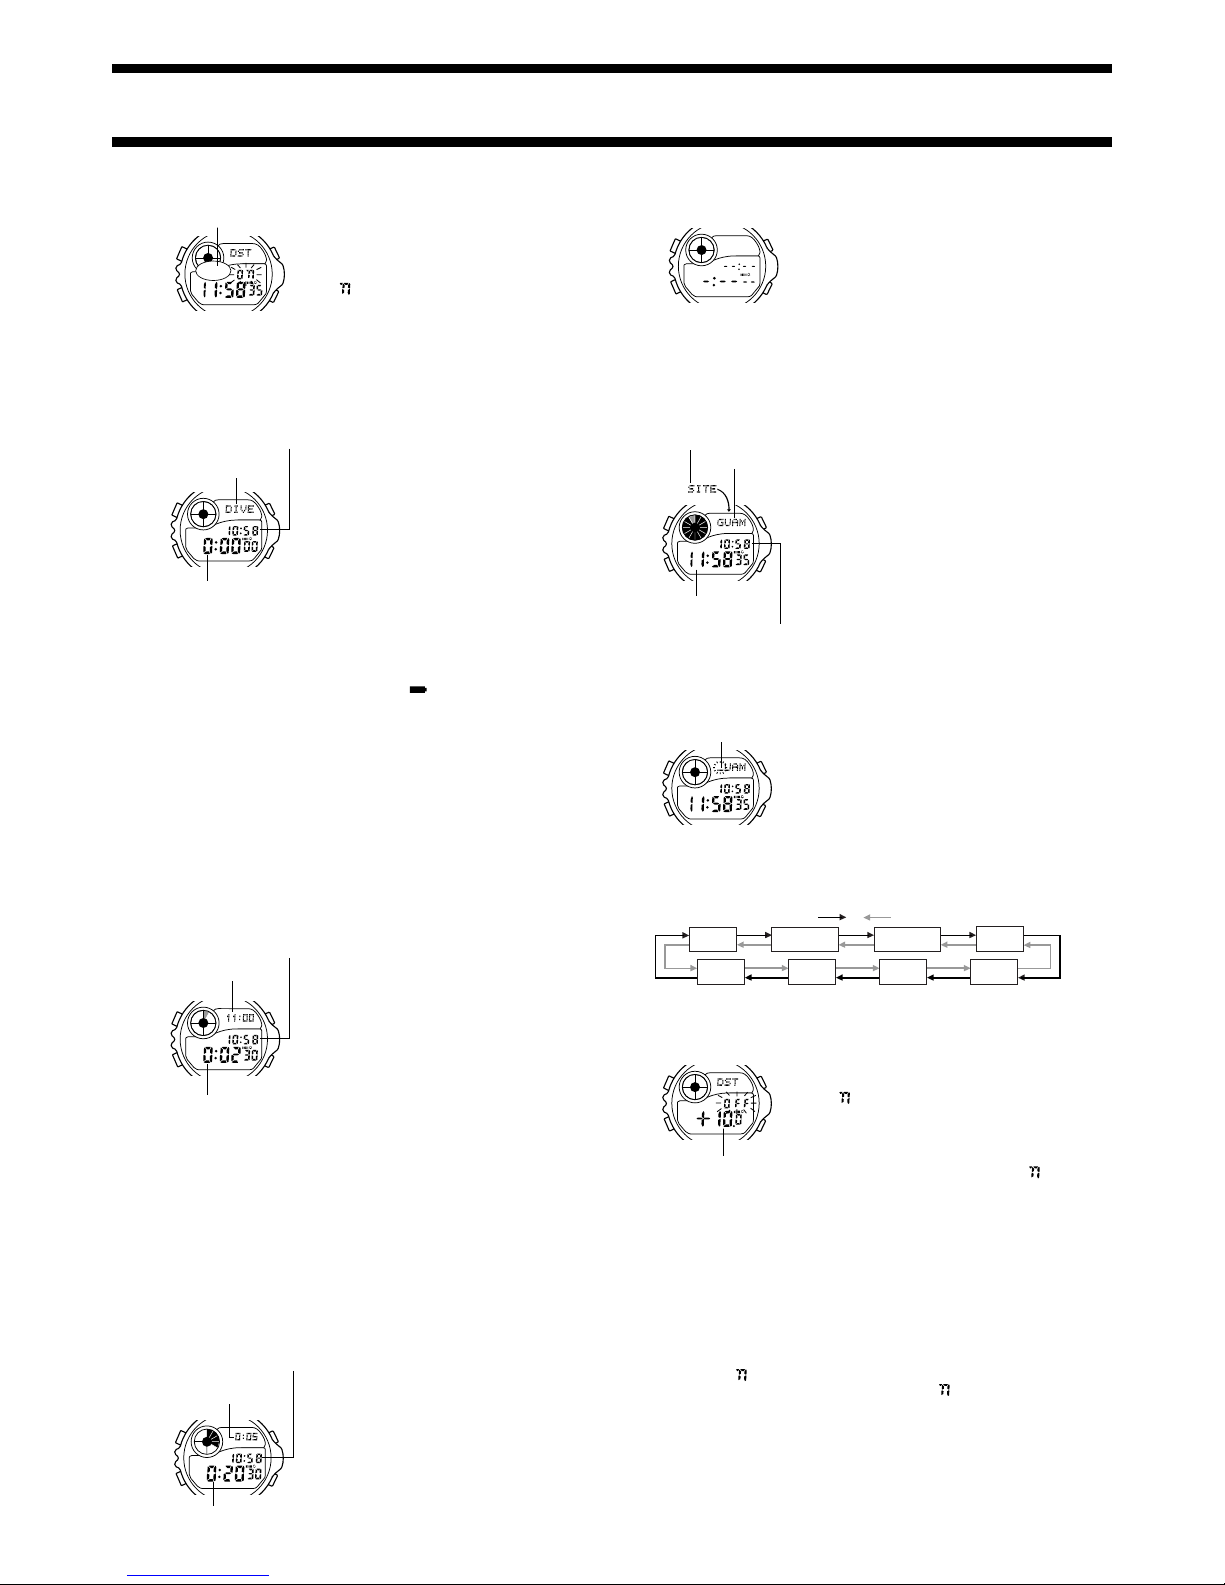
Site Mode
•The current time in all Site Mode sites is calculated in accordance with
the Greenwich Mean Time (GMT) differential for each site, based on the
current Home Site time setting in the Timekeeping Mode.
•The GMT differential is the time difference of the time zone where the
site is located from Greenwich Mean Time.
•The seconds count of the Site Time is synchronized with the seconds
count of the Timekeeping Mode.
•GMT differential is calculated by this watch based on Universal Time
Coordinated (UTC) data.
Backlight Precautions
•The electro-luminescent (EL) panel loses illuminating power after very
long use.
•The illumination provided by the backlight may be hard to see when
viewed under direct sunlight.
•Thewatch will emit an audible sound whenever the display is illuminated.
It does not indicate malfunction of the watch.
•The backlight automatically turns off whenever an alarm sounds.
Auto light switch precautions
•Avoid wearing the watch on the inside of your wrist. Doing so causes the
autolight switch to operate when it is not needed, which shortens battery
life.
•The backlight turns off in about two seconds, even if you keep the watch
pointed towards your face.
•Thebacklight may notlight if the faceof the watchismore than 15degrees
off the parallel as shown below. Make sure that the back of your hand is
parallel to the ground.
•Static electricity or magnetic force can interfere with proper operation of
the auto light switch. If the backlight does not light, try moving the watch
back to the starting position (parallel with the ground) and then tilt it back
toward you again. If this does not work, drop your arm all the way down
so it hangs at your side, and then bring it back up again.
•Undercertain conditions thebacklight may not lightuntil about onesecond
afteryou turn the faceofthe watch towards you.This does notnecessarily
indicate malfunction of the backlight.
More than 15
degrees too high More than 15
degrees too low
Parallel to ground
About the Battery
Whenever battery power is below a certain level, the flashing indicator
appears, display characters appear dim, the backlight may fail to light, the
alarm may fail to sound and the auto light switch does not operate. For safety
reasons, the watch will not enter the Dive Time Measurement Mode when
battery power is low. This is indicated by the message BATT appearing
when you hold down Mto enter the Dive Time Measurement Mode. Using
the watch while the battery is low can result in abnormal operation.
Even when battery power is not low, leaving the backlight on can cause
the flashing indicator to appear temporarily. In this case, the
indicator should disappear from the display after a while. However, note
thatalarm and backlightfunctions, which are normallydisabled when battery
poweris low,arealso disabled when the indicatoris temporarily flashing
due to the condition described above. Normal watch operation will return
after the indicator disappears. If it doesn’t disappear, have the battery
replaced. The amount of time it takes for the low battery warning indicator
to disappear depends on operating conditions.
ALWAYS LEAVE BATTERY REPLACEMENT UP TO THE DEALER
WHEREYOUBOUGHTTHE WATCH OR TOANAUTHORIZED CASIO
DISTRIBUTOR. BE SURE TO SHOW THE FOLLOWING
INFORMATION TO THE PERSON REPLACING THE BATTERY.
Attention dealer or CASIO distributor
Be sure to use the following procedure when replacing the battery.
1. Open and remove the back cover.
•Opening the back cover causes the message OPEN to appear on the
display.
•If CLOSE appears on the display when you open the back cover,
replace the back cover. Wait for a few minutes and try again.
2. Remove the battery holder.
3. Remove the old battery and load a new one.
4. Replace the battery holder.
5. Touch the AC contact and the battery (+) side with metallic tweezers.
6. Close the back cover.
•The message WAIT appears on the display about 20 seconds after
you perform the AC (all clear) operation in step 5 of the above
procedure, indicating that the watch is performing an internal self-
check for data errors. Note that the OPEN message remains on the
display during the internal self-check procedure, even after you close
the back cover.
–11
–10
–09
–08
–07
–06
–05
–04
–03
–02
–01
+00
+01
+02
+03
+3.5
+04
+4.5
+05
+5.5
+06
+6.5
+07
+08
+09
+9.5
+10
+11
+12
PAGO PAGO
HONOLULU, PAPEETE
ANCHORAGE,NOME
LOS ANGELES, SAN FRANCISCO, LAS VEGAS,
VANCOUVER, SEATTLE, DAWSON CITY
DENVER, EL PASO, EDMONTON
CHICAGO, HOUSTON, DALLAS/FORT WORTH, NEW
ORLEANS, MEXICO CITY, WINNIPEG
NEW YORK, MONTREAL, DETROIT, MIAMI, BOSTON,
PANAMA CITY, HAVANA, LIMA, BOGOTA
CARACAS, LA PAZ, SANTIAGO, PORT OF SPAIN
RIO DE JANEIRO, SAO PAULO, BUENOS AIRES,
BRASILIA, MONTEVIDEO
PRAIA
LONDON, DUBLIN, LISBON, CASABLANCA, DAKAR,
ABIDJAN
PARIS, MILAN, ROME, MADRID, AMSTERDAM,
ALGIERS, HAMBURG, FRANKFURT, VIENNA,
STOCKHOLM, BERLIN
CAIRO, JERUSALEM, ATHENS, HELSINKI, ISTANBUL,
BEIRUT, DAMASCUS, CAPE TOWN
JEDDAH, KUWAIT, RIYADH, ADEN,ADDIS ABABA,
NAIROBI
TEHRAN, SHIRAZ
DUBAI, ABU DHABI, MUSCAT
KABUL
KARACHI
DELHI, MUMBAI, CALCUTTA
DHAKA, COLOMBO
YANGON
BANGKOK, JAKARTA, PHNOM PENH, HANOI,
VIENTIANE
HONG KONG, SINGAPORE, KUALA LUMPUR, BEIJING,
TAIPEI, MANILA, PERTH, ULAANBAATAR
TOKYO, SEOUL, PYONGYANG
ADELAIDE, DARWIN
SYDNEY, MELBOURNE, GUAM, RABAUL
NOUMEA, PORT VILA
WELLINGTON, CHRISTCHURCH, NADI, NAURU ISLAND
Some Cities in Same Time Zone
TIME ZONE TABLE
GMT
Differential
Based on data as of June 1998.
Table of contents
Other Casio Watch manuals

Casio
Casio 2050 User manual

Casio
Casio 5244 User manual

Casio
Casio 3159 User guide

Casio
Casio 3358 User manual

Casio
Casio 5366 User manual

Casio
Casio G-SHOCK TOUGH SOLAR GW-1401-2 User manual

Casio
Casio 1534 Configuration guide

Casio
Casio 2376 Configuration guide

Casio
Casio 2639 User manual

Casio
Casio Analog (MAC) 5125 User manual