2072-2
DAY COUNTER MODE
The Day Counter Mode lets you count the number of days
from the Timekeeping Mode’s current date to a specific
target date. An indicator flashes on the display when the
target date is reached.
•There are 10 Day Counter records, each of which can
be set with its own title and target date.
•A Day Counter record has a title field, a target date field,
and a day counter field.
•When a target date is reached, the indicator flashes
on the display in the Timekeeping Mode and World Time
Mode. The indicator also flashes in the Day Counter
Mode when the screen for the target is on the display.
•The indicator flashes on the target date each year,
regardless of the year setting of the target date.
Recalling Day Counter Data
In the Day Counter Mode, press CC
CC
Cto scroll through the Day Counter record titles.
When the record you want is on the display, press BB
BB
Bto view its other data (target
date and day counter).
[Title] [Target Date] [Day Counter]
Press .
•Holding down CC
CC
Cscrolls through the titles at high speed.
•The six digits of the target date indicate the year, month, and day. The above dis-
play indicates January 1, 2001.
•---- appears as the title for any Day Counter record that does not have a title
assigned to it.
•The above procedure displays all 10 records, regardless of whether or not they
contain any data.
•The day counter value has a plus sign (
) in front of it when the corresponding
target date comes after the current date, or a minus sign (/) in front of it when the
target date comes before the current date.
•Day Counter Mode data reverts to the following defaults whenever the battery of
the watch is replaced.
First Record: Title ( NEXT), Target date (ABABAB)
Records 2 – 10: Titles (----), Target date ( ABABAB)
Setting New Day Counter Data
1.In the Day Counter Mode, press CC
CC
Cuntil a record with
---- (indicating no text) for the title appears.
2.Hold down BB
BB
Buntil the flashing cursor appears on the
display.
3.Use AA
AA
Aand CC
CC
Cto scroll through the available characters
in the following sequence.
(space) to
Press .
Press .
4.When the character you want is at the cursor position, press BB
BB
Bto move the flash-
ing cursor to the right.
5.Repeat the steps 3 and 4 until your title is complete.
•You can input up to eight characters for your title.
6.After you input your title, press BB
BB
Buntil the year setting
appears, with the year digits flashing.
•The title field has spaces for eight characters, so you
must press BB
BB
Bto move the cursor goes past the 8th char-
acter in order to get to the year setting.
7.Press CC
CC
Cto increase the setting or AA
AA
Ato decrease it.
•The year can be set in the range 1940 to 2039.
8.After you set the year, press BB
BB
Bso the month digits are
flashing.
9.Press CC
CC
Cto increase the setting or AA
AA
Ato decrease it.
10.After you set the month, press BB
BB
Bso the day digits are
flashing.
11.Press CC
CC
Cto increase the setting or AA
AA
Ato decrease it.
12.Hold down BB
BB
Buntil the digits on the display stop flash-
ing.
Changing Day Counter Mode Data
1.In the Day Counter Mode, scroll through the titles until the one you want to change
is on the display.
2.Hold down BB
BB
Buntil the flashing cursor appears on the display.
3.Use BB
BB
Bto move the flashing to the location you want to change. Each press of BB
BB
B
shifts the flashing in the following sequence.
Title Day
Year Month
•The title field has spaces for eight characters, so you must press BB
BB
Bto move the
cursor goes past the 8th character in order to get to the year setting.
4.Use AA
AA
Aand CC
CC
Cto change the character or the setting.
•For details on setting the data, see “Setting New Day Counter Data” (steps 3 for
title input and 7 for year, month, and day).
•Pressing AA
AA
Aand CC
CC
Cat the same time while the cursor is
flashing in the title clears the title and changes the tar-
get date so it matches the current Timekeeping Mode
date.
•Pressing AA
AA
Aand CC
CC
Cat the same time while the year,
month, or day digits are flashing changes the target date
so it matches the current Timekeeping Mode date.
5.Hold down BB
BB
Buntil the digits on the display stop flash-
ing.
[Timekeeping Mode]
Title
Press CC
CC
C.
Year Month Day
Cursor
Year Month Day
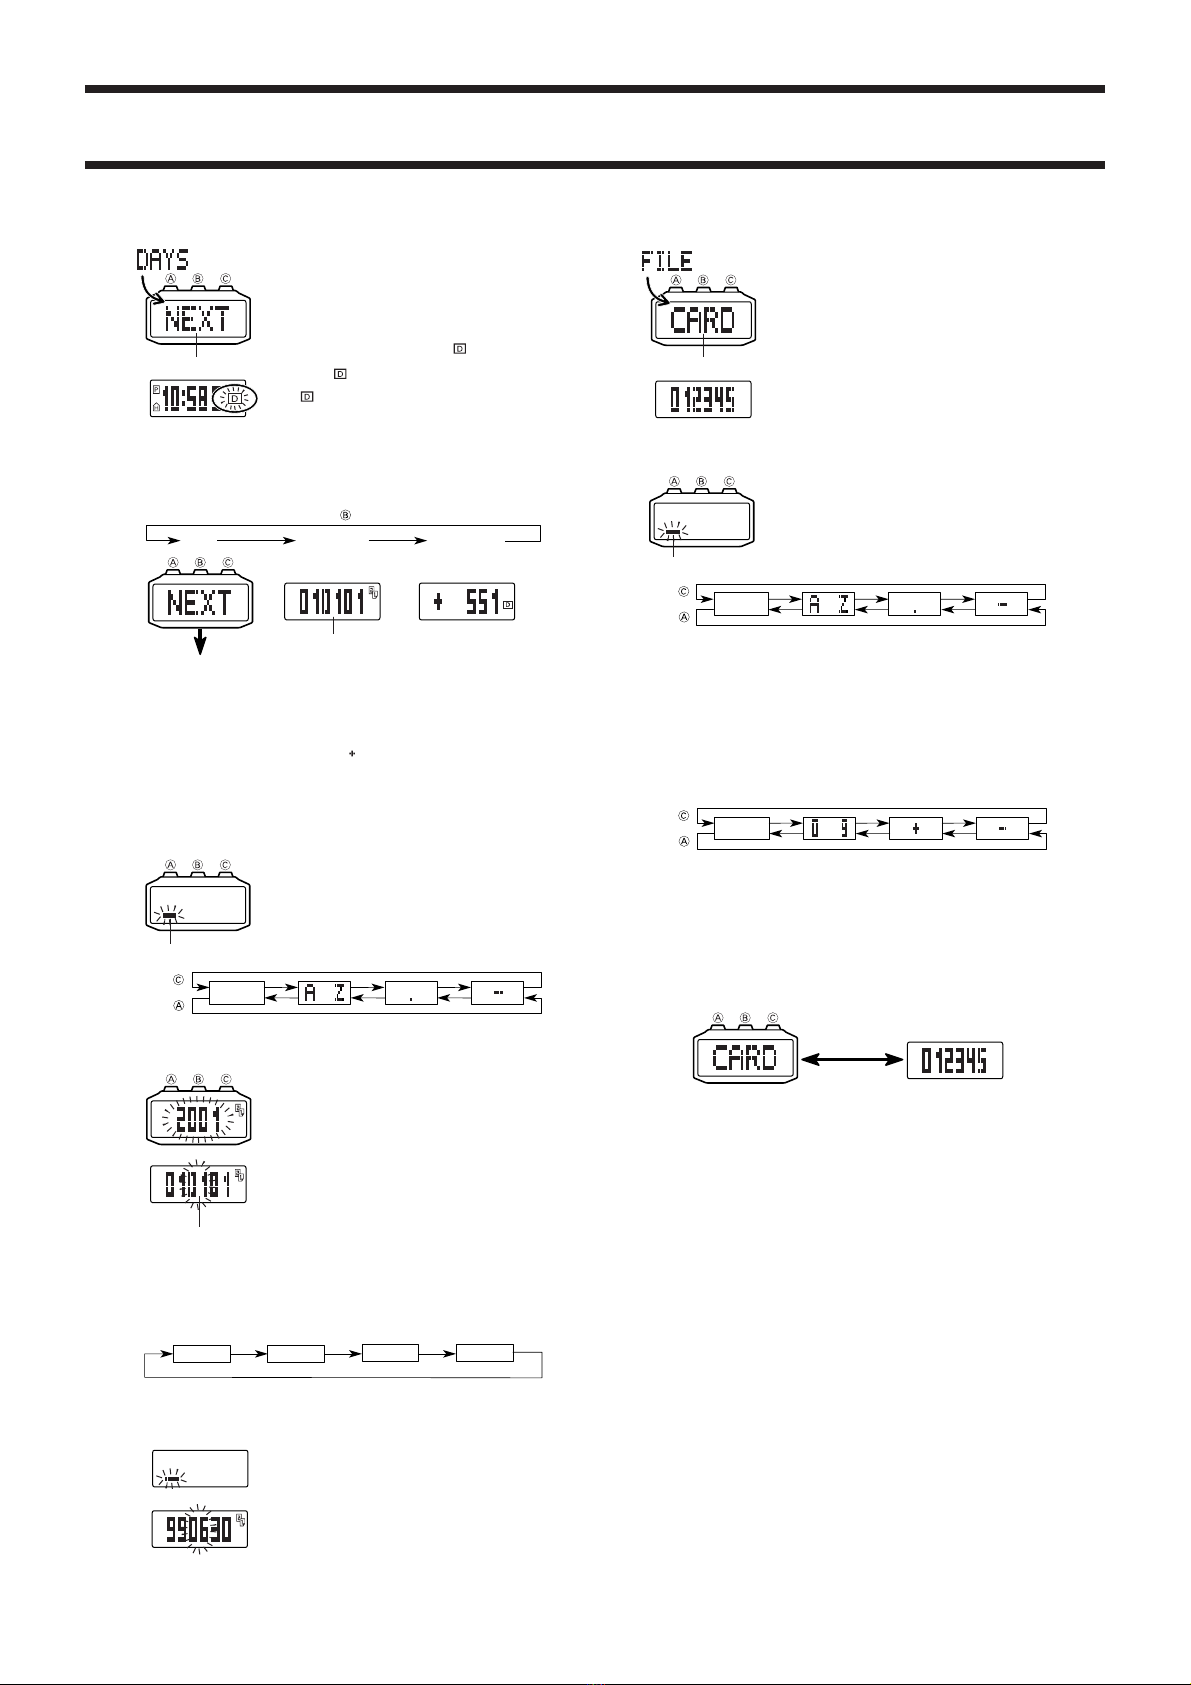
FILE MODE
The File Mode lets you input up to 10 records of memo
text and number data for instant recall when you need
them.
•A File Mode record has a text field and a number field.
•Inputting data into the number field without inputting
anything in the text field causes the text field to show
---- on the display, which can be mistaken for an
empty record. Because of this, it is a good idea to al-
ways input both text and number data for each record.
•Remember that credit card and other sensitive data
can be misuse when the watch is in the hands of
another party.
•To protect against the misuse of the data, input them
in coded form that cannot be understood by others.
Inputting New File Data1.In the File Mode, press CC
CC
Cuntil a record with ----
(indicating no text in the text field) appears.
2.Hold down BB
BB
Buntil the flashing cursor appears on the
display.
3.Use AA
AA
Aand CC
CC
Cto scroll through the available charac-
ters in the following sequence.
(space) to
Press .
Press .
4.When the character you want is at the cursor position, press BB
BB
Bto move the cursor
to the right.
5.Repeat the steps 3 and 4 until your memo text is complete.
•You can input up to eight characters for your memo text.
6.After you input your memo text, use BB
BB
Bto move the cursor to the number field.
•You tell when you are in the text field because of the long cursor (-). The number
field has a short cursor (/).
•The memo text field has spaces for eight characters, so you must press BB
BB
Bto move
the past the 8th character in order to get to the number field.
•The number field has spaces for 24 digits. Pressing BB
BB
Buntil the cursor moves past
the 24th digit causes it to jump back to the first character of the memo text field.
7.Use AA
AA
Aand CC
CC
Cto change the character (space, number, plus symbol, or hyphen) at
the cursor position in the number field. The character changes in the following
sequence.
(space)
Press .
Press . to
8.When the character you want is at the cursor position, press BB
BB
Bto move the cursor
to the right.
9.Repeat steps 7 and 8 until you complete number input.
•You can input up to 24 digits for number.
10.Hold down BB
BB
Buntil the cursor disappears from the display.
Recalling File Data
1.In the File Mode, press CC
CC
Cto scroll through the records.
•Holding down CC
CC
Cscrolls through the records at high speed.
•Only memory text data (field) appears when you scroll through File Data records.
•All 10 File Mode records appear, regardless of whether or not they contain data.
2.Press BB
BB
Bto toggle the screen between the memo text and number fields.
[Memo Text] [Number]
Editing File Data
1.In the File Mode, scroll through the records and display the text field of the one you
want to edit.
2.Hold down BB
BB
Buntil the cursor appears on the display.
3.Use BB
BB
Bto move the cursor to the character you want to change.
4.Use AA
AA
Aand CC
CC
Cto change the character.
•For details on inputting characters, see “Inputting New File Data” (steps 3 for memo
text input and 7 for number).
5.Hold down BB
BB
Buntil the cursor disappears from the display.
Deleting File Data
1.In the File Mode, scroll through the records and display the text field of the one you
want to delete.
2.Hold down BB
BB
Buntil the cursor appears on the display.
3.Press AA
AA
Aand CC
CC
Cat the same time to delete the data item.
•After the data item is deleted, the cursor appears on the display.
4.Hold down BB
BB
Buntil the cursor disappears from the display.
[Number]
Memo text
Cursor
Press BB
BB
B.