Casio 5145 User manual

Operation Guide 5145
9
Illumination
In any mode (except when a setting screen is on the display), press Bto illuminate
the display for about 1.5 seconds for easy reading in the dark.
Illumination may be difficult to see under bright sunlight.x
Illumination turns off automatically if you press any button that causes an operationx
tone to sound or if an alert operation is performed.
8
Type A:
No graphics
Type B:
With graphics
*UDSKLF
7
Display
Depending on its model number, your watch can have one of two display types
(Type A or Type B) as shown below. All of the examples in this manual show Type A
(no graphics). If your watch has a Type B display (with graphics), graphic figures will
appear and disappear timed with the seconds count.
Also, your watch may have dark figures on a light background or light figures on ax
dark background. All of the illustrations in this manual show dark figures on a light
background.
Note that the display style of a watch is fixed. You cannot switch between styles.x
6
Stopping the Alarm Tone ..........................................................................94
Turning the Hourly Time Signal On or Off...................................................94
Time and Date Settings 96
Configuring Time and Date Settings ..........................................................97
Hand Home Position Adjustment 106
Specifications......................................................................................... 111
5
Swapping Your Home Time and World Time Cities .................................... 70
World Time City Code List ........................................................................ 73
Countdown Timer 76
Setting the Countdown Timer Start Time...................................................76
Using the Countdown Timer .....................................................................78
Time Up Alert ...........................................................................................79
Stopping the Time Up Alarm.....................................................................79
Stopwatch 80
Starting or Stopping an Elapsed Time Operation .......................................81
Alarm and Hourly Time Signal 87
Switching between Screens...................................................................... 87
Setting an Alarm Time .............................................................................. 89
Turning the Alarm On or Off ...................................................................... 92
4
Reception Time........................................................................................ 45
Positioning the Watch for Best Reception..................................................45
Receiving a Calibration Signal................................................................... 48
Auto Receive............................................................................................48
Using Manual Receive ..............................................................................52
Signal Level Indicator ...............................................................................54
Viewing the Latest Signal Reception Results ............................................. 56
Turning Auto Receive On or Off.................................................................57
Calibration Signal Reception Precautions .................................................. 60
Troubleshooting........................................................................................62
World Time 67
Searching for a City..................................................................................68
Using Summer Time (DST)........................................................................ 69
Turning Summer Time On (DST) or Off (Standard Time) ............................. 69
3
Contents
Display 7
Illumination 9
Keep your watch exposed to light! 10
Modes and Indicators 17
Power Supply 22
Power Saving 32
How a Radio-controlled Watch Works 36
What is a radio-controlled watch?............................................................. 36
Calibration Signal .....................................................................................37
Reception Ranges....................................................................................39
2
Your watch runs on electric power generated from light, which is stored by a
rechargeable battery. To ensure stable operation, make sure that the watch is
exposed to light as much as possible as described in this manual.
See “Charging Guide” (page 30) for more information about required charging
times.
Be sure to charge the watch sufficiently before using it!
1
Congratulations upon your selection of this CASIO watch.
Features■
Accurate timekeeping using a time calibration signal●
Solar power system charges with sunlight●
LED light●
World Time●
Timer●
Stopwatch●
Alarm and Hourly Time Signal●
MA1209-EB

Operation Guide 5145
19
To switch between screens
Each press of Acycles the digital display in the sequence shown below.
'DWH
'D\RIWKH
ZHHN
6HFRQGV
+RXUPLQXWH
30LQGLFDWRU
QRGLVSOD\
IRU$0
0RQWKGDWH
'D\ 7LPH
6HFRQGV
18
Timekeeping Mode
Type A: No graphics
%DWWHU\OHYHOKDQG
+RXUKDQG
0LQXWHKDQG
'LJLWDOGLVSOD\
&KDQJHV
GLVSOD\VFUHHQ
,OOXPLQDWHV
GLVSOD\
&KDQJHV
PRGH
EXWWRQ EXWWRQ
EXWWRQ EXWWRQ
Type B: With graphics
Graphics appear and disappearx
to indicate the passage of
seconds.
*UDSKLF
The battery level hand indicates*
the current battery level in all
modes.
17
Modes and Indicators
The analog hands are not shown for most of the face illustrations in this User’sx
Guide.
Each press of Csounds a confirmation tone and cycles through available modes
in the sequence shown below.
The watch will revert to the Timekeeping Mode automatically if you leave it in thex
Battery Mode or Alarm Mode without performing any operation for about two or
three minutes.
16
When wearing the watch, try to keep your sleeve from blocking its face (solar cell).x
Charging efficiency is reduced
significantly even if the face
of the watch is covered only
partially by your sleeve.
15
Whenever you are not wearing the watch on your wrist, position it so the facex
(solar cell) is pointed in the direction of a source of bright light.
/LJKW
6RODUFHOO
Leave the watch under
fluorescent lighting, near a
window, etc.
14
Tips on how to keep the battery charged.●
Always try to ensure that the watch is exposed to enough light to keep its batteryx
indicator at LEVEL 1 or LEVEL 2. Some functions are disabled when battery power
drops to LEVEL 3.
/LJKW
5HFKDUJHDEOH
EDWWHU\
/HYHO
/HYHO
/HYHO
/HYHO
%DWWHU\LQGLFDWRU
$OOIXQFWLRQV
HQDEOHG
6RPHIXQFWLRQV
GLVDEOHG
13
Avoid overuse of display illumination.●
Overuse of display illumination can run down the battery.
'LVFKDUJH
5HFKDUJHDEOH
EDWWHU\
3RZHUVXSSOLHGWRZDWFK
12
While the watch is not exposed to light...
'LVFKDUJH
5HFKDUJHDEOH
EDWWHU\
3RZHUVXSSOLHGWRZDWFK
Your watch continues to operate even when it is not exposed to light. Leaving the
watch in the dark can run down its battery and cause functions to become disabled.
11
How the solar cell and battery work.●
While the watch is exposed to light...
/LJKW
5HFKDUJHDEOH
EDWWHU\
6RODUFHOO
&RQYHUWVOLJKWWRSRZHU
(OHFWULFHQHUJ\
&KDUJH
3RZHUVXSSOLHGWRZDWFK
10
Keep your watch exposed to light!
Your watch runs on electric power generated from light, which is stored by a
rechargeable battery.
To ensure stable operation, make sure that the watch is exposed to light as much
as possible.

Operation Guide 5145
29
To charge the battery●
Point the solar panel (face) of the watch at a light source.
Remember that even partial blockage of the solar cell reduces charging efficiency.x
6RODUFHOO
The illustration shows the resin band model.x
28
Charging Precautions●
Avoid charging the watch in the following locations, and anywhere else where the
watch may become very hot.
On the dashboard of an automobile parked in the sunx
Very close to an incandescent light source or other sources of heatx
In a location exposed to direct sunlight for long periodsx
Note that the display panel may become black under very high temperatures. This is
temporary, and the display will appear normal again at lower temperatures.
Depending on the light source you are using, the case of the watch
may become quite hot when charging. Take care to guard against burn
injury after charging.
27
Level 3 or 4 indicates charging is required!●
Battery Level 3 or 4 indicates that remaining battery power is very low. Be sure to
recharge the battery by exposing the watch to light as soon as possible at the first
sign of low battery power.
Flashing R Indicator●
If you use the light or alarm a number of times during a short period, an R (recover)
indicator may flash on the display and the following operations may become disabled
as the battery level recovers.
5HFRYHULQGLFDWRU
Analog timekeepingx
Display illuminationx
Alarm and hourly time signalx
Time up beeperx
Time calibration signal receptionx
Normal operation will return after the battery recovers.
26
Indicators described to the left appear in the Timekeeping Mode at Level 3 andx
Level 4.
Exposing the watch to direct sunlight or other strong light may cause the batteryx
level hand to indicate a level that is momentarily higher than the actual battery
level. Because of this, you should wait for a short while after charging to check the
battery level.
Even if the battery level drops all the way to Level 5, you still will be able tox
recharge the battery and use the watch again.
If you start charging from Level 5, the display of the watch will appear when thex
battery reaches Level 2. At this time you should continue to expose the watch to
light until it charges up to Level 2 or Level 1.
The Home City will revert to TYO (Tokyo) whenever the battery drops down tox
Level 5. If you are using a Home City setting that is not TYO (Tokyo), select the
Home City you want after the battery is charged sufficiently.
25
Level 4
Hour, minute, and battery hands stop at 12 o’clock;
following are disabled: digital display, display
illumination, alarm, hourly time signal, timer time up
alert, signal reception.
Level 5 All functions, including timekeeping, disabled.
24
Level 1 All functions enabled.
Level 2 All functions enabled.
Level 3
Following are disabled: Key operation, illumination,
alarm, hourly time signal, time up beeper, and other
alerts; time calibration signal reception.
23
Checking the Battery Level●
Use the Battery Mode to check the current level of the watch’s rechargeable battery.
In the Timekeeping Mode, pressx Conce to change to the Battery Mode.
The battery level hand indicates the current battery level in all modes.x
7LPHNHHSLQJ0RGH
([DPSOH'DWHGLVSOD\
%DWWHU\0RGH
22
Power Supply
The power supply of this watch uses a solar cell to generate electric power, which is
stored by a rechargeable battery.
Using or storing the watch where it is not exposed to light regularly or allowing it to
be blocked from light by your sleeve as you are wearing it can cause the power of
the rechargeable battery to run down.
To ensure stable operation, be sure to allow the watch to be exposed to light as
much as possible while you are wearing or storing it.
21
C
World Time Mode P-67
Countdown Timer Mode
P-76
:RUOG7LPH&LW\FRGH
C
0RGHQDPH 6WDUWWLPH
C
Alarm Mode P-87 Stopwatch Mode P-80
0RGHQDPH C0RGHQDPH (ODSVHGWLPH
20
Timekeeping Mode Battery Mode P-22
C
%DWWHU\OHYHO
C

Operation Guide 5145
39
Reception Ranges■
The table below shows the time calibration signal that the watch receives when a
particular city code is selected as your Home City.
For information about the Home City setting, see page 67. See page 73 for detailsx
about city codes.
Home City (Cities that support signal reception) Radio receiver
TPE, SEL, TYO Japan (JJY)
HKG, BJS China (BPC)
(HNL), (ANC), YVR, LAX, YEA, DEN, MEX, CHI, NYC,
YHZ, YYT United States (WWVB)
LIS, LON, MAD, PAR, ROM, BER, STO, ATH, (MOW) U.K. (MSF) and Germany
(DCF77)
City codes in parentheses indicate areas where reception may be possible onlyx
when conditions are good.
38
Note that transmission of the Japanese calibration signal may be interrupted
occasionally due to maintenance, lightning, etc.
For more information, visit the website of the Japan Standard Time Group of
the National Institute of Information and Communications Technology (NICT) at
the URL below.
http://jjy.nict.go.jp/
Note that the above URL is subject to change.x
37
Calibration Signal■
The Japanese calibration signal (Call Sign: JJY) is maintained by the National●
Institute of Information and Communications Technology (NICT). It is transmitted
24 hours a day from Mt. Otakadoya (40 kHz) located in Fukushima Prefecture, and
from Mt. Hagane (60 kHz) located on the border between Saga Prefecture and
Fukuoka Prefecture.
The Chinese calibration signal (Call Sign: BPC) is maintained by National Time●
Service center (NTSC) of China and is transmitted from Shangqiu.
The U.S. calibration signal (Call Sign: WWVB) is transmitted by the National●
Institute of Standards and Technology (NIST) from Fort Collins, Colorado.
The U.K. calibration signal (Call Sign: MSF) is transmitted by the National Physical●
Laboratory (NPL) from Anthorn, which is located near Anthorn, Cumbria.
The German calibration signal (Call Sign: DCF77) is transmitted by Physikalisch -●
Technische Bundesanstalt (PTB) in Mainflingen, which is located southeast of
Frankfurt.
Time calibration signal frequencies and transmitter locations are subject to change.x
36
How a Radio-controlled Watch Works
What is a radio-controlled watch?■
A radio-controlled watch is designed to receive a time calibration signal that contains
standard time data, and adjust its current time setting accordingly.
7UDQVPLWWHU
:DWFK
&HVLXP
DWRPLFFORFN
/RQJZDYHWLPH
FDOLEUDWLRQVLJQDO
After the watch receives a Standard Time signal, it performs internal calculations
to determine the current time. Because of this, there may be an error of up to
one second in the indicated time.
35
Turning Power Saving On or Off●
See the procedure under “Configuring Time and Date Settings” (page 97) for
information about turning off Power Saving.
Leaving the watch in a drawer or anywhere else it is dark can cause Power
Saving to trigger in order to conserve battery power.
34
Function sleepx
Function sleep is triggered whenever the watch is left in the dark for six or seven
days.
Alarms and the hourly time signal are disabled. Analog timekeeping and autox
signal receive are both disabled.
Internal timekeeping continues to operate normally.x
To recover from a sleep state●
Move the watch to a brightly lit location or press any button.
It can take up to two seconds before display figures re-appear after you place thex
watch in a well-lit area.
33
What happens when the watch is in a sleep state●
Display sleepx
Display sleep is triggered whenever the watch is left in the dark for about one hour
any time between the hours of 10 p.m. and 6 a.m.
The display goes blank in the display sleep state.x
Alarms and the hourly time signal continue to operate normally.
Digital-analog time coordination and auto signal receive are both performed
normally.
The watch does not enter a sleep state if it is in the Countdown Timer Mode orx
Stopwatch Mode.
32
Power Saving
Power Saving causes the watch to enter a sleep state automatically, which causes
the hands to stop and the display to go blank, whenever the watch is left in the dark.
The Power Saving feature of the watch is turned on at the factory, but you can turn
it off if you want.
Note that the watch also may enter a sleep state if the watch is blocked from lightx
by your sleeve.
31
Approximate Charge Times Required to Advance to a Higher Level●
Exposure Level
(Brightness)
Approximate Charging Time
Level 5 Level 4 Level 3 Level 2 Level 1
Outdoor sunlight
(50,000 lux) 3 hours 28 hours 8 hours
Sunlight through a
window (10,000 lux) 8 hours 105 hours 28 hours
Daylight through a
window on an overcast
day (5,000 lux)
13 hours 169 hours 46 hours
Indoor fluorescent lighting
(500 lux) 144 hours – – – – – –
Note that the charging times in the table above are for reference only. Actualx
charging time depends on a variety of environmental factors.
30
Charging Guide●
The tables in this section provide some guidelines about the amount of time●
required each day to ensure stable operation of the watch.
The values provided here show the amount of charging required each day tox
support the operations below (all times approximate).
Light:x
1.5 seconds/day
Alarm tone:x
10 seconds/day
Signal receive:x
5 minutes/day
Display operation:x
18 hours/day
Stable operation is enabledx
by frequent charging.
Exposure Level (Brightness) Approximate
Charging Time
Outdoor sunlight (50,000 lux) 8 minutes
Sunlight through a window
(10,000 lux) 30 minutes
Daylight through a window on
an overcast day (5,000 lux) 48 minutes
Indoor fluorescent lighting
(500 lux) 8 hours

Operation Guide 5145
49
Home City Auto Receive Start Times
123456
TPE, SEL,
TYO
Standard
Time Midnight 1:00 a.m. 2:00 a.m. 3:00 a.m. 4:00 a.m. 5:00 a.m.
HKG, BJS Standard
Time 1:00 a.m. 2:00 a.m. 3:00 a.m. 4:00 a.m. 5:00 a.m. —
HNL, ANC,
YVR, LAX,
YEA, DEN,
MEX, CHI,
NYC, YHZ,
YYT
Standard
Time
Summer
Time
Midnight 1:00 a.m. 2:00 a.m. 3:00 a.m. 4:00 a.m. 5:00 a.m.
LIS, LON
Standard
Time 1:00 a.m. 2:00 a.m. 3:00 a.m. 4:00 a.m. 5:00 a.m. Midnight*
Summer
Time 2:00 a.m. 3:00 a.m. 4:00 a.m. 5:00 a.m. Midnight*
1:00 a.m.*
48
Receiving a Calibration Signal■
There are two methods you can use in order to receive the time calibration signal.
Auto receive: Reception six times a day (five times for the China signal)x
Manual receive: You hold downx Din the Timekeeping Mode.
Auto Receive■
Auto Receive is performed whenever one of the cities shown in the table below isx
selected as the Home City (page 67). Note however that the initial factory default
setting for auto receive is OFF for the HNL, ANC, and MOW city codes.
For information about how to turn auto receive on or off, see page 57.x
Calibration signal reception will start automatically whenever the current time inx
the Timekeeping mode (page 17) reaches one of the Auto Receive Start Times
shown below. Auto receive is performed up to six times a day (five times for the
China signal). Once a signal receive operation is successful, no more auto receive
operations are performed that day. Note that the Auto Receive Start Times differ
according to the current Home City setting and the summer time setting.
47
Next to a household
appliance or office
equipment (TV, speaker,
fax, computer, cell phone,
etc.)
At a construction site,
airport, or other location
where there is radio
interference
Near mountains
If you are experiencing problems with reception, move away from the types of
locations described above to a location with better reception, and try again.
46
Important!●
Reception is difficult and may even be impossible in the locations described below.
Avoid such locations when performing signal reception.
You should think of your watch as operating like a radio or TV when it is receivingx
the calibration signal.
Among or near buildings Near high-voltage lines Inside an automobile,
train, plane, or other
vehicle
45
Reception Time■
A receive operation can take anywhere from about two to seven minutes.
Under certain conditions, a receive operation can take as long as 14 minutes.x
Positioning the Watch for Best Reception■
Remove the watch from your wrist
and place it somewhere so its top
(12 o’clock, where the antenna is
located) is facing approximately in the
direction of the signal transmitter. Keep it
away from metal objects.
Orienting the watch so it is sidewaysx
to the transmitter makes it more
difficult for it to receive the signal.
Do not move the watch while it isx
receiving the calibration signal.
5HVLQEDQG
0HWDOEDQG
44
Certain conditions can make reception impossible even when the watch is within●
one of the reception ranges shown above. Signals become weaker outside of
the smaller circles indicated by dashed lines in the maps above, so the reception
environment has a greater effect on signal reception.
The following also can affect signal reception: geographic contours, structures,x
weather, climate, time of day (afternoon, evening), noise.
Using this watch in an area covered by a time calibration that is different from the●
areas supported by this watch may result in incorrect time indication due to local
application of summer time, etc.
43
0DLQƃLQJHQ
7KHVLJQDOWUDQVPLWWHGRXWRI$QWKRUQ
PD\EHUHFHLYDEOHZLWKLQWKLVUDQJH
$QWKRUQ
NP
NP
(QJODQG06)*HUPDQ\'&)
42
NP
NP
)RUW&ROOLQV
8QLWHG6WDWHV::9%
41
NP &KDQJFKXQ
%HLMLQJ
6KDQJKDL
+RQJ.RQJ
6KDQJTLX
&KHQJGX
NP
&KLQD%3&
40
Transmitter Locations
NP
NP
NP
NP
0W+DJDQH
N+]
0W2WDNDGR\D
N+]
6LJQDOUHFHSWLRQLVSRVVLEOHLQWKH7DLZDQDUHDZKHQ
UHFHSWLRQFRQGLWLRQVDUHJRRG
-DSDQ--<

Operation Guide 5145
59
When auto receive is turned on...
When the Home City is TPE, SEL, or TYO●
With one of these settings, the watch automatically selects either the Mt. Otakadoya
signal (40 kHz) or the Mt. Hagane signal (60 kHz), whichever is strongest.
The transmitter from which a signal last was received successfully will be givenx
priority for the next auto receive operation.
When the Home City is HKG or BJS●
The watch receives the signal from Shangqiu.
When the Home City is HNL, ANC, YVR, LAX, YEA, DEN, MEX, CHI, NYC,●
YHZ, or YYT
The watch receives the signal from Ft. Collins, Colorado.
When the Home City is LIS, LON, MAD, PAR, ROM, BER, STO, ATH, or MOW●
The watch selects either the U.K. (Anthorn) transmitter or German (Mainflingen)
transmitter automatically, whichever is strongest.
The transmitter from which a signal last was received successfully will be givenx
priority for the next auto receive operation.
58
2. Hold down
A
for about two seconds until the
setup menu appears.
The current setting (ON or OFF) will flash on thex
display.
The watch will exit the setting screen automaticallyx
if you do not perform any operation for about two or
three minutes.
3. Press
D
to toggle the setting between on and off.
4. When the setting is the way you want, press
A
to exit the setting screen.
This will exit the setting screen and return to the last receive operation time andx
date.
Pressx Dto return to the Timekeeping Mode.
$ERXWVHFRQGV
57
Turning Auto Receive On or Off■
You can turn off auto receive so it is not performed each day.
You can turn auto receive on or off only while a city that supports auto receive isx
selected as your Home City.
For details about the city codes that support calibration signal reception, see pagex
39.
1. In the Timekeeping Mode, press
D
to display the
time and date of the last reception.
This will cause “GET” to appear on the display.x
If you do not perform any operation for about one or twox
minutes, the watch will return to the Timekeeping Mode
automatically.
56
Viewing the Latest Signal Reception Results■
5HFHSWLRQWLPH
5HFHSWLRQ
PRQWKDQGGD\
In the Timekeeping Mode, press
D
.
Perform the following steps to view the date andx
time the timekeeping settings were last adjusted
in accordance with a time calibration signal.
The “GET” message, reception date, andx
reception time will cycle at two-second intervals.
If there have been no successful receivex
operation, the last reception time will show
“– : – –”.
To return to the Timekeeping Mode, pressx D
again.
If you do not perform any operation for aboutx
one or two minutes, the watch will return to the
Timekeeping Mode automatically.
55
Use the signal level indicator to check the reception status and to determine●
the best location for signal reception.
Note that weather, the time of day, surroundings, and other factors all can●
affect reception.
54
Signal Level Indicator■
The signal level indicator cycles through the values shown
below while reception is in progress.
Keep the watch in a location where reception is stable while a
receive operation is in progress.
8QVWDEOH 6WDEOH
Even under optimum reception conditions, it can take about 10 seconds forx
reception to stabilize.
%DWWHU\OHYHO
53
When reception is successful
After a receive operation is complete, the watch will been and then adjust its current
time setting. Next, it will display the date and time of the adjustment.
After the date and time of the adjustment appears on the display, pressx Dto
return to the Timekeeping Mode. The watch also will return to the Timekeeping
Mode automatically if you do not perform any operation for about one or two
minutes.
When reception fails (ERR)
The watch does not adjust its current time setting, and displays “ERR”.
If the “ERR” indicator is displayed, you can clear it manually by pressingx D. The
error also will clear automatically if you do not perform any operation for about one
or two minutes.
52
Using Manual Receive■
You can use a button operation to trigger signal reception manually whenever youx
want. Perform this operation in a location and environment that is compatible with
reception (page 45). Also, do not move the watch while the receive operation is
in progress.
$ERXWVHFRQGV
In the Timekeeping Mode, hold down
D
for about
two seconds.
The watch will beep and reception will start.x
A signal level indicator (page 54) will be displayedx
while reception is in progress.
To cancel a manual receive operation
Press any button.
51
Auto Receive modes
Auto receive can be performed only while the watch is in the Timekeeping Mode
or World Time Mode. Use Cto enter the Timekeeping Mode or World Time mode
when you want the watch to perform auto receive.
When reception is successful
As soon as a time calibration signal reception is successful, the watch updates its
time setting and then returns to the mode it was in before receive operation started.
When reception fails
The watch returns to the mode it was in before the receive operation was started,
without updating the time setting.
50
Home City Auto Receive Start Times
123456
MAD, PAR,
ROM,
BER, STO
Standard
Time 2:00 a.m. 3:00 a.m. 4:00 a.m. 5:00 a.m. Midnight*
1:00 a.m.*
Summer
Time 3:00 a.m. 4:00 a.m. 5:00 a.m. Midnight*
1:00 a.m.* 2:00 a.m.*
ATH
Standard
Time 3:00 a.m. 4:00 a.m. 5:00 a.m. Midnight*
1:00 a.m.* 2:00 a.m.*
Summer
Time 4:00 a.m. 5:00 a.m. Midnight*
1:00 a.m.* 2:00 a.m.* 3:00 a.m.*
MOW
Standard
Time 4:00 a.m. 5:00 a.m. Midnight*
1:00 a.m.* 2:00 a.m.* 3:00 a.m.*
Summer
Time 5:00 a.m. Midnight*
1:00 a.m.* 2:00 a.m.* 3:00 a.m.* 4:00 a.m.*
*Next Day

Operation Guide 5145
69
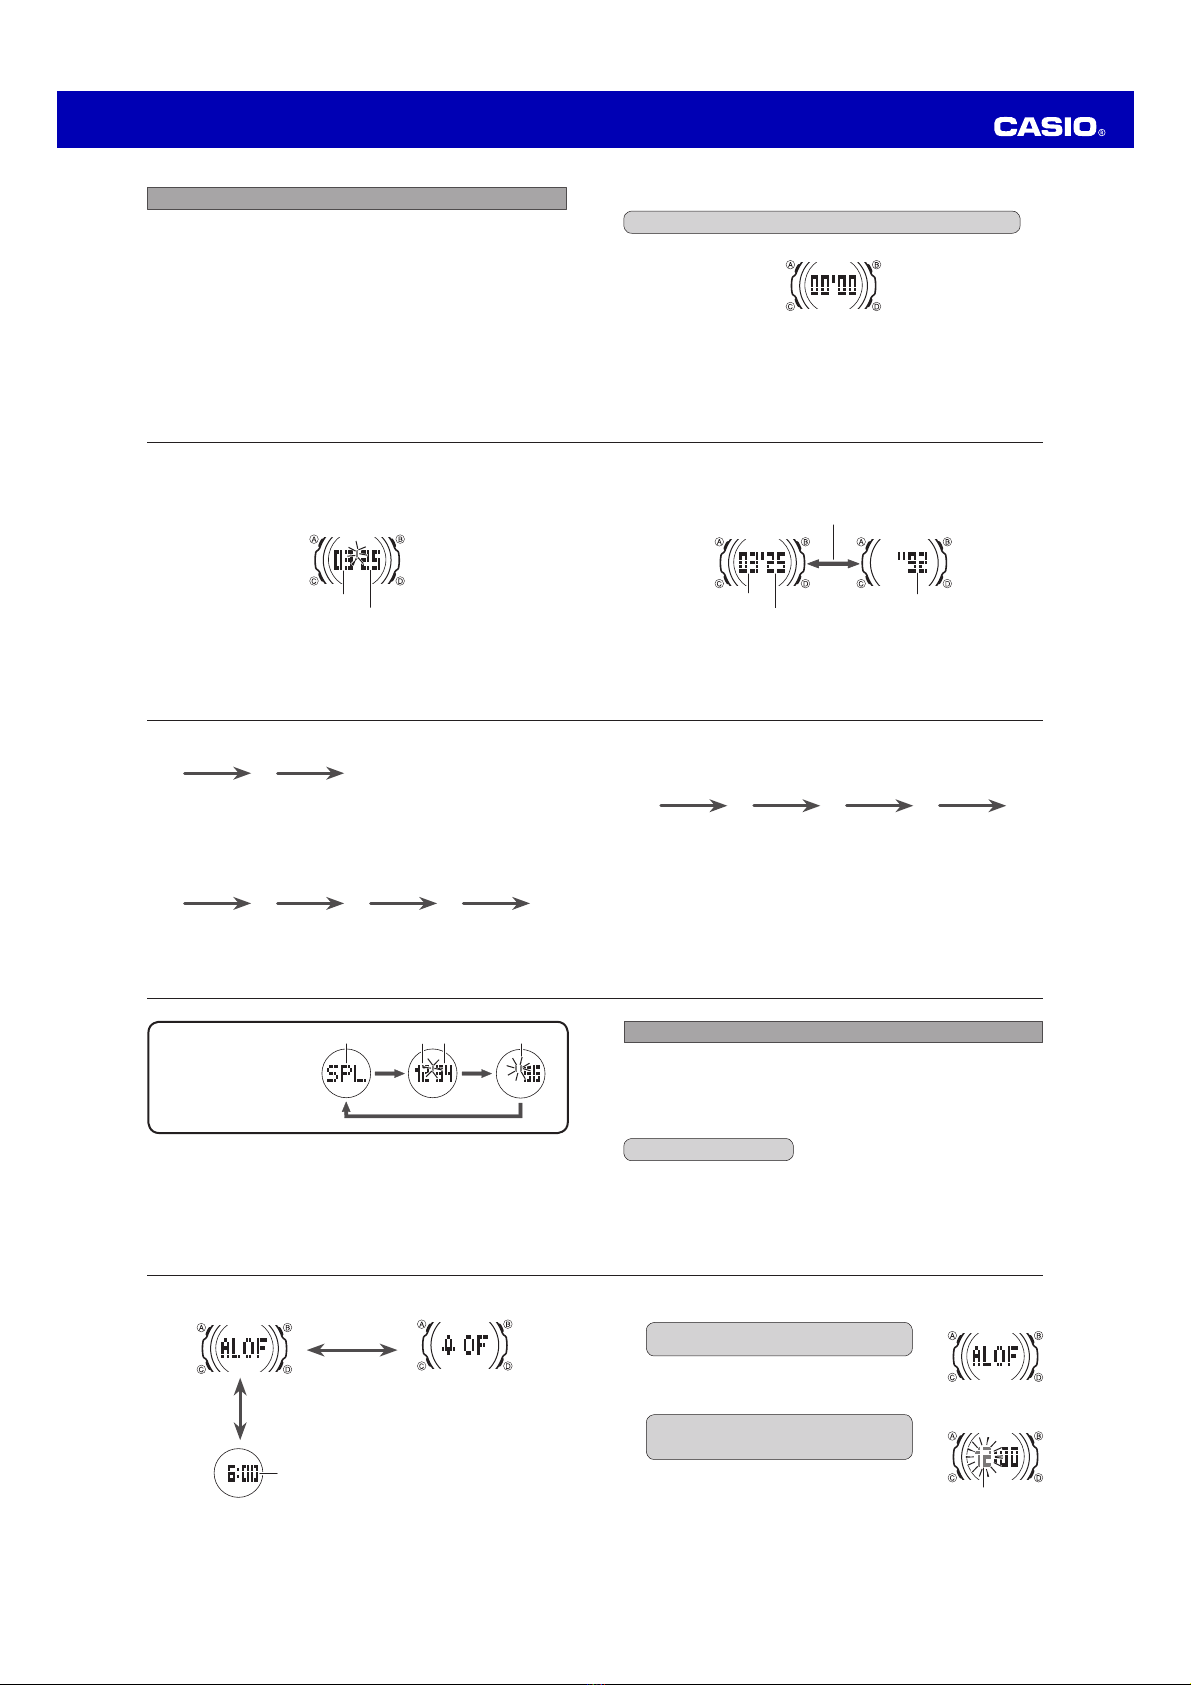
Using Summer Time (DST)■
Summer time, or Daylight Saving Time (DST) as is it is known in some countries, calls
for setting clocks ahead one hour during the summer season. Note that the use of
summer time depends on the country and even the local area.
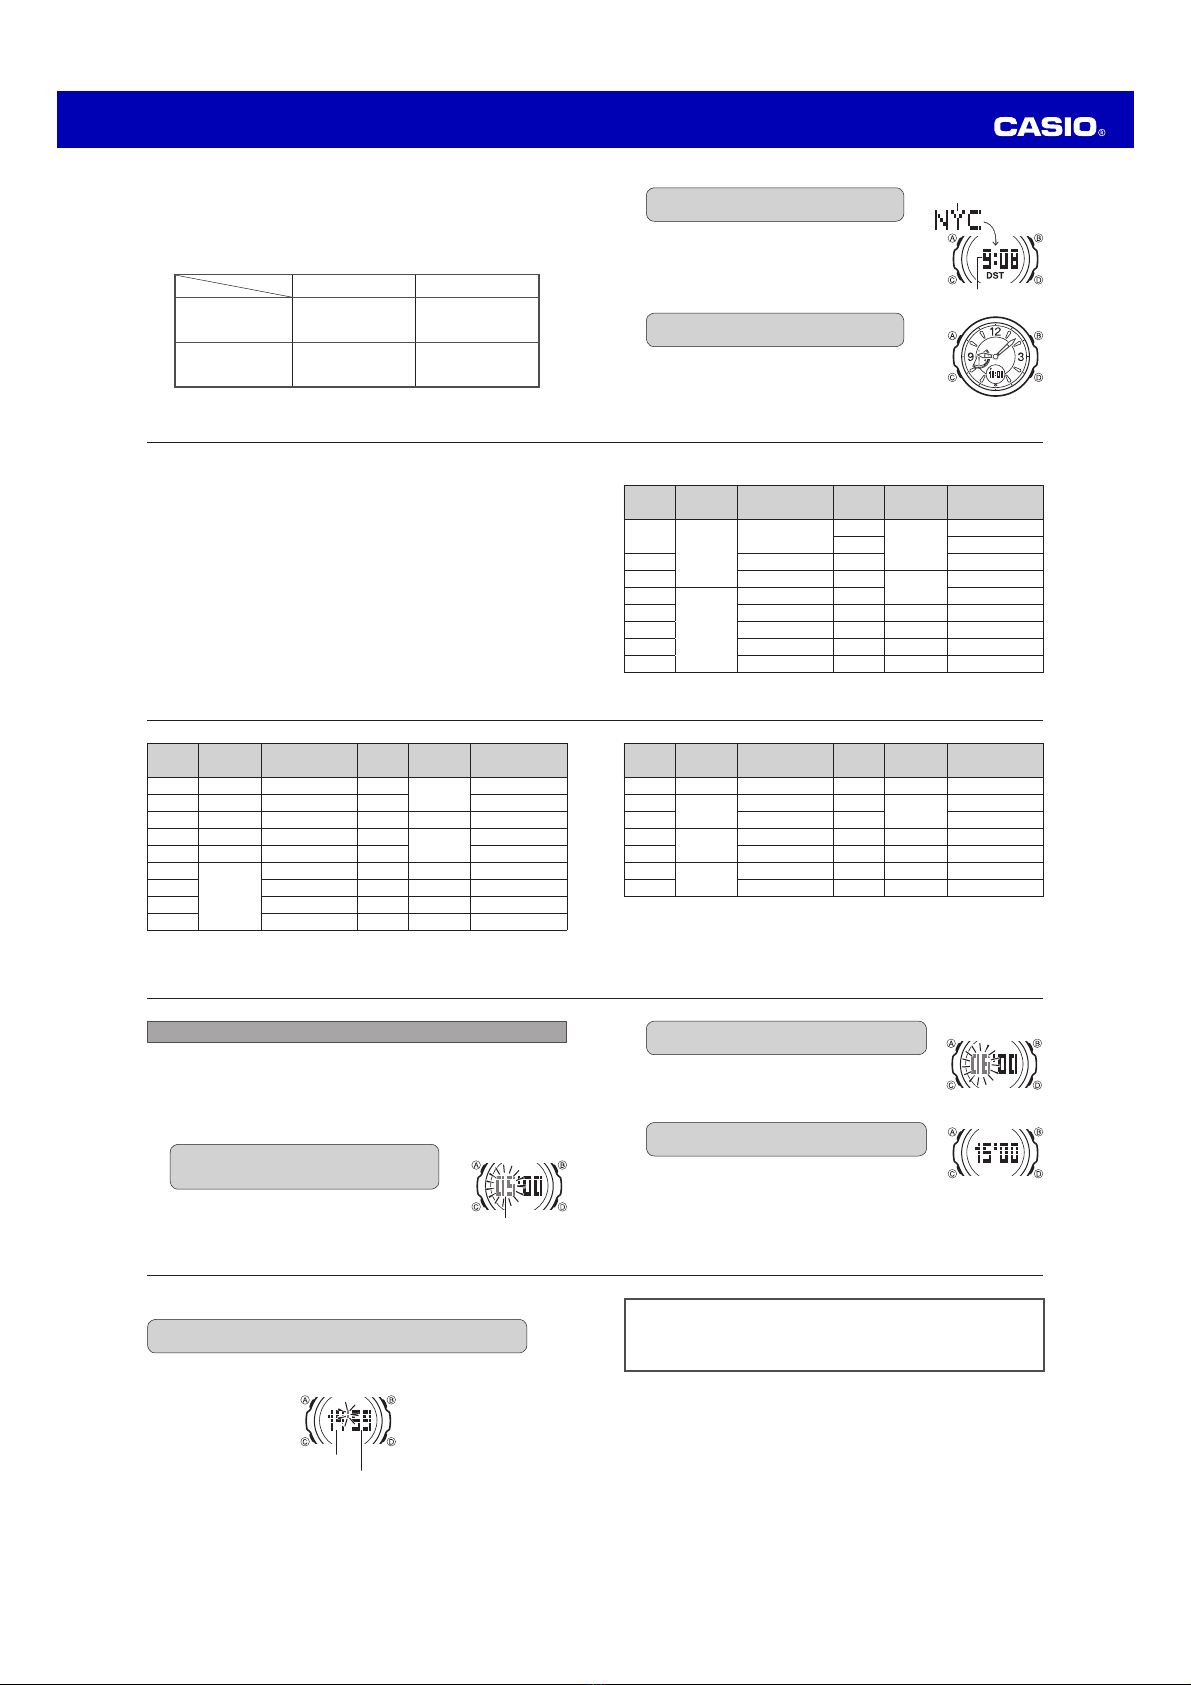
Turning Summer Time On (DST) or Off (Standard Time)■
In the World Time Mode, use Dto display the screen for the city code whose
setting you want to change.
Hold down
A
for about two seconds.
This toggles summer time between on and off.x
Thex “DST”indicator will be on the display and
timekeeping will be advanced by one hour when summer
time is turned on.
You can turn summer time on or off independently forx
each World Time Mode city. Note, however, that you
cannot turn on summer time for the “GMT”city code.
'67LQGLFDWRU
$ERXWVHFRQGV
68
Searching for a City■
In the World Time Mode, press
D
.
This will cause the currently selected World Time City to appear for about twox
seconds, followed by the current time in that city.
Pressingx Dwhile a city code is displayed will scroll to the next city code.
Holding downx Dscrolls at high speed.
&LW\FRGH
$ERXWVHFRQGV
:RUOG7LPH
67
World Time
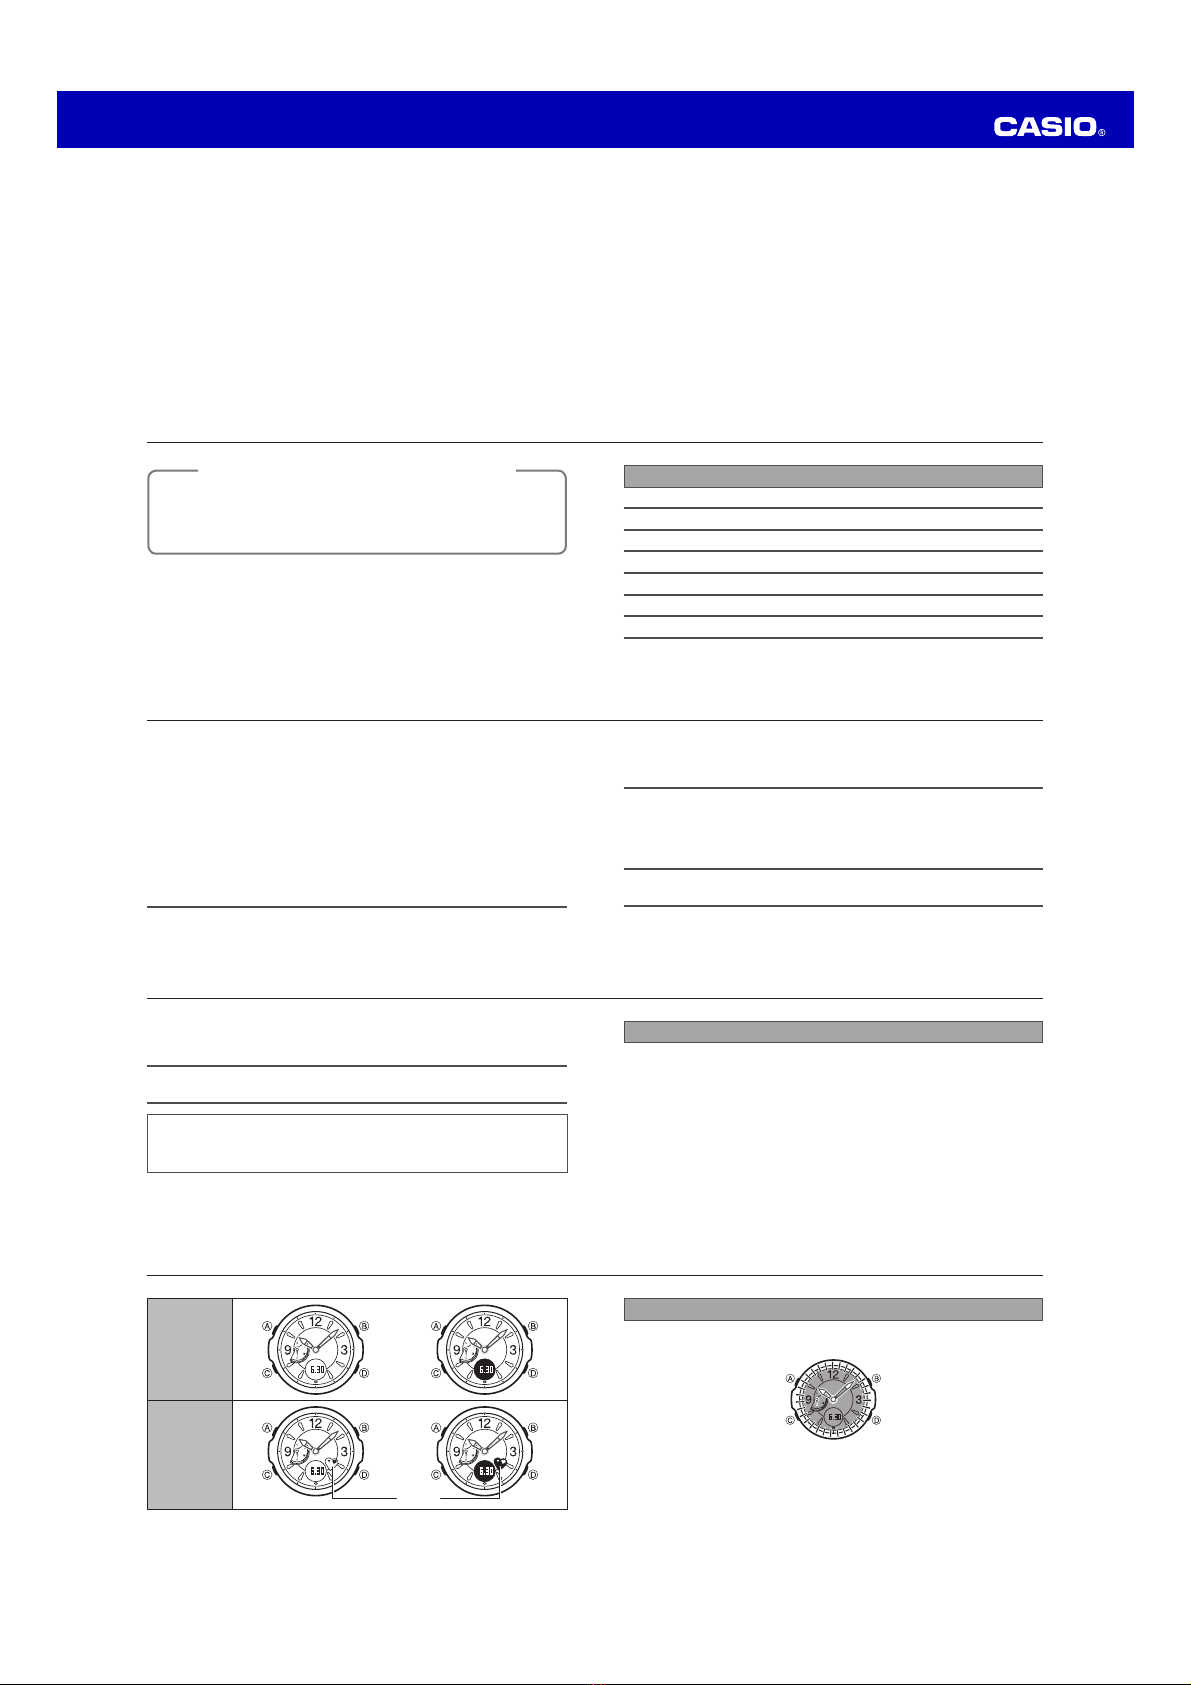
Use the Cbutton to enter the World Time Mode as shown under “Modes and
Indicators” on page 17.
World Time lets you display the current time in any one of 48 cities (31 time zones)
around the world.
The times for each city code in the World Time Mode are displayed automaticallyx
by applying a time differential to the current Timekeeping Mode time.
When you enter the World Time Mode, the screen for the city that was displayedx
when you last exited the mode appears first.
The seconds count in the World Time Mode is synchronized with the Timekeepingx
Mode seconds count.
Important!■
If the World Time Mode time is incorrect, check to make sure the correct Home City
is selected and that its current time is set correctly in the Timekeeping Mode.
See page 96 for details on how to set the current time.x
66
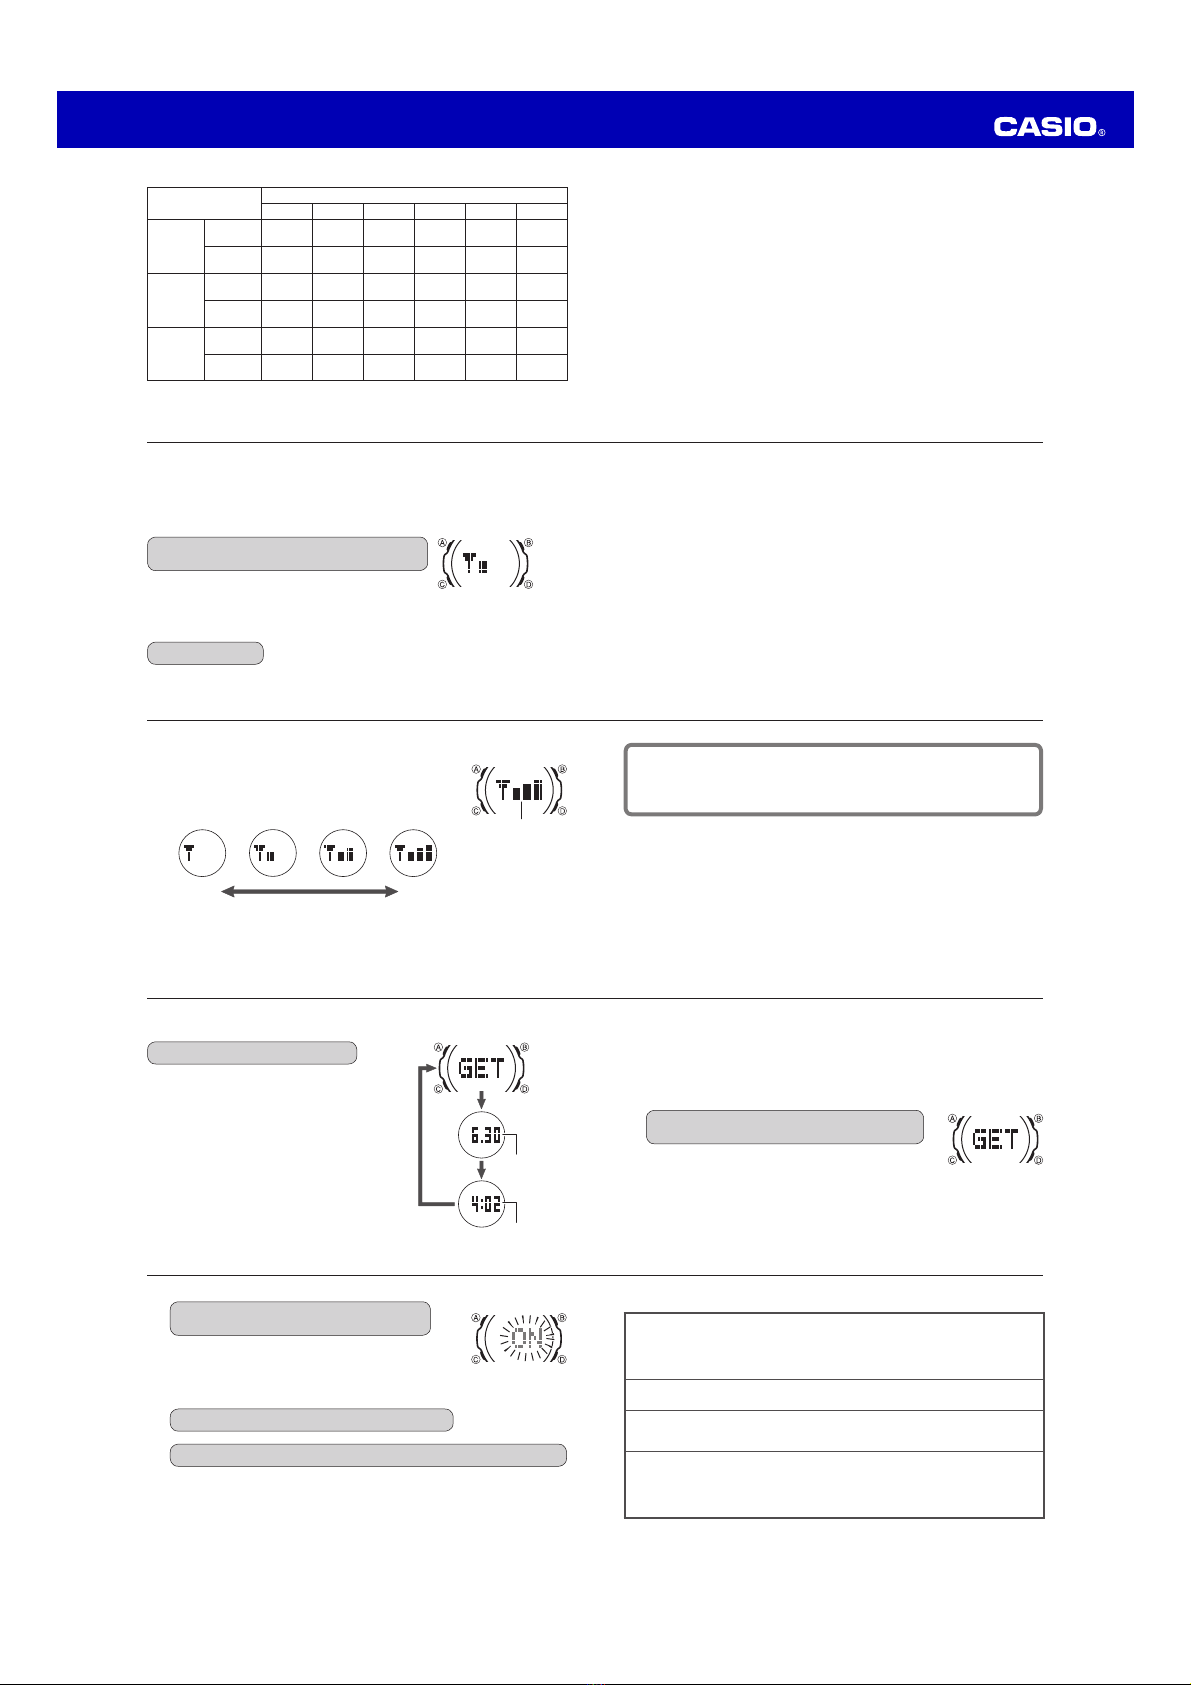
How can I view the last reception date and time?
9.
In the Timekeeping Mode, press●D(lower right button). This will display the date
and time that the time calibration signal was last received successfully. To return to
the Timekeeping Mode, press Dagain.
If you cannot receive the calibration signal or if the time setting is incorrect after
signal reception, check the setup of the watch.
The following are the watch’s factory default settings, which are configuredx
automatically whenever you have the battery replaced or when you recharge the
watch’s the battery after it falls to Level 5.
Auto receive ON Auto receive performed.
Home City TYO Tokyo
Summer time AUTO Auto switching (according to signal data)
65
Why can’t I change the auto receive on/off setting?
6.
You will not be able to turn auto receive on or off if you have any city that is not●
included under “Reception Ranges” on page 39 selected as your Home City. For
details about setting the Home City, see “Time and Date Settings” on page 96.
When is auto receive performed?
7.
Auto receive is performed in the middle of the night, when reception conditions are●
best. Before going to bed at night, place the watch near a window, with 12 o’clock
facing in the general direction of the transmitter (page 45).
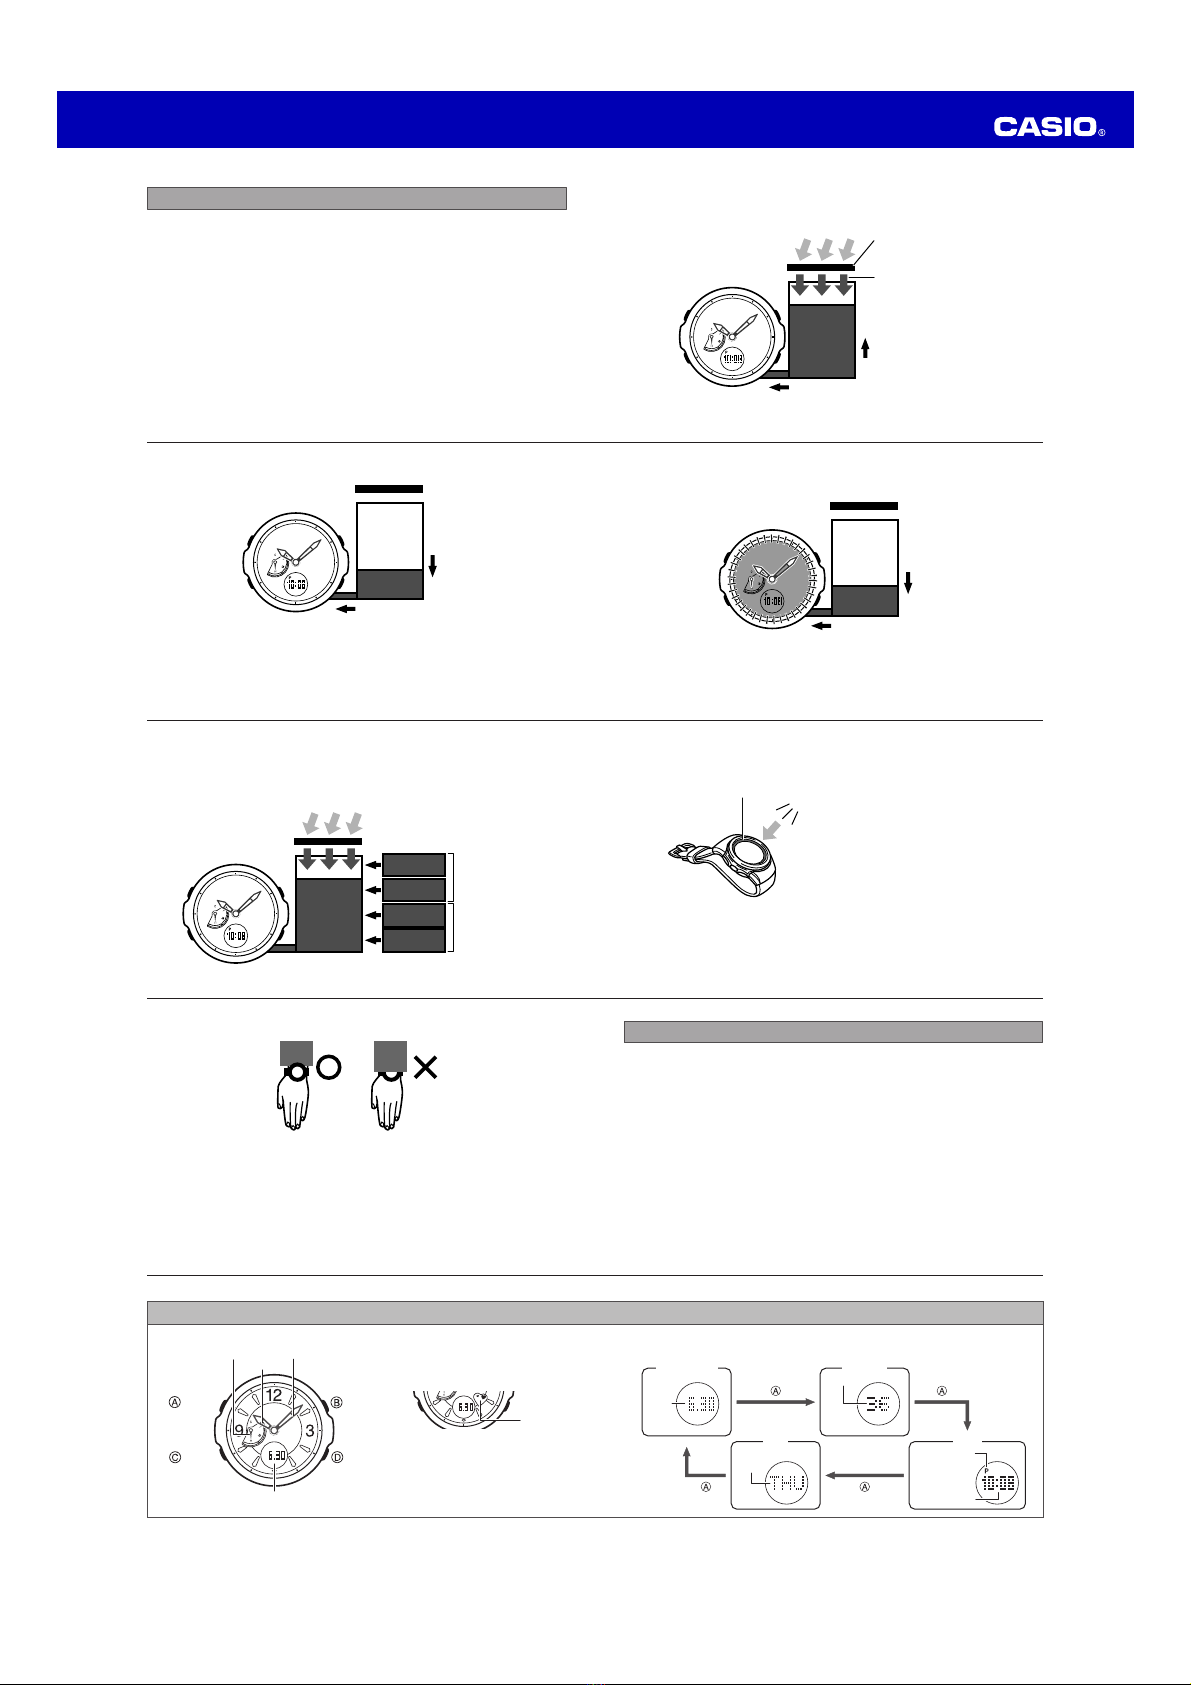
How do I perform manual receive?
8.
In the Timekeeping Mode, hold down●D(lower right button) for about two
seconds. A confirmation tone will sound to indicate that manual receive has
started. Place the watch near a window, with 12 o’clock (where the antenna is
located) facing in the general direction of the transmitter.
64
Why is the current time shown by the watch one hour ahead even though the
3.
calibration being received successfully?
Is summer time (DST) turned on? Use the procedure under●“Time and Date
Settings” (page 96) to change the summer time setting to OFF or AUTO.
Why is the current time setting wrong even though the calibration being
4.
received successfully?
Are your Home City settings configured correctly?●
For details about setting the Home City, see “Time and Date Settings” on page 96.
Why are the digital time and analog time different?
5.
Normally, received time calibration data is used to adjust the digital display time,●
and then the analog hands are adjusted to match the digital time.
If the hands are misaligned for some reason, they will not indicate the correct time.
If this happens, use the procedure under “Hand Home Position Adjustment” (page
106) to adjust the analog time.
63
Is auto receive turned off?●
Use the procedure under “Turning Auto Receive On or Off“ on page 57 to turn on
auto receive.
Is a timer operation in progress?●
Signal reception cannot be performed while a timer operation is in progress.
Is the watch in a mode other than the Timekeeping Mode or World Time Mode●
when an auto receive time (page 48) is reached?
Auto receive is performed only when the watch is in the Timekeeping Mode or
World Time Mode. It is not performed if the watch is in any other mode.
Why is the hourly time signal and current time slightly off even though the
2.
calibration being received successfully?
After the watch receives the time calibration signal, it performs an internal●
decoding process before updating its time setting. Because of this, the time
setting may be off slightly (within one second).
62
Troubleshooting■
The watch cannot receive the time calibration signal.
1.
Is the signal being transmitted?●
Transmission of time calibration signals may be interrupted occasionally due to
maintenance, lightning, etc.
Are you within the reception range of a transmitter?●
See page 39 for information about areas where the watch can receive the signal.
Is there something in the immediate area that may be interfering with reception?●
Even if you are within the reception range of a transmitter, digital noise or objects
between you and the transmitter can interfere with reception. Avoid such areas
(see “Positioning the Watch for Best Reception” on page 45) during signal
reception.
Do you have the correct Home City code selected?●
Calibration signal reception will be impossible if you have any city that is not
included under “Reception Range” on page 39 selected as your Home City. For
details about setting the Home City, see “Time and Date Settings” on page 96.
61
Remember that geographic contours, nearby buildings, the season, or the time●
of day can make reception impossible even when you are within range of the
transmitter.
Proper reception may be impossible if there is something blocking the signal. If●
reception is unsuccessful, try again.
You will need to adjust the current time manually when using this watch in an area●
that is not covered by a receivable time calibration signal.
When the watch is unable to adjust its time using the calibration signal for some●
reason, timekeeping accuracy is as noted in the specifications at the back of this
manual.
Strong electrostatic charge can cause timekeeping error.●
Receive is canceled if an alarm operation starts while it is being performed.●
The watch’s calendar shows dates up to the year 2099. Attempting a receive●
operation after that causes an error.
60
Calibration Signal Reception Precautions■
Auto receive can be performed only while the watch is in the Timekeeping Mode●
or World Time Mode.
The receive operation is disabled under any of the following conditions.●
When a timer operation is in progressx
When the battery is at Level 3 or Level 4x
When the watch is in the recover modex
When the watch is in the function sleep statex
Receipt of a calibration signal causes the digital time to be adjusted first, followed●
by adjustment of the analog time. In order to ensure proper correction of the
analog time, be sure synchronize the analog time with the digital time so they are
the same before performing a receive operation.
Pressing any button while auto receive is in progress will cause the watch to exit●
the receive operation.
Make sure you are within the range of a calibration signal transmitter before●
performing a receive operation.

Operation Guide 5145
79
Pressingx Awhile the countdown is stopped will reset to the countdown start
time.
Pressingx Dagain while the timer countdown is stopped will restart the
countdown.
Time Up Alert■
The watch beeps for 10 seconds when the end of the countdown is reached.
Stopping the Time Up Alarm■
Pressing any button while the alert is sounding will stop it.
78
Using the Countdown Timer■
In the Countdown Timer Mode, press
D
to start, stop or resume the
countdown.
The time is counted down in one-second steps.x
6HFRQGV
5HVHW
6WDUW6WRS
0LQXWHV
77
2. Use
D
(+) and
B
(–) to scroll through numbers at
the current flashing digit.
Holding down either button changes the setting atx
high speed.
The start time can be set in 1-second increments upx
to 60 minutes.
3. When the setting is the way you want, press
A
to
exit the setting screen.
The watch also will exit the setting mode if you do notx
perform any operation for about two or three minutes.
Ŏ
76
Countdown Timer
Use the Cbutton to enter the Countdown Timer Mode as shown under “Modes
and Indicators” on page 17.
You can set the start time of the timer in units of one minute in the range of 1 to
60 minutes. The watch beeps for 10 seconds when the end of the countdown is
reached.
Setting the Countdown Timer Start Time■
1. In the Countdown Timer Mode, hold down
A
for about two seconds until the minutes start to
flash on the display. This is the setting screen.
0LQXWHV
$ERXWVHFRQGV
75
City
Code
UTC
Offset City Name
ANC –9 Anchorage
YVR –8 Vancouver
LAX Los Angeles
YEA –7 Edmonton
DEN Denver
MEX –6
Mexico City
CHI Chicago
City
Code
UTC
Offset City Name
NYC –5 New York
SCL –4 Santiago
YHZ Halifax
YYT –3.5 St. John’s
RIO –3
Rio de Janeiro
FEN –2
Fernando de Noronha
RAI –1 Praia
The contents of the table are current as of December 2009.x
Time differentials in the above table are in accordance with Coordinated Universalx
Time (UTC).
The rules governing UTC offsets and summer time are determined by eachx
individual country.
74
City
Code
UTC
Offset City Name
DEL +5.5 Delhi
KTM +
5.75
Kathmandu
DAC +6 Dhaka
RGN +6.5 Yangon
BKK +7 Bangkok
SIN
+8
Singapore
HKG Hong Kong
BJS Beijing
TPE Taipei
City
Code
UTC
Offset City Name
SEL +9 Seoul
TYO Tokyo
ADL +9.5 Adelaide
GUM +10 Guam
SYD Sydney
NOU +11 Noumea
WLG +12 Wellington
PPG –11 Pago Pago
HNL –10 Honolulu
73
World Time City Code List■
City
Code
UTC
Offset City Name
UTC
0
Coordinated
Universal Time
LIS Lisbon
LON London
MAD
+1
Madrid
PAR Paris
ROM Rome
BER Berlin
STO Stockholm
City
Code
UTC
Offset City Name
ATH
+2
Athens
CAI Cairo
JRS Jerusalem
MOW +3 Moscow
JED Jeddah
THR +3.5 Tehran
DXB +4 Dubai
KBL +4.5 Kabul
KHI +5 Karachi
72
Important!■
If you are using the watch in Japan, be sure to select TYO (Tokyo) as your Home
City.
Selecting another city code will make it impossible to receive the time calibration
signal, which will cause the watch’s time setting to be off.
71
1. In the World Time Mode, use
D
to select the
city you want to use as your new Home City.
2. To swap, hold down
A
and
B
at the same
time until the watch beeps.
This will make the World Time city you selected inx
step 1 (New York) your new Home City.
Your previous Home City (Tokyo) will be your newx
World Time city.
&LW\FRGH
:RUOG7LPH
70
Swapping Your Home Time and World Time Cities■
You can use this procedure to swap your currently set Home Time and World Time
cities.
Example : To swap a Tokyo (TYO) Home Time setting with a New York (NYC)
World Time setting
Home Time World Time
Before swapping
Tokyo (TYO)
10:08 p.m.
Standard time
New York (NYC)
9:08 a.m.
Summer time
After swapping
New York (NYC)
9:08 a.m.
Summer time
Tokyo (TYO)
10:08 p.m.
Standard time

Operation Guide 5145
89
Setting an Alarm Time■
1. In the Alarm Mode, use
D
to display the alarm
screen.
2. Hold down
A
for about two seconds until the
hour digits start to flash, which indicates the
setting screen.
Displaying the setting screen turns on the alarmx
automatically.
VHFRQGLQWHUYDO
+RXU
88
$ODUP6FUHHQ
D
+RXUO\7LPH6LJQDO6FUHHQ
2-second interval
$ODUPWLPH
87
Alarm and Hourly Time Signal
Use the Cbutton to enter the Alarm as shown under “Modes and Indicators”on page
17.
The watch beeps for about 10 seconds when the Timekeeping Mode time reaches
the currently set alarm time. The Hourly Time signal causes the watch to beep every
hour on the hour.
Switching between Screens■
In the Alarm Mode, press
D
.
Each press ofx Dtoggles between the alarm screen and the hourly time signal
screen.
When you enter the Alarm Mode, the screen that was displayed the last time youx
exited the mode appears first.
In the case of the alarm screen, the display alternates between the alarm ON/OFFx
setting and the alarm time setting.
86
Split Time Indicator 6SOLWLQGLFDWRU VHFRQG
0LQXWHV 6HFRQGV
The split time screen cycles
alternately through the split
indicator (SPL), a minute/
second screen, and a 1/100
second screen.
85
Changing to another mode while a split time is displayed cancels the split timex
operation.
To time 1st and 2nd place finishers●
DADAA
Start 1st Finisher
(Displays time of
1st finisher.)
2nd Finisher Displays time of
2nd finisher.
Reset
Pressing Dwhile the split time is on the display stops elapsed time measurement,
leaving the split time on the display.
Press Ato exit the split time screen and display the total elapsed time when
measurement was stopped.
84
To measure elapsed time●
D D A
Start Stop Reset
Pressing Awhile timing is stopped resets the stopwatch to all zeros.
Cumulative Time Measurement
Pressing Dto restart the stopwatch without resetting it to all zeros causes the
elapsed time measurement to resume from where it was last stopped.
To measure split times●
D A A D A
Start Record split Release split Stop Reset
Pressing Awhile timing is being performed displays the split time screen, but timing
continues internally.
83
Paused Elapsed Time Measurement Screenx
When elapsed time measurement is paused, the display alternates between a
minute/second screen and a 1/100 second screen at two-second intervals.
0LQXWHV
6HFRQGV
VHFRQG
VHFRQGLQWHUYDO
82
Stopwatch Display●
Elapsed Time Screenx
This screen shows the elapsed minutes and seconds.
0LQXWHV
6HFRQGV
81
Starting or Stopping an Elapsed Time Operation■
In the Stopwatch Mode, press
D
to start, stop, or restart the stopwatch.
6SOLW5HVHW
6WDUW6WRS
80
Stopwatch
Use the Cbutton to enter the Stopwatch Mode as shown under “Modes and
Indicators” on page 17.
The stopwatch measures elapsed time in units of 1/100 second up to 59 minutes,
59.99 seconds (60 minutes). When the maximum limit is reached, the elapsed time
returns to zero automatically and timing continues from there.

Operation Guide 5145
99
AUTO●
This setting enables the auto summer time setting, which turns summer time on
or off in accordance with the received time calibration signal.
OFF●
This setting turns off summer time, and displays the current time normally.
ON●
This setting turns on summer time.
Selecting this setting displays the DST indicator, and advances the currentx
time setting by one hour.
Note that the above setting toggles betweenx “OFF”and “ON”when any city code
that does not support calibration signal reception (page 39) is selected.
98
Seex “World Time City Code List” (page 73) for a complete list of city codes.
Holding down either button changes the setting at high speed.x
3. Press
D
to change to the summer time setting.
Configure the summer time setting you want.x
4. Use
D
to cycle through the summer time settings
until the one you want is displayed.
Pressingx Dto cycle through the summer time (DST)
settings described below.
97
Configuring Time and Date Settings■
1. In the Timekeeping Mode, hold down
A
for about
two seconds until the watch beeps and “ADJ”
appears on the display.
The currently selected city code will be flashing on thex
screen.
The watch will exit the setting screen automaticallyx
if you do not perform any operation for about two or
three minutes.
2. Use
D
(Eastward) and
B
(Westward) to scroll
through the city codes until the one you want to
use as your Home City is displayed.
Display the time zone that you want to select as yourx
Home Time Zone.
VHFRQGLQWHUYDO
&LW\FRGH
Ŏ
7<2 7RN\R
96
Time and Date Settings
You can use the following procedure to set the current time and date of the Home
City that you have selected in the Timekeeping Mode.
Always use the Timekeeping Mode to set and adjust the current time and datex
settings.
You also can turn Power Saving on or off while setting the time and date.x
The watch automatically adjusts its analog setting to match the current digital
setup of your Home City.
If the analog time is not correct even though you are sure the digital setup of
your Home City is correct and the watch is performing signal reception properly,
check the home positions of the hands and make adjustments if necessary
(page 106).
95
+RXUO\7LPH6LJQDO2I
I
A
+RXUO\7LPH6LJQDO2Q
94
Stopping the Alarm Tone■
Pressing any button while the alarm tone is sounding will stop it.
Turning the Hourly Time Signal On or Off■
1. In the Alarm Mode, use
D
to display the hourly time signal screen.
2. Press
A
to toggle the hourly time signal between ON and OFF.
“x ” appears on the display when the hourly time signal is off. “ ” appears
on the display when the hourly time signal is on.
93
$ODUP2II
A
$ODUP2Q
2-second
interval
2-second
interval
$ODUPWLPH $ODUPWLPH
92
Turning the Alarm On or Off■
1. In the Alarm Mode, use
D
to display the alarm screen.
2. Press
A
to toggle the alarm between ON and OFF.
“x ” appears on the display when the alarm is off.
“” appears on the display when the alarm is on.
On the alarm screen, the display alternates between the alarm ON/OFF settingx
and the alarm time setting.
91
5. Use
D
(+) and
B
(–) to change the minute setting.
Holding down either button changes the setting at highx
speed.
6. When the setting is the way you want, press
A
to exit the setting screen.
The watch also will exit the setting mode if you do not perform any operation forx
about two or three minutes.
Ŏ
90
3. Use
D
(+) and
B
(–) to change the hour setting.
Holding down either button changes the setting at highx
speed.
When setting the hour, make sure you specify AMx
(no indicator) or PM (P) correctly when using 12-hour
timekeeping, or that you specify the correct 24-hour time.
The same 12-hour/24-hour format you select for thex
Timekeeping Mode time is also applied in the Alarm Mode.
4. Press
C
to move the flashing to the minute
setting.
Ŏ
0LQXWHV

Operation Guide 5145
109
If the battery level hand is not at its proper home position
Use
C
to adjust the hand position.
Each press ofx Cmoves the battery indicator hand clockwise.
Move the hand to its 12 o’clock position.
Holdingx Cwill cause the hand to move at high speed. To stop high-
speed hand movement, press any button. High speed hand movement
also will stop automatically if the battery level hand completes one
revolution.
108
2. Adjust hands to their home positions.
If the hour and minute hands are not at their proper
home positions
Use
D
(+) and
B
(–) to adjust the hour and minute hand positions.
Holding down either button will cause the hand to move at high speed.x
Once started, high-speed hand movement will continue even if you
release the button. To stop high-speed hand movement, press any
button.
High-speed hand movement started with thex D(+) button will stop
automatically after 12 revolutions of the minute hand. If started with the
B(–) button, it will stop after one revolution of the minute hand.
107
Thoughx “ADJ”will appear on the display about two seconds after you hold
down A, do not release the button yet. Keep it depressed until “H-SET”
appears.
The watch will return to regular timekeeping automatically if you do not performx
any operation for about two or three minutes. Any changes you have made to
settings up to that point will be saved.
If the hour, minute and battery level hands are all at 12 o’clock, which is their
home position, jump to step 3.
106
Hand Home Position Adjustment
Strong magnetism or impact can cause the hands of the watch to be off, even if the
watch is able to perform the signal receive operation. If this happens, perform the
following home position correction procedure.
Home position adjustment is not necessary when the analog hands and digitalx
display indicate the same time in the Timekeeping Mode.
1. In the Timekeeping Mode, hold down
A
and
keep it depressed for about five seconds until
“H.SET”appears on the display.
The hour, minute and battery level hands should allx
move to 12 o’clock, which is their home position.
Also, “0:00”will appear on the display.
+RXUKDQG
%DWWHU\OHYHOKDQG
0LQXWHKDQG
$ERXW
VHFRQGV
105
7. When the setting is the way you want, press
A
to exit the setting screen.
Digital-Analog Synchronization
The watch automatically adjusts its analog setting to match the current digital time
setting.
Depending on how many hours different the digital and analog time settings are, itx
may take some time for the analog hand setting procedure to be finished.
104
e. When the Power Saving setting is selected
Press Dto toggle Power Saving between on and off.
Repeat the above steps as many times as necessary to select each setting
and change it as required.
When setting the hour, make sure you specify AM (no indicator) or PM (P) correctlyx
when using 12-hour timekeeping, or that you specify the correct 24-hour time.
You can set the year within the range of 2000 to 2099. The day of the week is setx
automatically in accordance with the date you set.
The watch makes adjustments for leap years and month lengths automatically.x
103
+RXU
0LQXWHV
Ŏ
c. While the hour, minutes, year, month, or day setting is
flashing, press
D
or
B
to change it.
Holding down either button scrolls through the settings atx
high speed.
d. When the operation tone setting is selected
Each press of Dtoggles the operation tone between on
and off.
2SHUDWLRQWRQHRQ
2SHUDWLRQWRQHRI
I
102
6. Use
D
(+) and
B
(–) to scroll through the available options at the current
flashing setting.
KRXUWLPHNHHSLQJ
a. When the 12/24-hour timekeeping setting is selected
Pressing Dtoggles the timekeeping format between
12-hour (“12H” indicator) and 24-hour (“24H” indicator).
b. When the seconds setting is selected
Press Dto reset the seconds to 00 in accordance with the
time signal on the radio, TV, etc.
Pressingx Dwhile the seconds count is in the range of 30
to 59 resets it to 00 and adds 1 to the minutes. Pressing
Din the range of 00 to 29 resets the seconds count
without changing the minutes. 5HVHWVWR
101
Home City
C
Summer Time
C
12/24-hour
timekeeping
CC
Power Saving Second
CC
Operation tone Hour
C C
Day
C
Month
C
Year
C
Minute
100
5. Use
C
to move the flashing to the setting you want
to change.

Operation Guide 5145
113
Alarm : Time alarm
Setting Units: Hour, minute
Beeper: 10 seconds
Hourly Time Signal: Beeps twice every hour on the hour
Other : Auto return to regular timekeeping; 12/24-hour timekeeping;
LED light; alarm test; auto light; power saving; battery
indicator; operation tone on/off
Main Element : Tuning fork type high-performance quartz oscillator; one-chip
CMOS-LSI
Battery : Secondary battery
Battery Operating
Time
: Approximately 8 months
No exposure to light; 10 seconds alarm operation;
1.5 seconds light operation, five minutes of calibration
signal reception; 18 hours of display per day
()
112
Transmitters : Call signs: JJY (40 kHz/60 kHz), WWVB (60 kHz),
MSF (60 kHz), DCF77 (77.5 kHz), BPC (68.5 kHz)
World Time : Current time in 48 cities (31 time zones) around the globe,
summer time
Countdown Timer : Setting Unit: 1 minute
Timing Range: 60 minutes
Count Unit: 1 second
Beeper: 10 seconds
Stopwatch
Function
: Measurement unit: 1/100 second
Measurement range: 59 minutes, 59.99 seconds (60 minutes)
Measurement functions: Elapsed time; cumulative elapsed
time; split times; first/second place finishers
111
Specifications
Quartz Oscillation
Frequency
: 32,768 Hz
Accuracy : Within an average of ±30 seconds per month when time
calibration signal reception is not performed
Basic Functions : Analog
Hour, minute (moves every 20 seconds), Battery level hand
Digital
Hour, minute, second, a.m./p.m. (P)/24-hour time format,
month, day, day of the week, full auto calendar (2000 to
2099)
Radio-controlled
Watch Functions
: Auto receive/manual receive; last successful receive check;
summer time auto switching; auto transmitter select (for JJY,
MSF/DCF77)
110
3. Press
A
to exit home position correction and
return to regular timekeeping.
After performing home position adjustment, enter the Timekeeping Mode
and check to make sure that the analog hands and the digital display
indicate the same time. If they do not, perform home position adjustment
again.
Table of contents
Other Casio Watch manuals

Casio
Casio BGA101-7B User manual

Casio
Casio QW-693 User manual

Casio
Casio QW-2269 Troubleshooting guide

Casio
Casio 5208 User manual

Casio
Casio 5055 User manual

Casio
Casio 4737 User manual

Casio
Casio 2550 User manual

Casio
Casio 5262 User manual

Casio
Casio QW-1444 Configuration guide

Casio
Casio 4333 User manual