manuals.online logo
Brands
  1. Home
  2. •
  3. Brands
  4. •
  5. Cateye
  6. •
  7. Flashlight
  8. •
  9. Cateye Volt1700 HL-EL1020RC User manual

Cateye Volt1700 HL-EL1020RC User manual

Other Cateye Flashlight manuals

Cateye GVolt80 User manual

Cateye

Cateye GVolt80 User manual

Cateye VOLT 400 HL-EL461RC User manual

Cateye

Cateye VOLT 400 HL-EL461RC User manual

Cateye AMPP500 User manual

Cateye

Cateye AMPP500 User manual

Cateye GVolt70 User manual

Cateye

Cateye GVolt70 User manual

Cateye AMPP1100 User manual

Cateye

Cateye AMPP1100 User manual

Cateye HL-EL471RC User manual

Cateye

Cateye HL-EL471RC User manual

Cateye VOLT1700 User manual

Cateye

Cateye VOLT1700 User manual

Cateye HL-EL460RC Rear User manual

Cateye

Cateye HL-EL460RC Rear User manual

Cateye Volt400 User manual

Cateye

Cateye Volt400 User manual

Cateye AMPP 100 HL-EL041RC User manual

Cateye

Cateye AMPP 100 HL-EL041RC User manual

Cateye SYNCKinetic TL-NW100K User manual

Cateye

Cateye SYNCKinetic TL-NW100K User manual

Cateye VOLT 1200 HL-EL1000RC User manual

Cateye

Cateye VOLT 1200 HL-EL1000RC User manual

Cateye Volt1600 User manual

Cateye

Cateye Volt1600 User manual

Cateye Sync Wearable SL-NW100 User manual

Cateye

Cateye Sync Wearable SL-NW100 User manual

Cateye VOLT500XC User manual

Cateye

Cateye VOLT500XC User manual

Cateye HL-EL1010RC User manual

Cateye

Cateye HL-EL1010RC User manual

Cateye VOLT800 HL-EL471RC User manual

Cateye

Cateye VOLT800 HL-EL471RC User manual

Cateye HL-EL340RC User manual

Cateye

Cateye HL-EL340RC User manual

Cateye AMPP200 User manual

Cateye

Cateye AMPP200 User manual

Cateye Volt 6000 HL-EL6000RC User manual

Cateye

Cateye Volt 6000 HL-EL6000RC User manual

Cateye Sync Core HL-NW100RC User manual

Cateye

Cateye Sync Core HL-NW100RC User manual

Cateye HL-EL1000RC User manual

Cateye

Cateye HL-EL1000RC User manual

Cateye GVOLT25C User manual

Cateye

Cateye GVOLT25C User manual

Cateye HL-EL6000RC User manual

Cateye

Cateye HL-EL6000RC User manual

Popular Flashlight manuals by other brands

LIVARNO LUX LAH 55 A2 operating instructions

LIVARNO

LIVARNO LUX LAH 55 A2 operating instructions

Gama Sonic 23i60065 instruction manual

Gama Sonic

Gama Sonic 23i60065 instruction manual

Avacom AVACOM Ain user manual

Avacom

Avacom AVACOM Ain user manual

Ryobi RFL180M Original instructions

Ryobi

Ryobi RFL180M Original instructions

RIB SPARK ACG7061 quick start guide

RIB

RIB SPARK ACG7061 quick start guide

Abicor Binzel MB EVO PRO Series operating instructions

Abicor Binzel

Abicor Binzel MB EVO PRO Series operating instructions

PELI 7610 instruction manual

PELI

PELI 7610 instruction manual

Black & Decker FSL18 manual

Black & Decker

Black & Decker FSL18 manual

Black & Decker 9506 instruction manual

Black & Decker

Black & Decker 9506 instruction manual

Berner 341709 instruction manual

Berner

Berner 341709 instruction manual

PELI 3415 Zone 0 operating instructions

PELI

PELI 3415 Zone 0 operating instructions

ADC Adlite Pro Use, Care and Maintenance

ADC

ADC Adlite Pro Use, Care and Maintenance

tiki Cabos Warnings and Instructions

tiki

tiki Cabos Warnings and Instructions

Fervi 0338 Operation and maintenance manual

Fervi

Fervi 0338 Operation and maintenance manual

Milwaukee M18 IL Original instructions

Milwaukee

Milwaukee M18 IL Original instructions

Spectronics Spectroline LeakTracker SPI-LT instruction manual

Spectronics

Spectronics Spectroline LeakTracker SPI-LT instruction manual

Larson Electronics SLEDB-110V-M instruction manual

Larson Electronics

Larson Electronics SLEDB-110V-M instruction manual

vulta hurricane 262 lumen fg-e15 user manual

vulta

vulta hurricane 262 lumen fg-e15 user manual

manuals.online logo
manuals.online logoBrands
  • About & Mission
  • Contact us
  • Privacy Policy
  • Terms and Conditions

Copyright 2025 Manuals.Online. All Rights Reserved.

RECHARGEABLE HEADLIGHT
HL-EL1020RC
Before using the light, read this manual thorough-
ly and keep it for future reference. Do not use the
light in any way other than as described in this
manual.
Manual
WARNING!!!
• This light emits an extremely powerful beam equivalent to
automobile headlight so it may cause a hazardous situation
depending on the beam angle used. Be sure to direct the light
beam downward so the driver approaching does not get dazzled.
• Before your trip, please make sure the light is firmly mounted
to the bracket and it lights up. The light must not be obscured.
• Always pay attention to the remaining battery power by
checking the indicator periodically while using the light.
• Do not disassemble or modify the light or any of the
included items.
CAUTION!
• Do not use high mode on public roads.
• Do not stare at the light when it is illuminating.
Otherwise it may damage your eyesight.
• Operating the light while riding is dangerous.
Always ride safely.
• Note that the light becomes hot while illuminated.
Do not block the lens or cover the light.
• Due to the variability of LEDs, the color and brightness may
differ even between devices with the same model number.
• Do not place it within children’s reach.
• In preparation for unexpected battery shutoff, we recom-
mend you carry a spare cartridge battery and light.
• When used with a cyclocomputer, attach the headlight as
far away from the cyclocomputer as possible, as it may
affect measurement.
• This device is rated IPX4 based on JIS C0920. Do not immerse
the device in water. Doing so may cause a malfunction. Wipe
off any moisture after using the device in rainy weather.
• Do not subject the light to strong vibrations, impacts, or
excessive force. Discontinue use if any abnormality occurs.
• Do not charge or use the battery at any voltage or polarity
other than that specified. Do not short-circuit the battery.
• Do not drop the light into a fire or heat the light.
• If the light unit or parts become dirty with mud, etc., clean
with a soft cloth which is moistened with mild soap. Never
apply paint thinner, benzine or alcohol; damage will result.
LITHIUM-ION BATTERIES
Recharge the battery for first time use or after
long period of storage:
The voltage of the battery may drop due to self-discharge
during long period of storage. Always fully charge the
battery before use.
Cautions for charging and usage:
• Using a PC or USB battery charger with an output cur-
rent of 1.5 A or more is recommended for charging.
• Please be sure that no dust or other foreign objects are
attached to the plug of the USB cable before charging.
• Do not subject the light to vibrations while charging.
• When your PC is in sleep state, the unit cannot be charged.
• Once charging is completed, be sure to disconnect the
USB cable from the charging port.
• Charging and lighting times are approximate values,
and will vary by environmental and user conditions.
• Charging, discharging, and storing in high tempera-
tures will cause the rechargeable battery to deteriorate
faster. Do not place the light inside a vehicle or near
a heater. Make sure to charge only when the ambient
temperature is between 41˚F and 104˚F (5˚C and 40˚C).
• When the operating time decreases significantly, the
battery life is close to an end. Replace the cartridge
battery with a new one.
Cautions on storage:
• If the device will not be used for a long period of time,
store it in a location that is not too hot or too humid.
• Charge the battery for about 30 minutes every 6 months.
• When you store the cartridge battery alone, be sure
to install the cap. Otherwise, damage or a fire may be
caused by short circuit.
Cautions for dispose:
Dispose of used cartridge batteries appropriately according
to local regulations.
Before Initial Use
This unit is shipped with
small charge to check the
light. Be sure to charge it
before use, according to
the instructions “HOW TO
CHARGE” and “Cautions for
charging and usage”.
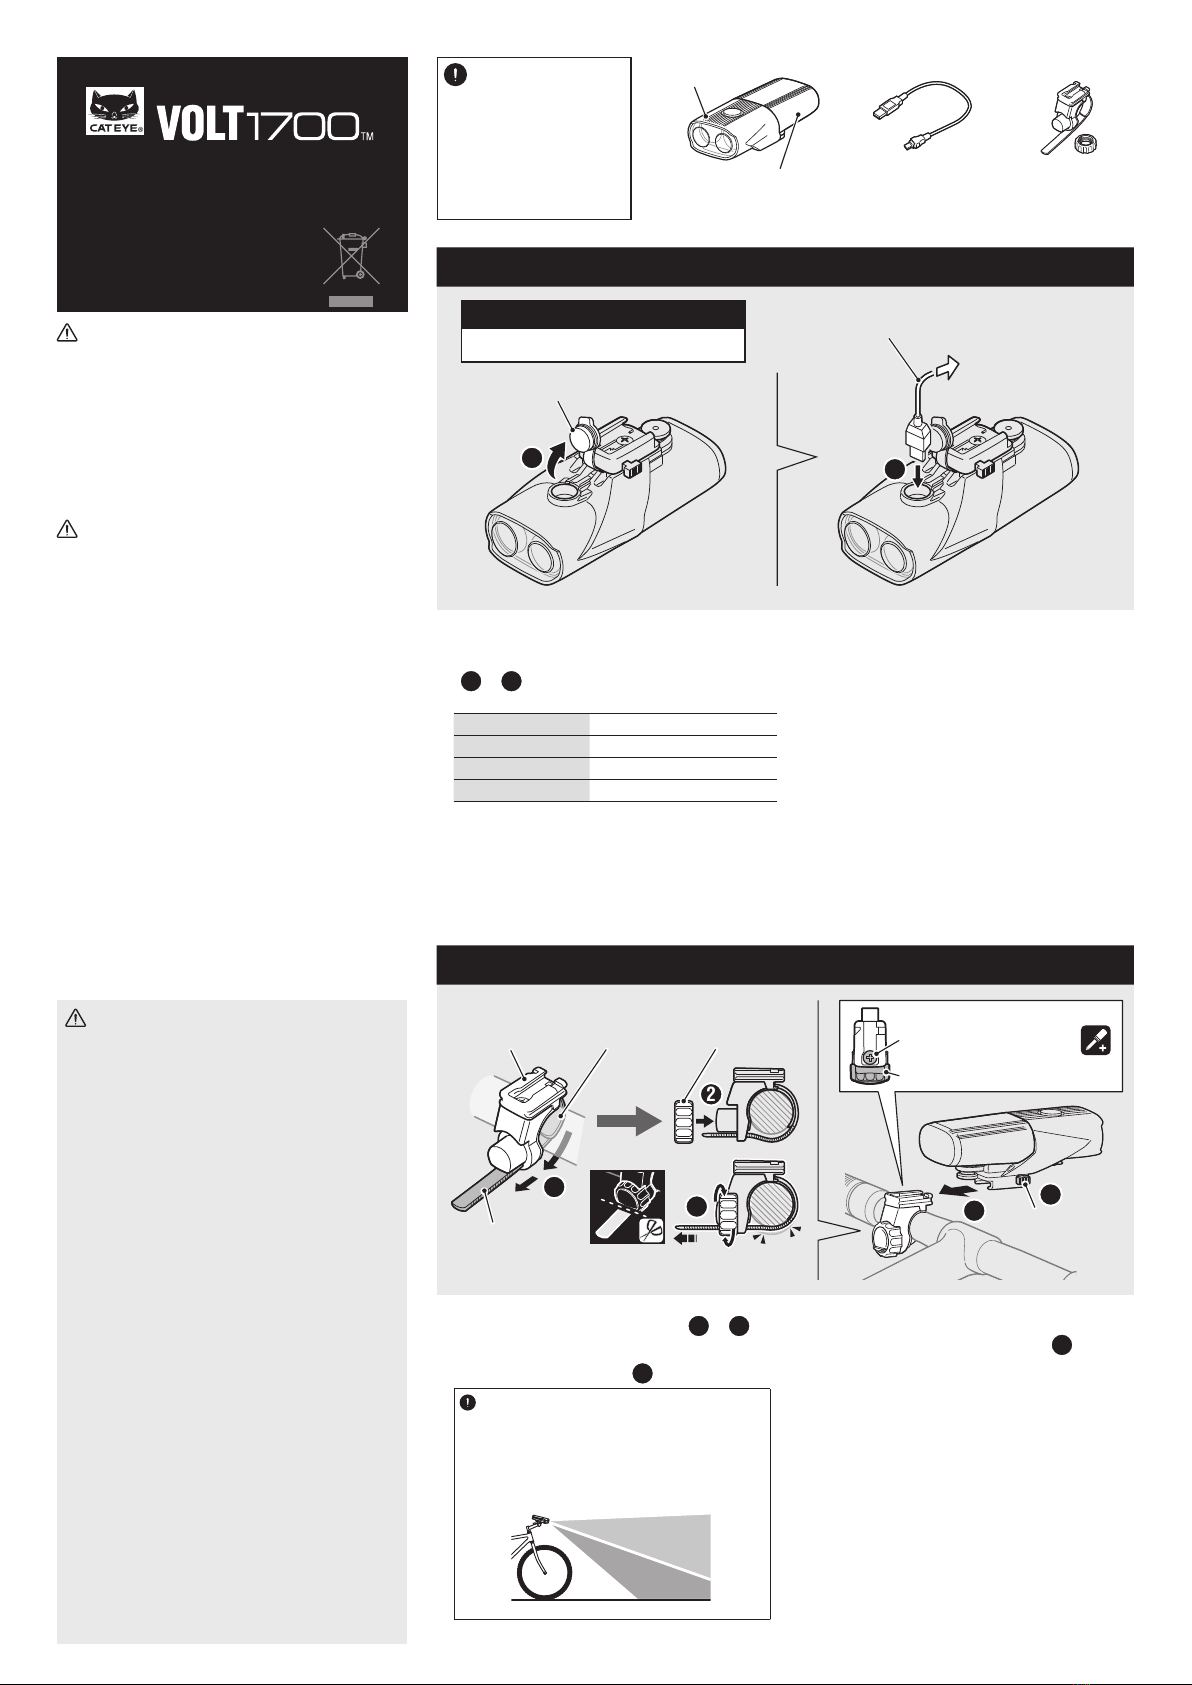
1. Connect the light unit to your PC or a commercial
USB battery charger using the USB cable.
(1– 2)
The switch lights up, and charging starts.
Switch button light State (charging rate)
Illuminated in red Charging (less than 50%)
Illuminated in orange
Charging (more than 50% )
Illuminated in green Charging is completed
* When your PC is in sleep state, the unit cannot
be charged.
* Use a USB battery charger of 0.5 A (USB2.0) or
more. The cartridge can be fast-charged with
high capacity USB battery charger.
2. After charging is completed, remove the USB cable,
and install the charge jack cover.
CAUTION!: Attach the charge jack cover securely
to ensure waterproofness.
* The battery charges to about 80% after approxi-
mately 12 hours.
* Charging time is approximate values, and will vary
depending on the environmental and usage condi-
tions.
Standard charging time
Approx. 5.5 (1.5 A)– 15 (0.5 A)h
1. Mount the bracket to the handlebar. ( 1– 3)
2.
Insert the light unit into the bracket until it clicks,
and adjust the beam angle. (
4)
Beam angle adjustment
Turn on the light on a smooth road at night,
and loosen the dial slightly to move the bracket.
Adjust the beam angle so it does not direct to
a driver approaching and then tighten the dial
firmly to fix the bracket.
3. To remove the light unit, pull out it forward while
pressing down on the release button ( 5).
CAUTION!:
• Be sure to tighten the dial by hand. When you
tighten it too hard with a tool, the screw thread
may be stripped.
• Check the dial and screw (*1) on the bracket pe-
riodically, and use them without any loosening.
• Round off the cut edge of the bracket strap to
prevent injury.
2 HOW TO MOUNT TO A BICYCLE
1 HOW TO CHARGE
OK
NO!
5
4
13
2
2
1
Cartridge battery
(BA-6.8TF)
FlexTight™ bracket
(H-34N)
USB cable
(MICRO USB)
Light unit
ENG
USB cable
Charge jack cover
To PC or USB battery
charger
DialRubber padBracket
Strap
Release button
Screw (Horizontal adjustment)
Dial (Vertical adjustment)
*1
Design Pat. Pending
Copyright© 2022 CATEYE Co., Ltd.
EL1020RC-220310 3
SPECIFICATIONS
Light source LED x 2
Cartridge battery Li-ion 3.6 V 6800 mAh : BA-6.8TF
Charge terminal Micro B USB
Operating time
High : Approx. 2 hours
Middle : Approx. 5 hours
Low : Approx. 15 hours
Daytime HyperConstant : Approx. 12 hours
Flashing : Approx. 150 hours
* Average runtime at 20˚C.
Standard charging time Approx. 5.5 (1.5 A) – 15 (0.5 A) hours
Charge voltage 5 V
Temperature range Charging : 41˚F – 104˚F (5˚C – 40˚C)
Operating : 14˚F – 104˚F (-10˚C – 40˚C)
Recharge/discharge number
of times
About 300 times
(until the rated capacity drops to 70%)
Waterproof IPX4
Dimensions/weight 4-45/64" x 2-13/64" x 1-55/64" (119.3 x 56 x 47.3 mm) /
9.04 oz (256.3 g) (Including the cartridge battery)
* The specifications and design are subject to change without notice.
LIMITED WARRANTY
2-year Warranty : Light unit only
(Deterioration of the cartridge battery is out of warranty)
CatEye products are warranted to be free of defects from materials and
workmanship for a period of 2 years from original purchase. If the product
fails to work during normal use, CatEye will repair or replace the defect at no
charge. Service must be performed by CatEye or an authorized retailer. To
return the product, pack it carefully and enclose the warranty certificate (proof
of purchase) with instruction for repair. Please write or type your name and
address clearly on the warranty certificate. Insurance, handling and transporta-
tion charges to CatEye shall be borne by person desiring service.
For UK and REPUBLIC OF IRELAND consumers, please return to the place of
purchase. This does not affect your statutory rights.
STANDARD ACCESSORIES
OPTIONAL ACCESSORIES
4
HOW TO REPLACE THE CARTRIDGE BATTERY
Remove the cartridge battery according to the procedure. (1– 2)
To install the cartridge, reverse the procedure.
CAUTION!: Make sure the lock pin fits firmly into the cartridge battery.
If not locked firmly, the cartridge battery may drop off and it may
cause sudden turn off.
3 SWITCH OPERATION (SWITCHING THE LIGHTING MODE)
The ON/OFF and lighting modes are selected using a switch.
*2 When you turn the light on, it lights up in the last lighting mode you used. (Mode memory function)
* The light unit may get hot depending on the condition the light is used in but it is not a malfunction. When it gets hot, protection circuit activates and it auto-
matically lowers brightness level. One it is cooled down, the light recovers the previous brightness level.
5341831N
Helmet mount
5342440
Center fork bracket
1604110
Out-front bracket 2
5342730
USB cable
5343200
Cartridge battery
(Li-ion 3.6 V 6800 mAh)
5338827N
FlexTight™ bracket
(MICRO USB)
(BA-6.8TF)(H-34N)
Remaining battery capacity (Battery indicator)
When the switch lights up, there is little remaining battery power.
Switch button light Remaining battery power
Illuminated in orange 50 - 30 %
Illuminated in red 30 - 15 %
Flashing in red Less than 15%
CO., LTD.
2-8-25, KUWAZU, HIGASHI SUMIYOSHI-KU, OSAKA, JAPAN 546-0041
For inquiries, please visit https://cateye.com/intl/contact/
[For US Customers]
Please visit https://www.cateyeamerica.com/contact-us/
Toll Free : 800.5.CATEYE
1
2
Lock pin
Cartridge battery
Double-click
*2
*2
Press
and hold
Press and hold
OFF ON
Click Click
HighHigh HighHigh
MiddleMiddle
LowLow
DaytimeDaytime
HyperConstantHyperConstant
FlashingFlashing
Approx. 5 h Approx. 15 h Approx. 12 h
Approx. 150 h
Approx. 2 h
Switch (Indicator)
OK
NO!