CCM 040-1196-2 User manual

model no. 040-1196-2
INSTRUCTION
MANUAL
NOTE: Read instructions carefully before installation.
Refer to assembly instructions and ensure the bike carrier
is installed correctly.
Keep this instruction manual in your vehicle for future reference.
For assistance, please contact customer service at
1-888-670-6686 (toll-free).
PREMIUM HITCH MOUNT
PLATFORM BIKE CARRIER
040_1196_2_Eng.indd 657268 917116
01a
04/27/15
Brenda
01a/b
04/29/15
Brenda
WO
Date
Artist
PROCESS
BLACK
PANTONE
000
CTC01 LITHO FLEXO

model no. 040-1196-2
SAFETY INSTRUCTIONS
WARNING
• Donotusethebikecarrierforoff-roadpurposes.
• Donotloadtandemsorrecumbentsonthisbikecarrier.
• Donotinstallthisbikecarrieronatrailerorothertowedvehicles.
• Inspectandcheckthebikecarrierbeforeandafterloadingthebicycles.Ifrequired,tighten
thestraps.
• Checkfortightnessofthestrapsatregularintervals,asthebicyclesmayshiftduringtravel.Inspect
morefrequentlywhentravellingonbumpyroads.
• Afterloadingthebicycles,donotattempttotilttherack.Doingsomayleadtodamageofthevehicle
carryingthebikecarrier,vehiclesmovingbehindorbicyclecargo.
• Donotwashoruseanautomatedcarwashwhilethebikecarrierismountedonthevehicle.
• Somestates/provincesmaynotallowthelicenceplatetobeobstructed.
Pleasecheckwiththelocalministryoftransportationformoreinformation.
• Thisbikecarriermaynotbesuitableforuseonvehiclesequippedwitharear-mountedsparetire,as
thiscarrierrequiresclearancefromthevehicleof5"(13cm)beyondthehitchreceiverpinopening.
IT IS THE USER'S RESPONSIBILITY TO ENSURE THE SAFE AND PROPER USE OF THIS PRODUCT.
Improperattachmentormisuseofthebikecarriermaydamagethebikecarrier,bicyclesloadedonthecarrier,thevehicle
carryingthecarrierorvehiclesmovingbehind,therebyresultinginHAZARDOUSsituationsduetopossiblecollisionor
swervingofthevehicle.
READ AND FOLLOW THE SAFETY INSTRUCTIONS BEFORE USING THE BIKE CARRIER.
NEVER EXCEED THE MAXIMUM LOAD CAPACITY ON THE BIKE CARRIER.
WEIGHT LIMIT: 90lb(40kg)totalor45lb(20kg)pertraypair.
LIMITED WARRANTY
ThisCCMproductisguaranteedfor1yearfromthedateoforiginalretailpurchaseagainstdefectsinmaterials
andworkmanship.
Subjecttotheconditionsandlimitationsdescribedbelow,thisproduct,ifreturnedtouswithproofofpurchase
withinthestatedwarrantyperiodandifcoveredunderthiswarranty,willberepairedorreplaced(withthesame
model,oroneofequalvalueorspecification),atouroption.Wewillbearthecostofanyrepairorreplacement
andanycostsoflabourrelatingthereto.
THESE WARRANTIES ARE SUBJECT TO THE FOLLOWING CONDITIONS AND LIMITATIONS:
• abillofsaleverifyingthepurchaseandpurchasedatemustbeprovided;
• thiswarrantywillnotapplytoanyproductorpartthereofwhichiswornorbrokenorwhichhasbecome
inoperativeduetoabuse,misuse,accidentaldamage,neglectorlackofproperinstallation,operationor
maintenance(asoutlinedintheapplicableowner’smanualoroperatinginstructions)orwhichisbeingused
forindustrial,professional,commercialorrentalpurposes;
• thiswarrantywillnotapplytonormalwearandtearortoexpendablepartsoraccessoriesthatmaybesupplied
withtheproductthatareexpectedtobecomeinoperativeorunusableafterareasonableperiodofuse;
• thiswarrantywillnotapplytoroutinemaintenanceandconsumableitemssuchas,butnotlimitedto,fuel,
lubricants,vacuumbags,blades,belts,sandpaper,bits,fluids,tune-upsoradjustments;
• thiswarrantywillnotapplywheredamageiscausedbyrepairsmadeorattemptedbyothers(i.e.personsnot
authorizedbythemanufacturer);
• thiswarrantywillnotapplytoanyproductthatwassoldtotheoriginalpurchaserasareconditionedor
refurbishedproduct(unlessotherwisespecifiedinwriting);
• thiswarrantywillnotapplytoanyproductorpartthereofifanypartfromanothermanufacturerisinstalled
thereinoranyrepairsoralterationshavebeenmadeorattemptedbyunauthorizedpersons;
• thiswarrantywillnotapplytonormaldeteriorationoftheexteriorfinish,suchas,butnotlimitedto,scratches,
dents,paintchips,ortoanycorrosionordiscoloringbyheat,abrasiveandchemicalcleaners;and
• thiswarrantywillnotapplytocomponentpartssoldbyandidentifiedastheproductofanothercompany,
whichshallbecoveredundertheproductmanufacturer’swarranty,ifany.
ADDITIONAL LIMITATIONS
This warranty applies only to the original purchaser and may not be transferred. Neither the retailer nor the
manufacturer shall be liable for any other expense, loss or damage, including, without limitation, any indirect,
incidental, consequential or exemplary damages arising in connection with the sale, use or inability to use this
product.
NOTICE TO CONSUMER
This warranty gives you specific legal rights, and you may have other rights, which may vary from province to
province. The provisions contained in this warranty are not intended to limit, modify, take away from, disclaim
or exclude any statutory warranties set forth in any applicable provincial or federal legislation.
WARRANTY
23
CAUTION
Somevehiclesmaynotsupportthebikecarrier.
Thisbikecarrierisdesignedinsuchawaythatthepaintofthevehiclewillnotbedamagedifthecarrier
isproperlymountedonthevehicle.
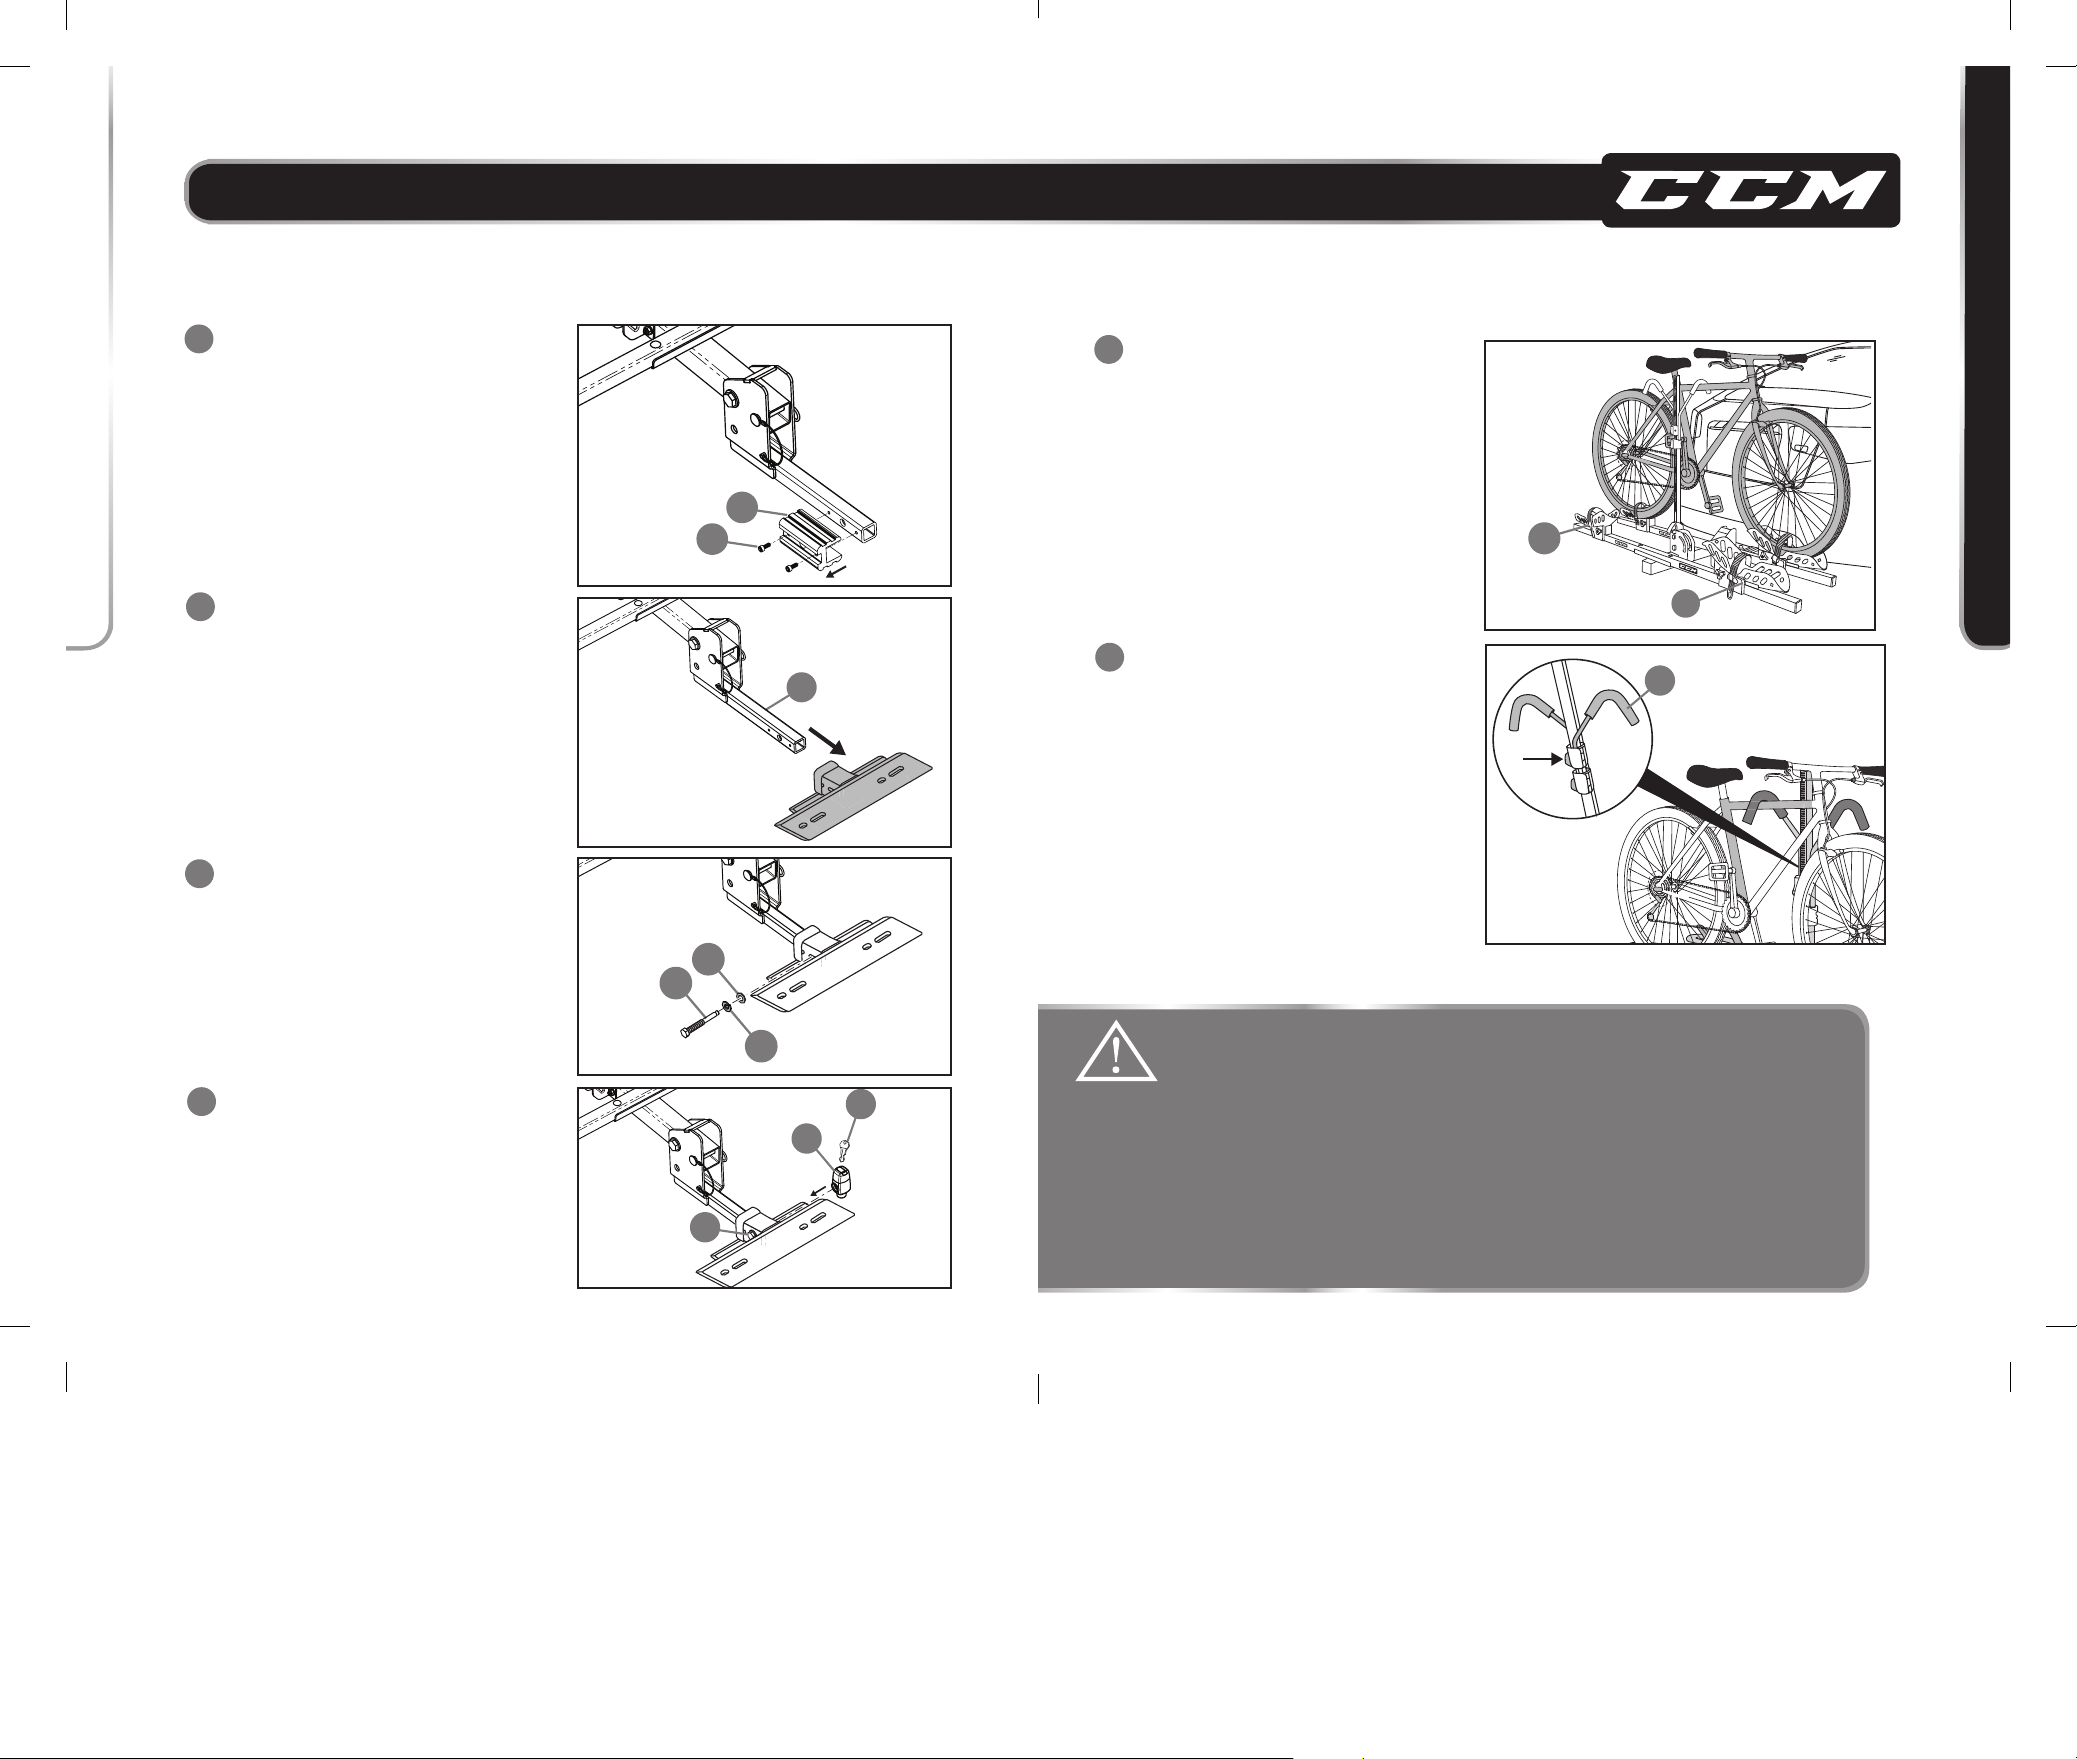
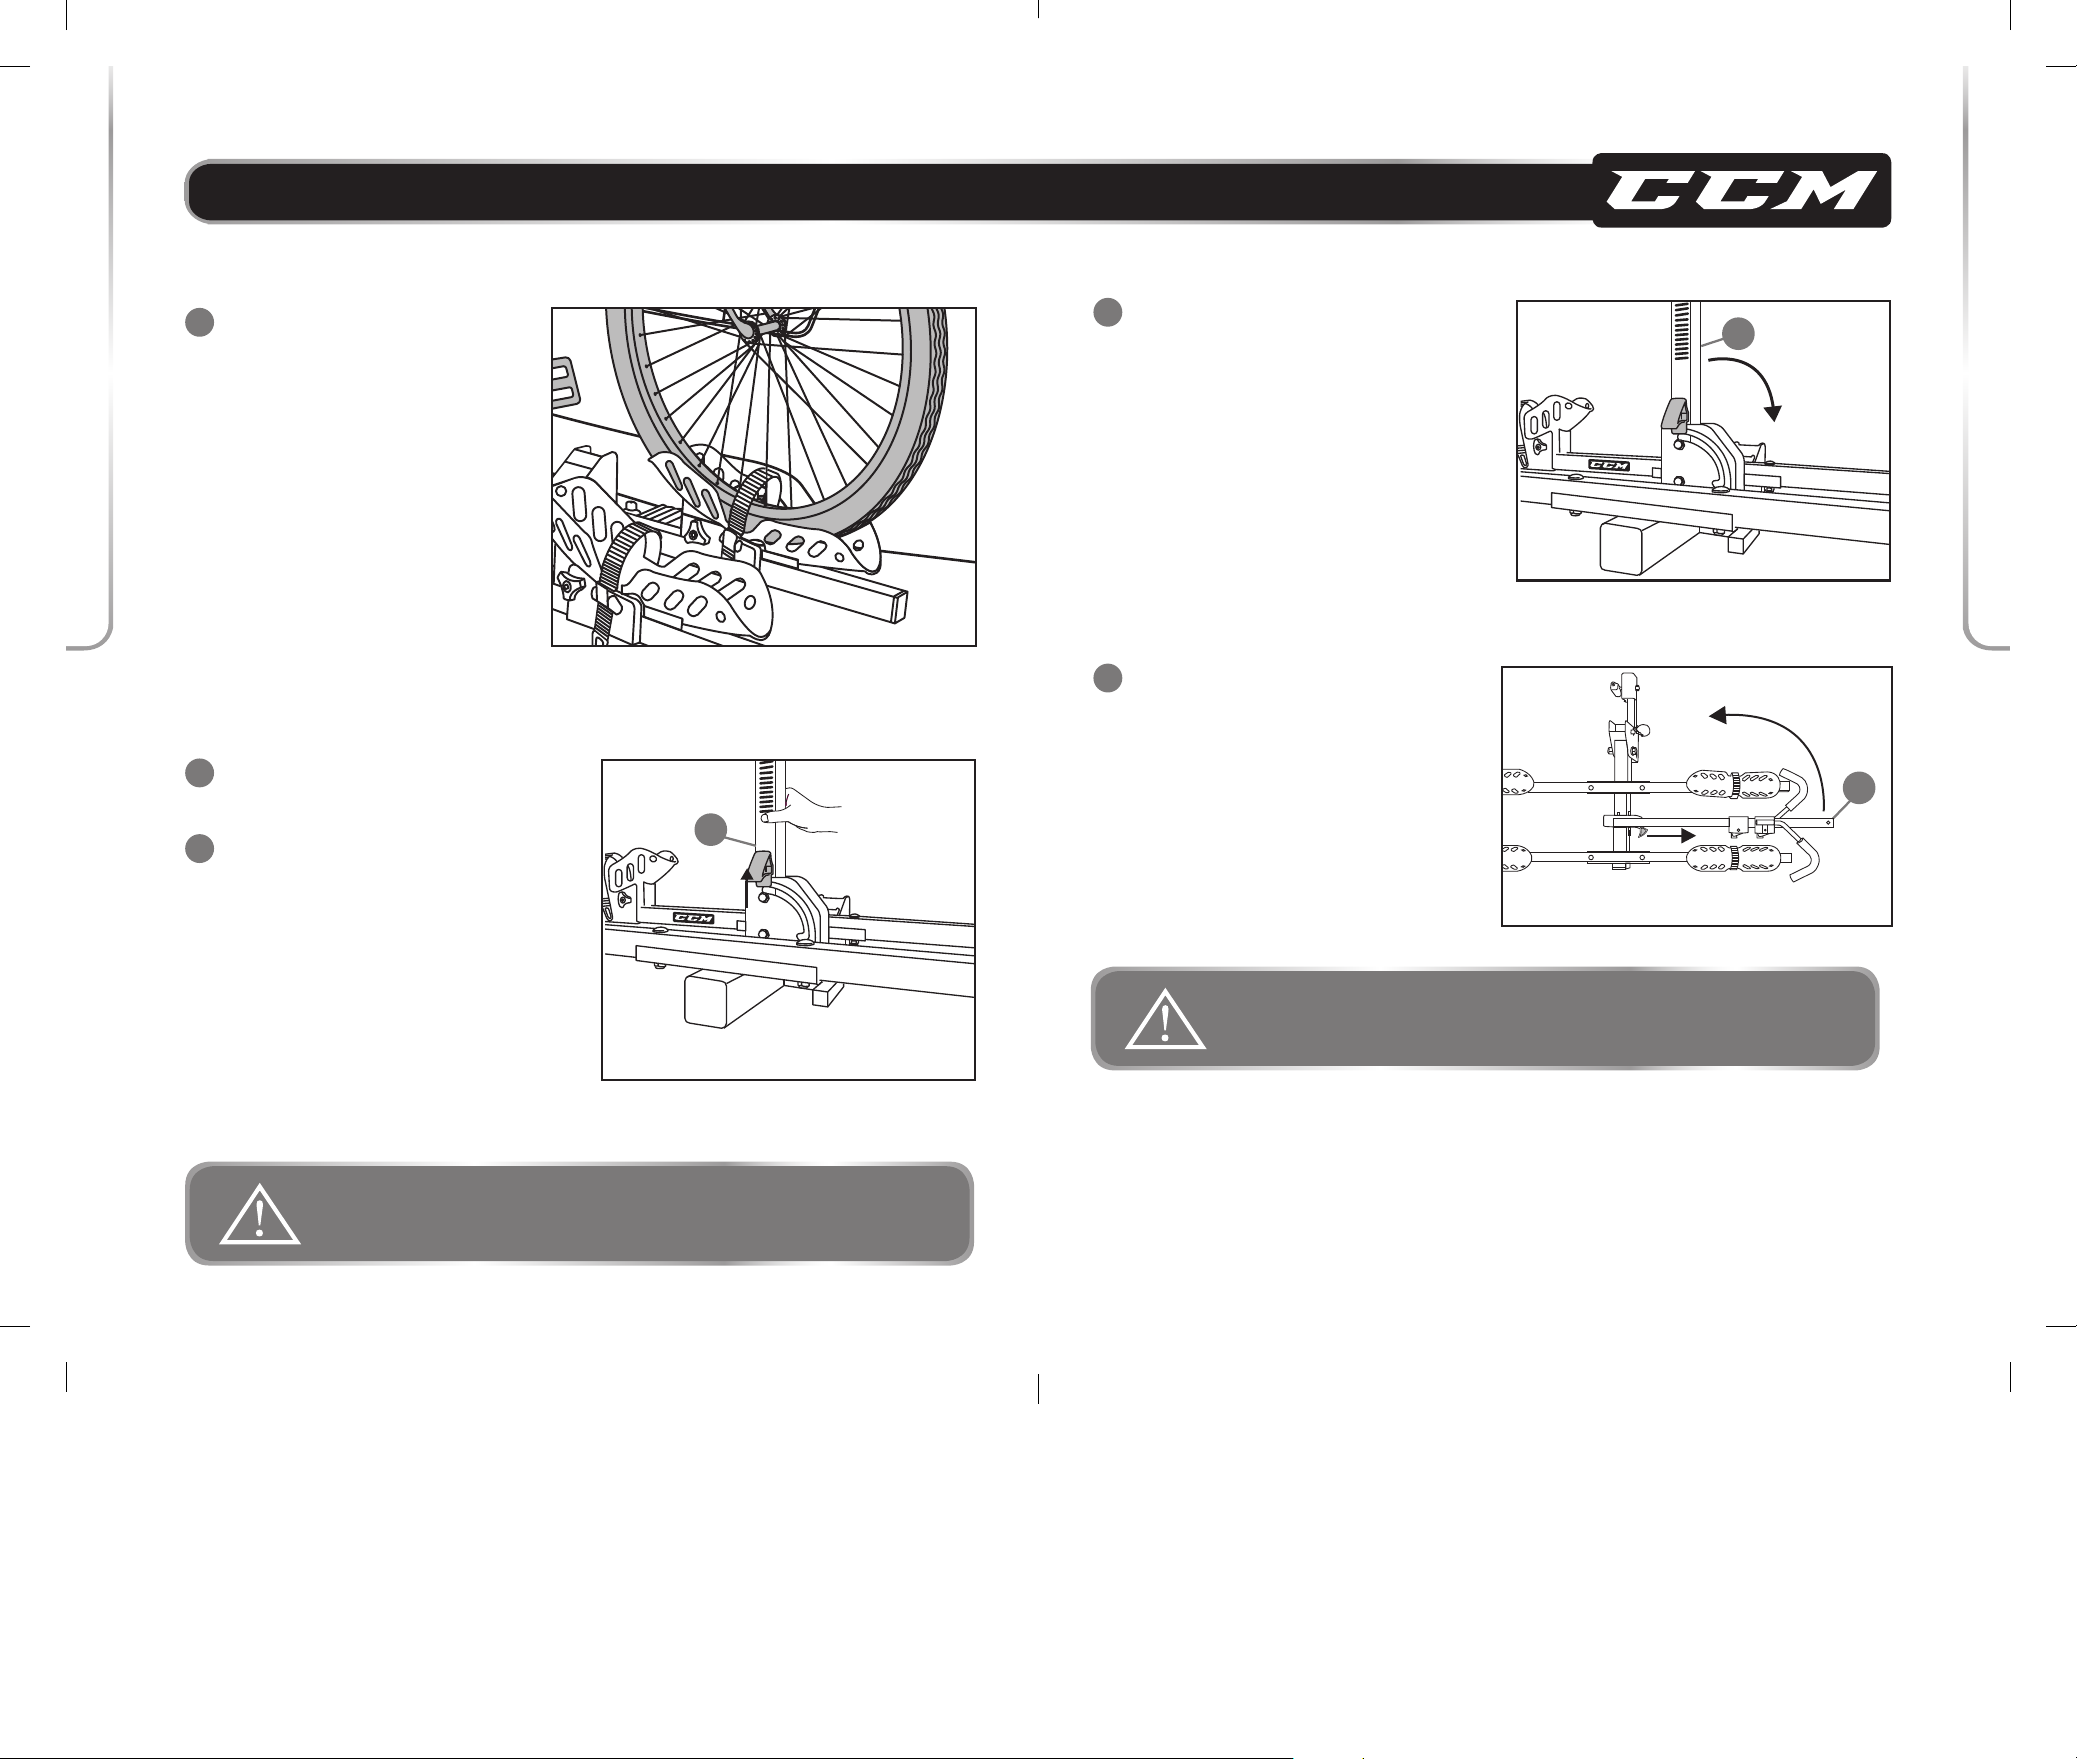
• Alwayssecureyourbicycle(s)tothebikecarrierusingstraps(notincluded).
• Donotusewornordamagedstraps.
• Neverloadmorethantwobicycles(totalling90lb[40kg])onthebikecarrier.
• Donotallowthebicycletirestohangneartheexhaustpipeofthevehicle.Thehotexhaustcouldmelt
anddestroythetires.
• Toprolongthelifeofthebikecarrier,removethebikecarrierfromthevehiclewhennotinuse.
• Donotusepowertoolsorpneumatictoolsforassembly.
MadeinChina ImportedbyTrileaf Distribution TrifeuilToronto,CanadaM4S2B8

model no. 040-1196-2
PACKAGING CONTENTS
PACKAGING CONTENTS
KEY NUMBER DESCRIPTION QUANTITY ILLUSTRATION
A Centrebracket 1
BStingerbase(withpinand2"(5cm)
receiveradaptor) 1
CPinclip 1
DWheeltrayloadbar 2
ECentremast 1
FWheeltray(driverside) 2
GWheeltray(passengerside) 2
HAnti-swayhitchpin 1
I Hitchpinlock 1
JKey 2
KHexbolt,31/2"(90mm) 1
LStepbolt,23/4"(70mm) 2
M Stepbolt,13/4"(45mm) 4
N Nylonlocknut,15/16"(24mm) 1
O Nylonlocknut,1/2"(13mm) 6
PSpringwasher,1/2"(13mm) 1
QFlatwasher,5/8"(16mm) 2
RFlatwasher,1/2"(13mm) 1
SFlatwasher,5/16"(8mm) 6
4
PARTS LIST
1
2
3
45
6
78 910 11
12
13
14
151617 18
19
2021
22
23
5
PARTS LIST

model no. 040-1196-2
ASSEMBLY
6
Aligntheholesonthecentrebracket(A)with
correspondingupperholesonthestingerbase(B).
Secureusinghexbolt(K),twoflatwashers(Q)
andanylonlocknut(N)intheindicatedhole.
Tightenusing15/16"(24mm)socketwrench
andadjustablewrench.
QN
Q
K
A
B
B
C
A
23
Insertthetetheredpin(23)intothealignedholeson
thecentrebracket(A)andstingerbase(B).Secure
usingthepinclip(C).
1
2
3
ASSEMBLING THE BIKE CARRIER
TOOLS REQUIRED (NOT INCLUDED)
• 1"(25mm)adjustablewrench
• 1/2"(13mm)socketwrench
• 15/16"(24mm)socketwrench
• 3/4"(19mm)socketwrench
• 3/16"(4.76mm)hexdrivescrewdriver
E
A
Placethecentremast(E)onthecentrebracket(A)
sothattheholesonthebaseofthecentremast
alignwiththebracket.
A
D
O
S
M
Securethetwowheeltrayloadbars(D)tothe
centrebracket(A)usingfourstepbolts(M),four
flatwashers(S)andfournylonlocknuts(O).Tighten
usinga1/2"(13mm)socketwrench.
6
Placethetwowheeltrayloadbars(D)onthecentre
bracket(A)sothattheboltholesonthewheeltrayload
barsalignwiththecentrebracketholes.
A
D
5
OS
E
A
L
Securethecentremast(E)tothecentrebracket(A)
usingtwostepbolts(L),twoflatwashers(S),and
twonylonlocknuts(O).Tightenusinga1/2"(13mm)
socketwrench.
4
7
ASSEMBLY
ASSEMBLY

model no. 040-1196-2
F
D
G
G
F
Insertthetwowheeltrays(driverside)(F)and
thetwowheeltrays(passengerside)(G)onto
eachendofthewheeltrayloadbars(D).
7
Note: Thisbikecarriercanbefittedtovehiclesequippedwitha11/4"(3.2cm)or2"(5cm)
hitchreceiver.
•Followsteps9to11forfittingthebikecarriertoa2"(5cm)hitchreceiver.
•Followsteps12to15forfittingthebikecarriertoa11/4"(3.2cm)hitchreceiver.
21
Rotatethehandknob(21)clockwiseoneach
wheeltraytosecurethetraysinplace.
Note: Rotatecounter-clockwisetoloosenthe
wheeltraysforadjustment.
8
8
ASSEMBLY
9
I
J
H
Tightentheanti-swayhitchpin(H)usinga3/4"
(19mm)socketwrenchandsecureitusingthe
hitchpinlock(I).
Note:Usekey(J)toremovethelock.
11
Inserttheanti-swayhitchpin(H)intothe
alignedholesofthe2"(5cm)receiver
adaptorandhitchreceiverusingaspring
washer(P)andflatwasher(R).
10
H
P
R
STINGER INSTALLATION FOR 2" (5 cm) HITCH RECEIVER
B
7
99
Insertthe2"(5cm)receiveradaptor(7)ofthe
stingerbase(B)intothe
2"(5cm)
hitchreceiverof
thevehicle.
9
ASSEMBLY

F
model no. 040-1196-2
ASSEMBLY
10 11
H
P
R
Inserttheanti-swayhitchpin(H)intothealigned
holesofthestingerandhitchreceiverusinga
springwasher(P)andflatwasher(R).
14
B
Insertthestingerbase(B)intothe11/4"(3.2cm)
hitchreceiverofthevehicle.
13
7
9
Disassemblethe2"(5cm)receiveradaptor(7)ofthe
stingerbase(B)byremovingthetwo3/16"hexdrive
screws(9)usingascrewdriver.
12
STINGER INSTALLATION FOR 1 1/4" (3.2 CM) HITCH RECEIVER
CAUTION:
•Position the bicycle pedal in such a way to prevent the vehicle from being
scratched.
•Do not allow the bicycle tires to hang near the exhaust pipe of vehicle.
The hot exhaust could melt and destroy the tires.
• Check for tightness of the straps at regular intervals, as the straps may loosen
and bicycles may shift during travel. Inspect more frequently when travelling
on bumpy roads.
• Remove the bike carrier from the vehicle when not in use to avoid
additional wear on both the vehicle and the carrier.
Placethebicyclesinanalternatingdirectionon
thebikecarrierinsuchawaythatthewheelsof
thebicyclerestonthewheeltrays(F)and(G).
16
Note: Loadtheheaviestbicycleclosesttothe
vehicle.
LOADING BICYCLES ON THE BIKE CARRIER
4
Pushdowntherackarm(4)ofthecentremast
ontothetoptubeofthebicycleuntiltherack
armisfirmlylockedinposition.
Note:Pressthebuttonprovidedatthecentre
mast,andlifttoreleasethelockingoftherack
arm,whileunloadingthebicycle.
17
OPERATION
I
J
H
Tightentheanti-swayhitchpin(H)usinga3/4"
(19mm)socketwrenchandsecureitusingthe
hitchpinlock(I).
Note:Usekey(J)toremovethelock.
15
G

F
E
model no. 040-1196-2
12
WARNING:
Hold the centre mast firmly while pulling the quick-release handle so as to
prevent the user from being hit by the rack arm
.
Ensurethatthebikecarrierisnotloaded
withbicycles.
19
TILTING THE BIKE CARRIER
Securethebicyclewheelswiththeleftandright
wheeltraysusingthebuilt-inratchetingstraps.
Insertthelooseendofthestrapintothebuckle
untilsnug.
Pressthefaceofthebuckletoreleasethestrap.
18
Note:Thebikecarriercanbetiltedforeasyaccesstothereartrunk/hatchofthevehicleandtopreventdamagetothe
carrierorvehiclewhileopeningthetrunklidofthevehicle.
Tiltthecentremast(E)tothepassengerside
ofthevehicle.Thecentremastwilllockintoits
loweredposition.
Afterloading,pullthequick-releasehandleand
liftthecentremast(E)backtoitsuprightposition,
ensuringthequick-releasehandlehaslocked
intoplace.
21
22
OPERATION
CAUTION:
Make sure the centre mast (E) is tilted while opening the trunk lid of the vehicle.
13
Holdthecentremast(E)andpullupwardson
thequick-releasehandleatthebaseofthemast.
20
OPERATION
E
E

model no. 040-1196-2
FOLDING THE BIKE CARRIER
Liftthecentrebracket(A)oftherackintowards
thevehicle.Reinsertthepin(23)andsecureusing
thepinclip(C).
Ensurethatthebikecarrierisnotloaded
withbicycles.
Pullthepinclip(C)fromthepin(23)onthestinger
base(B),thenremovethepin.
23
25
26
B
C
A
23
C
B
A
23
OPERATION
NOTE: Thewheeltrayscanbefoldedupwhiletherackisnotinuseorforstorage.
14
Tiltthecentremastintothewheeltrays,following
steps19-21.
24
•Wipethebikecarrierwithadampclothandmilddetergentaftereveryuseandbeforestorage.
•Foldthewheeltraysforcompactstorageofthebikecarrier.
•Storethebikecarrierindoorsandinacool,dryplace.
CLEANING
STORAGE
CLEANING AND STORAGE
15
Table of contents
Other CCM Automobile Accessories manuals