manuals.online logo
Brands
  1. Home
  2. •
  3. Brands
  4. •
  5. Celsicom
  6. •
  7. Accessories
  8. •
  9. Celsicom MM601 User manual

Celsicom MM601 User manual

User manual
MM601 / MM600P1
Quick Guide
Register as a customer and create an account for the Celsiview cloud service
At the moment the Celsiview cloud service version two can be tested, it can be accessed by click-
ing on the ”Celsiview 2 Beta” button on celsiview.se. The instructions below are based on Celsiview
2.
Click on the ”Create new account” button. Fill in all the information needed to create the account.
A verication email will then be sent to the email address provided in the registration process.
Click on the link in the email to verify the account. If you do not receive an email, please check the
spam mail. Once the account is veried, a page will appear with a link to the login page.
Adding the sensor to your sensor register
Go to the Celsiview 2 login page by clicking on ”Celsiview 2 Beta” on celsiview.se and log in. Select
” Sensor ” in the menu and then ” Add new sensor ”. Now scan a sensor or enter the data manually
(S/N + control code written on the sensor). After the sensor data is displayed, click on ”Add this
sensor”. The cost of the sensor is now presented. Accept by adding the sensor to the shopping bas-
ket. Now scan the remaining sensors in the same way before proceeding to checkout.
Click on the shopping basket and view the contents. A summary of the costs is now displayed. Se-
lect or create an invoice recipient. The invoice recipient should contain all the information needed
to be accepted by your nance department. The references, cost centre, etc. will appear on your
invoice. Click on ”Complete transaction” to activate the sensor.
Start and activate the sensor(s)
Connect the separate measuring node MM600P1 via the connector on the cable from MM601.
The cable can be plugged into any of the two connector slots on the MM600P1 node. In the free
connector slot, an additional MM600P1 can be connected via a bus cable (purchased separately).
Up to 8 nodes can be connected to one MM601 master sensor. On the round switch you set which
node in the order you connected (1 to 8).
Hold the grey sensor in both hands, place your right and left thumbs on top of the °celsicom logo
on the top of the sensor. Now slide the lid upwards/forwards to open it.
Insert 2 alkaline AA/LR6 batteries (1.5V) into the battery holder. The sensor will now beep to indi-
cate that it is booting up and the orange LED will light up. Both orange and green LEDs will light
up shortly afterwards in a constant light while the sensor is searching for a mobile connection.
The connection to the mobile network may take several minutes.
When the sensor is properly connected, the orange LED goes out and the green one starts ashing
and three short beeps are heard. The green LED now ashes the mobile signal strength every 30 se-
conds for three minutes. 3 blink=high level, 2=medium and 1=low. Feel free to move the transducer to
achieve the best possible strength. A better signal strength gives a longer battery life.
After three minutes, the sensor switches to measuring and transmitting every three hours to save
battery power. Measurement and transmission intervals are adjustable in the Celsiview cloud service.
Measuring more often than every three hours will affect the properties of the wood material (measu-
rement object) and may result in inaccurate readings. To restart the above process or if the sensor does
not connect properly, disconnect one battery, wait 60 seconds and reconnect it again.
Add/change measurement locations linked to the sensor
Each MM601 sensor delivers 8 measurement values if 8
MM600P1 measurement nodes are connected. 8
Login to celsiview.se (Version 2 Beta).
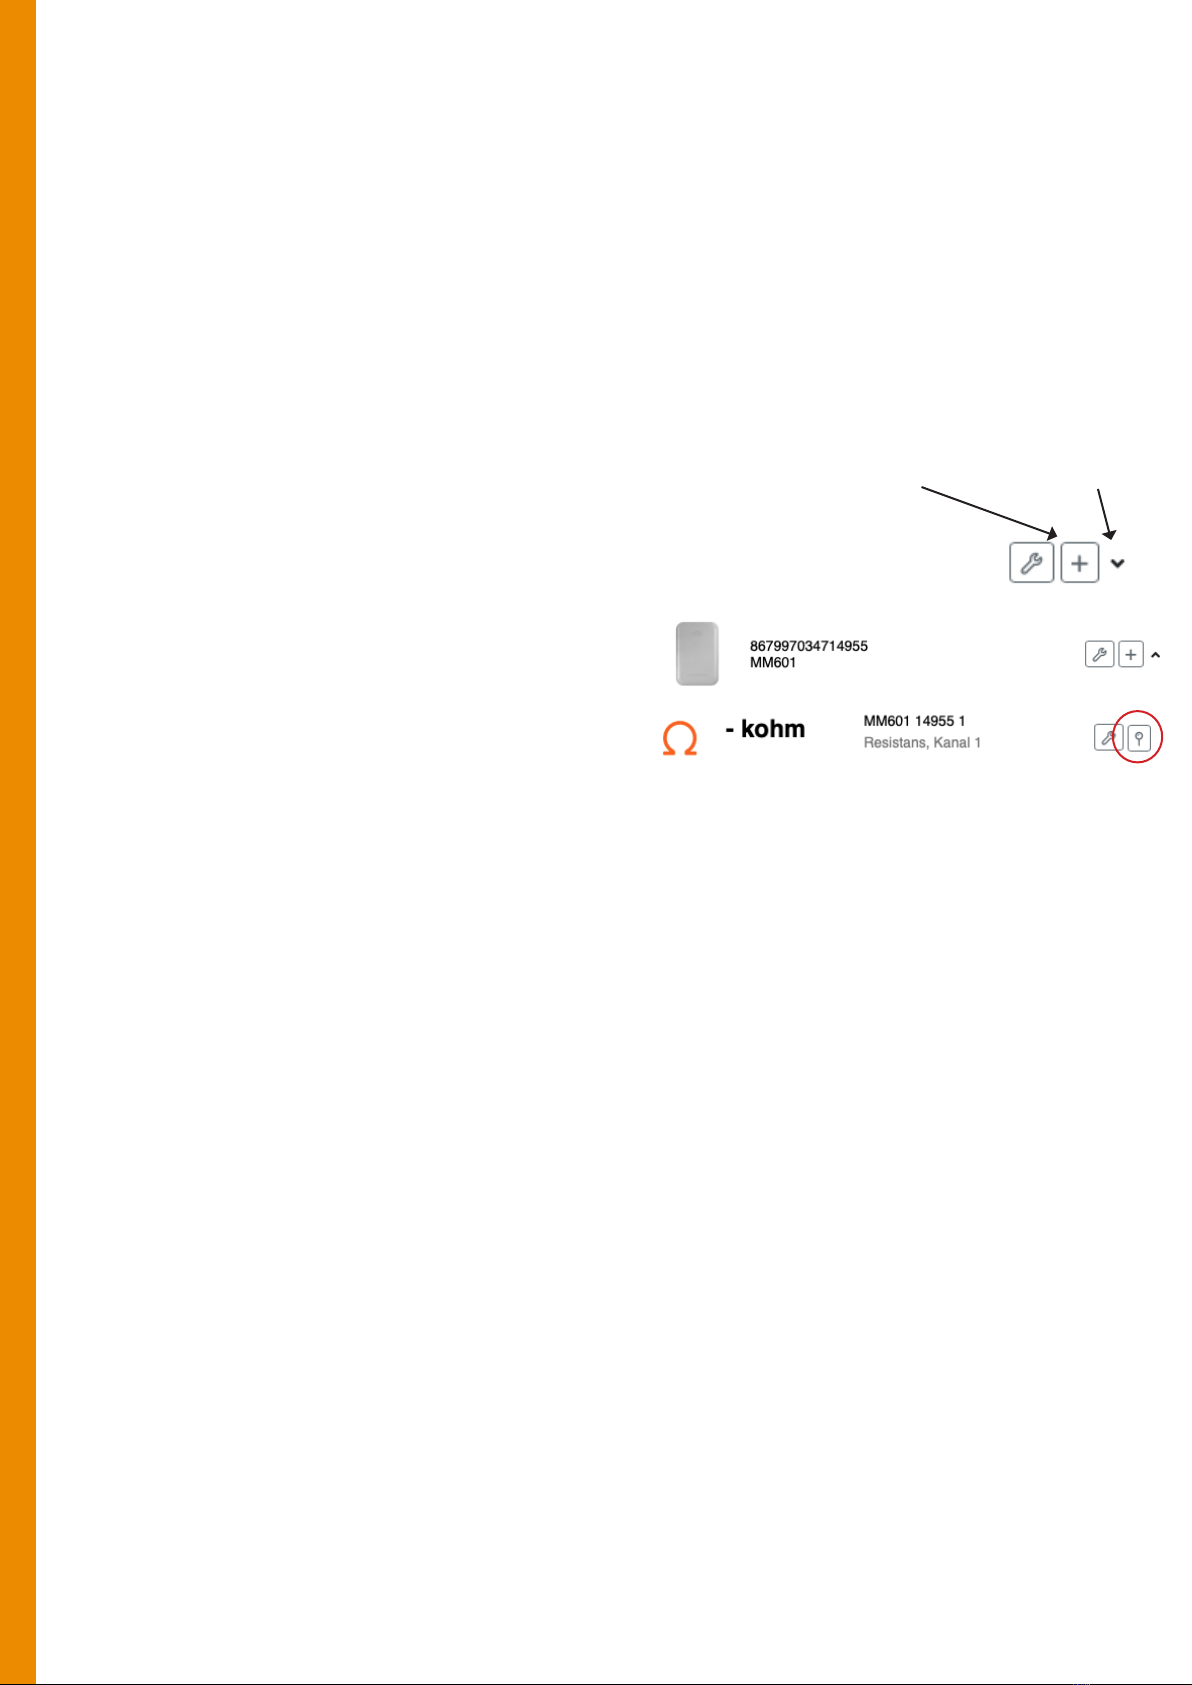
Click on ”Sensors” in the menu. At the far right of the
line for the sensor, some symbols are displayed.
To add all 8 channels as readings to your sensor
location list click on the plus sign and enter a
name/prex for the readings, e.g. ”Moisture con-
tent sensor”. Press ”OK”. The locations are now
created and can be found under the menu item
”Locations”.
If only a single MM600P1 measurement node is to be used, click on the symbol with a down arrow.
All 8 channels of the sensor will be opened. Now click on the map pin (location) on the channel (1 to
8) where a measuring node is connected. Select ”Create location”, enter a name for the measurement
location and save.
To change a setting/name of a location, e.g. set the measurement curve (fur/spruce/Protimeter WME),
click on ”Locations” in the menu and then on the tool symbol on the right of the line or click on a line
and select ”Go to settings”.
By clicking on the star symbol on the far right of a location row, or selecting ”Make a favorite” after
clicking on a row, that measurement will appear as a favorite (widget) on the home screen. (Menu item
”Home”)
The options ”Settings”, ”Reports” and ”Make a favourite” etc. are also accessible by simply clicking on
any row/location on the ”Locations” page.
Reports
To print or export reports/measurements, click on ”Reports” in the menu. Select what to display in the
report/graph by the menu options above the graph. It also selects the time period you want to look at.
Click on the ”Export” button to download or send the report as e.g. an Excel le or PDF.
Add all channels Add single channels
My business
In the ”My business” menu, sites can be structured into different groups/folders. Right-click on ”Groups
and locations” to create a group/folder. Then drag and drop the measurement locations you want into
any group.
A group or location can also be shared with another person by right-clicking on the location or group
and selecting ”Share”. Select ”Create new user”, enter the email address of the person to be assigned
to the site/group. Automatically, the username of that person will be set to the same as the email
address. Click on ”OK”. The new recipient now appears in the list of selectable recipients. Select the
rights the new user should have. Click on ”OK”. The new user will now receive an e-mail asking him to
choose a password. The new user can then log in with their details and will have access to what has
been distributed.
Add alarm recipients
Log in to the account. Click on the username in the top right corner. Select ”Alarm handling”. Add the
email addresses/SMS numbers where alerts should be sent. Test the alarm by clicking on the letter
symbol of the recipient to which the test should be sent. NOTE! Check that it arrives.
Other information
Stainless steel screws work well as measuring points in the measurement object (wooden structure).
Pins/nails may drop out of the material as it dries.
Avoid interference with the measurement signal by following these points:
• The MM600P1 measuring node should be placed at least 1 meter away from electrical equipment
or cables
• The bus cable between the MM601 and the MM600P1 should not pass close to the measuring point
• The bus cable should be placed as far away from electrical cables/equipment as possible and
should not be parallel to other cables
• The measuring cables are sensitive to ESD/static electricity. Take measures to protect them
• A jagged/uneven waveform in a report indicates interference at the measurement point
The encoder should be mounted with the three half-rings on the cover facing upwards and the logo
facing downwards. If the sensor is to be mounted against a metal surface, magnetic mount 7040
0060 (or other non-metallic spacer) must be used to bring the sensor out at least 10 mm from the
mounting surface. Otherwise, the metal surface will interfere with the connection of the sensor and
the measurement data will have difculty reaching our servers.
Support
All support is handled by our distributors. See celsicom.se for more information. User manuals and
other support material are available at support.celsicom.se.
User manual
MM601 / MM600P1
Celsicom AB
Härdgatan 28 A, 432 32 Varberg
SVERIGE
celsicom.se
support.celsicom.se
Version of user manual: 3 Made in Sweden
Model Measured value Range Maximum
deviation
MM600P1 Resistance (normal)
Resistance (max)
Moisture ratio Fur Wood Trätek (normal)
Moisture ratio Fur Wood Trätek (max)
Protimeter WME A (normal)
Protimeter WME A (max)
200kOhm to800MOhm
50kOhm to 1GOhm
12% to 26%
11,5% to 45%
10% to 25%
9,5% to 50%
±15%
Not dened
±3% of measured value
Not dened
±3% of measured value
Not dened
Connection NB-IoT (LTE Cat NB1) B20. Power 23 dBm
Batteries 2 x AA/LR6 1,5V (not included)
Battery time Depending on the transmission interval. Example at 20°C, good signal
quality, measurement every 3 hours and transmission every 3 hours: > 12
months
Measurement and transmissi-
on interval
Adjustable by users via the Celsiview cloud service.
Memory 200 measurements
Size MM601 enclosure, 78 (w) x 114 (h) x 30 (d) mm
MM600P1 enclosure, 30 (w) x 45 (h) x 20 (d) mm
Weight MM601, 148 grams (without battery)
MM600P1, 50 grams
Certicate CE
Mounting method Mounted vertically with the screw holes facing upwards
NOTE! If the sensor is to be mounted against metal, magnetic mount 7040
0060 can be used. (Or other 10 mm spacer, not made of metal)

This manual suits for next models

3

Other Celsicom Accessories manuals

Celsicom T603 User manual

Celsicom

Celsicom T603 User manual

Celsicom TH500 User manual

Celsicom

Celsicom TH500 User manual

Celsicom Connect CC202 User manual

Celsicom

Celsicom Connect CC202 User manual

Popular Accessories manuals by other brands

Festo AS-i Series Brief description

Festo

Festo AS-i Series Brief description

CKD PF500 Series instruction manual

CKD

CKD PF500 Series instruction manual

Robus connect RCCHIME-01 quick start guide

Robus

Robus connect RCCHIME-01 quick start guide

Siko MSAC506 Translation of the original installation instructions

Siko

Siko MSAC506 Translation of the original installation instructions

MORLEY-IAS MI-LZR Installation and maintenance instructions

MORLEY-IAS

MORLEY-IAS MI-LZR Installation and maintenance instructions

Lufft WS Series quick start

Lufft

Lufft WS Series quick start

Allterco Robotics Shelly flood user guide

Allterco Robotics

Allterco Robotics Shelly flood user guide

Sontay MW-U manual

Sontay

Sontay MW-U manual

Technaxx MusicMan TX-08 manual

Technaxx

Technaxx MusicMan TX-08 manual

SunSetter VISTA Owner's Manual & Installation Instructions

SunSetter

SunSetter VISTA Owner's Manual & Installation Instructions

Campbell SR50AH instruction manual

Campbell

Campbell SR50AH instruction manual

FortrezZ FTS05US user manual

FortrezZ

FortrezZ FTS05US user manual

PCB Piezotronics IMI SENSORS 648A00 Installation and operating manual

PCB Piezotronics

PCB Piezotronics IMI SENSORS 648A00 Installation and operating manual

Kortel Design Kanibal Race II User Manual and Safety Instructions

Kortel Design

Kortel Design Kanibal Race II User Manual and Safety Instructions

Beco Technic Atlantic manual

Beco Technic

Beco Technic Atlantic manual

Juice 1 quick start guide

Juice

Juice 1 quick start guide

Nice Volo ST Instructions and warnings for the fitter

Nice

Nice Volo ST Instructions and warnings for the fitter

Medizintechnik SaneoSPORT instruction manual

Medizintechnik

Medizintechnik SaneoSPORT instruction manual

manuals.online logo
manuals.online logoBrands
  • About & Mission
  • Contact us
  • Privacy Policy
  • Terms and Conditions

Copyright 2025 Manuals.Online. All Rights Reserved.