manuals.online logo
Brands
  1. Home
  2. •
  3. Brands
  4. •
  5. Center
  6. •
  7. Measuring Instrument
  8. •
  9. Center 532 User manual

Center 532 User manual

532
UVLIGHTMETER
CENTER TECHNOLOGY CORP.
4F, NO.415, Jung-Jeng Rd., Shu-Lin Dist., New Taipei City 238, Taiwan
E-Mail:center@centertek.com
http://www.centertek.com GCA000532-12000
Safety Information
n
o

M
i
t
a
c
n
u
r
u
t
a
s
l
n
I
Environment Conditions:
Introduction
Thank you for using our UV Light Meter. To ensure that you can get the
most from it, we recommend that you read and follow the manual carefully
before use. The UV Meter has been designed, manufactured, and
delivered under strict quality control criteria. This meter has the following
characteristic.
Read the following safety information carefully before attempting to operate
or service the meter.
Use the meter only as specified in this manual ; otherwise, the protection
provided by the meter may be impaired.
Ÿ Altitude up to 2000 meters
Ÿ Relatively humidity 70% max.
Ÿ Operation Ambient 0 ~ 40°C
Explanation of Symbols:
Comply with EMC.
When servicing, use only specified replacement parts.
Storage Temperature:
Dimension / Weight:
Accessories:
169(L)×63(W)×37(H)mm (6.7”×2.5”×1.5”)
Battery, instruction manual, carrying case.
-10 to 50°C (14 to 122°F)
Temperature characteristics:
Response time: 0.5 sec
Light detector: UV Photodiode
Operation temperature: 0°C ~ 40°C(32°F ~ 104°F)
Operation humidity: 0~80% RH
Storage Humidity: 0 to 70% RH
Specifications
Measuring range: Low range: 1 to 3999 uw/cm2
High range: 0.01 to 39.99 mw/cm2
Sensitivity Wavelength
Region (nm):
260 nm ~ 395 nm
Easy to use
Auto power off function
Measuring range fully covering UVA & UVB
±0.1% / °C(away from 25°C)
Over range: “-OL-” display
Power supply: 1.5V type AA battery x2
Power life: Approx. 80 hours
Weight: Approx. 210g
Repairs or servicing not covered in this manual should only be performed
by qualified personal.
Attention!
Periodically wipe the case with a dry cloth. Do not use abrasives or
solvents on this instrument.
Cleaning
Maintenance
Operating carefully, and do not drop the meter or hit it with a hard object.
Avoid using the meter in a dirty, dusty, or salt-air area or where there are
corrosive gases. If dirt or dust adhered to the surface of the light detecting
surface, this will decrease the accuracy of the measuring value. To clean
the surface, use soft and dry cloth to wipe it clean.
Precautions on handling
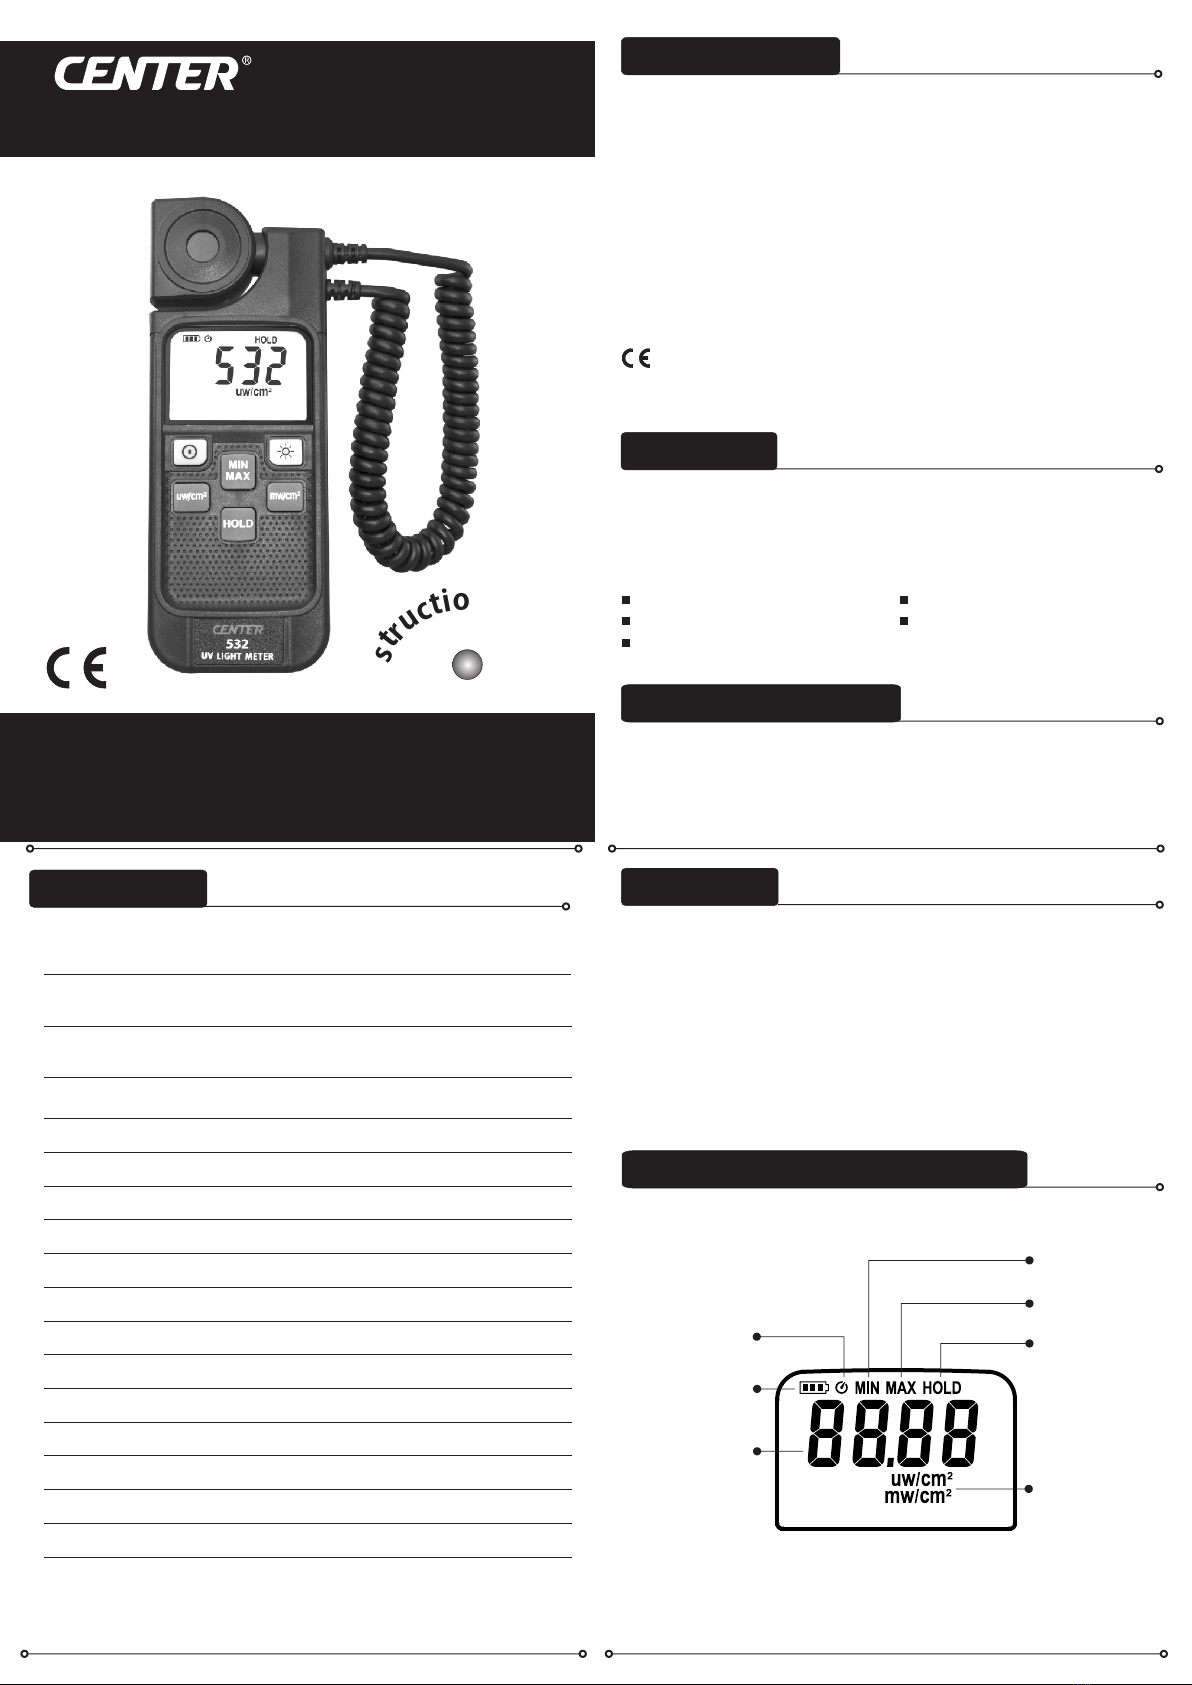
Symbol Definition & Button Location
1. LCD Display:
MAX/MIN function build in
Large backlight LCD display
Battery status
indicator
Minimum value
indicator
Maximum value
indicator
Auto power off
indicator
Ultraviolet
intensity Unit
indicator
Value hold
indicator
Ultraviolet intensity
value indicator
Accuracy: ±3% rdg ±5 dgts
Wavelength for
Calibration (nm):
365 nm
LCD display:
6 1/2" large size back light LCD display.
Power button:
Push this button to turn on the meter. Push and hold this button for 3
seconds to turn it off. The unit will automatically turn itself off after 30
minutes if there is no key operation. To disable the automatic power off
function, turn the meter off, push and keep holding “ ” button, then
push power button to turn on. The “ ” will disappear from the LCD to
confirm this operation.
Backlight ( Power ) button:
Push this button to turn on and off the LCD backlight. The backlight will
be automatically off after 30 seconds to save battery power.
HOLD button:
The user may hold the present reading and keep it on the LCD display
by pressing the button. To release the data held operation, user
may press the button again.
Max Min button:
Push this button to set the meter working under MAX/MIN mode. By
pushing this button, the user may swap the LCD reading among
maximum, minimum and current reading. Push and hold this key for 3
seconds to exit MAX/MIN mode.
2
uw/cm selector button:
2
To switch the measuring range to lower range with unit uw/cm
2
mw/cm selector button:
2
To switch the measuring range to higher range with unit mw/cm
2. Name of Parts & Position: 1
2
3
4
5
6
7
8
Light Sensing Probe:
This probe can be fixed on the meter parallel or perpendicular to
the LCD surface. Or it may be detached from the unit to fit the
measuring requirement.
Battery cabinet cover:
When battery capacity segment is
less than one, the user should
replace the battery. The battery
cabinet cover can be opened with a
Philips screw driver and two AA type
batteries should be replaced.
/ /
9

Other Center Measuring Instrument manuals

Center C315 User manual

Center

Center C315 User manual

Center 265 User manual

Center

Center 265 User manual

Center 201 User manual

Center

Center 201 User manual

Center C325 User manual

Center

Center C325 User manual

Center 342 User manual

Center

Center 342 User manual

Center 531 User manual

Center

Center 531 User manual

Center 323 User manual

Center

Center 323 User manual

Center 530 User manual

Center

Center 530 User manual

Center 321 User manual

Center

Center 321 User manual

Center C322 User manual

Center

Center C322 User manual

Center 390 User manual

Center

Center 390 User manual

Center 340 User manual

Center

Center 340 User manual

Center SE-323 User manual

Center

Center SE-323 User manual

Center 32 User manual

Center

Center 32 User manual

Center 392 User manual

Center

Center 392 User manual

Center 232 User manual

Center

Center 232 User manual

Center 252 User manual

Center

Center 252 User manual

Center 212 User manual

Center

Center 212 User manual

Center C317 User manual

Center

Center C317 User manual

Center 221 User manual

Center

Center 221 User manual

Center 22 User manual

Center

Center 22 User manual

Center 322 User manual

Center

Center 322 User manual

Center 262 User manual

Center

Center 262 User manual

Center 327 User manual

Center

Center 327 User manual

Popular Measuring Instrument manuals by other brands

Alcatel Vacuum Technology adixen AP 2004 user manual

Alcatel Vacuum Technology

Alcatel Vacuum Technology adixen AP 2004 user manual

Nidec MFD-02 Operation manual

Nidec

Nidec MFD-02 Operation manual

Raycus RFL-P200 user guide

Raycus

Raycus RFL-P200 user guide

X-Rite RM200QC quick start guide

X-Rite

X-Rite RM200QC quick start guide

TC Electronic Clarity M user manual

TC Electronic

TC Electronic Clarity M user manual

Kilsen KZ705 Series Installation sheet

Kilsen

Kilsen KZ705 Series Installation sheet

SIXTOL SX3005 Instructions for use

SIXTOL

SIXTOL SX3005 Instructions for use

EML UM-P-780-700 user manual

EML

EML UM-P-780-700 user manual

HBM RTN Mounting instructions

HBM

HBM RTN Mounting instructions

Microrad NHT-3D user manual

Microrad

Microrad NHT-3D user manual

Tempo Communications OPM5 Series Quick reference card

Tempo Communications

Tempo Communications OPM5 Series Quick reference card

Chauvin Arnoux CA 10 user manual

Chauvin Arnoux

Chauvin Arnoux CA 10 user manual

AR DC4260 Operating and service manual

AR

AR DC4260 Operating and service manual

ADLINK Technology PXIe-9834 user manual

ADLINK Technology

ADLINK Technology PXIe-9834 user manual

TESTO 330i Startup & Safety

TESTO

TESTO 330i Startup & Safety

PCB Piezotronics TLD339A36 Installation and operating manual

PCB Piezotronics

PCB Piezotronics TLD339A36 Installation and operating manual

AutoTest AutoLight user manual

AutoTest

AutoTest AutoLight user manual

Siko MBR Series User information

Siko

Siko MBR Series User information

manuals.online logo
manuals.online logoBrands
  • About & Mission
  • Contact us
  • Privacy Policy
  • Terms and Conditions

Copyright 2025 Manuals.Online. All Rights Reserved.