CenterVue COMPASS User manual

CenterVue
COMPASS Operating Manual
Pag. 1 di 53
Operating Manual

CenterVue
COMPASS Operating Manual
Pag. 2 di 53
MANUAL INFORMATION
Date of release: March 31st, 2016
Revision number: 11
Reference software version: v2.0
Manufacturer:
CenterVue S.p.A.
Via San Marco 9h, 35129 Padova –ITALY
Tel. +39 049 739 6147
Fax +39 049 739 6148
CONTENTS
1. INTRODUCTION....................................................................................................................................... 4
2. SYSTEM.................................................................................................................................................... 5
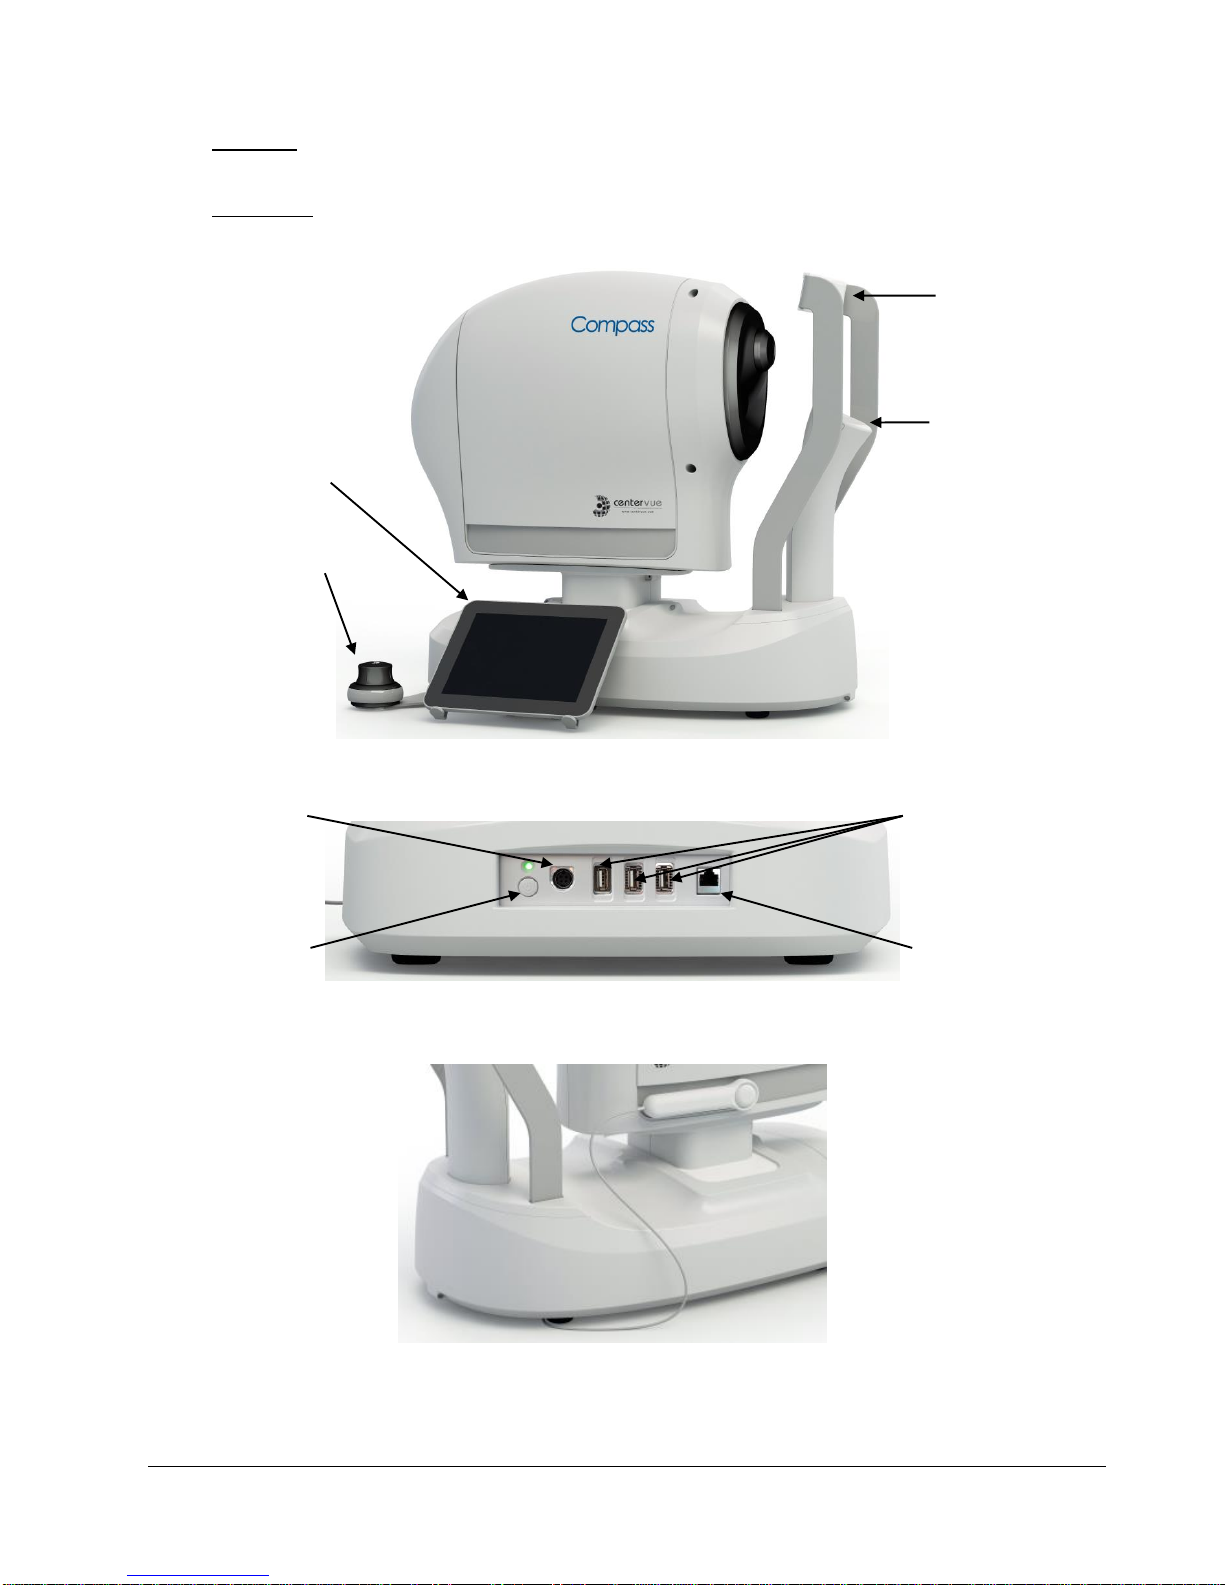
2.1 The device ............................................................................................................................................. 5
2.2 The tablet............................................................................................................................................... 6
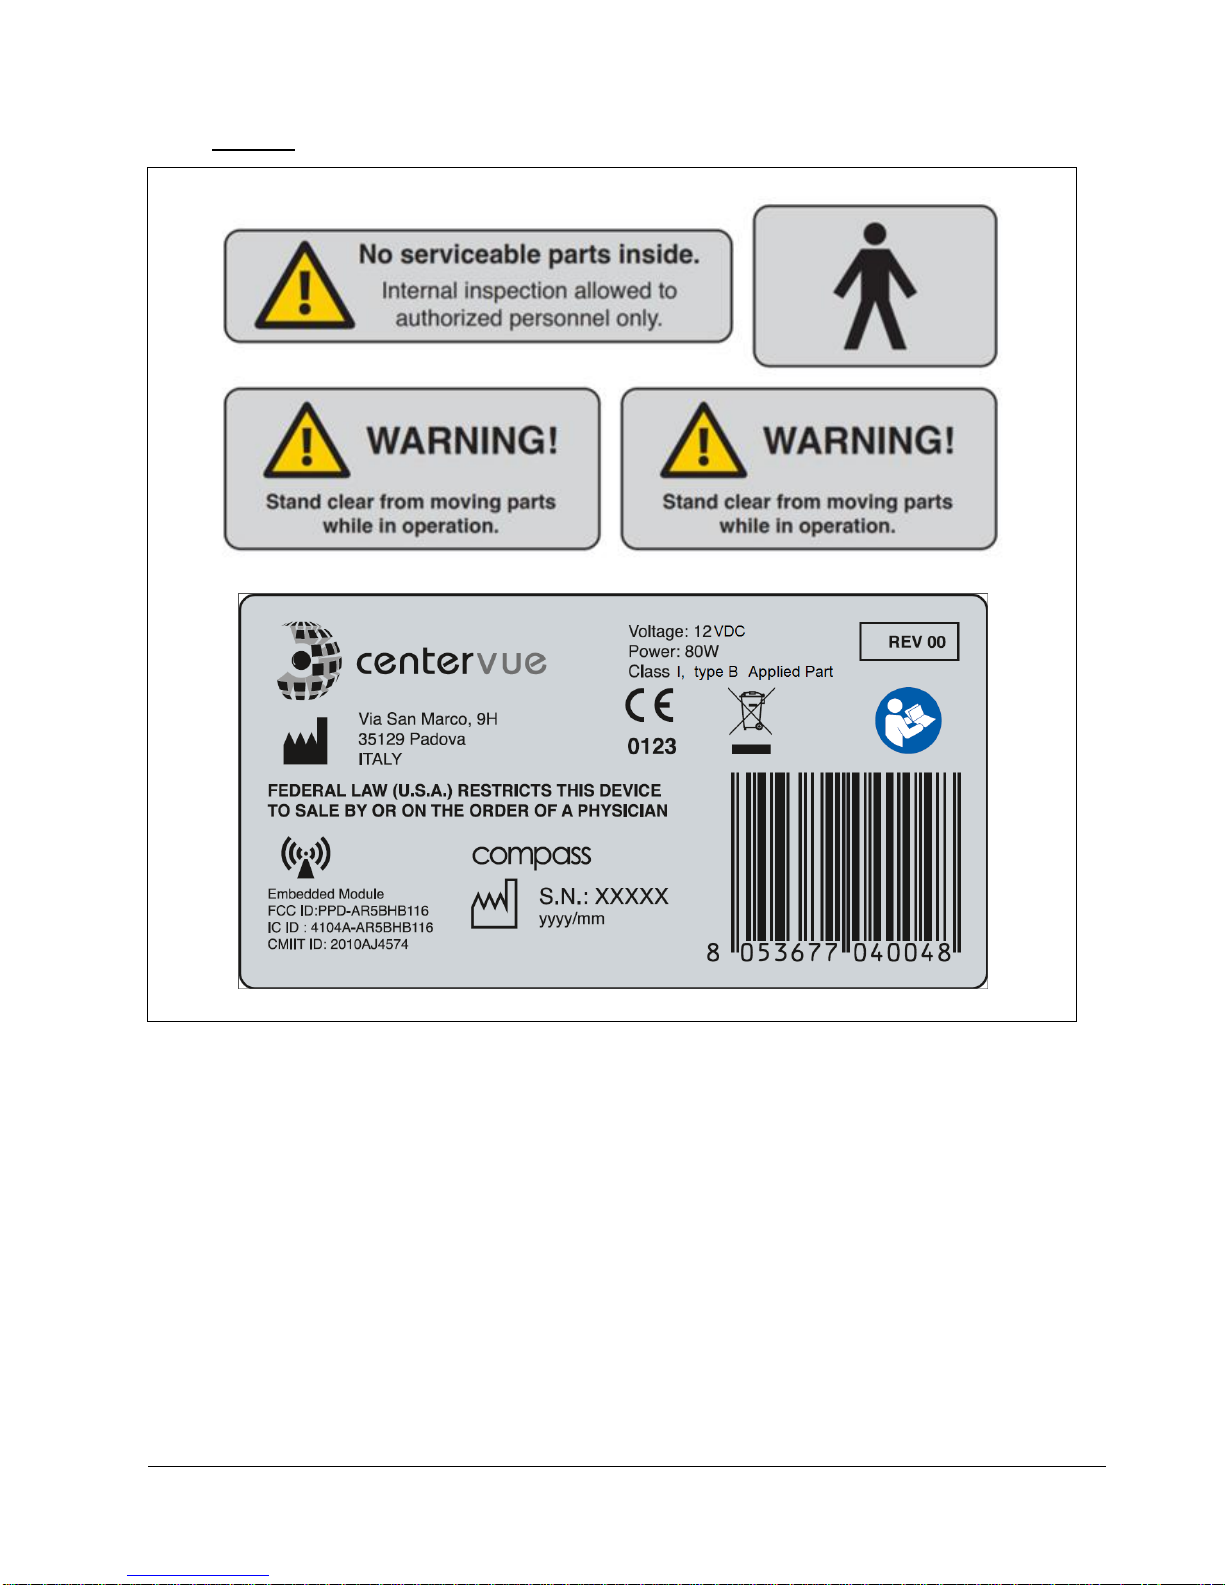
3. LABELS ..................................................................................................................................................... 7
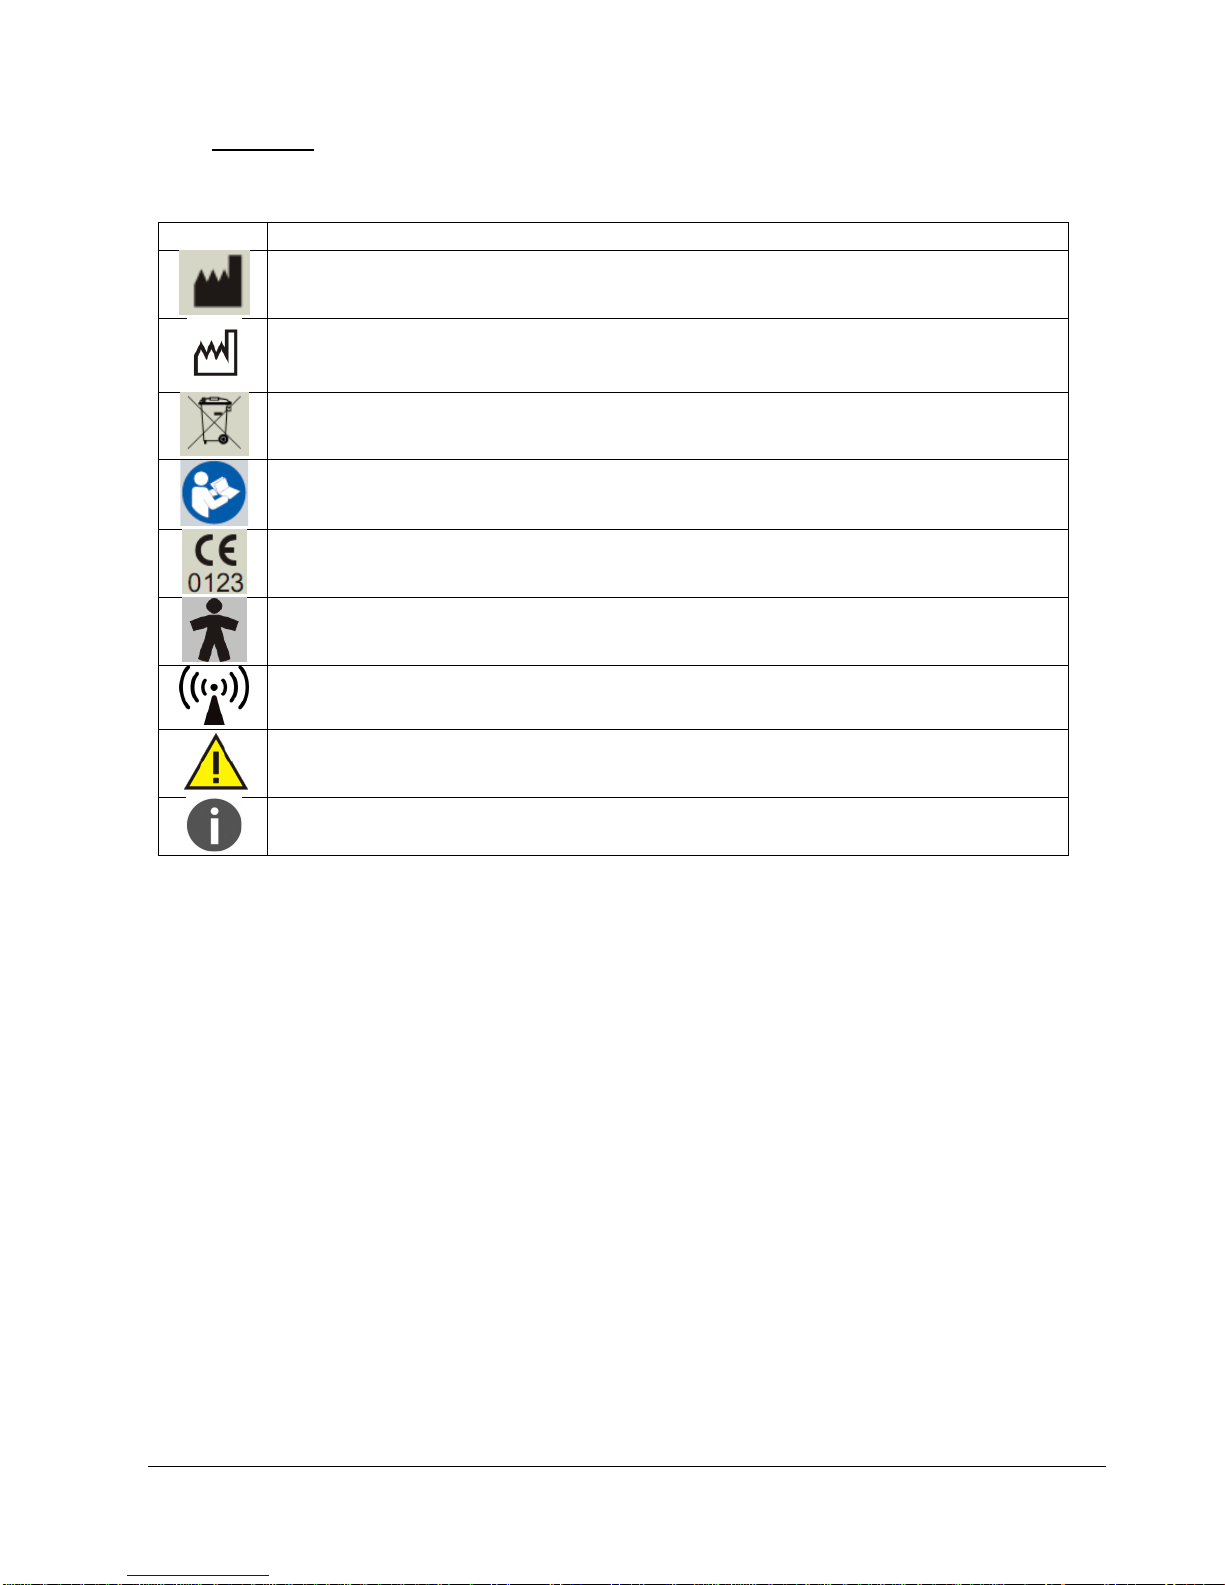
4. SYMBOLS.................................................................................................................................................. 8
5. PREPARING THE SYSTEM...................................................................................................................... 9
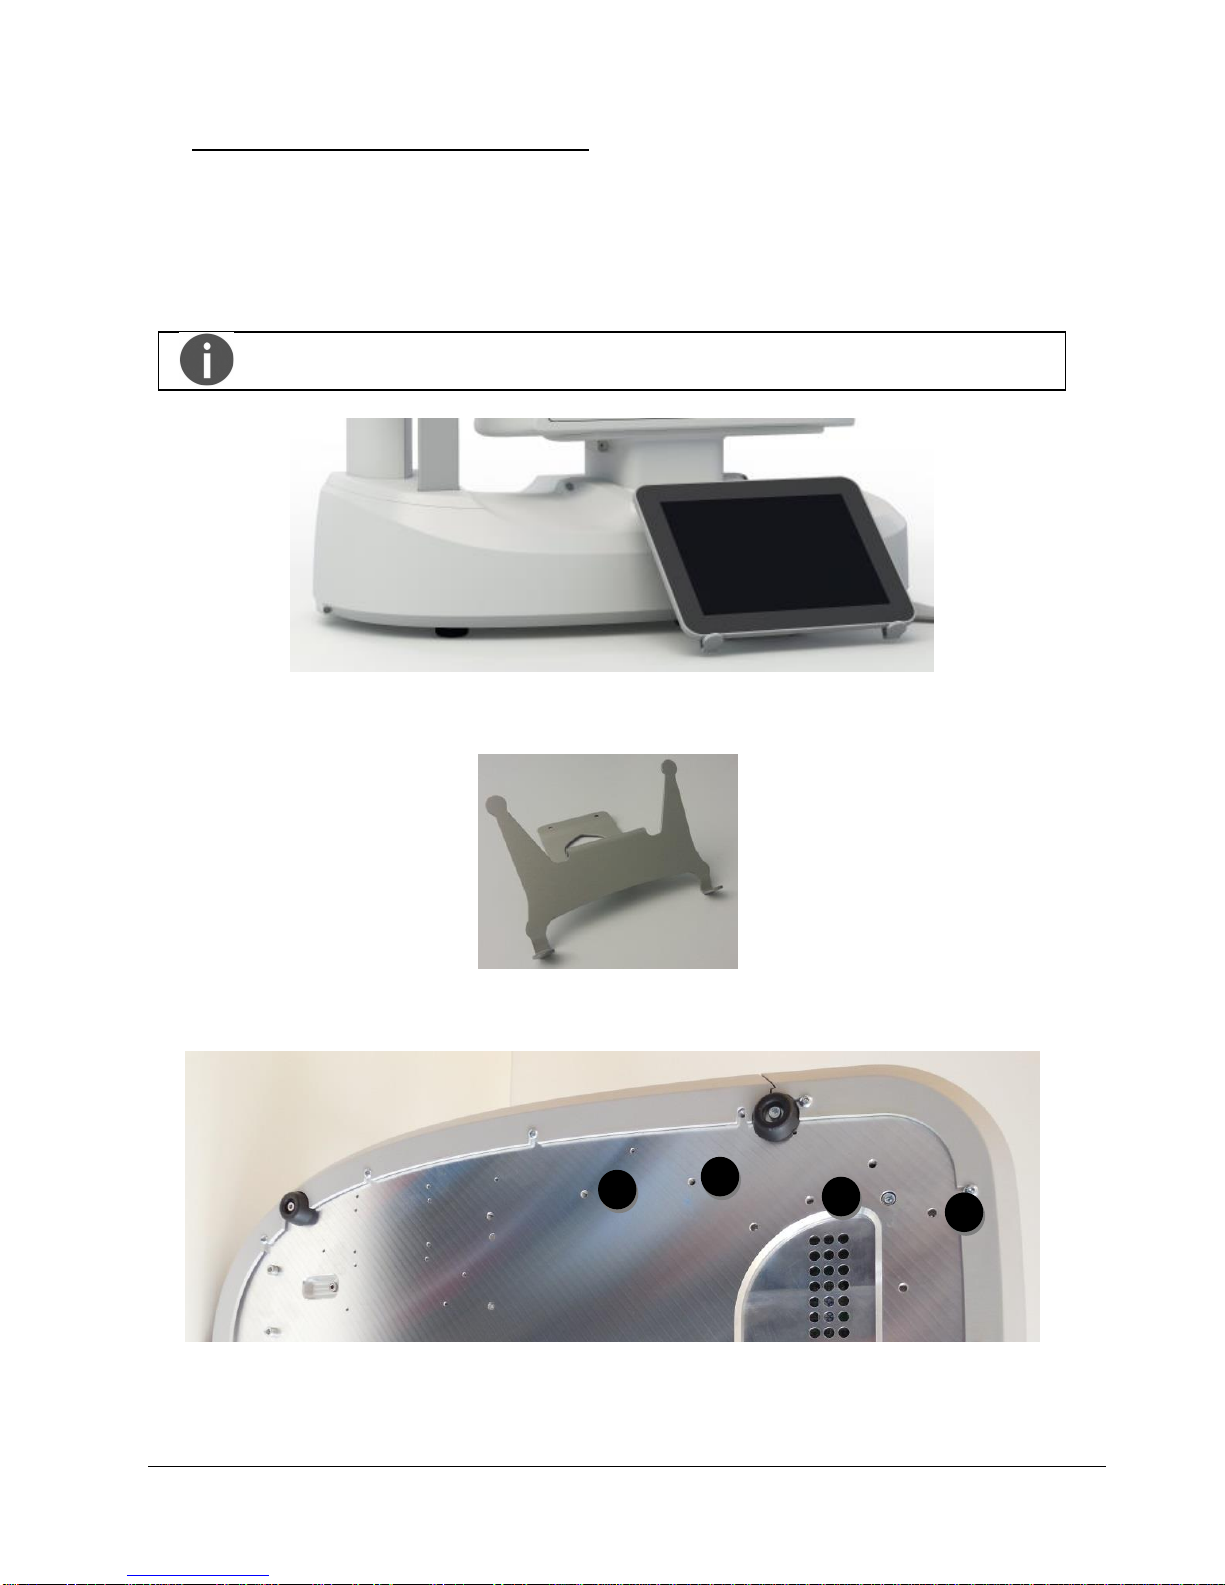
5.1 Assembling the tablet and joystick supports........................................................................................ 10
5.2 Turning on the Device.......................................................................................................................... 11
6. PREPARING THE SUBJECT.................................................................................................................. 12
7. WARNINGS AND PRECAUTIONS ......................................................................................................... 13
8. NOTES FOR THE OPERATOR .............................................................................................................. 14
9. PERFORMING THE TEST...................................................................................................................... 15
9.1 Adding a new patient........................................................................................................................... 15
9.2 Searching for an existing patient ......................................................................................................... 15
9.3 Selecting an existing patient................................................................................................................ 15
9.4 Root test vs. follow-up test................................................................................................................... 17
9.5 Initiating a new root test....................................................................................................................... 17
9.6 Initiating a new follow-up test............................................................................................................... 17
9.7 Choosing test parameters.................................................................................................................... 18
9.8 Before starting ..................................................................................................................................... 19
9.9 During the test ..................................................................................................................................... 20
9.10 Auto-alignment..................................................................................................................................... 21
9.11 Retinal tracking.................................................................................................................................... 22
9.12 Monitoring test progress...................................................................................................................... 23
10. REVIEWING RESULTS........................................................................................................................... 24
10.1 Individual test results review................................................................................................................ 26
10.2 Reliability indices ................................................................................................................................. 27
10.3 Dual image review ............................................................................................................................... 29
10.4 Creating a Progression Report............................................................................................................ 30
10.5 Remote Viewer .................................................................................................................................... 31

CenterVue
COMPASS Operating Manual
Pag. 3 di 53
11. PRINTING................................................................................................................................................ 34
11.1 Printer Setup........................................................................................................................................ 34
11.2 Report for 24-2 test.............................................................................................................................. 35
11.3 Report for 10-2 test.............................................................................................................................. 35
11.4 Progression report ............................................................................................................................... 38
12. SETTINGS............................................................................................................................................... 40
12.1 Launching the Configurator ................................................................................................................. 40
12.2 Password change ................................................................................................................................ 40
12.3 Backup................................................................................................................................................. 41
12.4 Restore ................................................................................................................................................ 42
12.5 Device lock reset procedure................................................................................................................ 42
12.6 Password change for Remote Viewer ................................................................................................. 42
12.7 Network configuration.......................................................................................................................... 43
12.8 Shared folder configuration.................................................................................................................. 44
13. SYSTEM SHUTDOWN............................................................................................................................ 44
14. TECHNICAL SPECIFICATIONS ............................................................................................................. 45
15. CLEANING............................................................................................................................................... 46
16. TROUBLESHOOTING............................................................................................................................. 47
17. ELECTROMAGNETIC COMPATIBILITY................................................................................................ 48
18. DISPOSAL............................................................................................................................................... 53

CenterVue
COMPASS Operating Manual
Pag. 4 di 53
1. INTRODUCTION
Fundus Perimetry is a technique that images the retina during visual field testing, enabling a
correlation to be made between visual function and retinal structure.
COMPASS is a scanning ophthalmoscope combined with an automatic perimeter, also a Fundus
Perimeter, that allows the acquisition of confocal images of the retina, simultaneously to the
measurement of retinal threshold sensitivity and the analysis of fixation. The Device operates in
non-mydriatic conditions, i.e. without the need of pharmacological dilation.
As a perimeter, the system offers full compatibility with standard 24-2 visual field testing and
contains an age-matched database of retinal sensitivity in normal subjects.
As a retinal imager, COMPASS uses a confocal optical design, similarly to SLO systems, to
capture color as well as red-free images of superior quality. In addition, a high resolution live image
of the retina obtained using infrared illumination is available throughout the test.
COMPASS is intended for use as a diagnostic device to aid in the detection and management of
glaucoma. The device is indicated for measuring retinal sensitivity, for a quantitative assessment of
fixation characteristics, as well as to capture infrared and color images of the retina without the use
of a mydriatic agent.
The Device integrates a tablet and is provided with an external power supply. The device works
with a dedicated software application and operates as a standalone unit.
The clinical interpretation of the results obtained with COMPASS is restricted to licensed eye care
practitioners. The process of making a diagnosis using COMPASS results is the responsibility of
the eye care practitioner.
A device specific training is required for any operator to become able to use the system.

CenterVue
COMPASS Operating Manual
Pag. 5 di 53
2. SYSTEM
2.1 The device
Fig. 1 - COMPASS
Fig. 2 –Detail of connectors side
Fig. 3 –Patient push button
3 USB ports
Ethernet port
Main switch
12V power inlet
Tablet (example)
Digital joystick
(not used)
Forehead rest =
contacting part
Chin rest =
contacting part
Patient Side

CenterVue
COMPASS Operating Manual
Pag. 6 di 53
COMPASS is provided with:
dedicated tablet with USB cable and related support
external power supply and related power cord
digital, USB powered, joystick and related support
this operating manual
removable forehead rest
patient push button
front lens cap
2.2 The tablet
The tablet is an integral part of the system and COMPASS cannot operate without it.
The tablet must be connected to COMPASS using the supplied USB cable: if the connection is not
working an error message will appear on the screen (see par. 16 for details).
Use the USB port next to the power inlet to connect the tablet: this is the only port that will
also recharge the tablet.
The tablet is equipped with a color, multi-touch display.
More than one model is supported: the tablet power switch, volume control and USB port
are located on the tablet frame and vary depending on the specific model.
Patient data and images are not stored on the tablet.
The tablet must be used only together with COMPASS and in accordance with the
instructions provided in this manual. Use of the tablet for other purposes, as well as
any modifications of the tablet settings other than indicated in this manual may
result in the COMPASS to become unusable.
Charging the tablet
COMPASS cannot be used if the tablet is not sufficiently charged. The tablet is charged via the
USB port of the device.
To maximize the duration of the charge:
Set the screen brightness to “Auto” or anyway not to maximum;
Plug the tablet in the left-most USB port, near the power switch;
Keep COMPASS powered and the tablet connected when the device is off;
Turn off the screen when the device is not in use.

CenterVue
COMPASS Operating Manual
Pag. 7 di 53
3. LABELS

CenterVue
COMPASS Operating Manual
Pag. 8 di 53
4. SYMBOLS
The meaning of the symbols adopted in this manual is as follows:
Symbol
Explanation
Manufacturer Data
Manufacturing Date (year/month of production)
Electronic and electric devices must be recycled.
Refer to Instruction Manual
CE mark: the device complies with the essential requirements of the European
Medical Devices Directive 93/42/EC
Type B Applied Part
Non-ionizing radiation - ME EQUIPMENT that include RF transmitters
Generic Warning
Important information

CenterVue
COMPASS Operating Manual
Pag. 9 di 53
5. PREPARING THE SYSTEM
We recommend to read carefully and thoroughly par. 7 WARNINGS AND
PRECAUTIONS before proceeding with first use.
To make COMPASS functional for the first use:
extract the system from its box;
place it on a suitable electrical table
1
;
insert the soft forehead rest on the metal support (see Fig. 4);
mount the supports provided for the tablet and the joystick (see par. 5.1 below);
connect the patient push button cable to the connector located underneath the device;
connect the power supply provided with the unit to the power inlet (see Fig. 2);
place the tablet on its support and connect it using the cable to the left-most USB port;
place the joystick on its support, connect it using the cable to any of the free USB ports and
check for its correct orientation;
plug the power supply to the wall socket.
Fig. 4 - Forehead rest mounted on metal support
1
Not provided with the system

CenterVue
COMPASS Operating Manual
Pag. 10 di 53
5.1 Assembling the tablet and joystick supports
The tablet and joystick are mounted, using the included supports (see Fig. 6), towards the posterior
part the device, on any side. Both supports are fixed with screws to the bottom of the device.
As an example, Fig. 7 shows the holes to be used for the left-side mount depicted in Fig. 5: to fix
the supports use holes marked 1 and 2 for the tablet and those marked 3 and 4 for the joystick.
Other configurations can be chosen, based on a user’s preferences.
The joystick is not used in the current software version.
Fig. 5 –Tablet mounted on the left side of the device
Fig. 6 –Support for the tablet
Fig. 7 –Instrument bottom with holes for tablet and joystick supports
4
3
1
2

CenterVue
COMPASS Operating Manual
Pag. 11 di 53
5.2 Turning on the Device
Turn on the Device by keeping the main switch pressed for approximately 3 secs, turn on the
tablet by keeping its switch pressed for approximately 4 secs, wait for the boot process to complete
and the Login screen to appear (see Fig. 8).
Fig. 8 –Login screen
From the drop-down menu select “Doctor”, type the password
2
and click on Login. If login is
successful, the Home screen opens (see Fig. 9).
To modify the password, see par. 12.2.
Fig. 9 - Home screen
2
To find out the password please contact an authorized Centervue representative

CenterVue
COMPASS Operating Manual
Pag. 12 di 53
6. PREPARING THE SUBJECT
This paragraph explains how to prepare a subject for the COMPASS test.
There are no restrictions as to the selection of the subjects undergoing testing, but since the test
requires the subject to maintain concentration and to follow the below instructions for several
minutes, very young subjects (before primary school), as well as mentally diseased persons may
not be able to co-operate appropriately.
COMPASS compensates for a subject’s spherical refractive error in the range -12 to +15 diopters:
testing a subject presenting a spherical error out of the above range may result in inaccurate
measurements.
COMPASS does not compensate for a subject’s astigmatism. Subjects with astigmatism within ± 4
diopters can be tested normally. Testing a subject with astigmatism outside of the above range
may result in inaccurate measurements.
The subject can wear contact lenses or spectacles while being examined, although in the latter
case artifacts may appear in the retinal image.
Patient contacting parts are indicated in Fig. 1 and Fig. 3.
COMPASS is a non-mydriatic device: there is no need to dilate the subject unless if the pupil is
smaller than 3 mm. The eye which is not examined should be patched.
Before starting the test, please check the following:
subject should sit in a comfortable position, with the fore head and chin in firm
contact with the rests;
height of the table and chair should be adjusted so that the subject can
comfortably place her/his chin on the corresponding rest;
the subject’s head should be vertical (not tilted forward / backward);
chin rest should be positioned so that the subject’s eye is aligned to the eye
mark found on the sides of the metal frame. If this is not the case the chin rest
height needs to be adjusted.
Before the test inform the subject about the following:
COMPASS will test your ability to perceive light while looking at a steady target.
the test is non-invasive, in particular you will only perceive some light.
find a comfortable position and keep the chin and forehead firmly pressed against
the rests;
at the beginning of each test, the unit will move around to find your pupil: this is
absolutely normal;
always keep your eyes wide open, so that eyelids do not interfere;
when the test starts, look straight in front of you and when a small green, circular
spot appears anywhere, look at it;
do not move, nor speak during the test;
you can blink whenever you feel necessary, unless instructed not to do so;
you will be given this push-button: press it when you see, or believe to see, a whitish
small spot appearing anywhere;
it is absolutely normal that you do not see many of the spots.

CenterVue
COMPASS Operating Manual
Pag. 13 di 53
7. WARNINGS AND PRECAUTIONS
The following precautions are important for the device safety:
Federal laws (US) restrict this device to sale by or on the order of a physician or a
properly licensed practitioner.
Clinical interpretation of the results is restricted to licensed eye care practitioners.
A device specific training is required for any operator to become able to use the
system.
Do not open the Device: this could lead to electric shocks or damage to the system.
Do not use the Device in the event that the cover or other parts of the device have
been removed.
Only technicians authorized by CenterVue may service the Device. Centervue
cannot be held responsible for system safety should the device be opened, repairs
carried out, third parties’ software be installed, or parts be replaced by un authorized
persons.
Do not expose the Device to water: this could lead to fire or electric shock.
Stand clear from moving parts during operation.
The Device is supplied with an earth ground by means of a protection conductor
contained inside the power supply cable. Before turning on the system, make sure
the power supply socket is correctly grounded to avoid the risk of electric shock.
The Device must NOT be used in an oxygen rich environment or in presence of
flammable anesthetics.
In case an unexpected hardware condition occurs during use, an error message may
appear (see for example Fig. 10) and COMPASS may become temporarily locked. It
is possible to reset this condition by letting the device re-initialize: refer to par. 12.4
for the complete procedure. If the error condition persists, please contact an
authorized service center.
The following precautions are important to prevent use errors:
The Device must be placed in a room which is not exposed to adverse chemical-
physical conditions, such as the presence of sulfur, salt, dust, direct sunlight, lack
of ventilation, high humidity, sudden temperature drops or peaks. The safety and/or
effectiveness of the instrument cannot be guaranteed if these conditions are not
fulfilled.
Since the Device measures a light sensitivity at the threshold of perception, it
needs to be operated in a dark environment.
The Device needs to be operated under the following environmental conditions:
temperature: 10 - 40 C° (50 –104 F°); humidity (max): 90% not condensing.
The Device needs to be stored under the following environmental conditions:
temperature: 0 –60 C° (32 - 140 F°); humidity (max): 90% not condensing.
Fig. 10 –Example of error message

CenterVue
COMPASS Operating Manual
Pag. 14 di 53
8. NOTES FOR THE OPERATOR
COMPASS provides capabilities for a fully automated test process. No specific skills are required
to operate the Device and a minimal, device specific, training is required to become able to operate
the system.
In particular, the operator shall be acquainted with the following concepts:
pupil: the central part of the external surface of the eye, through which light goes in;
retina: the internal surface of the eye ball;
optic disk: a specific portion of the retina characterized by a roughly circular shape and by
outgoing / incoming vessels;
fixation / fixating: the ability of a subject to stare at a specific point in space and specifically
the Device internal fixation target;
alignment: the action of moving the top part of the system so that its optics are aligned with
a subject’s pupil;
focusing: the compensation, by means of internal optics, of a subject’s spherical defect
(myopia, hyperopia);
sensitivity threshold: the minimum intensity of a light stimulus that is perceived by a subject
as emerging from the background.
Acquaintance with the basic concepts of standard automated perimetry is helpful for
an effective use of some of the features of the Device and for interpretation of its
results.

CenterVue
COMPASS Operating Manual
Pag. 15 di 53
9. PERFORMING THE TEST
This paragraph explains how to operate COMPASS to perform the test (in this manual the terms
“test” and “exam” are used as synonyms). Once the Device has been turned on click on the
compass button to open the Patient List screen (see Fig. 11).
Fig. 11 –Patient list screen
The different columns in the list indicate respectively (left to right):
the presence and number of exams (represented by the retinal images) stored for a certain
patient (right and left eye);
the patient’s full name;
the patient’s date of birth;
the date of the last exam performed.
9.1 Adding a new patient
To create a record for a new patient, click on and the Patient Editing screen will open
(see Fig. 12). Type the last name, first name and select the date of birth (mandatory fields),
optionally select the gender and type a unique code of your choice. Then click OK to save or
Cancel to abort.
9.2 Searching for an existing patient
To search for an existing patient, click on and type the initial letters of the patient you are
looking for, then click Ok. When the desired patient is shown in the list, click on it to select. To exit
the search, click on to hide the keyboard and then on .
9.3 Selecting an existing patient
To select a specific patient in the list, click on it. The list is sorted by the date and time of the last
exam and can be scrolled up and down.

CenterVue
COMPASS Operating Manual
Pag. 16 di 53
Fig. 12 –Patient editing screen
Once a patient has been selected in any of the above ways, the Patient Record screen opens
(see Fig. 13) and provides information on the selected patient, whose name is shown at the top-left
corner of the screen. See par. 10 for full details on how to review a patient’s data.
Fig. 13 –Patient Record screen

CenterVue
COMPASS Operating Manual
Pag. 17 di 53
9.4 Root test vs. follow-up test
COMPASS allows to measure a subject’s visual field in time, hence creating a sequence of tests.
COMPASS provides two different test modalities:
a root test is the first performed on a certain subject and eye, thus it does not
require the existence of a previous test;
follow-up tests require a previous root test of the same eye.
The follow-up modality exploits image registration techniques to accurately
match stimuli locations in the follow-up test with their position in the
corresponding root test and ensure high precision of the results. Operators
shall be fully aware of the difference between root tests and follow-up tests.
With COMPASS:
any follow-up test is associated with its root test
any root test is identified by this graphics:
it is not possible to generate a progression report using only root tests
it is only possible to generate a progression report using a root test and its
follow-up tests
9.5 Initiating a new root test
To initiate a new root test, click on the New Exam button.
9.6 Initiating a new follow-up test
To initiate a new follow-up test, select the desired root test and click on the New Follow Up button.

CenterVue
COMPASS Operating Manual
Pag. 18 di 53
9.7 Choosing test parameters
When the New Exam command is pressed the Test parameters selection screen opens (see Fig.
14), allowing review and modification of a test parameters.
The following commands / functions are available:
1. Eye selection (OD, OS)
2. Selection of the threshold strategy (“4-2” or ZEST)
3. Chin rest height adjustment
4. Selection of the test grid (or pattern)
3
5. Test start
6. Back to Patient Record screen
Fig. 14 –Test parameters selection screen
ZEST vs. 4-2
Zippy Estimation by Sequential Testing (ZEST) is an adaptive Bayesian method for
determining sensitivity measures. ZEST, similarly to SITA algorithms, allows to reduce
examination time while maintaining accuracy.
In terms of threshold, ZEST estimates are on average 0.9 dB higher than those found
with the 4-2 staircase (similarly to SITA algorithms vs. full threshold).
In terms of examination time, the average for a 24-2 test is approximately 40% shorter
using ZEST than using 4-2.
3
Total deviation and Pattern deviation maps and related indices are only available when using the 24-2 grid
1
2
3
4
5
6

CenterVue
COMPASS Operating Manual
Pag. 19 di 53
The following perimetric parameters are used and cannot be modified:
background luminance: 31.4 asb
maximum luminance (0 dB): 10000 asb
stimulus duration: 200 ms
stimulus size: Goldmann III
blind spot test: ON
foveal threshold: ON
false Positives: ON
false Negatives: ON
fixation target for foveal stimulus: 4 green circles in diamond configuration
fixation target for non-foveal stimuli: single green circle
9.8 Before starting
Following are some hints to maximize the effectiveness of the test:
check that the lens cap has been removed
check that the room is sufficiently dark
subject should sit in a comfortable position, with the forehead and chin in firm
contact with the corresponding rests. Subject’s head should be vertical and not
tilted. Chin rest should be positioned so that eye is aligned to the mark
ask the subject to look at the fixation target throughout the test
perform a quick training on subjects that never had perimetry before

CenterVue
COMPASS Operating Manual
Pag. 20 di 53
9.9 During the test
The following table describes the test process flow.
#
STEP
PURPOSE
INSTRUCTIONS
1
Auto-
alignment
Align instrument
to subject’s eye
Subject should not move and should look for the green fixation target.
For additional details see next paragraph.
2
Auto-focus
Correct for
subject’s
spherical
refraction
Subject should not blink and should look at fixation target
3
Reference
image
Capture reference
retinal image to
be used for eye
tracking
The reference image should have good quality, in particular images
that are too dark, or partially occluded by eye lashes or lids should be
retaken. Click the back arrow to retake the reference image if its quality
is not satisfactory (see for example Fig. 15).
: a poor quality reference image may compromise the VF
test, increase its duration, prevent retinal tracking or make follow-
up testing impossible.
4
Blind spot
test
Identify location of
blind spot
Drag and center circle over optic disc, then click the forward arrow (see
Fig. 16)
: improper or missed placement of the optic disc marker
results in failure of the BS test
5
Detect
fixation
Locate center of
fixation
Subject should look steadily at fixation target.
: once this step has completed the system will stop and wait for
confirmation: click the forward arrow to proceed with next step
6
Fovea Test
Measure
sensitivity at the
fovea
Subject should look at the center of the 4 green dots and press the
button when she/he sees a white spot.
: if not properly instructed subjects often miss clicking at
this time.
: once this step has completed the system will stop and wait for
confirmation: click the forward arrow to proceed with next step
7
Perimetry
Measure
sensitivity at all
grid locations
using central
fixation target
Subject should look steadily at the green dot and press the button
when she/he sees a white spot. Subject can blink at any time.
Periodically inform the subject of the progress. See note concerning
eye tracking.
: if not properly instructed subjects sometimes get away
from the forehead rest during the test.
: once this step has completed the system will stop and wait for
confirmation: click the forward arrow to proceed with next step
8
Color
image
Capture color
photo of posterior
pole
Subject should not blink and should look at the green fixation dot until a
light is flashed.
: click on the back arrow to retake the image if of poor quality.
Other manuals for COMPASS
1
Table of contents
Other CenterVue Medical Equipment manuals
Popular Medical Equipment manuals by other brands

RoMedic
RoMedic Vega505EE Instructions for use

Moretti
Moretti KYARA TENS LTM710 instruction manual

Respironics
Respironics Millennium M10 operating instructions

Mindray
Mindray accutorr plus operating instructions

Arrow International
Arrow International Multiple-Lumen Central Venous... manual

Prytime Medical
Prytime Medical ER-REBOA Instructions for use