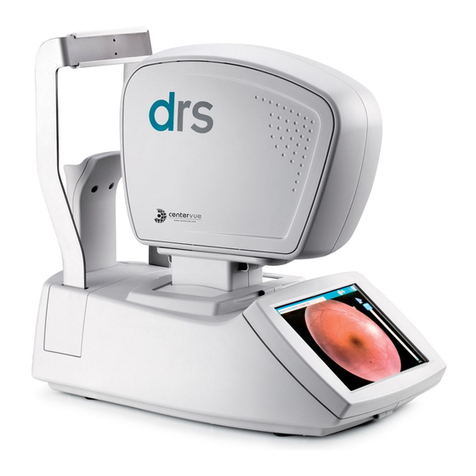
CenterVue drs plus User manual

DRSplus –Operating Manual
1/58
Operating Manual

DRSplus –Operating Manual
2/58
MANUAL INFORMATION
Date of release:
December 14, 2019
Revision Number:
4
Reference software version:
1.4
Manufacturer:
CenterVue S.p.A.
Via San Marco 9h, 35129 Padova –ITALY
Tel. +39 049 501 8399
Fax +39 049 501 8398
The information in this manual are correct at the date of issue of the manual. The device configuration
can change as product improvement are incorporated and this manual may not exactly depict your
device. Please contact the customer service if you have any questions about differences.

DRSplus –Operating Manual
3/58
CONTENTS
1. Introduction ................................................................................................................................................... 5
2. Symbols.......................................................................................................................................................... 6
2.1 Symbols used on the device.................................................................................................................. 6
2.2 Other symbols found in this manual..................................................................................................... 6
3. Product description........................................................................................................................................ 8
4. Labels ........................................................................................................................................................... 11
5. WARNINGS AND PRECAUTIONS................................................................................................................... 12
6. Notes for the operator................................................................................................................................. 14
6.1 Definitions........................................................................................................................................... 14
7. Preparation of device................................................................................................................................... 15
7.1 First usage ........................................................................................................................................... 15
7.2 Initial configuration wizard ................................................................................................................. 16
7.3 Login.................................................................................................................................................... 18
7.4 Patient list ........................................................................................................................................... 19
7.5 Navigation Bar..................................................................................................................................... 20
8. Preparation of the patient ........................................................................................................................... 21
9. Acquisition of retinal images ....................................................................................................................... 22
9.1 Configuration of Exam Parameters ..................................................................................................... 23
9.2 Automatic acquisition of images......................................................................................................... 24
9.3 “Fast” exam......................................................................................................................................... 25
9.4 “External eye” examination ................................................................................................................ 26
9.5 Stereo modality (available under license only) ................................................................................... 26
10. Patients Database ........................................................................................................................................ 27
10.1 Adding a new patient .......................................................................................................................... 27
10.2 Editing an existing patient................................................................................................................... 27
10.3 Single and multiple selection of patients ............................................................................................ 27
10.4 Deletion of patients ............................................................................................................................ 28
10.5 Export of all patients’ images.............................................................................................................. 28
11. Image review................................................................................................................................................ 29
11.1 Patient Details screen ......................................................................................................................... 29
11.2 Image review....................................................................................................................................... 31
11.3 Side-by-side image review .................................................................................................................. 32
11.4 Visual flickering of images................................................................................................................... 33
11.5 Mosaic................................................................................................................................................. 33
11.6 Remote Viewer.................................................................................................................................... 35
12. Exporting images.......................................................................................................................................... 36
13. Configuring the device................................................................................................................................. 37
13.1 Account ............................................................................................................................................... 37
13.2 Users ................................................................................................................................................... 37
13.3 Network .............................................................................................................................................. 38
13.4 Date and time...................................................................................................................................... 39
13.5 Security ............................................................................................................................................... 39
13.6 Export.................................................................................................................................................. 40
13.7 Printers................................................................................................................................................ 41
14. Utilities......................................................................................................................................................... 42
14.1 Assistance............................................................................................................................................ 42
14.2 Backup................................................................................................................................................. 43

DRSplus –Operating Manual
4/58
14.3 Restore................................................................................................................................................ 44
14.4 Reset ................................................................................................................................................... 45
14.5 Licenses ............................................................................................................................................... 45
14.6 Update................................................................................................................................................. 46
14.7 More.................................................................................................................................................... 46
14.8 Demo dataset...................................................................................................................................... 47
14.9 Optical head position .......................................................................................................................... 47
15. Power-off ..................................................................................................................................................... 48
16. Cleaning ....................................................................................................................................................... 49
17. Maintenance................................................................................................................................................ 50
18. Electromagnetic Compatibility..................................................................................................................... 51
18.1 Manufacturers EMC Declaration according to ISO 60601-1-2............................................................ 51
18.2 Guidance and manufacturer declaration –electromagnetic immunity.............................................. 52
18.3 Immunity tests performance criteria .................................................................................................. 54
18.4 Wi-Fi specifications ............................................................................................................................. 55
18.5 FCC (USA) and IC (Canada) radio certification..................................................................................... 56
19. Technical Specifications ............................................................................................................................... 57
20. Disposal........................................................................................................................................................ 58
20.1 Separate collection for electrical and electronic equipment .............................................................. 58

DRSplus –Operating Manual
5/58
1. Introduction
Congratulations for choosing drsplus and its color confocal retinal imaging capabilities.
The drsplus is intended for the acquisition of colored images of the retina without the use of a
mydriatic agent. More specifically, the drsplus provides colored images of the retina with a field of
view of 45° x 40°, in fully automatic mode. The device includes a dedicated software application and
operates as a stand-alone unit.
The clinical interpretation of images acquired by the drsplus must be carried out
exclusively by ophthalmologists.
The ophthalmologist is responsible for any diagnosis based on drsplus results.
Use of the device is strictly limited to suitably trained operators.

DRSplus –Operating Manual
6/58
2. Symbols
2.1 Symbols used on the device
The meaning of the symbols adopted in the device labels is as follows:
Symbol
Explanation
Information about the Manufacturer.
Manufacturing date (year/week).
Electrical and electronic waste is destined for separate recycling.
Refer to the Operating Manual.
CE mark: the device complies with the essential requirements of the European
Medical Devices Directive 93/42/EC.
Type B Applied Part.
Non-ionizing radiation - ME EQUIPMENT that includes RF transmitters.
Direct current.
Power button. See the device back panel (Fig. 7).
2.2 Other symbols found in this manual
Symbol
Explanation
Important Information.

DRSplus –Operating Manual
7/58
General Warning, read carefully.

DRSplus –Operating Manual
8/58
3. Product description
The drsplus consists of:
❖The device (with a lens cap for shipping only) (Fig. 1);
❖Cables protection shell (Fig. 2);
❖Device stand (Fig. 3);
❖Headrest with silicon cushion (Fig. 4);
❖External power supply (Fig. 5) which includes a country-specific power cable.
Fig. 1 –drsplus device
Fig. 2 –Cables protection shell
Fig. 3 –Device stand
Fig. 4 –Headrest
Fig. 5 –External power supply

DRSplus –Operating Manual
9/58
Fig. 6 –drsplus
Fig. 7 –Back Panel
Headrest
Patient side
Operator side
Touch screen
USB ports
Ethernet port
Power button
Power supply
connector
LED
Device power status
Back panel
(with shell)
DisplayPort
(version 1.0)

DRSplus –Operating Manual
10/58
The drsplus can be equipped with:
❖External fixation light (Fig. 8);
❖Prismatic goggles for stereo view (Fig. 9).
Fig. 8 –External fixation light
Fig. 9 - Stereo goggles
The drsplus is provided with:
❖This operating manual;
❖Contents list;
❖Unpacking, packing and setup manual;
❖Climatic preconditioning instructions;
❖Electrical test report.

DRSplus –Operating Manual
12/58
5. WARNINGS AND PRECAUTIONS
The following precautions are important for the device safety:
❖The clinical interpretation of the images acquired by the drsplus is restricted to
licensed eye care practitioners.
❖Use of the device is restricted to operators who have undergone the necessary
training.
❖Do not open the device in order to prevent the risk of electrocution and damage
to the device itself.
❖Do not use the device if the covers or other parts of the device have been
removed.
❖Only technicians authorized by CenterVue may service the drsplus. CenterVue
cannot be held responsible for the device safety should drsplus be opened,
repairs carried out, third-parties’ software be installed, or parts be replaced by
an unauthorized person.
❖Avoid all contact with water: risk of fire or electric shock.
❖Stand clear from moving parts during operation.
❖The device is equipped with an earth connection by means of a protective
conductor inside the power cable. Before switching on the device, check that the
power outlet is correctly earthed to avoid the risk of electrocution.
❖The drsplus must be used in a room with an electrical system that complies with
applicable healthcare environment safety regulations.
❖The drsplus power supply must be connected to a socket with a circuit breaker.
❖The drsplus must NOT be used in an oxygen-rich environment or in presence of
flammable anesthetics.
❖External devices connected to the drsplus, into the patient environment, must
comply with IEC 60601-1. Those devices that do not comply with the IEC 60601-1
must be kept out of the patient environment, and must comply with IEC 60950.
Any operator who connects external devices to drsplus creates a new Medical
Electrical System as defined by IEC 60601-1 and is therefore responsible of the
conformity of such system with the requirements defined in clause 16 of
IEC 60601-1. Please contact the local distributor for any additional information.
❖When in operation, drsplus contains Personal Data.
IT IS THE OPERATOR’S RESPONSIBILITY TO KEEP AND MAINTAIN AN UPDATED
COPY OF THE DATA GENERATED BY THE drsplus THROUGH REGULAR USE OF THE
BACKUP FACILITY, THUS PREVENTING THE RISK OF ACCIDENTAL LOSS OF DATA.

DRSplus –Operating Manual
13/58
❖drsplus needs to be operated in the following environmental conditions:
oTemperature: +10 °C to +35 °C
oHumidity (max): 90% not condensing
❖drsplus needs to be stored in the following environmental conditions:
oTemperature: -10 °C to +60 °C
oHumidity (max): 90% not condensing
❖The device must be placed in a room which is not exposed to adverse chemical-
physical conditions, such as the presence of sulfur, salt, dust, direct sunlight, lack
of ventilation, high humidity, sudden temperature drops or peaks. The safety
and/or effectiveness of the instrument cannot be guaranteed if these conditions
are not met.
The following precautions are important to avoid incorrect use of the device:
❖Provide explanations to patients before placing them in front of the device.
❖Use the device in dim light, or at least away from direct light. This will facilitate the
natural dilation of the pupil.
❖The minimum pupil diameter required to obtain good quality images is 2.5 mm.
❖If the patient does not fix correctly and steadily, the images acquired may relate
to portions of retina that are not what is expected.

DRSplus –Operating Manual
14/58
6. Notes for the operator
This section provides basic information for drsplus operators. No specific skills are required to use the
drsplus. However, operators must receive the minimum training in the use of the device. The
acquisition of images using the drsplus does not involve any risks. This is because the device does not
come into contact with the patient’s eye and the only perceived effect will be a flash of light when
each shot is taken. The device is controlled entirely by touchscreen. Once the acquisition sequence
has started, the drsplus will perform the examination automatically.
IT IS THE OPERATOR’S RESPONSIBILITY TO KEEP AND MAINTAIN AN UPDATED COPY
OF THE DATA GENERATED BY THE drsplus THROUGH REGULAR USE OF THE BACKUP
FACILITY, THUS PREVENTING THE RISK OF ACCIDENTAL LOSS OF DATA.
6.1 Definitions
Exam: any image acquisition session performed using the drsplus for a certain patient on a certain
date.
External eye examination: examination mode involving the acquisition of images of the ocular surface
instead of the retina.
Field: portion of the retina visible in a specific image.
Fixation: the ability of a patient to fix his/her view on a specific point, for example the internal fixation
target of the drsplus.
Fixation target: small bright green circle visible when looking into the front lens of the drsplus, used
to move the gaze of the patient and capture different fields.
Pupil: the central circular opening on the ocular surface, through which light enters the eye. The pupil
naturally contracts when struck by light. If the pupil is too small the image quality may be impaired.
Retina: the posterior pole of the ocular bulb. It is the main area of interest in the images acquired by
drsplus.
Stereo exam: examination mode that involves the acquisition of two images of the retina taken from
different angles, providing a three-dimensional view using suitable prismatic glasses.
❖If the patient does not fixate correctly and steadily, the images acquired may
relate to portions of retina that are not what is expected.
❖Provide explanations to patients before placing them in front of the device.

DRSplus –Operating Manual
15/58
7. Preparation of device
This section explains how to set up the drsplus for use.
7.1 First usage
Read carefully the chapter 5 before proceeding to the device operation.
To prepare drsplus for the first usage:
❖Take the device out of its shipping box and place it onto a suitable table;
❖Install the headrest (included in the package) on the device (Fig. 11);
❖Connect the power supply to the back panel, and to the wall socket;
❖(Optional) Connect a printer to one of the USB ports located in the back panel of the device;
❖Install the cables protection shell.
drsplus needs to be operated in a semi dark environment, to ease the natural dilation
of the pupil.
Fig. 11 –Headrest

DRSplus –Operating Manual
16/58
Fig. 12 –Back panel with cables protection shell
7.2 Initial configuration wizard
Turn on the device by pressing the power switch button: upon the first power on of the device, the
initial Configuration Wizard will be (Fig. 13).
Use the button located near the top-right corner of the screen to temporarily skip the Configuration
Wizard and go straight to the login screen. The Configuration Wizard will be shown the next time the
device is started.
To proceed with the Configuration Wizard, press the START button. In any of the wizard steps, it is
possible to browse back to the previous interface by pressing the PREVIOUS button.
Fig. 13 –Beginning of the Configuration Wizard

DRSplus –Operating Manual
17/58
In the following step it is possible to set the current time-zone (Fig. 14).
Fig. 14 –Configuration Wizard: setting of the local time-zone
In the following step it is possible to set the current date and time and configure their format (Fig. 15).
Fig. 15 –Configuration Wizard: date and time settings
In the following screen (Fig. 16) the local “System Administrator” user can be created by selecting user
name and password. The user name must contain at least 4 characters
1
. The password must contain
at least 6 characters. It is possible to select for such user a different language than the one selected in
the first step.
1
Moreover, “service” and “production” cannot be used as user names.

DRSplus –Operating Manual
18/58
Fig. 16 –Configuration Wizard: creation of the System Administrator account
In the following screen (Fig. 17) it is possible to create another account (Operator account), by
following the same rules and constraints described for the Administration account.
Fig. 17 –Configuration Wizard: creation of user accounts
7.3 Login
Turn on the device by pressing the power switch button (Fig. 7). When the boot is completed, the
Login screen will be shown (Fig. 18).
Select the desired user from the menu, input the user password and press the login button.
The drsplus can now be operated.
To modify the password, see §13.1.

DRSplus –Operating Manual
19/58
Fig. 18 –Login screen
7.4 Patient list
Upon the login, the Patient List will be shown (Fig. 19). It includes the following data, for each patient,
from left to right:
❖Thumbnails of the last two images acquired for that patient. The total number of images
acquired for that patient is superimposed above the thumbnail, for the left and right eye
respectively;
❖Surname;
❖Name;
❖Code;
❖Date of Birth;
❖Gender;
❖Date of the last examination made with drsplus.
Fig. 19 –Patient List
To browse back to the Patient List, from any other screen, press
the Patients icon locate on the top left side of the screen

DRSplus –Operating Manual
20/58
7.5 Navigation Bar
Upon the login, the Navigation Bar shown in Fig. 20 is found on many screens. At the center of the
Navigation Bar the current username, date and time are found.
Fig. 20 –Navigation Bar
The Navigation Bar functionalities follows:
Function
Command
Browse to the Patient List
View the USB devices ready for images export, if any
View the current status of ethernet and wireless connections.
Open the panel including Configuration (§13) and Utilities tools
(§14)
Logout, Reboot and Shutdown menu
Table of contents
Other CenterVue Medical Equipment manuals
Popular Medical Equipment manuals by other brands

aidapt
aidapt VM949BN Usage and maintenance instructions

Sunrise Medical
Sunrise Medical Quickie GTi Titanium None User instruction manual & warranty

Albrecht
Albrecht CDS Elbow Brace Extension User instructions

Plinth 2000
Plinth 2000 93G1 Service manual

Sirona
Sirona ORTHOPHOS SL 2D Service manual

Chiltern Invadex
Chiltern Invadex TRT1 user guide

Otto Bock
Otto Bock 17BK1 Series Instructions for use

OrthoSensor
OrthoSensor Knee Balancer user guide

HEBU medical
HEBU medical HBS x-touch 300 argon operating manual

MP Biomedicals
MP Biomedicals FastPrep-24 instruction manual

medi
medi protect.Walker boot manual

Burton
Burton NOVA LED NXT Instructions for use & maintenance