Century Stroll On 3-Wheel User manual
www.centurybaby.com
Stroll OnTM 3-Wheel
Century® Stroll On™ 3W Lightweight Stroller
Cochecito ligero Century® Stroll On™ 3W
Owner’s Manual •Manual del propietario
Copyright Century Children’s Products 2020 NWL0001160588C 12.20
NWL0001160588C Stroll On 3W_R02.indd 1NWL0001160588C Stroll On 3W_R02.indd 1 12/22/20 9:29 AM12/22/20 9:29 AM

www.centurybaby.com
2
www.centurybaby.com
8
1 2
Quick Guide
Guía rápida
1. Open storage latch. Lift
handle of stroller up.
2. Attach brake assemblies to rear wheel axle rod and attach to
the frame. Be sure brake faces the rear of the stroller. Add brake
cogs, wheel, washer, cotter pin and hub cap (see section 3-B).
1. Abra la puerta del
almacenamiento.
Levante la manija del cochecito
hacia arriba.
2. Instale los ensamblajes del freno en la varilla del eje de las
ruedas traseras y sujételos al armazón. Asegúrese de que el
freno esté mirando hacia la parte posterior del cochecito.
Agregue los engranajes del freno, la rueda, la arandela, la
clavija y el tapacubos (consulte la sección 3-B).
5. Attach arm bar to the stroller
(see section 3-E).
6. Attach child’s tray to the arm bar
(see section 3-E).
5. Sujete la barra para los brazos al
cochecito (consulte la sección 3-E).
6. Sujete la bandeja para el niño a la
barra para los brazos
(consulte la sección 3-E).
5
6
CLICK!
¡CLIC!
3. Attach front wheel to
stroller (see section 3-D).
4. Fasten bottom of basket
to the axle with 3 snaps.
3. Sujete la rueda delantera al
cochecito
(consulte la sección 3-D)
.
4. Sujete la parte inferior de la
canasta al eje con 3 broches.
CLICK!
¡CLIC!
SNAP!
¡RUIDO!
CLICK!
¡CLIC!
CLICK!
¡CLIC!
Carton • Caja
7. Remove child’s tray by
lifting up on the front tab
and rotate the tray off the
arm bar.
7. Saque la bandeja para el
niño al levantar la lengüeta
delantera y girar la bandeja
para sacarla de la barra
para los brazos.
To Fold • Para plegar
8. Press buttons on both sides of frame. Rotate handle down.
CHECK that the storage latch is secure.
8. Oprima los botones en ambos costados del armazón. Gire
la manija hacia abajo.
VERIFIQUE que la traba de almacenamiento esté segura.
3
4
7
NWL0001160588C Stroll On 3W_R02.indd 2NWL0001160588C Stroll On 3W_R02.indd 2 12/22/20 9:29 AM12/22/20 9:29 AM
3
www.centurybaby.com
www.centurybaby.com
5-A Care & Maintenance • Cuidado y mantenimiento
5-B Replacement Parts • Warranty Information
Piezas de repuesto • Información sobre la garantía
5-C Product Registration • Registro del producto
5 CARE • CUIDADO
Pages • Páginas 23-24
1 WARNING • ADVERTENCIA
Pages • Páginas 4-6
2-A Parts List • Lista de piezas
2 FEATURES • CARACTERÍSTICAS
Page • Página 7
3-A To Open Stroller • Abrir el cochecito
3-B Rear Wheels • Las ruedas traseras
3-C Basket Assembly • Ensamblaje de la canasta
3-D Front Wheel • La rueda delantera
3-E Arm Bar and Child’s Tray• Barra para los brazos y bandeja para el niño
3 ASSEMBLY • ENSAMBLAJE
Pages • Páginas 8-13
4-A Canopy • Capota
4-B To Secure Child • Sujetar al niño
4-C To Recline • Para reclinar
4-D Brakes • Los frenos
4-E To Attach Century®Infant Car Seat • Para instalar el asiento
de automóvil para bebé Century®
4-F To Fold Stroller • Cómo plegar el cochecito
4 USE • USO
Pages • Páginas 14-22
NWL0001160588C Stroll On 3W_R02.indd 3NWL0001160588C Stroll On 3W_R02.indd 3 12/22/20 9:29 AM12/22/20 9:29 AM

www.centurybaby.com
4
www.centurybaby.com
Failure to follow these warnings and the assembly instructions could result in
serious injury or death. Only use product as instructed.
PLEASE SAVE OWNER’S MANUAL FOR
FUTURE USE.
ADULT ASSEMBLY REQUIRED.
NEVER LEAVE CHILD UNATTENDED.
Always keep child in view while in stroller.
AVOID SERIOUS INJURY from falling or
sliding out. Always use seat belt. After fastening
buckles, adjust belts to get a snug fit around
your child.
AVOID FINGER ENTRAPMENT: Use care
when folding and unfolding the stroller. Be
certain the stroller is fully erected and latched
before allowing your child near the stroller.
AVOID STRANGULATION: DO NOT
place items with a string around your child’s
neck, suspend strings from this product, or
attach strings to toys.
NEVER USE STROLLER ON STAIRS or
escalators. You may suddenly lose control of the
stroller or your child may fall out. Also, use
extra care when going up or down a
step or curb.
STROLLER TO BE USED only at walking
speed. Product not intended for use while
jogging, skating, etc.
USE OF THE STROLLER with a child
weighing more than 50 lb (22.5 kg) or taller
than 45 in. (114.3 cm) will cause excessive wear
and stress on the stroller. Use the stroller with
only one child at a time.
TO PREVENT A HAZARDOUS,
UNSTABLE CONDITION, never place
purses, shopping bags, parcels or accessory
items on the handle or canopy.
TO PREVENT A HAZARDOUS,
UNSTABLE CONDITION, do not place
more than 10 lb (4.5 kg) in the storage basket.
TO AVOID BURNS, never put hot liquids in
the parent tray.
TO PREVENT TIPPING, do not place more
than 3 lb (1.36 kg) in the parent tray.
DO NOT use storage basket as a child carrier.
DO NOT ALLOW your child to stand on the
basket. It may collapse and cause injury.
NEVER PLACE child in the stroller with head
toward footrest.
NEVER ALLOW YOUR STROLLER to be
used as a toy.
DISCONTINUE USING YOUR
STROLLER should it become damaged
or broken.
CAREGIVER MUST always help child get into
and out of the stroller.
CAREGIVER MUST always ensure the brakes
are engaged when placing child into stroller.
USING CENTURY® INFANT CAR SEAT
WITH STROLLER:
READ THE MANUAL provided with your
Century car seat before using it with
your stroller.
FALL HAZARD: Always check that infant car
seat is securely attached to stroller by pulling up
on the car seat.
ALWAYS SECURE your child with the car
seat harness when using the car seat in the
stroller. If your child is already in the car seat,
check that the child is secured with the harness.
Improper use of this stroller with a car seat may
result in serious injury or death.
See Century infant car seat owners manual for
maximum size of child.
WARNING
1
NWL0001160588C Stroll On 3W_R02.indd 4NWL0001160588C Stroll On 3W_R02.indd 4 12/22/20 9:29 AM12/22/20 9:29 AM

5
www.centurybaby.com
www.centurybaby.com
1
POR FAVOR, GUARDE EL
MANUAL DEL PROPIETARIO
PARA USO FUTURO.
REQUIERE QUE LO ARME UN
ADULTO.
NUNCA DEJE A UN NIÑO SIN
ATENDER. Mantenga siempre al
niño a la vista mientras está en el
cochecito.
EVITE SERIAS LESIONES de
caídas o resbalones. Use siempre el
cinturón de seguridad. Después de
ajustar las hebillas, ajuste las correas
para obtener un calce apretado
alrededor de su niño.
EVITE EL ATRAPAMIENTO DE
LOS DEDOS: Tenga cuidado
cuando pliega y despliega el
cochecito. Asegúrese de que el
cochecito esté completamente
armado y trabado antes de permitir
que el niño se acerque al mismo.
EVITE LA ESTRANGULACIÓN.
NO ponga artículos con un cordón
alrededor del cuello del niño,
suspenda cordones de este producto
ni ponga cordones a los juguetes.
NUNCA USE EL COCHECITO
EN ESCALERAS o escaleras
mecánicas. Podría perder
repentinamente el control del
cochecito o el niño podría caerse.
Además, use mucho cuidado cuando
sube o baja un escalón o bordillo.
EL COCHECITO DEBE USARSE
solamente a la velocidad del caminar.
El producto no debe usarse para
correr, patinar, etc.
EL USO DE UN COCHECITO
con un niño que pesa más de
50libras (22.5 kg) o es más alto que
45 pulgadas (114.3 cm) causará
desgaste y tensión excesiva en el
cochecito. Use el cochecito
solamente con un niño por vez.
PARA PREVENIR UNA
SITUACIÓN PELIGROSA E
INESTABLE, nunca ponga carteras,
bolsas de compras, paquetes o
accesorios en la manija o capota.
PARA PREVENIR UNA
SITUACIÓN PELIGROSA E
INESTABLE, no ponga más de
10 libras (4,5 kg) en la canasta de
almacenamiento.
PARA EVITAR QUEMADURAS,
nunca ponga líquidos calientes en la
bandeja para padres.
PARA PREVENIR QUE SE
TUMBE, no ponga más de 3libras
(1,36 kg) en la bandeja para padres.
NO use la canasta de
almacenamiento como transportador
para niños.
NO DEJE que el niño se pare sobre
la canasta. Podría desarmarse y
causar lesiones.
No observar estas advertencias y las instrucciones de ensamblaje podría resultar en
lesiones serias o la muerte. Use solamente el producto según las instrucciones.
ADVERTENCIA
NWL0001160588C Stroll On 3W_R02.indd 5NWL0001160588C Stroll On 3W_R02.indd 5 12/22/20 9:29 AM12/22/20 9:29 AM

www.centurybaby.com
6
www.centurybaby.com
NUNCA PONGA al niño en el
asiento para niño pequeño con la
cabeza hacia el apoyapiés.
NUNCA DEJE QUE EL
COCHECITO se use como un
juguete.
DEJE DE USAR SU
COCHECITO si resulta dañado o
roto.
LA PERSONA A CARGO DEL
CUIDADO debe ayudar siempre al
niño a subirse y bajarse del
cochecito.
LA PERSONA A CARGO DEL
CUIDADO debe tener la seguridad
de que los frenos estén activados
cuando pone al niño en el cochecito.
USO DEL ASIENTO DE
AUTOMÓVIL PARA BEBÉ
CENTURY® CON EL
COCHECITO:
LEA EL MANUAL incluido con su
asiento de automóvil Century antes
de usarlo con su cochecito.
PELIGRO DE CAÍDA: Verifique
siempre que el asiento de automóvil
para bebé esté debidamente
asegurado al cochecito tirando del
asiento de automóvil hacia arriba.
ASEGURE SIEMPRE a su niño
con el arnés del asiento de automóvil
cuando usa el asiento de automóvil
en el cochecito. Si su niño ya está en
el asiento de automóvil, verifique que
esté asegurado con el arnés.
El uso inadecuado de este cochecito
con un asiento de automóvil podría
resultar en lesiones serias o la
muerte.
Vea el manual del propietario del
asiento de automóvil para bebé
Century para determinar el tamaño
máximo del niño.
ADVERTENCIA
1
NWL0001160588C Stroll On 3W_R02.indd 6NWL0001160588C Stroll On 3W_R02.indd 6 12/22/20 9:29 AM12/22/20 9:29 AM

7
www.centurybaby.com
www.centurybaby.com
2-A
Parts List
Lista de piezas
All models • Todos modelos
Check that you have all the parts and
hardware (red bag) for this model BEFORE
assembling your product. If any parts are
missing, call Customer Service
1-844-385-0249.
No tools required.
Verifique que tenga todas las piezas y los
equipos (bolsa roja) de este modelo ANTES
de armar su producto. Si falta alguna pieza,
llame a Servicio al Cliente
1-844-385-0249.
No requiere herramientas.
2X
* Red bag contains hardware for rear wheel assembly, do not discard
* La bolsa roja contiene los herrajes para el ensamblaje de las ruedas traseras; no la deseche.
Stroller
Cochecito
Front Wheel
Rueda delatera
Break Assemblies
Ensamblajes del freno
Rear Wheel Axle Rod
Varilla del eje de las ruedas traseras
Arm Bar
Barra para los brazos
Child’s Tray
Bandeja para el niño
2X
Cotter Pins
Clavijas
2X
Hub Caps
Cubos
2X
Washers
Arandelas
2X
Rear Wheels
Las Ruedas Traseras
Brake Cogs
Engranajes del freno
NWL0001160588C Stroll On 3W_R02.indd 7NWL0001160588C Stroll On 3W_R02.indd 7 12/22/20 9:29 AM12/22/20 9:29 AM

www.centurybaby.com
8
www.centurybaby.com
To Open Stroller
Abrir el cochecito
Asegúrese de poner el cochecito sobre un pedazo de cartón o algún otro material
de protección para prevenir dañar el piso.
Be sure to place stroller on top of a piece of cardboard or some other
protective cover to prevent any damage to floor.
1. Abra la puerta del almacenamiento.
1. Open storage latch.
2. Levante la manija del cochecito
hacia arriba.
2. Lift handle of stroller up.
3. VERIFIQUE que el armazón del
cochecito esté completamente trabado
cada vez que lo abre y antes de continuar
con los pasos de ensamblaje restantes.
3. CHECK that the stroller frame is
completely locked every time you unfold
the stroller and before continuing with
the rest of the assembly steps
Carton • Caja
CLICK!
¡CLIC!
3-A
NWL0001160588C Stroll On 3W_R02.indd 8NWL0001160588C Stroll On 3W_R02.indd 8 12/22/20 9:29 AM12/22/20 9:29 AM

9
www.centurybaby.com
www.centurybaby.com
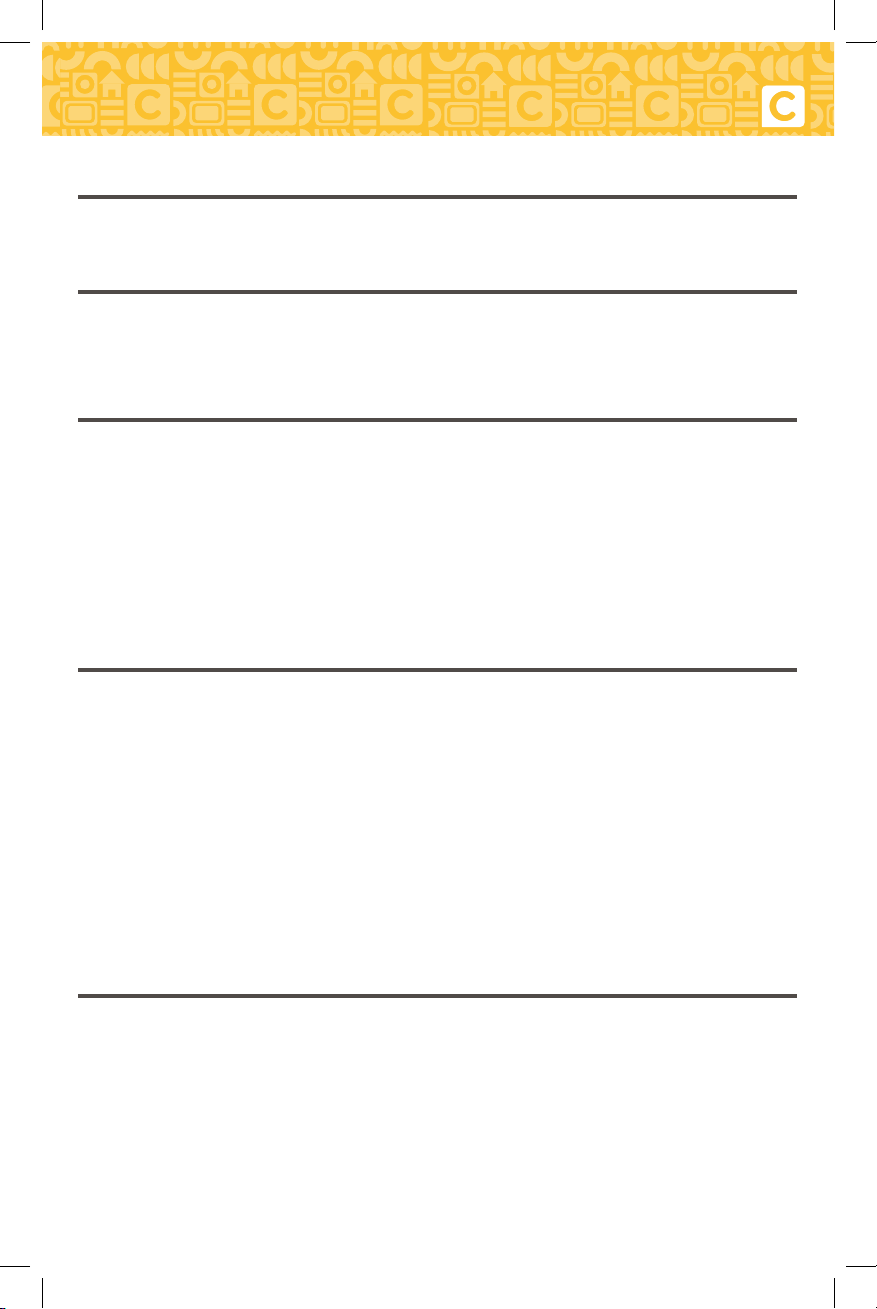
3-B
Rear Wheel Axle Rod • Varilla del eje de las ruedas traseras
Rear Wheels
Las ruedas traseras
1. Instale los ensamblajes del freno a la
varilla del eje como se indica.
1. Attach break assemblies to axle rod
as shown.
2. Las palancas del freno apuntan hacia la
parte trasera del cochecito. Verifique
que el eje trasero esté instalado
correctamente tirando del ensamblaje
del freno.
2. Brake levers point toward rear of stroller.
Check that rear axle is securely attached
by pulling on brake assembly.
CLICK!
¡CLIC!
Rear Wheels • Ruedas traseras
2X2X 2X2X 2X
1. Asegúrese de que los engranajes del freno
estén montados en el centro de la
rueda trasera.
1. Ensure brake cogs are assembled onto the
center of the rear wheel.
2X
NWL0001160588C Stroll On 3W_R02.indd 9NWL0001160588C Stroll On 3W_R02.indd 9 12/22/20 9:29 AM12/22/20 9:29 AM
www.centurybaby.com
10
www.centurybaby.com
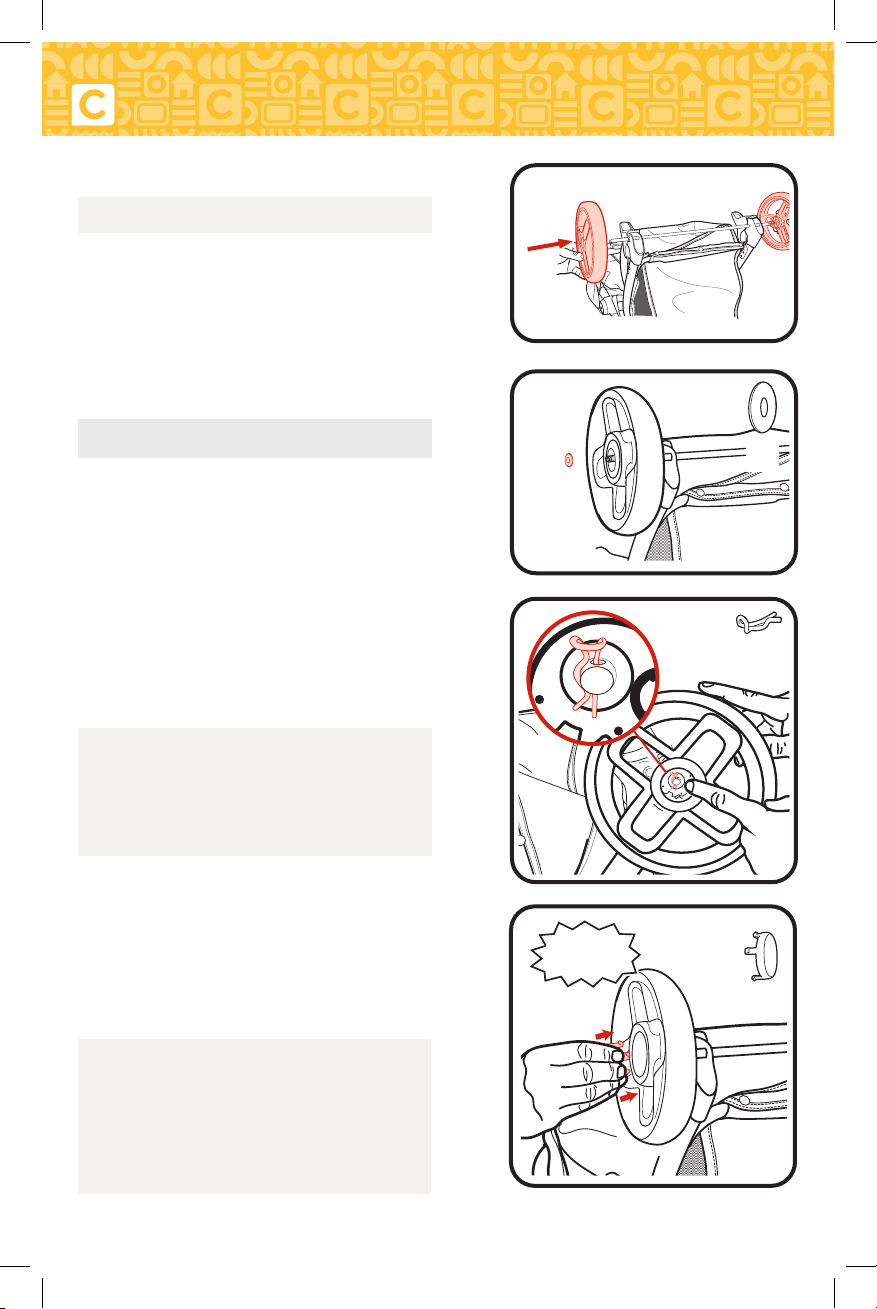
2. Sujete las ruedas traseras al eje.
2. Attach wheels on axle.
3. Ponga la arandela en el eje.
3. Place washer on axle.
5. Sujete el cubo como se indica. Repita el
procedimiento del otro lado.
VERIFIQUE que las ruedas estén
instaladas correctamente tirando de
las ruedas.
5. Attach hub cap as shown. Repeat on
other side.
CHECK that wheels are securely
attached by pulling on wheels.
2X
SNAP!
¡RUIDO!
2X
2X
4. Empuje el lado recto de la clavija a través
de el agujero del eje. La clavija se separará
alrededor del eje. El lado curvo de la
clavija DEBE mirar hacia arriba como se
indica.Repita el proceso en el otro costado.
4. Push straight side of cotter pin through
axle hole. The cotter pin will separate
around the axle. Curved end of the cotter
pin MUST face up as shown. Repeat steps
for other side.
3-B
NWL0001160588C Stroll On 3W_R02.indd 10NWL0001160588C Stroll On 3W_R02.indd 10 12/22/20 9:29 AM12/22/20 9:29 AM
11
www.centurybaby.com
www.centurybaby.com
www.centurybaby.com
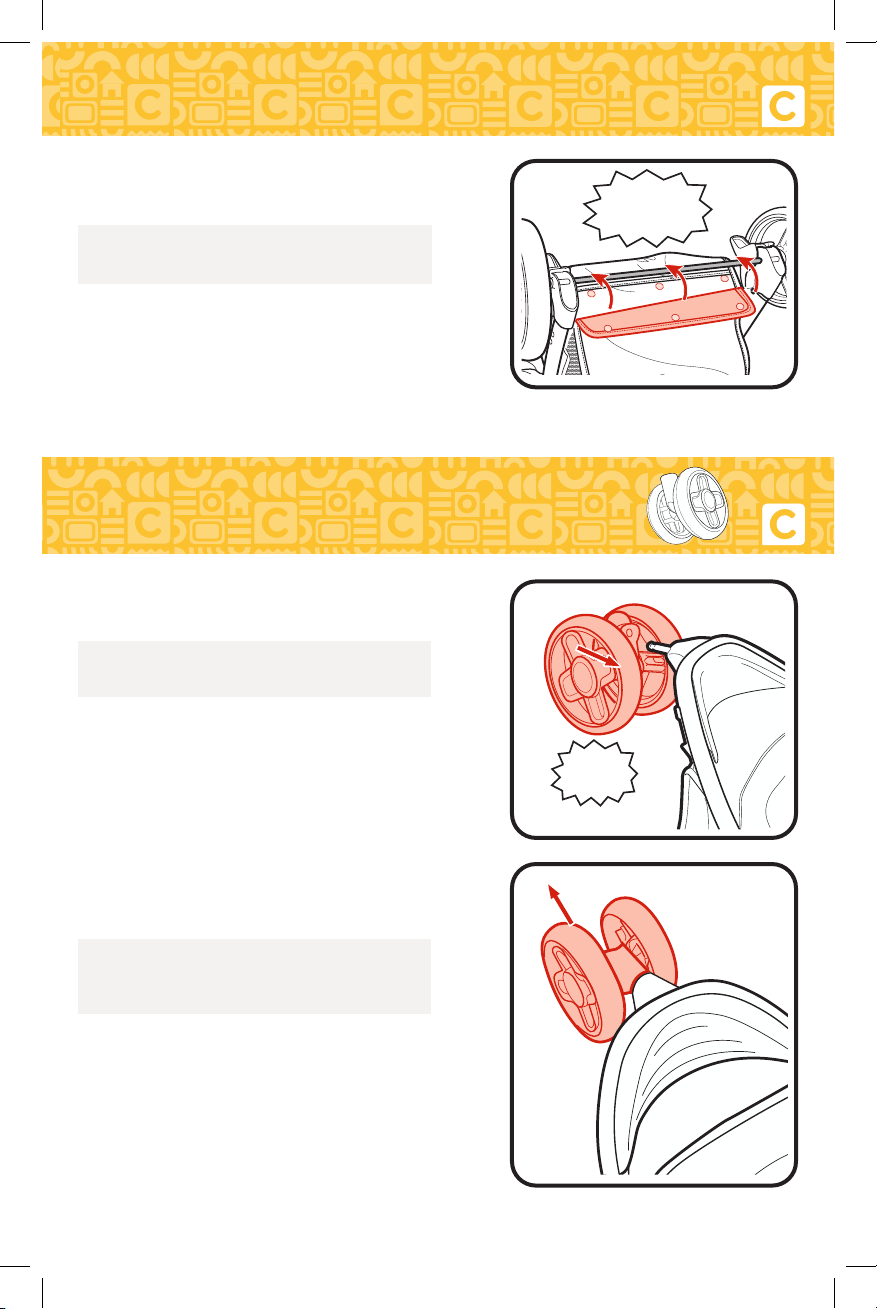
Basket Assembly
Ensamblaje de la canasta
1. Sujete la parte inferior de la canasta al eje
con 3 broches como se indica.
1. Fasten bottom of basket to the axle with 3
snaps as shown.
SNAP!
¡RUIDO!
3-C
Front Wheel
La rueda delatera
3-D
CLICK!
¡CLIC!
2. CHECK that wheel is securely attached
by pulling on wheel assembly.
2. VERIFIQUE que la rueda esté
apretadamente sujetada tirando del
ensamblaje de la rueda.
1. Attach front wheel to stroller as shown.
1. Sujete la rueda delantera al cochecito
como se indica.
NWL0001160588C Stroll On 3W_R02.indd 11NWL0001160588C Stroll On 3W_R02.indd 11 12/22/20 9:29 AM12/22/20 9:29 AM
www.centurybaby.com
12
www.centurybaby.com
Arm Bar and Child’s Tray
Barra para los brazos y bandeja para el niño
WARNING
Always secure your child with the seat belt. The arm bar is not a restraint device.
DO NOT lift the stroller by the arm bar or child tray. Use care when snapping the
arm bar on the stroller with a child in the stroller.
ADVERTENCIA
Asegure siempre a su niño con el cinturón de seguridad. La barra para los brazos no
es un dispositivo de seguridad. NO levante el cochecito agarrándolo por la barra para
los brazos o por la bandeja para el niño. Tenga cuidado cuando traba la barra para los
brazos en el cochecito si hay un niño en el cochecito.
1. Sujete la barra para los brazos al
cochecito como se indica.
1. Attach arm bar to stroller as shown.
2. Tire de la barra para los brazos para
asegurarse de que esté sujetada.
2. Pull on arm bar to make sure it
is attached.
CLICK!
¡CLIC!
3-E
NWL0001160588C Stroll On 3W_R02.indd 12NWL0001160588C Stroll On 3W_R02.indd 12 12/22/20 9:29 AM12/22/20 9:29 AM

13
www.centurybaby.com
www.centurybaby.com
3-E
1. Press the arm bar latches, then pull the
arm bar away from the frame.
1. Oprima las trabas de la barra para los
brazos, luego tire de la barra para los
brazos hacia afuera del armazón.
Removing Arm Bar • Cómo retirar la barra para los brazos
Attaching Child’s Tray • Para sujetar la bandeja para el niño
1. Sujete la bandeja para el niño a la barra
para los brazos empujando con firmeza
la bandeja para el niño sobre la barra
para los brazos.
1. Attach child’s tray to the arm bar by
firmly pushing down on child’s tray
onto the arm bar.
1. Saque la bandeja para el niño al
levantar la lengüeta delantera y girar
la bandeja para sacarla de la barra para
los brazos.
1. Remove child’s tray by lifting up on the
front tab and rotate the tray off the
arm bar.
Removing Child’s Tray • Para sacar la bandeja para el niño
NWL0001160588C Stroll On 3W_R02.indd 13NWL0001160588C Stroll On 3W_R02.indd 13 12/22/20 9:29 AM12/22/20 9:29 AM

www.centurybaby.com
14
www.centurybaby.com
Canopy
Capota
4-A
1. Tire hacia adelante para abrir la capota.
1. Pull forward to open canopy.
2. Empuje hacia atrás para cerrar la capota.
2. Push backwards to close canopy.
3. Tire la solapa hacia adelante para abrirla y
hacia atrás para cerrar la ventana
de la capota.
3. Pull flap forward to open and backwards
to close canopy window.
NWL0001160588C Stroll On 3W_R02.indd 14NWL0001160588C Stroll On 3W_R02.indd 14 12/22/20 9:29 AM12/22/20 9:29 AM

15
www.centurybaby.com
www.centurybaby.com
To Secure Child
Sujetar al niño
4-B
WARNING
Falling Hazard: Always use the seat belt.
ADVERTENCIA
Peligro de caídas: Use siempre el cinturón de seguridad.
5 Point Harness • Arnés de 5 puntos
1. Para abrirlo, oprima el botón de la
hebilla para liberar las correas
de la cintura.
1. To open, press button on buckle to
release the waist straps.
2. Para cerrarlo, deslice los
conectores de las correas del hombro
en las correas de la cintura y póngalos
en la hebilla.
2. To close, slide shoulder strap
connectors onto waist straps and insert
into buckle.
3. Use slide adjuster on shoulder, waist
and crotch straps for tighter
adjustment. To change shoulder
harness slots (see page 17).
3. Use el ajustador deslizable en las
correas del hombro, la cintura y la
entrepierna para ajustarlas más
apretadamente. Para cambiar ranuras
del arnés del hombro (vea la página 17).
NWL0001160588C Stroll On 3W_R02.indd 15NWL0001160588C Stroll On 3W_R02.indd 15 12/22/20 9:29 AM12/22/20 9:29 AM

www.centurybaby.com
16
www.centurybaby.com
1. Para abrirlo, oprima el botón de la hebilla
para liberar las correas de la cintura.
1. To open, press button on buckle to release
the waist straps.
2. Deslice las conexiones de la correa para
los hombros de las correas para
la cintura.
2. Slide shoulder strap connectors off of
waist straps.
3 Point Harness • Arnés de 3 puntos
3. Saque las correas para los
hombros del cochecito.
3. Remove shoulder straps from stroller.
4. Sujete las correas para la cintura a la
hebilla del arnés como se indica.
4. Attach waist straps to harness buckle
as shown.
5. Use el ajustador deslizable de la cintura
para ajustarlo más apretadamente.
5. Use slide adjuster at waist for
tighter adjustment.
4-B
NWL0001160588C Stroll On 3W_R02.indd 16NWL0001160588C Stroll On 3W_R02.indd 16 12/22/20 9:29 AM12/22/20 9:29 AM

17
www.centurybaby.com
www.centurybaby.com
4-B
6. Para abrirlo, oprima el botón de la hebilla
para liberar las correas de la cintura.
6. To open, press button on buckle to
release the waist straps.
Adjusting Shoulder Harness position • Ajustar la posición del arnés
para los hombros
Anclaje del arnés del hombro
Shoulder harness anchor
Ajustador deslizable
Slide adjuster
1. Pase el anclaje del arnés por el frente del
asiento y luego vuelva a insertarlo en las
ranuras deseadas a la misma altura. Use el
sujetador del arnés del hombro en las ranuras
que estén más cerca a la altura del hombro
del niño. Use el ajustador deslizable para
lograr ajustes adicionales.
1. Push harness anchor through the front of the
seat then re-insert through desired slots at
the same height level. Use shoulder harness
anchor in the slots that are closest to child’s
shoulder height. Use slide adjuster for
further adjustment.
NWL0001160588C Stroll On 3W_R02.indd 17NWL0001160588C Stroll On 3W_R02.indd 17 12/22/20 9:29 AM12/22/20 9:29 AM

www.centurybaby.com
18
www.centurybaby.com
1. Para reclinar, empuje el botón hacia
abajo y tire el asiento hacia atrás.
1. To recline push button down and
pull seat towards the rear.
2. Para levantar, tire ambas
correas hacia arriba.
2. To raise, pull both straps up.
To Recline
Para reclinar
WARNING
When making adjustments to the stroller seat, make sure child’s head, arms, and legs
are clear of moving seat parts and stroller frame.
ADVERTENCIA
Cuando realiza ajustes al asiento del cochecito, asegúrese que la cabeza, brazos y
piernas del niño estén lejos de las piezas del asiento que se mueven y del armazón
del cochecito.
4-C
NWL0001160588C Stroll On 3W_R02.indd 18NWL0001160588C Stroll On 3W_R02.indd 18 12/22/20 9:29 AM12/22/20 9:29 AM
19
www.centurybaby.com
www.centurybaby.com
4-D
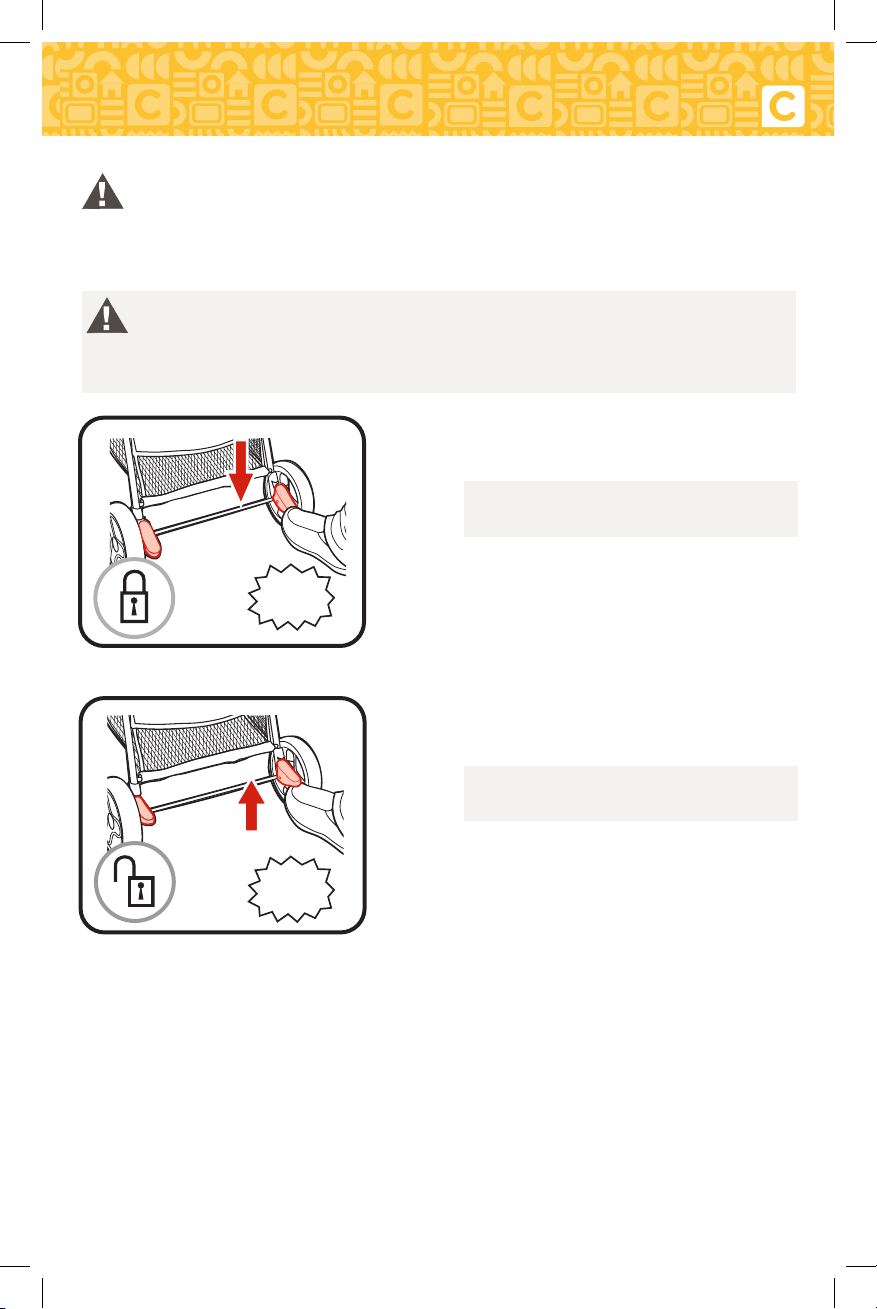
1. Empuje ambos frenos hacia abajo
para trabarlos.
1. Push down on both brakes to lock.
2. Empuje ambos frenos hacia arriba
para destrabarlos.
2. Push up on both brakes to unlock.
Brakes
Los frenos
WARNING
Always apply both brakes. CHECK that brakes are on by trying to
push stroller.
ADVERTENCIA
Siempre use ambos frenos. VERIFIQUE que los frenos estén activados
tratando de empujar el cochecito.
CLICK!
¡CLIC!
CLICK!
¡CLIC!
NWL0001160588C Stroll On 3W_R02.indd 19NWL0001160588C Stroll On 3W_R02.indd 19 12/22/20 9:29 AM12/22/20 9:29 AM

www.centurybaby.com
20
www.centurybaby.com
4-E
To Attach Century
®
Infant Car Seat
Para instalar el asiento de automóvil para bebé Century
®
1. Recline el asiento en la posición
totalmente reclinada.
1. Recline seat to full recline position.
2. Si está sujetada, saque la bandeja para el
niño de la barra para los brazos.
2. If attached, remove child’s tray from
arm bar.
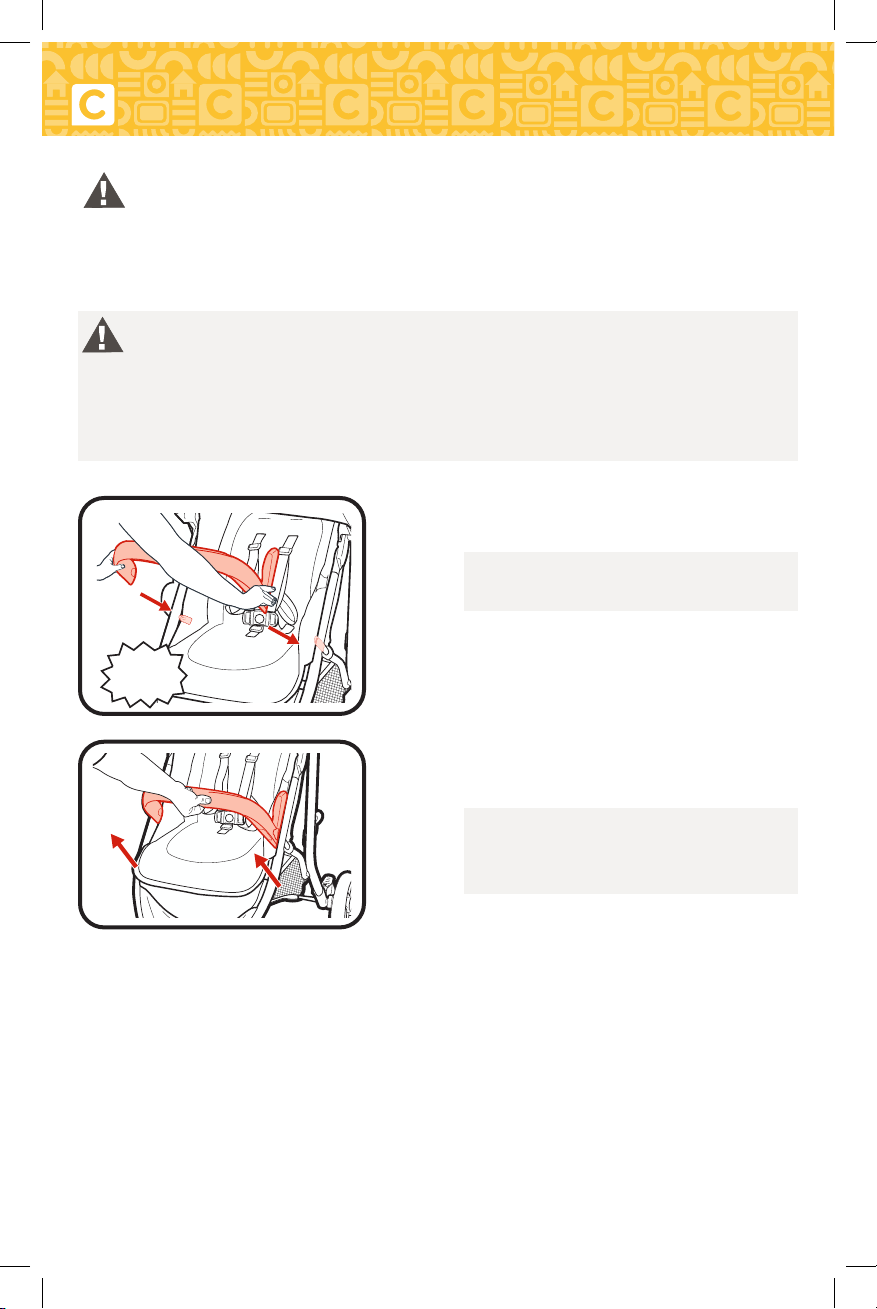
3. Busque los montantes en el asiento para
niño pequeño.
3. Find mounts in toddler seat.
NWL0001160588C Stroll On 3W_R02.indd 20NWL0001160588C Stroll On 3W_R02.indd 20 12/22/20 9:29 AM12/22/20 9:29 AM
This manual suits for next models
1
Table of contents
Other Century Stroller manuals

Century
Century PM-1016AA User manual

Century
Century PM-1109AB User manual

Century
Century 6965 User manual

Century
Century 4-in-1 TravelSolutions User manual

Century
Century Travel Solutions Travel SolutionsTM Plus User manual

Century
Century 4-in-1 TravelSolutions User manual

Century
Century PM-1026AB User manual

Century
Century 6901 User manual

Century
Century LIFESTYLE SERIER PM-1722AC User manual

Century
Century Stroll On User manual


