
a
a. Vision Positioning Statu
Flashing red light.
Vision positioning failure
Solid red light
In vision positioning
b. Flight Status Indicator - LED
Solid blue light on start-up
Solid green light
Flashing green light
Red and blue light flashing alternately
Red and green light flashing alternately
Flashing blue light
Solid blue light
Solid red light
Flashing red light
Red light flashes doubly
Green light flashes doubly
Blue and green light flashes alternately
Self-inspection
RC and aircraft is paired,GPS is located
RC and aircraft is paired,GPS is not located
Horizontal calibration process
Vertical calibration process
RC and aircraft is not paired,GPS is not located
RC and aircraft is not paired,GPS is located
Serious error
Low battery alarm
Alarm for severe low battery.
Beginner mode (GPS not positioned)
Compass data error
06
I
Product Overview Product Overview
I
07
Flight Modes
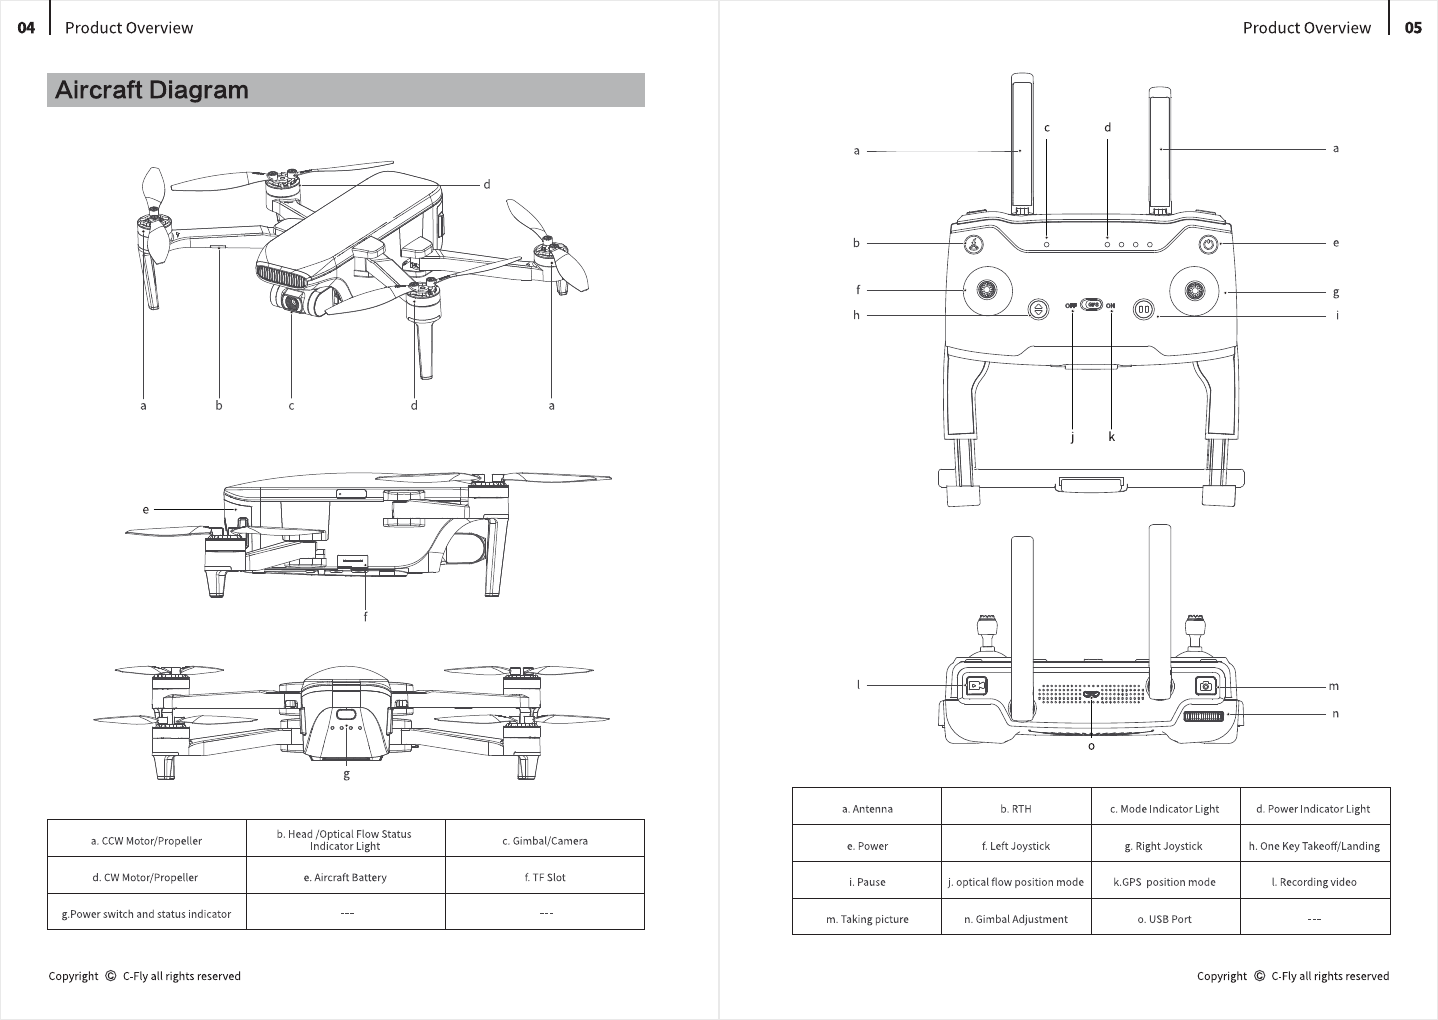
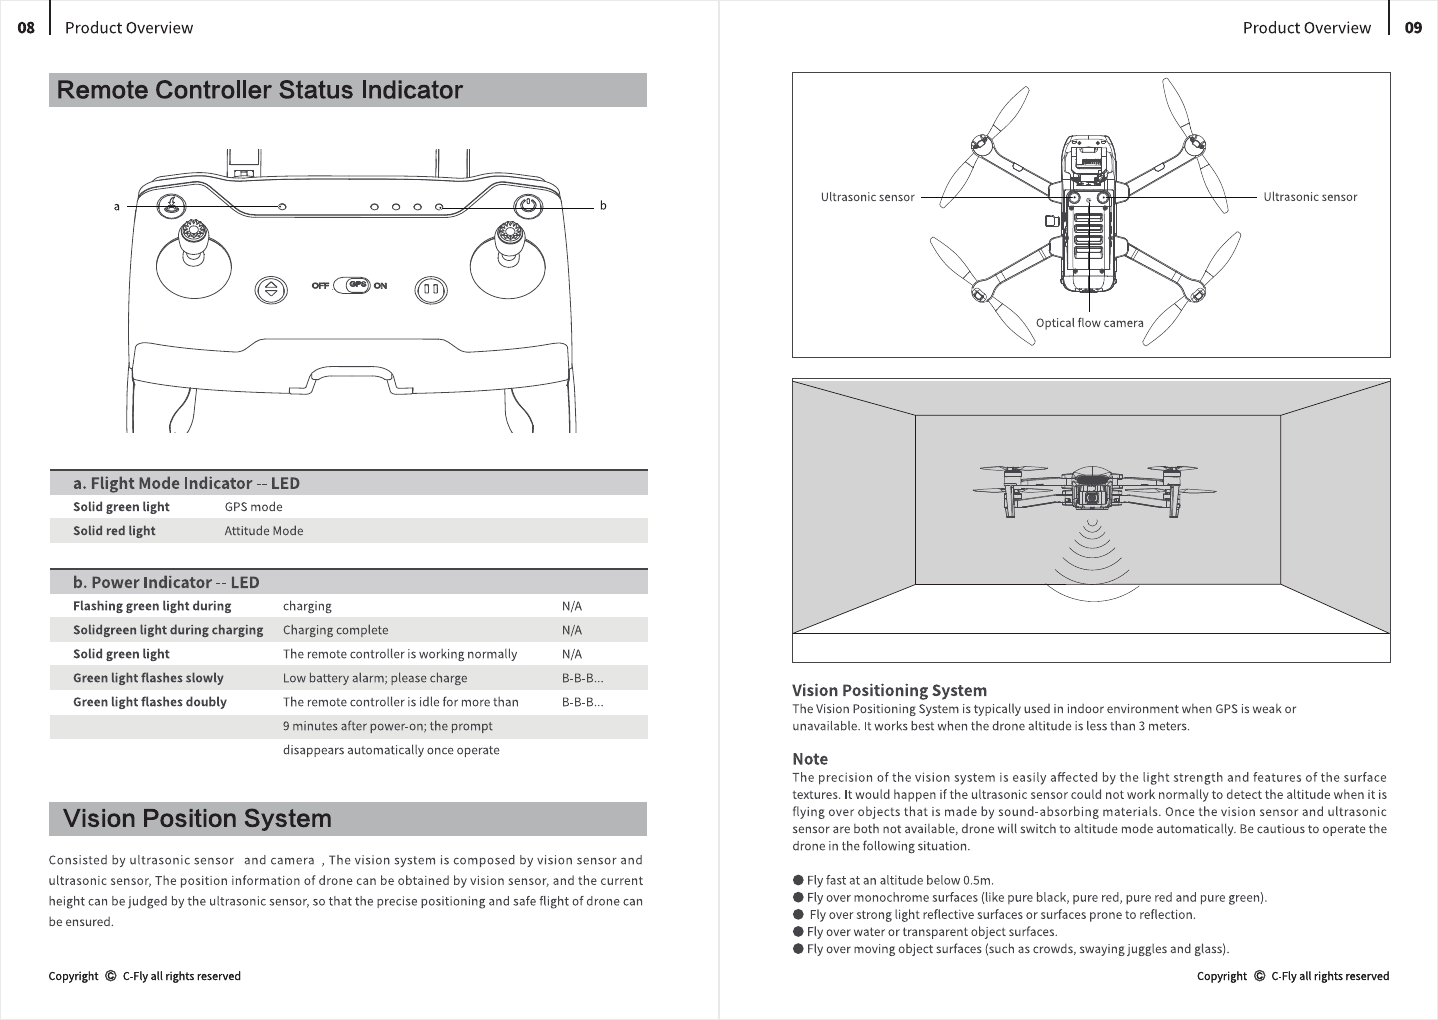
Aircraft LEDs And Status Indicator
Position Mode
When the aircraft is in GPS mode, it can achieve accurate hover of the aircraft. When the GPS signal is weak,
the aircraft will automatically enter altitude mode or vision positioning mode.
Altitude Mode
In Altitude Mode, when the visual positioning conditions are satisfied, the aircraft will automatically enter
the visual positioning mode, in the visual positioning mode, the aircraft can hover stably with the vision
positioning system.
When the visual positioning condition is not satisfied, the aircraft will hold the current altitude by barome-
ter. Accurate hover can not be achieved, as the aircraft has possibility to drift horizontally and it requires
user with skilled flight control.
Aircraft has Return-to-home (RTH) function, and there are 3 types of RTH: one-key RTH, low battery RTH
and lose control RTH. When the GPS signal is good and the aircraft successfully records the return point, if
the user turns on one-key RTH, or the aircraft triggers low battery RTH, or the communication signal
between the remote controller and the aircraft is lost, the aircraft will automatically return to the return
point and land.Before the aircraft takes off, when the aircraft status indicator turns green and the GPS
mode is displayed on the APP, the current position of the aircraft will be recorded as the return point.
One-key RTH
When the GPS signal is good (the aircraft status indicator is solid green), the aircraft can return to the
return point via the"&" button on the remote control, and the return process is the same as lose control
RTH. The difference is that when the aircraft returns and begins to land, the user can control the aircraft
through the joystick to avoid obstacles and change the landing position. After pressing and holding the " "
button for more than 2 seconds to exit the return, the user can regain control of the aircraft.
Low Battery RTH
During the flight, when the red light of the aircraft status indicator flashes slowly, the aircraft triggers low
battery RTH. During the landing, the user can control the aircraft by joystick to avoid obstacles and change
the landing position.
Lose Control RTH
When the GPS signal is good (the aircraft status indicator is solid green), the compass is working normally,
and the aircraft successfully records the return point, if the remote control signal continues to be lost for
more than 2 seconds, the flight control system will take over the control of the aircraft and control the
aircraft to fly back to the last recorded return point. If the signal of the remote controller is restored later
during the flight, the return process will continue, but the user can cancel the return and regain the control
of the aircraft through the Pause button"& ".
Attentions:
•
The aircraft cannot avoid obstacles when it is flying back during the RTH process.
•
The aircraft cannot return to the Return Point if the GPS signal is weak or unavailable.
•
During RTH process, when the aircraft is flying above 30 meters, the aircraft will immediately perform the RTH function;
when flying below 30 meters, the aircraft will rise to 30 meters automatically and then perform the RTH function.
•
If the aircraft does not receive the satellite signal or the signal of the remote controller continues to be lost for more than
2 seconds, the aircraft will not be able to retum, and will slowly descend until it lands.
Copyright © C-Fly all rights reserved Copyright © C-Fly all rights reserved
a
a. Vision Positioning Statu
Flashing red light.
Vision positioning failure
Solid red light
In vision positioning
b. Flight Status Indicator - LED
Solid blue light on start-up
Solid green light
Flashing green light
Red and blue light flashing alternately
Red and green light flashing alternately
Flashing blue light
Solid blue light
Solid red light
Flashing red light
Red light flashes doubly
Green light flashes doubly
Blue and green light flashes alternately
Self-inspection
RC and aircraft is paired,GPS is located
RC and aircraft is paired,GPS is not located
Horizontal calibration process
Vertical calibration process
RC and aircraft is not paired,GPS is not located
RC and aircraft is not paired,GPS is located
Serious error
Low battery alarm
Alarm for severe low battery.
Beginner mode (GPS not positioned)
Compass data error
06
I
Product Overview Product Overview
I
07
Flight Modes
Aircraft LEDs And Status Indicator
Position Mode
When the aircraft is in GPS mode, it can achieve accurate hover of the aircraft. When the GPS signal is weak,
the aircraft will automatically enter altitude mode or vision positioning mode.
Altitude Mode
In Altitude Mode, when the visual positioning conditions are satisfied, the aircraft will automatically enter
the visual positioning mode, in the visual positioning mode, the aircraft can hover stably with the vision
positioning system.
When the visual positioning condition is not satisfied, the aircraft will hold the current altitude by barome-
ter. Accurate hover can not be achieved, as the aircraft has possibility to drift horizontally and it requires
user with skilled flight control.
Aircraft has Return-to-home (RTH) function, and there are 3 types of RTH: one-key RTH, low battery RTH
and lose control RTH. When the GPS signal is good and the aircraft successfully records the return point, if
the user turns on one-key RTH, or the aircraft triggers low battery RTH, or the communication signal
between the remote controller and the aircraft is lost, the aircraft will automatically return to the return
point and land.Before the aircraft takes off, when the aircraft status indicator turns green and the GPS
mode is displayed on the APP, the current position of the aircraft will be recorded as the return point.
One-key RTH
When the GPS signal is good (the aircraft status indicator is solid green), the aircraft can return to the
return point via the"&" button on the remote control, and the return process is the same as lose control
RTH. The difference is that when the aircraft returns and begins to land, the user can control the aircraft
through the joystick to avoid obstacles and change the landing position. After pressing and holding the " "
button for more than 2 seconds to exit the return, the user can regain control of the aircraft.
Low Battery RTH
During the flight, when the red light of the aircraft status indicator flashes slowly, the aircraft triggers low
battery RTH. During the landing, the user can control the aircraft by joystick to avoid obstacles and change
the landing position.
Lose Control RTH
When the GPS signal is good (the aircraft status indicator is solid green), the compass is working normally,
and the aircraft successfully records the return point, if the remote control signal continues to be lost for
more than 2 seconds, the flight control system will take over the control of the aircraft and control the
aircraft to fly back to the last recorded return point. If the signal of the remote controller is restored later
during the flight, the return process will continue, but the user can cancel the return and regain the control
of the aircraft through the Pause button"& ".
Attentions:
•
The aircraft cannot avoid obstacles when it is flying back during the RTH process.
•
The aircraft cannot return to the Return Point if the GPS signal is weak or unavailable.
•
During RTH process, when the aircraft is flying above 30 meters, the aircraft will immediately perform the RTH function;
when flying below 30 meters, the aircraft will rise to 30 meters automatically and then perform the RTH function.
•
If the aircraft does not receive the satellite signal or the signal of the remote controller continues to be lost for more than
2 seconds, the aircraft will not be able to retum, and will slowly descend until it lands.
Copyright © C-Fly all rights reserved Copyright © C-Fly all rights reserved


 user manual")