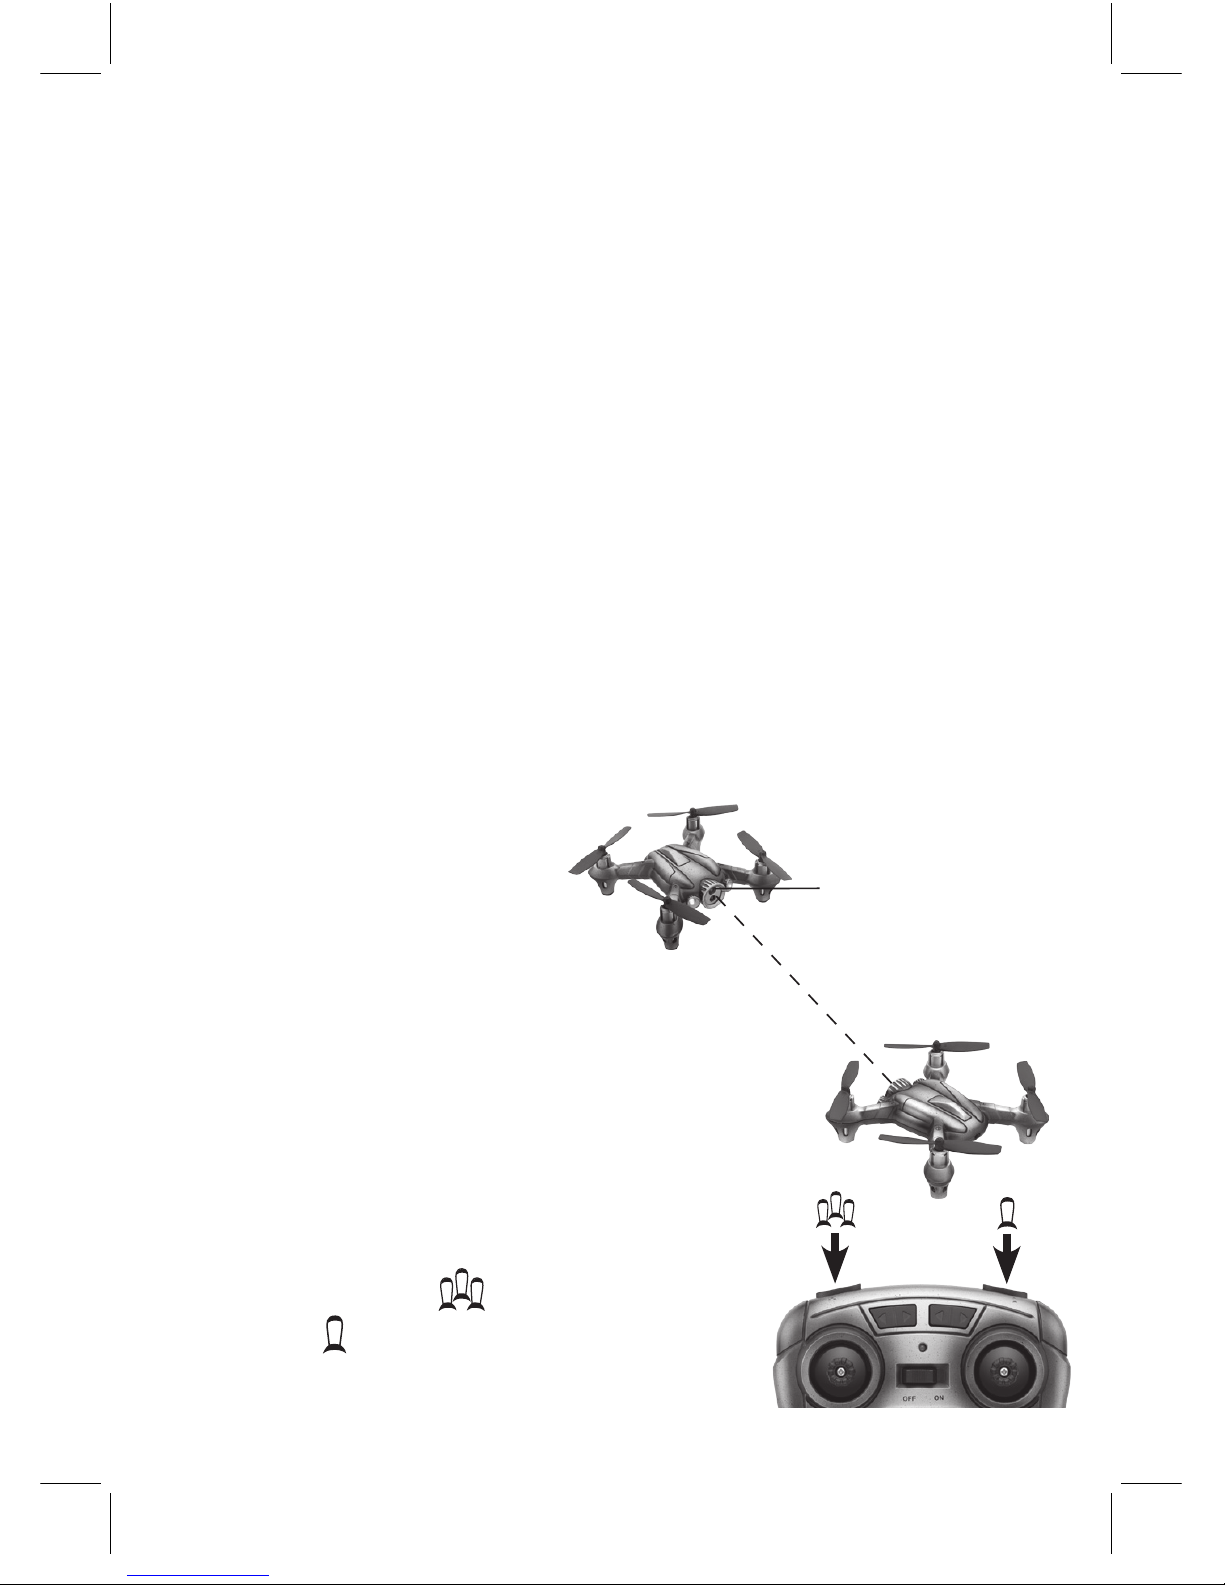
Radio Shack 6001381 User manual

Battle Drone
AGE 12+
USER’S GUIDE
6001381
6001381_PM_En.indd 1
8/13/2015 5:00:35 PM

2
Contents
Features ................................................................................. 3
Package Contents ................................................................. 3
Specications ........................................................................ 3
Fly Safely ................................................................................ 3
Charge the Drone.................................................................. 4
Lithium Battery Notes.............................................................................. 4
Install Batteries in the Remote Control ...............................5
Battery Notes.............................................................................................. 5
Pairing..................................................................................... 8
Fly Your Drone........................................................................8
Trim Your Drone ......................................................................................... 8
Land Your Drone......................................................................................... 9
Perform Stunts ........................................................................................... 9
Dogght! ................................................................................ 9
Replace Damaged Propellers ............................................. 10
Troubleshooting .................................................................. 11
Drone does not respond........................................................................ 11
Drone dicult to control........................................................................ 11
Calibrate Your Drone ..................................................................... 11
FCC Information .................................................................. 12
Limited Warranty.................................................................13
CHOKING HAZARD!
Small parts. Not for children under 3 years.
6001381_PM_En.indd 2
8/13/2015 5:00:35 PM

3
We hope you enjoy your Battle Drone from RadioShack. Please read
this user’s guide before setting up and using your drone.
Features
• Drone Combat Mode
•Six-Axis Gyro
• Auto-stabilize feature
•USB charging
Package Contents
• Drone (2) • Remote Control (2)
• USB Charging Cable (2) • Spare Propellers (8)
•User’s Guide
Specifications
Power .......................................................................................................................
Drone...........................................................3.7V lithium polymer battery
Remote Control.............................................................4 × AAA batteries
Control Distance ............................................................................65 ft. (20m)
Specifications are subject to change and improvement without
notice. Actual product may vary from the images found in this
document.
Fly Safely
• When ying outdoors, keep the drone away from power lines,
trees, water, and other obstacles.
• When ying indoors, keep the drone away from walls, air
conditioning, air vents, fans, breakable objects, and other
obstacles.
• Do not y the drone near or at other people or animals.
• Keep eyes, hands, hair, and loose clothing away from moving
propellers.
• Adult supervision is recommended at all times.
6001381_PM_En.indd 3
8/13/2015 5:00:35 PM

4
Charge the Drone
1. Set the drone's ON/OFF switch to OFF.
2. Connect the included USB charging cable to the drone's CHG
jack and a USB power source. The USB connector LED lights red
during charging, and turns o when charging is complete.
A full charge takes about 50 minutes, and gives you up to 5
minutes ight time.
3. After charging, unplug the charging cable.
CAUTION
• Use only the included USB charging cable to charge the drone's
battery. Other cables may damage the drone.
• Always let the drone battery cool before recharging.
Lithium Battery Notes
Your drone uses a built-in lithium polymer battery for power. Follow
the instructions for charging.
•Do not charge longer than recommended. Unplug the charging cable
when the drone is charged.
• Do not puncture or crush. Do not disassemble.
• Do not dispose of lithium batteries in the trash.
• If the electrolyte in the cells should get on your skin, thoroughly wash
with soap and water. If in the eyes, rinse thoroughly with cool water.
Immediately seek medical attention.
• Do not attempt to charge or operate damaged toys.
ON/OFF
CHG
LED
6001381_PM_En.indd 4
8/13/2015 5:00:36 PM

5
Install Batteries in the Remote Control
1. On the remote control, set the ON/OFF switch to OFF.
2. Use a screwdriver to open the twin battery compartments. Then
insert four AAA batteries (not included), matching the polarities
(+and –) marked inside. Replace the cover.
Note: If the remote control’s LED ashes during use, the batteries
are low and should be replaced.
Battery Notes
• Dispose of old batteries promptly and properly. Do not burn or bury them.
Use only fresh batteries of the required size and recommended type.
• Do not mix old and new batteries, dierent types of batteries (standard,
alkaline, or rechargeable), or rechargeable batteries of dierent capacities.
• Remove batteries during longer storage periods. Batteries can leak
chemicals that can damage electronic parts.
6001381_PM_En.indd 5
8/13/2015 5:00:37 PM

6
Movement Trim
Forward /
Reverse
Throttle
Ascend
Descend
Turn right
Turn left
LED
Push
(Stunt
mode)
Multiple Fire
6001381_PM_En.indd 6
8/13/2015 5:00:37 PM

7
Slide Trim
Left /
Right
Movement Trim
Forward /
Reverse
Steering
OFF/ON
Forward
Backward
Spin right
Spin left
Push
(High/low
speed)
Single re
6001381_PM_En.indd 7
8/13/2015 5:00:38 PM

8
Pairing
Switch on and pair one drone and remote control at a time.
1. Turn on the drone. The drone's LEDs ash.
2. Place the drone on level ground.
3. Turn on the remote control. The remote control's LED ashes.
4. Move the throttle all the way up and then down to pair the
remote control with the drone. The drone’s propellers remain
still during pairing. When paired, the LEDs on both the remote
control and drone light steadily.
Note: If pairing fails, turn o the drone and remote control and repeat
the steps above, or change locations to avoid interference.
Fly Your Drone
1. After pairing, push the steering control in to switch between high
speed (double beep) and low speed (single beep).
2. With the drone on the ground, move the throttle forward to
ascend. To avoid turbulence, y the drone at least 1 ft. (30cm) o
the ground.
For advanced users: Hold the remote control with one hand,
resting your thumb on the throttle. Throw the drone about 9 ft.
(3m) away from you, and move the throttle forward to y. The
drone adjusts itself automatically and ies smoothly.
IMPORTANT: If your drone lands upside down, pull the throttle all the
way down. Wait for the propellers to stop before touching the drone.
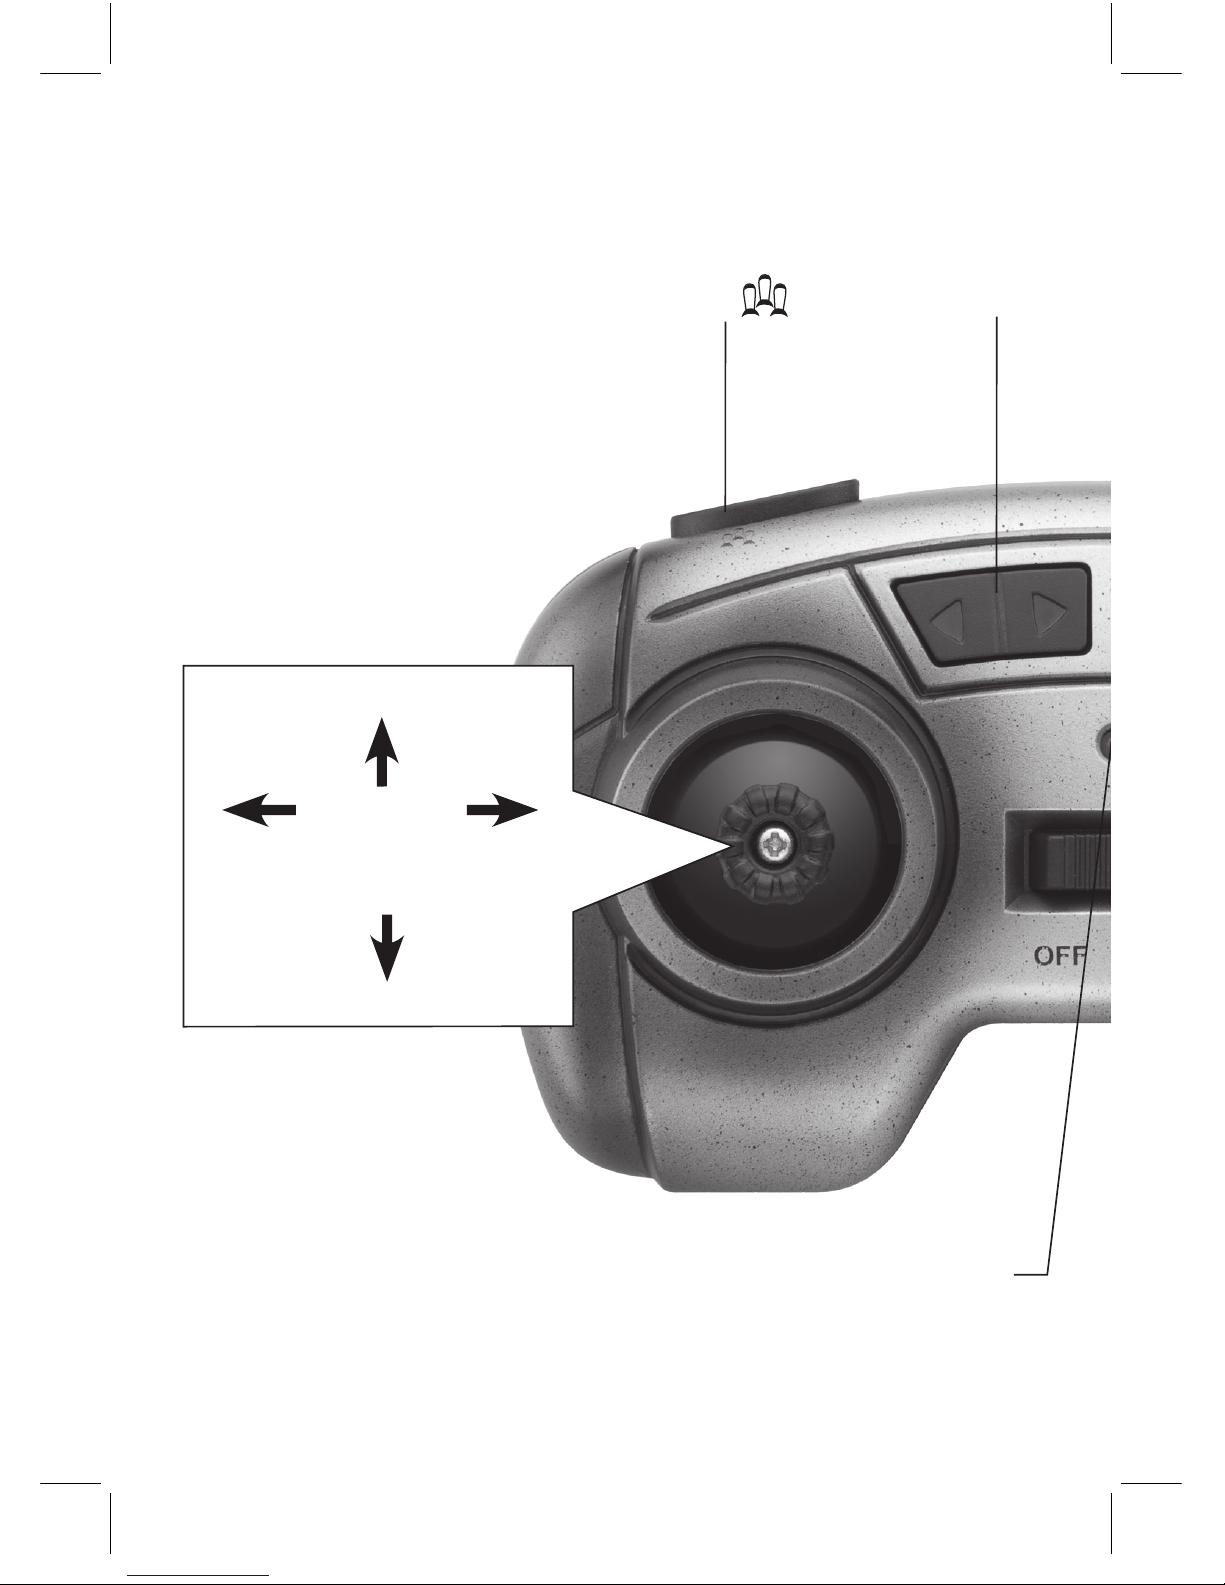
Trim Your Drone
Move the throttle forward and see how the drone reacts.
Reverse/ Forward Movement Trim: If the drone tends
to move forward, press f; if it tends to move backward,
press g.
Left/Right Slide Trim: If the drone tends to slide right,
press f; if it tends to slide left, press g.
Note: The remote control beeps when you press a trim control, but
stops beeping when you reach maximum trim adjustment.
6001381_PM_En.indd 8
8/13/2015 5:00:38 PM

9
Land Your Drone
1. Slowly move the throttle backward to descend. Avoid moving
the throttle too quickly, as it can stop the propellers instantly and
cause the drone to crash.
2. When you nish playing, turn o the remote control and drone.
Perform Stunts
CAUTION: Make sure there is enough space for the drone to
perform stunts without crashing into objects or people.
1. Push the throttle control to activate stunt mode. The remote
control beeps repeatedly.
2. Use the steering control to perform stunts:
•Front ip: Move steering forward
•Back ip: Move steering backward
•Barrel roll: Move steering right or left
3. The drone automatically exits stunt mode after performing a
stunt, or push in the throttle control again to exit immediately.
Dogfight!
Battle with a friend. You will
need to y within close range
to shoot deadly infrared
missiles.
Each player has 3 lives per
challenge. First drone to lose
all 3 lives goes down!
1. Use the throttle and
steering controls to y
and hover close. When
within 16 ft of your
opponent, level to re.
• Press and hold for a rapid volley, or
•Press to shoot single re.
IR sensor
Maximum
distance 16 ft (5m)
6001381_PM_En.indd 9
8/13/2015 5:00:39 PM

10
2. When your drone is hit, the LEDs blink and the drone shakes and
spins.
• After receiving a third hit, the casualty drone will automatically
slowly descend and land.
3. Never give up. Move throttle forward to take o for another battle!
Replace Damaged Propellers
The left and right propellers
of the drone are dierent, and
marked A/B on the propeller.
You must use the correct
propeller in the correct
location.
To replace a damaged
propeller, remove the old one
and press the new one onto
the propeller axle. If you cannot
remove the old propeller by
hand, use pliers.
WARNING:
• To avoid injury and damage, check the propellers for nicks and
breaks and make sure they are securely attached before and after
each ight. Replace any damaged propellers.
• Use only the supplied propellers. Do not alter, modify, or
customize the propellers.
B
B
A
A
6001381_PM_En.indd 10
8/13/2015 5:00:39 PM

11
Troubleshooting
Drone does not respond
• Make sure the drone and remote control are switched on and
paired.
• Avoid pairing both drones at the same time within 10 feet as this
causes interference. Pair each drone with its matching remote
control individually.
• Drone battery maybe low. Fully charge the battery. See “Charge
the Drone.“
• Remote control batteries maybe low. Replace the batteries.
• Make sure the drone is within the control range (65 ft) and in line
of sight.
• In battle mode, make sure you y within IR range (16 ft), and level
with your opponent to shoot. Stage your battles indoors to avoid
strong sunlight which aects IR reception.
Drone difficult to control
• The throttle control is very sensitive. Use small, ne movements
to control.
• Propellers maybe bent. Adjust propellers by hand. If you cannot
adjust them, replace with the spare propellers.
• Practice in low speed mode. See “Fly Your Drone."
• The gyroscope inside your drone may need calibrating:
Calibrate Your Drone
1. With your drone and remote control switched on and paired,
place the drone on level ground.
2. Move the throttle all the way down.
3. Move the steering forward and hold this position for a few
seconds until the drone LEDs start to blink.
4. Release the steering. The drone LEDs light steadily, indicating
successful calibration. You are now ready for takeo.
•See “Trim Your Drone" to ne tune hovering and movement to
further improve control of your drone after calibration.
6001381_PM_En.indd 11
8/13/2015 5:00:39 PM

12
FCC Information
This equipment has been tested and found to comply with the limits for a Class B digital
device, pursuant to Part 15 of the FCC Rules. These limits are designed to provide
reasonable protection against harmful interference in a residential installation. This
equipment generates, uses, and can radiate radio frequency energy and, if not installed
and used in accordance with the instructions, may cause harmful interference to radio
communications. However, there is no guarantee that interference will not occur in a
particular installation. If this equipment does cause harmful interference to radio or
television reception, which can be determined by turning the equipment o and on, the
user is encouraged to try to correct the interference by one or more of the following
measures:
• Reorient or relocate the receiving antenna.
• Increase the separation between the equipment and receiver.
• Connect the equipment into an outlet on a circuit dierent from that to which the
receiver is connected.
• Consult the dealer or an experienced radio/TV technician for help.
If you cannot eliminate the interference, the FCC requires that you stop using your
equipment. Changes or modications not expressly approved by the party responsible
for compliance could void the user’s authority to operate the equipment.
This device complies with Part 15 of the FCC Rules. Operation is subject to the
following two conditions: (1) this device may not cause harmful interference, and (2) this
device must accept any interference received, including interference that may cause
undesired operation.
6001381_PM_En.indd 12
8/13/2015 5:00:39 PM

13
Limited Warranty
General Wireless Operations Inc., doing business as RadioShack (hereafter
“RadioShack”) warrants this product against defects in materials and workmanship
under normal use by the original purchaser for ninety (90) days after the date of
purchase from a RadioShack-owned store or an authorized RadioShack franchisee or
dealer. RADIOSHACK MAKES NO OTHER EXPRESS WARRANTIES.
This warranty does not cover: (a) damage or failure caused by or attributable to abuse,
misuse, failure to follow instructions, improper installation or maintenance, alteration,
accident, Acts of God (such as oods or lightning), or excess voltage or current; (b)
improper or incorrectly performed repairs by persons who are not a RadioShack
authorized service facility; (c) consumables such as fuses or batteries; (d) ordinary wear
and tear or cosmetic damage; (e) transportation, shipping or insurance costs; (f) costs
of product removal, installation, set-up service, adjustment or reinstallation; and (g)
claims by persons other than the original purchaser.
Should a problem occur that is covered by this warranty, take the product and the
RadioShack sales receipt as proof of purchase date to any RadioShack store in the U.S.
RadioShack will, at its option, unless otherwise provided by law (a) replace the product
with the same or a comparable product, or (b) refund the purchase price. All replaced
products, and products on which a refund is made, become the property of RadioShack.
RADIOSHACK EXPRESSLY DISCLAIMS ALL WARRANTIES AND CONDITIONS NOT
STATED IN THIS LIMITED WARRANTY. ANY IMPLIED WARRANTIES THAT MAY BE
IMPOSED BY LAW, INCLUDING THE IMPLIED WARRANTY OF MERCHANTABILITY
AND, IF APPLICABLE, THE IMPLIED WARRANTY OF FITNESS FOR A PARTICULAR
PURPOSE, SHALL EXPIRE ON THE EXPIRATION OF THE STATED WARRANTY
PERIOD.
EXCEPT AS DESCRIBED ABOVE, RADIOSHACK SHALL HAVE NO LIABILITY OR
RESPONSIBILITY TO THE PURCHASER OF THE PRODUCT OR ANY OTHER PERSON
OR ENTITY WITH RESPECT TO ANY LIABILITY, LOSS OR DAMAGE CAUSED DIRECTLY
OR INDIRECTLY BY USE OR PERFORMANCE OF THE PRODUCT OR ARISING OUT
OF ANY BREACH OF THIS WARRANTY, INCLUDING, BUT NOT LIMITED TO, ANY
DAMAGES RESULTING FROM INCONVENIENCE AND ANY LOSS OF TIME, DATA,
PROPERTY, REVENUE, OR PROFIT AND ANY INDIRECT, SPECIAL, INCIDENTAL, OR
CONSEQUENTIAL DAMAGES, EVEN IF RADIOSHACK HAS BEEN ADVISED OF THE
POSSIBILITY OF SUCH DAMAGES.
Some states do not allow limitations on how long an implied warranty lasts or the
exclusion or limitation of incidental or consequential damages, so the above limitations
or exclusions may not apply to you. This warranty gives you specic legal rights, and you
may also have other rights which vary from state to state.
Contact General Wireless Operations Inc. at:
RadioShack Customer Relations
300 RadioShack Circle
Fort Worth, TX 76102 07/15
www.radioshack.com
6001381_PM_En.indd 13
8/13/2015 5:00:39 PM

© 2015 General Wireless Operations Inc.
All rights reserved. RadioShack is a registered
trademark used by General Wireless Operations Inc.
Printed
in China
08A15
6001381
Complies with the European Union’s “Restriction of Hazardous
Substances Directive,” which protects the environment by restricting
specic hazardous materials and products.
6001381_PM_En.indd 14
8/13/2015 5:00:39 PM
Table of contents
Other Radio Shack Drone manuals

Radio Shack
Radio Shack VEGADRONE User manual

Radio Shack
Radio Shack Dominator User manual

Radio Shack
Radio Shack SURVEYOR User manual

Radio Shack
Radio Shack 2770422 User manual

Radio Shack
Radio Shack Vektor Drone User manual

Radio Shack
Radio Shack Zeraxa 2.0 User manual

Radio Shack
Radio Shack FLIP FLOP STUNT DRONE User manual

Radio Shack
Radio Shack 2770422 User manual

Radio Shack
Radio Shack Zeraxa 6001352 User manual

Radio Shack
Radio Shack Surveyor Drone User manual