CHEFOOK CHFPC500EKO User manual

CHFPC500EKO
CHFPC600EKO
CHFP2C700
12
INDEX
1. Contents
2. Introduction
3. Precautions and safety instructions before the initial start-up
4. Technical Features of Chest Freezers
5. Assembly Chest Freezers /The Initial start-up
6. Operating the Chest Freezers
7. Cleaning and Maintaining Chest Freezers
8. Trouble shooting
9. Compliance Norms

13
2. INTRODUCTION
Please read this operating manual carefully before you start operating your freezer in order lo ensure
maximum efficiency from this product that has been manufactured lo serve you aver the years.
These chest freezers are intended far storage, usage or sale of packed frozen food directly from a freezing
unit in trading enterprises and restaurants kitchens, cafes, food shops, booths and the markets.
In all of the manufacturing processes
“environmentally friendly”
technologies are used as well as
materials and refrigerants that are not harmful to the nature.
As an initial step, please carefully read this manual thoroughly in order to ensure maximum efficiency
from your freezer and prevent user defects.
Detect the chest freezer immediately on delivery far any damage. In case of any damage, contact with your
authorized dealer within 24 hours.
Attention!
It requires a lapse of minimum 2 hours after any transportation before you start operating the
freezer.
3. PRECAUTIONS AND SAFETY INSTRUCTIONS BEFORE THE INITIAL START-UP
Your chest freezer must be plugged certainly in an earthed wall socket.
Before operating the freezer, ensure that the mains socket is checked for proper earthing (grounding)
as well as nominal voltage and frequency requirements by the authorized service staff or a qualified
electrician.
If the supply card is damaged, it must be replaced by the manufacturer or its authorised service or a
similarly qualified person in order to avoid any hazard.
The nominal voltage and frequency requirements far the freezer are specified on the data plate.
Never make any repairs or carry out maintenance when the chest freezer is plugged in.
Do not position the freezer in a place close lo a source of strong heat or exposed lo direct sunlight. The
appliance can be used in an ambient temperature of max. 32 °C.
Unless otherwise stated, do not place your cooler to open areas where water can leak in.
Do not wash with pressurized water or hose when cleaning the product and its surroundings, use a wet
cloth. Otherwise, the water which may intrude into the electrical components of the product can cause
electric shock and fire risk.
Do not let children get into and play around the freezer. Keep the freezer key and plastic bags covering the
accessories and the Manuel in a safe place out of reach of children.
Do not place any explosives and flammables in the chest freezer far safety reasons.
Before the initial start up, clean the interior of the freezer and insert the interior drain tap.
Avoid opening the lid frequently and aver loading the body exceeding the maximum load line.
This appliance is not intended for use by persons (including children) with reduced physical, sensory or
mental capabilities, or lack of experience and knowledge, unless they have been given supervision or
instruction concerning use of the appliance by a person responsible for their safety.
Children should be supervised to ensure that they do not play with the appliance.
14
Please check your refrigerant gas type from the rating label:
Only far the models with
R600a or R290 gas
:
R600a/R290 gas is used in some models, explained in this instruction manual. R600a/R290 is an
environmentally friendly gas and used in appliances which have effective cooling technology.
This gas is flammable only under certain conditions. You must follow up the following rules if you wish to
get normal operating conditions:
WARNING:
Keep ventilation openings, in the appliance enclosure or in the built-in structure, clear of
obstruction.
WARNING:
Do not use mechanical devices or other means to accelerate the defrosting process.
WARNING:
Do not damage the refrigerant circuit.
WARNING:
Do not use electrical appliances inside the food storage compartments of the appliance. Do
not tangle with the device due to maintenance, repair or any other reasons other than authorized service.
Plug off the device against any possible freezing or icing and leave far defrosting.
Choose original components for all parts necessary for replacement on the product.
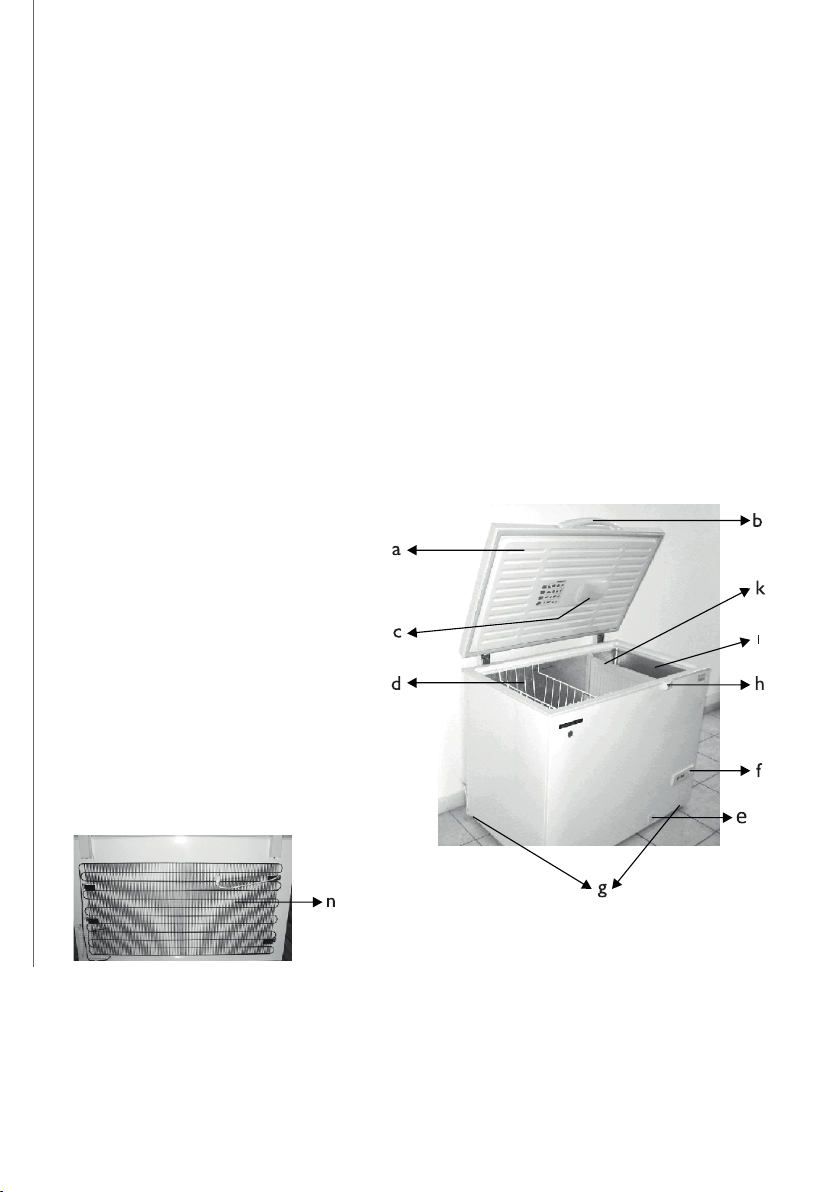
4. TECHNICAL FEATURES OF CHEST FREEZERS
a - Lid
b - Handle
c - Internal Lighting Cover (optional)
d - Storage Basket
e - Water Drainage
f - Control panel
g - Adjustable feet
h - Locking Mechanism (optional)
i - Fast Freeze Compartment
k - Separator
n - Back Condenser
15
TECHNICAL FEATURES FR200PSK FR300PSK FR400PSK FR500PSK FR600PSK
Operating Temperature °C -18/-24 -18/-24 -18/-24 -18/-24 -18/-24
Energy Consumption KWh/24h
Please see the name platePower W
Voltage/ Frequency V/hz
Exterior Dimensions L x W x H 724x720x845 1014x720x845 1304x720x845 1554x720x845 2055x720x845
lnterior Dimensions L x W x H 600x510x675 890x510x675 1180x510x675 1430x510x675 1930x510x675
Gross Volume L190 295 400 490 655
Net Volume L175 272 371 455 607
Noise Output dBa 50 56 69 74 53,2
Name plate is located on the back side of the cabinet.
Please see the back page of the guide for the Type label sample.
5. ASSEMBLING CHEST FREEZERS /THE INITIAL START UP
Remove the plastic blockings inserted between the lid and the body.
Air circulation at the rear and at the side is required for the body to operate efficiently.
Allow minimum 10 cm of space from the sides and the rear in order to ensure proper air circulation.
6. OPERATING THE CHEST FREEZER
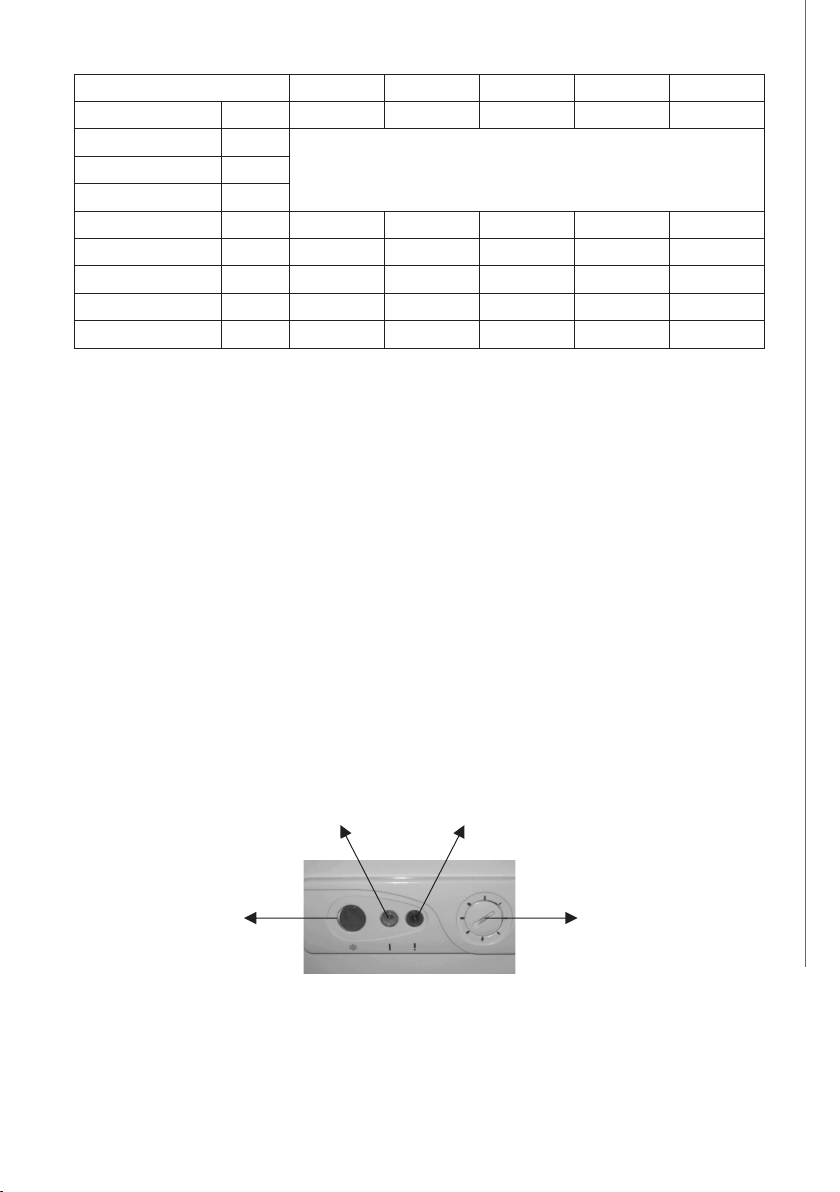
Control panel:
•Green Light (in the middle): It indicates that there is electric current to your chest freezer and it is
operating
•Red Light (on the right): If it is on this indicates that the interior temperature of the chest freezer is not
at the desired limit value.
•Yellow Switch Button (on the left): It is the fast freeze button.
•Thermostat setting knob
Power On Light - Green Temperature alarm - Red
Freeze Button - Yellow Thermostat Setting Knob
Thermostat Setting:
Thermostat is set to maximum during manufacturing. You can easily adjust the thermostat knob by the
help of a coin from the 1. Level (warmest) up to the 7. Level (coldest).
Make the thermostat setting considering the seasonal changes, food load in the freezer and the ambient
16
conditions under which it is operated.
Fast Freeze:
fast freeze mode can be activated for up to 24 hours by pressing the yellow button. With this active mode,
the compressor is in continuous operation. Do not adjust the thermostat. To turn off, press the yellow
button again.
Packing
WARNING!
When you open the freezer while it is in operation, the hot air in the room will enter into it and
if you close the lid, it will have a vacuum packaged that will prevent its reopening. Wait about 60 seconds
and try again.
Storing Foods:
Place the products which are going to be stored longer in the bottom part of the conservator and those
which are intended for realization in the top part of the conservator.
Maximum Load Line
In order to gain maximum benefit from the chest freezer and ensure proper food storage, leave enough
space between the top lid and the food packages. Therefore never exceed the maximum load line marked
in the body.
17
7. CLEANING AND MAINTAINING CHEST FREEZER
To ensure higher efficiency of your chest freezer, the body must be cleaned and maintained at least once
in a year.
Always remove the plug from the mains socket before cleaning the body.
Defrosting:
It will take longer to form ice crystals interior if the lid of the body is not frequently opened and foods are
stored in closed packages.
Ice forming on the interior walls of your chest freezer decreases the efficiency of your freeze within time.
We recommend that you defrost the body when the ice reaches 5-6 mm of thickness. Set your freeze to
fast freeze mode 24 hours before you start defrosting. Then remove the packages and wrap them separate-
ly and put in the freezer compartment of your fridge to prevent heat gain. So foods will be well preserved
during defrosting and cleaning.
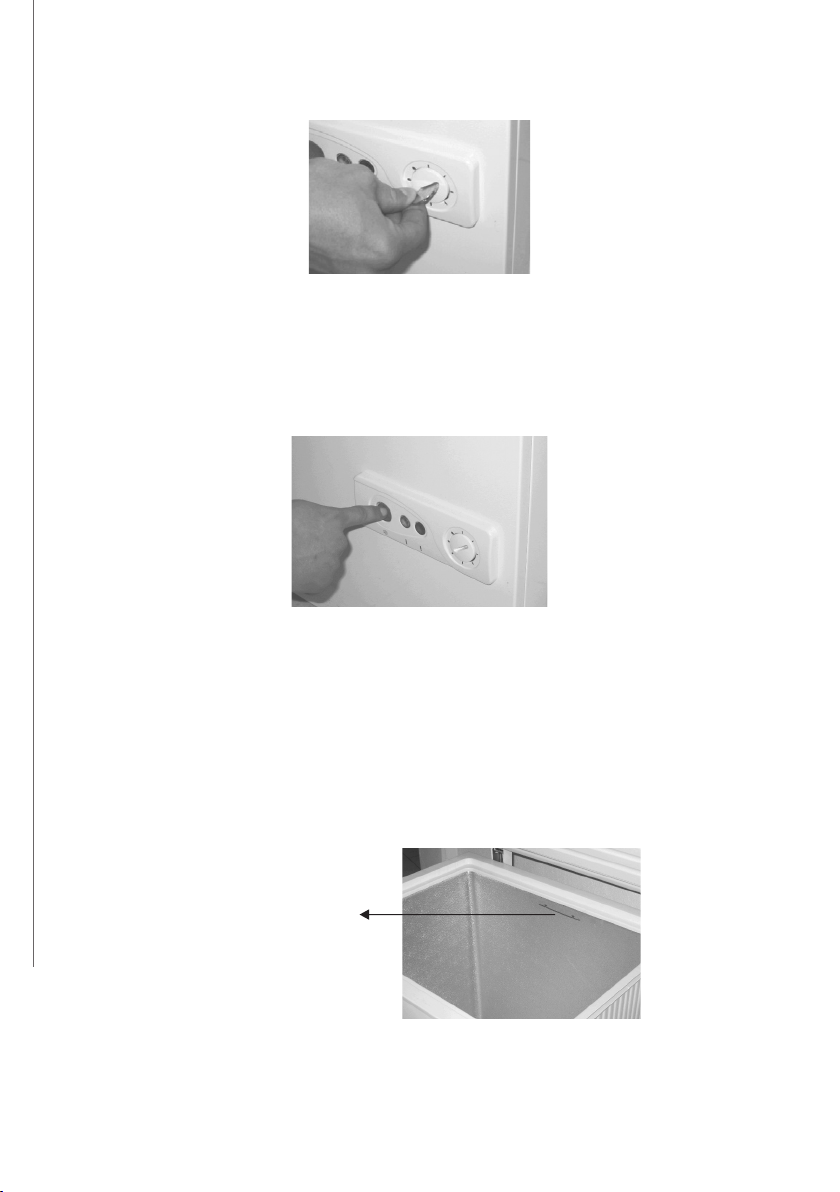
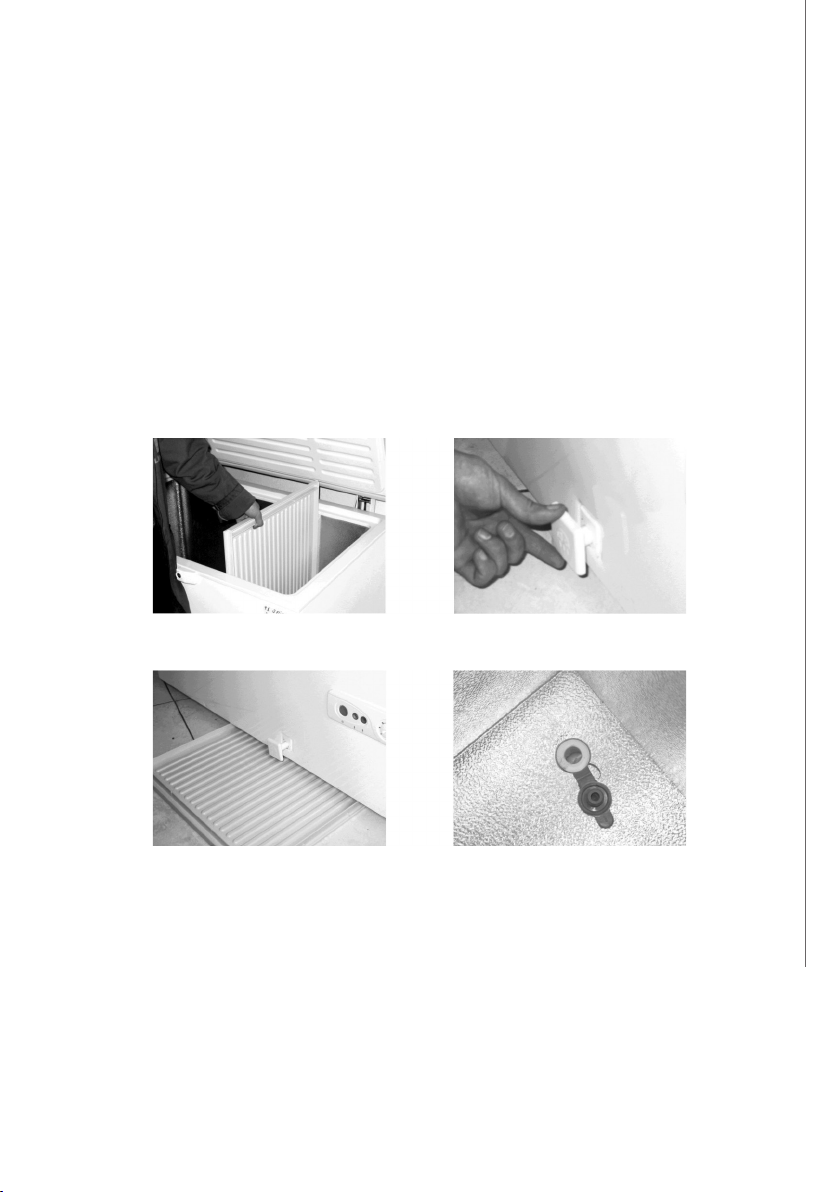
Picture A Picture B
Picture C Picture D
Follow the steps described to drain the water that may have accumulated on the floor of your chest freezer
during defrosting:
Step 1. Pull out the separator of the chest freezer (Picture A) and place it under the exterior water drain
tap. (Picture C).
Step 2. The exterior drain tap is placed on the front at the bottom of your freezer. Rotate it 90 ° to left
(quarter rotation), pull it out for 2-3 cm and leave it (Picture B). If you want to accelerate water draining,
you can remove the tap.
Step 3. Remove the rubber tap on the floor of the body. (The tap is fixed to the floor sheet therefore do
not exert force. (Picture D)

18
Attention!
Never use any hot water, electrical heater, sharp tools or similar things as they may harm the
chest freezer.
Replacing the Electric Bulb
If the light bulb does not function anymore, always unplug the chest freezer from the mains before replac-
ing it. Push in the notched lamp cover on the long sides and pull it up. Rotate the electric bulb, take it off
and replace it with a new one ma x 15 Watts. Place the lamp cover back. Plug in the freezer for further use.
Holidays-Non Working Days /Stop Using For A WHILE:
Do not unplug your chest freezer if you are going to stop usage & x for a short time.
If you are going to stop usage and expluatation for a long lime, unplug the freeze and empty it. After
defrosting, clean the chest freezer and wipe it out with a cloth. Leave the lid open to prevent door in the
chest freezer.
Transporting your freeze:
Before relocating the body, unplug ii from the mains socket, defrost ii, wipe the
interior walls and floor with a damp cloth, place the plastic blockings between the top lid and the body
and carry it in the normal position as it is used.
Attention:
Expansion gas (C-Pentane) is used in the insulation system of the freezer. When you dispose
the freezer, it is required to observe the applicable laws and rules of the country in which it is used.

19
8. TROUBLE SHOOTING
•
If the Red Signal on the control panel is steadily on:
It indicates that the compressor is broken
•
If the compressor continuously functions:
Check if the ambient temperature is above 32°C. Check if the
walls of the freezer are covered with a sheet of ice and if the lids have been left open.
•
If the Green power light is off and the freeze does not function:
Check if there is power failure or the
freezer is properly plugged.
•
If your freeze functions loudly:
Check if the feet are properly levelled.
•
If there is door in your chest freezer:
Clean your freezer as soon as possible.
•
If there are tears on the frame of your freeze:
Temporary tears can occur in intensively moisturized
environments. This is normal.
After having checked the above-mentioned points and carried out the recommendations, if your chest
freezer still functions unsatisfactorily, contact the nearest authorized service.
9. COMPLIANCE NORMS
Chest freezers described in this manual are manufactured and inspected in compliance with the
TS 2225 EN 60335-2-24
TS EN ISO 15502
I EC 60335-2-24
2006/95/EC
2004/108/EC norms.

Chefook
Viale dell'industria, 23 - 35023 - BAGNOLI DI SOPRA (PD)
Tel. +39.049.5342967 - Whatsapp +39.366.8630408
e-mail: [email protected]
web site: www.chefook.com
CHEF
This manual suits for next models
2
Table of contents
Other CHEFOOK Commercial Food Equipment manuals


