CHEFOOK 029801 FOX AUTO Instruction Manual

20
AUTHORISED RETAILER
AUTOMATIC MEAT TENDERISER
029801 FOX AUTO
USER AND MAINTENANCE INSTRUCTIONS
Ed. 002 05/2021

2 19
English
7.4 - WEEE (Waste Electrical and Electronic Equipment) regulations
Pursuant to Art. 13 of Italian Legislative Decree No. 151 of 25 July 2005
“Implementation of Directives 2002/95/EC, 2002/96/EC and 2003/108/EC
relating to the reduced use of hazardous substances in electrical and
electronic devices, and to waste disposal”.
The crossed-out wheelie bin symbol on the equipment or on its packaging
indicates that the product must be disposed of separately from other waste at the
end of its useful life.
The separate waste collection of this device at the end of its life is organised and
managed by the manufacturer. The user who wishes to dispose of this device
must contact the manufacturer and follow the given instructions to ensure that the
separate waste collection procedure is observed at the end of the equipment’s
useful life.
The correct disposal of the device for the subsequent recycling, management and
treatment of its parts in an environment-friendly way helps to prevent possible
adverse effects on the environment and promotes the reuse and/or recycling of its
constituent materials.
Unlawful disposal of the product by the user shall imply the application of
administrative penalties under current law.

18
7.3.2 - Removing the blade pack (Fig. 7.2.2)
To remove the blade pack, proceed as follows:
- Wear Kevlar safety gloves that meet accident-
prevention criteria.
- Loosen the two knobs (2) fastening the scraper
and remove them.
- Grip the scraper (3) (from in front of the
machine) and pull it towards yourself until it
slides off.
- Loosen the two knobs on the slide (4).
- Grip the blade pack (5) with both hands from the
sides.
- Turn it with the blade tips towards yourself by
levering it on the fixing point, detach it and pull it
out.
7.3.3 - Removing the chopping board
(Fig. 7.2.3)
From the front of the machine grip the handle of
the chopping board (7) and pull it towards yourself
by sliding the board along the slit on the base.
Move it slightly to make the pin come out of the
hole and extract the chopping board.
3
Fig. 7.2.2
4
2
5
Fig. 7.2.3
6
7
3
English
CONTENTS
1. Delivery and warranty 4
1.1 Introduction
1.2 Storing and using this manual
1.3 Warranty
1.4 Machine description
1.5 Intended use
1.6 Improper use
1.7 Specific equipment details
1.7.1 Warning and danger signs
1.8 Guards and safety devices
1.9 Work position
2. Technical specifications 9
2.1 Main parts
2.2 Technical characteristics
2.3 Machine dimensions and weight
2.4 Noise level emitted
2.4 Wiring diagrams
2.4.1 Single-phase wiring diagram
2.4.2 Three-phase wiring diagram
3. Controls and indicators 13
3.1 List of controls and indicators
4. Factory testing, shipping, delivery and installation 13
4.1 Factory testing
4.2 Delivery and handling
4.3 Installation
4.3.1 Installation
4.3.2 Disposal of packaging
4.3.3 Handling the machine
4.4 Electrical connections
4.4.1 Three-phase machine
4.4.2 Single-phase machine
5. Start-up and shutdown 15
5.1 Verification of the correct electrical connection
5.2 Verification of the presence and efficiency of guards and safety devices
5.3 Verification of the efficiency of the emergency stop button
5.4 Machine start-up
5.5 Machine shutdown
6. Using the machine 16
6.1 Safety instructions
6.2 Using the machine
7. Maintenance 17
7.1 Safety instructions
7.2 Lubrication
7.3 Cleaning the machine
7.3.1 Removing the plexiglass cover (Fig. 7.2.1)
7.3.2 Removing the blade pack (Fig. 7.2.2)
7.3.3 Removing the chopping board (Fig. 7.2.3)
7.4 WEEE (Waste Electrical and Electronic Equipment)
8. Malfunctions and remedies 20
8.1 Malfunctions: causes and remedies

4
1 - Delivery and warranty
1.1 - Introduction
CAUTION!
The symbols used in this manual draw the reader’s attention to points and
operations that are hazardous to the operator’s personal safety or that risk
damaging the machine.
Do not use the machine unless you have read and properly understood these
notes.
CAUTION!
For reasons of clarity, some of the illustrations appearing in this manual show the
machine or parts of it with its panels or guards removed.
Never use the machine in this condition; only use it when it is fully equipped with
the guards and in good working order.
The manufacturer forbids the reproduction, even partial, of this manual or the use
of its contents for purposes other than those expressly allowed.
Any breach in this regard shall be punishable by law.
1.2 - Storing and using this manual
This manual uses text and illustrations to familiarise users with the machine and
explain the instructions and essential criteria for its transport, handling, use and
maintenance. Read this manual carefully before using the machine. Store this
manual with care near the machine so that it can be readily available for future
reference.
If the manual is lost or damaged, you can request a copy from your dealer.
If you sell the machine, report the new owner's identification and address to the
manufacturer.
The manual reflects the state of knowledge at the time of sale of the machine, and
cannot be considered inadequate in the light of more recent experience and
updates. The manufacturer reserves the right to update the products and manuals
without being obliged to update previous products and manuals, except in
exceptional circumstances. In case of doubt, contact your local service centre or
the manufacturer.
The manufacturer is committed to continuously improving its products. For this
reason, the manufacturer welcomes any reports or proposals geared towards
improving the machine and/or the manual. The machine is delivered to the
customer with the warranty conditions applicable at the time of sale.
Please contact your dealer for any further information.
1.3 - Warranty
The user is not authorised to tamper with the machine in any way.
Contact your dealer if you encounter any anomalies.
Any attempt to dismantle, modify or tamper with any part of the machine by the
user or unauthorised personnel will immediately void the Declaration of
Conformity drawn up pursuant to Directive 2006/42/EEC and the warranty, and
17
English
7 - Maintenance
7.1 - Instructions
CAUTION!
Maintenance and cleaning must always be carried out with the machine at a
standstill and disconnected from the mains power supply.
Always keep the maintenance zone clean and dry.
Do not allow unauthorised persons to intervene on the machine.
Parts and tools must be replaced using original spare parts at authorised service
centres.
The blade pack must be handled while wearing Kevlar safety gloves that meet
accident-prevention criteria.
The machine is not designed to operate inside a cold room: this could
seriously damage the electrical components sensitive to condensate (which
forms at low temperatures) and also alter the viscosity of the grease and/or
lubricating oil in the gearbox housed inside it, jeopardising the machine’s
correct operation and causing potential failures.
7.2 - Lubrication
The shaft and the sliding rods should be greased using vaseline grease for
improved sliding of the slide.
7.3 - Cleaning the machine
CAUTION!
Disconnect the machine from the mains power supply before cleaning it.
Do not clean the machine using a water jet.
Only use non-toxic detergents specifically formulated for cleaning components
used with foodstuffs.
The blades are made of grade AISI 420 steel and may rust if they are not dried
after washing them.
The blade pack must be handled while wearing Kevlar safety gloves that meet
accident-prevention criteria.
7.3.1 - Removing the plexiglass cover (Fig. 7.2.1)
To remove the plexiglass protection, proceed as follows:
- Grip the cover (1) and lift it until it lies vertical.
- Slide the cover off the pins towards the left.
Fig. 7.2.1
1

16
6 - Using the machine
6.1 - Instructions
CAUTION!
Only authorised personnel may intervene on the machine.
Before using the machine, the operator must ensure that all guards are in place
and that the safety devices are present and working efficiently.
If this is not the case, switch the machine off and contact the maintenance
supervisor.
The product to be tenderised must have the right size so that it fits beneath the
scraper and must not protrude from the chopping board.
The blade pack must be handled while wearing Kevlar safety gloves that meet
accident-prevention criteria.
CAUTION! The product to be tenderised must have a maximum height
of 10 cm and must not protrude from the chopping board.
6.2 - Using the machine
-Verify that the supply voltage matches the value shown on the rating plate.
-Make sure that the product to be tenderised does not have any rind, bones or
nerves that can ruin the blades.
-Open the front panel and place the product on the chopping board.
-Close the front panel and start the machine by pressing the ON button. The
blade pack will start moving.
-Grip the handle of the chopping board and move it forward and back along the
slit on the chopping board. Thanks to the sliding pin located under the chopping
board, the latter can be shifted forward and back, but also turned to the right and
left. By moving in this way the blades can tenderise the entire product.
-Switch the machine off using the OFF button: the blade pack will return to its
initial position and the machine will stop.
-Extract the tenderised product.
5
English
relieves the manufacturer of any liability for damages deriving from such action.
The manufacturer is also relieved of all liability for the consequences of:
-incorrect installation;
- improper use of the machine by inadequately trained personnel;
- use of the machine in breach of local regulations;
-lack of or negligent maintenance;
-use of non-original spare parts, not specified for the model in question;
-total or partial failure to follow the instructions.
1.4 - Machine description
The meat tenderiser you have purchased is a straightforward, compact machine
guaranteeing powerful operation and efficient performance.
-Since the product must be used with food products, all components that can
come into contact with it have been carefully chosen to guarantee the utmost
hygiene.
-The chopping board is made of stainless steel and can be easily removed for
guaranteeing maximum hygiene and facilitating cleaning operations.
-The blade pack is made of grade AISI 420 steel and can be easily removed to
ensure long-lasting operation and maximum hygiene.
-Electronic control of the absorption for monitoring the forward movement of the
shaft.
-Ventilated motors offering the following advantages:
extremely constant performance and long motor life;
longer actual work time thanks to fewer interruptions;
low level of heating so that the meat stays constantly fresh and unaltered.
This equipment conforms to the essential safety and health requirements set out in
Directive 2006/42/EC and to the requirements of Directives 2014/30/EU, 2014/35/
EU, 2006/42/EC, 2011/65/EU (RoHS) and Regulation (EC) 1935/2004.
If any accident occurs, the manufacturer shall not be held liable if the machine has
been modified, tampered with, had its safety guards removed or is used for
purposes other than the intended use specified by the manufacturer.
1.5 - Intended use
The machine was designed and manufactured for tenderising slices of meat.
It must be used in a professional setting by qualified operators who have read and
understood this manual. Use the machine exclusively when it is securely placed on
a solid worktable.
1.6 - Improper use
The machine must only be used for its intended purposes; in particular:
- Do not use the machine for tenderising food products other than meat.
- Do not use the machine unless it has been properly installed with all its guards in
good working order and correctly fitted, to prevent the risk of serious injury.
- Do not use or store the machine inside a cold room: this could seriously damage
the electrical components sensitive to condensate (which forms at low
temperatures) and also alter the viscosity of the grease and/or lubricating oil in

6
the gearbox housed inside it, jeopardising the machine’s correct operation and
causing potential failures.
- Do not access any of the electrical components without having first disconnected
the machine from the mains power supply: risk of electric shock.
- Do not process products that are too large to be fully contained under the blade
pack.
- Do not wear clothing which does not comply with safety regulations. Consult
your employer for information on the applicable safety regulations and the
personal protective equipment to be worn.
- Do not start the machine if it has a fault.
- Before using the machine, make sure that any potentially hazardous conditions
have been adequately eliminated. If you notice anything unusual in its operation,
shut down the machine and inform the maintenance supervisors.
- Do not allow unauthorised persons to work on the machine.
In case of injury caused by electric shock, the first thing to do is to detach the
injured person from live conductors (as the person will probably be unconscious).
This is highly hazardous.
In this instance, the injured person is also a live electrical conductor; touching them
directly would mean suffering electric shock.
It is advisable to disconnect the contacts directly from the line’s power supply
valve; should this not be possible, move the victim away using insulating material
(wooden or PVC sticks, fabric, leather, etc.).
First-aid medical assistance should be requested promptly and the injured person
should be taken to hospital.
1.7 - Specific equipment details
Citing the “Model”, “Serial number” and “year of manufacture” of the machine
will help our technical assistance service to respond to your requests rapidly and
effectively. We recommend specifying the machine model and serial number
whenever you contact the technical assistance service.
This information appears on the rating plate shown in Fig. 1.7.1. As a reminder, we
suggest writing the data of the machine you have purchased in the table below:
Machine Model………………………..
Serial number…………………………
Year of construction…………………
Type……………………………………
15
English
5 - Start-up and shutdown
5.1 - Verification of the correct electrical connection
- Connect the plug to the mains power supply.
-Set the residual-current switch to “I”.
-Press the ON button. The blade pack will start moving down and up.
5.2 - Verification of the presence and efficiency of guards and safety
devices
1 - With the machine running, open the front
panel “1” Fig. 5.2.1. The machine must stop
instantly.
2 - With the machine running, press the
mushroom-head emergency button “2” Fig
5.2.1.
The machine must stop instantly.
3 - Check that the stainless steel casing “4” Fig
5.2.1 is intact and rigidly fastened.
5.3 - Verification of the efficiency of the emergency stop button
With the machine connected to the mains electricity and the accessory tool
moving, press the OFF button (Ref. 5 Fig. 5.2.1).
The blade pack must return to its initial position and the machine must stop.
5.4 - Machine start up
To start the machine, simply press the ON button (Ref. 6 Fig. 5.2.1). Start the
machine only after properly connecting the plug to the mains power supply.
5.5 - Machine shutdown
To stop the machine, simply press the OFF button (Ref. 5 Fig. 5.2.1). The blade
pack will return to its initial position and the machine will stop.
Fig. 5.2.1
1
4
2
6
5

14
Remove the cellophane wrapping and any other packaging present inside.
4.3.2 - Disposing of packaging material
The packaging materials (cardboard, nylon, wood, etc.) can be regarded as solid
urban waste, which means that they can disposed of freely.
If the machine is delivered to a country where special regulations apply, dispose of
the packaging accordingly.
4.3.3 - Handling the machine
Lift the machine up using a forklift truck with adequate
load-bearing capacity.
Check the stability and position of the load on the forks,
particularly along uneven, slippery or inclined surfaces.
When moving the load, keep it as low as possible in
order to ensure better stability and visibility. Widen the
forks on the forklift truck in order to stabilise the load as
much as possible.
At least two operators are required to move the
machine manually.
4.4 - Electrical connections
CAUTION!
Check that the power supply line has the same specifications as those shown on
the machine’s rating plate. All interventions must be carried out solely by
specialised personnel expressly authorised by the relevant supervisor. Make the
connection to a power line equipped with an efficient earthing socket.
4.4.1 - 380 V-50 Hz three-phase machine
and 220 V-50 Hz three-phase machine
In these configurations, the machine is supplied with a power cord with 4 x 1.5 mm
gauge.
This cord is connected to a three-phase plug with
three pins + earth. Attach the cord to the three-
phase power supply line by installing a 16 A
residual current circuit breaker in between.
4.4.2 - 220 V-50 Hz single-phase machine
In this configuration, the machine is supplied with a power cable with
3 x 1.5 mm gauge. This cable is connected to a single-phase plug
with three pins. Attach the cable to the 220 V-50
Hz single-phase power supply line by installing
a 16 A residual current circuit breaker in
between.
Consult the manufacturer for configurations
differing from those mentioned above. If the power cable needs to
be extended, use a cable of the same gauge as the original cable
installed by the manufacturer.
Fig. 4.3.1
7
English
CAUTION! Do not alter the data on the rating plate for any reason.
1.7.1 - Warning and danger signs (Fig. 1.7.2)
CAUTION!
Do not intervene on the electrical components when the machine is connected to
the mains power supply. You risk getting an electric shock.
Observe the warnings signalled by the signs. Failure to do so could lead to
personal injury.
Make sure that the signs are always present and legible.
If they are not, apply or replace them.
A = Machine model
B = Power supply
C = Motor power
D = Motor frequency Hz
E = Weight
F = Amperage
G = Year of construction
H = Serial N°
I = Manufacturer
L = Bar code
A
B C
D E
F G
H
I
L
Fig. 1.7.1
Fig. 1.7.2

8
1.8 - Guards and safety devices
CAUTION!
Before using the machine, make sure that its safety devices are properly
positioned and in good working order.
Check that they are present and work properly at the start of each shift. If not,
notify the maintenance supervisor.
(Fig. 1.8.1)
1 - Interlocked plexiglass cover
2 - Guard protecting the stainless steel mechanical moving elements
3 - Mushroom-head emergency button
CAUTION!
Do not tamper with the safety devices for any reason.
2
3
1
Fig. 1.8.1
13
English
3 - Controls and indicators
3.1 - List of controls and indicators
1 Start button:
Press to start the blade pack.
2 Stop button: press to switch the machine off.
When pressed, the blade pack returns to its initial position and then the
machine switches off.
3 Mushroom-head emergency button: switches the machine off instantly.
To restart the machine, turn the button to unlock it.
CAUTION! If the machine seizes up due to jamming of the product, press the
reversal button on the machine’s right-hand side (see Fig. 2.1.1 Ref. 9). Pressing
this button will reverse the motor’s movement and the shaft will lift to free the
jammed product or the slide.
4 - Factory testing, shipping, delivery and installation
4.1 - Factory testing
The machine you have purchased has been tested at our plants to verify its correct
operation and proper adjustment. The tests were conducted using materials similar
to those processed by the user.
4.2 - Delivery and handling
All shipped material is carefully checked prior to being handed over to the shipping
agent. Unless otherwise agreed with the customer, the machine is wrapped in
nylon and screwed onto the pallet. It is then covered with cardboard, which is
strapped to the pallet. When you receive the machine, check the condition of its
packaging. If you notice any damage to the packaging, sign the delivery note with
the following note: “Goods accepted with reservation...” and the reason.
If you notice any damage to the components of the machine after opening the
package, report it to the shipping agent within three days from the date shown on
the documents.
4.3 - Installation
CAUTION! The installation area must be level and solid, and the area supporting
the machine must ensure that it is stable and safe. Moreover, the machine must be
placed where there is ample space around it, taking into account the dimensions
required for supporting it. This will facilitate manoeuvring during work phases and
ensure easy access for subsequent maintenance operations.
Provide adequate lighting around the tenderiser to ensure proper visibility for the
operator using it.
4.3.1 - Installation
Handle the package with a lift truck or similar equipment, since the machine is
delivered in a cardboard carton mounted to a pallet.
Remove the two straps fastening the cardboard box to the pallet.
Remove the cardboard.
Fig. 3.1.1
1 23
12
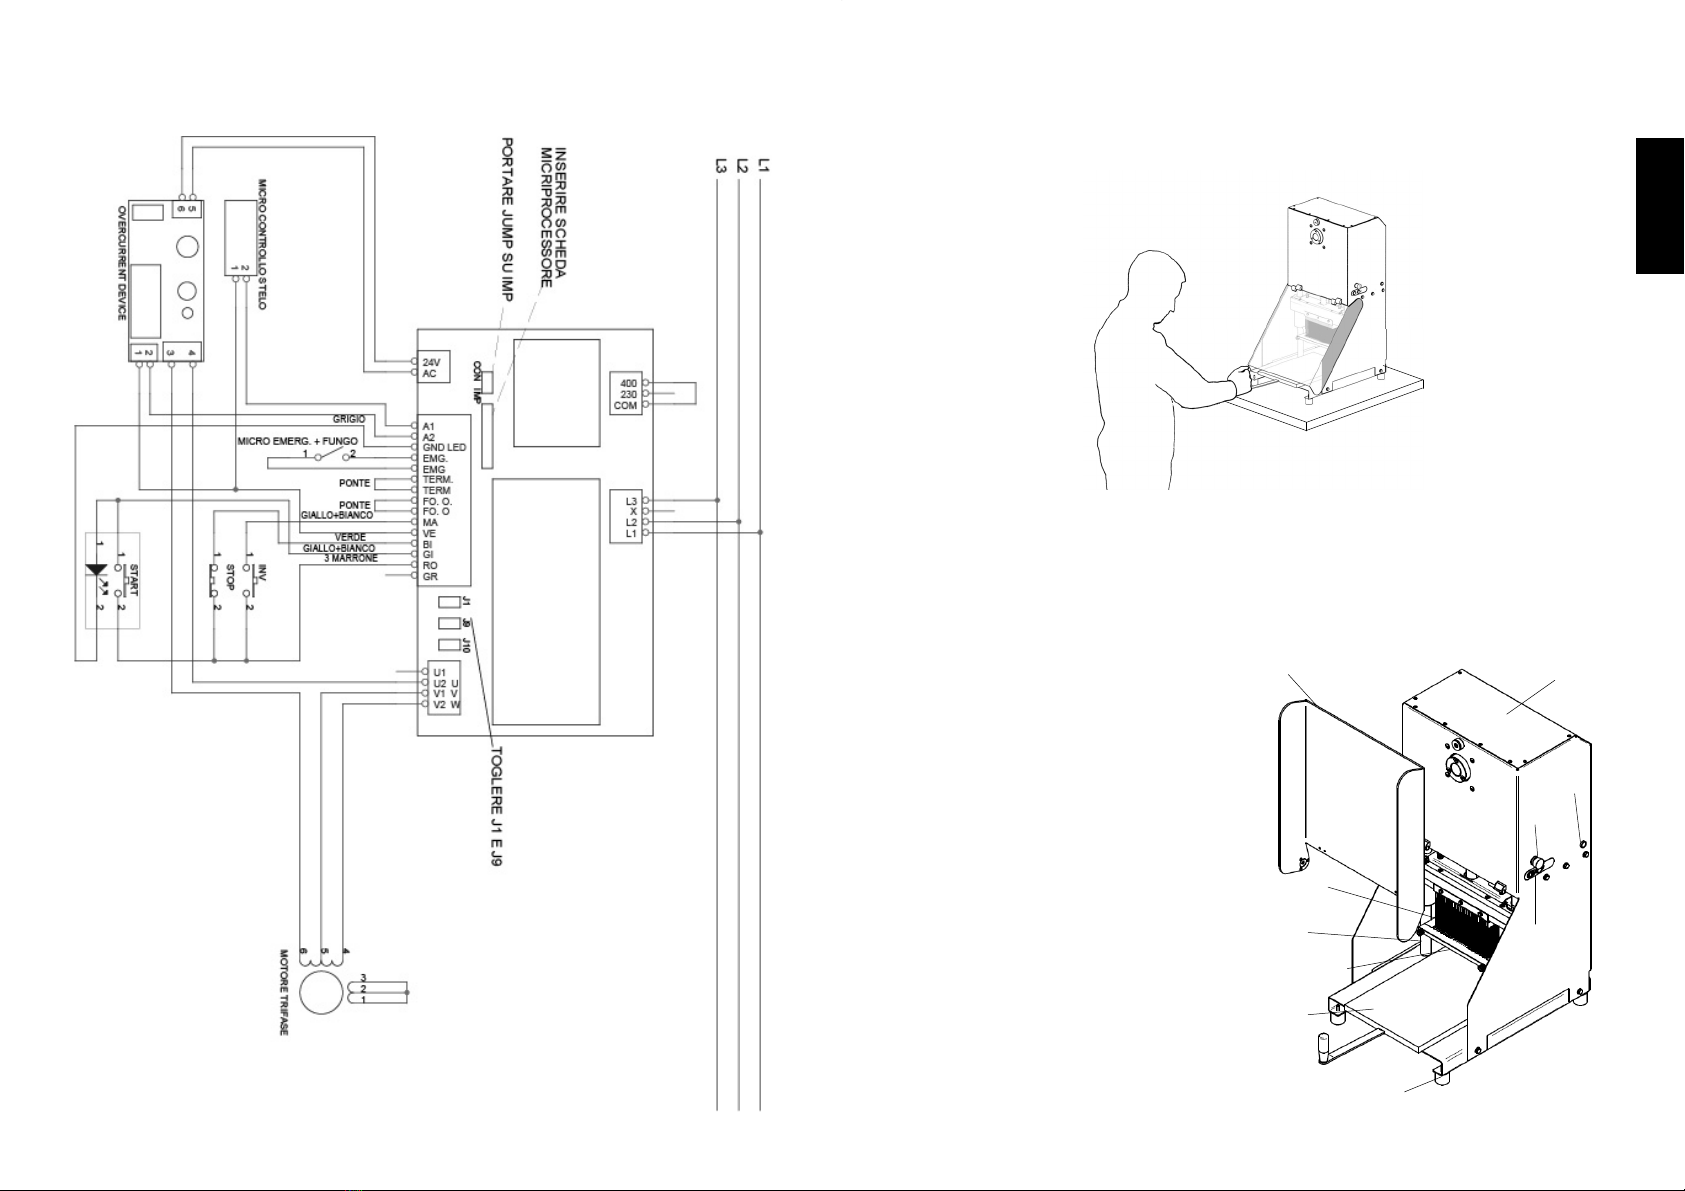
2.4.2 - Three-phase wiring diagram
9
English
1.9 - Work position
To optimise work with the machine, the operator should assume the position
shown in Fig. 1.9.1.
2 - Technical specifications
2.1 - Main parts
To aid comprehension of the manual, the main components of the machine are
listed below and shown in Fig. 2.1.1.
1. Removable plexiglass guard
2. Mushroom-head emergency stop
button
3. Grade AISI 304 steel machine body
4. POLYETHYLENE chopping board
5. Feet
6. Grade AISI 420 steel blade pack
7. POM-C scraper
8. Grade AISI 304 steel sliding rods
9. Reversal button
10. Machine controls
1
2
3
4
6
7
8
Fig. 2.1.1
9
5
10
Fig. 1.9.1

10
2.2 - Technical specifications
2.3 - Machine dimensions and weight
A B C D E F Net weight
mm mm mm mm mm mm kg
424 560 520 615 970 875 85
Motor Power supply Work area Blades
watt/hp Volt mm n°
1100/1,5 400V/50Hz 216x280x100 32
750/1 230V/50Hz 216x280x100 32
A
C
B
D F
E
Fig. 2.3.1
11
English
2.4 - Wiring diagrams
2.4.1 - Single-phase wiring diagram
Other CHEFOOK Commercial Food Equipment manuals


Popular Commercial Food Equipment manuals by other brands


Omcan
Omcan BE-CN-2083-CSS instruction manual

Somerset
Somerset SDP-747 Operation manual

Chocolate World
Chocolate World Cw60 Use and maintenance manual

Rocam Losi
Rocam Losi TETI Instructions for assembly, installation, use and maintenance

Zoin
Zoin Danny DC120BSVB171VA Technical instructions

Omcan
Omcan FR-CN-0007W instruction manual

Falcon
Falcon E2962 User instructions

Lotus
Lotus LIBR.ISTR.TP70G Installation and operating instructions

Horizon Fitness
Horizon Fitness BOOK BINDER BQ-470 Important information

Diamond
Diamond ML20/B5-VV/R2 Technical instructions

GenLab
GenLab PRIME RANGE operating instructions

Wahl
Wahl KM CORDLESS 09596-200 Operation manual