ChickenGuard EXTREME User manual

1
chickenguard.com

2chickenguard.com
Contents
English 3
Français 10
Deutsch 18
Nederlands 26
Espanõl 33
Italiano 40
Dansk 47
Svenska 54

3
chickenguard.com
ENGLISH
INSTALLATION
ATTACH THE CONTROL BOX TO YOUR COOP
1. Attach the control box to the inside/outside of your coop.
(DO NOT USE A POWER DRILL)
2. Position the cord centrally to the top of the coop door.
3. Attach the cord to the top of the coop door (ensuring that you
maintain tension to prevent it from unravelling on the spindle).
Note: Allow 3-4 inches (7.5 – 10cm) gap between the bottom of the
control box and the top of the coop door, when the coop door is fully
open.
PLACE THE SEAL INTO THE FRONT PANEL
1. Remove the silicone seal from the zip lock bag.
2. Press the silicone seal into the recess around the edges of the
inside of the front panel.
3. Start from the bottom left hand corner and work your way round
the front panel.
4. Remove any excess length.
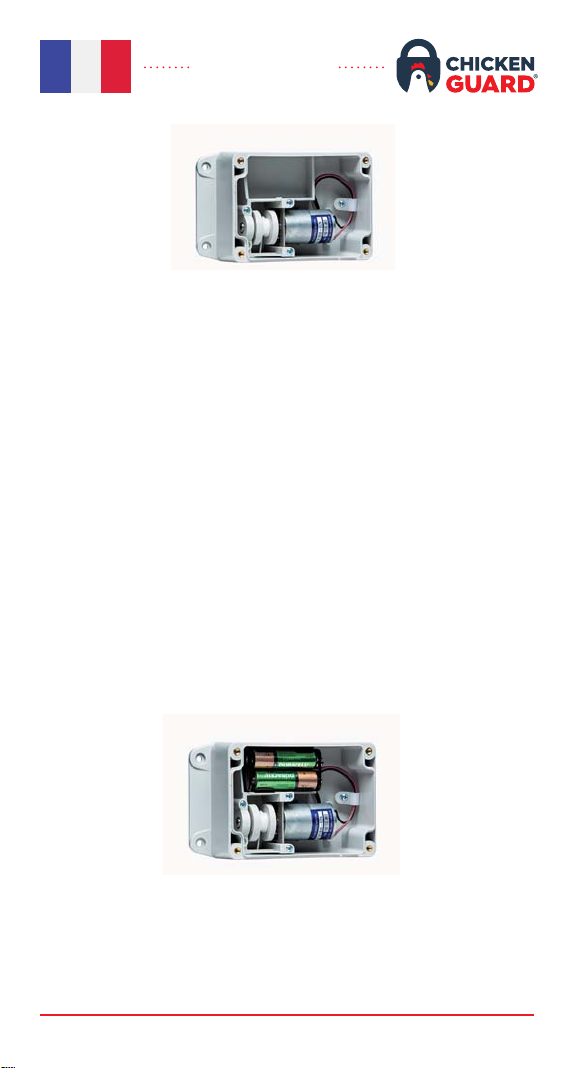
INSTALL THE 4 x AA BATTERIES
1. Install the batteries in the battery holder. Do not use 9V batteries.
2. Attach the battery connector to the battery holder.
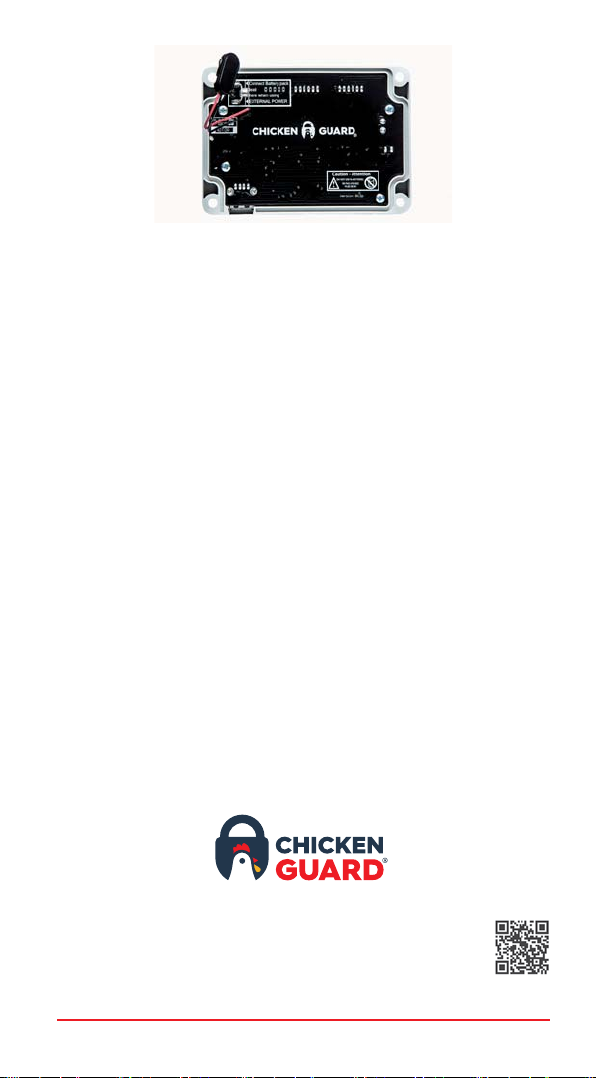
CONNECT THE FRONT PANEL
1. Connect the red/black lead in the control box, to the prongs on
the inside of the front panel (with the black wire on top).
Note: If the red/black lead is connected the wrong way the UP and
DOWN will work in reverse.
Do not use 9V batteries.

4chickenguard.com
2. Place the battery holder into the control box.
3. Screw the front panel to the control box.
(DO NOT USE A POWER DRILL)
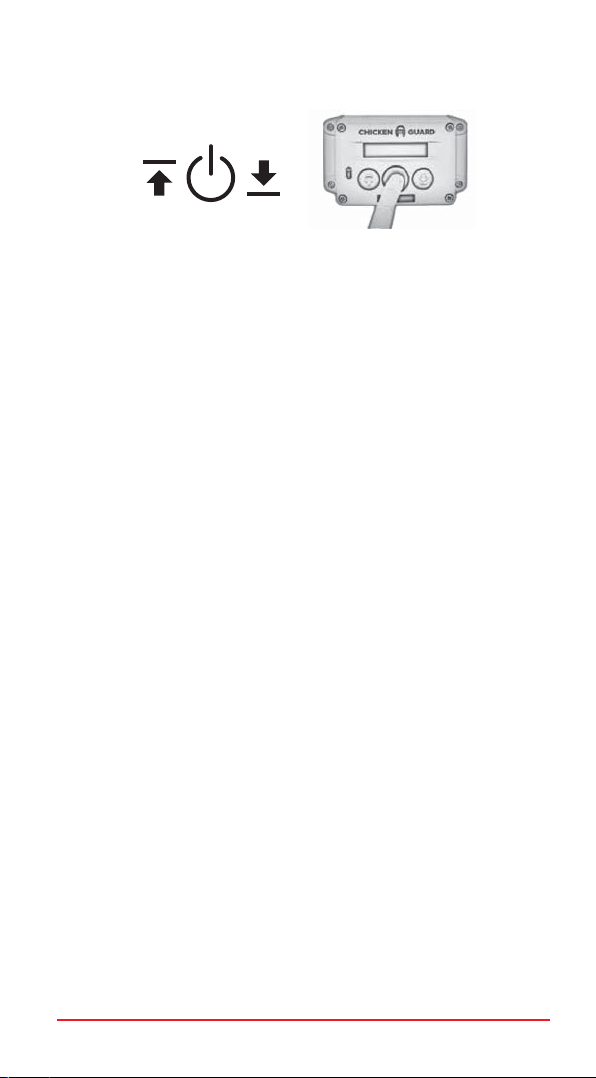
INITIAL SETUP
1. Press MENU button twice to turn on (just once if already on) -
the screen will display CHICKENGUARD.COM and the time.
2. Press MENU again to enter main MENU – the screen will display
SETUP WIZARD.
3. Press MENU again to start the SETUP WIZARD.
AUTOMATIC SETUP WIZARD
SELECT LANGUAGE
1. Press UP or DOWN to choose your language.
2. Press MENU to save.
SELECT TIME FORMAT
Press UP for 12hr clock or DOWN for 24hr clock
SET THE TIME
1. Press UP or DOWN to set the hour.
2. Press MENU to save.
3. Press UP or DOWN to set the minutes.
4. Press MENU to save.
CONTINUE
Select YES with the UP button to continue.
DOOR CALIBRATION
1. Press and hold UP until the door is fully open.
2. When the door is fully open, let go of the UP button.
3. Press MENU to save (the fully open position).
4. Press and hold DOWN until the door is fully closed.
5. When the door is fully closed, let go of the DOWN button.
6. Press MENU to save (the fully closed position).
(IF USING CHICKENGUARD SELF-LOCKING DOOR KIT – ENSURE
WINGS ARE FULLY EXTENDED WHEN IN CLOSED POSITION
WHILST CALIBRATING)
DOOR WILL NOW OPEN FULLY AUTOMATICALLY
7. The display will read: CALIBRATION COMPLETE.
UP MENU DOWN

5
chickenguard.com
CONTINUE
Select YES with the UP button.
OPENING & CLOSING SETTINGS
The options below can be independently set. For example, you can
have a timed opening in the morning and then use the Light Sensor to
close at night.
Press UP or DOWN to choose your preferred option:
• MANUAL • SENSOR
• TIMER • LUX+
For detailed information, see the descriptions below:
MANUAL
This option is to halt the automatic opening or closing of the coop
door. You would have to manually open or close the door by pressing
either the UP or DOWN buttons – useful if you have ducks as they are
not creatures of habit. For example, you would set a timed opening in
the morning and MANUAL for the evening allowing you to make sure
they were in safely before manually closing the door.
SENSOR
This option is for automatic opening of the coop door at dawn,
or the automatic closing in the evening at dusk, using the Light
Sensor.
Note: The Light Sensor is only available on Premium and
Extreme models.
TIMER
This option is for automatic opening of the coop door in the morning,
or automatic closing in the evening, at your set time/s.
1. Press UP or DOWN to set the open/close hour.
2. Press MENU to save.
3. Press UP or DOWN to set the open/close minutes.
4. Press MENU to save.
LUX+
This setting uses a combination of both the Light Sensor and Timer.
When selecting this option, you will be asked to set a default time.
When this is set, the ChickenGuard will use the Light Sensor as its
primary method to close, but, if it is not dark enough to close using the
Light Sensor when the default time is reached, the door will then close
based on the default time you set.
YOUR CHICKENGUARD IS NOW READY
TO USE

6chickenguard.com
EXTRAS: MISC SETTINGS
MULTI-TIMER
This feature enables different timed OPEN/CLOSE cycles for each day
of the week. To enable this feature, select it and then, using the UP/
DOWN buttons, select the correct day, i.e. If it is Monday today, select
MON and then press MENU to confirm.
Now, when you go into the OPEN/CLOSE settings and select TIMER
you will need to set the day and time of the cycle. If for example you
wanted a different time for Saturday, navigate the >> << symbols
to the day, press MENU and then using the UP/DOWN button,
change the day to SAT and then press MENU. Now the hour will start
flashing. Adjust it to the new time and press MENU. Do the same for
the minutes. If you want to change other days, simply repeat. When
finished, navigate to EXIT and press MENU to save everything. To
disable this feature, simply navigate to the MULTI -TIMER menu and
select NO.
CLOCK 12/24HR
You may change the time format here by simply selecting your
preference using the UP or DOWN buttons.
SENSOR DELAY
This feature allows you to set a delay when using the Light Sensor.
For example, if the door was closing a little bit too early when using
the Light Sensor, you could enable this feature and then, when you
select SENSOR in the CLOSE Settings, you now have the option of
delaying the closing by anything from 0 to 60 minutes. Simply press
the UP/DOWN button to increase/decrease the delay in 5 minute
intervals. It is also possible to adjust the Light Sensor sensitivity in the
LUX Adjustment Menu. To disable this feature, simply select NO in the
SENSOR DELAY menu.
EXTERNAL POWER
When using an external power source, select this option to disable the
battery check, otherwise when using 5 volt power supplies, you will
get a Battery Warning indication.
UNLOCK SENSOR
Only needed if you want to upgrade a Standard model to enable the
use of the Light Sensor. Just let your vendor know the code number
displayed and they will supply you with the unlock PIN. There is an
upgrade fee for this service.
FIRMWARE AND BATTERY CHECK
Displays the firmware version and the status of the battery.

7
chickenguard.com
ABOUT THE BATTERIES
1. Do not use 9V batteries – they will destroy the unit.
2. Always use 4 x AA batteries (Alkaline only).
3. Do not use lithium batteries.
4. Do not use rechargeable batteries (as their voltage can drop in
hot/cold weather conditions).
5. When the batteries need changing, the red LED on the front panel
will be permanently lit (the red LED on the front panel always
flashes every 30 seconds when the door is CLOSED).
6. When changing batteries, all your settings will be kept in memory,
only the Time will need to be updated.
CHECKING THE BATTERY LEVEL
1. Press MENU to enter the programme menu.
2. Press UP or DOWN until you find: MISC SETTINGS
3. Press MENU to enter the miscellaneous mode.
4. Press UP or DOWN until you find: STANDARD, PREMIUM
or EXTREME
5. The battery status should read OK and tell you the voltage.
6. If the voltage is less than 5.1, it will affect the unit performance and
the batteries will need replacing.
ADJUSTING THE LIGHT SENSOR
1. Press MENU to enter the programme menu.
2. Press UP or DOWN until you find: LUX ADJUSTMENT.
3. Press MENU to enter the LUX adjustment mode.
4. Press UP or DOWN and navigate the > symbol to READ
5. Press MENU.
6. This will take a quick snapshot of the current light level.
LIGHT SENSOR: ADJUSTING OPEN/CLOSE SENSOR VALUES
To adjust the OPEN or CLOSE trigger values, navigate the > symbol
to either OPEN or CLOSE. Press MENU once and then using the UP
or DOWN button, change the relevant value. When completed, press
MENU to save this value.
Open: Min = 200 Max = 253 DEFAULT = 210
Close: Min = 0 Max = 199 DEFAULT = 80
NB: Darker is a lower number – Brighter is a higher number
Note: This feature is only available on the Premium and Extreme
models.
CHANGING THE TIME
1. Press MENU to enter the programme menu.
2. Press UP or DOWN until you find: SET TIME.
3. Press MENU to enter the SET TIME mode.
4. Press UP or DOWN to set the hour.
5. Press MENU to save.
6. Press UP or DOWN to set the minutes.
7. Press MENU to save.

8chickenguard.com
CHANGING THE LANGUAGE
1. Press MENU to enter the programme menu.
2. Press UP or DOWN until you find: LANGUAGE.
3. Press UP or DOWN to find your language.
4. Press MENU to save.
CHANGING THE DOOR CALIBRATION
1. Press MENU to enter the programme menu.
2. Press UP or DOWN until you find: CALIBRATE DOOR.
3. Press MENU to enter the calibrate door mode.
4. Press and hold UP until the door is fully open.
5. Press and hold DOWN until the door is fully closed.
6. Release the button and the door will automatically open.
7. The display will now read: CALIBRATION COMPLETE.
Note: To adjust the open and close positions, you can repeat this
process as many times as you wish.
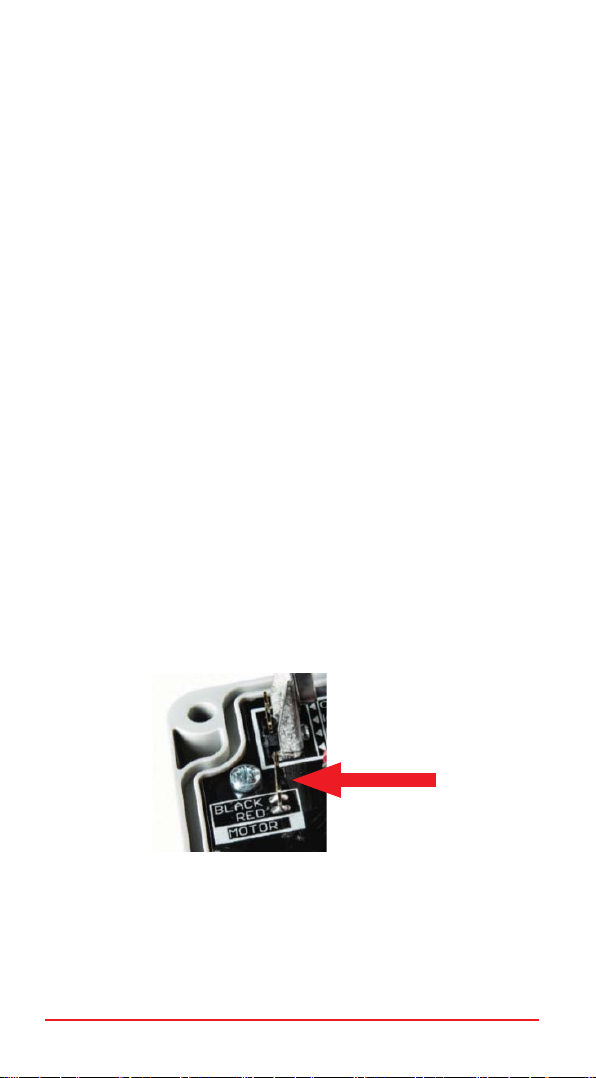
IMPORTANT
If there is no movement of the door when pressing UP or
DOWN, check that the motor lead has been connected.
If the door moves in the opposite direction to the button, then
check the orientation of the motor lead as per picture below.
USING ELECTRIC MAINS POWER
If you want to use electric mains power, rather than batteries then
follow these instructions.
Note: Requires a USB-USB cable and USB charger (not included).
1. Remove the front panel.
2. Disconnect the battery connector from the battery holder.
3. Connect the battery connector to the front panel like so:
4. Re-attach the front panel.
9
chickenguard.com
5. There is a USB port on the underside of the control box.
Simply plug the USB charger into the control box.
6. To disable the battery check, navigate into the MISC SETTINGS
menu and scroll through until you see EXTERNAL POWER. Select
YES and press MENU. You will now see on the main menu screen
a small flashing X in the lower righthand corner to signify that an
external power source has been connected.
www.chickenguard.com
For more information or help setting up your
ChickenGuard, visit our website for SETUP
videos or FAQs in our HELP CENTRE.
10 chickenguard.com
FRANÇAIS
INSTALLATION
FIXEZ LE PORTIER AUTOMATIQUE À VOTRE POULAILLER
1. Fixez le portier automatique à l’intérieur/extérieur de votre
poulailler. (NE PAS UTILISER DE PERCEUSE ÉLECTRIQUE).
2. Placez le cordon dans l’axe de la trappe.
3. Attachez le portier automatique à la trappe grâce au cordon (en
vous assurant de maintenir une tension pour éviter qu’il ne se
déroule du treuil).
Remarque: laissez un espace de 7,5 à 10 cm entre le bas du portier
automatique et le haut de la trappe, lorsque celle-ci est complètement
ouverte.
PLACEZ LE JOINT D’ÉTANCHÉITÉ SUR LE COUVERCLE
1. Retirez le joint en silicone du sachet plastique.
2. Enfoncez le joint d’étanchéité en silicone dans le renfoncement
prévu à cet effet sur le couvercle boîtier de commande.
3. Commencez par le coin inférieur gauche et faites le tour
du panneau.
4. Coupez la longueur restante.
INSTALLEZ LES 4 PILES AA
1. Installez les piles dans le support de piles. N'utilisez pas de piles 9V.
2. Fixez le connecteur de batterie au support de piles.
3. N’utilisez pas de piles 9V - elles détruiront l’appareil.
RACCORDEZ LE BOITIER DE COMMANDE
1. Raccordez le fil rouge/noir au boîtier de commande sur les
broches « motor ». Le fil noir devant être sur la broche «black».
Remarque: Si le fil rouge/noir est branché dans le mauvais sens,
HAUT « UP » et BAS « DOWN » fonctionneront à l’envers
11
chickenguard.com
2. Placez le support de piles dans le boîtier.
3. Visser le couvercle boîtier de commande au panneau arrière.
(NE PAS UTILISER DE PERCEUSE ÉLECTRIQUE)
CONFIGURATION INITIALE
1. Appuyez deux fois sur le bouton MENU pour allumer (une seule
fois s’il est déjà allumé) - l’écran affichera :
« CHICKENGUARD.COM » et l’heure.
2. Appuyez à nouveau sur MENU pour accéder au MENU principal
- l’écran affichera : ASSISTANT DE CONFIGURATION
« SETUP WIZARD »
3. Appuyez à nouveau sur MENU pour lancer L’ASSISTANT DE
CONFIGURATION « SETUP WIZARD ».
ASSISTANT DE CONFIGURATION AUTOMATIQUE
CHOISIR LA LANGUE
1. Appuyez sur HAUT « UP » ou BAS « DOWN » pour choisir
votre langue « FRENCH »
2. Appuyez sur MENU pour sauvegarder.
SÉLECTIONNER LE FORMAT DE L’HEURE
Appuyez sur HAUT « UP » pour 12 heures ou BAS « DOWN » pour 24
heures.
RÉGLAGE DE L’HEURE
1. Appuyez sur HAUT « UP » ou BAS « DOWN » pour régler l’heure.
2. Appuyez sur MENU pour sauvegarder.
3. Appuyez sur HAUT « UP » ou BAS « DOWN » pour régler
les minutes.
4. Appuyez sur MENU pour sauvegarder.
CONTINUER
Sélectionnez « OUI » en appuyant sur le bouton HAUT « UP » pour
continuer.
CALIBRAGE DE LA PORTE
1. Appuyez sur la touche HAUT « UP » et maintenez-la enfoncée
jusqu’à ce que la porte soit complètement ouverte.
2. Lorsque la porte est complètement ouverte, relâchez le bouton
HAUT « UP ».
3. Appuyez sur MENU pour enregistrer (la position d’ouverture
complète).
4. Appuyez et maintenez enfoncée la touche BAS « DOWN » jusqu’à
ce que la porte soit complètement fermée.
UP MENU DOWN

12 chickenguard.com
5. Lorsque la porte est complètement fermée, lâchez le bouton BAS
« DOWN ».
6. Appuyez sur MENU pour enregistrer (la position de fermeture
complète).
(SI VOUS UTILISEZ LA TRAPPE AUTOMATIQUE VERROUILLABLE
CHICKENGUARD - ASSUREZ-VOUS QUE LES LOQUETS SOIENT
COMPLÈTEMENT SORTIS LORSQU’ILS SONT EN POSITION DE
FERMETURE COMPLÈTE PENDANT LE CALIBRAGE)
LA PORTE VA MAINTENANT S’OUVRIR AUTOMATIQUEMENT.
7. Vous verrez apparaître sur l’écran : CALIBRAGE TERMINÉ
« CALIBRAGE TERMINÉ ».
CONTINUER
Sélectionnez « OUI » en appuyant sur le bouton HAUT « UP » pour
continuer.
PARAMÈTRES D’OUVERTURE ET DE FERMETURE
Les fonctions ci-dessous peuvent être configurées
indépendamment l’une de l’autre.Par exemple, vous pouvez
avoir une ouverture par horaire le matin et ensuite utiliser le
capteur de lumière pour la fermeture à la tombée de la nuit.
Appuyez sur HAUT « UP » ou BAS « DOWN » pour choisir votre option
préférée :
• MANUELLE « MANUEL » • SONDE « SENSOR »
• MINUTEUR « MINUTEUR » • LUX+
Pour des informations détaillées, voir les descriptions ci-dessous:
MANUELLE « MANUEL »
Cette option permet d’arrêter l’ouverture ou la fermeture automatique
de la porte du poulailler. Vous devrez ouvrir ou fermer la porte de
façon manuelle en appuyant sur les boutons HAUT « UP » ou BAS «
DOWN » - ce qui sera très utile si vous avez des canards, car ce ne
sont pas des créatures qui ont des comportements routiniers. Par
exemple, vous pouvez régler une ouverture programmée le matin et le
mode MANUEL « MANUEL » pour le soir, ce qui vous permet de vous
assurer qu’ils sont en sécurité avant de fermer manuellement la porte.
SONDE « SENSOR »
Cette option est prévue pour l’ouverture automatique de la porte
du poulailler à l’aube, ou encore la fermeture automatique le soir à la
tombée de la nuit, à l’aide du capteur de lumière.
Remarque:le capteur de lumière n’est disponible que sur les
modèles Premium et Extreme.

13
chickenguard.com
MINUTEUR « MINUTEUR »
Cette option permet l’ouverture automatique de la porte du
poulailler le matin, ou la fermeture automatique le soir, à l’heure ou
aux heures fixées.
1. Appuyez sur HAUT « UP » ou BAS « DOWN » pour régler l’heure
d’ouverture/fermeture.
2. Appuyez sur MENU pour sauvegarder.
3. Appuyez sur HAUT « UP » ou BAS « DOWN » pour régler les
minutes d’ouverture/fermeture.
4. Appuyez sur MENU pour sauvegarder.
LUX+
Ce réglage utilise une combinaison du capteur de lumière « SENSOR
» et du MINUTEUR « MINUTEUR ». Lorsque vous sélectionnez cette
option, il vous sera demandé de définir une heure par défaut. Lorsque
cela est programmé, le ChickenGuard utilisera le capteur de lumière
comme méthode principale pour effectuer la fermeture, maiss’il n’est
pas assez sombre pour effectuer la fermeture en utilisant le capteur
de lumière lorsque l’heure par défaut est atteinte, la porte se fermera
en fonction de l’horaire que vous avez fixé par défaut.
VOTRE CHICKENGUARD EST DÉSORMAIS
PRÊT ÀL’EMPLOI
EXTRAS : « AUTRES OPTIONS »
MULTI-MINUTEUR « MULTI-TIMER »
Cette fonction permet de programmer différents cycles de la fonction
: « OUVERTURE/FERMETURE » pour chaque jour de la semaine.
Pour activer cette fonction, sélectionnez-la, puis, à l’aide des boutons
HAUT/BAS « UP/DOWN », choisissez le jour correct, c’est-à-dire si
c’est le lundi aujourd’hui, sélectionnez LUNDI « LUN », puis appuyez
sur MENU pour valider.
Maintenant, une fois que vous êtes dans les réglages « OUVERTURE/
FERMETURE » et en sélectionnant le MINUTEUR « MINUTEUR », vous
devrez régler le jour et l’heure du cycle. Si, par exemple, vous voulez
une heure différente pour le samedi, naviguez avec les symboles :
>> << jusqu’au jour désiré, appuyez sur la touche MENU puis sur la
touche HAUT/BAS « UP/DOWN », changez le jour en SAMEDI « SAM
» et appuyez sur la touche MENU. L’heure commencera à clignoter.
Ajustez-le à la nouvelle heure et appuyez sur MENU. Faites de même
pour les minutes. Si vous voulez changer d’autres jours, répétez la
procédure. Lorsque vous avez terminé, naviguez jusqu’à QUITTER «
EXIT » et appuyez sur MENU pour tout enregistrer. Pour désactiver
cette fonction, il suffit de naviguer jusqu’au niveau MULTI-MINUTERIE
« MULTI-TIMER » et de sélectionner NON « NON ».

14 chickenguard.com
FORMAT HORLOGE 12/24H
Vous pouvez changer le format de l’heure ici en sélectionnant
simplement votre préférence à l’aide des boutons « UP » ou « DOWN ».
DÉLAI DE LA SONDE « RETARDER CAPTEUR »
Cette fonction vous permet de régler un délai si vous utilisez la sonde
capteur de lumière. Par exemple, si la porte se fermait un peu trop
tôt lors de l’utilisation du capteur de lumière, vous pouvez activer
cette fonction (« RETARDER CAPTEUR » > « OUI »), puis, lorsque
vous sélectionnez SONDE « SENSOR » dans les réglages de «
FERMETURE », vous avez la possibilité de retarder la fermeture de
0 à 60 minutes. Il suffit d’appuyer alors sur le bouton de « MENU »,
ensuite HAUT/BAS « UP/DOWN » pour augmenter/diminuer le délai en
intervalles de 5 minutes et de rappuyer sur le bouton « MENU » pour
sauvegarder.
Un autre moyen de modifier le délai de la sonde existe : en réglant la
sensibilité du capteur de lumière dans le menu « LUX AJUSTEMENT »
: voir le chapitre RÉGLAGE DU CAPTEUR DE LUMIÈRE.
Pour désactiver cette fonction, il suffit de sélectionner NON « NON »
dans la section DÉLAI DE LA SONDE « RETARDER CAPTEUR ».
SOURCE D’ALIMENTATION EXTERNE
Si vous utilisez une source d’alimentation externe, sélectionnez
cette option pour désactiver le contrôle de la batterie, sinon si vous
utilisez une alimentation de 5 volts, vous obtiendrez une indication
d’avertissement de batterie.
DÉVERROUILLER LE CAPTEUR DE LUMIÈRE
Ceci est une option permettant de transformer un portier Standard
en portier Premium pour permettre l’utilisation du capteur de lumière.
Il suffit d’indiquer à votre fournisseur le numéro de code affiché et il
vous fournira après un délai le Code PIN de déverrouillage. Ce service
est payant.
VÉRIFICATION DE LA VERSION LOGICIEL ET DE LA BATTERIE
Permet de connaître la version du logiciel et de vérifier l’état de charge
de la batterie.
ÀPROPOS DES PILES
1. N’utilisez pas de piles 9V - elles détruiront l’appareil.
2. Utilisez toujours 4 piles AA (alcalines uniquement).
3. N’utilisez pas de piles au lithium.
4. N’utilisez pas de piles rechargeables (leur tension peut chuter par
temps chaud/froid).
5. Lorsque les piles doivent être remplacées, la LED rouge sur le
portier restera allumée en permanence (la LED rouge sur se met
à clignoter toutes les 30 secondes lorsque la porte est FERMÉE «
CLOSED »).
6. Lorsque vous changez les piles, tous vos réglages seront
conservés en mémoire, seule l’HEURE « TIME » devra être mise
à jour.

15
chickenguard.com
VÉRIFICATION DU NIVEAU DE LA BATTERIE
1. Appuyez sur MENU.
2. Appuyez sur HAUT « UP » ou BAS « DOWN » jusqu’à ce que vous
trouviez : RÉGLAGES DIVERS « AUTRES OPTIONS »
3. Appuyez sur « MENU » pour passer en mode RÉGLAGES DIVERS
« AUTRES OPTIONS »
4. Appuyez sur HAUT « UP » ou BAS « DOWN » jusqu’à ce que vous
trouviez : « STANDARD », « PREMIUM » ou « EXTREME »
5. L’état de la batterie devrait indiquer « OK » et vous indiquer
le voltage.
6. Si le voltage est inférieur à 5.1 V, cela affectera les performances
de l’appareil et les batteries devront être remplacées.
RÉGLAGE DU CAPTEUR DE LUMIÈRE
1. Appuyez sur MENU.
2. Appuyez sur HAUT « UP » ou BAS « DOWN » jusqu’à ce que vous
trouviez : « LUX AJUSTEMENT ».
3. Appuyez sur MENU pour accéder au mode de réglage « LUX ».
4. Appuyez sur HAUT « UP » ou BAS « DOWN » et naviguez avec le
symbole > jusqu’à LIRE « LIRE ».
5. Appuyez sur MENU.
6. Ceci prendra un instantané rapide du niveau de lumière actuel.
RÉGLAGE DU CAPTEUR DE LUMIÈRE : RÉGLAGE DES VALEURS
DU CAPTEUR POUR LA FERMETURE ET L’OUVERTURE
Pour régler les paramètres de déclenchement de L’OUVERTURE «
OUVERTURE » ou la FERMETURE « FERMETURE », déplacez-vous
avec le symbole > jusqu’à « Ouv. » ou « Fer. ». Appuyez une fois sur «
MENU » et ensuite, à l’aide des boutons « UP » ou « DOWN », modifiez
la valeur correspondante. Lorsque vous avez terminé, appuyez sur «
MENU » pour enregistrer cette valeur.
Ouvert: Min = 200 Max = 253 PAR DÉFAUT = 200
Fermée: Min = 0 Max = 199 PAR DÉFAUT = 80
NB: Plus sombre correspond à un nombre inférieur – Plus clair
correspond à un nombre supérieur.
Remarque: Cette fonction n’est disponible que sur les modèles
Premium et Extreme.
MODIFICATION DE L’HEURE
1. Appuyez sur MENU.
2. Appuyez sur HAUT « UP » ou BAS « DOWN » jusqu’à ce que vous
trouviez : RÉGLER L’HEURE « REGLER L’HORLOGE ».
3. Appuyez sur MENU pour entrer dans le mode RÉGLER L’HEURE «
REGLER L’HORLOGE ».
4. Appuyez sur HAUT « UP » ou « BAS » « DOWN » pour régler l’heure.
5. Appuyez sur MENU pour sauvegarder.
6. Appuyez sur HAUT « UP » ou BAS « DOWN » pour régler les
minutes.
7. Appuyez sur MENU pour sauvegarder.
16 chickenguard.com
MODIFIER LA LANGUE
1. Appuyez sur MENU.
2. Appuyez sur HAUT « UP » ou BAS « DOWN » jusqu’à ce que vous
trouviez : LANGUE « LANGUAGE ».
3. Appuyez sur HAUT « UP » ou BAS « DOWN » pour trouver votre
langue « FRENCH »
4. Appuyez sur MENU pour sauvegarder.
MODIFICATION DU CALIBRAGE DE LA PORTE
1. Appuyez sur MENU.
2. Appuyez sur HAUT « UP » ou BAS « DOWN » jusqu’à ce que vous
trouviez : CALIBRER LA PORTE « CALIBRAGE PORTE ».
3. Appuyez sur MENU pour accéder au mode de calibrage de la
porte.
4. Appuyez sur la touche HAUT « UP » et maintenez-la enfoncée
jusqu’à ce que la porte soit complètement ouverte.
5. Appuyez et maintenez enfoncée la touche BAS « DOWN » jusqu’à
ce que la porte soit complètement fermée.
6. Relâchez le bouton et la porte s’ouvrira automatiquement.
7. L’écran va maintenant indiquer : CALIBRAGE TERMINÉ «
CALIBRAGE TERMINÉ »
Remarque: Pour ajuster les valeurs d’ouverture et de fermeture, vous
devrez renouveler ce processus autant de fois que désiré.
IMPORTANT
S’il n’y a pas de mouvement de la porte lorsque vous appuyez
sur HAUT « UP » ou BAS « DOWN », vérifiez que le câble du
moteur a étéconnectécomme indiquéci-dessus.
Sila porte se déplace dans la direction inverse du bouton,
vérifiez le branchement du fil du moteur comme indiquéci-
dessus.
UTILISER UNE ALIMENTATION ÉLECTRIQUE
Si vous souhaitez utiliser l’alimentation électrique plutôt que les piles,
suivez ces instructions.
Remarque : nécessite un câble USB-USB et un chargeur USB (non
inclus)

17
chickenguard.com
1. Retirez le panneau avant.
2. Débranchez le connecteur de la batterie du support de batterie.
3. Branchez le connecteur de batterie sur le couvercle sur le
« EXTERNAL POWER »
4. Refermez le couvercle.
5. Il y a un port USB sur la face inférieure du boîtier de contrôle.
Il suffit de brancher le chargeur USB dans le boîtier de contrôle.
6. Pour désactiver le contrôle de la batterie, naviguez dans le
menu RÉGLAGES DIVERS « AUTRES OPTIONS » et faites défiler
jusqu’à ALIMENTATION EXTERNE « ALIMENTATION EXTERNE ».
Sélectionnez OUI « OUI ». Vous verrez maintenant sur l’écran du
menu principal un petit X clignotant dans le coin inférieur droit
pour indiquer qu’une source d’alimentation externe a été
connectée.
Remarque:la fonction « REMOTE CONTROL » est une option en
cours de développement et qui n’est pas encore en service.
www.chickenguard.com
Pour plus d’informations ou pour obtenir de l’aide
pour configurer votre ChickenGuard, visitez notre
site Web pour les vidéos d’INSTALLATION ou la
foire aux questions dans notre CENTRE D’AIDE.
18 chickenguard.com
DEUTSCH
INSTALLATION
BEFESTIGEN SIE DIE STEUERBOX AN IHREM HÜHNERSTALL
1. Befestigen Sie den Steuerkasten an der Innenseite / Außenseite
Ihres Stalls – BENUTZEN SIE KEINEN AKKUSCHRAUBER,
SONDERN EINEN SCHRAUBENZIEHER!
2. Positionieren Sie die Schnur mittig zur Oberseite der Stalltüre.
3. Befestigen Sie die Schnur an der Oberseite der Stalltüre. (Achten
Sie darauf, dass Sie die Spannung beibehalten, damit sie sich
nicht aus der Spindel löst).
Hinweis: Lassen Sie einen Abstand von 7,5 bis 10 cm zwischen der
Unterseite des Steuerkastens und der Oberseite der Stalltür, wenn die
Stalltüre vollständig geöffnet ist.
PLATZIEREN SIE DAS SIEGEL IN DER FRONTPLATTE
1. Nehmen Sie die Silikondichtung aus dem Plastiktütchen.
2. Drücken Sie die Silikondichtung in die Nut an den Kanten der
Innenseite der Frontplatte.
3. Beginnen Sie von der unteren linken Ecke und arbeiten Sie sich
um die Frontplatte herum.
4. Schneiden Sie überschüssige Länge ab.
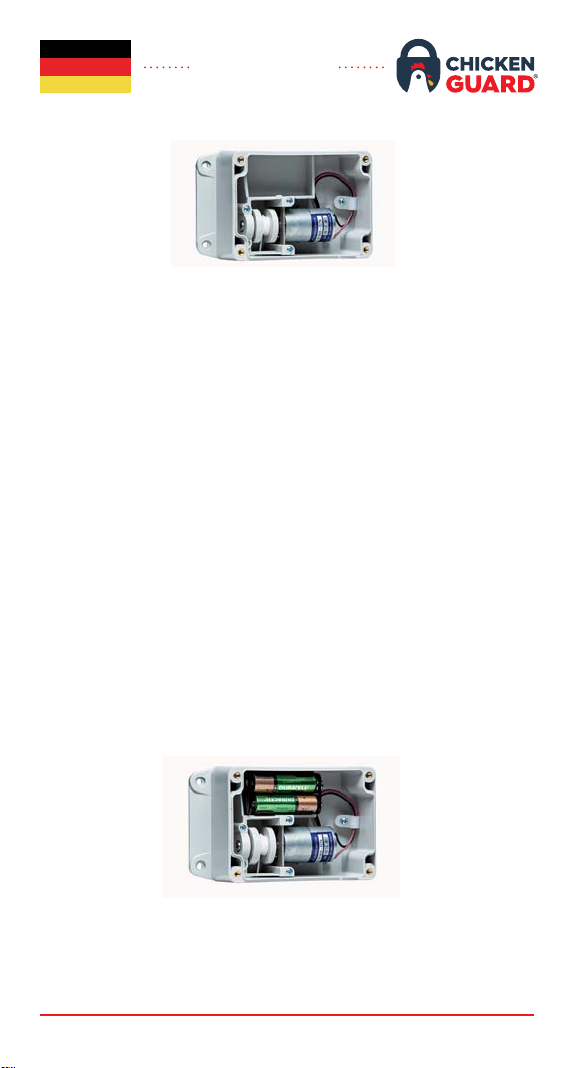
EINLEGEN DER AA BATTERIEN
1. Setzen Sie die Batterien in den Batteriehalter ein.
Verwenden Sie keine 9V Blocks.
2. Befestigen Sie den Batterieanschluss am Batteriehalter.
VERBINDEN SIE DIE FRONTPLATTE
1. Verbinden Sie die rote / schwarze Leitung in der Steuerbox mit
den Zinken an der Innenseite der Frontplatte (mit dem schwarzen
Kabel oben).
Verwenden Sie keine 9V Blocks.
19
chickenguard.com
Hinweis: Wenn das rote und schwarze Kabel falsch angeschlossen
sind, funktionieren die HOCH und RUNTER Tasten verkehrt herum.
2. Legen Sie den Batteriehalter in die Steuerbox.
3. Schrauben Sie die Frontplatte an die Steuerbox.
(BENUTZEN SIE AUCH HIER KEINEN AKKUSCHRAUBER)
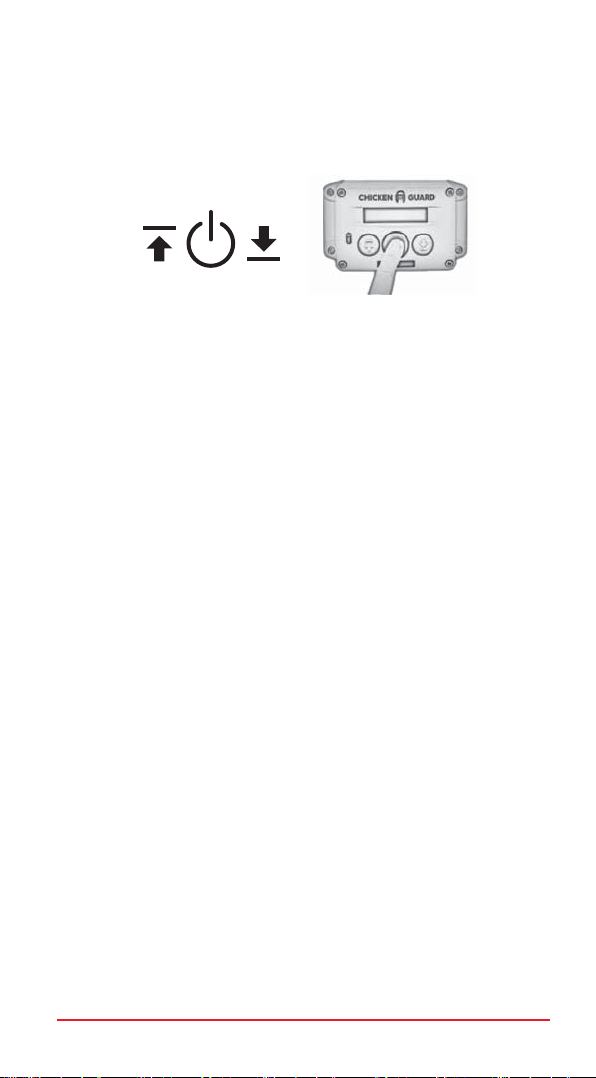
ERSTEINRICHTUNG
1. Drücken Sie die Taste MENÜ zweimal, um das Gerät
einzuschalten (nur einmal, wenn es bereits eingeschaltet ist) - der
Bildschirm zeigt CHICKENGUARD.COM und die Uhrzeit an.
2. Drücken Sie erneut MENÜ, um das Hauptmenü aufzurufen. Auf
dem Bildschirm wird EINRICHTUNGSASSISTENT angezeigt.
3. Drücken Sie erneut MENÜ, um den EINRICHTUNGSASSISTENTEN
zu starten.
AUTOMATISCHER EINSTELLUNGSASSISTENT
SPRACHE AUSWÄHLEN
1. Drücken Sie HOCH oder RUNTER, um Ihre Sprache auszuwählen.
2. Drücken Sie zum Speichern MENÜ.
ZEITFORMAT AUSWÄHLEN
Drücken Sie HOCH für 12-Stunden-Uhr oder RUNTER für 24-Stunden-
Uhr.
ZEIT EINSTELLEN
1. Drücken Sie HOCH oder RUNTER, um die Stunde einzustellen.
2. Drücken Sie zum Speichern MENÜ.
3. Drücken Sie HOCH oder RUNTER, um die Minuten einzustellen.
4. Drücken Sie zum Speichern MENÜ.
FORTFAHREN
Wählen Sie JA mit der Taste HOCH, um fortzufahren.
TÜRKALIBRIERUNG
1. Halten Sie die Taste HOCH gedrückt, bis die Tür vollständig
geöffnet ist.
2. Wenn die Tür vollständig geöffnet ist, lassen Sie die Taste
HOCH los.
3. Drücken Sie MENÜ zum Speichern. (Der vollständig geöffneten
Position).
4. Drücken und halten Sie RUNTER, bis die Tür vollständig
geschlossen ist.
UP MENU DOWN

20 chickenguard.com
5. Wenn die Tür vollständig geschlossen ist, lassen Sie die
AB-Taste los.
6. Drücken Sie zum Speichern MENÜ (der vollständig geschlossenen
Position).
(BEI VERWENDUNG DES SELBSTSCHLIEßENDEN TÜR-KITS
VON CHICKENGUARD MÜSSEN SIE SICHERSTELLEN, DASS DIE
FLÜGEL WÄHREND DER KALIBRIERUNG IN GESCHLOSSENER
POSITION VOLLSTÄNDIG VERLÄNGERT WERDEN)
TÜR WIRD JETZT VOLLAUTOMATISCH ÖFFNEN
7. Auf dem Display erscheint: KALIBRIERUNG VOLLSTÄNDIG.
FORTFAHREN
Wählen Sie JA mit der HOCH-Taste.
EINSTELLUNGEN FÜR ÖFFNUNG UND SCHLIEßUNG
Die folgenden Optionen können unabhängig voneinander
eingestellt werden.Zum Beispiel können Sie morgens eine
zeitgesteuerte Öffnung einstellen und dann den Lichtsensor
verwenden, um nachts zu schließen.
Drücken Sie HOCH oder RUNTER, um Ihre bevorzugte Option
auszuwählen:
• MANUELL • SENSOR
• TIMER • LUX+
Weitere Informationen finden Sie in den folgenden Beschreibungen:
MANUELL
Diese Option verhindert das automatische Öffnen oder Schließen der
Stalltür. Sie müssten die Tür manuell öffnen oder schließen, indem
Sie entweder die HOCH- oder die RUNTER-Taste drücken - nützlich,
wenn Sie Enten haben, da sie keine Gewohnheitstiere sind. Zum
Beispiel: Würden Sie am Morgen eine zeitgesteuerte Öffnung und
am Abend MANUELL einstellen, um sicherzustellen, dass sie sich in
Sicherheit befinden, bevor Sie die Tür manuell schließen.
SENSOR
Diese Option dient zum automatischen Öffnen der Stalltüre im
Morgengrauen oder zum automatischen Schließen am Abend
bei Dämmerung mit dem Lichtsensor.
Hinweis:Der Lichtsensor ist nur für Premium- und Extreme-
Modelle verfügbar.
Position).
This manual suits for next models
2
Table of contents
Languages:


