Chirana Medical Smile Mini 04 User manual

Dental unit
Smile Mini 04
Instructions for use


INSTRUCTIONS FOR USE DU Smile Mini 04
3 Serial. No. S14 04100 54
CONTENTS: Page
1. Operating warnings ............................................................................................................5
1.1. Symbols .......................................................................................................................5
1.2. Target group ................................................................................................................5
1.3. Service.........................................................................................................................5
1.4. Operating book............................................................................................................5
1.5. Warranty conditions ....................................................................................................5
2. Purpose and use..................................................................................................................6
3. Assembly and installation ..................................................................................................6
4. The description of the device .............................................................................................6
4.1. Main parts of the dental unit........................................................................................6
4.1.1. Dentist table..............................................................................................................6
4.1.2. Spittoon block ..........................................................................................................7
4.1.3. Foot actuator.............................................................................................................8
4.1.4. The head of the light.................................................................................................9
4.2. The dimensions of the dental unit................................................................................9
4.3. The production label..................................................................................................10
4.4. Technical data............................................................................................................10
5. Basic equipment...............................................................................................................11
6. Additional equipment.......................................................................................................11
7. Putting into operation.......................................................................................................11
7.1. Switching of the device .............................................................................................11
7.2. Switching of the light ................................................................................................11
8. Operation of the product ..................................................................................................12
8.1. Manipulation with the dentist table...........................................................................12
8.2. Description of functions controlled by the keyboard buttons....................................12
8.2.1. Buttons for the tools...........................................................................................12
8.2.2 Button for the chair .................................................................................................13
8.2.3 Buttons for spittoon block.......................................................................................13
8.3. Setting of the tools on the dentist table......................................................................13
8.3.1. Multifunctional syringe..........................................................................................14
8.3.2. Turbine nozzle........................................................................................................14
8.3.3. Micromotor.............................................................................................................14
8.3.4. Ultrasonic scaler.....................................................................................................15
8.3.5. Polymerization lamp ..............................................................................................15
8.4. Controlling tools for the spittoon block.....................................................................16
8.4.1. The saliva ejector ...................................................................................................16
8.4.2. Suction....................................................................................................................16
8.4.3. Bowl rinsing...........................................................................................................16
8.4.4. Cup filling ..............................................................................................................16
8.4.5. Switching of source of water for cooling instruments (Optional)..........................16
8.5. Fulfillment of the bottle with clean water .................................................................16
8.6 Controlling of the assistant table (optional equipment).................................................17
8.6.1. Saliva ejector..........................................................................................................17
8.6.2. Exhauster................................................................................................................17
8.7 The system of exhausting and waste separation.............................................................18
9. Maintenance of the product..............................................................................................18
9.1. Maintenance by service personnel.............................................................................18
9.2. Maintenance by service technician............................................................................20
10. Cleaning, disinfection and sterilization........................................................................20
11. Safety technical controls ............................................................................................... 21
12. Transport .......................................................................................................................21

INSTRUCTIONS FOR USE DU Smile Mini 04
4 Serial. No. S14 04100 54
13. Storage...........................................................................................................................22
14. Disposal of the device...................................................................................................22
15. Guidance and declaration of the producer to the electromagnetic compatibility..........22
15.1. Electromagnetic radiation......................................................................................22
15.2. Resistance against the electromagnetic interference..............................................23
15.3. Recommended protective distances between the portable and mobile high
frequency communication devices and the dental unit SMILE MINI 04 ............................25

INSTRUCTIONS FOR USE DU Smile Mini 04
5 Serial. No. S14 04100 54
1. Operating warnings
1.1. Symbols
By this symbol are marked the attentions in the instructions for use, which
require special attention. Before the first using of the product, please be familiar
with all of the attentions written in this instructions for use.
By this symbol are marked other important attentions written in this instructions.
1.2. Target group
This Instructions for use is intended for the dentists and personnel of the dentisty.
The parts of the dental unit, which are in the contact with the patient, dentist and
working personnel are not carcinogenic, mutagen, toxic and they do not content
phthalates.
1.3. Service
The name and the address of the organization, which accomplishes the repair of the device require
from the supplier of the device.
If the device is sold from the original user to the other user is necessary to notify
the change of the user to the supplier of the device resp. to the producer.
1.4. Operating book
This book is intended for the records about the installation, repairs and regular revisions.
Each step should be recorded into this book and it is important to do the step only
by the service technician.
1.5. Warranty conditions
You can download the guarantee conditions at the following address:
www.chirana.eu/preview-file/guarantee-conditions-units-2944.pdf
i
i
i
i
ATTENTION

INSTRUCTIONS FOR USE DU Smile Mini 04
6 Serial. No. S14 04100 54
2. Purpose and use
The dental unit Smile Mini 04 is intended only for the use in the field of dentisty. The handling of the
device can be done only by the qualified medical personnel.
The unit is intended for the explosion-proof surrounding.
3. Assembly and installation
Assembly and installation of the dental unit Smile Mini 04 can perform a service technician of
CHIRANA Medical inc. Stara Tura and service staff from companies that are authorized to perform
that activity. Assembly and installation shall be carried out according to the instructions for assembly
and installation of Smile Mini 04 and according to the installation plan Smile Mini 04
Smile dental unit Mini 04 is classified according to the type of protection against electric
current as a Class of I. and can be installed only in rooms where the wiring complies the
requirements of the national standards.
The device may be operated only by staff familiar with these instructions for use.
- To eliminate the risk of electric shock, this device must be connected to the
mains supply with protective earthing.
- If national regulations require separation of amalgam, then the dental unit must
be connected to an external amalgam separator.
4. The description of the device
The dental unit Smile Mini O4 consists of each other functionally connected parts. The version and the
equipment of the parts can differ according to the version and equipment of the dental unit.
4.1. Main parts of the dental unit
1. Dentist table
2. Spittoon block
3. Foot actuator
4. Head of the light
Some parts of the dental unit can have different variants, which differ from the
basic pictures.
4.1.1. Dentist table
The dentist table is carried on the pantographic arm and it should be in the version with the lower
guidance of the tool hoses or with the upper guidance of the tool hoses.
i
ATTENTION
ATTENTION
ATTENTION
1
2
3
4

INSTRUCTIONS FOR USE DU Smile Mini 04
7 Serial. No. S14 04100 54
4.1.1.1. Dentist table –lower guidance
1. Dentist table
2. Holders of the tools
3. Hoses of the tools
4. Keyboard
5. Rubber tray
4.1.1.2. Dentist table –upper guidance
1. Dentist table
2. Upper guidance (whip)
3. Seating
4. Keyboard
5. Tools of hoses
6. Tray table with the arm and the
rubber tray
7. Rubber tray
The dentist table can include from one to four tools from the given offer:
- 1x multifunctional syringe
- 3x turbine nozzle
- 2x commutator micromotor
- 2x brushless micromotor , but together at maximum three micromotors
- 1x ultrasonic scaler
- 1x polymerization lamp
The sequence of the tools on the dentist table can be optional –it depends on the order.
4.1.2. Spittoon block
1. Spittoon bowl
2. Left cover
3. Right removable cover
4. Bottle with the water for cooling tools
5. Assistant table (optional equipment)
The spittoon block can content one or two tools from the given offer:
- 1x saliva ejector
- 1x suction bottle
5
7
6
4
2
1
3
1
2
3
4
5
5
4
1
3
2

INSTRUCTIONS FOR USE DU Smile Mini 04
8 Serial. No. S14 04100 54
4.1.2.1. Spittoon bowl
The spittoon bowl is rotary. The pipes of the glass and bowl rinsing are detachable.
1. Spittoon bowl
2. Catcher
3. Bowl to the catcher
4. Cover of the sieve
5. Pipe of the bowl rinsing
6. Pipe of the glass filing
4.1.3. Foot actuator
Foot switch
Rotary foot actuator
Multifunctional rotary foot
actuator
Foot controller FCR1-6
1. Launch of the tool
2. Speed/power control
3. Chair control
4. Carrier
4
3
1,2
1
2
4
5
6
3
1,2
4
3
1,2
4
1

INSTRUCTIONS FOR USE DU Smile Mini 04
9 Serial. No. S14 04100 54
4.1.4. The head of the light
The headlights are available in four versions: a Halogen light FARO EDI, or LED lights FARO
ALYA and FARO MAYA, FARO MAYA and LED A.
4.2. The dimensions of the dental unit

INSTRUCTIONS FOR USE DU Smile Mini 04
10 Serial. No. S14 04100 54
4.3. The production label
Producer
Year of production
SN
Serial Number
The device must not be disposed with
the household waste
IPX1C
Protection degree
CE mark according to Directive 93/42
/ EEC on medical devices with a
number of the notified body
Classification of type B
Follow the instructions for use
Familiarize yourself with the
instructions in the instructions for use
Eurasian conformity mark
4.4. Technical data
Rated supply voltage 230V~, 220V~ (110V~) ± 10 %
Rated frequency 50 - 60 Hz ± 2 %
Max. input at 50 Hz (without chair) 450 VA
Type of attachment part B
Type of protection against the el. shock I
(fixed installation)
Degree of protection IPX1C
Input pressure of air 0,5 MPa (+0,2 ; -0,03) MPa
Input pressure of water 0,6 MPa (-0,3) MPa
Range of water hardness from 8,4 dH to 12 dH
Water temperature at the input < 25oC
Water temperature at the output for cup (at heating the water) 40°C (-10)°C
Range of temperature of the surrounding from +10oC to +40oC
Range of relative air humidity from 30 % to 75 %
Range of atmospheric pressure from 70,0 kPa to 106,0 kPa
Weight without chair < 60 kg
Max. additional loading of the dentist´s tray 2 kg

INSTRUCTIONS FOR USE DU Smile Mini 04
11 Serial. No. S14 04100 54
5. Basic equipment
The basic equipment and spare parts are delivered with the device and they are listed in the Packing
list.
- Do not modify this unit without the authorization of the producer
- In case of modifications, after the decision of the producer, must be carried out
appropriate inspections and tests to ensure the continued safety of the use of the
dental unit
- Use only spare parts from CHIRANA Medical inc.
6. Additional equipment
Additional equipment delivered with the device is included in the part of the Packing list as an
equipment delivered with the device for the special order.
7. Putting into operation
7.1. Switching of the device
The dental unit is switched by pressing the main switch in the position I.
After switching of the dental unit is the LED diode lighted up in the position I on
the indicating scale of keyboard.
Before you switch off the main power switch turn off the by the switch of cooling
the cooling of tools, otherwise there may be a short-term water leakage through
the tools
After work, switch off the dental unit, press the power switch to the position O By switching of the
unit is closed air intake, water and electricity in the unit.
It is recommended to always close the main water supply to the dental unit.
7.2. Switching of the light
The light is switched and is controlled by the switch (in the sensor version by the sensor) on the lower
part of the body of the light. The light has its own instructions for use.
The light footprint of the light is necessary to set in the place of the mouth;
thereby it eliminated the risk of the damage of patient´s sight.
i
i
ATTENTION
ATTENTION

INSTRUCTIONS FOR USE DU Smile Mini 04
12 Serial. No. S14 04100 54
8. Operation of the product
8.1. Manipulation with the dentist table
The vertical position of the dentist table placed on the pantographic arm is fixed by the brake. By
mechanical loading of tray tables it is not given out to the mechanical falling of the table. Before
changing of the vertical position of the dentist table is necessary to release the brake. The brake is
released by turning of the wheel placed in the lower part of the dentist arm.
Grab the handle placed in the right lower side of the table on the dentist ´s table with released
brake and set the table in the required position.
Lock again the arm by the usage of the brake wheel after releasing of the table into the required
position.
Pay attention by the manipulation with the table in order not to allow
getting something between the rear part of the table and the arm.
It could come to the injury of shutting.
8.2. Description of functions controlled by the keyboard buttons
8.2.1. Buttons for the tools
Reversing revolutions of the micromotor (ENDO function of the ultrasonic scaler)
If the alarm light are set the left - handed revolutions of the micromotor. For some types of
ultrasonic scalers is this button used for activating the function of ENDO
Reduction of the revolutions of the micromotor/performance of the scaler by step 5%
Raising of the revolutions of the micromotor/performance of the scaler by step 5%
Wheel of the mechanical brake
ATTENTION
Indicating scale
Assistant keyboard (optional equipment)

INSTRUCTIONS FOR USE DU Smile Mini 04
13 Serial. No. S14 04100 54
8.2.2 Button for the chair
The controlling of the chair is the same from the dentist keyboard as well from the multifunctional
foot actuator. The chair has its own instructions for use.
Safety button STOP
By pressing the button is stopped the movement of the chair.
During the dentist work with the tools is the chair automatically blocked
Movement of the chair down
By holding of the button is controlled the movement of the chair down. By short pressing of
the button is brought up the programme No.1.
Movement of the chair up
By holding of the button is controlled the movement of the chair up. By short pressing of the
button is brought up the programme No. 2.
Movement of the rest down
By holding of the button is controlled the movement of the rest down. By short pressing of
the button is brought up the programme No.3.
Movement of the rest up
By holding of the button is controlled the movement of the rest up. By short pressing of the
button is brought up the programme No. 4, By repeating short pressing is the chair returned
back to the last working position.
Setting of the programmed positions of the chair
Set the chair into the desired position. Push the programming button placed on the chair and while
holding of this button press one of four controlling buttons of the chair. It sounds acoustic signal
informing that the programming position was programmed.
When you move the chair make sure that nothing stands in the path of movement
of the chair, back rest, arm with the dentist table and the spittoon block!
8.2.3 Buttons for spittoon block
Switch ON/OFF of the glass filing
Function is timed –it automatically gets to the switching OFF.
If you want to set the timer press the button for the required time. The acoustic signal
occurs after releasing of the button and new time is written into the memory. The
minimum time for setting is 3secs.
Switch ON/OFF of the bowl rinsing
Function is timed –it automatically gets to the switching OFF.
If you want to set the timer press the button for the required time. The acoustic signal
occurs after releasing of the button and new time is written into the memory. The
minimum time for setting is 3secs.
8.3. Setting of the tools on the dentist table
Tools have their own individual manual which is attached to the package
of the each tool.
The tools placed on the dentist table (excepting the multifunctional syringe) are programmable
blocked against simultaneous using.
Only the first pulled tool is prepared for the operation. All tools pulled after it are blocked.
i
ATTENTION

INSTRUCTIONS FOR USE DU Smile Mini 04
14 Serial. No. S14 04100 54
8.3.1. Multifunctional syringe
Pull the syringe from the holder resp. take it up from the seating.
For starting the air press the blue button.
For starting the water press the green button.
For starting of the water nebula press simultaneously blue and green button.
8.3.2. Turbine nozzle
The turbine nozzle is activated by the pulling of the holder resp. taking it up from the seating. If the
nozzle is lighting, the light is switched for the whole time of its activation. For starting the
activity of the turbine nozzle press the foot switch resp. deflects the lever of the foot actuator turned
into right. By releasing of the foot actuator is the activity ended. The size and the direction of the
revolutions of the turbine nozzle are possible to set.
Cooling of the tool (drill) with water spray:
Switching ON/OFF of the cooling of the tool with the water spray is realised with the switch of
cooling placed on the bottom side of the dentist table. The switch is for all tools. If the cooling is
switched ON, it is switched ON for the each toll, if it is switched OFF, it is switched OFF for all the
tools. If the cooling is switched ON is possible to regulate the amount of the cooling water by the
button placed on the bottom side of the dentist table.
1. Oil catcher
2. Insert to the oil catcher
3. Cooling switch
4. Regulating button of the
amount of cooling water
In the basic equipment is one common regulator ( button) for setting the amount
of water for all tools( excepting multifunctional syringe). In dependence of the
equipment can the unit content independent regulators of the amount of water for
each tool separately.
8.3.3. Micromotor
The micromotor is activated by pulling from the holder, resp. taking it up from the seating. If the
micromotor is lighted, then the lighting is switched ON during the whole time of its activation. For
starting the activity of the micromotor press the foot switch resp. swing the lever pivot of foot actuator
to the right. The release of foot actuator is operation ended. The size and direction of rotation of the
micromotor can be set by clicking on the keyboard of dentist. Foot switch can be continuously
adjusted by micromotor revolutions in advance by buttons in the set range
Cooling of tool (drill) is by water spray and is controlled as in the turbine nozzle.
1
2
3
4
i

INSTRUCTIONS FOR USE DU Smile Mini 04
15 Serial. No. S14 04100 54
Revolutions of the micromotor can be adjusted continuously by foot just a foot
actuator. Foot switch can only turn on the micromotor revolutions, respectively.
switch off. Speed setting can be done using keyboard buttons of the dentist.
Actual number of revolutions depends on the drill used in the micromotor and
micromotor nozzle.
Giromatic
Function in which the micromotor is cyclically changing the direction of rotation. This function is for
the expansion of dental tubules.
Micromotor is activated by pulling out of the holder, respectively. by picking up from the
seating. Press and for 3 seconds hold reversing of micromotor. Starting the function
indicated by the reciprocating indications on the indicator scale. Frequency (range) of
oscillation can be set by buttons and .
To disable the function, briefly press the button of micromotor reversal.
This function is active only for commutator micromotor.
Revolutions of the micromotor are at capacity giromatic constant. The speed can
not be changed even by buttons or foot control. By buttons may be changed only
frequency (range) of oscillation of tool .
8.3.4. Ultrasonic scaler
Use only terminals which are determined for it and do not work without
cooling of the terminals with the water.
In other case the damage of the tooth or the damage of the scaler by the
heat can be caused.
Recommend water flow is 20ml/min.
Scaler is activated by pulling out of the holder, respectively. by picking up from the seating. To start
activities scaler press the foot switch, resp. Swing the lever pivot of the foot controller to the right. The
release of the foot controller, the operation ends. Performance of scaler can be set by clicking on the
keyboard of dentist or foot control. Foot switch can only turn scaler, respectively. switch off. Foot
controller can be continuously adjust performance of suction scaler in advance by buttons is set the
range.
If scaler lights, then the light is on for its whole action.
Cooling of the terminal by the water spray is likewise controlled as in the turbine nozzle.
For some types of scalers is this button used for activating the function of ENDO
8.3.5. Polymerization lamp
To begin the operations of the polymerization lamp press the button on the lamp body. To stop of the
activity press the button a second time. Different types supplied by polymerization lamp have different
light regimes.
The intensity of the polymerization lamp is very high hence it is necessary
to protect your sight against direct view to the light source.
i
i
i
i
ATTENTION
ATTENTION
3s

INSTRUCTIONS FOR USE DU Smile Mini 04
16 Serial. No. S14 04100 54
8.4. Controlling tools for the spittoon block
8.4.1. The saliva ejector
It is activated by switching the mechanical switch located in the saliva ejector mounted to the position
(upwards). To stop the activity switch to position (down).
8.4.2. Suction
It is activated by switching the mechanical switch located in the suction mounted to the position
(upwards). To stop the activity switch to position (down).
The suction performance of suction can be regulated by control valve placed on the hose ending.
8.4.3. Bowl rinsing
It is activated by switching the mechanical switch located under the spittoon bowl towards symbol of
bowl. To stop activity switch the switch to its original position.
8.4.4. Cup filling
It is activated by switching the mechanical switch located under the spittoon bowl towards symbol of
Cup. To stop activity switch the switch to its original position.
8.4.5. Switching of source of water for cooling instruments (Optional)
Slide the switch to select the source of water for supply water for cooling instruments. In the position
is selected central (city) water supply in position is selected pure water from the bottle.
1. Switch of cup filling
2. Switch of bowl rinsing
3. Switch of source of water for cooling
tools
4. Switch of the saliva ejector
5. Switch of suction
6. The damper of suction
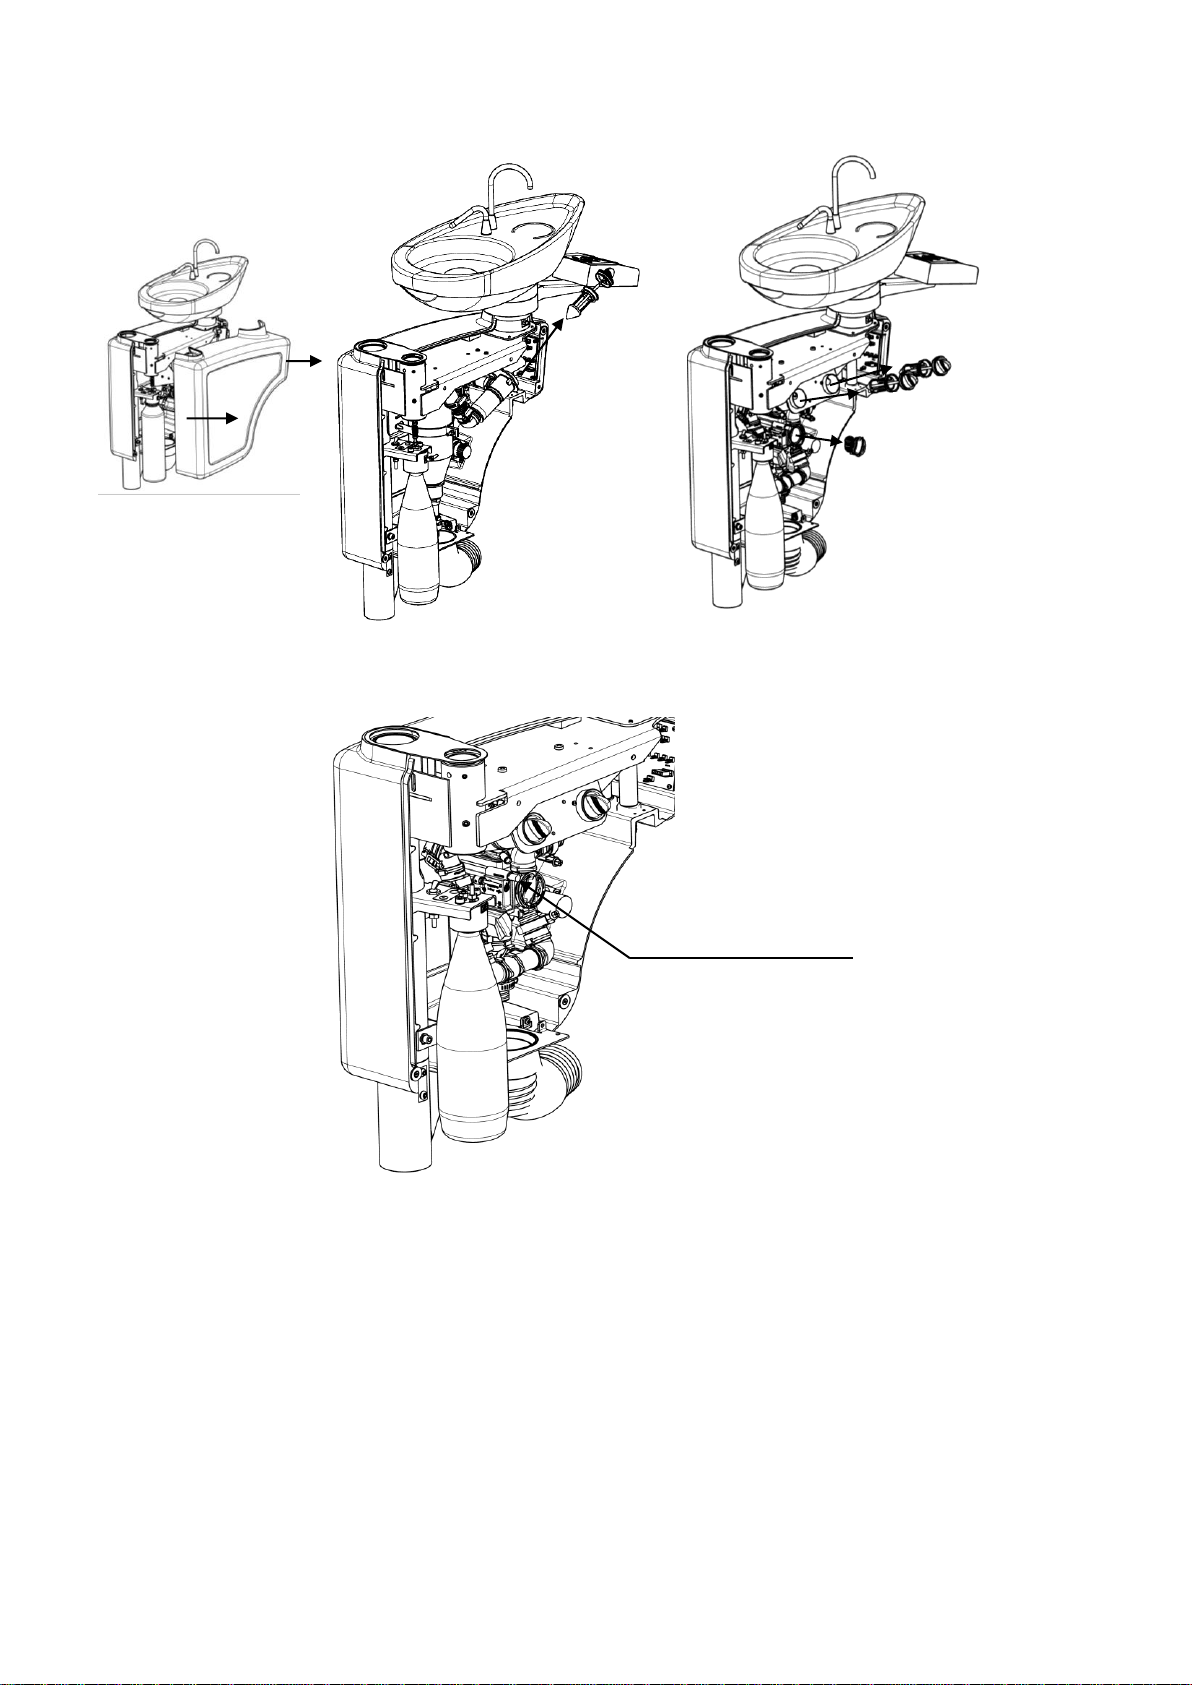
8.5. Fulfillment of the bottle with clean water
Bottle with pure water is bolted to the spittoon block. Before handling a bottle pull it toward you
remove the right side cover of the spittoon block.
1
2
3
4
5
6

INSTRUCTIONS FOR USE DU Smile Mini 04
17 Serial. No. S14 04100 54
Release pressure in the bottle by putting the vent valve to position .
Bottle unscrew by turning of the bottle to the left.
When filling bottles make sure that in the bottle are no foreign substances that
could affect the composition and quality of clean water. Fill up the bottle.
volume of 0.9 litres (volume of the bottle is 1 liter).
Never use demineralized water for industrial purposes.
Hold the bottle filled from the bottom, insert and turn right bottle screw.
Vent valve switch back to position and attach the cover of the spittoon block
Bottle can be unscrewed and performed well without withdrawing the right door
of the spittoon block. Before handling a bottle in this case is necessary to turn off
the main switch of the dental unit that has been depressurized bottle.
8.6 Controlling of the assistant table (optional equipment)
8.6.1. Saliva ejector
It is activated into operation by pulling of the terminal from the holder. The function of the
saliva ejector is stopped after inserting of the terminal to the holder.
The suction performance of the saliva ejector is possible to regulate by the regulation valve
placed in the terminal of the hose. It is possible to completely stop its function.
8.6.2. Exhauster
It is activated into operation after pulling of the terminal from the holder. The function ends
after inserting of the terminal from the holder. The suction function of the exhauster is
possible to regulate by the regulation valve placed in the terminal of the hose. It is possible to
completely stop its function.
If the unit contents the CATTANI system it is possible to turn off for a while
exhaustion during long-time exhaustion. This is normal stage. Exhaustion is
automatically resumed if the terminal of the exhauster or saliva ejector is
pulled from the holder.
He exhaustion is finished with delay after insert in of the terminal from the
saliva ejector or exhauster back to the holder. The delay can take a few
seconds.
i
Breather
valve
i
ATTENTION
ATTENTION

INSTRUCTIONS FOR USE DU Smile Mini 04
18 Serial. No. S14 04100 54
By blood, sputum exhaustion and by different sanitation resource comes
foam, which can cause flooding of the separating CATTANI system and
long –time breaking of exhaustion. If you want to avoid the existence of
foam insert to the filter of the exhausting hoses (see picture in the Chapter
9.1.) one cleaning and antifoam pill CATTANI and exhaust small amount of
water before using of the saliva ejector or exhauster. The pill is dissolved for
a few hours. Cleaning and antifoam pills CATTANI have not only antifoam
action but antibacterial function too.
8.7 The system of exhausting and waste separation
In the dependence of the version the dental unit can contain different systems of exhaustion
and waste separation.
Ejector exhaustion , dry exhaustion ( CATTANY system) or wet exhaustion. The spittoon
valve Dürr MSBV ensures waste exhaustion from the spittoon bowl in the units connected to
the central wet exhaustion. All information you can find in own instructions for use.
9. Maintenance of the product
9.1. Maintenance by service personnel
Use gloves for this work!
-Operating personnel must:
-Before starting work, rinse and blow through the hose tools (without tools) by running the tool
with enabled cooling and rinse cup filling tube running the cup filling.
-Before and after longer break of the work ( weekend, holiday) flush and nip hoses of tools (
without tools) by starting of the device with switched cooling and flush the pipe of the glass filling
by activation of the glass filling.
If the unit contents bottle for clean water it is recommended before longer break of the work fill
hoses of the tools with disinfection agent for decontamination and prevention of the creating of
biofilm see Chapter 10.
-2 - 3 times a day to check condition and cleanliness of the catcher in the spittoon bowl and
necessary, cleaned or replaced - see Fig. in Chap. 4.1.3.1.
-2 - 3 times a day, clean the hose and ejector pump flushing with clean water min. 0.5 litres.
-Twice or three times per day the sieve in the terminal of the saliva ejector ( ejector
exhausting)
-Once per day clean filter of exhausting hoses ( dry or wet exhausting) see picture bellow
-Once per day after work clean filter of the spittoon valve Dürr MSBV (wet exhausting)
see picture below.
i
ATTENTION
INSTRUCTIONS FOR USE DU Smile Mini 04
19 Serial. No. S14 04100 54
Dry exhaustion
The wet suction
-Start the cleaning of spittoon valve Dürr MSBV twice a day by pressing the button on the
spittoon valve Dürr MSBV (wet suction).
-1x a month clean the conventional detergent, insert the looped oil - see Fig. in Chap. 8.3.2.
-- once per six months to replace a bottle of clean water and a bottle of disinfectant.
However, if you notice wear and tear, scratches, discoloration, loss of transparency,
deformation, or other damage, replace with a new bottle immediately.
Another maintenance of the device BY service personnel is limited to cleaning and sterilization of the
device of sterilizable parts.
Maintenance, cleaning and sterilizing instruments (micromotor, turbine handpiece, micromotor
nozzles) perform according to manufacturer's instructions of instruments.
The button of spittoon valve
cleaning Dürr MSBV
The filters of suction
hoses
The filter of spittoon
valve Dürr MSBV
Filter of
exhausting
hoses

INSTRUCTIONS FOR USE DU Smile Mini 04
20 Serial. No. S14 04100 54
Chemicals must be collected only on a tray with rubber. When accidental spillage of a substance such.
Trikresol, Chlumského solution and other aggressive substances painted parts of the device, the
surface must be immediately wiped with swab soaked in water.
9.2. Maintenance by service technician
-During the warranty period, the user must at regular six-month intervals invite authorized service
technician who must:
-- Check condition of filters for water and air inlet housing
-- Check and, if necessary, readjust the working pressures of water and air in the inlet housing and
dentist for different instruments according to the Instructions for Assembly and Installation
-- Check the various regulatory and controls
-- Check freedom of movement of arms and possibly readjust their braking.
10. Cleaning, disinfection and sterilization
Cleaning of the device (spittoon block, table, foot switch) is done with a damp cloth, non-flammable
cleaning agents, taking care not to get water on the device. All parts of the appliance are thoroughly
clothed and polished with a dry flannel cloth.
The spittoon bowl and exhausting components (saliva ejector, exhauster) are recommended to
clean and disinfect twice per day for example with the agent Dürr Dental Orotol or Metasys
Green and Clean MB and M2. The Dürr Dental MD 550 is specially designed to clean the
spittoon bowl. To clean suction parts of the residual powders we recommend to use Dürr
Dental MD 555 once a week. When cleaning, follow the instructions on the detergent label.
Do not use abrasive or highly foaming agents, as these can lead to malfunctions
suction. Unauthorized are the solvents / example. acetone and the like. / and
agents based on phenols ,chlorine and aldehydes.
Water ways of tool hoses are recommended to continually disinfect with disinfection agent
for continual disinfection (decontamination) of water ways determined for dental devices (e.g.
Alpron made by company Alpro). The bottle for clean water (optional equipment) –Chapter
8.5 fill with solution of disinfection agent for continual disinfection (decontamination) of
water ways for dental devices diluted according to the manufacturer ´s instructions.
During long –time break of dental unit is recommended to make disinfection
(decontamination) as follows:
-Bottle for clean water (optional equipment) Chapter 8.5 fill with the disinfection agent for
decontamination and prevention for the creation of biofilm in the water ways of dental
units (e.g. Bilpron made by company Alpro).
-Switch the water source switch for cooling devices (optional equipment) to the position -
see Chapter 8.4.5.
-Switch ON cooling tools with water spray and by regulator set the maximum amount of
cooling water –se Chapter 8.3.2.
-Hose of each tool (without tool) hold above the spittoon bowl and by activation of foot
control (eventually with the button on the syringe) soak disinfection agent to the hose
(syringe). Firstly the water leaks out. Let the water to leak till the disinfection agent cannot
start to leak.
-Hoses filled with disinfection agent place on their place and switch OFF the dental unit.
Disinfection agent will stay impregnated in the tool hoses and it will work during the
whole time of inaction of the dental unit.
-Before starting of other action it is necessary to fill the bottle for clean water with clean
water.
ATTENTION
Table of contents
Other Chirana Medical Dental Equipment manuals


Popular Dental Equipment manuals by other brands

DENTSPLY Tulsa Dental
DENTSPLY Tulsa Dental ProUltra PIEZO ULTRASONIC Instructions for use

Amanngirrbach
Amanngirrbach Artex CN user manual

NSK
NSK S-Max M65 Operation manual

Miele
Miele G 7881 operating instructions

Woodpecker
Woodpecker PT MASTER 3 instruction manual

Genoss
Genoss iCT injection SE user manual


