Chopin Mixolab 2 Instruction sheet

Quick installation and rst test
Installation rapide et premier test
Instalación rápida y primer test
Краткое руководство по установке и проведению
первого испытания
INSTALLING YOUR MIXOLAB 2
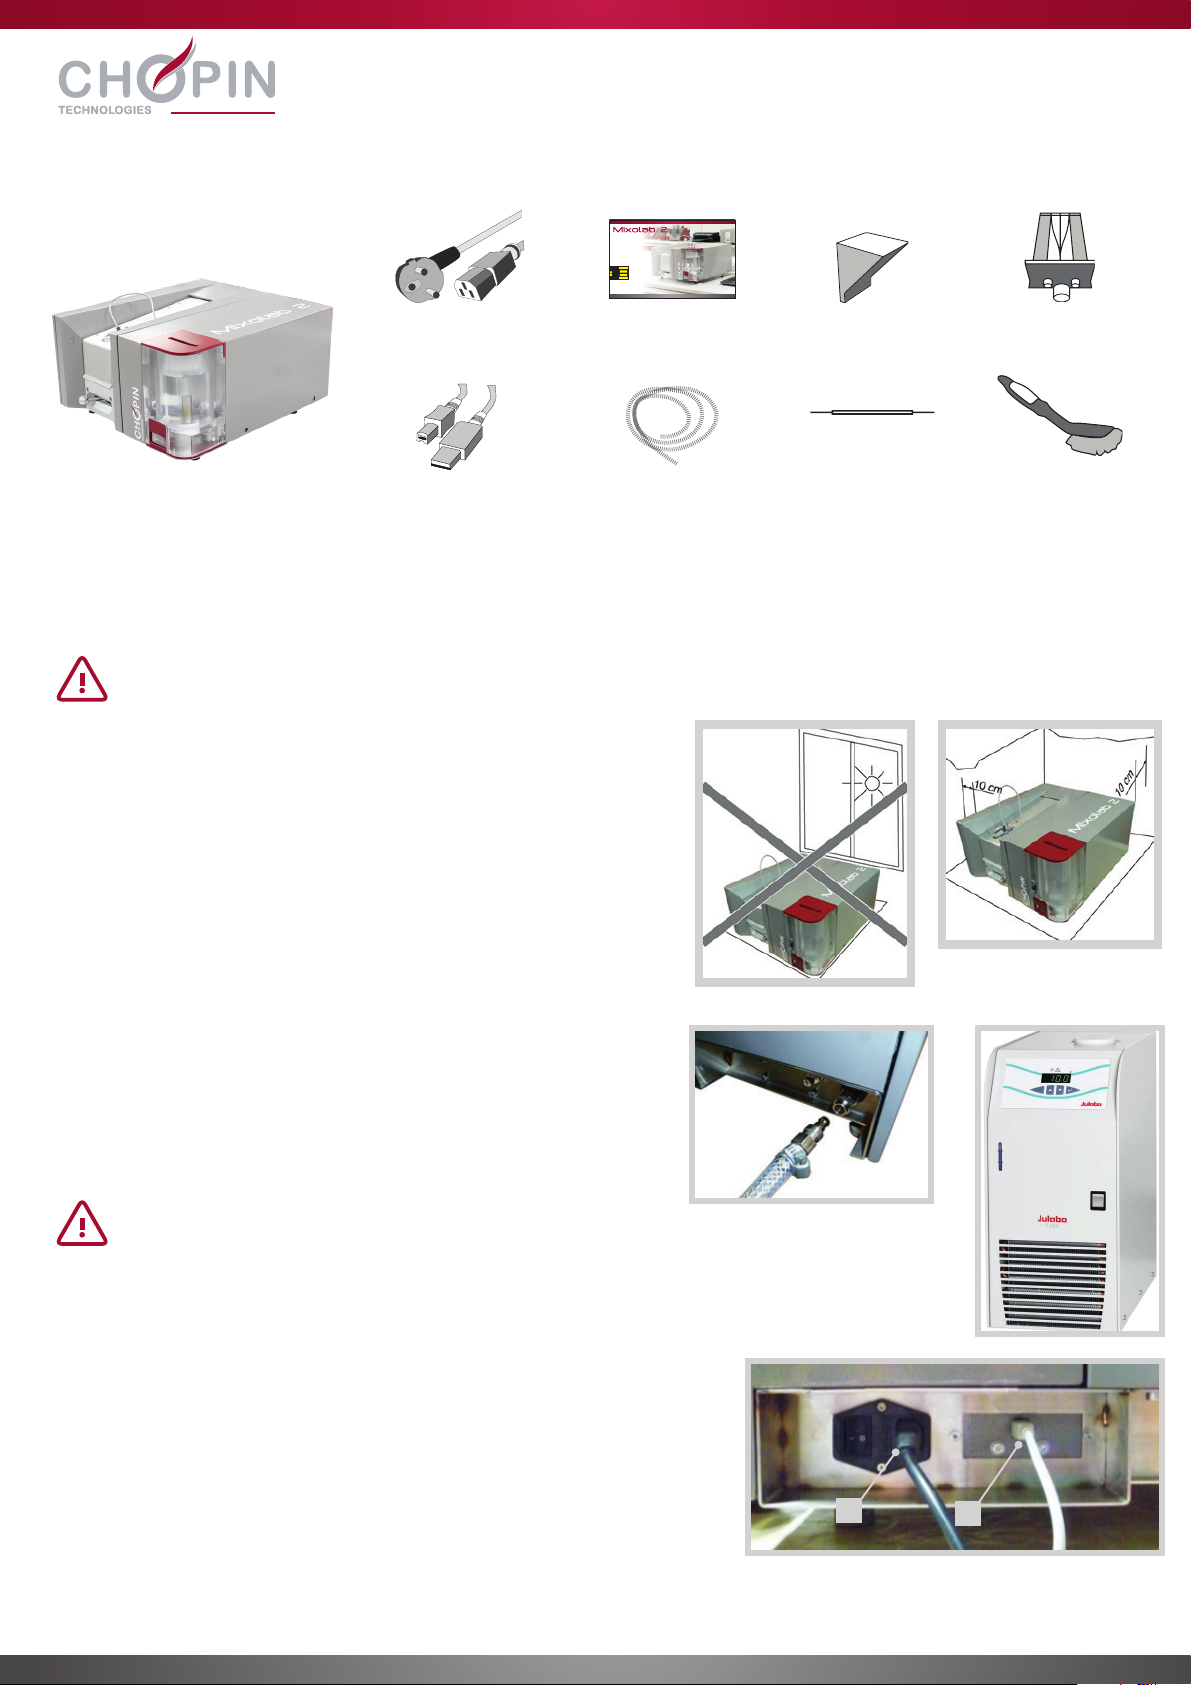
A. Contents
B. Installation
C. Connecting the water tube
D. Connecting the power
1. Attach the movable parts of the quick connectors to the tubes and
lock them in place using the brackets.
2. Connect the first tube from the “IN” connector of the recirculating
water chiller to the “OUT” connector of the Mixolab 2.
3. Connect the second tube from the “OUT” connector of the recirculating
water chiller to the “IN” connector on the Mixolab 2.
1. Connect the device using the power cable supplied.
2. Connect to the PC via the USB port using the cable supplied.
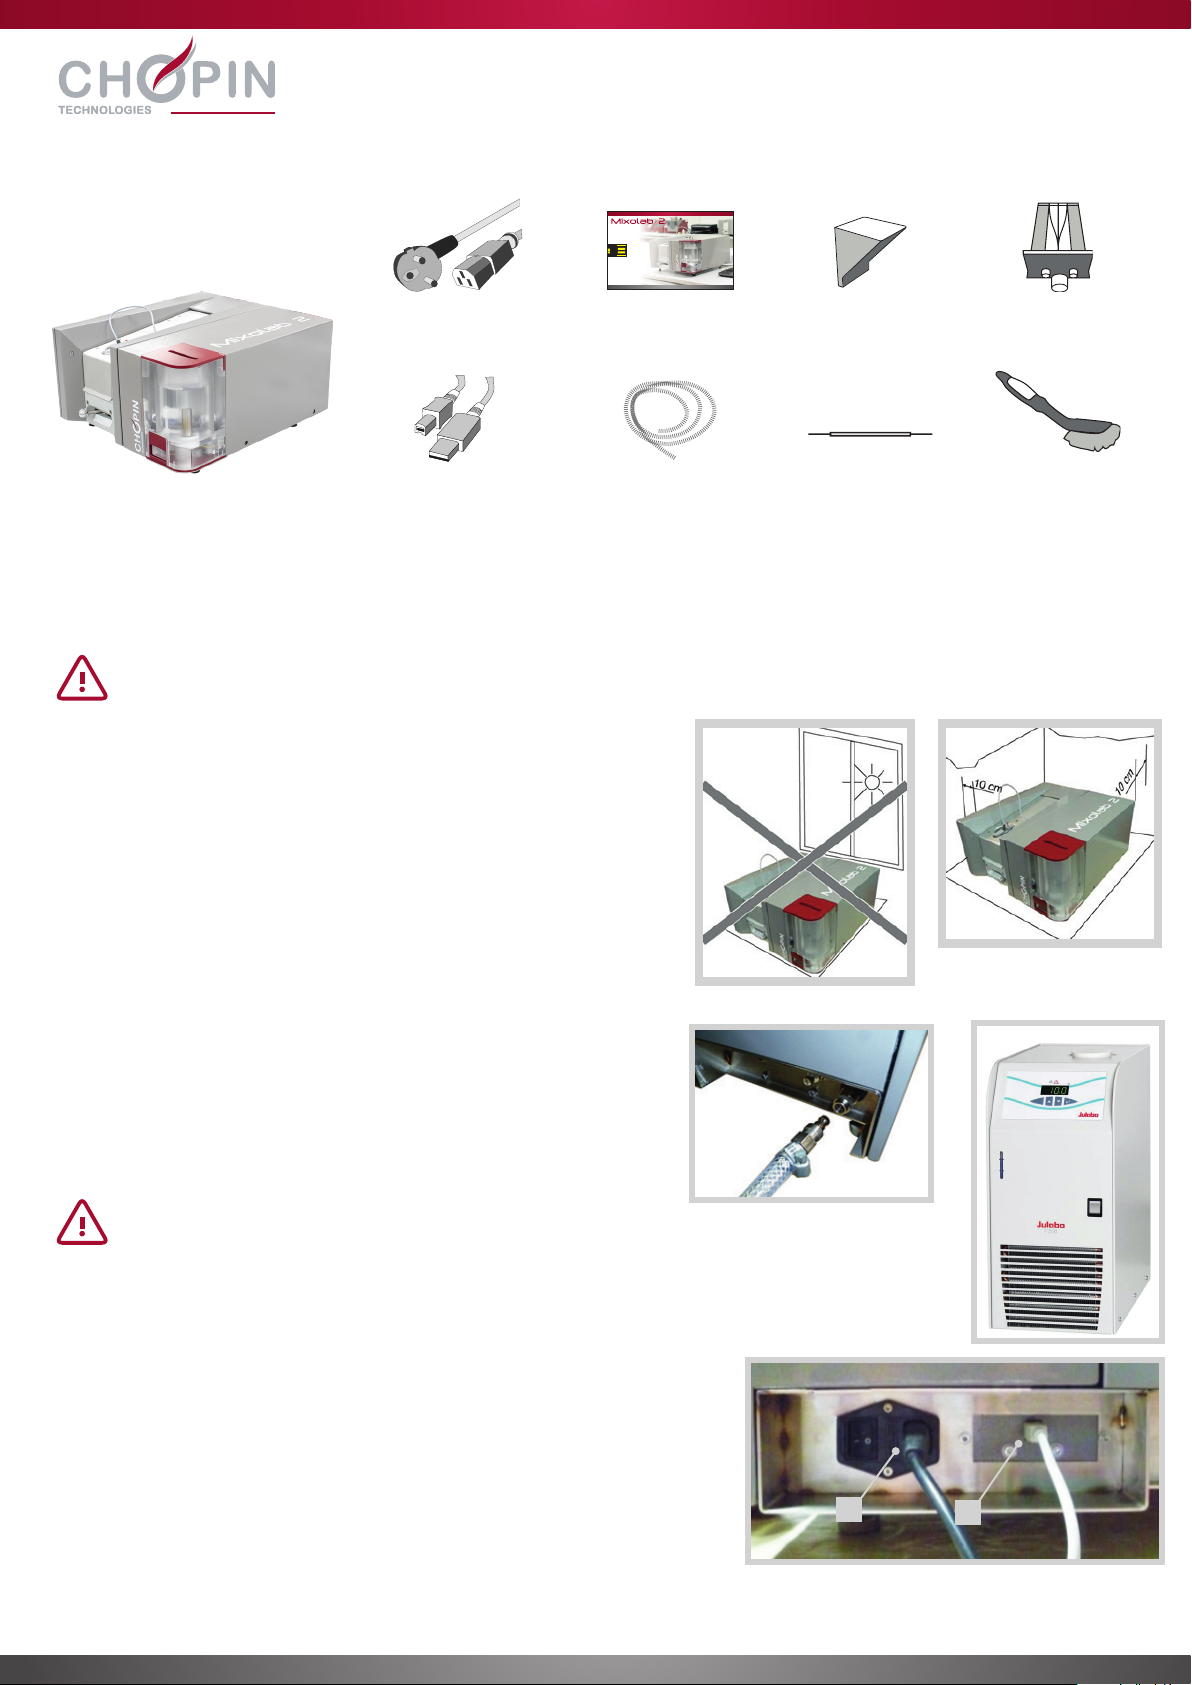
Place the Mixolab 2 on a horizontal, stable surface.
•Leave space of at least 10 cm around the unit in all directions to
ensure effective ventilation.
•Do not place the Mixolab 2 in front of a window, especially if the
window is exposed to direct sunlight.
We recommend that the Mixolab 2 should be delivered and installed by an authorized CHOPIN Technologies technician.
Keep this packaging. It is essential to use it to transport the device.
The Mixolab 2 can also be connected to a faucet. Nevertheless, it
is highly recommended to use a recirculating water chiller in order
to obtain precise, repeatable and reproducible results throughout
the year.
An example of a suitable cryostat is the JULABO F250
F Class.
Mixolab 2
12
Power cable
Shielded USB
cable
2 reinforced
tubes
USB stick with
software and
user’s manual
Feed hopper Mixing bowl
Cleaning brush
Nozzle cleaning
tool
cle-usb-mixolab2.indd 2 27/03/2015 10:12:24

E. Installing the software
F. Powering Up
1. On the provided USB stick, double-click on the software installation
icon.
2. Click on [Run] and choose the language for the installation assistant,
then click on [OK].
3. Accept the license terms and click on [Next].
4. Choose the destination folder for the software and click on [Next].
5. Click on [Install] to start the installation.
The software must be installed on the local hard drive of the
computer connected to the Mixolab. An installation on a network
location can cause errors.
6. Once the installation has completed, a window will appear to allow
you to extract and install the USB drivers. Click on [Extract].
7. Once the file has been decompressed, an installation window will
appear. Click on [Next] then on [Finish].
8. When the software is run for the first time, the message below will
appear.
Click on OK, then select the folder where the database will be
created and saved.
Minimum configuration:
- Windows 7, Windows 8, Windows 10
- Core i5 1.7GHz / 4Go
- USB Port
- PDF reader
Before powering up the device:
1. Fill the tank with distilled water
2. Place the nozzle over the water tank
Then :
3. Switch the device on by using the switch located on the rear of the device.
4. An LED located on the front will flash red/orange/green during the initialization phase, which lasts between one and two
minutes.
2
34
6
5
7 8
1 2 3 4
If the USB driver is not fully installed, click on the executable file supplied
on the USB stick. Windows 7, Windows 8
Windows 10

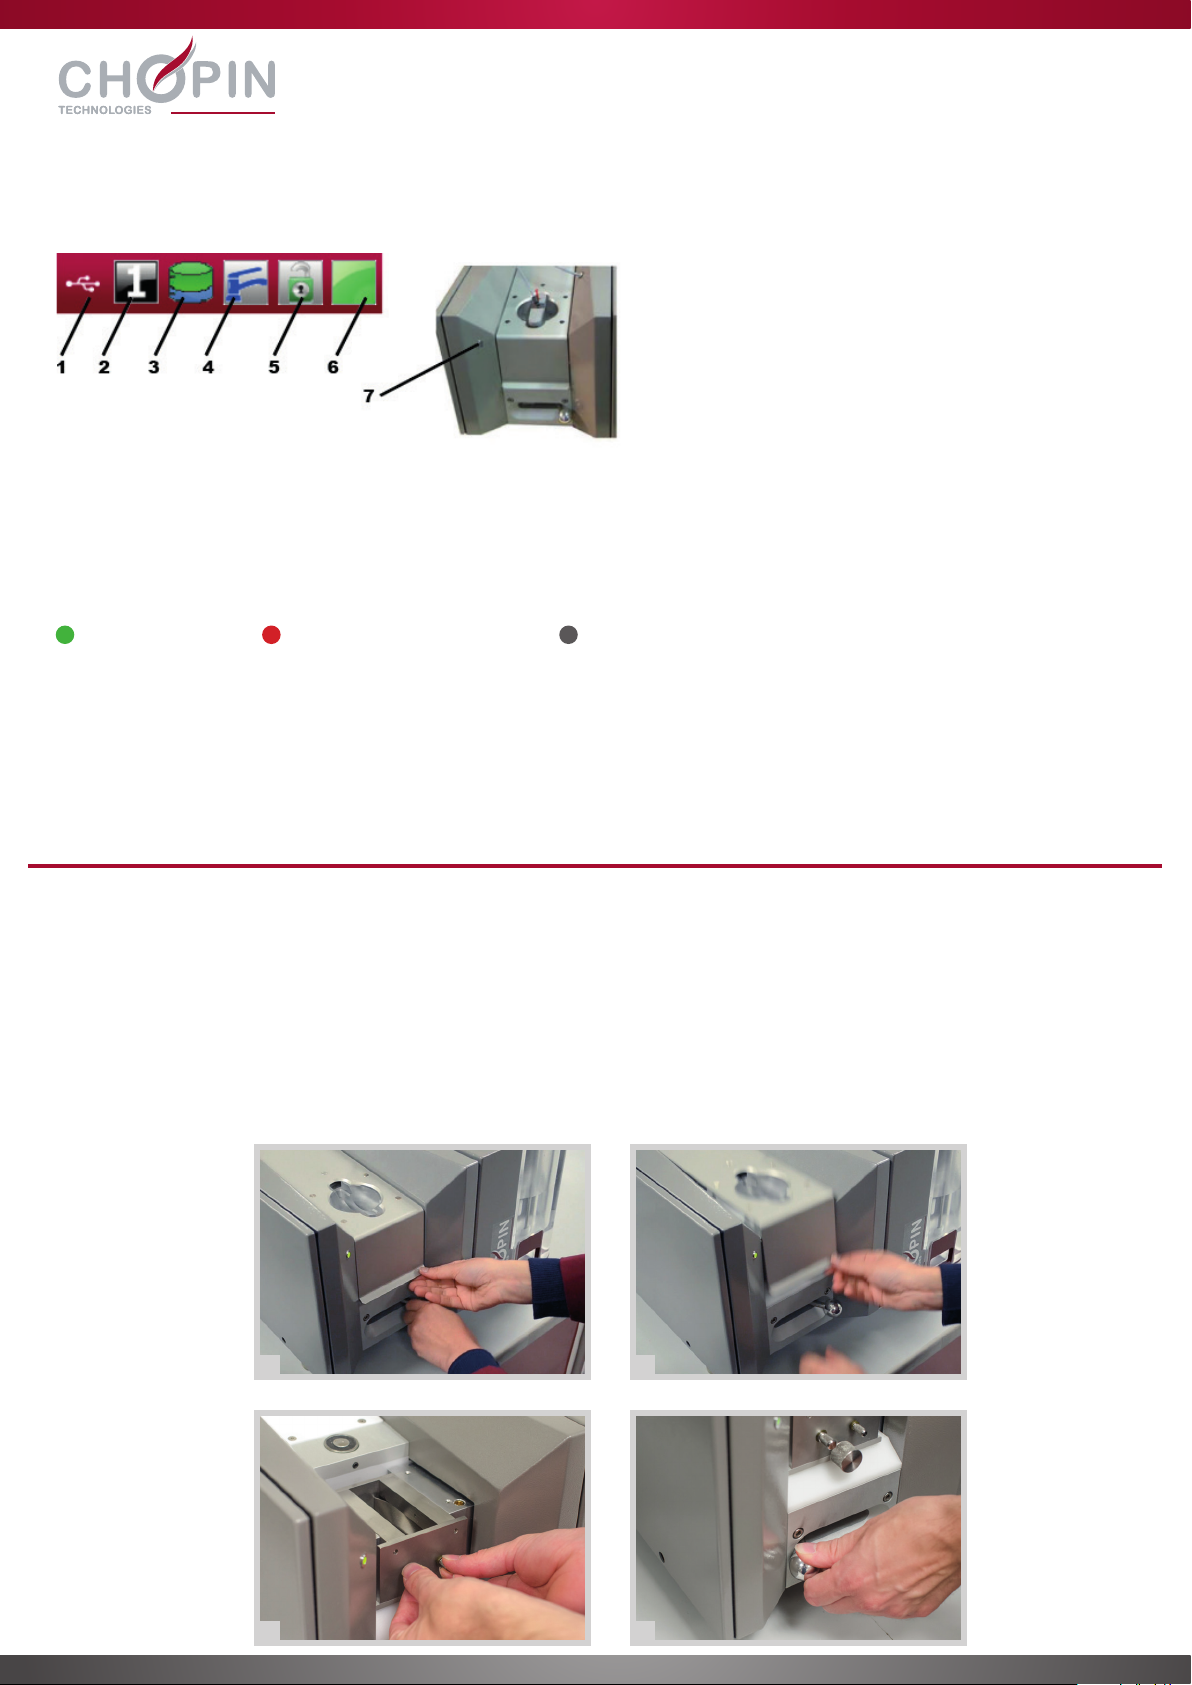
The software gives a real-time overview of the device status.
1. Communication
On: a communication link between the Mixolab 2 and the computer has been established
Off: no link between the Mixolab 2 and the computer
2. Number of the mixing bowl in use (1 or 2). (Please note that a second bowl is available as an option)
3. Water tank level indicator
Green: tank full Red: tank requires refilling Gray: tank is missing
4. Cooling indicator
5. Cover lock indicator
6. Device status indicator
7. Status LED
1. Move the locking handle to the right (unlocked position).
2. Open the lid.
3. Insert the mixing bowl by pushing it all the way to the bottom of the slot.
4. Move the locking handle to the left (locked position).
If the handle cannot be pushed all the way to the slot, rotate the mixing arm using the roller knobs until the mixing bowl is
completely inserted into the slot.
USING THE MIXOLAB 2
A. Status overview
PERFORM A FIRST TEST
A. Inserting the mixing bowl
1 2
3 4
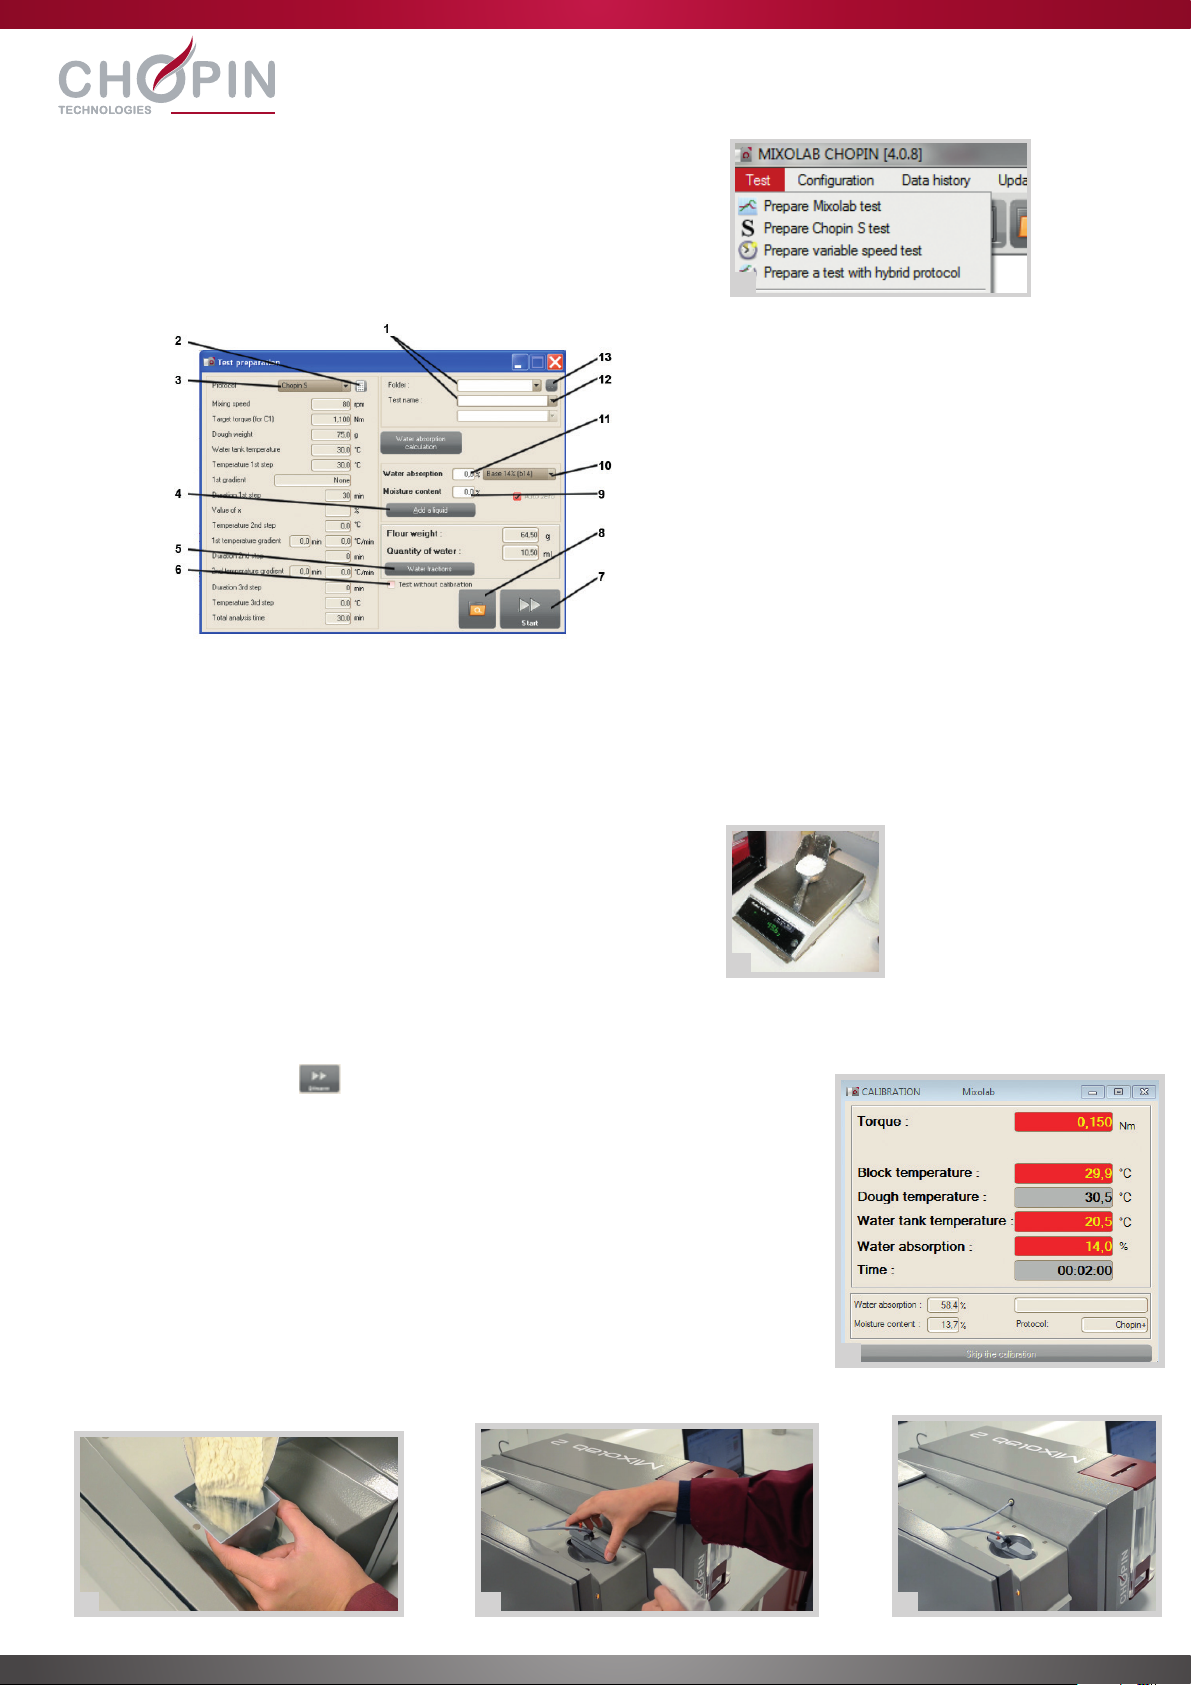
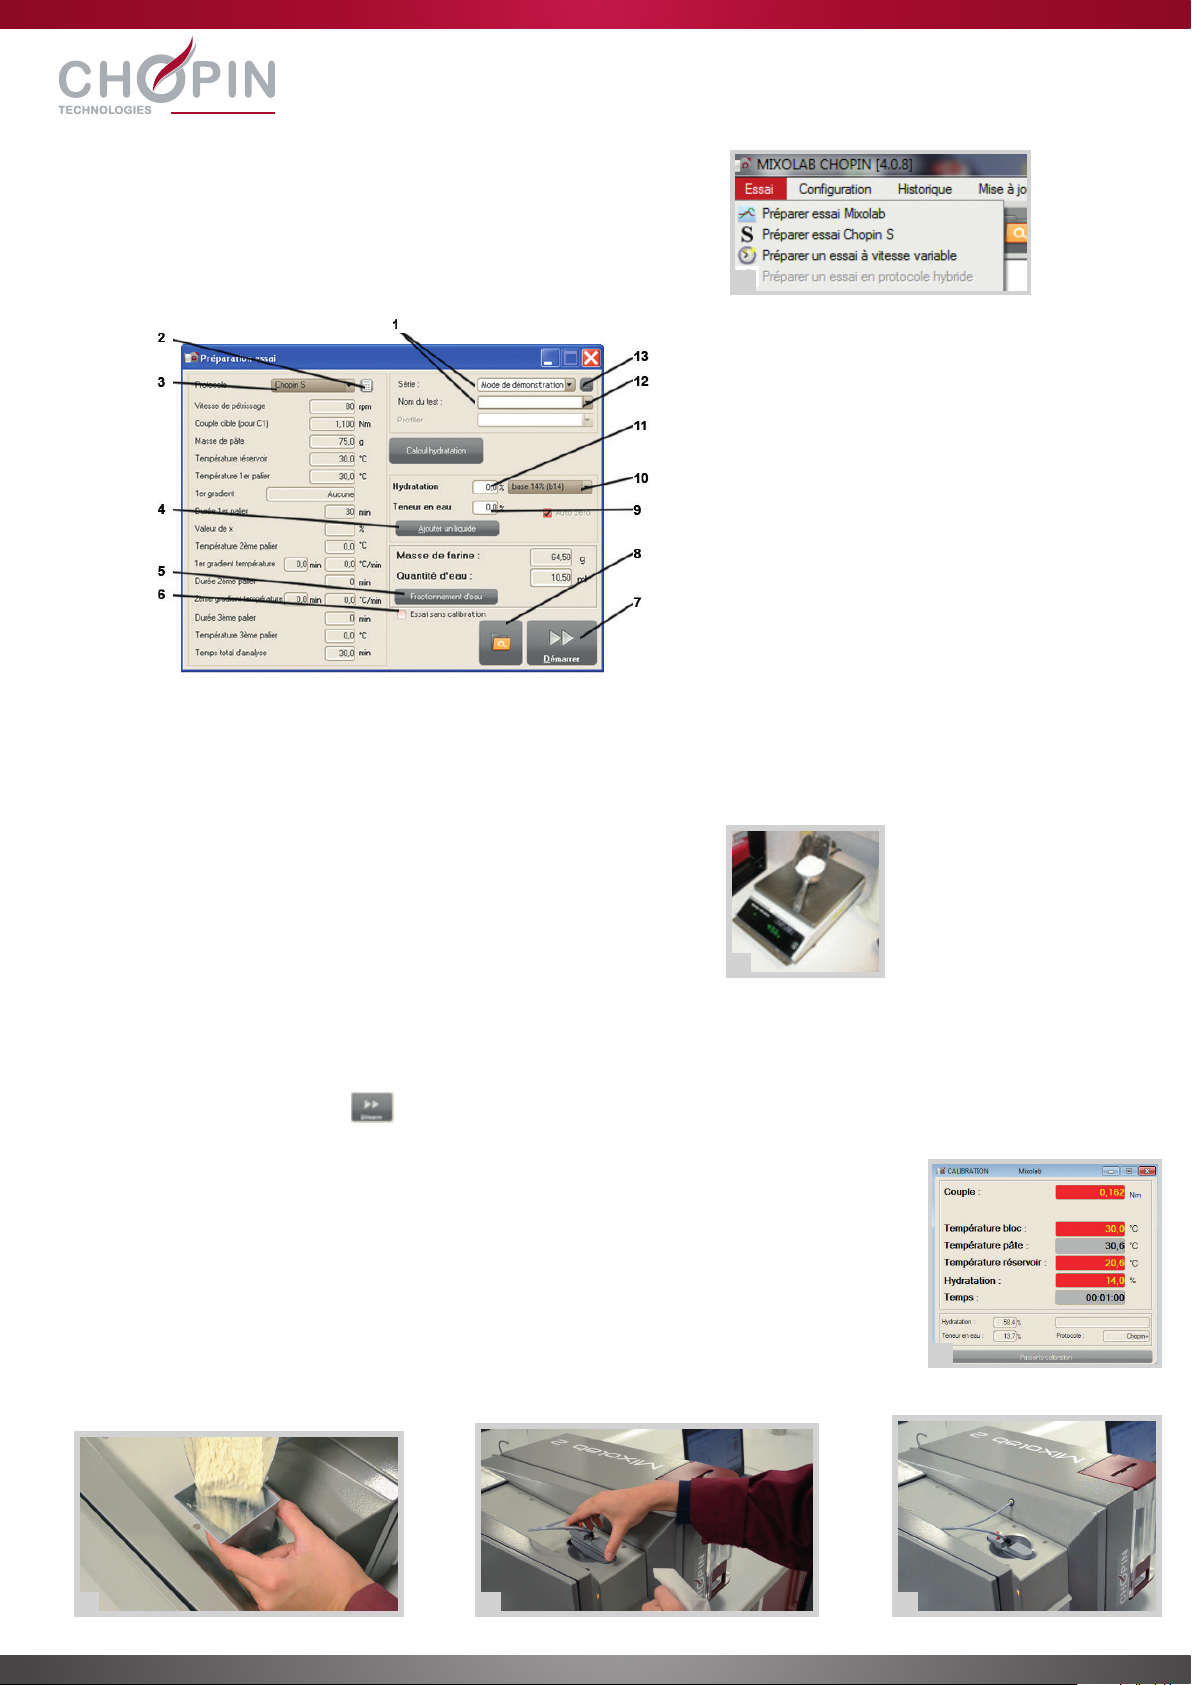
1. Within the software, click on [Test] then on [Prepare a Mixolab test].
The following window will appear:
B. Preparing the test
C. Conducting the test
1. Test series and name
2. Formula and protocol selection
3. Protocol
4. Manual liquid addition
5. Adjustable water injection
6. Test with no calibration
7. Start test
8. Open one or two reference tests
9. Water content of the current sample
10. Base hydration
11. Desired hydration
12. Select profiler
13. Create a series
2. Select a protocol from the drop-down menu (3).
3. Choose the folder (1) where the test will be saved.
4. Enter a name for the test (1).
5. Enter the desired hydration (11) and the hydration base (10).
6. Enter the water content of the sample (9). The software will automatically
calculate the sample weight to be prepared and the quantity of water to
be injected.
7. Weigh out the quantity of flour indicated by the software to an accuracy
of ± 0.1g
1. Click on the start icon to launch the test. The LED will turn orange, which
means that the test is underway (the lid is locked and the mixing arms are working).
2. The calibration window will appear. Any parameters that have not yet reached their
reference values are shown against a red background; others have a green or gray
background.
3. A message asks the user to add flour into the mixing bowl.
4. Place the hopper on top of the mixing bowl and gradually add the flour to the
hopper.
5. After 30 seconds, a message asks the user to place the nozzle onto the mixing
bowl.
6. Wipe the nozzle clean and then place it into the nozzle-holder.
7. When all the parameters have reached their reference values, the test will start
automatically.
4 5 6
1
7
2

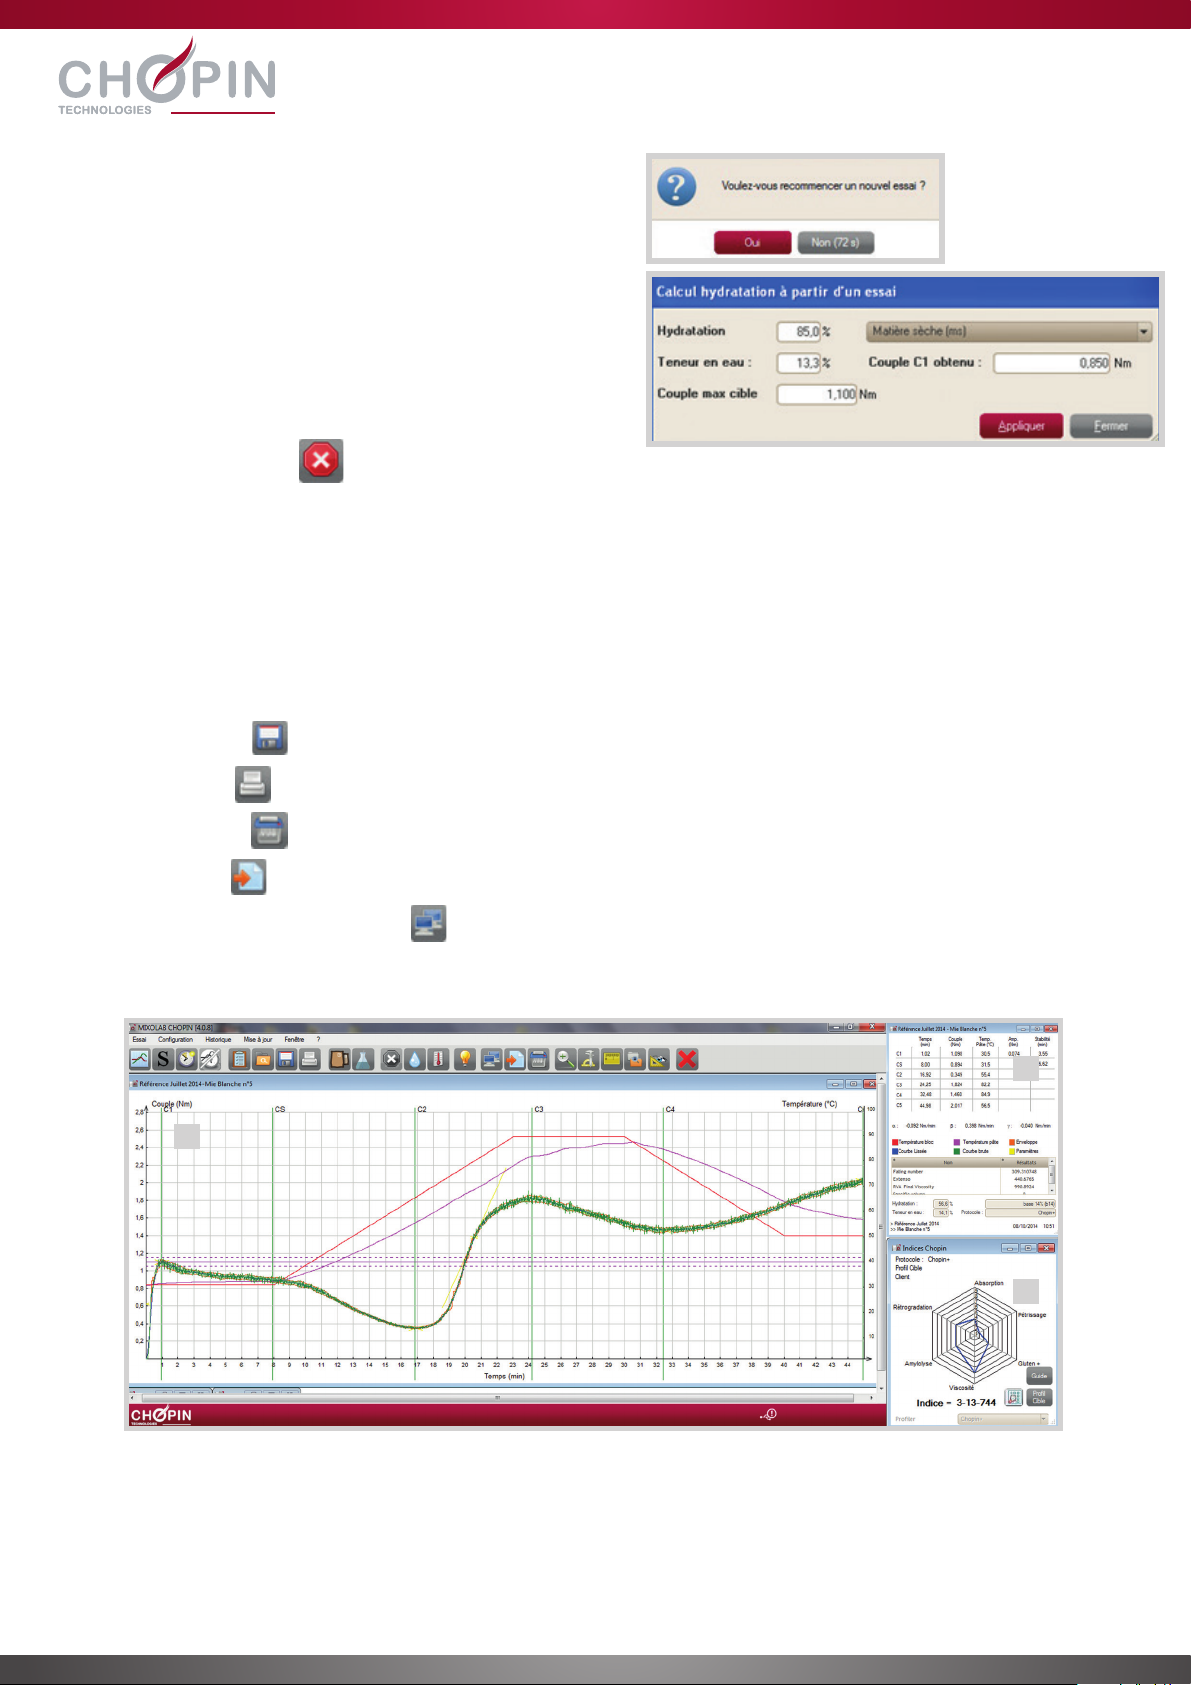
D. Results
8. After eight minutes, if the target torque (1.1 Nm) has not
been reached, the software suggests carrying out a new
test.
8a. Click on “Yes” before expiry of the allotted time to carry
out a new test. The software will automatically calculate
the correct hydration to reach the target consistency at
1.1Nm.
8b. Click on “No” to continue the current test.
9. The test will continue for 45 minutes (in the case of the
standard CHOPIN+ protocol) and will stop automatically.
It is possible to stop the test at any time while it is running by
clicking on [Stop test]:
The test results are presented in three parts:
1 the graph of the test shown in green, along with the specific values (C and gradient)
2 a table summarizing the characteristic points of the curve
3 the profiler, a translation into six qualitative index of the graphical test result
Once the test has completed, it is possible to:
Save the test results
Print the test results
Delete the test results
Export the test results
Create a screen capture of the test results
1
2
3
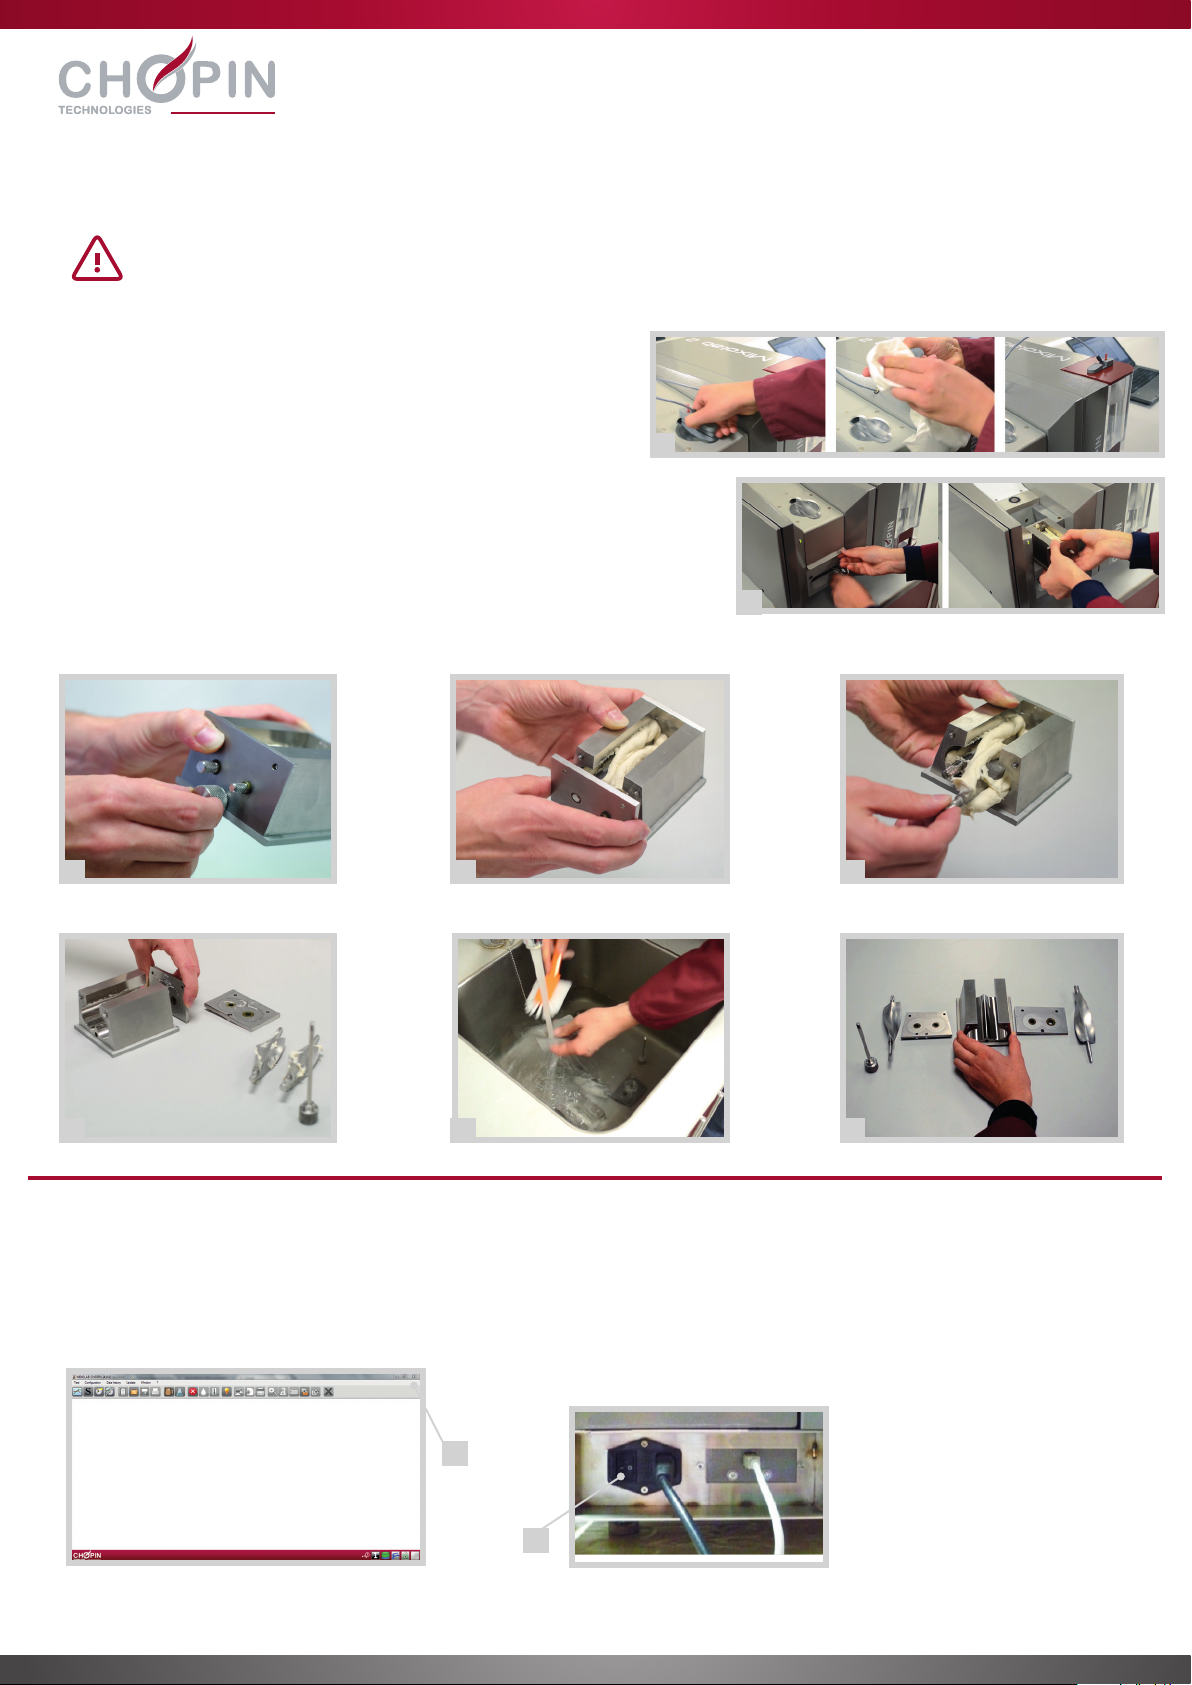
E. Cleaning the instrument after each test
1. Place the nozzle on the water tank after cleaning it.
2. Open the lid and pull out the mixing bowl.
3. Unscrew the positioning screw from the mixing bowl.
4. Remove the front cover.
5. Remove the two mixing arms.
6. Remove the back cover.
7. Immerse all parts into lukewarm water and, using
the brush, clean them carefully. Remember these are
precision parts and must be handled with care. Do not
drop or allow damage these parts.
8. Dry the parts thoroughly using a dry cloth.
1. Shut down the application.
2. Shut down the Mixolab 2 completely, using the switch located on the rear of the device.
After each test has been carried out, it is necessary to clean the mixing bowl with care.
Wait for the mixing bowl to cool down: the indicator should turn green, showing that the lid is unlocked.
SHUTTING DOWN THE INSTRUMENT
1
2
3
6
4
7
5
8
1
2
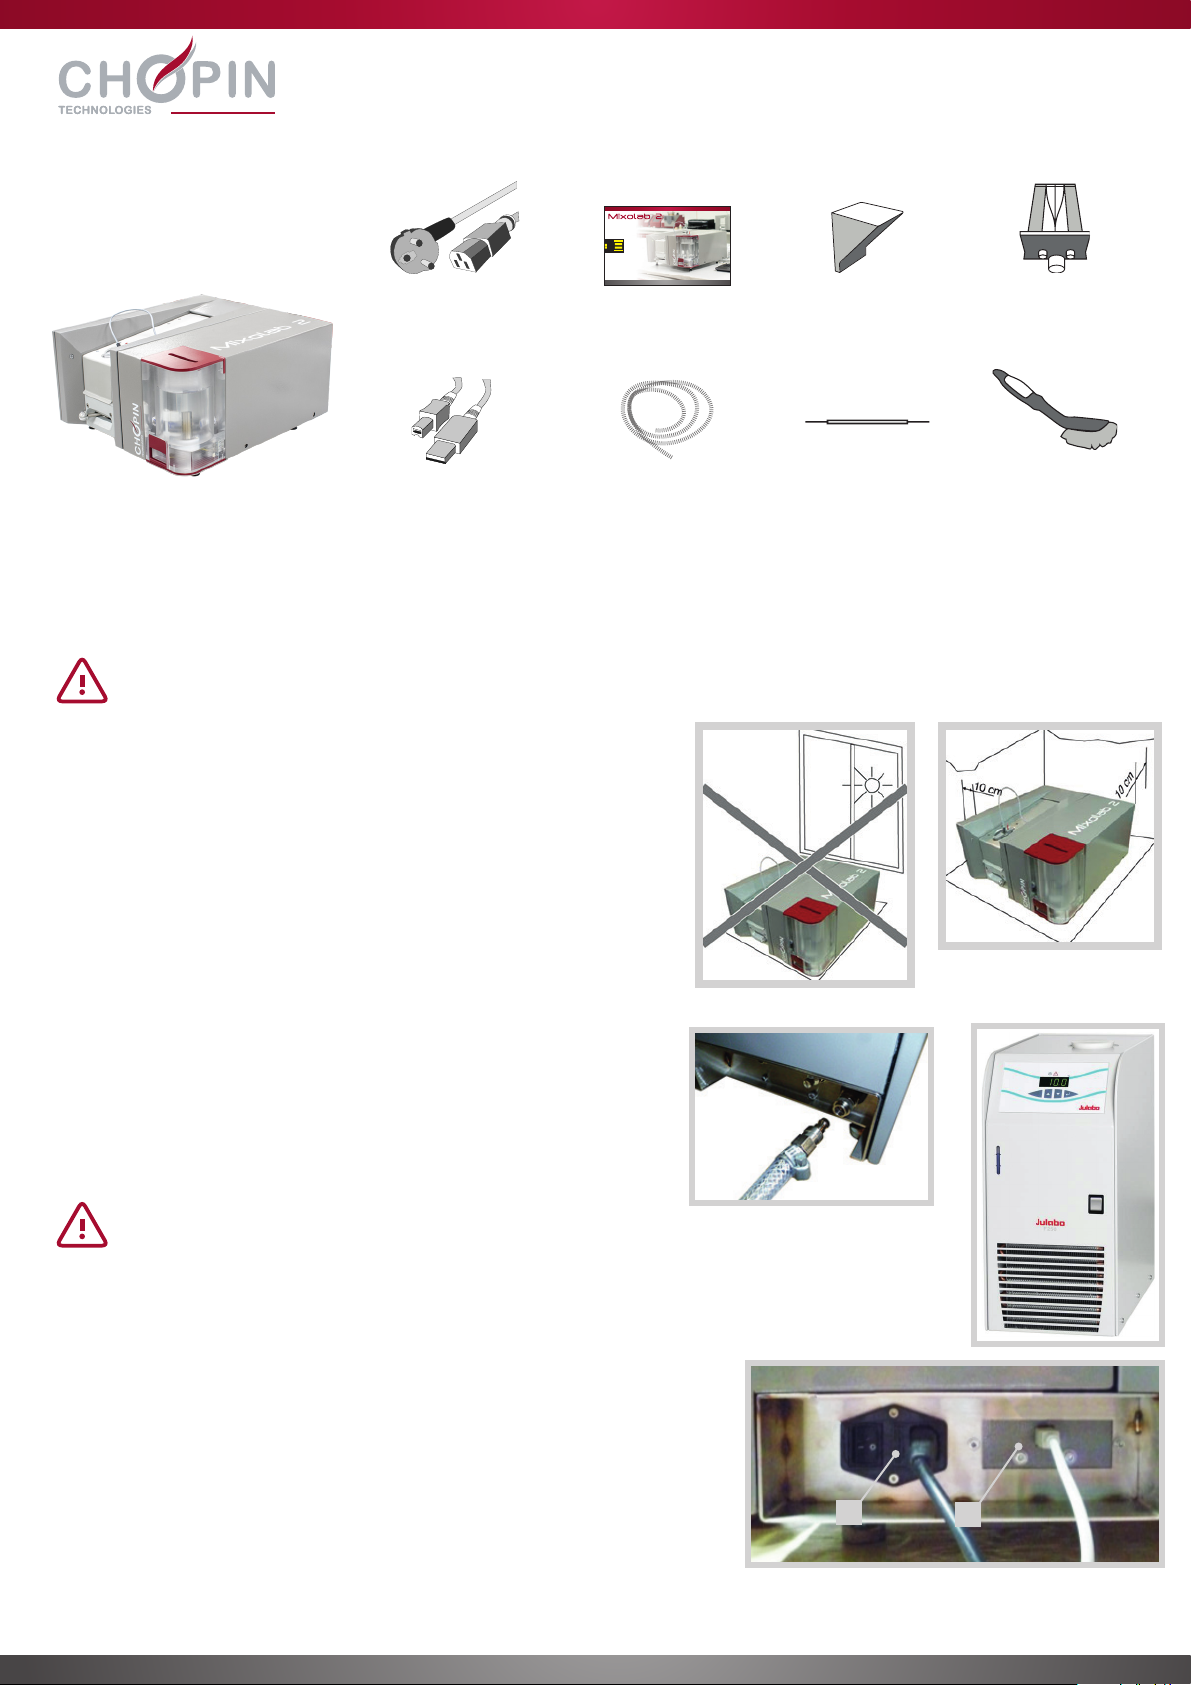
INSTALLER VOTRE MIXOLAB 2
A. Composition
B. Mise en place
C. Raccordement hydraulique
D. Raccordement électrique
1. Monter les parties mobiles des raccords rapides sur les tuyaux et les
serrer avec les colliers.
2. Brancher le premier tuyau entre le connecteur ‘‘IN’’ (entrée) du
cryostat et le connecteur ‘‘OUT’’ (sortie) du Mixolab 2.
3. Brancher le second tuyau entre le connecteur ‘‘OUT’’ (sortie) du
cryostat et le connecteur ‘‘IN’’ (entrée) du Mixolab 2.
1. Brancher l’appareil au secteur à l’aide du câble d’alimentation fourni.
2. Connecter le PC au port USB à l’aide du câble fourni.
Poser le Mixolab 2 sur une surface horizontale et stable.
•Ne pas placer le Mixolab 2 derrière une vitre, surtout si celle-ci est
exposée au soleil.
•Laisser un espace d’environ 10 cm autour de l’appareil pour assurer
une bonne ventilation.
Il est recommandé que le Mixolab 2 soit livré et installé par un technicien agréé CHOPIN Technologies.
Conserver l’emballage. Il est à utiliser impérativement pour tout transport de l’appareil.
Il est également possible de connecter le Mixolab à un robinet.
Toutefois, afin d’obtenir des résultats précis, répétables et
reproductibles tout au long de l’année, il est fortement recommandé
d’utiliser un cryostat.
Exemple d’équipement : JULABO F250
classe F
Câble
d’alimentation
Câble USB
blindé
2 tuyaux
renforcés
Mixolab 2
Clé USB logiciel Trémie de
remplissage
Cuve
Brosse de
nettoyage
Outil de
nettoyage de la
buse
12
cle-usb-mixolab2.indd 2 27/03/2015 10:12:24

E. Installation du logiciel
F. Mise sous tension
1. Sur la clé USB fournie, double-cliquer sur l’icône d’installation du
logiciel.
2. Cliquer sur [Exécuter] puis choisir la langue de l’assistant d’installation
et cliquer sur [OK].
3. Accepter l’accord de licence et cliquer sur [Suivant].
4. Choisir le répertoire d’installation et cliquer sur [Suivant].
5. Cliquer sur [Installer] pour lancer l’installation.
Le logiciel doit impérativement être installé sur le disque dur
local de l’ordinateur connecté au Mixolab. Une installation sur un
emplacement réseau peut entrainer des dysfonctionnements.
6. Une fois l’installation terminée, une fenêtre apparait pour procéder
à la décompression et à l’installation des pilotes USB. Cliquer sur
[Extract].
7. Le fichier se décompresse et la fenêtre d’installation apparait. Cliquer
sur [Suivant] puis [Terminer].
8. Au premier lancement du logiciel, le message ci-contre apparaît.
Cliquer sur OK. Puis sélectionner le dossier où la base de données
sera créée et sauvegardée.
Configuration nécessaire :
- Windows 7, Windows 8, Windows 10
- Core i5 1.7GHz / 4Go
- Port USB
- PDF reader
Avant de mettre l’appareil sous tension :
1. Remplir le réservoir d’eau distillée
2. Placer la buse sur le réservoir
Ensuite :
3. Mettre l’appareil sous tension en utilisant l’interrupteur situé à l’arrière.
4. Une LED située sur la face avant clignote rouge / orange / vert durant la phase d’initialisation (1 à 2 minutes).
2
3 4
65
78
1 2 3 4
En cas d’installation incomplète du pilote USB, cliquer sur l’exécutable
fourni sur la clé USB Windows 7, Windows 8
Windows 10

Le logiciel donne des indications en temps réel sur l’état de l’appareil.
1. Indicateur de communication
Visible : communication entre Mixolab 2 et ordinateur établie
Non visible : pas de communication entre Mixolab 2 et ordinateur
2. Numéro de la cuve utilisée (1 ou 2)
3. Témoin du niveau du réservoir
Vert : réservoir plein Rouge : réservoir à remplir Gris: réservoir absent
4. Témoin de refroidissement
5. Témoin de verrouillage du capot
6. Indicateur d’état
7. LED d’état
1. Placer la poignée de verrouillage à droite (position déverrouillée).
2. Ouvrir le couvercle.
3. Insérer la cuve en la poussant jusqu’au bout vers le fond de son emplacement.
4. Placer la poignée de verrouillage à gauche (position verrouillée).
Si la cuve ne s’insère pas jusqu’au fond de son emplacement, faire tourner les axes des fraseurs à l’aide des boutons moletés
jusqu’à ce que la cuve entre complètement dans son emplacement.
UTILISATION
A. Indicateurs généraux
REALISER UN PREMIER TEST
A. Insertion de la cuve
1 2
3 4
1. À partir du logiciel, cliquer sur [Essai] puis sur [Préparer essai Mixolab].
La fenêtre suivante apparaît :
B. Préparation du test
B. Conduite du test
1. Série et nom du test
2. Sélection des formules du protocole
3. Protocole
4. Fonction ajout de liquide manuel
5. Fractionnement réglable injection de l’eau
6. Essai sans calibration
7. Départ du test
8. Ouverture d’un ou deux essais de référence
9. Teneur en eau de l’échantillon utilisé
10. Base d’hydratation
11. Hydratation souhaitée
12. Choix profiler
13. Création de série
2. Sélectionner un protocole à partir du menu déroulant (3).
3. Choisir le dossier (1) où l’essai sera enregistré.
4. Entrer un nom pour l’essai (1).
5. Entrer l’hydratation souhaitée (11) et sa base (10).
6. Entrer la teneur en eau de l’échantillon (9). Le logiciel calcule
automatiquement la masse d’échantillon à peser et la quantité d’eau
qui sera injectée.
7. Peser la farine à ± 0,1 g selon la masse indiquée par le logiciel.
1. Cliquer sur l’icône démarrer pour commencer le test. La LED passe à l’orange, ce qui
signifie que l’essai est en cours (le couvercle est verrouillé et les fraseurs sont en marche).
2. La fenêtre de calibration apparaît. Les paramètres n’ayant pas encore atteint leurs valeurs de
consigne sont sur fond rouge, les autres sur fond vert ou gris.
3. Un message demande à l’utilisateur d’introduire la farine dans la cuve.
4. Mettre en place la trémie sur le dessus de la cuve et verser progressivement la farine dans la
trémie.
5. Après 30 secondes, un message invite l’utilisateur à positionner la buse sur la cuve.
6. Essuyer la buse puis positionner la sur le porte-buse.
7. Lorsque tous les paramètres ont atteint leur valeur de consigne, l’essai est automatiquement
lancé.
4 5 6
1
7
2
D. Résultats
8. Après 8 minutes, si le couple cible (1,1 Nm) n’a pas été
atteint, le logiciel propose à l’utilisateur de réaliser un nouvel
essai.
8a. Cliquer sur ‘‘Oui’’ avant l’écoulement du temps imparti
pour réaliser un nouvel essai. Le logiciel calcule
automatiquement l’hydratation adaptée pour atteindre
la cible de consistance à 1,1Nm.
8b. Cliquer sur ‘‘Non’’ pour poursuivre l’essai.
9. L’essai se poursuit pendant 45 minutes (cas du protocole
standard CHOPIN+) et s’arrête automatiquement.
Il est possible à tout moment d’arrêter l’essai en cours en
cliquant sur [Arrêt essai] :
Les résultats de l’essai sont présentés en 3 parties :
1 la courbe de l’essai tracée en vert, ainsi que ses valeurs caractéristiques (Ci et pentes).
2 un tableau résumant les points caractéristiques de la courbe
3 le Profiler, traduction en 6 indices qualitatifs, de la courbe de l’essai
Une fois l’essai terminé, il est possible :
d’enregistrer l’essai
d’imprimer l’essai
de supprimer l’essai
d’exporter l’essai
de faire une capture d’écran de l’essai
1
2
3

E. Nettoyage après chaque test
1. Positionner la buse sur le réservoir après l’avoir essuyée.
2. Ouvrir le couvercle et retirer la cuve.
3. Dévisser la vis d’assemblage de la cuve.
4. Retirer la face avant.
5. Retirer les deux fraseurs.
6. Retirer la face arrière.
7. Plonger tous les éléments dans de l’eau tiède et à l’aide de la
brosse, les nettoyer soigneusement.
8. Bien sécher les pièces avec un chiffon sec.
1. Arrêter l’application.
2. Arrêter complètement le Mixolab 2 en utilisant l’interrupteur situé à l’arrière de l’appareil.
Après chaque test réalisé, il est nécessaire de nettoyer très soigneusement la cuve.
Attendre que la cuve refroidisse : le voyant doit passer au vert indiquant que le couvercle est déverrouillé.
ETEINDRE L’APPAREIL
1
2
3
6
4
7
5
8
1
2
INSTALACIÓN DEL MIXOLAB 2
A. Composición
B. Instalación
C. Conexión hidráulica
D. Conexión eléctrica
1. Ensamblar las partes móviles de las conexiones rápidas a las
mangueras y ajustar con las abrazaderas.
2. Conectar la primera manguera entre el conector ‘‘IN’’ (entrada) del
criostato y el conector ‘‘OUT’’ (salida) del Mixolab 2.
3. Conectar la segunda manguera entre el conector ‘‘OUT’’ (salida) del
criostato y el conector ‘‘IN’’ (entrada) del Mixolab 2.
1. Conectar la unidad utilizando el cable de alimentación suministrado.
2. Conectar el ordenador al puerto USB utilizando el cable suministrado.
Colocar el Mixolab 2 sobre una superficie horizontal y estable.
•No colocar el Mixolab 2 detrás de una ventana, en especial si está
expuesta a la luz del sol.
•Dejar un espacio de 10 cm alrededor de la unidad para garantizar
una buena ventilación.
Se recomienda que el Mixolab 2 sea entregado e instalado por un técnico autorizado de CHOPIN Technologies.
Conservar el embalaje. A utilizar imperativamente para el transporte del equipo.
El Mixolab 2 también puede conectarse a un grifo. Sin embargo,
para obtener resultados precisos, repetitivos y reproducibles a lo
largo de todo el año, se recomienda altamente utilizar un criostato.
Ejemplo de equipo: JULABO F250 clase F
Mixolab 2
12
Cable de
alimentación
Cable USB
blindado
2 mangueras
reforzadas
Memoria USB
con el software
Tolva de llenado Depósito
Cepillo
Herramienta para
limpiar la boquilla
cle-usb-mixolab2.indd 2 27/03/2015 10:12:24

E. Instalación del software
F. Encendido
1. En la memoria USB suministrada, hacer doble clic en el icono de
instalación del software.
2. Hacer clic en [Ejecutar] después seleccione el idioma del asistente
de instalación y hacer clic en [OK].
3. Aceptar el acuerdo de licencia y hacer clic en [Siguiente].
4. Seleccionar el directorio de instalación y hacer clic en [Siguiente].
5. Hacer clic en [Instalar] para iniciar la instalación.
El software debe instalarse en el disco duro local del ordenador
que se encuentra conectado al Mixolab. La instalación en una
ubicación en red puede causar un mal funcionamiento.
6. Una vez terminada la instalación, aparecerá una ventana para realizar
la descompresión y la instalación de los controladores USB. Hacer
clic en [Extraer].
7. El archivo se descomprime y aparece la ventana de instalación.
Hacer clic en [Siguiente] después en [Terminar].
8. En la primera ejecución del programa, aparecerá un mensaje. Hacer
clic en OK. Después seleccionar la carpeta en la que se creará y
guardará la base de datos.
Configuración necesaria:
- Windows 7, Windows 8, Windows 10
- Procesador i5 1.7GHz / 4Go
- Puerto USB
- Lector PDF
Antes de encender la unidad:
1. Llenar el depósito de agua destilada.
2. Colocar la boquilla sobre el depósito.
A continuación:
3. Colocar la unidad a la corriente utilizando el interruptor que se encuentra en la parte posterior.
4. La luz de LED que se encuentra en el panel frontal parpadeará de color rojo/ámbar/verde durante la fase de inicialización
(1-2 minutos).
2
3 4
6
5
7 8
1 2 3 4
En caso de instalación incompleta del piloto USB, haga clic sobre el ejecutable
proporcionado en la memoria USB Windows 7, Windows 8
Windows 10
El programa ofrece información en tiempo real sobre el estado de la unidad.
1. Indicador de comunicación
Visible: comunicación entre el Mixolab 2 y el ordenador conectado
No visible: no hay comunicación entre el Mixolab 2 y el ordenador
2. Número del depósito utilizado (1 o 2)
3. Indicador el nivel del depósito
Verde: depósito lleno Rojo: debe llenarse el depósito Gris: no hay depósito
4. Indicador de enfriamiento
5. Indicador de bloqueo de la tapa
6. Indicador de estado
7. Luz de LED que indica el estado
1. Colocar la palanca de bloqueo hacia la derecha (posición de desbloqueo).
2. Abrir la tapa.
3. Insertar el depósito empujándolo hasta el fondo de donde va colocado.
4. Colocar la palanca de bloqueo hacia la izquierda (posición de bloqueo).
Si el depósito no se ajusta hasta el fondo donde va colocado, girar los ejes de la amasadora utilizando los botones hasta que el
depósito entre por completo.
UTILIZACIÓN
A. Indicadores generales
REALIZACIÓN DEL PRIMER TEST
A. Insertar el depósito
1 2
3 4
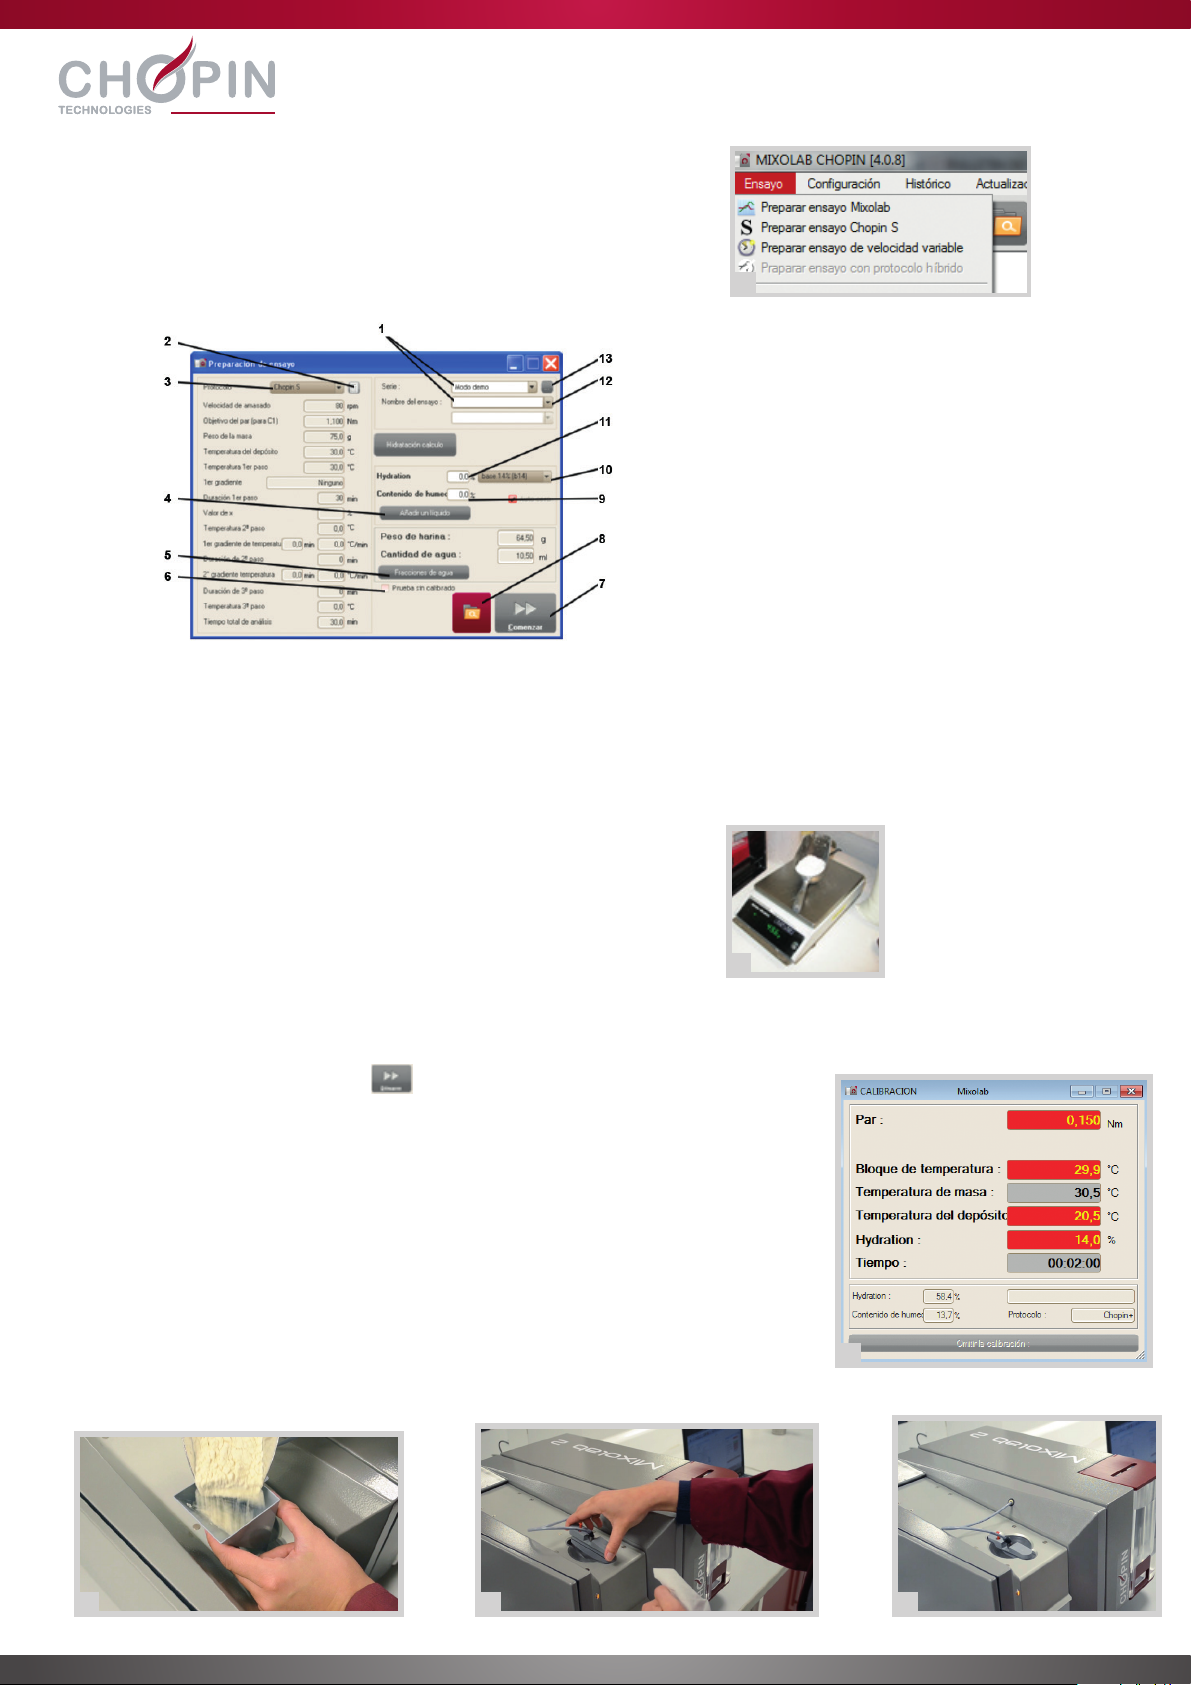
1. Desde el programa, hacer clic en [Probar] y después en [Preparar test
Mixolab]. Aparecerá la siguiente ventana:
B. Preparación del test
B. Llevar a cabo un test
1. Serie y nombre de la prueba
2. Selección de fórmulas del protocolo
3. Protocolo
4. Función agregar liquido manualmente
5. Fraccionamiento ajustable de inyección de agua
6. Prueba sin calibración
7. Inicio de la prueba
8. Apertura de uno o dos referenciales
9. Contenido de agua de la muestra utilizada
10. Base de hidratación
11. Hidratación deseada
12. Selección de perfil
13. Creación de serie
2. Seleccionar un protocolo desde el menú despegable (3).
3. Seleccionar la carpeta (1) en la que quedará guardado.
4. Introducir el nombre del test (1).
5. Introducir la hidratación que desea (11) y su base (10).
6. Introducir el contenido de agua de la muestra (9). El programa calcula
automáticamente la masa de la muestra y la cantidad de agua que será
inyectada.
7. Pesar la harina a ± 0,1 g según la masa indicada por el programa.
1. Hacer clic sobre el icono iniciar para comenzar el test. La luz LED pasa a
ser naranja, lo que significa que la prueba se está llevando a cabo (la tapa está
bloqueada y las palas amasadoras están trabajando).
2. Aparece la ventana de calibración. Los parámetros que aún no alcanzan los valores
indicados se encuentran sobre el fondo rojo, los demás sobre fondo verde o gris.
3. Un mensaje indica de introducir la harina en el depósito.
4. Colocar la tolva en la parte superior del depósito y agregar poco a poco la harina
en la tolva.
5. Después de 30 segundos, aparece un mensaje que indica de colocar la boquilla
sobre el depósito.
6. Limpiar la boquilla y después colocarla sobre el soporte de la boquilla.
7. Cuando todos los parámetros hayan alcanzado el valor indicado, el test se iniciará
automáticamente.
4 5 6
1
7
2

D. Resultados
8. Después de 8 minutos, si no se ha alcanzado el par objetivo
(1,1 Nm), el programa propone realizar un nuevo test.
8a. Hacer clic en ‘‘Sí’’ antes de que expire el plazo para
realizar un nuevo test. El programa calcula de manera
automática la hidratación adaptada para conseguir la
consistencia deseada a 1,1Nm.
8b. Hacer clic en ‘‘No’’ para continuar con el test.
9. El test continuará durante 45 minutos (si se utiliza el protocolo
estándar CHOPIN+) y se detendrá automáticamente.
Se puede detener el test en curso en cualquier momento
haciendo clic en [Detener test]
Los resultados del test se presentan en 3 partes:
1 la curva del test se muestra en verde, al igual que sus valores característicos (CI y pendientes)
2 una tabla que resume los puntos característicos de la curva
3 el Perfil, se traduce en 6 índices cualitativos de la curva del test
Una vez que termina la prueba, es posible:
Guardar el test
Imprimir el test
Borrar el test
Exportar el test
Hacer una captura de pantalla del test
1
2
3

E. Limpieza después de cada test
1. Colocar la boquilla en el tanque después de haberla
limpiado.
2. Abrir la tapa y retirar el depósito.
3. Aflojar el tornillo del depósito.
4. Retirar el panel frontal.
5. Retirar las dos palas amasadoras.
6. Retirar el panel posterior.
7. Sumergir todas las piezas en agua tibia y con la ayuda de un
cepillo, limpiarlas a fondo.
8. Secar las piezas utilizando un paño seco.
1. Detener la aplicación.
2. Detener por completo el Mixolab 2 utilizando el interruptor que se encuentra ubicado en la parte posterior de la unidad.
Después de realizar un test, se debe limpiar con mucho cuidado el depósito.
Esperar a que el depósito se enfríe: la luz debe volverse verde indicando que la tapa está desbloqueada.
APAGAR LA UNIDAD
1
2
3
6
4
7
5
8
1
2

УСТАНОВКА ВАШЕГО MIXOLAB 2
А. Содержание
Б. Установка
В. Подсоединение шланга охладительной системы
Г. Подключение питания
1. Прикрепите подвижные части быстроразъемных соединений
для труб и закрепите их, используя скобки.
2. Подсоедините первую трубку к разъему “IN” циркуляционного
охладителя воды и к разъему “OUT” Вашего Mixolab 2.
3. Подсоедините вторую трубку к разъему “OUT” циркуляционного
охладитель воды и к разъему “IN” Вашего Mixolab 2.
1. Подключите устройство через кабель питания который
поставляется в комплекте.
2. Подключите к ПК через USB-порт с помощью кабеля, входящего
в комплект.
Разместите Mixolab 2 на горизонтальной, устойчивой поверхности.
•Оставьте хотя бы 10 см пространства со всех сторон
прибора,чтобыобеспечитьэффективнуювентиляцию.
•Не размещайте Mixolab 2 напротив окна, особенно если
окновыходитнасолнечнуюсторону.
Мы рекомендуем, чтобы Mixolab 2 был доставлен и установлен компетентным техником CHOPIN Technologies.
Сохраните упаковку. Это важно для транспортировки.
Прибор Mixolab 2 также может быть подключен к крану.
Тем не менее, настоятельно рекомендуется использовать
циркуляционный охладитель воды для того, чтобы получить
точные, повторяемые и воспроизводимые результаты на
протяжении года. Примером подходящего криостата
являетсяJULABOF250FClass.
Mixolab 2
12
Кабель питания
Экранированный
USB-кабель
2 пластиковых
шланга
USB-накопитель с
программным обеспечением и
руководством пользователя
Воронка Тестомесилка
Щетка для
очистки
Приспособление
для чистки
инжектора
cle-usb-mixolab2.indd 2 27/03/2015 10:12:24
Other manuals for Mixolab 2
1
Table of contents
Languages:
Other Chopin Laboratory Equipment manuals

Chopin
Chopin RHEO F4 Instruction sheet

Chopin
Chopin SDmatic Instruction sheet

Chopin
Chopin LabMill Instruction sheet

Chopin
Chopin Mixolab User manual

Chopin
Chopin Alveo PC graph Instruction sheet

Chopin
Chopin Mixolab 2 User manual

Chopin
Chopin AlveoLabgraph Instruction sheet

Chopin
Chopin Infraneo Instruction sheet
Popular Laboratory Equipment manuals by other brands


Leica BIOSYSTEMS
Leica BIOSYSTEMS SM2010 R Instructions for use

Cannon
Cannon CT-1000 instruction & operation manual

BIO RAD
BIO RAD DCODE manual

Renfert
Renfert Catalyser 2300-0001 instruction manual

V&P Scientific
V&P Scientific SpinVessel 650ml operating instructions

Dionex
Dionex ICS-2100 installation instructions