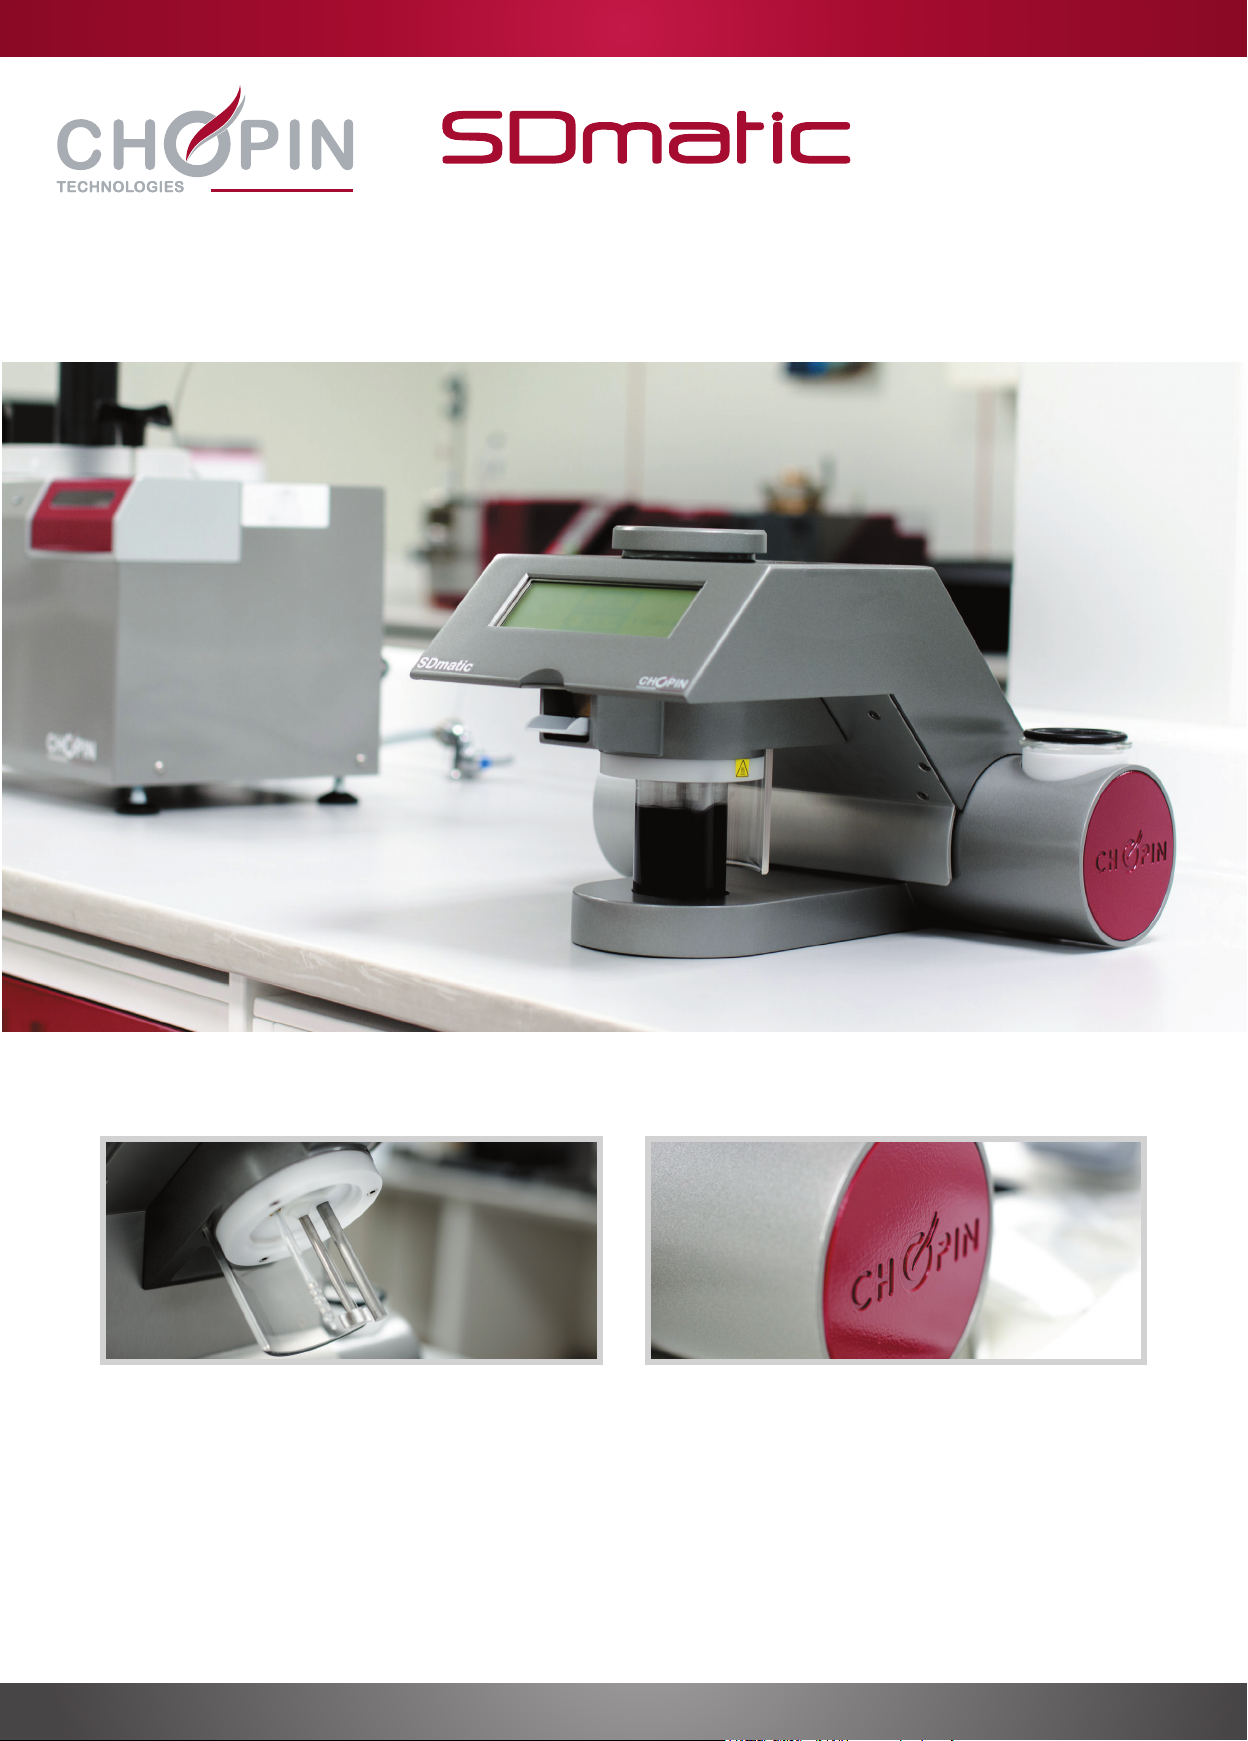
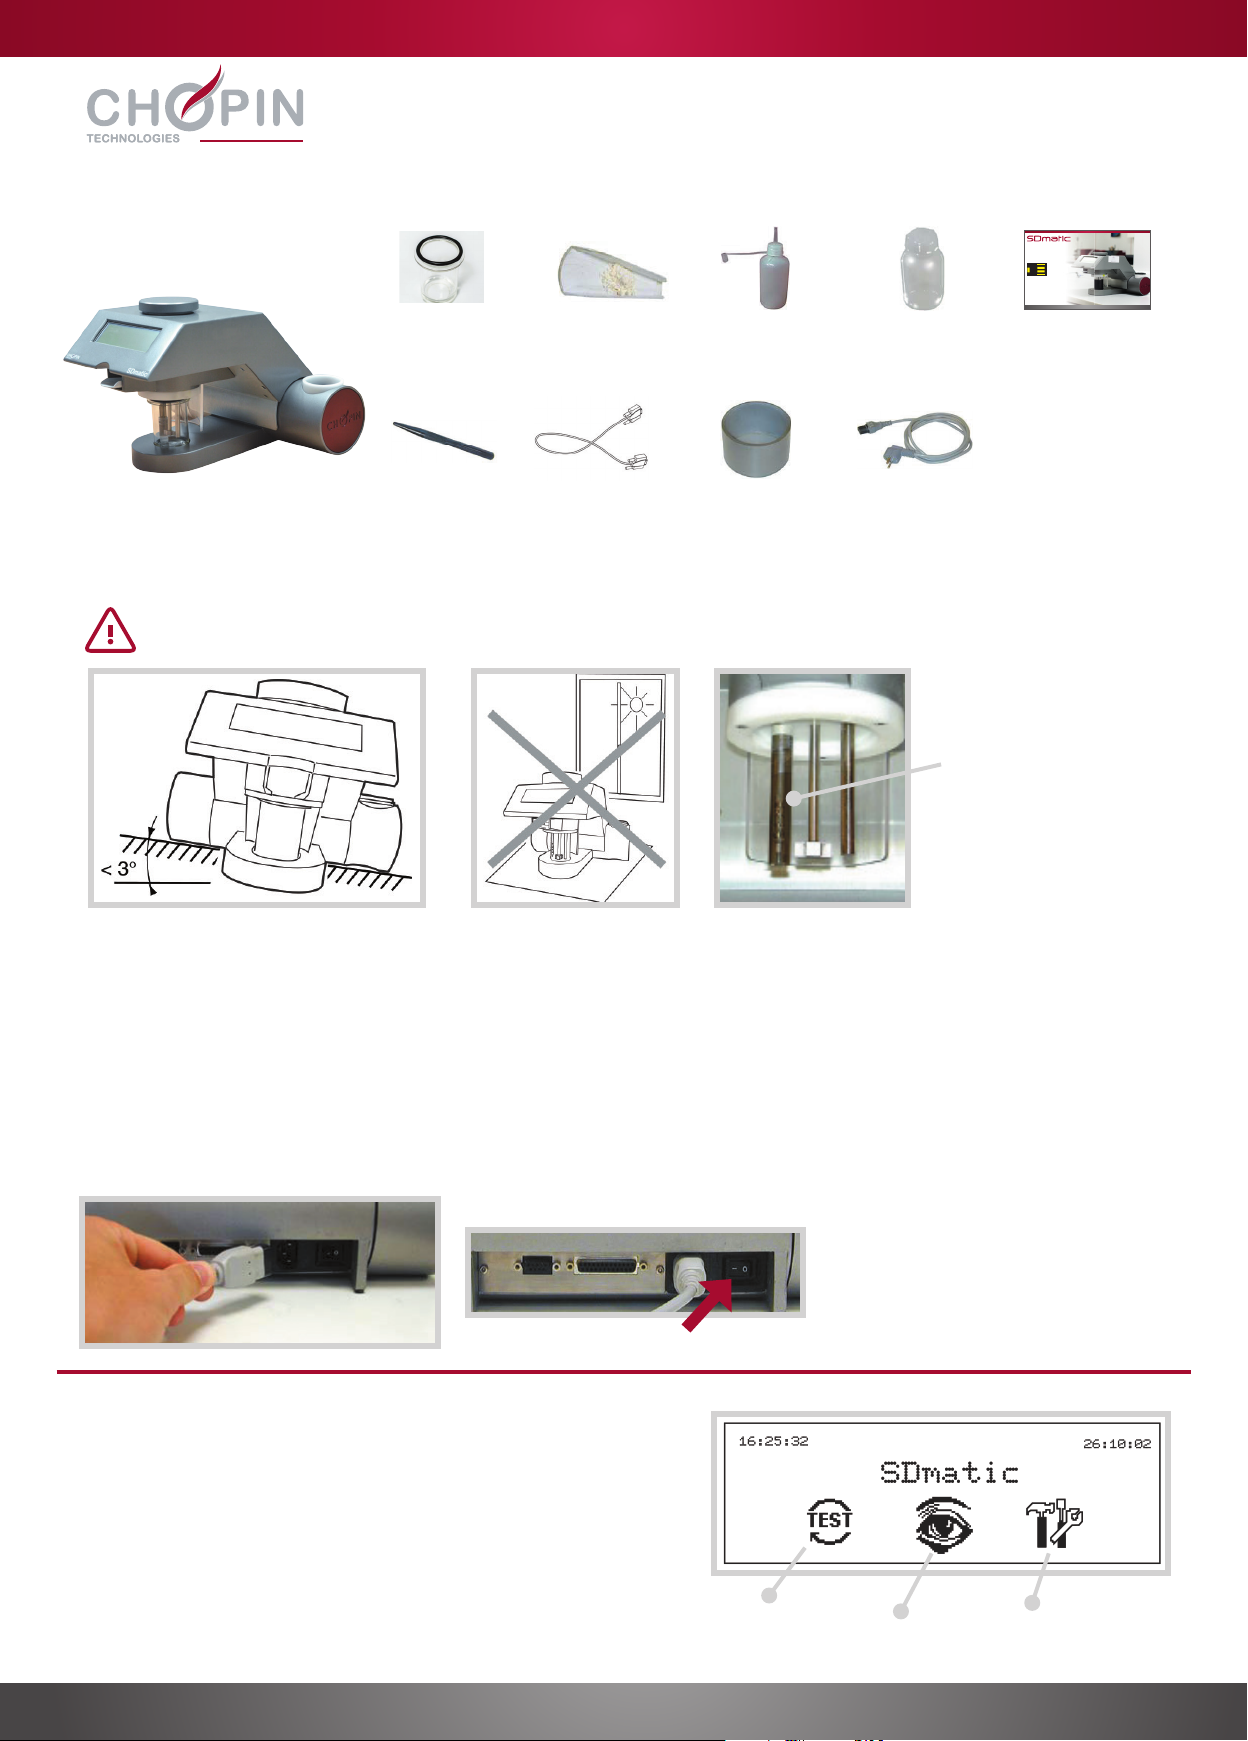
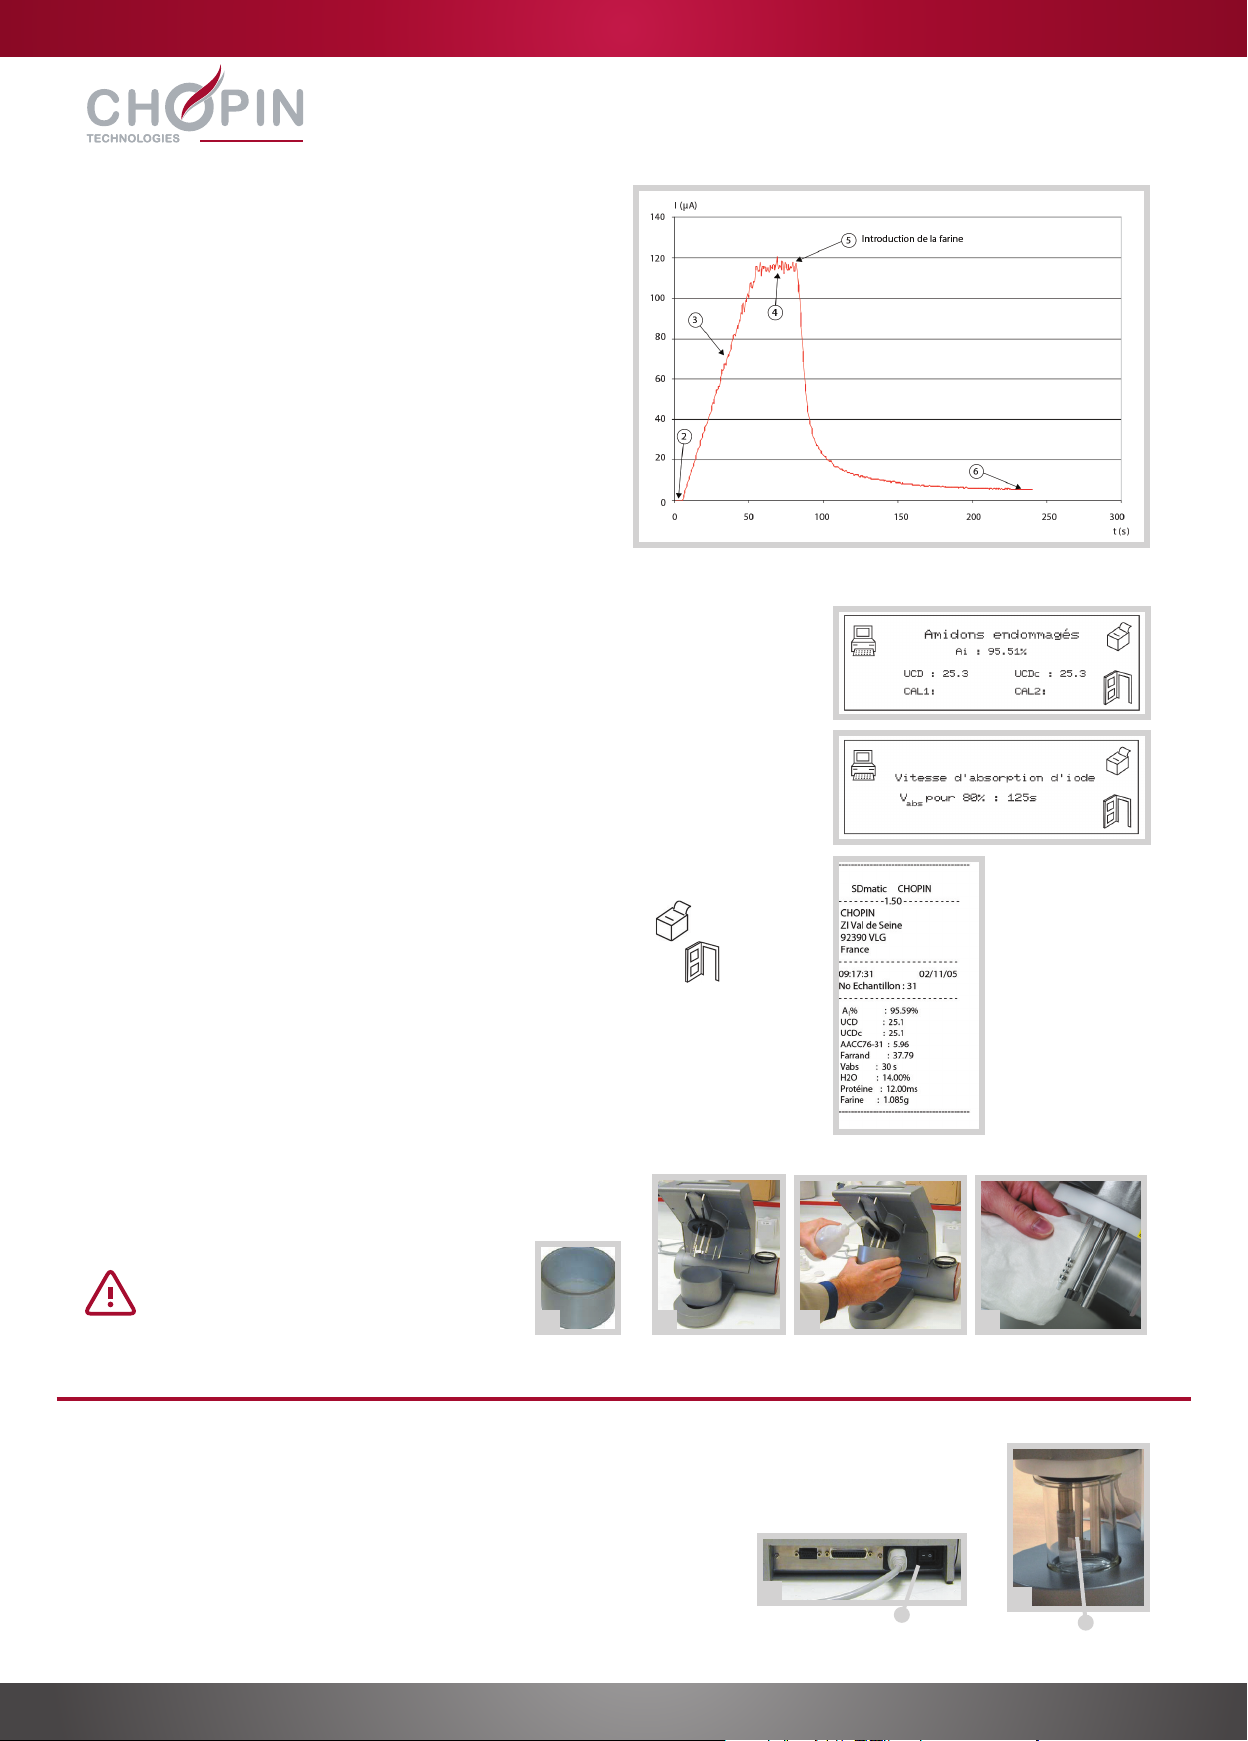
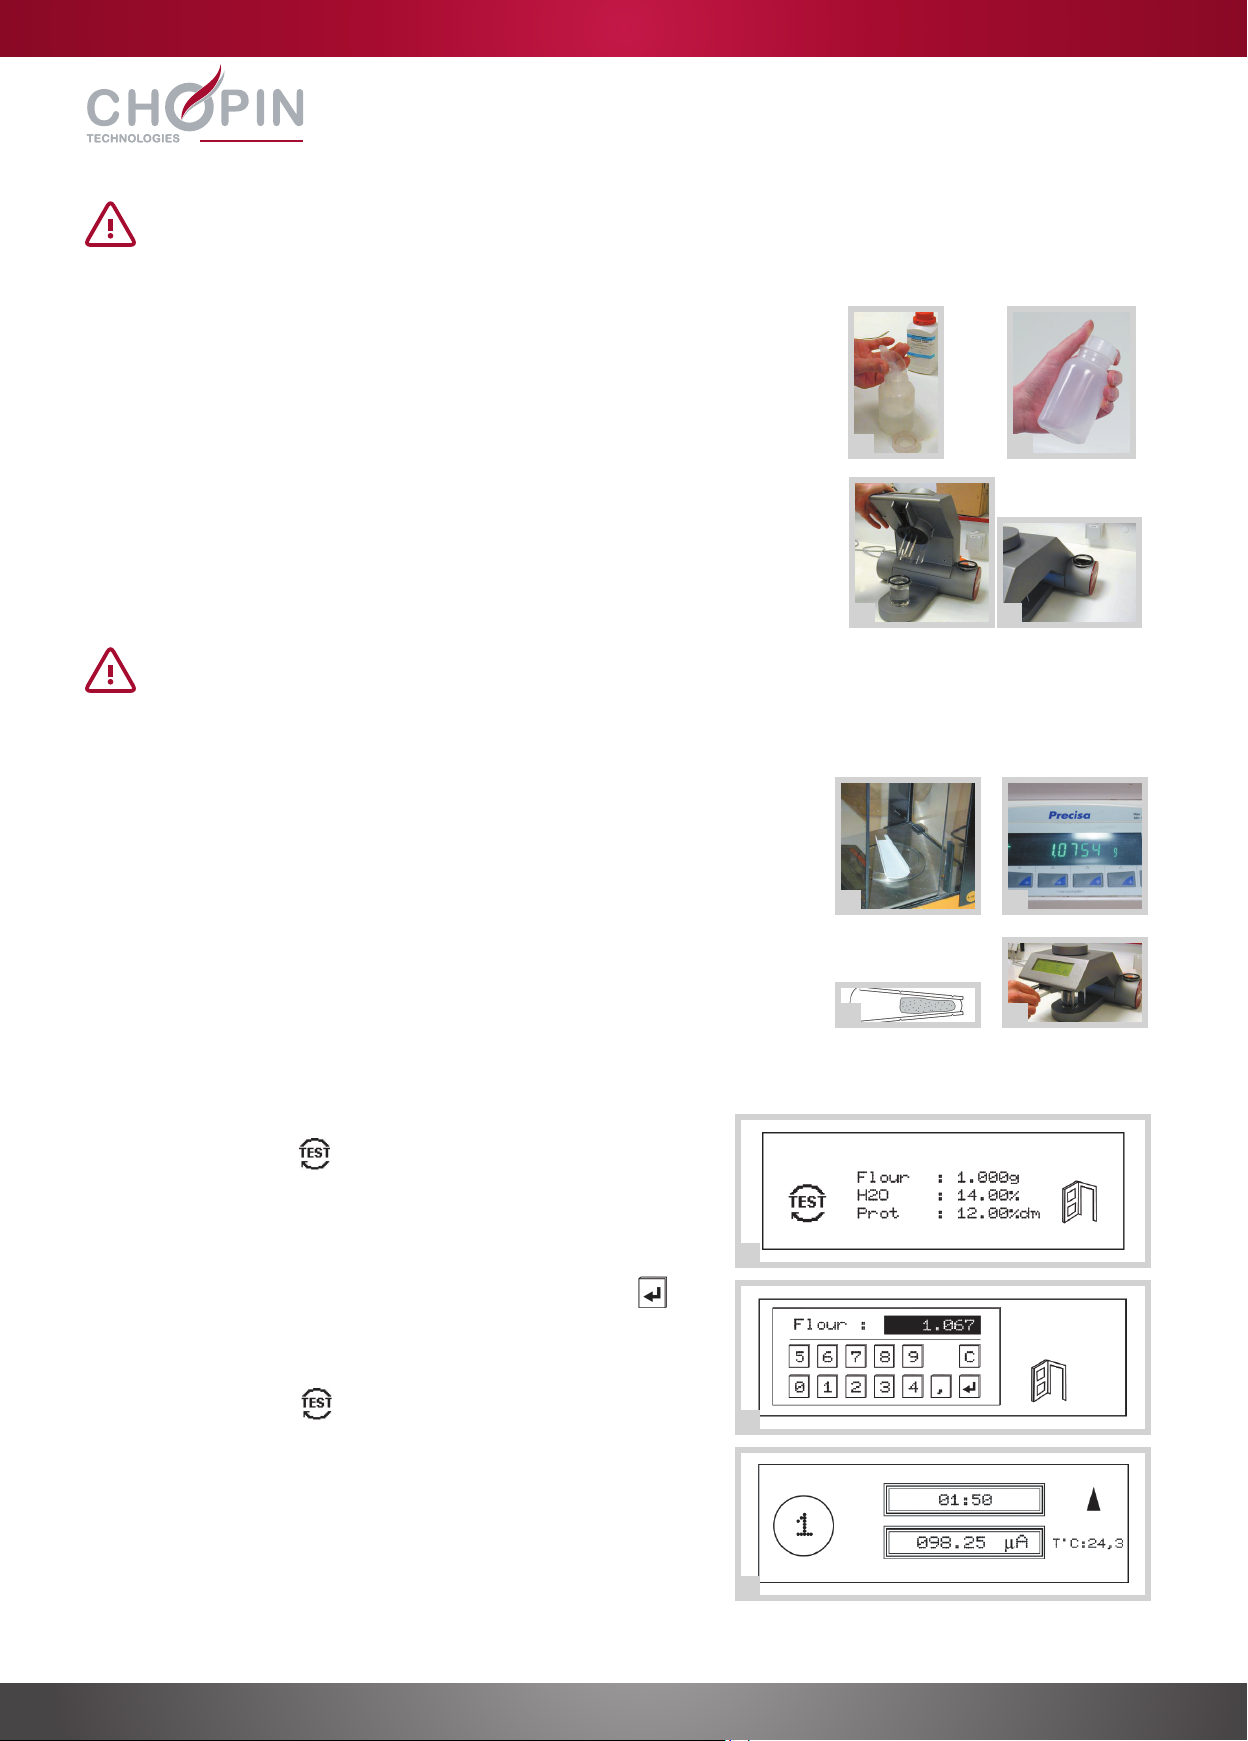
Chopin SDmatic Instruction sheet

Quick installation and rst test
Installation rapide et premier test
Instalación rápida y primer test
Быстрая установка и первый анализ

INSTALL YOUR SDMATIC
A. Contents
B. Installation
C. Connecting the power and switching on
A. Description of the menus
Store the packaging. It is essential to use it when transporting the instrument.
Install the SDmatic on a stable, horizontal surface.
Do not place the SDmatic behind a window, especially if it is in direct sunlight.
On delivery, the measurement probe is protected with a plastic cover. This should be unscrewed before using the instrument,
and should be stored for use when moving or transporting the instrument.
The home screen has three menus:
• Test: enter the settings required to test and launch a measurement
cycle of the starch damage in a sample of flour.
• Control: test the functionalities of the SDmatic.
• Calibration: set different functionalities of the SDmatic.
1. Connect the instrument with the power cable.
2. Switch on the instrument using the switch located at the rear.
Probe protector
Calibration menu
Control menu
Test menu
Dropper
RS 232 cable
USB software stick
and instructions
Power cable
Reaction bowl
(x2)
SDmatic
Plastic bottle
Cleaning
recipient
Spoon (x2)
Touch screen
stylus
cle-usb-sdmatic.indd 2 30/03/2015 14:17:05
USE

PERFORM A FIRST TEST
A. Preparing of the solution
B. Preparing of the flour
C. Performing the test
Do not touch the heating element or the measurement probe directly with the fingers.
Do not leave the reaction bowl in this location more than 30 min.
The bowls are fragile, handle with care when installing them.
1. Prepare the solution in the plastic bottle provided:
- 120 ml of distilled water (± 0.1 ml)
- 1.5 grams of citric acid (C6H8O7) (± 0.1 g)
- 3 grams of potassium iodide (KI) (± 0.2 g)
- 1 drop of sodium thiosulfate (Na2O3S2) at 0.1 mol/l.
2. Shake the bottle for a few moments and pour the solution obtained into the
reaction bowl.
3. Place the reaction bowl in the SDmatic and lower the arm.
4. For increased productivity, it is possible to prepare a test solution in the second
reaction bowl and allow it to preheat in the location provided to the right.
1. Use precision scale to determine the tare weight of the spoon.
2. Weigh 1 gram of flour (± 0.1 g).
3. Spread the flour between the marks without exceeding the upper rims.
4. Read and note the precise weight indicated on the scale.
5. Put the spoon in the SDmatic.
This operation should only be carried out if the reaction bowl and the solution are
in place.
1. Touch the icon of the main menu.
2. Touch ‘‘flour’’.
3. A digital display appears. Enter the mass measured when weighing
the flour (point B.2) using the stylus and keyboard.
4. Validate by touching the validation key.
5. Touch the value to modify the water content and protein values.
These values are optional and are used for the calculation of the
UCDc values.
6. Touch the icon to start the cycle.
7. A new display appears and indicates in real time: the number of
the test phase (see point D. on next page), the timer, the intensity
measured in the solution by the probe, the temperature of the
solution and the heat indicator.
The timer only starts when the temperature reaches 35 °C. The
measurement of the intensity evolves from phase 3.
8. At the end of the test, the SDmatic emits three ‘‘beeps’’.
1
1 2
53
2
43
2
3
7

D. The measurement cycle
E. Results
F. Cleaning after each test
• Phase 0: initiation of the measurement cycle
• Phase 1: the element brings the solution to the correct
temperature (35 °C)
• Phases 2 and 3: the probe electrochemically produces
iodine as a function of the mass of flour introduced
• Phase 4: the plateau measures the exact current (i.e.,
iodine) created (maximum value (lm))
•Phase 5: at the end of the plateau, the flour is introduced
and the iodine is fixed, the current decreases as a
function of the absorption of the iodine
• Phase 6: 180 seconds after the incorporation of the flour,
the probe measures the value of residual current (Ir).
At the end of the test, the results are displayed with:
• The level of starch damage expressed by the iodine absorption rate (AI%) as well
as various other units of measure (UCD, UCDc, AACC 76-31, Farrand).
• The standard value (UCD) is a raw value
• The corrected value (UCDc) takes into account the levels of moisture and protein.
To see the speed of iodine absorption, touch ‘‘Starch damage’’.
To return to the previous screen, touch ‘‘Speed of iodine absorption’’.
After each test the measurement probe, the stirrer and the element of the
SDmatic must be cleaned.
1. To do this, use the container located on the left side of the SDmatic.
2. Place the container below the measurement probe, the stirrer and the
element.
3. Gently rinse with distilled water.
4. Wipe with a soft, dry cloth.
1. Switch off the instrument using the switch located at the rear.
2. When the instrument is not in use, the measurement probe of the
SDmatic must be immersed in water.
It is possible to:
• Print the results by touching the ‘‘Print’’ icon.
• Exit the results screen by touching the w icon.
1
12
2 3 4
Switch Water
SWITCHING OFF THE INSTRUMENT
The measurement probe is very fragile - it
must be gently cleaned and wiped dry in
order not to damage the measurement
rings.

INSTALLER VOTRE SDMATIC
A. Composition
B. Mise en place
C. Raccordement électrique et mise sous tension
A. Description des menus
Conserver l’emballage. Il est à utiliser impérativement pour tout transport de l’appareil.
Poser le SDmatic sur une surface horizontale et stable.
Ne pas placer le SDmatic derrière une vitre, surtout si celle-ci est exposée au soleil.
A la livraison, la sonde de mesure est entourée par une protection plastique. Il convient de la dévisser avant la mise en service
de l’appareil, et de la conserver pour tout déplacement ou transport de l’appareil.
L’écran d’accueil permet de choisir entre trois menus :
• Test : permet de rentrer les paramètres nécessaires au test
et de lancer un cycle de mesure de l’endommagement de
l’amidon d’un échantillon de farine.
• Contrôle : permet de tester les fonctionnalités du SDmatic.
• Calibration : permet de régler différentes fonctionnalités du
SDmatic.
1. Brancher l’appareil au secteur à l’aide du câble d’alimentation fourni.
2. Mettre l’appareil sous tension en utilisant l’interrupteur situé à l’arrière.
Protecteur de sonde
Menu calibration
Menu contrôle
Menu test
doseur
compte-gouttes
Câble RS 232
Clé USB logiciel et
mode d’emploi
Câble d’alimentation
Bol de réaction
(x2)
SDmatic
flacon plastique
Récipient de
nettoyage
Cuillère (x2)
Crayon pour
écran tactile
UTILISATION
cle-usb-sdmatic.indd 2 30/03/2015 14:17:05

RÉALISER UN PREMIER TEST
A. Préparation de la solution
B. Préparation de la farine
C. Conduite du test
Ne toucher ni la résistance ni la sonde de mesure directement avec les doigts.
Ne pas laisser le bol de réaction dans cet emplacement plus de 30 min.
Les bols sont fragiles, les manipuler avec précaution lors de leur mise en place.
1. Préparer dans le flacon plastique fourni :
- 120 ml d’eau distillée (± 0,1 ml)
- 1,5 grammes d’acide citrique (C6H8O7) (± 0,1 g)
- 3 grammes d’iodure de potassium (KI) (± 0,2 g)
- 1 goutte de thiosulfate de sodium (Na2O3S2) à 0,1 mol/l.
2. Agiter quelques instants le flacon et verser la solution obtenue dans le bol de
réaction.
3. Mettre en place le bol de réaction dans le SDmatic et rabattre le bras.
4. Pour gagner en productivité, il est possible de préparer une solution de test dans
le deuxième bol de réaction et de la mettre à préchauffer dans l’emplacement situé
à droite.
1. A l’aide d’une balance de précision, réaliser une tare de la cuillère.
2. Peser 1 gramme de farine (± 0,1g).
3. Répartir la farine entre les marques sans dépasser les bords pour la hauteur.
4. Relever et noter précisément le poids indiqué sur la balance.
5. Mettre la cuillère en place dans le SDmatic.
Cette opération ne doit être effectuée que si le bol de réaction et la solution sont
en position.
1. Appuyer sur l’icône du menu principal.
2. Appuyer sur ‘‘Farine’’.
3. Un affichage numérique apparaît. Entrer la masse relevée lors de la
pesée (point B.2) de la farine à l’aide du stylo et du clavier.
4. Valider en appuyant sur la touche de validation.
5. Pour modifier les valeurs de teneur en eau et des protéines,
appuyer sur la valeur. Ces valeurs sont facultatives et servent pour
le calcul des valeurs UCDc.
6. Appuyer sur l’icône pour lancer le cycle.
7. Un nouvel affichage apparaît et indique en temps réel : le numéro
de phase de l’essai (voir point D. page suivante), le chronomètre,
l’intensité mesurée dans la solution par la sonde, la température de
la solution et l’ indicateur de chauffe.
Le chronomètre ne démarre que lorsque la température atteint
35°C. La mesure de l’intensité évolue à partir de la phase n°3.
8. A la fin du test, le SDmatic émet trois ‘‘bips’’.
1
1 2
53
2
43
2
3
7

D. Déroulement d’un cycle de mesure
E. Résultat
F. Nettoyage après chaque test
• Phase 0 : initialisation du cycle de mesure.
• Phase 1 : la résistance chauffante a amené la solution à
bonne température (35°C).
• Phase 2 et 3 : la sonde produit électrochimiquement de
l’iode en fonction de la masse de farine introduite.
•Phase 4 : le palier mesure exactement la quantité de
courant (donc d’iode) créée (valeur maximale (Im)).
• Phase 5 : à la fin du palier, la farine est introduite et fixe
l’iode, le courant décroît en fonction de l’absorption de
l’iode.
• Phase 6 : 180 secondes après l’incorporation de la
farine, la sonde mesure la valeur du courant résiduel (Ir).
A la fin du test, les résultats sont affichés avec :
• Le taux d’amidon endommagé exprimé par le taux d’absorption d’iode (AI%) ainsi
que différentes autres unités de mesure (UCD, UCDc, AACC 76-31, Farrand).
• La valeur standard (UCD) est une valeur brute.
• La valeur corrigée UCDc tient compte des teneurs en humidité et en protéine.
Pour voir la vitesse d’absorption d’iode, appuyer sur «Amidons endommagés».
Pour revenir à l’écran précédent, appuyer sur «Vitesse d’absorption d’iode».
Après chaque test, la sonde de mesure, l’agitateur et la résistance du
SDmatic doivent être nettoyés.
1. Pour cela, utiliser le récipient situé sur la partie gauche du SDmatic.
2. Positionner le récipient en dessous de la sonde de mesure, l’agitateur et la
résistance.
3. Rincer délicatement avec de l’eau distillée.
4. Essuyer avec un chiffon sec et doux.
1. Mettre le SDmatic hors tension en utilisant l’interrupteur situé à l’arrière de
l’appareil.
2. Lorsque l’appareil n’est pas utilisé, la sonde de mesure du SDmatic
doit être immergée dans l’eau.
Il est possible :
• D’imprimer les résultats en appuyant sur l’icône ‘‘Impression’’.
• De sortir de l’écran de résultat en appuyant sur l’icône ‘‘Quitter’’.
1
12
2 3 4
Interrupteur Eau
ETEINDRE L’APPAREIL
La sonde de mesure est très fragile, elle doit
impérativement être nettoyée et essuyée
délicatement afin de ne pas détériorer les
anneaux de mesures.

INSTALAR SU SDMATIC
A. Composición
B. Instalación
C. Conexión eléctrica y puesta bajo tensión
A. Descripción de los menús
Conservar el embalaje. Hay que utilizarlo obligatoriamente para el transporte del aparato.
Poner el SDmatic sobre una superficie horizontal y estable.
No colocar el SDmatic detrás de un cristal, sobre todo si está expuesto al sol.
En el transporte, la sonda de medición está rodeada por una protección plástica. Conviene quitarla antes de la instalación y
conservarla para cualquier desplazamiento del aparato.
La pantalla de inicio permite elegir entre tres menús :
• Test : permite introducir los parámetros necesarios para el
test y lanzar un ciclo de medición del daño del almidón de una
muestra de harina.
• Control : permite testar las funciones del SDmatic.
• Calibración : permite regular diferentes funciones del SDmatic.
1. Enchufar el aparato a la corriente con ayuda del cable de alimentación proporcionado
2. Poner el aparato bajo tensión utilizando el interruptor situado detrás
Protector de sonda
Menú de calibración
Menú de control
Menú de prueba
Dosificador
cuentagotas
Cable RS 232
Lápiz USB software
y modo de empleo
Cable de alimentación
Vaso de
reacción (x2)
SDmatic
Frasco de
plástico
Recipiente de
limpieza
Cuchara (x2)
Lápiz para
pantalla táctil
UTILIZACIÓN
cle-usb-sdmatic.indd 2 30/03/2015 14:17:05

REALIZAR UN PRIMER TEST
A. Preparación de la disolución
B. Preparación de la harina
C. Realización del test
No tocar ni la resistencia ni la sonda de medición directamente con los dedos.
No dejar el vaso de reacción en esta ubicación más de 30 min.
Los vasos son frágiles, manipularlos con precaución durante su uso.
1. Preparación de la disolución :
- 120 ml de agua destilada (± 0,1 ml)
- 1,5 gramos de ácido cítrico (C6H8O7) (± 0,1 g)
- 3 gramos de yoduro potásico (KI) (± 0,2 g)
- 1 gota de tiosulfato de sodio (Na2O3S2) 0,1 mol/l.
2. Agitar unos instantes el frasco y verter la solución obtenida en el vaso de reacción.
3. Colocar el vaso de reacción en el SDmatic y plegar el brazo.
4. Para ganar en productividad, es posible preparar una solución de test
en el segundo vaso de reacción y ponerla a calentar en el sitio situado a la derecha.
1. Con ayuda de una balanza de precisión realizar una tara de la cuchara.
2. Pesar 1 gramo de harina (± 0,1g).
3. Repartir la harina entre las marcas sin sobrepasar los bordes en altura.
4. Leer y anotar con precisión el peso indicado en la balanza.
5. Colocar la cuchara en el SDmatic.
Esta operación solo debe ser realizada si el vaso de reacción y la solución están
en posición.
1. Presionar sobre el icono del menú principald.
2. Presionar sobre “harina”.
3. Aparece la pantalla digital. Introducir la masa anotada durante
el pesaje (punto B.2) de la harina con ayuda del lápiz y del teclado.
4. Validar presionando sobre la tecla de validación.
5. Para modificar los valores de contenido en agua y de proteínas,
presionar vaso de reacción. Estos valores son facultativos y sirven
para el cálculo de los valores UCDc.
6. Presionar sobre el icono para lanzar el ciclo.
7. Aparece una nueva pantalla que indica el tiempo real: el número
de fase del ensayo (ver punto D. página siguiente), el cronómetro,
la intensidad medición en la disolución por la sonda, la temperatura
de la disolución y el indicador de calentamiento.
El cronómetro no arranca hasta que la temperatura no alcance los
35°C. La medición de la intensidad evoluciona a partir de la fase nº 3.
8. Al final del test, el SDmatic emite tres “bips’’.
1
1 2
53
2
43
2
3
7

D. Desarrollo de un ciclo de medición
E. Resultado
F. Limpieza tras cada test
• Fase 0 : inicio del ciclo de medición.
• Fase 1 : : la resistencia caliente ha llevado la disolución a
la temperatura adecuada (35°C).
• Fase 2 y 3 : la sonda produce electroquímicamente yodo
en función de la masa de harina introducida.
•Fase 4 : el palier mide exactamente la cantidad de
corriente (por tanto de yodo) creada (valor máximo (Im))
• Fase 5 : al final del palier, se introduce la harina y fija el
yodo, la corriente disminuye en función de la absorción
de yodo.
• Fase 6 : 180 segundos después de la incorporación de la
harina, la sonda mide el valor de la corriente residual (Ir).
Al final del test, los resultados se muestran con :
• La tasa de almidón dañado expresada por la tasa de absorción de yodo (AI%),
así como en otras unidades de medición diferentes (UCD, UCDc, AACC 76-31,
Farrand).
• El valor estándar (UCD) es un valor bruto.
• El valor corregido (UCDc ) tiene en cuenta contenidos en humedad y en proteína.
Para ver la velocidad de absorción de yodo, presionar sobre “Almidones
dañados”. Para volver a la pantalla precedente, presionar sobre “Velocidad de
absorción de yodo”.
Tras cada test, la sonda de medición, el agitador y la resistencia del SDmatic
se deben limpiar.
1. Para ello, utilizar el recipiente situado en la parte izquierda del SDmatic.
2. Posicionar el recipiente debajo de la sonda de medición, el agitador y la
resistencia.
3. Aclarar delicadamente con agua destilada.
4. Secar con un paño seco y suave.
1. Poner el SDmatic fuera de tensión utilizando el interruptor de la parte de
atrás del aparato.
2. Cuando el aparato no se utiliza, la sonda de medida del SDmatic
debe estar sumergida en agua.
Es posible :
• Imprimir los resultados presionando sobre el icono “Impresión”.
• Salir de la pantalla de resultados presionando sobre el icono “Salir”.
1
12
2 3 4
Interruptor Agua
APAGAR EL APARATO
La sonda de medición es muy frágil,
obligatoriamente debe limpiarse y secarse
delicadamente con el fin de no deteriorar
los anillos de medidas.

УСТАНОВКА ВАШЕГО SDMATIC
A. Комплектация
B. Установка
C. Подключение электричества и подача напряжения
A. Описание меню
Сохраняйте упаковку. Ее использование обязательно при транспортировке устройства.
Установите SDMatic на твердую горизонтальную поверхность.
Не ставьте SDMatic у окна, особенно если в него светит солнце.
На измерительный зонд доставленного устройства установлен пластиковый защитный кожух.
Экран приветствия позволяет выбрать три меню:
• Тест : позволяет установить необходимые тестовые
параметры и запустить цикл измерения уровня
повреждения крахмала в пробе муки.
• Управление : позволяет проверить функционал SDMatic
• Калибровка : позволяет отрегулировать различные
функции SDMatic
1. Подключите устройство к электросети при помощи предоставленного кабеля питания.
2. Подавайте напряжение при помощи расположенного сзади выключателя.
Защитный кожух зонда
Меню «Калибровка»
Меню «Управление»
Меню «Тест»
Капельный
дозатор
Кабель RS 232
USB-накопитель
с программным
обеспечением и
инструкцией
Кабель питания
Реакционная
чаша (x2)
SDmatic
Пластиковый
флакон
Емкость для
очистки
Дозировочная
ложка (x2)
Стилус для
сенсорного
экрана
ИСПОЛЬЗОВАНИЕ
cle-usb-sdmatic.indd 2 30/03/2015 14:17:05

ПРОВЕДЕНИЕ ПЕРВОГО АНАЛИЗА
A. Подготовка раствора
B. Подготовка муки
C. Проведение анализа
Не прикасайтесь напрямую к нагревательному элементу или к измерительному зонду.
Не оставляйте реакционную чашу в этой ячейке более чем на 30 минут.
Чаши хрупкие, будьте осторожны при их установке.
1. Подготовьте пластиковый флакон, содержащий
- 120 мл дистиллированной воды (± 0,1 мл)
- 1,5 г лимонной кислоты (C6H8O7) (± 0,1 г)
- 3 г йодистого калия (KI) (± 0,2 г)
- 1 каплю тиосульфата натрия (Na2O3S2) в концентрации 0,1 моль/л.
2. Встряхните флакон и налейте полученный раствор в реакционную чашу.
3. Установите реакционную чашу в SDMatic и опустите крышку.
4. Для повышения продуктивности допускается подготовка тестового раствора
во второй реакционной чаше, после чего ее необходимо поместить в
расположенную справа ячейку для предварительного нагрева.
1. Поместите измерительную ложку на весы высокой точности.
2. Взвесьте 1 г муки (± 0,1г).
3. Распределите муку между границами, не заходя за край по высоте.
4. Уберите ложку с весов и точно запишите показанный вес.
5. Установите измерительную ложку на место в SDMatic
Это действие можно производить только если реакционная чаша и раствор
уже подготовлены и установлены.
1. Нажмите на значок в главном меню.
2. Нажмите на кнопку “Мука’’ .
3. На экране отображаются цифровые данные.Введите массу
муки, полученную во время взвешивания (пункт B.2), при
помощи стилуса и клавиатуры.
4. Подтвердите данные, нажав на кнопку подтверждения.
5. Для изменения показателей содержания воды и белков
нажмите на показатель. Эти показатели необязательны и
используются для расчета UCD.
6. Нажмите на значок для начала цикла
7. На экране отобразятся новые данные, показывающие в
реальном времени: номер фазы анализа (см. пункт D на след.
странице), измерение времени, интенсивность, измеренную
зондом в растворе, температуру раствора и индикатор нагрева.
Измерение времени начинается после достижения
температуры 35°C. Измерение интенсивности начинается с
фазы №3.
8. После завершения анализа SDMatic трижды издаст звуковой
сигнал.
1
1 2
53
2
43
2
3
7

D. Ход цикла измерения
E. Результат
F. Чистка после каждого анализа
• Фаза 0 :инициализация цикла измерения
• Фаза 1: нагревательный элемент довел раствор до
нужной температуры (35°C).
• Фазы 2 и 3: зонд электрохимическим методом
генерирует йод в зависимости от массы поданной муки.
•Фаза 4: устройство точно измеряет силу созданного
тока (следовательно, и йод) (максимальное значение
(Im)).
• Фаза 5: производится подача муки и начинается
связывание йода, ток снижается в зависимости от
поглощения йода
• Фаза 6: Через 180 секунд после введения муки
измерительный зонд измеряет силу остаточного
тока (Ir).
По завершении анализа отображаются результаты, показывающие :
• Уровень поврежденного крахмала, выраженный в уровне поглощения
йода (AI%), а также в других единицах измерения (UCD, UCDc, AACC
76-31, Farrand).
• Стандартное значение (UCD) это валовой показатель.
• Скорректированное значение (UCDc ) учитывает содержание влаги и
белков.
Для просмотра скорости поглощения йода нажмите на кнопку “Поврежденный
крахмал’’ . Чтобы вернуться на предыдущий экран, нажмите на кнопку
“Скорость поглощения йода’’ .
После каждого анализа необходимо очищать измерительный зонд,
мешалку и нагревательный элемент SDMatic.
1. Для этого воспользуйтесь емкостью, расположенной на левой части
SDMatic.
2. Поместите емкость под измерительным зондом,
мешалкой и нагревательным элементом.
3. Аккуратно прополощите при помощи
дистиллированной воды.
4. Вытрите сухой мягкой тканью.
1. Прекратите подачу напряжения на SDMatic при помощи
расположенного сзади выключателя.
2. Когда устройство не используется, измерительный зонд SDMatic
необходимо погрузить в воду.
Есть возможность:
• Распечатать результаты, нажав на значок “Печать’’
• Выйти из меню результатов, нажав на значок “Выход’’
1
12
2 3 4
Выключатель Вода
ВЫКЛЮЧЕНИЕ УСТРОЙСТВА
Измерительный зонд очень хрупкий, его необходимо очищать и вытирать с
осторожностью, чтобы не повредить измерительные кольца.

Notes / Notas / Примeчания

Notes / Notas / Примeчания

Documentation produced by CHOPIN Technologies ©
2016 – Pictures: CHOPIN Technologies
Chopin Technologies
Distributors
CHOPIN Technologies
20 avenue Marcellin Berthelot
92390 Villeneuve-la-Garenne France
8www.chopin.fr
CHOPIN Technologies Inc.
19955 West 162nd. Street
Olathe, KS 66062 - USA
CHOPIN (BEIJING)
Trading Company LTD
R804, Unit B, 1# Building, Jia 5#, Lianhuachi
East Rd. Xicheng District,
Beijing, 100038 - CHINA
ApplicAtions lAborAtory
Research, loans and training
Tel. : +33 1 41 47 17 15
After-sAles service
Preventive and curative maintenance
Tel. : +33 1 41 47 50 33
sAles DepArtment
Tel. : +33 1 41 47 50 48
Other manuals for SDmatic
1
Table of contents
Languages:
Other Chopin Laboratory Equipment manuals

Chopin
Chopin LabMill Instruction sheet

Chopin
Chopin Alveo PC graph Instruction sheet

Chopin
Chopin Mixolab User manual

Chopin
Chopin AlveoLabgraph Instruction sheet

Chopin
Chopin Mixolab 2 User manual

Chopin
Chopin Infraneo Instruction sheet

Chopin
Chopin RHEO F4 Instruction sheet

Chopin
Chopin Mixolab 2 Instruction sheet