Chopin RHEO F4 Instruction sheet

Quick installation and rst test
Installation rapide et premier essai
Instalación rápida y primer test
Установка и проведение испытания

Power
cord
Hold on to the
packaging. It is
necessary for shipping
the instrument.
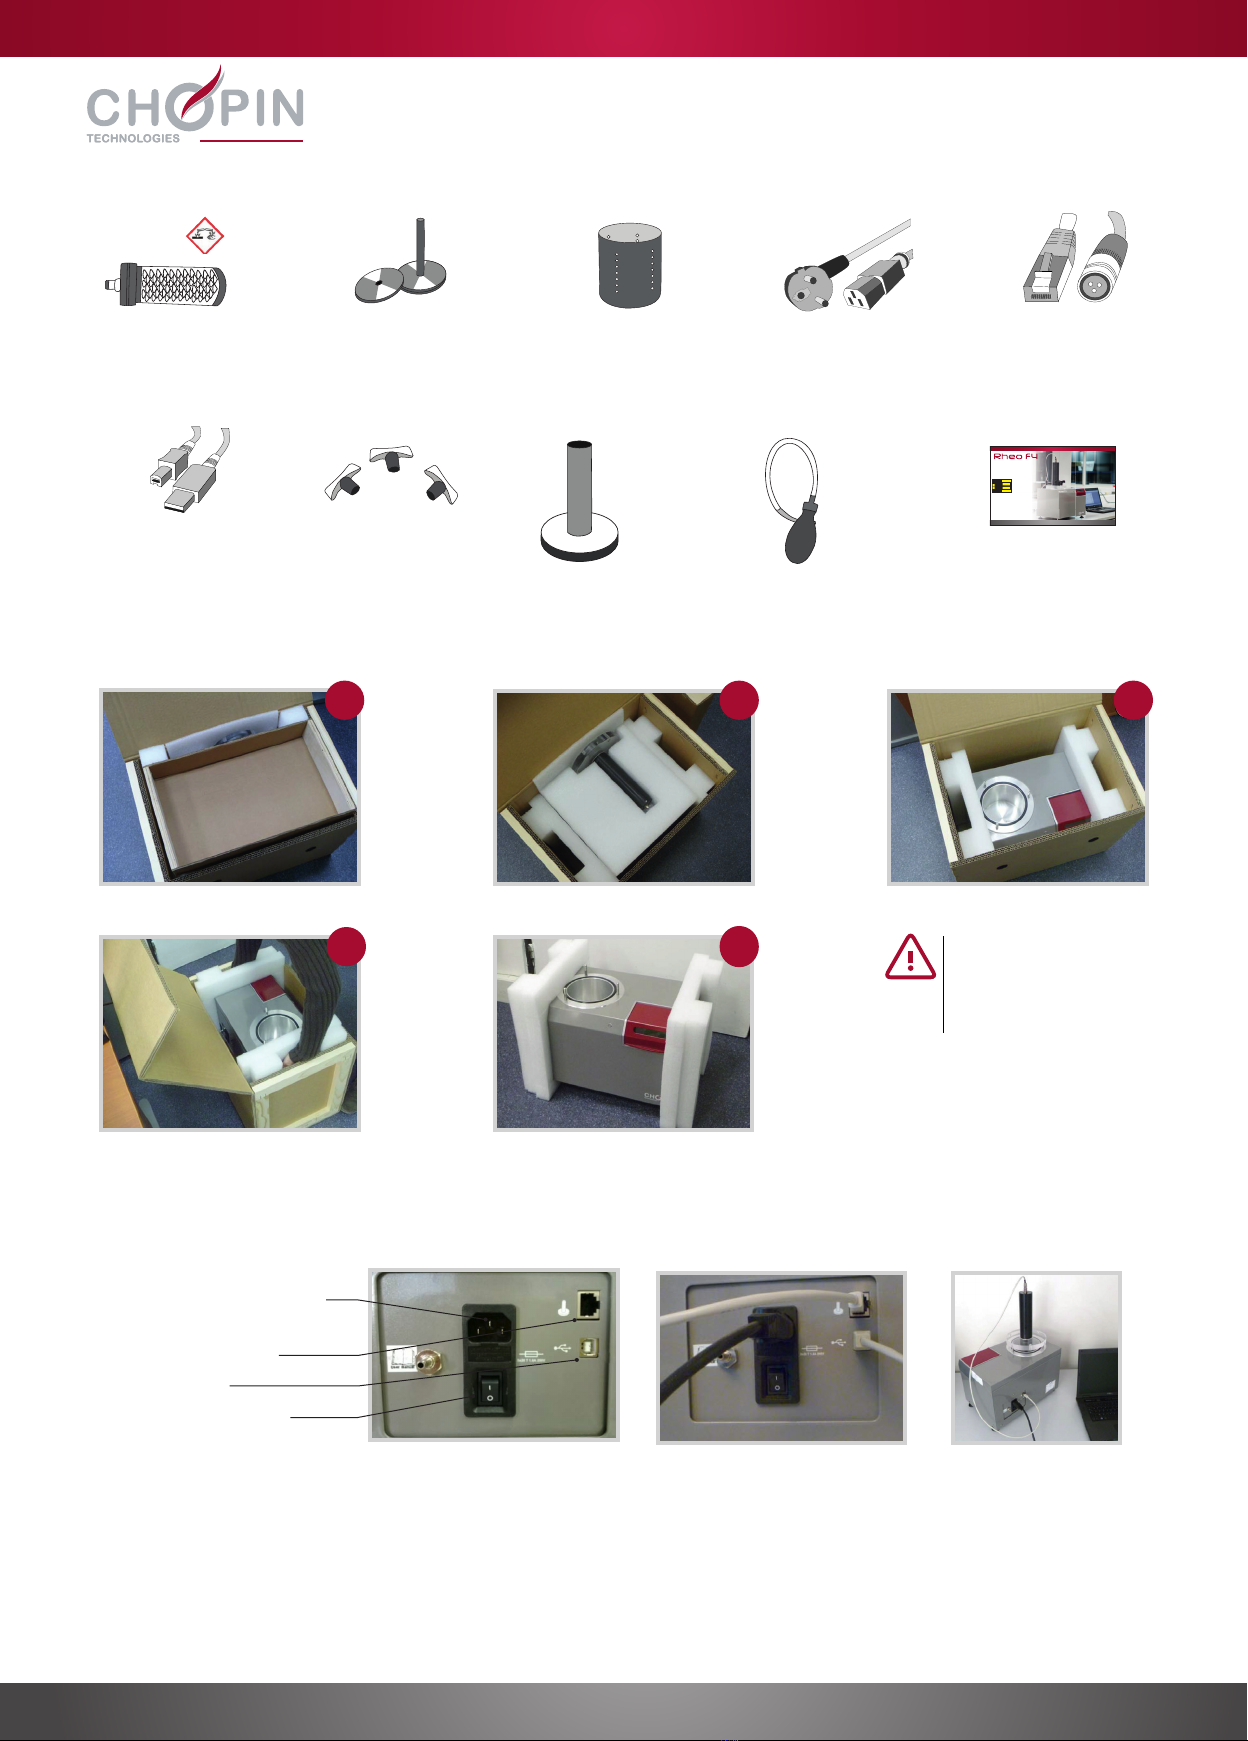
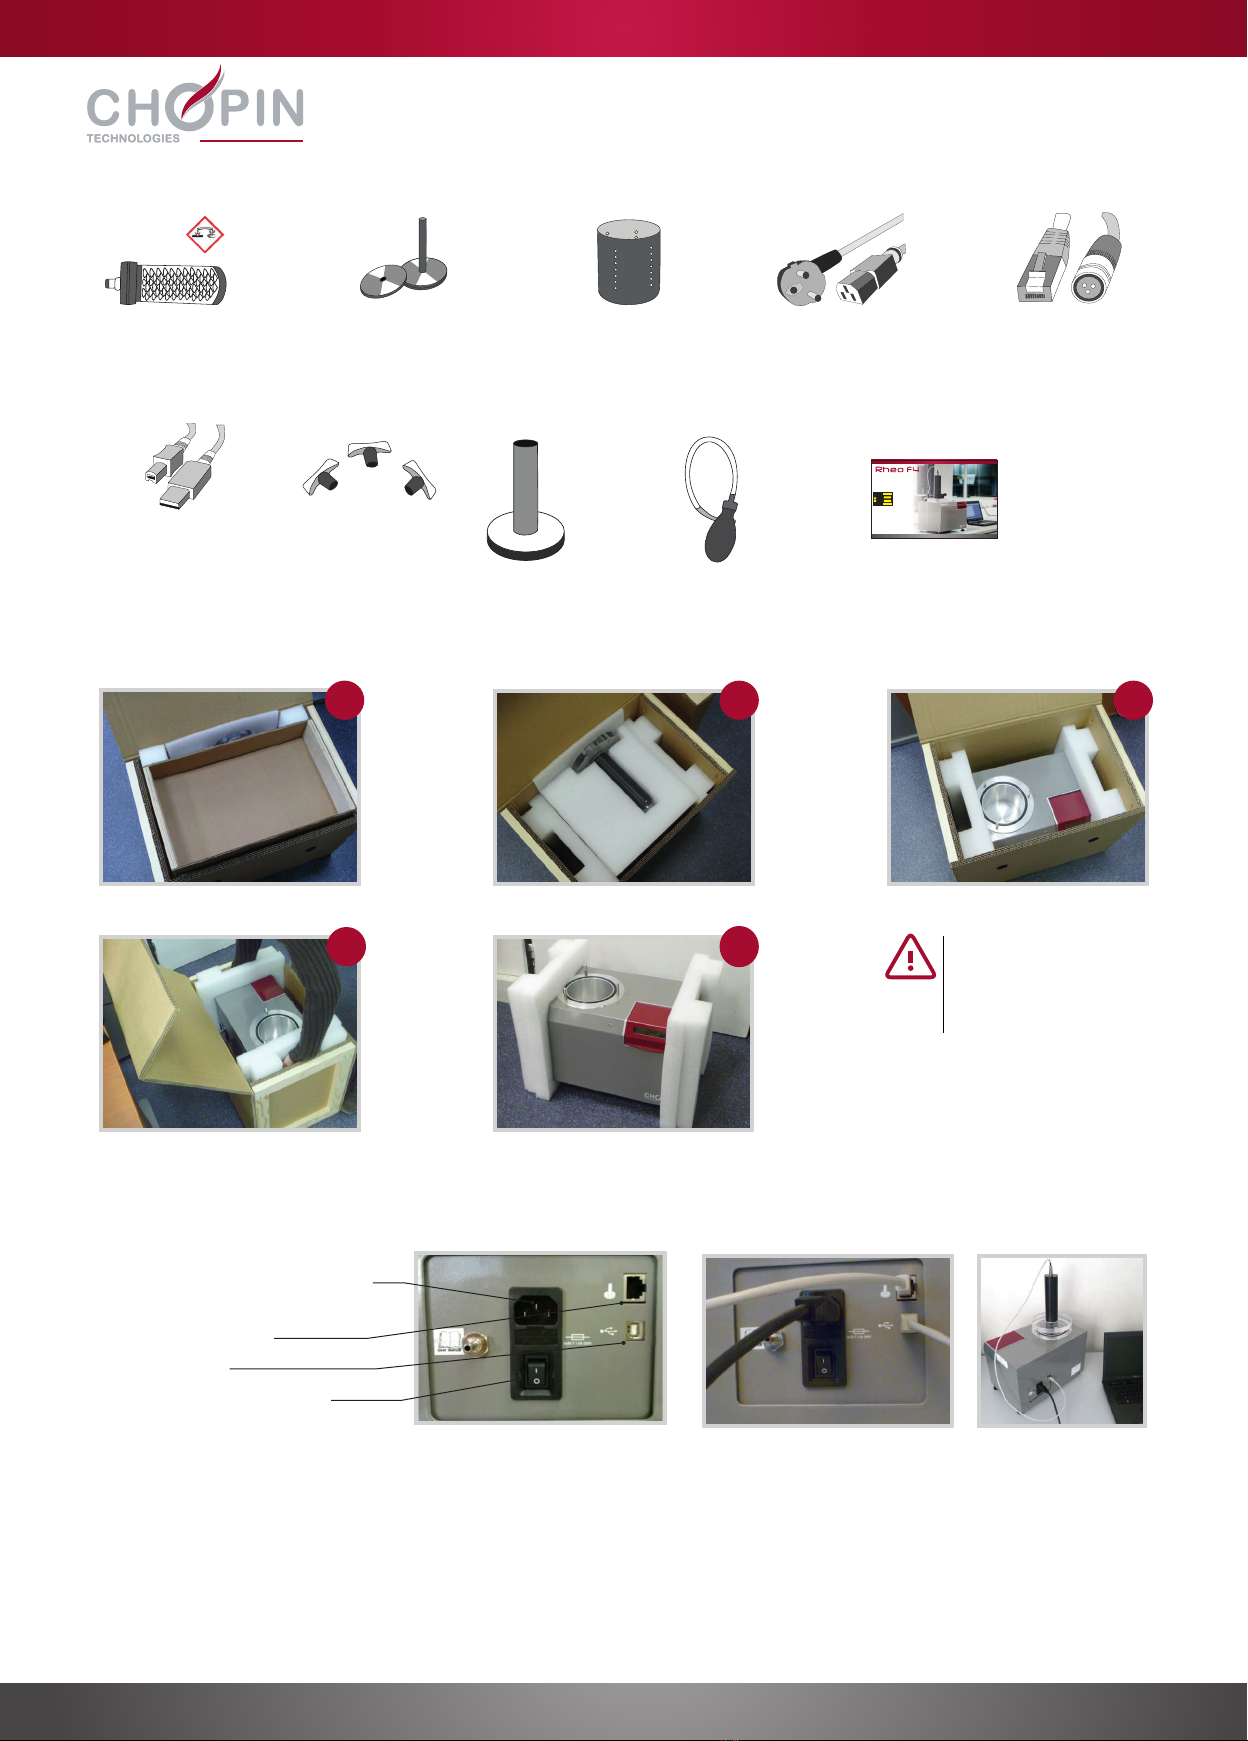
Unpack the equipment according to the following indications :
1
4
2
5
3
1. Connect the equipment using the power cord.
2. Connect the dough development sensor cable to the Rheo F4.
3. Connect the equipment to a computer using the USB cable.
4. Turn the Rheo F4 on using the On/Off switch on the back.
1. Power Supply Port
3. PC port
4. On/Off switch
2. Dough development
sensor port
INSTALL YOUR RHEO F4
1. Parts
2. Unpacking
3.Installation
A - Equipment
Fermentation
basket
Soda lime
cartridge
Dough
development
sensor cable
USB Cable
(PC-Rheo F4
connection)
Bowl
tightening
nut
Displat-
cement
sensor
Pump
(for
imper-
meability
testing) USB stick with software
and user’s manual
Standard support
piston assembly
and 5 discs of 500g
cle-usb-rheo-f4.indd 2 30/03/2015 14:52:59

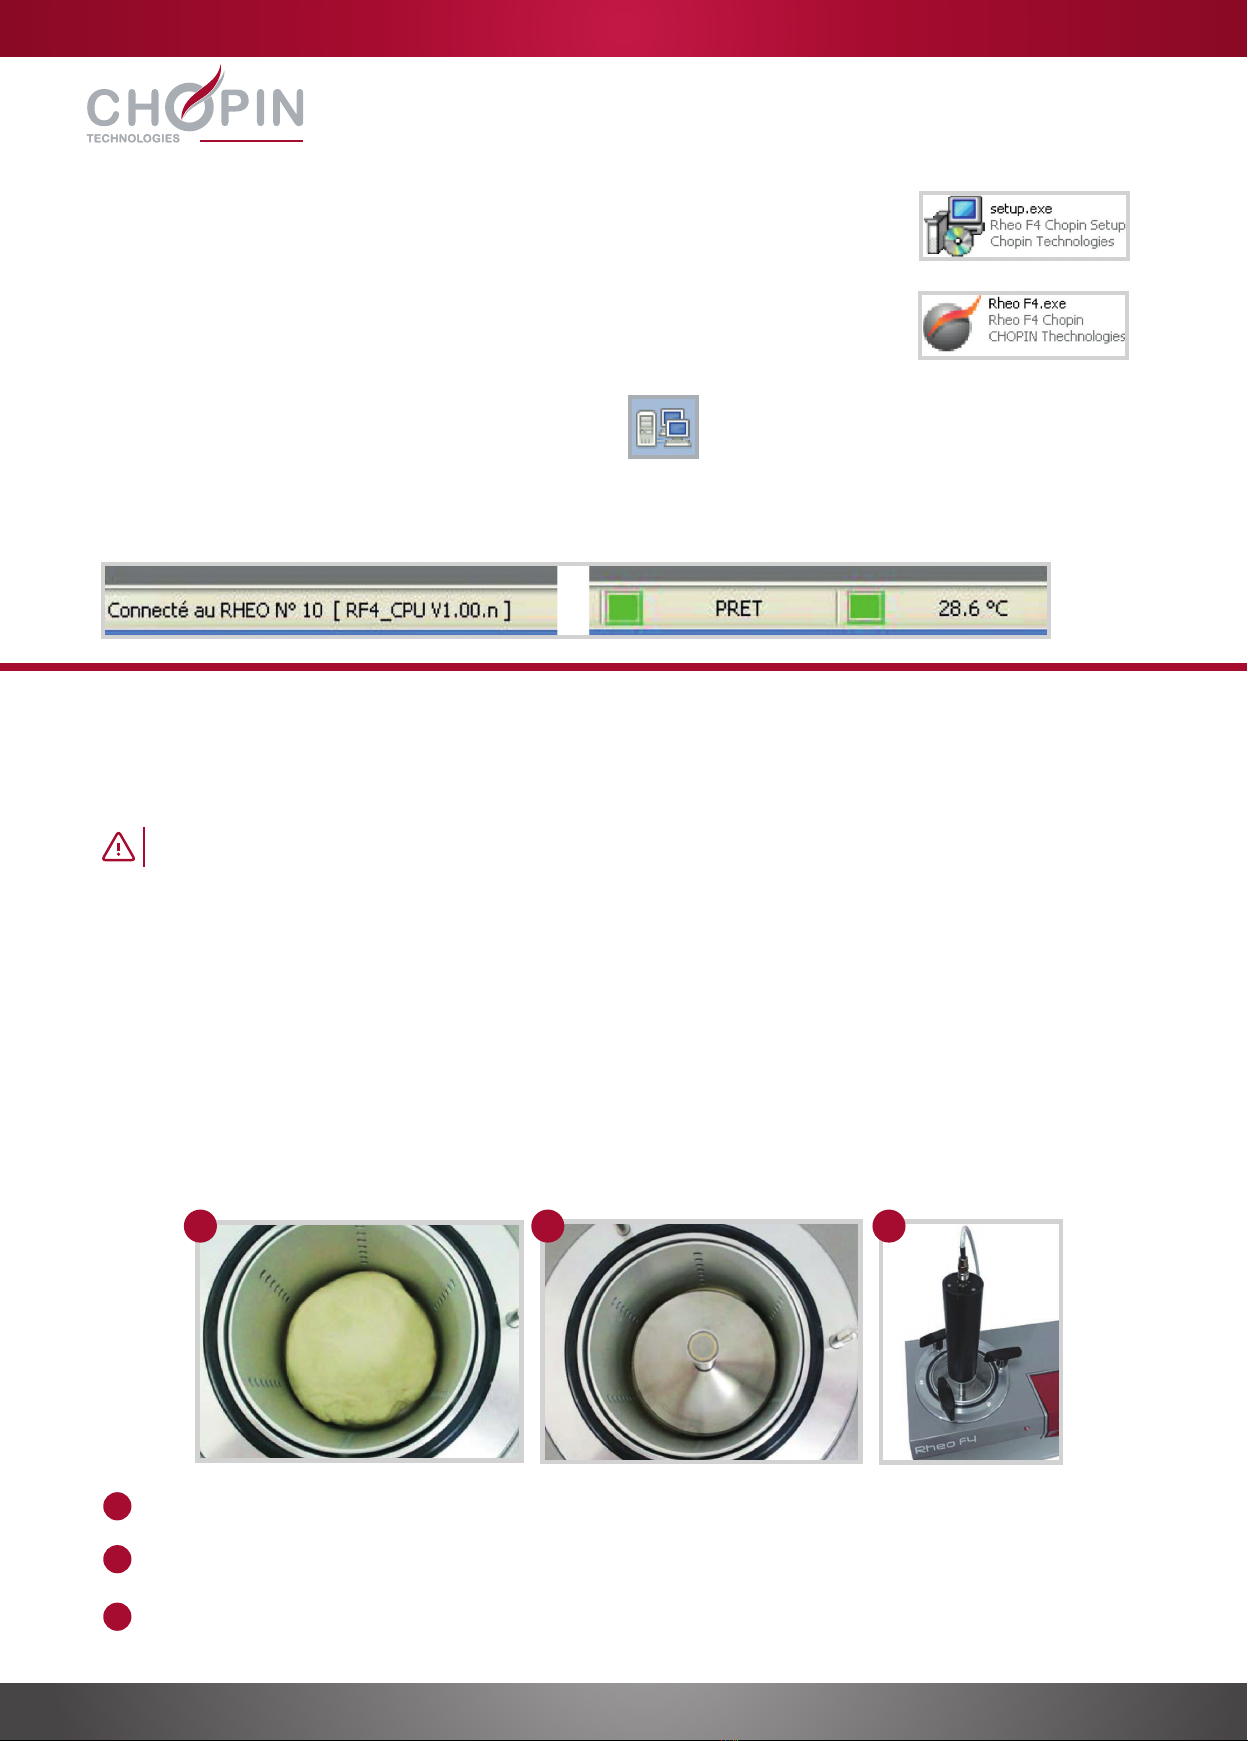
Double click on the software’s installation icon and then click [run].
Any mixing bowl in which the temperature of the tank can be controlled and monitored can be used to prepare
the dough. Nevertheless, the homogeneity of the mixture must be assured. The ALVEOGRAPH mixing bowl
matches these requirements perfectly.
Determine the amount of water that needs to be added using the tables shown in Annex 3 of the user’s manual.
Mix 5g of dried yeast to 250g of flour.
Start mixer and progressively add the water.
After one minute, stop mixing and, with a spatula, assure that all of the flour has been well hydrated and is well
incorporated into the dough.
Put the dough back and leave it for 6 minutes of mixing. The salt will be progressively added at the beginning of this
six minute period.
Once mixing has been completed, take all of the dough out and weigh 315g.
Access the connection menu by clicking on this icon :
Select the COM port that corresponds with the RHEO F4 connection.
Once the equipment is connected, the software shows the following message, and activates the status lights of the machine.
Once the installation of the software has been completed, start the software by clicking
on the [RHEO F4] icon.
Follow the instructions given on the screen.
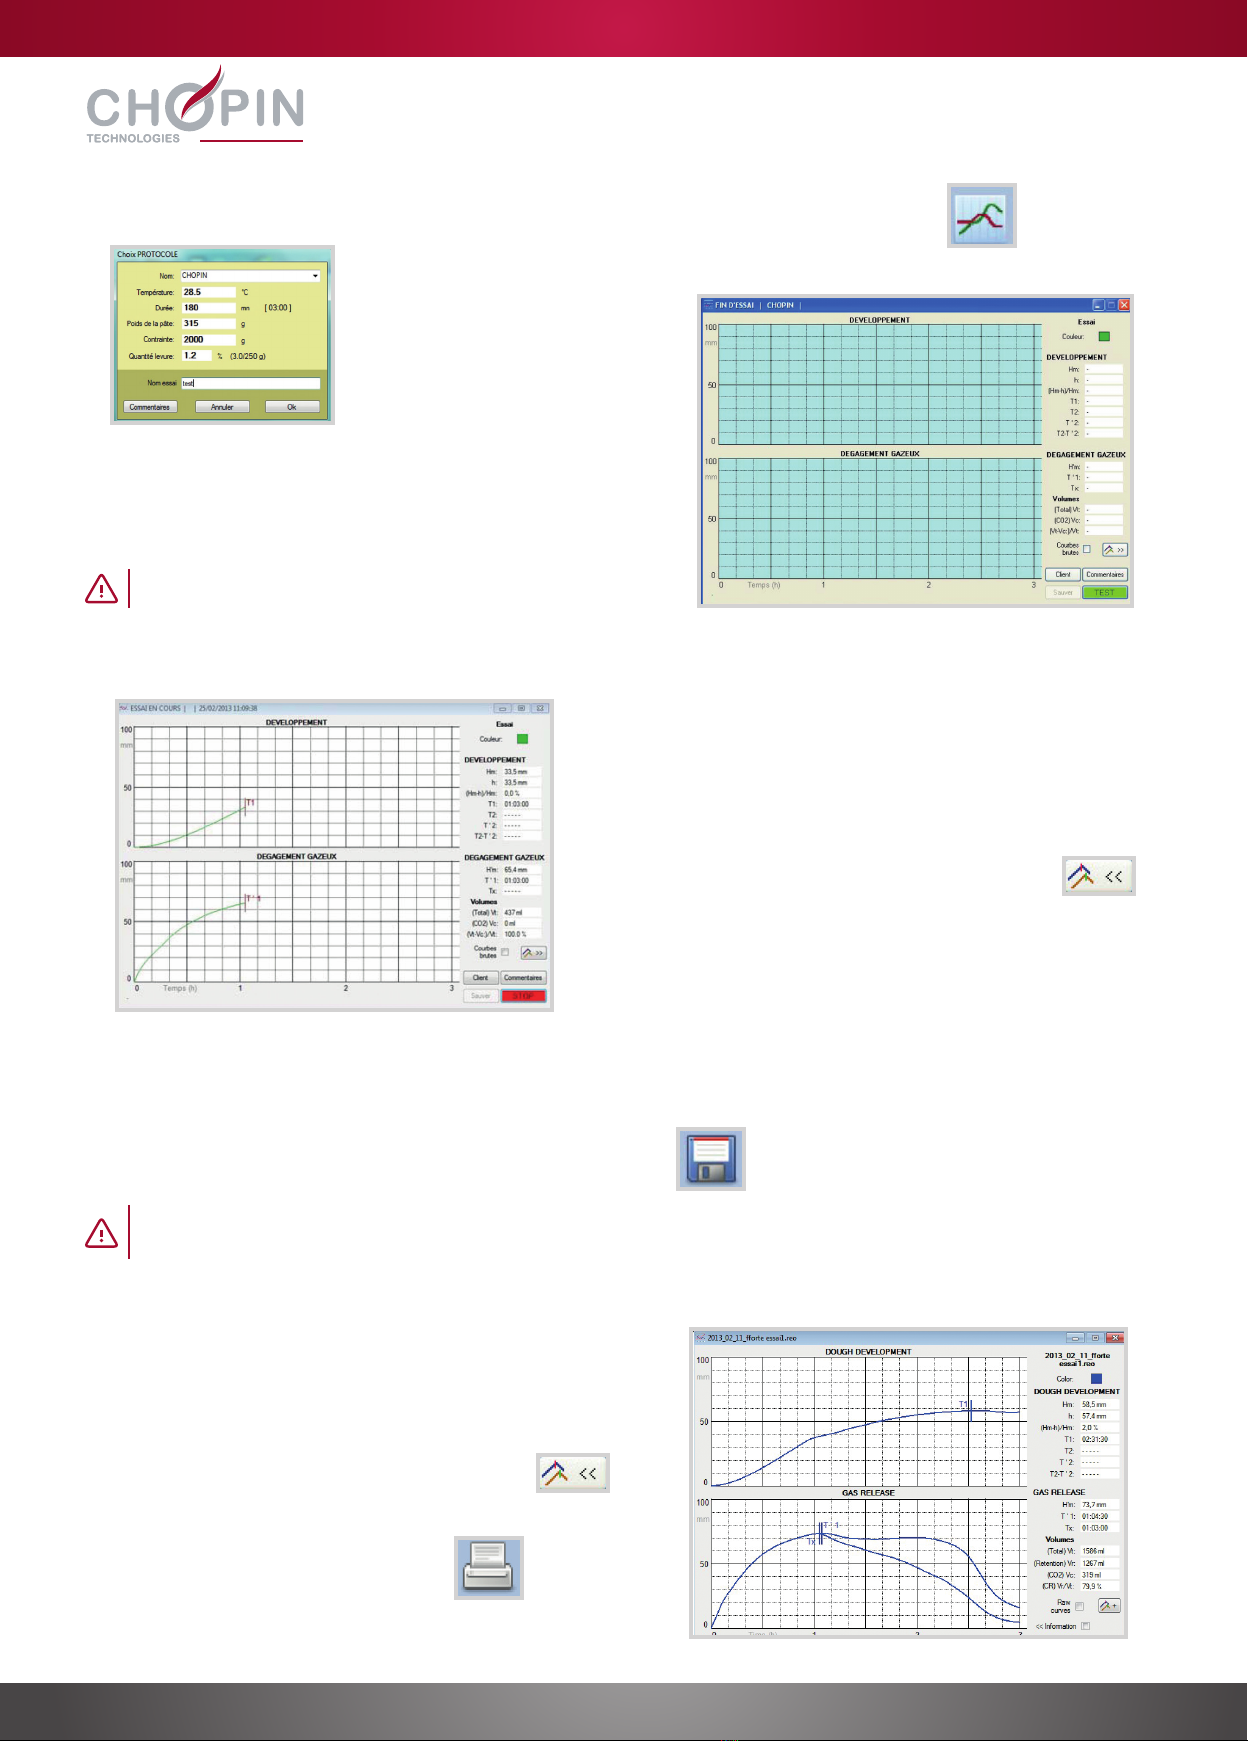
Carry out a first test
using the CHOPIN protocol
Place the dough into the fermentation basket, pressing it regularly with your hands so that it fills the whole
base of the basket and is at a uniform height.
Then place the piston on to the dough and add a weight of 2kg (4 discs). Put all of this into the equipment.
Position the dough development sensor and tightly close the assembly.
B - Software
1. Preparation of the dough
2. Preparation the test
C - PC-RHEO F4 Connection
1
1
2
2
3
3
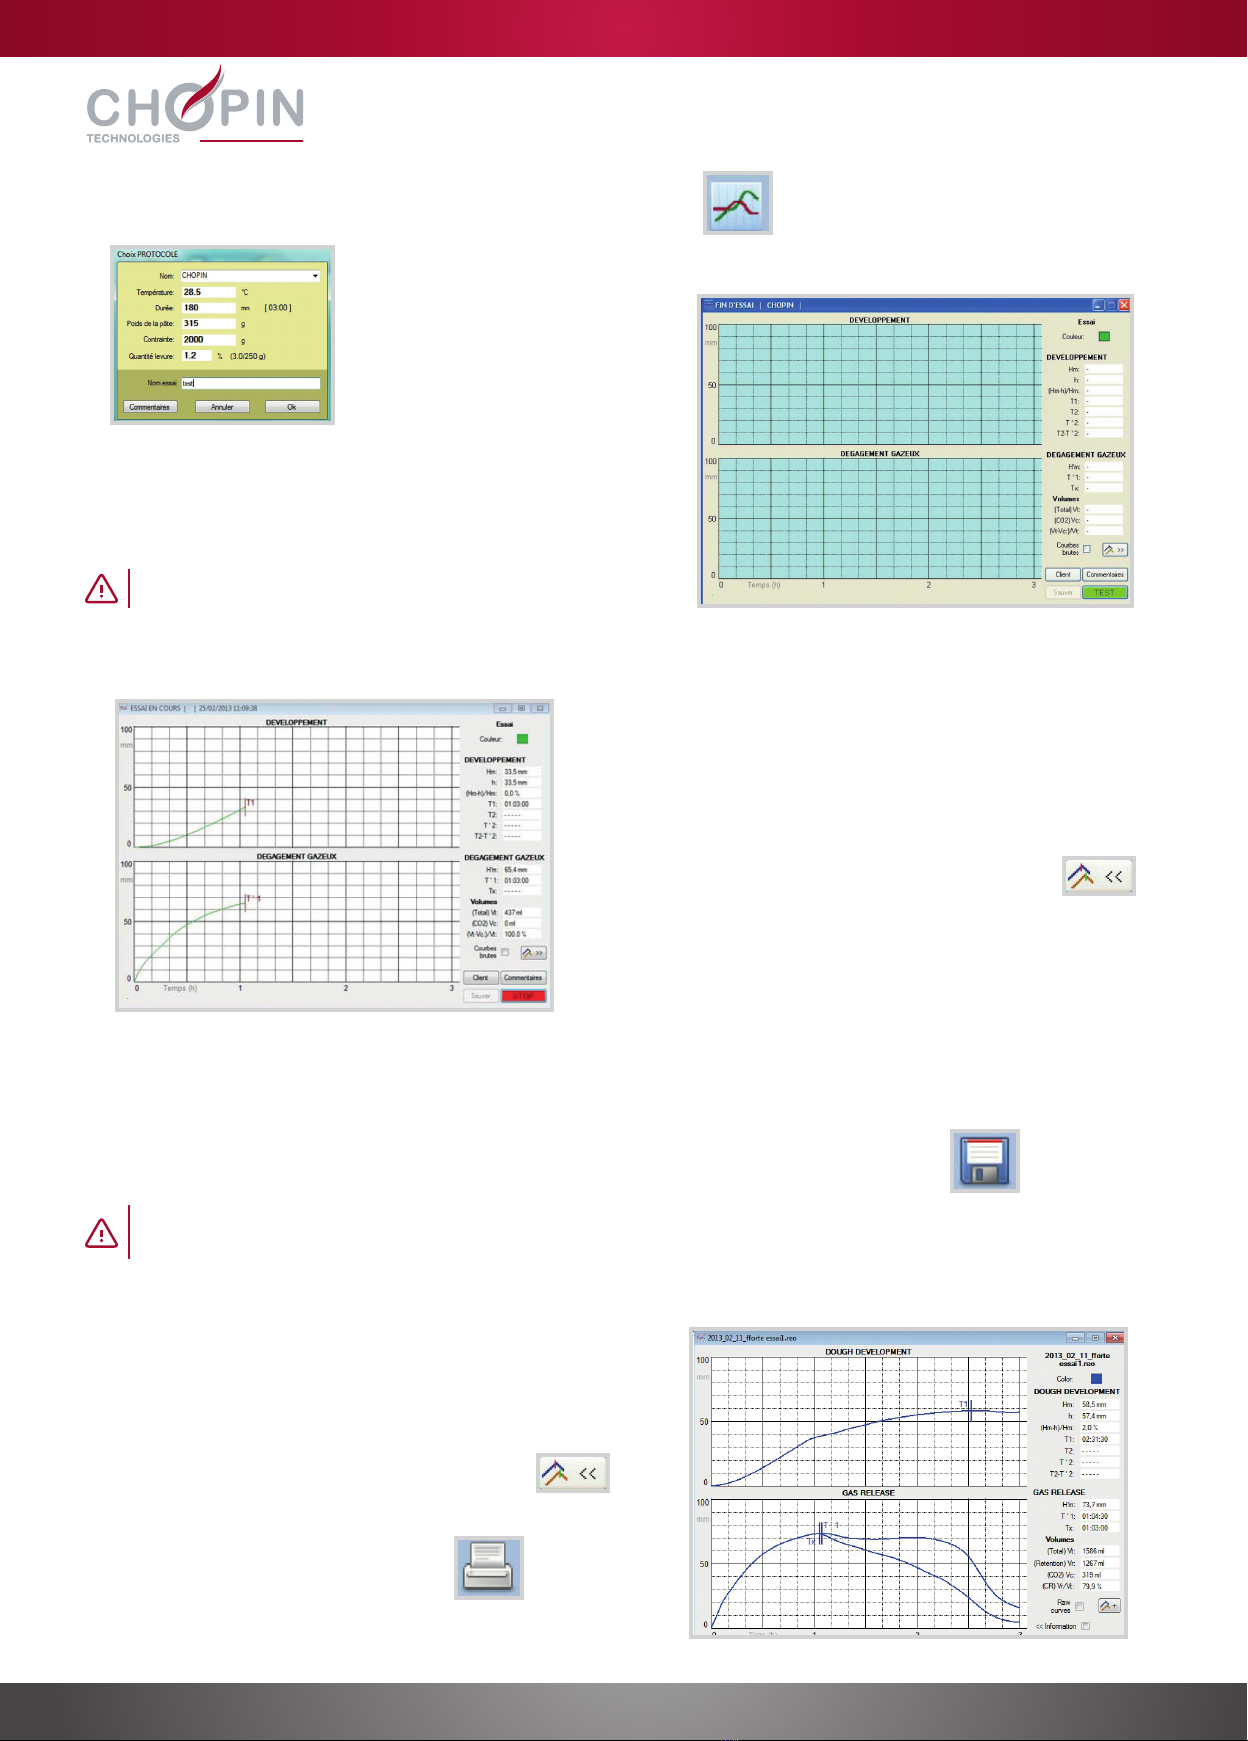
To start the test, click on Test > Start or directly on the [Start test] icon:
Once the test has been completed, the RHEO F4 will indicate it through a pop-up message screen.
The test can be saved by clicking on the [Save] button.
The final results are shown at the end of the test.
For the detailed description of the measured and calculated
parameters, see pages 30 and 31 of the user’s manual.
Up to 5 tests can be compared by clicking on this
button:
The results can be printed directly as a
certificate of analysis by clicking on this
button.
After each test, disconnect and clean:
- the basket and the weights with a damp sponge
- the bowl and the rubber O-ring with a damp cloth
Choose the protocol and then enter the name of the test.
Validate.
The test management window will come up. Click on the [TEST]
button to start the measures.
The test begins, the [TEST] button becomes [STOP].
From this point on, the test is managed automatically.
Stand-by mode on the computer must be completely
deactivated. Data acquisition lasts for 3 hours.
Results come up in real time throughout the all test.
While the test is going on, it can be compared to
a reference curve by clicking on this icon::
3. Starting the test
4. During the test
5. End of the test
A. Stop and clean
B. Results
Câble
d’alimentation
Conserver cet
emballage. Il est à
utiliser impérativement
pour le transport de
l’appareil.
Déballer votre appareil selon les indications suivantes :
1
4
2
5
3
1. Brancher l’appareil au secteur à l’aide du cordon d’alimentation.
2. Relier le capteur de déplacement à l’appareil à l’aide du câble spécifique.
3. Connecter l’appareil à un ordinateur à l’aide du câble USB.
4. Mettre le Rheo F4 sous tension (interrupteur I/O situé à l’arrière).
1. Port d’alimentation
3. Port PC
4. Interrupteur I/O
2. Port capteur de
déplacement
INSTALLER VOTRE RHEO F4
1.Colisage
2.Déballage
3.Installation
A - Appareil
Panier de
fermentation
Cartouche de
chaux sodée
Câble de
capteur de
déplacement
Câble USB
(connexion PC -
Rheo F4)
Poignées
de serrage
de la cuve
Capteur
de
dépla-
cement
Poire
(pour test
d’étan-
chéité)
Clé USB logiciel
Ensemble piston
support standard et
5 disques de 500g
cle-usb-rheo-f4.indd 2 30/03/2015 14:52:59

Double-cliquer sur l’icône d’installation du logiciel puis cliquer sur [Exécuter].
Tout pétrin dont la température de cuve est contrôlée peut être utilisé pour préparer la pâte. Il faut toutefois que
l’homogénéité du mélange soit assurée. Le pétrin de l’ALVEOGRAPHE convient tout particulièrement.
Déterminer la quantité d’eau à ajouter en utilisant les tables présentées en Annexe 3 du mode d’emploi.
Mélanger 5g de levures sèches à 250g de farine.
Démarrer le pétrissage et ajouter progressivement l’eau.
Au bout d’une minute, arrêter le pétrin et s’assurer avec une spatule que toutes les particules de farine ont bien été hydratées
et participent à la formation de la pâte.
Remettre ensuite le pétrin en marche pour les six minutes de pétrissage. Le sel sera ajouté progressivement tout au début
de la période de six minutes.
Le pétrissage étant terminé, sortir la totalité de la pâte et en prélever 315g.
Accéder au menu connexion en cliquant sur l’icône :
Sélectionner le port COM correspondant à la connexion du RHEO F4.
Dès que l’appareil est connecté, le logiciel affiche le message suivant et active les voyants d’état de la machine.
Une fois l’installation du logiciel terminée, lancer le logiciel en cliquant sur l’icône [RHEO F4].
Suivre les indications fournies à l’écran par l’assistant d’installation.
Réaliser un premier test
selon le protocole CHOPIN
Placer la pâte dans le panier de fermentation, la tasser régulièrement à la main, afin que la hauteur soit uniforme
et occupe tout le fond du panier.
Placer ensuite sur la pâte le piston et la charge de 2kg (soit 4 disques). Mettre le tout dans la cuve.
Positionner le capteur de déplacement et fermer l’ensemble hermétiquement. Le couvercle doit être fermé avec
les écrous de façon régulière et équilibrée.
B - Logiciel
1. Préparation de la pâte
2. Préparation de l’essai
C - Connexion PC - RHEO F4
1
1
2
2
3
3
Pour démarrer un essai, cliquer sur Essai > Démarrer ou directement sur l’icône [Démarrer essai] :
Le RHEO F4 indique la fin de l’essai par un écran d’avertissement.
L’essai peut être sauvegardé en cliquant sur le bouton [Enregistrer].
Les résultats complets sont affichés en fin de test.
Pour le descriptif détaillé des paramètres mesurés et calculés,
voir les pages 30 et 31 du mode d’emploi.
Jusqu’à 5 tests peuvent être comparés en utilisant
le bouton :
Les résultats peuvent être imprimés
directement sous la forme de certificat
d’analyse en cliquant sur le bouton.
Après chaque essai, retirer et nettoyer :
- le panier et les poids avec une éponge humide.
- la cuve et le joint circulaire en caoutchouc avec un chiffon humide.
Choisir le protocole puis entrer le nom de l’essai.
Valider.
La fenêtre d’interface de l’essai s’affiche. Cliquer sur le bouton [TEST]
pour démarrer les mesures.
L’essai démarre, le bouton [TEST] devient [STOP].
A partir de ce moment, le test est géré automatiquement.
Le mode veille de l’ordinateur doit absolument être désactivé.
L’acquisition des données dure 3h.
Les résultats sont affichés en temps réel, tout au long de l’essai.
L’essai en cours peut être comparé à une courbe
référence en mémoire en cliquant sur l’icône :
3. Lancement de l’essai
4. En cours d’essai
5. Fin de d’essai
A. Arrêt nettoyage
B. Résultats

Conserve el
embalaje original.
Es imprescindible en
caso de devolución
Desembale el dispositivo siguiendo estas indicaciones:
1
4
2
5
3
1. Conecte el dispositivo a través del cable de alimentación.
2. Conecte el cable del sensor de desplazamiento con el Reno F4.
3. Conecte el Rheo F4 con su ordenador a través del cable USB.
4. Ponga en funcionamiento el Rheo F4 pulsando el interruptor de encendido situado en el panel posterior.
1. Entrada de alimentación
3. Puerto USB
4. Interruptor de encendido
2. Entrada del sensor
de desplazamiento
CÓMO INSTALAR SU RHEO F4
1. Componentes
2.Desembalaje
3. Instalación
A - Dispositivo
Cesta de
fermentación
Cartucho de cal
sodada Cable del sensor
de desplazamiento
Cable USB
(conexión
PC - Rheo F4)
Palomillas de
sujeción del
recipiente
Sensor
de des-
plaza-
miento
Pera
(para el
control
de es-
tanquei-
dad) Memoria USB
con el software
Conjunto de soporte
de pistón estándar
y 5 discos de 500 g
Cable de
alimentación
cle-usb-rheo-f4.indd 2 30/03/2015 14:52:59
Haga doble clic sobre el icono de instalación del software y después haga clic en [Ejecutar]
Para elaborar la masa se puede utilizar cualquier amasadora que controle la temperatura. Sin embargo, es
esencial que se asegure la homogeneidad de la mezcla. Recomendamos para ello nuestro ALVEÓGRAFO.
Determine la cantidad de agua que se añadirá a la mezcla siguiendo las tablas que se presentan en el Anexo 3 del
manual.
Mezcle 5 g de levadura seca con 250 g de harina.
Comience a amasar y vaya añadiendo agua progresivamente.
Después de un minuto, retire la amasadora y con una espátula asegúrese de que todos los granos de harina estén
bien hidratados y se hayan mezclado bien.
A continuación, coloque de nuevo la amasadora y vuelva a amasar durante seis minutos más. La sal se añadirá
progresivamente durante este proceso de seis minutos.
Una vez haya terminado el amasado, retire toda la masa y recoja una muestra de 315 g.
Acceda al menú de conexión haciendo clic sobre el icono:
Seleccione el puerto COM correspondiente a la conexión del RHEO F4.
En el momento en el que el dispositivo se conecta, el programa activa las luces de estado de la máquina y muestra
el mensaje siguiente:
Una vez finalice la instalación, inicie el programa haciendo clic sobre el icono [RHEO F4].
Siga las instrucciones que el asistente de instalación le muestra en pantalla.
Realizar un primer test
siguiendo el protocolo CHOPIN
Coloque la masa en la cesta de fermentación, presiónela manualmente, de manera que la altura de la masa
quede homogénea y que se ocupe completamente el fondo de la cesta.
A continuación, coloque sobre la masa el pistón con una carga de 2 kg (es decir, con 4 discos). Introdúzcalo
todo en el recipiente.
Coloque el sensor de desplazamiento y cierre el conjunto herméticamente. La tapadera se debe cerrar con
las fijaciones aseguradas y equilibradas.
B-Software
1. Preparación de la masa
2. Preparación del test
C - Conexión PC – RHEO F4
1
1
2
2
3
3

Para iniciar el test, haga clic sobre Test > Iniciar o directamente sobre el icono [Iniciar test]:
Una vez finalizado el test, el RHEO F4 se lo indicará mediante una ventana de aviso.
El test se puede guardar haciendo clic sobre el botón [Guardar].
Al finalizar el test se muestran los resultados completos.
Para una descripción más detallada de los parámetros
medidos y calculados, consulte las páginas 30 y 31 del manual.
Se pueden comparar hasta cinco test utilizando el
botón:
Los resultados se pueden imprimir
directamente en formato de certificado
de análisis haciendo clic sobre el botón.
Después de cada test, retirar y limpiar:
- la cesta y los discos con una esponja húmeda
- el recipiente y la junta circular de goma con un paño húmedo
Seleccione el protocolo y escriba el nombre del test.
Confirme la orden.
Tras esto, se abrirá la ventana del test, haga clic en el botón
[TEST] para iniciar la medición.
A continuación, la prueba se iniciará y el botón [TEST] se
convertirá en [STOP].
A partir de este punto, el test se ejecutará automáticamente.
El ordenador tiene que tener desactivado el modo ahorro
de energía, ya que el proceso de toma de datos tiene una
duración de 3 horas.
Los resultados se muestran en tiempo real durante todo el
proceso del test.
El test puede compararse con una curva de
referencia registrada previamente haciendo clic
sobre el icono:
3. Inicio del test
4. Desarrollo del test
5. Final del test
A. Finalización y limpieza
B. Resultados
При перемещении
оборудования
держите его за
упаковку.
Распакуйте оборудование согласно рисункам ниже :
1
4
2
5
3
1. Подключите оборудование с помощью кабеля питания.
2. Подключите кабель датчика тестообразования к Rheo F4.
3. Подключите оборудование к компьютеру с помощью USB-кабеля.
4. Включите Rheo F4 с помощью выключателя питания на задней стороне.
1. Разъем источника питания
3. Разъём ПК
4. Выключатель питания
2. Разъём датчика
тестообразования
УСТАНОВКА RHEO F4
1. Комплектующие
2. Распаковка
3.Установка
A-Оборудование
Корзина
для
брожения
Кабель
литания
Картридж
для натровой
извести
Кабель датчика
тестообразования
USB-кабель
(соединение ПК
и Rheo F4)
Гайки
затягивания
чаши
Датчик
переме-
щения
Насос
(для
испыта-
ния на
герметич-
ность)
USB-накопитель
с программным
обеспечением
и руководством
пользователя
Стандартный
опорный поршень
в сборе и диски
5,500 г
cle-usb-rheo-f4.indd 2 30/03/2015 14:52:59

Дважды щелкните по значку установки программного обеспечения,
а затем щелкните [run].
Для замеса теста может использоваться любая тестомесилка с контролируемой температурой. При этом
необходимо обеспечить однородность смеси. Тестомесилка ALVEOGRAPH (АЛЬВЕОГРАФ) полностью
соответствует этим требованиям.
Определите необходимое количество воды с помощью таблицы в приложении 3 инструкции по эксплуатации.
Смешайте 5 г сухих дрожжей с 250 г муки.
Включите мешалку и постепенно добавляйте воду.
Через одну минуту остановите замес.
Продолжайте замес теста в течение 6 минут. Добавление соли производится постепенно в процессе замеса.
По окончании замеса извлеките и взвесьте навеску теста 315 г.
Войдите в меню подключения, нажав на этот значок:
Выберите COM-порт, соответствующий подключению RHEO F4.
После подключения оборудования, появляется следующее сообщение и загораются индикаторы состояния
машины.
По окончании установки, запустите программное обеспечение, нажав значок [RHEO F4].
Следуйте инструкциям на экране.
Выполните первое испытание
используя протокол CHOPIN
Поместите тесто в корзину для брожения, надавливая руками так, чтобы тесто заполнило дно корзины и
было везде одинаковой высоты.
Поставьте на тесто поршень и добавьте вес 2 кг (4 диска). Установите все это в оборудование.
Закрепите датчик тестообразования и плотно закройте установку.
B - Программное обеспечение
1. Приготовление теста
2. Подготовка к испытанию
C - Подключение RHEO F4 к ПК
1
1
2
2
3
3

Для запуска испытания нажмите кнопку Test> Start или значок [Start test]:
Окончание испытания отображается на экране RHEO F4 всплывающим сообщением.
Результаты испытания сохраняются нажатием кнопки [Save].
Конечные результаты отображаются в конце испытания.
Подробное описание измеренных и вычисленных
параметров см. на страницах 30 и 31 инструкции по
эксплуатации.
Можно сравнить до 5 результатов испытаний
нажатием этой кнопки:
Результаты и графики могут быть
распечатаны нажатием этой кнопки :
После каждого испытания отключите и очистите:
- корзину и весы с помощью влажной губки
- чашу и резиновое уплотнительное кольцо с помощью влажной ткани
Выберите протокол и затем введите название испытания.
Подтвердите выбор.
Появится окно управления испытанием. Нажмите кнопку
[TEST] для начала измерения.
При запуске испытания кнопка [TEST] меняется на [STOP].
С этого момента испытание управляется автоматически.
Энергосберегающий режим на компьютере должен быть
полностью отключен. Сбор данных выполняется в течение
3 часов.
Результаты отображаются в режиме реального
времени на всем протяжении испытания.
Во время испытания можно сравнить значения
с нормативной кривой, нажав на этот значок:
3. Начало испытания
4. Во время испытания
5. Окончание испытания
A. Остановка и очистка
B. Результаты

Notes / Notas / Примeчания

Notes / Notas / Примeчания
Documentation produced by CHOPIN Technologies ©
2016 – Pictures: CHOPIN Technologies
Chopin Technologies
Distributors
CHOPIN Technologies
20 avenue Marcellin Berthelot
92390 Villeneuve-la-Garenne France
8www.chopin.fr
CHOPIN Technologies Inc.
19955 West 162nd. Street
Olathe, KS 66062 - USA
CHOPIN (BEIJING)
Trading Company LTD
R804, Unit B, 1# Building, Jia 5#, Lianhuachi
East Rd. Xicheng District,
Beijing, 100038 - CHINA
ApplicAtions lAborAtory
Research, loans and training
Tel. : +33 1 41 47 17 15
After-sAles service
Preventive and curative maintenance
Tel. : +33 1 41 47 50 33
sAles DepArtment
Tel. : +33 1 41 47 50 48
Other manuals for RHEO F4
2
Table of contents
Languages:
Other Chopin Laboratory Equipment manuals

Chopin
Chopin Mixolab 2 User manual

Chopin
Chopin Mixolab User manual

Chopin
Chopin Mixolab 2 Instruction sheet

Chopin
Chopin LabMill Instruction sheet

Chopin
Chopin Alveo PC graph Instruction sheet

Chopin
Chopin SDmatic Instruction sheet

Chopin
Chopin Infraneo Instruction sheet

Chopin
Chopin AlveoLabgraph Instruction sheet
Popular Laboratory Equipment manuals by other brands


Funke Gerber
Funke Gerber CryoStar I manual

Thermo Scientific
Thermo Scientific Sorvall Legend X1R instruction manual

NEW BRUNSWICK SCIENTIFIC
NEW BRUNSWICK SCIENTIFIC MP-1000 Pourmatic Guide to operations

Okolab
Okolab UNO-T manual

Wasatch Photonics
Wasatch Photonics Cobra OCT Getting started guide

Quidel
Quidel Lyme FIA Sofia 2 user manual