CHOWIS ds viso+ User manual


CONTENTS
●................................................................................... Device
Overview ...........................................................................1
●................................................................................... Package
Inclusions. .........................................................................1
●....................................................................................How to
Install.................................................................................2
●....................................................................................How to
Sign Up..............................................................................3
-Sign Up Account.........................................................3
-Forgot Password. .......................................................3
●....................................................................................How to
Login................................................................................. 4
●....................................................................................How to
Activate Device ................................................................ 4
●....................................................................................How to
Migrate..............................................................................5
●....................................................................................Analysis
Flow...................................................................................5
-Select Mode of Diagnosis. .........................................5
-Total Diagnosis. ..........................................................6
-New Customer..................................................6
-Device Connection. ..........................................7
-Select Program...........................................................9
-Quick Diagnosis. .........................................................10
-Moisture Program. .................................................... 11
-Total Program.............................................................12
-Full Facial Analysis..............................................12
-Moisture and Sebum..........................................13
-Diagnosis. ...........................................................15
-Pores, Spots, and Impurities.............................1.5
-Wrinkles and Keratin......................................... 16

CONTENTS
- Analyze............................................................... 17
●.....................................................................................Results.
16
-Analysis Results Review............................................ 18
-Full Facial Results.............................................. 18
-Pores Results......................................................20
-Spots Results......................................................21
-Wrinkles Results................................................. 22
-Impurities Results. .............................................24
-Keratin Results................................................... 25
-Overall Results............................................................. 26
-Comments Section............................................. 27
-Share Results...................................................... 27
-E-mail Results...................................................... 28
●......................................................................................Custome
r Management................................................................... 29
-Manage Customer...................................................... 29
●......................................................................................View
Record. ..............................................................................30
-Compare Analysis Records.........................................30
-View Images. ..............................................................31
●......................................................................................Settings.
32
-Personalized Programs. ............................................. 32
-Camera Settings. ........................................................ 32
-Products and Treatments. ......................................... 33
-User Profile.................................................................34
-Share/E-mail................................................................ 35
-Language Setting. ......................................................36
-General Options. ........................................................37
●......................................................................................FAQ 39

DEVICE OVERVIEW
1
Quick Manual
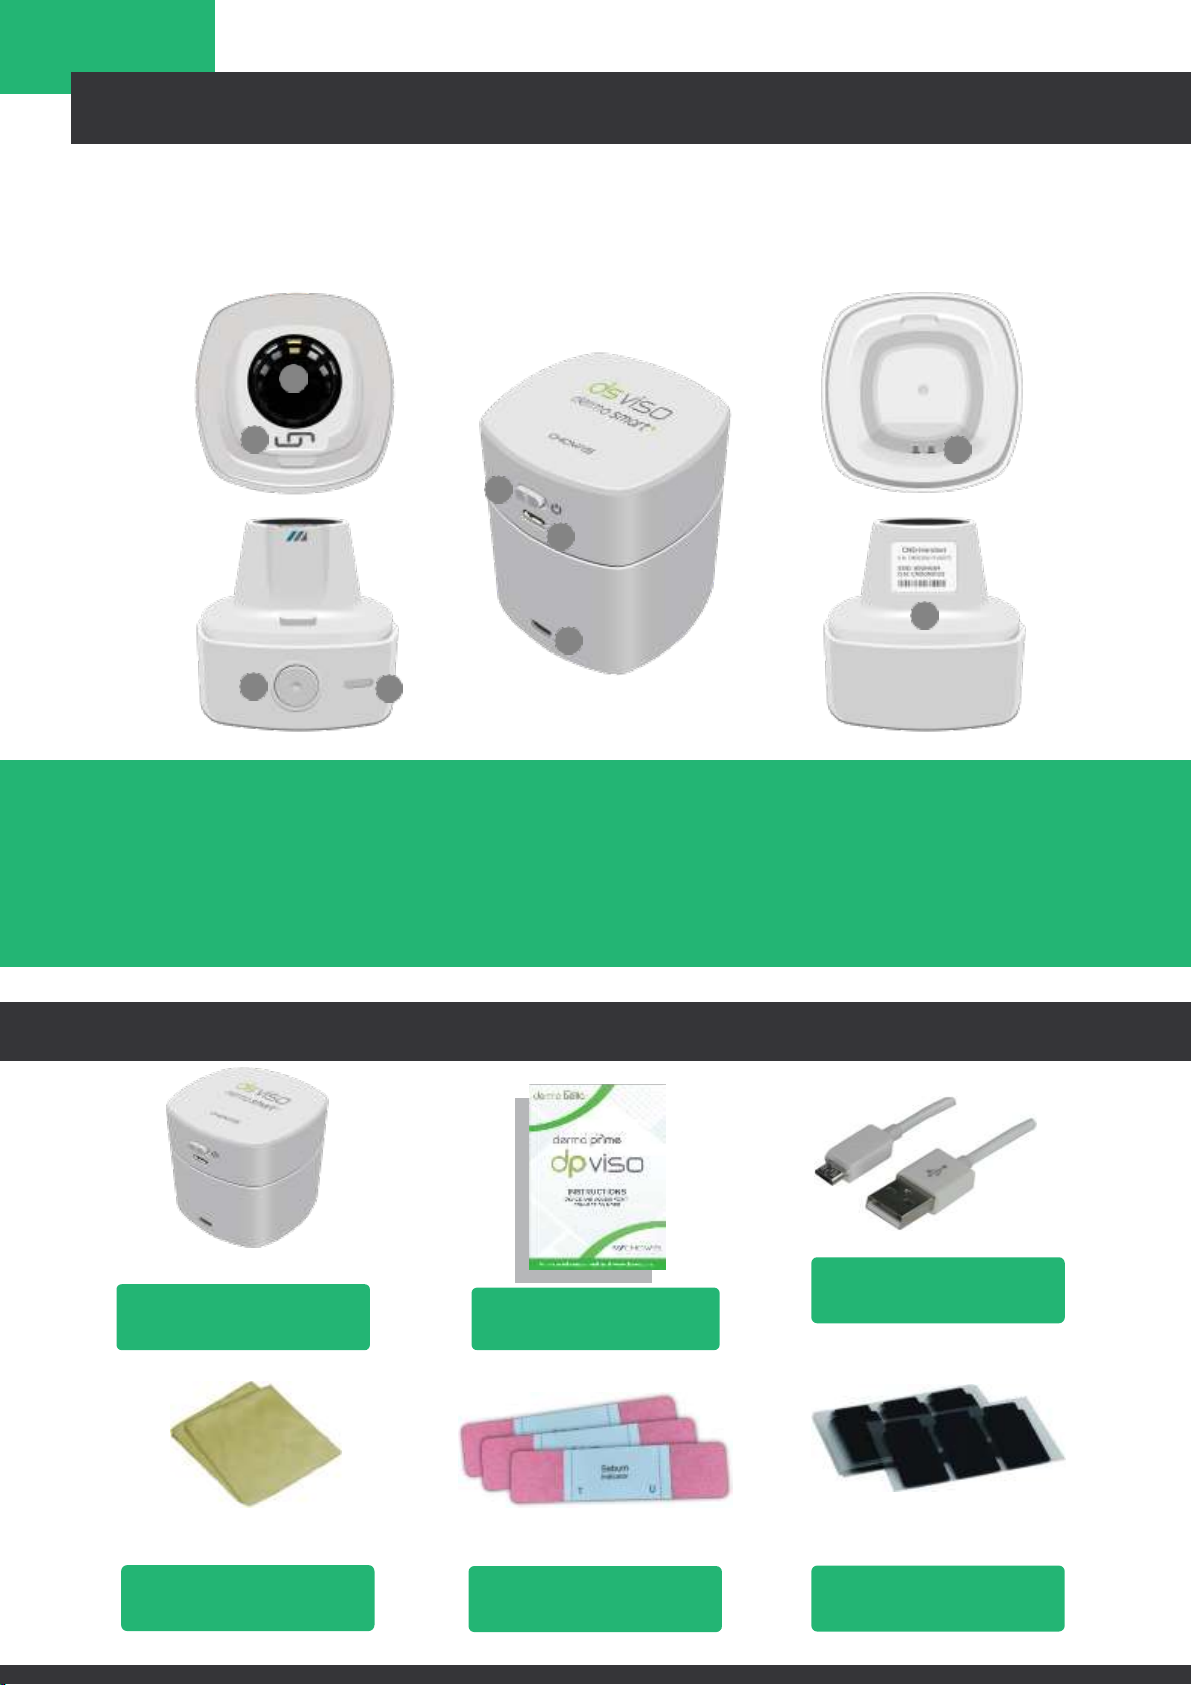
PACKAGE INCLUSIONS
Keratin - 1 pack
(150 Treatments)
Only for Professional & Expert Package
Sebum - 2 pack
(50pcs/pack)
(100 Treatments)
Cleaning Cloth
HANDSET
1
2
8
5
6
9
7
3
4
1. Optical Unit
2. Moisture Sensor
3. Capture Button
4. Measurement
Mode& Battery
Indicator
5. Power Switch
6. USB Power Port
7. Dock USB Power Port
8. Handset Charging Pin
9. Serial Number, SSID & O.N
DS VISO Device
5-pin USB Cable

HOW TO INSTALL
2
INSTALLING THE DERMOBELLA SKIN 2 APP
1. Open App Store/Play Store and search “Chowis”.
2. Select DermoBella Skin 2 Cloud app and tap install.

HOW TO SIGN UP
3
SIGN UP ACCOUNT
1. Open DermoBella Skin 2 app.
2. Tap “SIGN UP” to create an account.
3. Fill-up all the information provided and tap “REGISTER”.
4. Once registration is complete, there will be a confirmation link that will
bedelivered to your registered email account.
5. Click on the link that has been sent to your email account to verify your email.
FORGOT PASSWORD
1. Open DermoBella Skin 2 app.
2. Tap “FORGOT?” and input recovery email address then press “SUBMIT” button.
3. After pressing “SUBMIT” button, the new password will send to your
recoveryemail address.

HOW TO LOGIN
4
LOGIN ACCOUNT
1. Open DermoBella Skin 2 app.
2. Login your account and tap “Login” button to logging in to the app, then
press“OK” button to continue.
HOW TO ACTIVATE DEVICE
DEVICE ACTIVATION
1. After Login successful, Scan the Device QR code or the Paper QR Code to
activate the device.
2. Or you can use “Manual Input” to manually input the Optic Number and
SerialNumber of your Device.
ANALYSIS FLOW
5
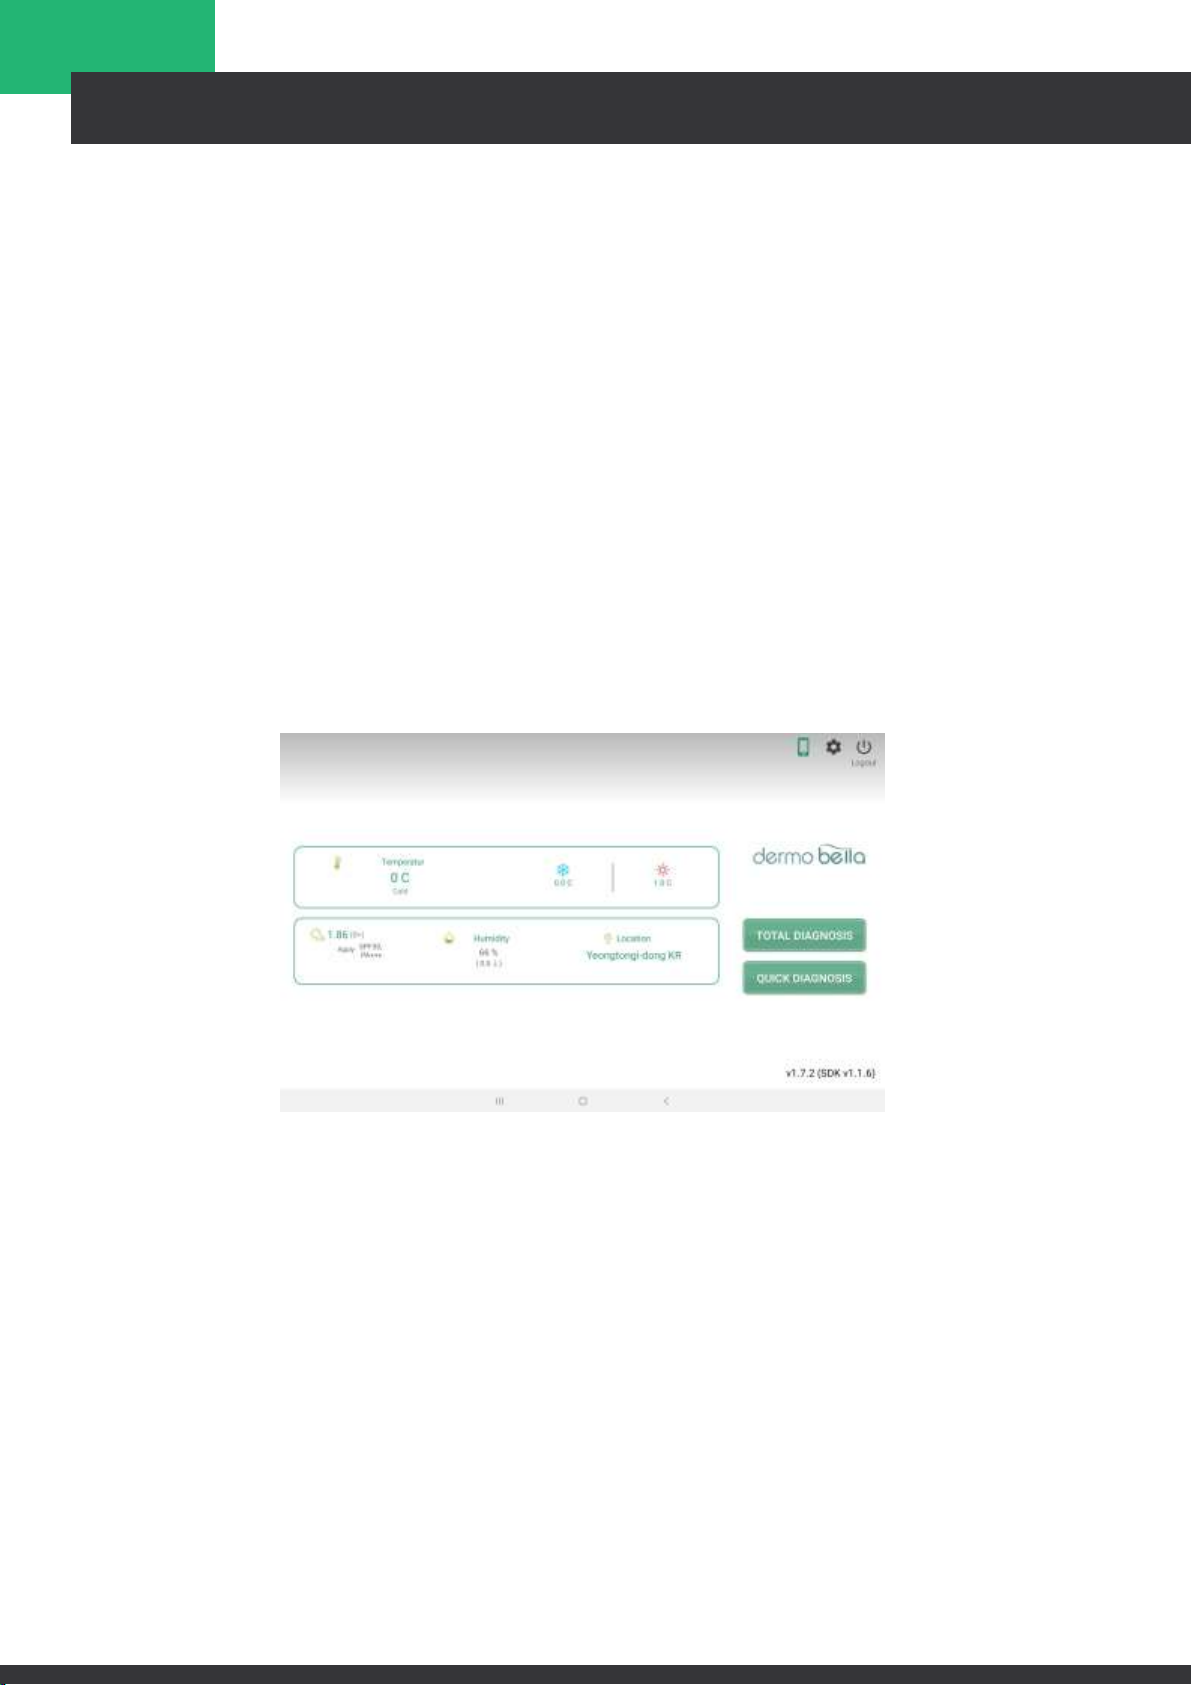
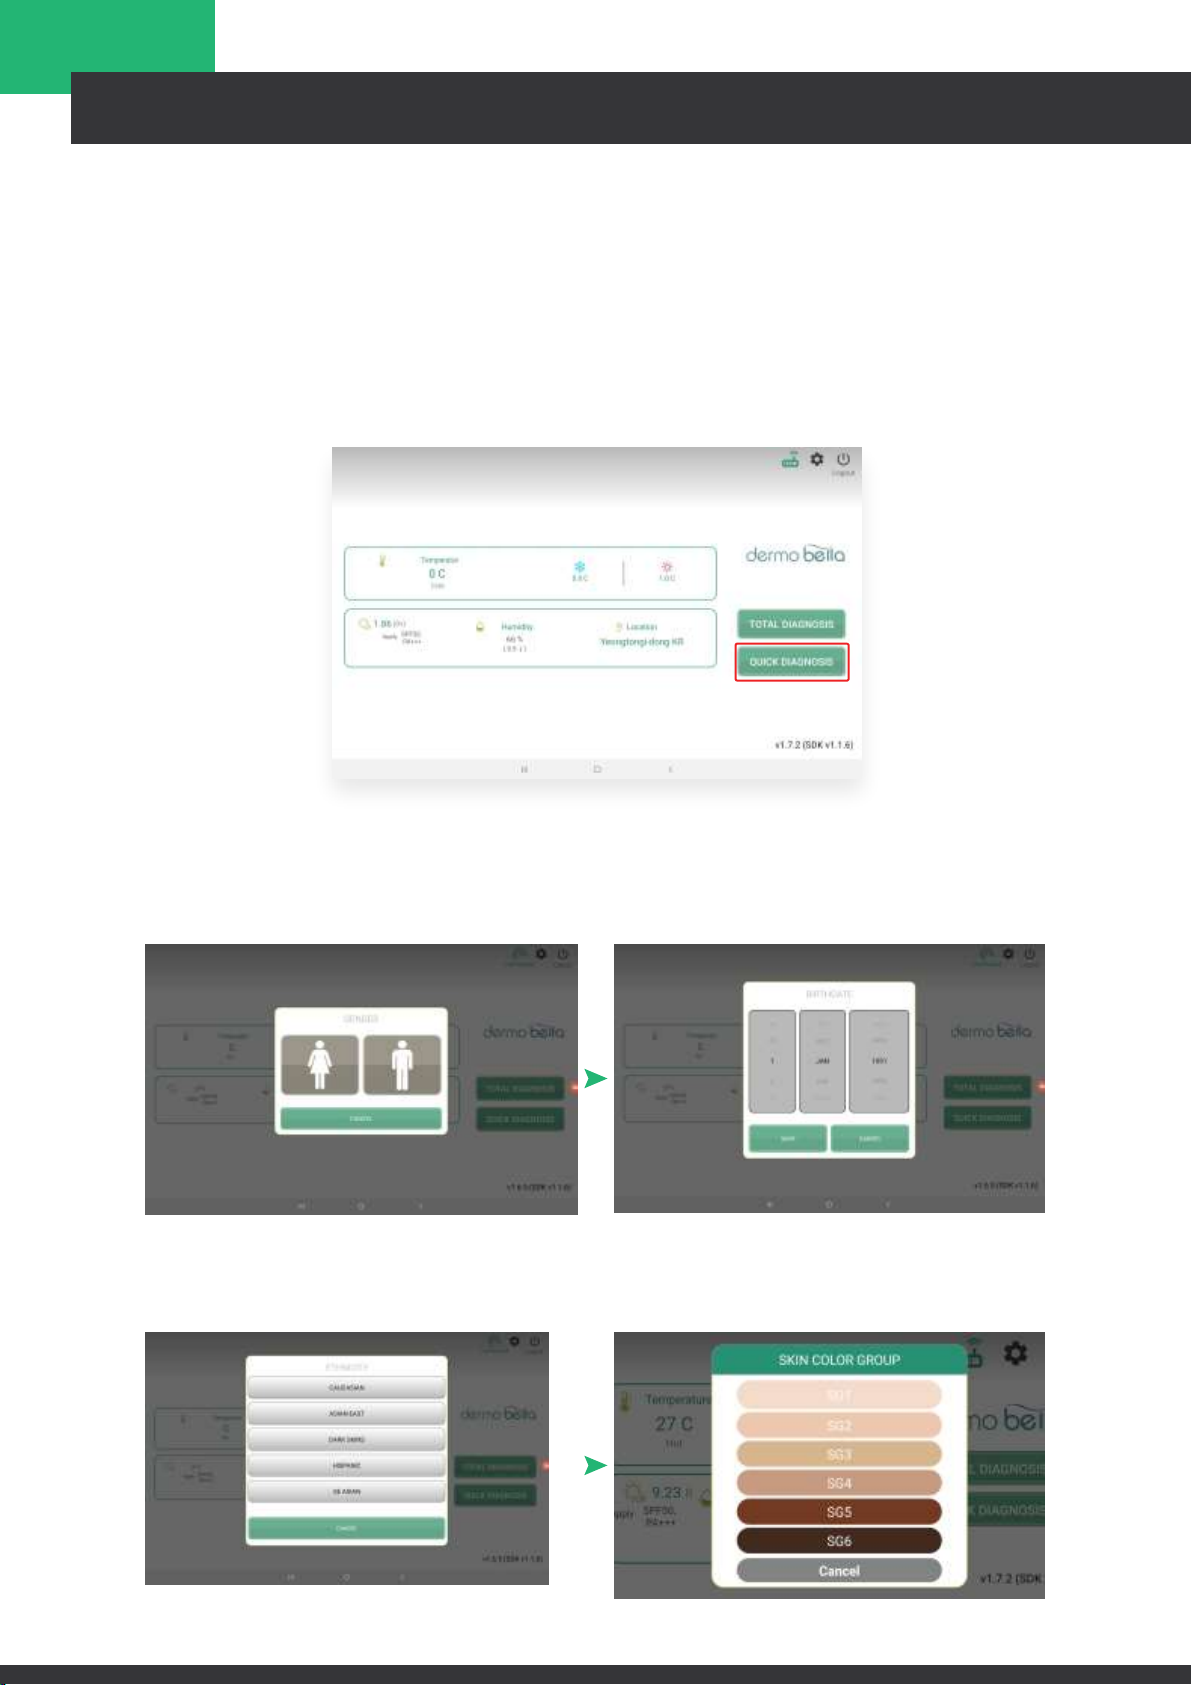
SELECT MODE OF DIAGNOSIS
Two options are provided on the main screen –total diagnosis or quick diagnosis.
TOTAL DIAGNOSIS
When selected, this option allows you to input specific details of the customer to
register including name, age, gender and save all information for next and succeeding
analysis sessions.
QUICK DIAGNOSIS
Quick diagnosis is an option without specific customer registration. The diagnosis
process is the same as total diagnosis, but customer data management is not available,
and data will not be saved including images and results.

ANALYSIS FLOW
6
TOTAL DIAGNOSIS
NEW CUSTOMER
1. Press TOTAL DIAGNOSIS from the main screen and select NEW CUSTOMER.
2. Fill in the needed data under New Customer.
NOTE: All information with “*”are important and must be fill out.
3. Press SAVE after all information is entered and the customer registration is now
completed.
ANALYSIS FLOW
7
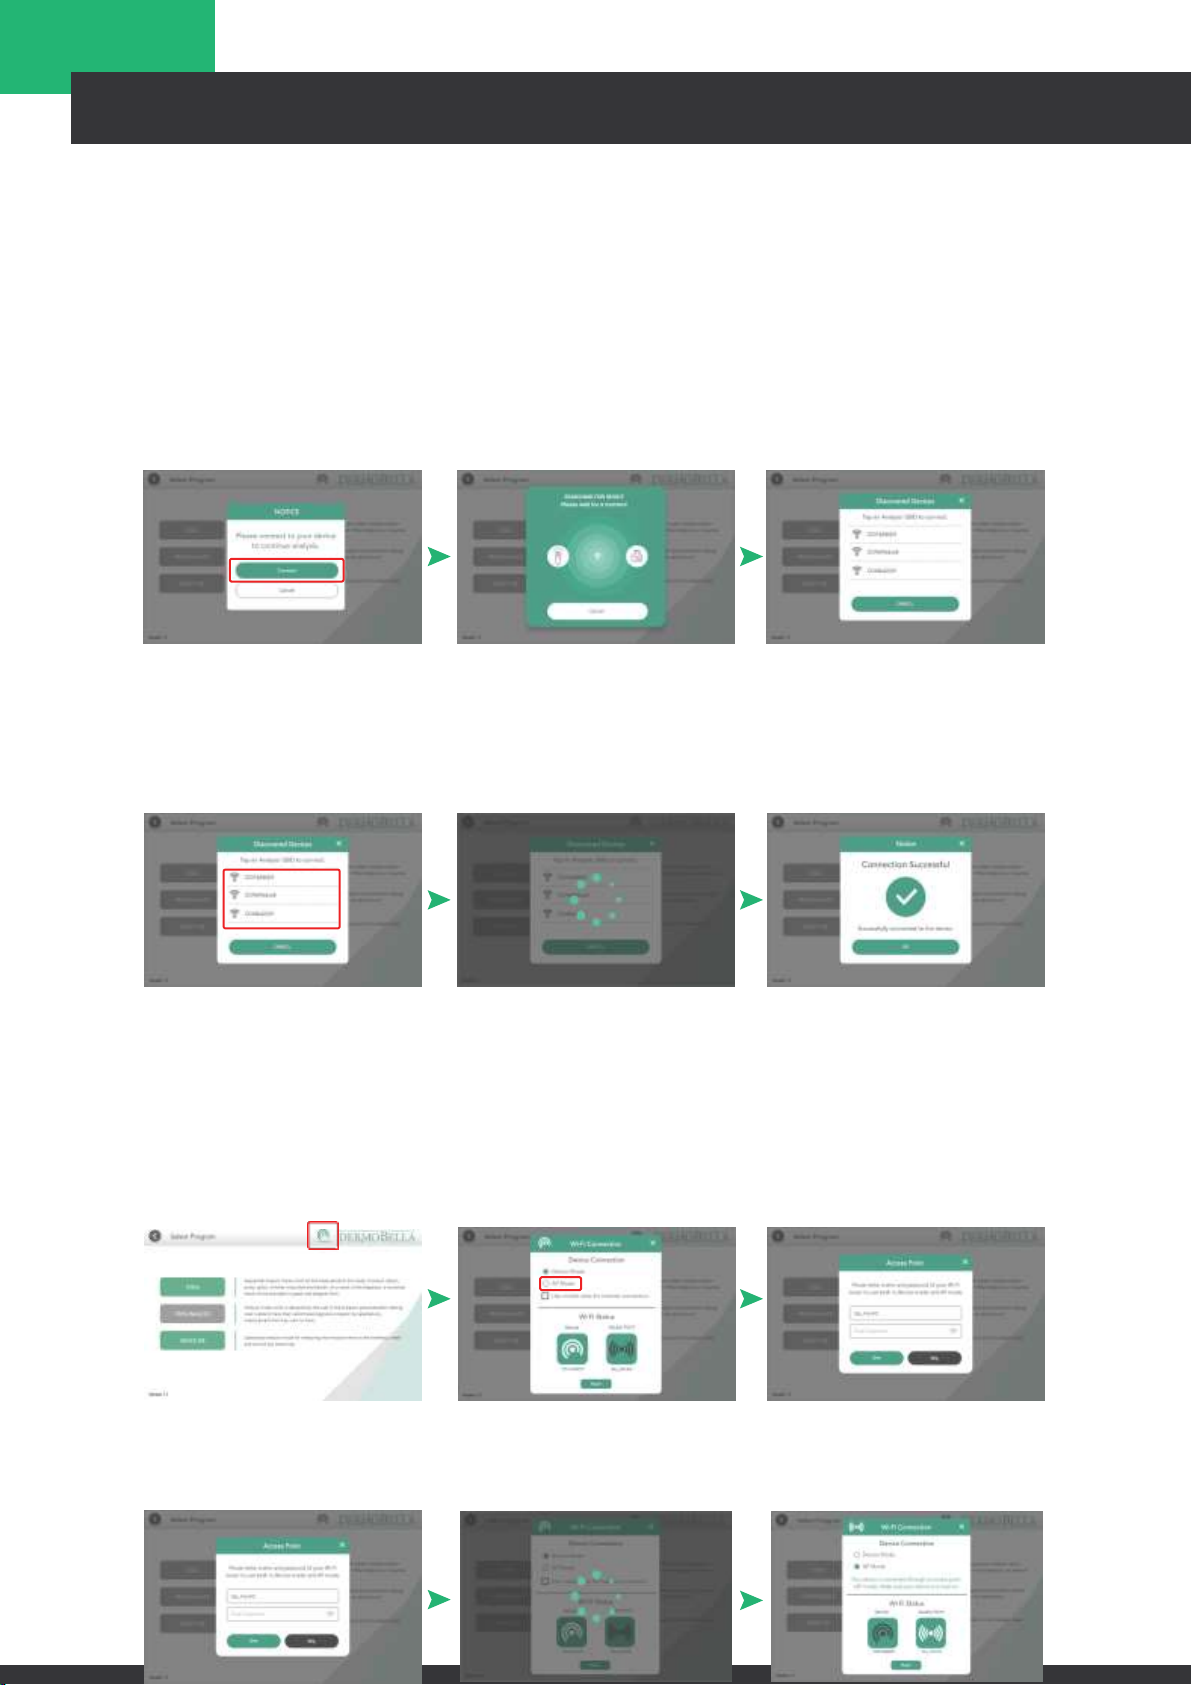
TOTAL DIAGNOSIS
Device Connection (Device Mode)
1. For first time use of device a pop up message will show up, tap “Connect”
2. Devices will search for an available Wi-Fi device, check the SSID number written
on the handset and that which is written on the tablet screen.
3. Match SSID: If you can find the same SSID number, tap the SSID numberand
wait until the device is connected with the tablet.
Device Connection (AP Mode)
1. Tap the connection Icon in the upper right corner besides DermoBella logo.
2. Input router’s name and password first and then switch to AP mode and wait
untilit connects.
3. After entering the router’s name and password, tap “Save” and wait until
theWi-Fi is connected to the tablet.
ANALYSIS FLOW
8
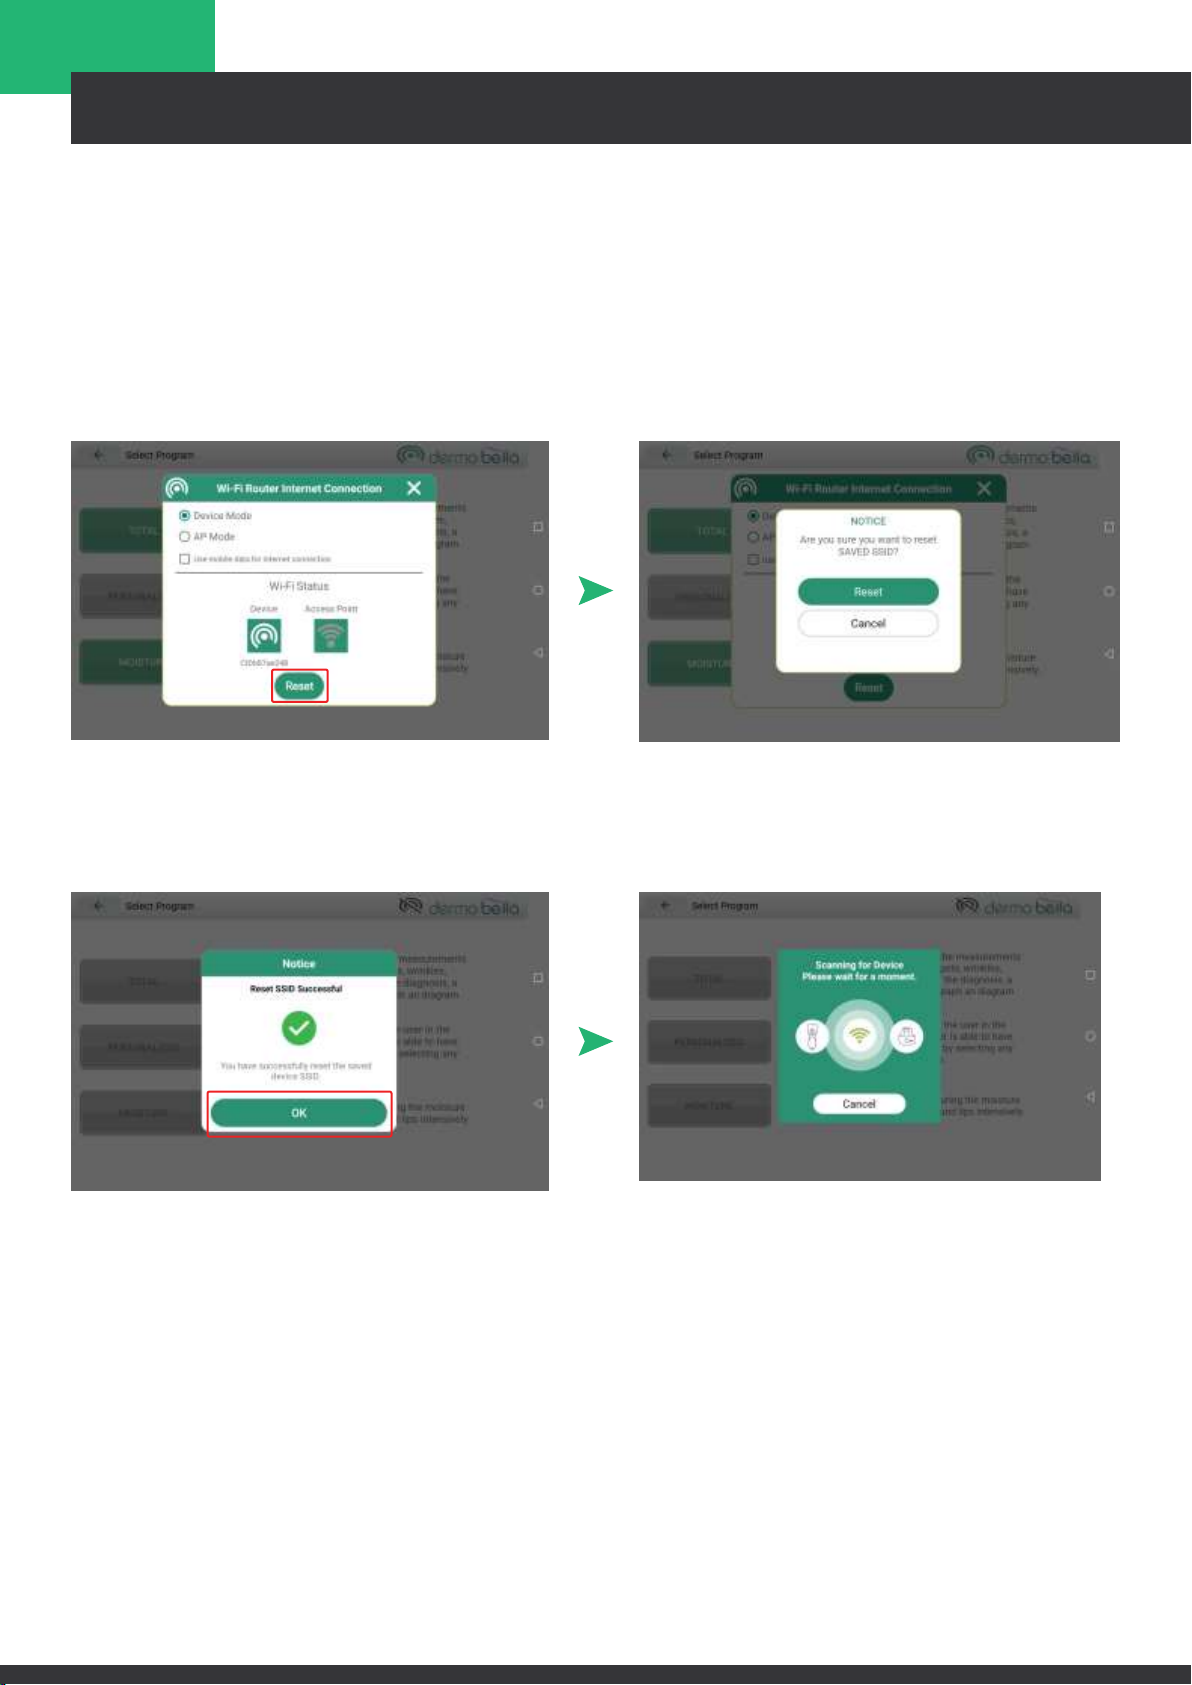
TOTAL DIAGNOSIS
Device Connection (Reset)
1. Tap the connection Icon in the upper right corner besides DermoBella logo.
2. Press the “Reset” button to reset or remove all saved SSID to the App.
3. After successfully reset the SSID tap “OK” to scan again for available SSID.

ANALYSIS FLOW
9
SELECT PROGRAM
1. TOTAL - Sequential analysis mode which all the measurements are moisture,
sebum, pores, sports, wrinkles, impurities and keratin. As a result of the diagnosis,
a numerical result will be provided in as a graph and diagram.
2. PERSONALIZED - Analysis mode which is designed by the user in the program
personalization setting. User can have their customized diagnosis program by
selecting any measurement that they want to have.
3. MOISTURE - Specialized analysis mode for measuring the
moisture level on the forehead, cheek and around lips
intensively.
ANALYSIS FLOW
10
QUICK DIAGNOSIS
Quick diagnosis is an option without specific customer registration. The diagnosis
process is the same as total diagnosis, but customer data management is not
available, and data will not be saved including images and results.
1. Select “Quick Diagnosis”.
2. Choose Gender, Birthdate, Ethnicity and Skin Color Group.

ANALYSIS FLOW
11
MOISTURE PROGRAM
1. Proceed to Selecting Program after selecting an existing Customer in Total
Diagnosis or directly select Quick Diagnosis.
2. Tap on “Moisture” button to measure Moisture alone
3. Tap the measurement area on the screen.
4. Place the moisture sensor onto the skin based on the selected area in the
screen and press the capture button.
Note: Press if you want to delete the latest measurement value. Moisture
resultin Moisture program will not be saved.
MOISTURE SENSOR

ANALYSIS FLOW
12
TOTAL PROGRAM
FULL FACIAL ANALYSIS
1. Follow full facial guidelines to have better results then press “Start Analysis”.
2. First Capture: Front View
Position and fit the front face properly to the guideline then press “Capture”.
3. After capturing front face view tap “Next” button to proceed to Left-side view
and Right-side view or “Retake” button to capture again.
ANALYSIS FLOW
13
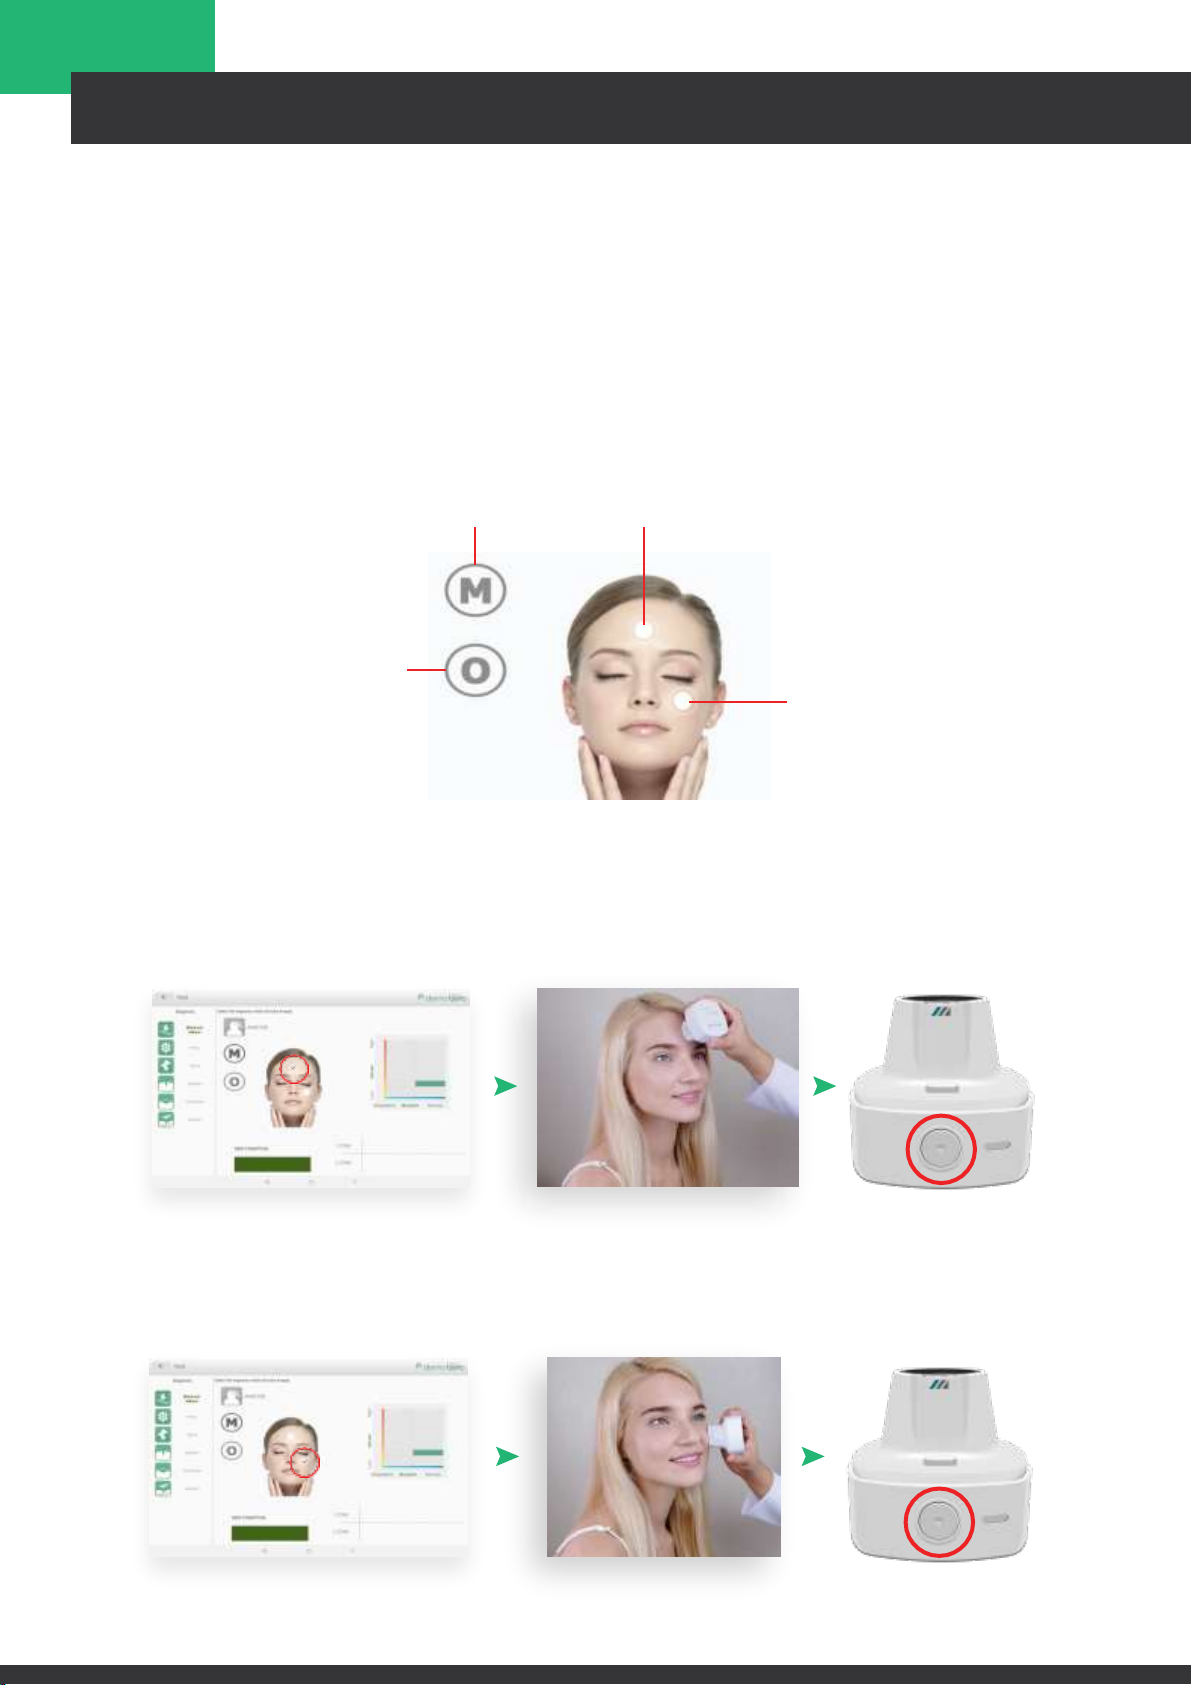
T-Zone
TOTAL PROGRAM
MOISTURE AND SEBUM
1. Select “M” for moisture measurement, and “O” for sebum measurement
2. Select one spot from T Zone or U Zone. Place the moisture sensor of the
optic on the part where you select and then, press the Camera button.
“M” is for Moisture T-Zone
“O” is for Sebum
U-Zone
3. For moisture measurement, locate the moisture sensor in T and U zone,
and press Camera button to take the measurement
U-Zone

ANALYSIS FLOW
14
6. Capture U-zone on Sebum indicator to measure.
TOTAL PROGRAM
MOISTURE AND SEBUM
4. For oil measurement, press the pink part of the sebum paper at the T and
U zone as written at the sebum paper gently for about 3 seconds. Then,
take the sebum paper images with the device. (Please refer to image below)
5 Capture T-zone on Sebum Indicator for measure.
7. To obtain the skin conditions result, moisture and oil measurement on the T andU
zone must be done properly.

ANALYSIS FLOW
15
TOTAL PROGRAM
DIAGNOSIS
Take pictures by categories. Multiple photos can be taken and saved for eachcategory
as shown on the bottom of the screen.
NOTE: 5 is the maximum number of images that can be taken per measurement.
PORES, SPOTS, and IMPURITIES
1. Select a category from the left side and place the handset on the part you
want to measure
2. Press Camera button on the handset.
3. Delete images: Select the image you want to delete. Selected images will be
reflected on the screen and then press ‘DELETE’ button
4. After taking all the images you want from all the skin parameters click ‘Analyze’
at the upper right side of the app. (Note: once analyze process has been
selected, you cannot go back to image capture page)

ANALYSIS FLOW
16
KERATIN
TOTAL PROGRAM
WRINKLES
1. Select Wrinkles category from the left side.
2. Place the handset at the end of crow’s feet (lines that surround the outer edge
of the eye) and adjust the position so that it is the starting point of each
picture,and then press Camera button on the handset.
1. Prepare Provided Keratin tape.
2. Peel o the transparent film, press the tape on the measuring area for 3 seconds.
3. Place the handset and adjust the position so that the pressed section can fit into
the whole screen, and then Press Camera button on the handset.
Table of contents
Other CHOWIS Diagnostic Equipment manuals


